battery MERCEDES-BENZ CLA COUPE 2013 Owners Manual
[x] Cancel search | Manufacturer: MERCEDES-BENZ, Model Year: 2013, Model line: CLA COUPE, Model: MERCEDES-BENZ CLA COUPE 2013Pages: 373, PDF Size: 11.47 MB
Page 8 of 373
Resetting the service interval dis-
play ................................................ 296
Service message ............................ 295
Special service requirements ........ .296
ATA (Anti-Theft Alarm system)
Activating/deactivating ................... 73
Function .......................................... .73
Interior motion sensor .....................74
Switching off the alarm .................... 73
Tow-away protectio n ........................73
ATTENTION ASSIST
Activating/deactivating ................. 225
Display message ............................ 251
Function/notes ............................ .201
Audio menu (on-board computer) .... 220
Authorised workshop
see Qualified specialist workshop
AUTO lights
Display message ............................ 248
see Lights
Automatic engine start (ECO start/
stop function) ................................... .151
Automatic engine switch-off (ECO
start/stop function) .......................... 150
Automatic headlamp mode .............. 111
Automatic transmission
Accelerator pedal position ............. 158
Automatic drive program .............. .160
Changing gear ............................... 158
DIRECT SELECT lever ..................... 155
Drive program displa y.................... 156
Driving tips .................................... 158
Emergency running mode .............. 163
Engaging drive position .................. 157
Engaging neutral ............................ 157
Engaging park position (AMG vehi-
cles) ............................................... 157
Engaging reverse gear ................... 157
Engaging the park position ............ 156
Holding the vehicle stationary on
uphill gradients .............................. 158
Kickdown ....................................... 158
Manual drive progra m.................... 160
Overview ........................................ 155
Problem (fault) ............................... 163
Program selector button ................ 159
Pulling away ................................... 148
Selector lever ................................ 157 Starting the engine ........................ 148
Steering wheel gearshift paddle
s... 160
Trailer towing ................................. 159
Transmission position dis-
play ........................................ 156, 157
Transmission positions .................. 157
Automatic transmission emer-
gency running mode ......................... 163
Auxiliary heating
Activating/deactivating ................. 138
Activating/deactivating (on the
centre console ).............................. 139
Display message ............................ 262
Important safety notes .................. 138
Problem (display message) ............ 142
Remote control .............................. 139
Setting ........................................... 229
Setting the departure time ............. 140
Auxiliary ventilation
Activating/deactivating ................. 138
Activating/deactivating (on the
centre console ).............................. 139
Problem (display message) ............ 142
Remote control .............................. 139
Axle load, permissible (trailer tow-
ing) ...................................................... 364 B
Ball coupling Folding in ....................................... 211
Folding out ..................................... 209
BAS (Brake Assist System) ................. 64
Battery (key)
Checking .......................................... 80
Important safety notes .................... 80
Replacing ......................................... 81
Battery (vehicle)
Charging ........................................ 314
Display message ............................ 250
Important safety notes .................. 312
Jump starting ................................. 316
Belt
see Seat belts
Belt force limiter
Activation ......................................... 50
Function ........................................... 50 Index
5
Page 15 of 373
Deactivating ................................... 186
Display message ............................ 251
Function/note
s............................. 186 I
Ignition lock see Key positions
Immobiliser .......................................... 72
Indicator and warning lamps
Coolant .......................................... 271
DISTRONIC PLUS ........................... 273
Engine diagnostics ......................... 271
SPORT handling mode ................... 268
Indicator lamps
Display message ............................ 246
see Warning and indicator lamps
Indicators
see Turn signals
Inspection
see ASSYST PLUS
Instrument cluster
Overview .......................................... 30
Setting s......................................... 226
Warning and indicator lamps ........... 32
Instrument cluster lighting .............. 214
Intelligent Light System
Activating/deactivating ................. 227
Display message ............................ 248
Overview ........................................ 114
Setting the dipped-beam head-
lamps for driving on the right/left .. 227
Interior lighting ................................. 116
Automatic control system .............. 117
Delayed switch-off (on-board
computer) ...................................... 228
Emergency lighting ........................ 117
Manual control ............................... 117
Overview ........................................ 116
Reading lamp ................................. 116
Setting the ambient lighting
brightness (on-board computer) .... 227
Interior motion sensor
Deactivating ..................................... 74
Function ........................................... 74
Priming ............................................ 74
Switching off .................................... 74
ISOFIX child seat securing system .... 54 J
Jack Storage location ............................ 307
Using ............................................. 337
Jump starting (engine) ...................... 316 K
Key Changing the battery ....................... 81
Checking the battery ....................... 80
Convenience closing feature ............ 90
Convenience opening feature .......... 90
Display message ............................ 263
Door central locking/unlocking ....... 79
Emergency key element ................... 79
Important safety notes .................... 78
Loss ................................................. 82
Modifying the programming ............. 79
Positions (ignition lock) ................. 147
Problem (malfunction) ..................... 82
Starting the engine ........................ 148
Key positions (ignition lock) ............ 147
Kickdown
Driving tips .................................... 158
Manual drive progra m.................... 162
Kneebag ............................................... 44 L
Lamps see Warning and indicator lamps
Lane Keeping Assist
Activating/deactivating ................. 225
Display message ............................ 252
Function/information .................... 205
Lane package ..................................... 203
Lap time (RACETIMER) ...................... 232
Lashing eyelets ................................. 281
Licence plate lamp (display mes-
sage) ................................................... 247
Light sensor (display message) ....... 248
Lighting
see Lights
Lights
Activating/deactivating the Intel-
ligent Light System ........................ 227 12
Index
Page 19 of 373
Removing/replacing the cover
(front wheel arch) .......................... 119
Replacing the battery (auxiliary
heating remote control) .................... 140
Reserve (fuel tank)
see Fuel
Reserve fuel
Display message ............................ 250
Warning lamp ................................ .271
Residual heat (climate control) ........137
Restraint system
see SRS (Supplemental Restraint
System)
Rev counter ........................................ 215
Reverse gear
Engaging (manual transmission) .... 155
Reverse gear (selector lever) ........... 157
Reversing camera
Cleaning instructions ..................... 300
Function/notes ............................ .197
Switching on/off ........................... 198
Reversing feature
Panorama sliding sunroo f................ 92
Roller sunblind s............................... 93
Side windows ................................... 89
Reversing lamp
Changing bulb s.............................. 120
Reversing lamps
Display message ............................ 247
Roller sunblind
Opening/closing .............................. 94
Panorama sliding sunroo f................ 93
Roof carrier ........................................ 281
Roof lining and carpets (cleaning
instructions) ...................................... 303
Roof load (maximum) ........................ 362
Route (navigation)
see Route guidance (navigation)
Route guidance (navigation) ............ 219S
Safety Child restraint systems .................... 51
Children in the vehicle ..................... 51
Safety system
see Driving safety systems Seat
Adjusting (Performance Seat) ........ 103
Folding the backrest (rear com-
partment) forwards/back .............. 280
Seat belt
Switching belt adjustment on/off
(on-board computer) ...................... 230
Seat belts
Adjusting the driver's and front-
passenger seat belt ......................... 48
Adjusting the height ......................... 48
Belt force limite r.............................. 50
Belt tensioner .................................. 50
Cleaning ......................................... 303
Display message ............................ 243
Fastening ......................................... 48
Important safety guidelines ............. 46
Rear seat belt status indicator ......... 49
Releasing ......................................... 49
Warning lamp ................................. 263
Warning lamp (function) ................... 49
Seats
Adjusting (electrically) ................... 100
Adjusting (manually) ...................... 100
Adjusting the 4-way lumbar sup-
port ................................................ 102
Adjusting the head restraint .......... 101
Cleaning the cover ......................... 302
Correct driver's seat position ........... 98
Important safety notes .................... 99
Seat heating problem .................... 104
Storing settings (memory func-
tion) ............................................... 107
Switching seat heating on/of f....... 103
Sensors (cleaning instructions) ....... 300
Service
see ASSYST PLUS
Service Centre
see Qualified specialist workshop
Service menu (on-board com-
puter) .................................................. 225
Service products
Brake fluid ..................................... 360
Coolant (engine) ............................ 360
Engine oil ....................................... 359
Fuel ................................................ 355
Important safety notes .................. 354
Washer fluid ................................... 361 16
Index
Page 27 of 373
G
WARNING
If you connect equipment to a diagnostics
connection in the vehicle, it can affect the
operation of the vehicle systems. This may
affect the operating safety of the vehicle.
There is a risk of an accident.
Do not connect any equipment to a diagnos-
tics connection in the vehicle. G
WARNING
Objects in the driver's footwell may restrict
the clearance around the pedals or block a
depressed pedal. This jeopardises the oper-
ating and road safety of the vehicle. There is a risk of an accident.
Stow all objects securely in the vehicle so that
they do not get into the driver's footwell.
Always fit the floormats securely and as pre-
scribed in order to ensure that there is always sufficient room for the pedals. Do not use
loose floormats and do not place several floor- mats on top of one another.
! If the engine is switched off and equip-
ment on the diagnostics connection is
used, the starter battery may discharge.
Connecting equipment to the diagnostics
connection can lead to emissions monitoring information being reset, for example. This
may lead to the vehicle failing to meet the
requirements of the next emissions test dur-
ing the main inspection. Qualified specialist workshop
A qualified specialist workshop has the nec-
essary special skills, tools and qualifications
to correctly carry out any necessary work on
your vehicle. This particularly applies to work
relevant to safety.
Observe the notes in the Service Booklet.
Always have the following work carried out at a qualified specialist workshop:
R work relevant to safety
R service and maintenance work R
repair work
R modifications, installations and conver-
sions
R work on electronic components
Mercedes-Benz recommends that you use a
Mercedes-Benz Service Centre. Vehicle registration
Mercedes-Benz may ask its Service Centres
to carry out technical inspections on certain
vehicles. The quality or safety of the vehicle is
improved as a result of the inspection.
Mercedes-Benz can only inform you about
vehicle checks if it has your registration data.
It is possible that your vehicle has not yet
been registered in your name in the following
cases:
R if your vehicle was not purchased at an
authorised specialist dealer.
R if your vehicle has not yet been examined at
a Mercedes-Benz Service Centre.
It is advisable to register your vehicle with a
Mercedes-Benz Service Centre.
Inform Mercedes-Benz as soon as possible
about any change in address or vehicle own-
ership. You can do this at a Mercedes-Benz
Service Centre, for example. Correct use
If you remove any warning stickers, you or
others could fail to recognise certain dangers.
Leave warning stickers in position.
Observe the following information when driv- ing your vehicle:
R the safety notes in this manual
R the technical data in this manual
R traffic rules and regulations
R laws and safety standards pertaining to
motor vehicles 24
Introduction
Page 82 of 373
is triggered if the door is opened from the
inside. Switch off the alarm . Key functions
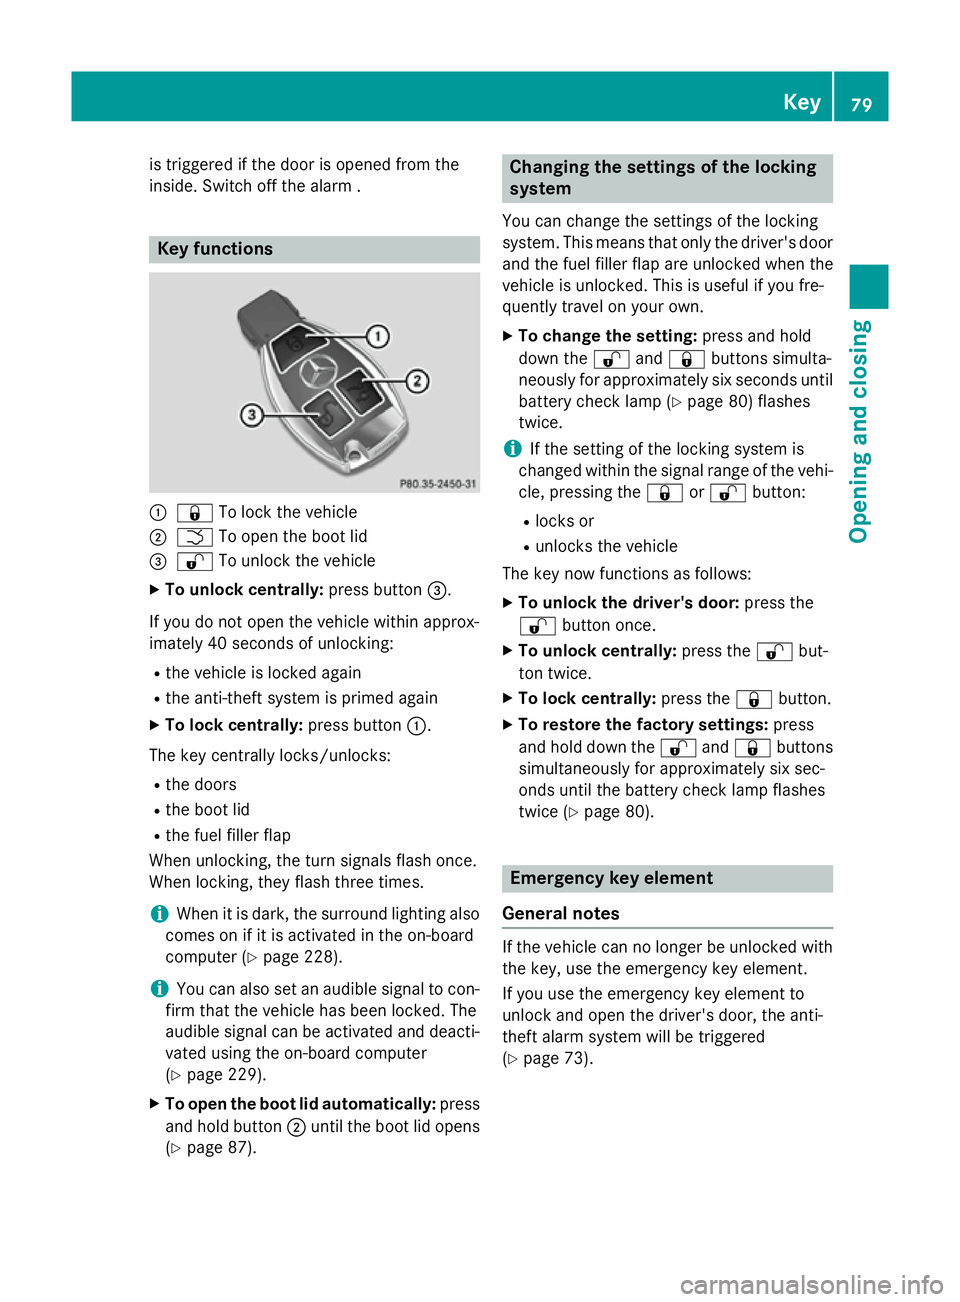
:
& To lock the vehicle
; F To open the boot lid
= % To unlock the vehicle
X To unlock centrally: press button=.
If you do not open the vehicle within approx-
imately 40 seconds of unlocking:
R the vehicle is locked again
R the anti-theft system is primed again
X To lock centrally: press button:.
The key centrally locks/unlocks: R the doors
R the boot lid
R the fuel filler flap
When unlocking, the turn signals flash once.
When locking, they flash three times.
i When it is dark, the surround lighting also
comes on if it is activated in the on-board
computer (Y page 228).
i You can also set an audible signal to con-
firm that the vehicle has been locked. The
audible signal can be activated and deacti-
vated using the on-board computer
(Y page 229).
X To open the boot lid automatically: press
and hold button ;until the boot lid opens
(Y page 87). Changing the settings of the locking
system
You can change the settings of the locking
system. This means that only the driver's door
and the fuel filler flap are unlocked when the
vehicle is unlocked. This is useful if you fre-
quently travel on your own.
X To change the setting: press and hold
down the %and& buttons simulta-
neously for approximately six seconds until
battery check lamp (Y page 80) flashes
twice.
i If the setting of the locking system is
changed within the signal range of the vehi- cle, pressing the &or% button:
R locks or
R unlocks the vehicle
The key now functions as follows:
X To unlock the driver's door: press the
% button once.
X To unlock centrally: press the%but-
ton twice.
X To lock centrally: press the&button.
X To restore the factory settings: press
and hold down the %and& buttons
simultaneously for approximately six sec-
onds until the battery check lamp flashes
twice (Y page 80). Emergency key element
General notes If the vehicle can no longer be unlocked with
the key, use the emergency key element.
If you use the emergency key element to
unlock and open the driver's door, the anti-
theft alarm system will be triggered
(Y page 73). Key
79Opening and closing Z
Page 83 of 373
There are several ways to deactivate the
alarm:
X Press the %or& button on the key.
or X Insert the key into the ignition lock.
If you unlock the vehicle using the emergency
key element, the fuel filler flap will not be
unlocked automatically.
X To unlock the fuel filler flap: insert the
key into the ignition lock.
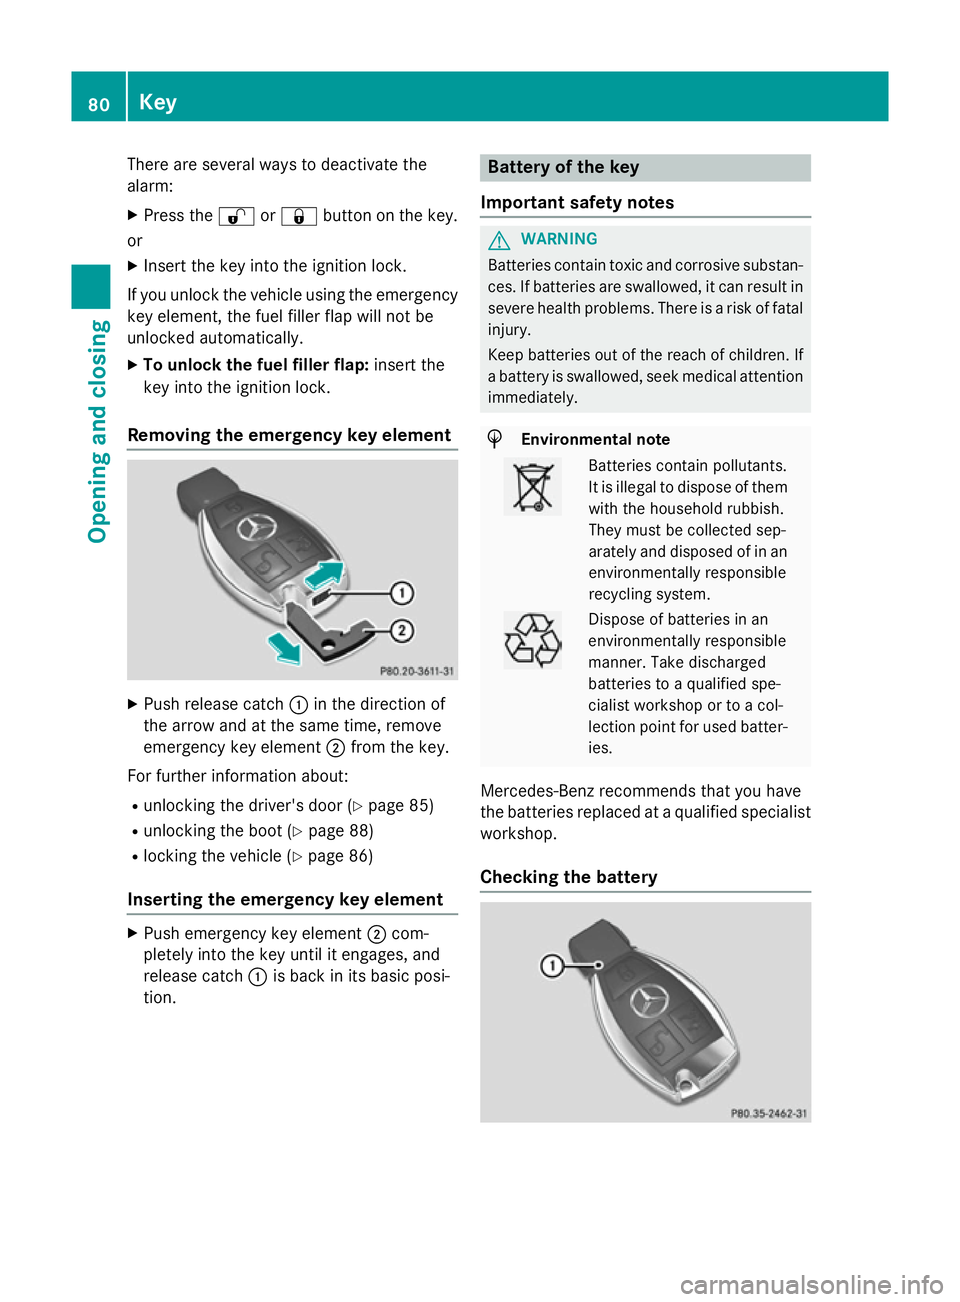
Removing the emergency key element X
Push release catch :in the direction of
the arrow and at the same time, remove
emergency key element ;from the key.
For further information about: R unlocking the driver's door (Y page 85)
R unlocking the boot (Y page 88)
R locking the vehicle (Y page 86)
Inserting the emergency key element X
Push emergency key element ;com-
pletely into the key until it engages, and
release catch :is back in its basic posi-
tion. Battery of the key
Important safety notes G
WARNING
Batteries contain toxic and corrosive substan- ces. If batteries are swallowed, it can result in
severe health problems. There is a risk of fatal injury.
Keep batteries out of the reach of children. If
a battery is swallowed, seek medical attention immediately. H
Environmental note Batteries contain pollutants.
It is illegal to dispose of them
with the household rubbish.
They must be collected sep-
arately and disposed of in anenvironmentally responsible
recycling system. Dispose of batteries in an
environmentally responsible
manner. Take discharged
batteries to a qualified spe-
cialist workshop or to a col-
lection point for used batter-
ies.
Mercedes-Benz recommends that you have
the batteries replaced at a qualified specialist workshop.
Checking the battery 80
KeyOpening and closing
Page 84 of 373
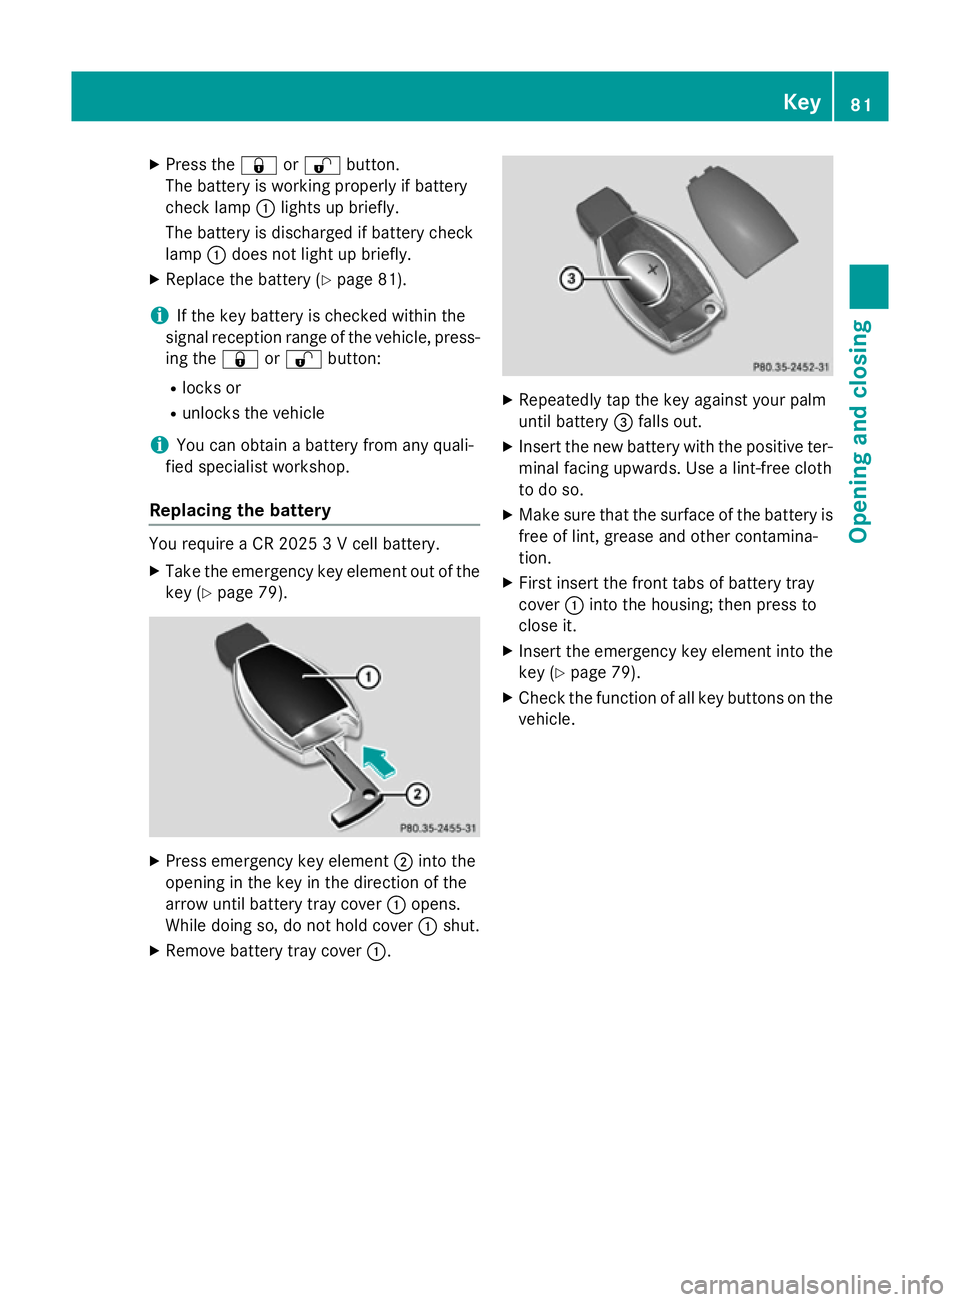
X
Press the &or% button.
The battery is working properly if battery
check lamp :lights up briefly.
The battery is discharged if battery check
lamp :does not light up briefly.
X Replace the battery (Y page 81).
i If the key battery is checked within the
signal reception range of the vehicle, press- ing the &or% button:
R locks or
R unlocks the vehicle
i You can obtain a battery from any quali-
fied specialist workshop.
Replacing the battery You require a CR 2025 3 V cell battery.
X Take the emergency key element out of the
key (Y page 79). X
Press emergency key element ;into the
opening in the key in the direction of the
arrow until battery tray cover :opens.
While doing so, do not hold cover :shut.
X Remove battery tray cover :. X
Repeatedly tap the key against your palm
until battery =falls out.
X Insert the new battery with the positive ter-
minal facing upwards. Use a lint-free cloth
to do so.
X Make sure that the surface of the battery is
free of lint, grease and other contamina-
tion.
X First insert the front tabs of battery tray
cover :into the housing; then press to
close it.
X Insert the emergency key element into the
key (Y page 79).
X Check the function of all key buttons on the
vehicle. Key
81Opening and closing Z
Page 85 of 373
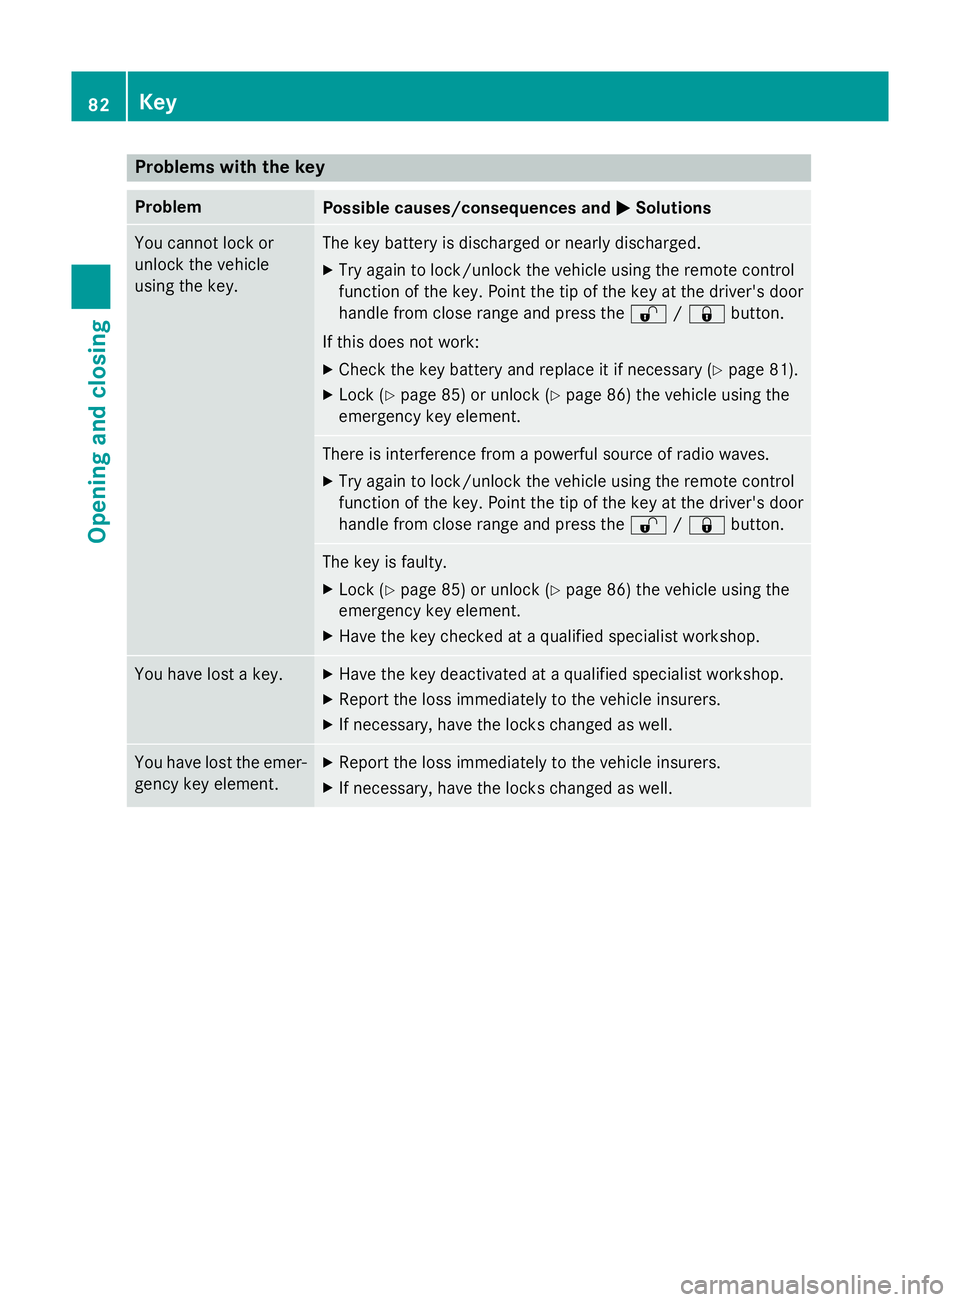
Problems with the key
Problem
Possible causes/consequences and
M
MSolutions You cannot lock or
unlock the vehicle
using the key. The key battery is discharged or nearly discharged.
X Try again to lock/unlock the vehicle using the remote control
function of the key. Point the tip of the key at the driver's door
handle from close range and press the %/& button.
If this does not work: X Check the key battery and replace it if necessary (Y page 81).
X Lock (Y page 85) or unlock (Y page 86) the vehicle using the
emergency key element. There is interference from a powerful source of radio waves.
X Try again to lock/unlock the vehicle using the remote control
function of the key. Point the tip of the key at the driver's door
handle from close range and press the %/& button. The key is faulty.
X Lock (Y page 85) or unlock (Y page 86) the vehicle using the
emergency key element.
X Have the key checked at a qualified specialist workshop. You have lost a key. X
Have the key deactivated at a qualified specialist workshop.
X Report the loss immediately to the vehicle insurers.
X If necessary, have the locks changed as well. You have lost the emer-
gency key element. X
Report the loss immediately to the vehicle insurers.
X If necessary, have the locks changed as well. 82
KeyOpening and closing
Page 86 of 373
Problem
Possible causes/consequences and
M
MSolutions The engine cannot be
started using the key. The on-board voltage is too low.
X Switch off non-essential consumers, e.g. seat heating or interior
lighting, and try to start the engine again.
If this does not work:
X Check the starter battery and charge it if necessary
(Y page 312).
or
X Jump-start the vehicle (Y page 316).
or
X Consult a qualified specialist workshop. The engine cannot be
started using the key. The steering lock is mechanically blocked.
X Remove the key and reinsert it into the ignition lock. While doing
this, turn the steering wheel in both directions. Doors
Important safety notes
G
WARNING
If children are left unsupervised in the vehicle, they could:
R open doors, thereby endangering other per-
sons or road users
R get out and be struck by oncoming traffic
R operate vehicle equipment and become
trapped, for example
In addition, the children could also set the
vehicle in motion, for example, if they:
R release the parking brake
R shift the automatic transmission out of park
position P or shift manual transmission into
neutral
R start the engine
There is a risk of an accident and injury.
When leaving the vehicle, always take the key with you and lock the vehicle. Never leave
children and animals unattended in the vehi-
cle. Keep the keys out of the reach of children. G
WARNING
If persons (particularly children) are exposed
to heat or cold for a prolonged period, there is a risk of serious or even fatal injuries. Never
leave persons (particularly children) unatten-
ded in the vehicle.
Stow luggage or loads preferably in the boot. Observe the loading guidelines (Y page 276).
United Kingdom only: G
WARNING
When the double locks are activated, the
doors can no longer be opened from the
inside. People in the vehicle can no longer get out, e.g. in hazardous situations. There is a
risk of injury.
Therefore, do not leave any people unsuper-
vised in the vehicle, particularly children, eld-
erly people or people in need of special assis-
tance. Do not activate the double lock when
people are in the vehicle.
If the vehicle has been locked with the key,
the double lock function is activated as stand-
ard. It is then not possible to open the doors
from inside the vehicle. You can deactivate
the double lock function by deactivating the Doors
83Opening and closing Z
Page 87 of 373
interior motion sensor (Y
page 74). The doors
can then be opened from the inside after the vehicle has been locked from the outside. You
can open the rear doors from inside the vehi- cle if they are not secured by the child-proof
locks (Y page 63). The anti-theft alarm system
is triggered if the door is opened from the
inside. Switch off the alarm . Unlocking and opening the doors
from the inside
i When a door is opened, the side window
on that side opens slightly. When the door
is closed, the side window is raised again.
! The side windows will not open/close if
the battery is discharged or if the side win- dows have iced up. It will then not be pos-
sible to close the door. Do not attempt to
force the door to close. You could other-
wise damage the door or the side window. X
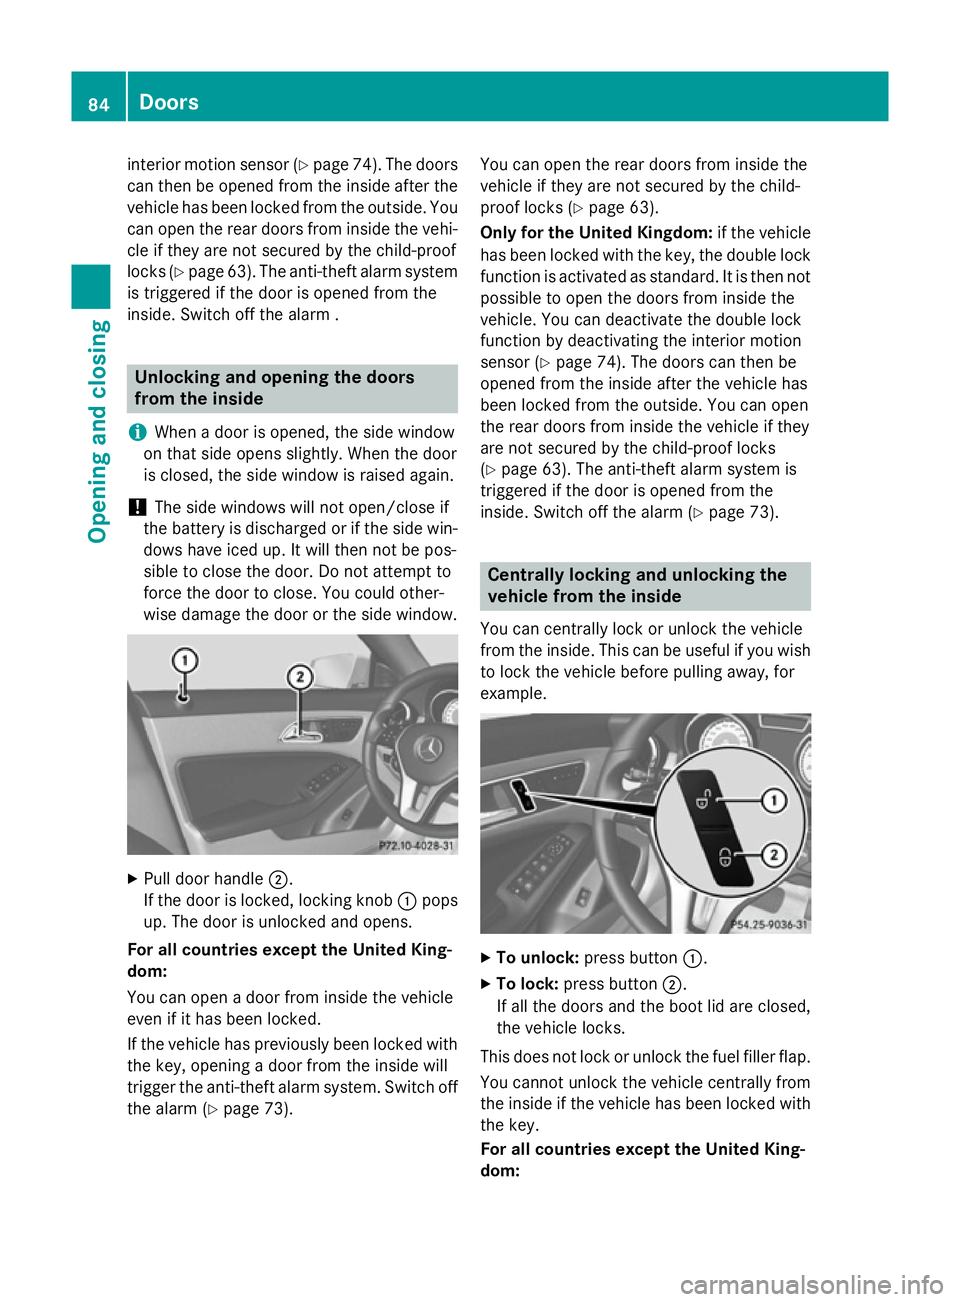
Pull door handle ;.
If the door is locked, locking knob :pops
up. The door is unlocked and opens.
For all countries except the United King-
dom:
You can open a door from inside the vehicle
even if it has been locked.
If the vehicle has previously been locked with
the key, opening a door from the inside will
trigger the anti-theft alarm system. Switch off
the alarm (Y page 73). You can open the rear doors from inside the
vehicle if they are not secured by the child-
proof locks (Y
page 63).
Only for the United Kingdom: if the vehicle
has been locked with the key, the double lock
function is activated as standard. It is then not
possible to open the doors from inside the
vehicle. You can deactivate the double lock
function by deactivating the interior motion
sensor (Y page 74). The doors can then be
opened from the inside after the vehicle has
been locked from the outside. You can open
the rear doors from inside the vehicle if they
are not secured by the child-proof locks
(Y page 63). The anti-theft alarm system is
triggered if the door is opened from the
inside. Switch off the alarm (Y page 73). Centrally locking and unlocking the
vehicle from the inside
You can centrally lock or unlock the vehicle
from the inside. This can be useful if you wish to lock the vehicle before pulling away, for
example. X
To unlock: press button :.
X To lock: press button ;.
If all the doors and the boot lid are closed,
the vehicle locks.
This does not lock or unlock the fuel filler flap. You cannot unlock the vehicle centrally from
the inside if the vehicle has been locked with
the key.
For all countries except the United King-
dom: 84
DoorsOpening and closing