fuel MERCEDES-BENZ CLA COUPE 2016 User Guide
[x] Cancel search | Manufacturer: MERCEDES-BENZ, Model Year: 2016, Model line: CLA COUPE, Model: MERCEDES-BENZ CLA COUPE 2016Pages: 345, PDF Size: 12.41 MB
Page 35 of 345
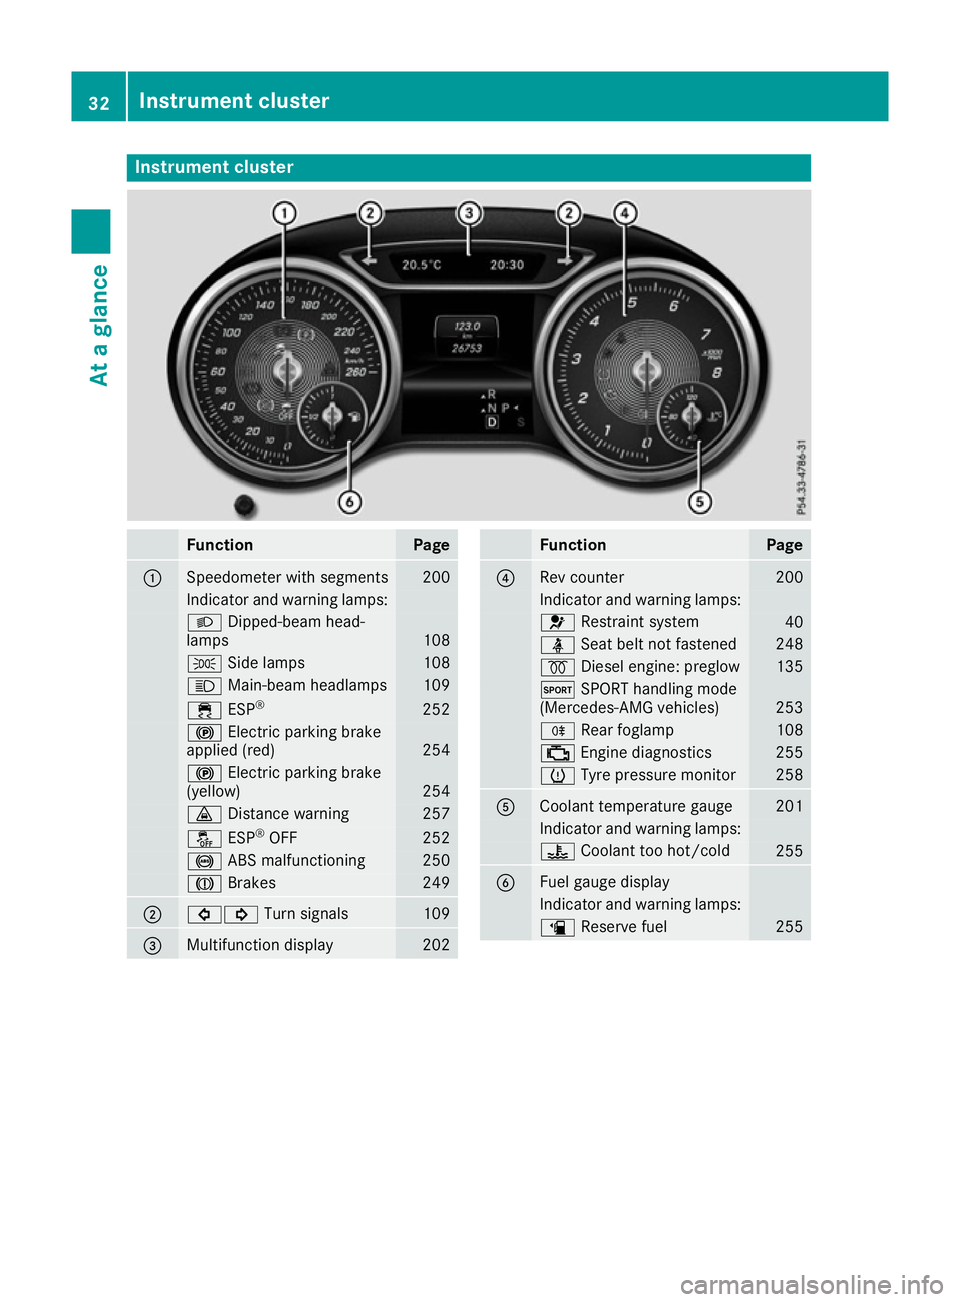
Instrument cluster
Function Page
:
Speedometer with segments 200
Indicator and warning lamps:
L
Dipped-beam head-
lamps 108
T
Side lamps 108
K
Main-beam headlamps 109
÷
ESP® 252
!
Electric parking brake
applied (red) 254
!
Electric parking brake
(yellow) 254
·
Distance warning 257
å
ESP®
OFF 252
!
ABS malfunctioning 250
J
Brakes 249
;
#!
Turn signals 109
=
Multifunction display 202 Function Page
?
Rev counter 200
Indicator and warning lamps:
6
Restraint system 40
ü
Seat belt not fastened 248
%
Diesel engine: preglow 135
M
SPORT handling mode
(Mercedes-AMG vehicles) 253
R
Rear foglamp 108
;
Engine diagnostics 255
h
Tyre pressure monitor 258
A
Coolant temperature gauge 201
Indicator and warning lamps:
?
Coolant too hot/cold 255
B
Fuel gauge display
Indicator and warning lamps:
æ
Reserve fuel 25532
Instrument clusterAt a glance
Page 56 of 345
on the front-passenger side deploys under the
following conditions:
- an occupant is detected in the front-
passenger seat or
- the seat belt buckle tongue is engaged in
the belt buckle of the front-passenger seat
R Windowbag on the side on which an impact
occurs, independently of seat belt usage and
regardless of whether the front-passenger
seat is occupied
R Seat belt tensioners, if the system determines
that deployment can offer additional protec-
tion for the vehicle occupants in this situation
i Not all airbags are deployed in an accident.
The different airbag systems work independ-
ently of each other.
How the airbag system works is determined
by the severity of the accident detected,
especially the vehicle deceleration or accel-
eration, and the apparent type of accident:
R frontal collision
R side impact PRE-SAFE
®
(anticipatory occupant
protection)
Introduction In certain hazardous situations, PRE-SAFE
®
takes pre-emptive measures to protect the vehi-
cle occupants.
Important safety notes !
Make sure that there are no objects in the
footwell or behind the seats. There is a risk
that the seats and/or the objects could be
damaged when PRE-SAFE ®
is activated.
Although your vehicle is equipped with PRE-
SAFE ®
, the possibility of injury in the event of an
accident cannot be ruled out. Always adapt your
driving style to suit the prevailing road and
weather conditions and maintain a safe distance from the vehicle in front. Drive carefully. Function PRE-SAFE
®
intervenes:
R in emergency braking situations, e.g. when
BAS is activated
R in critical driving situations, e.g. when physi-
cal limits are exceeded and the vehicle under- steers or oversteers severely
R when active Brake Assist intervenes power-
fully
PRE-SAFE ®
takes the following measures
depending on the hazardous situation detected:
R the front seat belts are pre-tensioned.
R if the vehicle skids, the side windows and the
panorama sliding sunroof are closed.
R vehicles with the memory function: the front-
passenger seat is adjusted if it is in an unfav-
ourable position.
If the hazardous situation passes without result- ing in an accident, PRE-SAFE ®
slackens the belt
pre-tensioning. All settings made by PRE-SAFE ®
can then be reversed.
If the seat belt pre-tensioning is not reduced:
X Move the seat backrest or seat back slightly
when the vehicle is stationary.
Seat belt pre-tensioning is reduced and the
locking mechanism is released.
The seat-belt adjustment is an integral part of
the PRE-SAFE ®
convenience function. Informa-
tion about the convenience function can be
found under "Belt adjustment" (Y page 43). Automatic measures after an acci-
dent
Immediately after an accident, the following
measures may be implemented, depending on
the type and severity of the impact: R the hazard warning lamps are activated
R the emergency lighting is activated
R the vehicle doors are unlocked
R the front side windows are lowered
R the engine is switched off and the fuel supply
is cut off
R vehicles with the Mercedes-Benz emergency
call system: automatic emergency call Occupant safety
53Safety Z
Page 80 of 345
X
To lock: press the &button.
The key centrally locks/unlocks: R the doors
R the boot lid
R the fuel filler flap
During unlocking, the turn signals flash once.
During locking, they flash three times.
When the locator lighting is activated via the
multimedia system, it also lights up when it is
dark after the vehicle is unlocked with the
remote control (see the separate operating
instructions).
You can also set an audible signal to confirm
that the vehicle has been locked. The audible
signal can be activated or deactivated using the on-board computer (Y page 211).
X To open the boot lid automatically: press
and hold the Fbutton until the boot lid
opens (Y page 87). KEYLESS-GO
General notes Bear in mind that the engine can be started by
any of the vehicle occupants if there is a key in
the vehicle.
Locking and unlocking You can start, lock or unlock the vehicle using
KEYLESS-GO. To do this, you need to carry the
key with you. You can combine the KEYLESS-GO
functions with the functions of a conventional
key. Unlock the vehicle using KEYLESS-GO, for
instance, and lock it using the &button on
the key.
The driver's door and the door at which the han- dle is used must both be closed. The key must beoutside the vehicle. When locking or unlocking
with KEYLESS-GO, the distance between the key
and the corresponding door handle must not be greater than 1 m.
A check that periodically establishes a radio
connection between the vehicle and the key
determines whether a valid key is in or in the
direct vicinity of the vehicle. This occurs, for
example:
R during engine start
R during driving R
when using HANDS-FREE ACCESS
R when the external door handles are touched
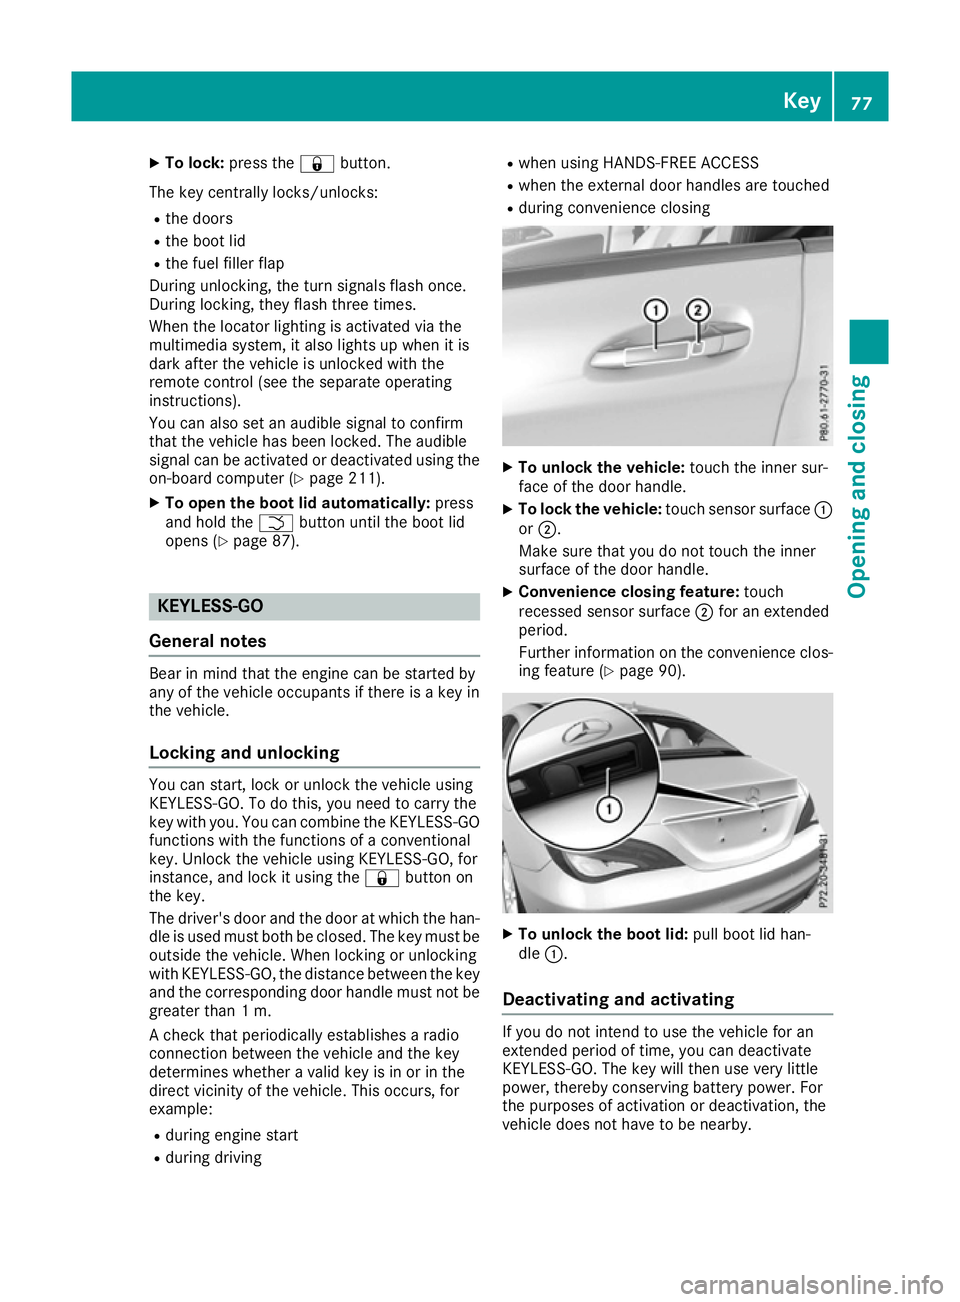
R during convenience closing X
To unlock the vehicle: touch the inner sur-
face of the door handle.
X To lock the vehicle: touch sensor surface :
or ;.
Make sure that you do not touch the inner
surface of the door handle.
X Convenience closing feature: touch
recessed sensor surface ;for an extended
period.
Further information on the convenience clos-
ing feature (Y page 90). X
To unlock the boot lid: pull boot lid han-
dle :.
Deactivating and activating If you do not intend to use the vehicle for an
extended period of time, you can deactivate
KEYLESS-GO. The key will then use very little
power, thereby conserving battery power. For
the purposes of activation or deactivation, the
vehicle does not have to be nearby. Key
77Opening and closing Z
Page 81 of 345
X
To deactivate: press the&button on the
key twice in rapid succession.
The battery check lamp of the key flashes
twice briefly and lights up once; KEYLESS-GO is deactivated (Y page 79).
X To activate: press any button on the key.
or X Insert the key into the ignition lock.
KEYLESS-GO and all its associated features
are available again. KEYLESS-GO start function
General notes Bear in mind that the engine can be started by
any of the vehicle occupants if there is a key in
the vehicle. Changing the settings of the locking
system
You can change the settings of the locking sys-
tem. This means that only the driver's door and the fuel filler flap are unlocked when the vehicle
is unlocked. This is useful if you frequently travel alone.
X To change the setting: press and hold down
the % and& buttons simultaneously
for about six seconds until the battery indica-
tor lamp flashes twice (Y page 79).
If the setting of the locking system is changed
within the signal range of the vehicle, pressing
the & or% button:
R locks or
R unlocks the vehicle
The key now functions as follows:
X To unlock: press the%button once.
X To unlock centrally: press the%button
twice.
X To lock centrally: press the&button. The KEYLESS-GO function is changed as fol-
lows:
X
To unlock the driver's door: touch the inner
surface of the door handle on the driver's
door.
X To unlock centrally: touch the inner surface
of the door handle on the front-passenger
door or the rear door.
X To lock centrally: touch the outer sensor
surface on one of the door handles.
X To restore the factory settings: press and
hold down the %and& buttons simul-
taneously for approximately six seconds until
the battery check lamp flashes twice
(Y page 79). Emergency key element
General notes If the vehicle can no longer be unlocked with the
key or KEYLESS-GO, use the emergency key ele-
ment.
If you use the emergency key element to unlock
and open the driver's door or the boot lid, the
anti-theft alarm system will be triggered
(Y page 73).
There are several ways to deactivate the alarm:
X To deactivate the alarm with the key: press
the % or& button on the key.
or X Insert the key into the ignition lock.
or X To deactivate the alarm with KEYLESS-GO:
press the Start/Stop button in the ignition
lock. The key must be in the vehicle.
or X Lock or unlock the vehicle using KEYLESS-
GO. The key must be outside the vehicle.
If you unlock the vehicle using the emergency
key element, the fuel filler flap will not be
unlocked automatically.
X To unlock the fuel filler flap: insert the key
into the ignition lock. 78
KeyOpening and closing
Page 87 of 345
out, e.g. in hazardous situations. There is a
risk of injury.
Therefore, do not leave any people unsuper-
vised in the vehicle, particularly children, eld- erly people or people in need of special assis-
tance. Do not activate the double lock when
people are in the vehicle.
If the vehicle has been locked from the outside, the double lock function is activated as stand-
ard. It is then not possible to open the doors
from inside the vehicle. You can deactivate the
double lock function by deactivating the interior
motion sensor (Y page 75). The doors can then
be opened from the inside after the vehicle has been locked from the outside. You can open the
rear doors from inside the vehicle if they are not secured by the child-proof locks (Y page 65).
The anti-theft alarm system is triggered if the
door is opened from the inside. Switch off the
alarm (Y page 73). Centrally locking and unlocking the
vehicle from the inside
You can centrally lock or unlock the vehicle from
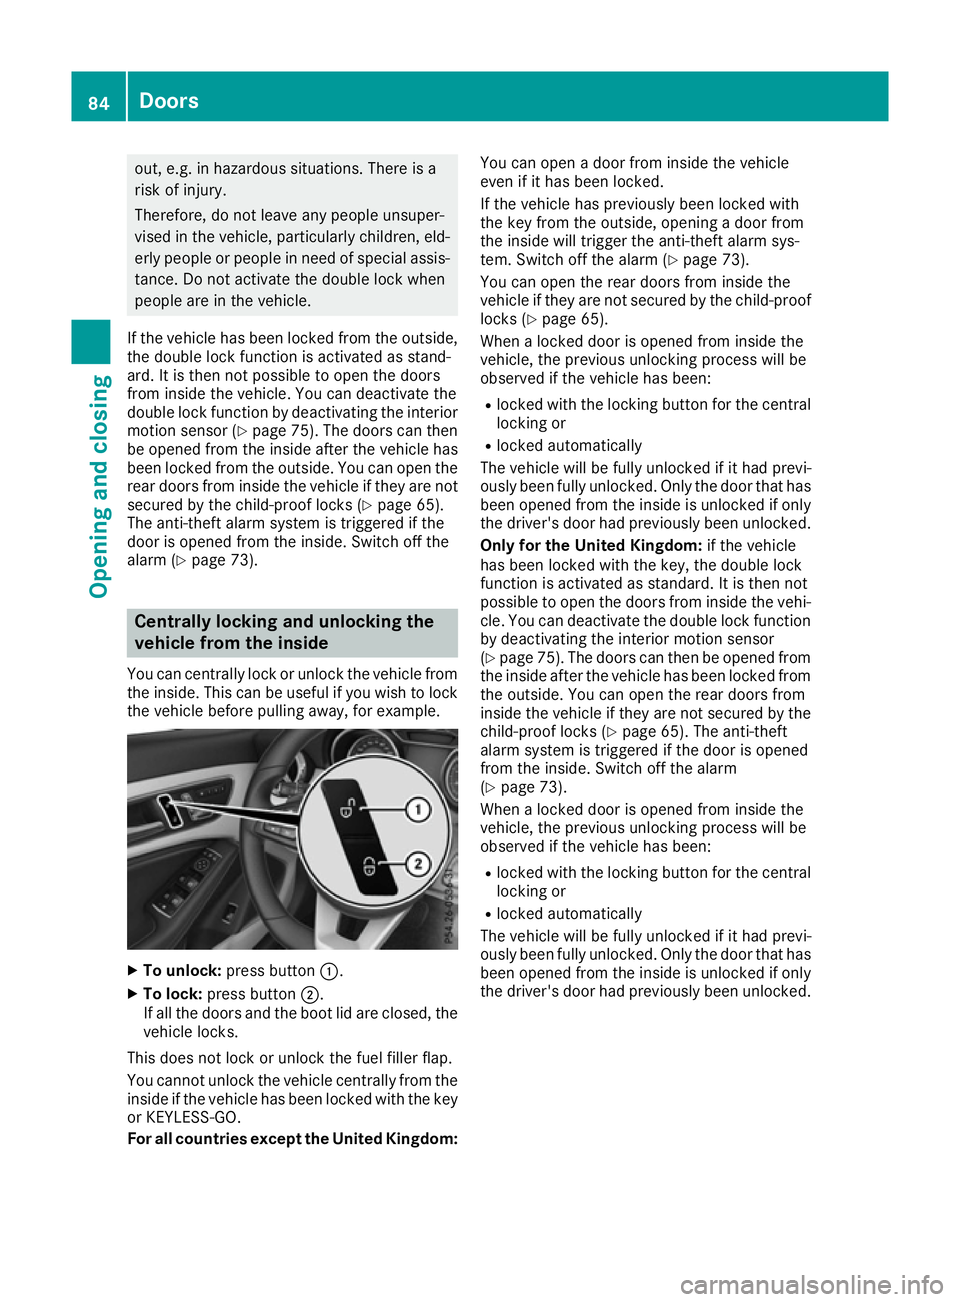
the inside. This can be useful if you wish to lock the vehicle before pulling away, for example. X
To unlock: press button :.
X To lock: press button ;.
If all the doors and the boot lid are closed, the
vehicle locks.
This does not lock or unlock the fuel filler flap.
You cannot unlock the vehicle centrally from the
inside if the vehicle has been locked with the key or KEYLESS-GO.
For all countries except the United Kingdom: You can open a door from inside the vehicle
even if it has been locked.
If the vehicle has previously been locked with
the key from the outside, opening a door from
the inside will trigger the anti-theft alarm sys-
tem. Switch off the alarm (Y page 73).
You can open the rear doors from inside the
vehicle if they are not secured by the child-proof locks (Y page 65).
When a locked door is opened from inside the
vehicle, the previous unlocking process will be
observed if the vehicle has been:
R locked with the locking button for the central
locking or
R locked automatically
The vehicle will be fully unlocked if it had previ-
ously been fully unlocked. Only the door that has been opened from the inside is unlocked if only
the driver's door had previously been unlocked.
Only for the United Kingdom: if the vehicle
has been locked with the key, the double lock
function is activated as standard. It is then not
possible to open the doors from inside the vehi- cle. You can deactivate the double lock function
by deactivating the interior motion sensor
(Y page 75). The doors can then be opened from
the inside after the vehicle has been locked from
the outside. You can open the rear doors from
inside the vehicle if they are not secured by the child-proof locks (Y page 65). The anti-theft
alarm system is triggered if the door is opened
from the inside. Switch off the alarm
(Y page 73).
When a locked door is opened from inside the
vehicle, the previous unlocking process will be
observed if the vehicle has been:
R locked with the locking button for the central
locking or
R locked automatically
The vehicle will be fully unlocked if it had previ-
ously been fully unlocked. Only the door that has been opened from the inside is unlocked if only
the driver's door had previously been unlocked. 84
DoorsOpening and closing
Page 89 of 345
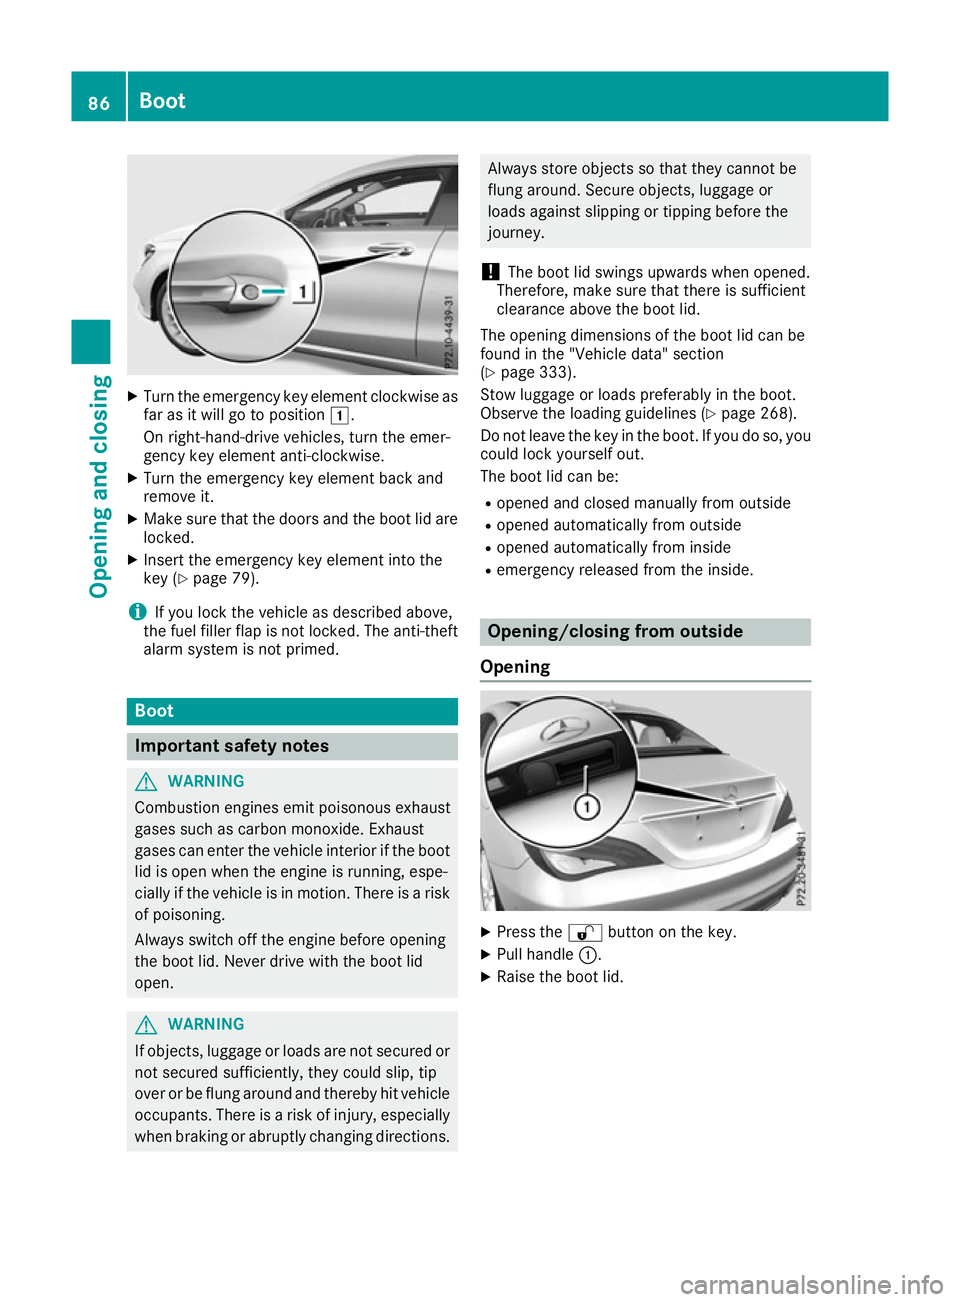
X
Turn the emergency key element clockwise as
far as it will go to position 1.
On right-hand-drive vehicles, turn the emer-
gency key element anti-clockwise.
X Turn the emergency key element back and
remove it.
X Make sure that the doors and the boot lid are
locked.
X Insert the emergency key element into the
key (Y page 79).
i If you lock the vehicle as described above,
the fuel filler flap is not locked. The anti-theft
alarm system is not primed. Boot
Important safety notes
G
WARNING
Combustion engines emit poisonous exhaust
gases such as carbon monoxide. Exhaust
gases can enter the vehicle interior if the boot
lid is open when the engine is running, espe-
cially if the vehicle is in motion. There is a risk of poisoning.
Always switch off the engine before opening
the boot lid. Never drive with the boot lid
open. G
WARNING
If objects, luggage or loads are not secured or not secured sufficiently, they could slip, tip
over or be flung around and thereby hit vehicle
occupants. There is a risk of injury, especially when braking or abruptly changing directions. Always store objects so that they cannot be
flung around. Secure objects, luggage or
loads against slipping or tipping before the
journey.
! The boot lid swings upwards when opened.
Therefore, make sure that there is sufficient
clearance above the boot lid.
The opening dimensions of the boot lid can be
found in the "Vehicle data" section
(Y page 333).
Stow luggage or loads preferably in the boot.
Observe the loading guidelines (Y page 268).
Do not leave the key in the boot. If you do so, you
could lock yourself out.
The boot lid can be:
R opened and closed manually from outside
R opened automatically from outside
R opened automatically from inside
R emergency released from the inside. Opening/closing from outside
Opening X
Press the %button on the key.
X Pull handle :.
X Raise the boot lid. 86
BootOpening and closing
Page 130 of 345
The auxiliary heating heats the air in the vehicle
interior to the set temperature. This occurs with- out using the heat of the running engine. The
auxiliary heating is operated directly using the
vehicle's fuel. For this reason, the fuel tank must
be at least Õfull to ensure that the auxiliary
heating functions.
The auxiliary heating/ventilation automatically
adjusts to changes in temperature and weather conditions. For this reason, the auxiliary heating could switch from ventilation mode to heating
mode or from heating mode to ventilation mode.
The auxiliary heating switches off when the
engine is switched off. The auxiliary ventilation
switches off when you turn the key to key posi-
tion 2(Y page 133).
The auxiliary heating switches off automatically
after 50 minutes.
You cannot use the auxiliary ventilation to cool
the vehicle interior to a temperature lower than
the outside temperature.
Before switching on X
Turn the key to position 2in the ignition lock
(Y page 133).
X Set the desired temperature.
Auxiliary heating or ventilation can also be
switched on if the manually set climate control is
activated. Optimum comfort is attained by set-
ting the system to automatic mode. Set the tem-
perature to 22 †.
The auxiliary heating or auxiliary ventilation can be switched on/off using the button on the
centre console or the remote control.
The on-board computer can be used to specify
up to three departure times, one of which may
be preselected (Y page 211). Switching the auxiliary heating/venti-
lation on or off using the button on the
centre console General notes
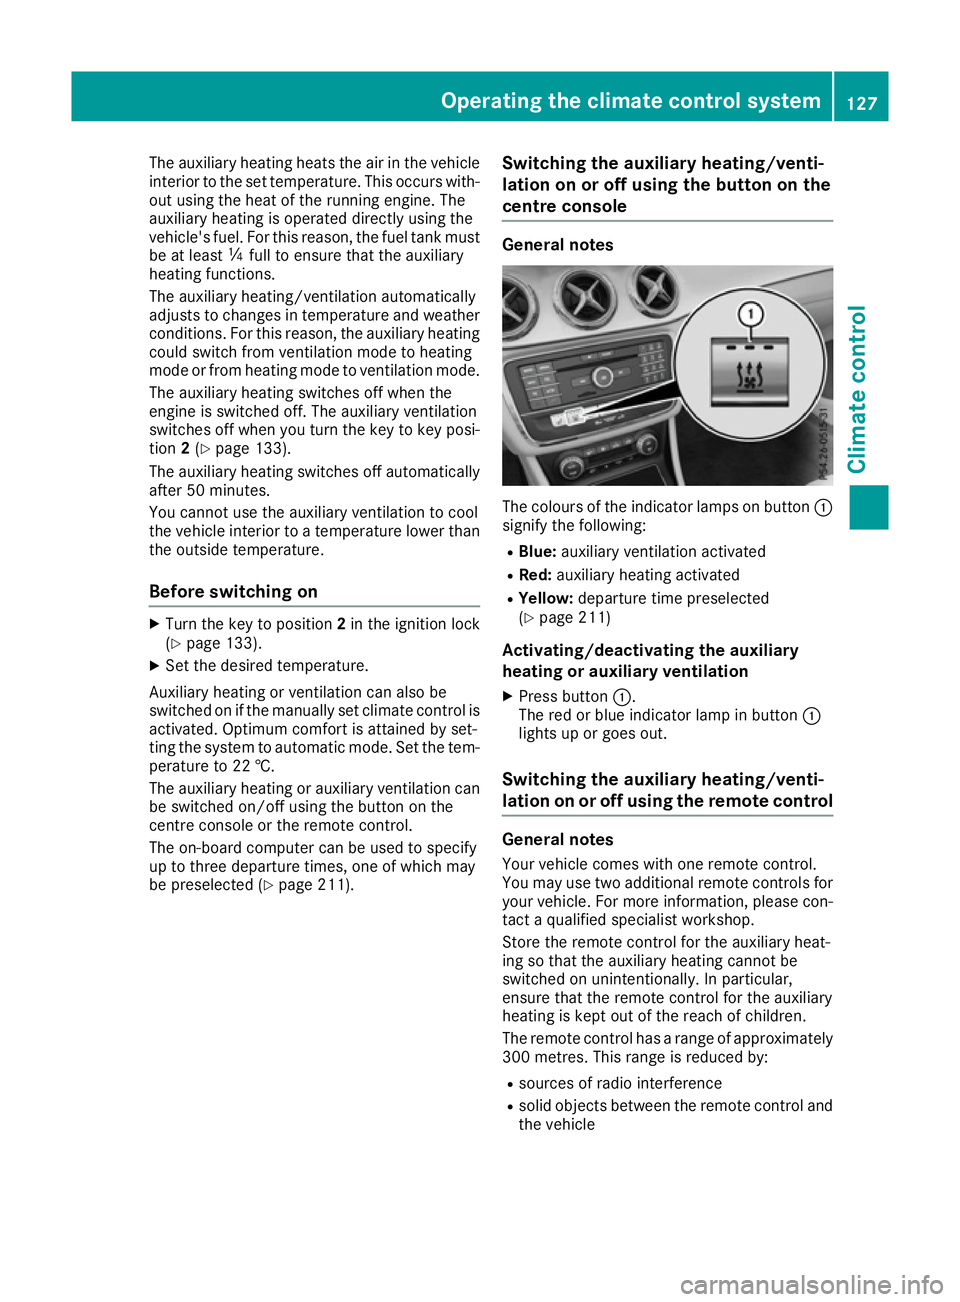
The colours of the indicator lamps on button
:
signify the following:
R Blue: auxiliary ventilation activated
R Red: auxiliary heating activated
R Yellow: departure time preselected
(Y page 211)
Activating/deactivating the auxiliary
heating or auxiliary ventilation
X Press button :.
The red or blue indicator lamp in button :
lights up or goes out.
Switching the auxiliary heating/venti-
lation on or off using the remote control General notes
Your vehicle comes with one remote control.
You may use two additional remote controls for
your vehicle. For more information, please con-
tact a qualified specialist workshop.
Store the remote control for the auxiliary heat-
ing so that the auxiliary heating cannot be
switched on unintentionally. In particular,
ensure that the remote control for the auxiliary
heating is kept out of the reach of children.
The remote control has a range of approximately
300 metres. This range is reduced by:
R sources of radio interference
R solid objects between the remote control and
the vehicle Operating the climate control system
127Climate control Z
Page 133 of 345
Problems with the auxiliary heating/ventilation
Problem
Possible causes/consequences and
M
MSolutions FAIL¨ The signal transmission between the transmitter and the vehicle is
faulty.
X
Change your position in relation to the vehicle, moving closer if
necessary.
X Make another attempt to switch the auxiliary heating/ventilation on
or off using the remote control. FAIL The auxiliary heating cannot be switched on or has switched itself off.
The starter battery is not sufficiently charged.
X Charge the starter battery.
X Make another attempt to switch on the auxiliary heating/ventilation
using the remote control. The auxiliary heating cannot be switched on or has switched itself off.
The fuel tank content is below the reserve fuel level.
X Refuel at the nearest filling station.
X Make another attempt to switch on the auxiliary heating using the
remote control. The auxiliary heating/ventilation cannot be switched on or has
switched itself off.
The auxiliary heating/ventilation is malfunctioning.
X Have the auxiliary heating/ventilation checked at a qualified spe-
cialist workshop. Air vents
Important safety notes
G
WARNING
Very hot or very cold air can flow from the air vents. This could result in burns or frostbite in the immediate vicinity of the air vents. There
is a risk of injury.
Make sure that all vehicle occupants always
maintain a sufficient distance to the air out-
lets. If necessary, redirect the airflow to
another area of the vehicle interior. In order to ensure the direct flow of fresh air
through the air vents into the vehicle interior,
please observe the following notes:
R keep the air inlet between the windscreen and
the bonnet free of blockages, such as ice,
snow or leaves
R never cover the vents or ventilation grilles in
the vehicle interior
i Optimal climate control function is achieved
by opening the air vents fully and setting the
adjusters to the middle position. 130
Air ventsClimate control
Page 140 of 345
Hill start assist is not active if:
R you are pulling away on a level road or a
downhill gradient
R on vehicles with automatic transmission, the
transmission is in position N
R the electric parking brake is applied
R ESP ®
is malfunctioning
Further information on holding the vehicle sta-
tionary on uphill gradients (Y page 148).ECO start/stop function
Introduction The ECO start/stop function switches the
engine off automatically if the vehicle is stopped
under certain conditions.
When pulling away again, the engine starts auto-
matically. The ECO start/stop function thereby
helps you to reduce the fuel consumption and
emissions of your vehicle.
Important safety notes G
WARNING
If the engine is switched off automatically and you exit the vehicle, the engine is restarted
automatically. The vehicle may begin moving. There is a risk of accident and injury.
If you wish to exit the vehicle, always turn off
the ignition and secure the vehicle against
rolling away.
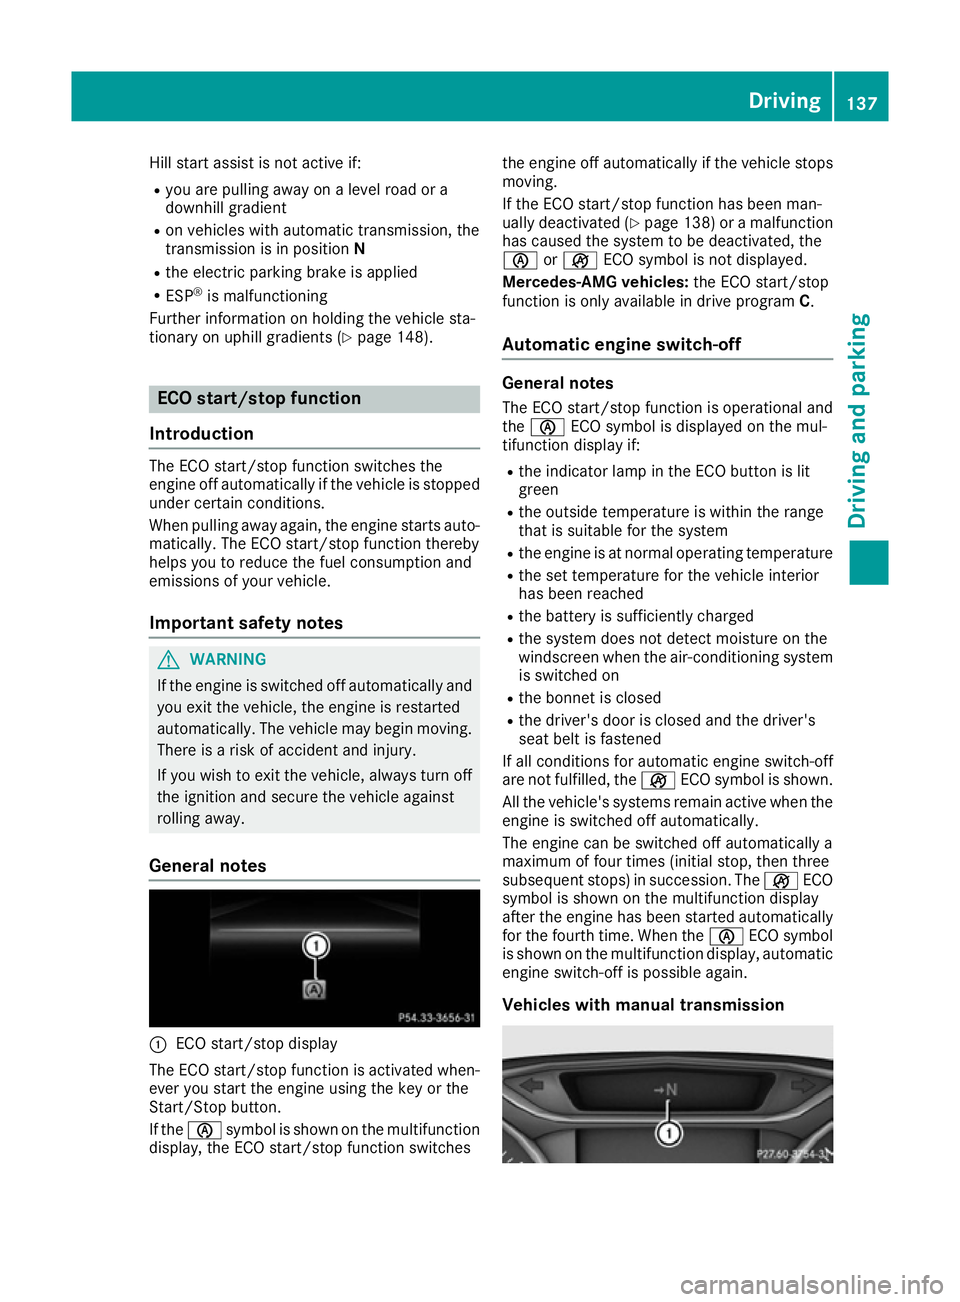
General notes :
ECO start/stop display
The ECO start/stop function is activated when-
ever you start the engine using the key or the
Start/Stop button.
If the è symbol is shown on the multifunction
display, the ECO start/stop function switches the engine off automatically if the vehicle stops
moving.
If the ECO start/stop function has been man-
ually deactivated (Y page 138) or a malfunction
has caused the system to be deactivated, the
è orç ECO symbol is not displayed.
Mercedes-AMG vehicles: the ECO start/stop
function is only available in drive program C.
Automatic engine switch-off General notes
The ECO start/stop function is operational and
the è ECO symbol is displayed on the mul-
tifunction display if:
R the indicator lamp in the ECO button is lit
green
R the outside temperature is within the range
that is suitable for the system
R the engine is at normal operating temperature
R the set temperature for the vehicle interior
has been reached
R the battery is sufficiently charged
R the system does not detect moisture on the
windscreen when the air-conditioning system
is switched on
R the bonnet is closed
R the driver's door is closed and the driver's
seat belt is fastened
If all conditions for automatic engine switch-off
are not fulfilled, the çECO symbol is shown.
All the vehicle's systems remain active when the engine is switched off automatically.
The engine can be switched off automatically a
maximum of four times (initial stop, then three
subsequent stops) in succession. The çECO
symbol is shown on the multifunction display
after the engine has been started automatically
for the fourth time. When the èECO symbol
is shown on the multifunction display, automatic
engine switch-off is possible again.
Vehicles with manual transmission Driving
137Driving and parking Z
Page 142 of 345
AMG performance exhaust system
(Mercedes-AMG vehicles)
You can choose between different AMG Per-
formance exhaust system volumes using the
position of the exhaust flap.
If the ignition is switched off for less than four
hours, the previously selected setting is activa-
ted when the engine is next started. If the igni-
tion is switched off for more than four hours, the quietest setting is activated when the engine is
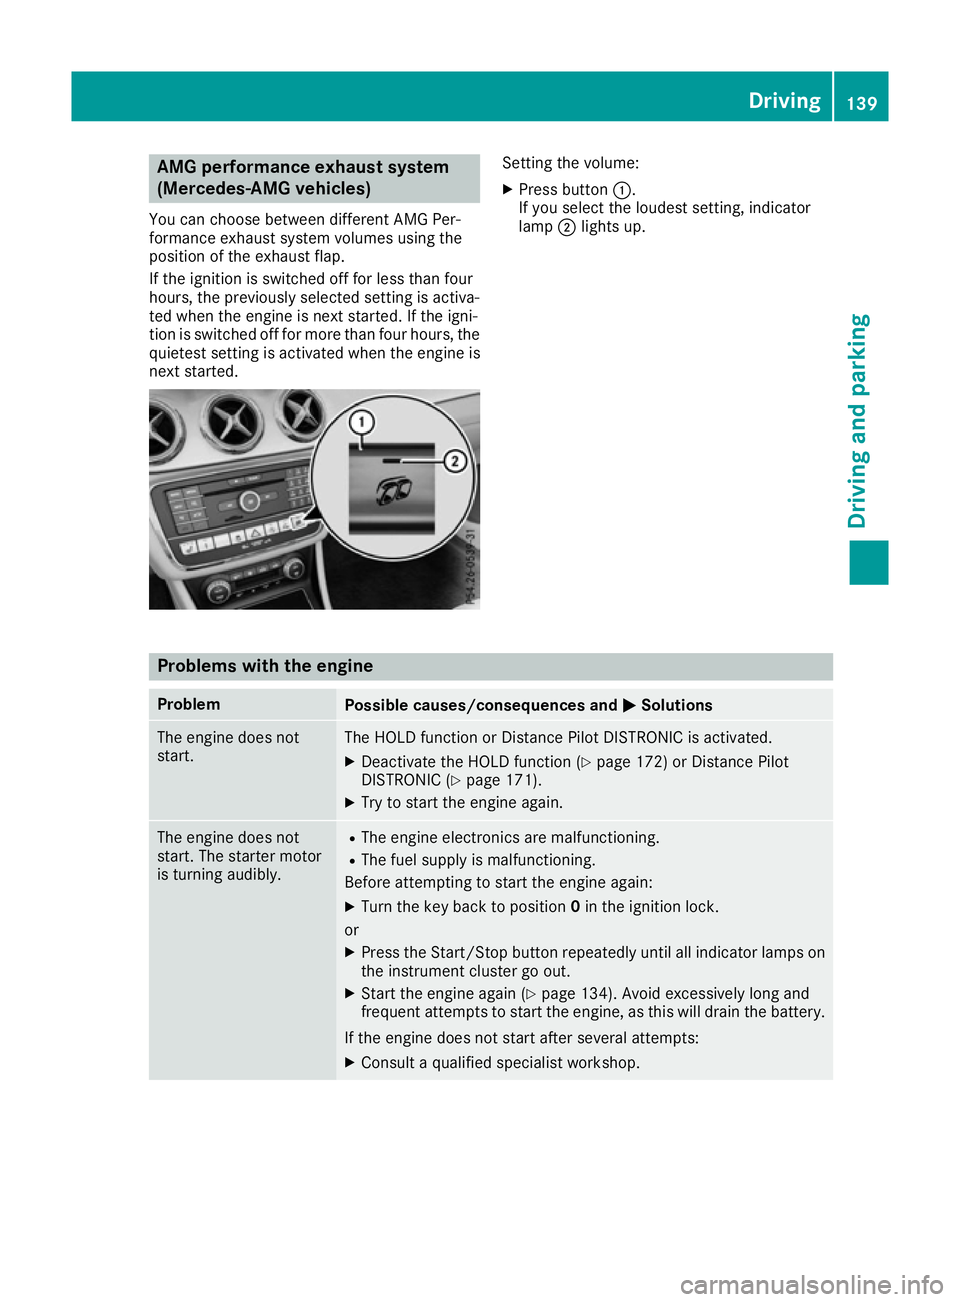
next started. Setting the volume:
X Press button :.
If you select the loudest setting, indicator
lamp ;lights up. Problems with the engine
Problem
Possible causes/consequences and
M MSolutions The engine does not
start. The HOLD function or Distance Pilot DISTRONIC is activated.
X Deactivate the HOLD function (Y page 172) or Distance Pilot
DISTRONIC (Y page 171).
X Try to start the engine again. The engine does not
start. The starter motor
is turning audibly. R
The engine electronics are malfunctioning.
R The fuel supply is malfunctioning.
Before attempting to start the engine again:
X Turn the key back to position 0in the ignition lock.
or X Press the Start/Stop button repeatedly until all indicator lamps on
the instrument cluster go out.
X Start the engine again (Y page 134). Avoid excessively long and
frequent attempts to start the engine, as this will drain the battery.
If the engine does not start after several attempts: X Consult a qualified specialist workshop. Driving
139Driving and pa rking Z