roof MERCEDES-BENZ CLA COUPE 2016 User Guide
[x] Cancel search | Manufacturer: MERCEDES-BENZ, Model Year: 2016, Model line: CLA COUPE, Model: MERCEDES-BENZ CLA COUPE 2016Pages: 345, PDF Size: 12.41 MB
Page 50 of 345
belt, a windowbag may be deployed in other
accident situations (Y page 51).Automatic front-passenger front air-
bag deactivation
Introduction In order to recognise a child restraint system on
the front-passenger seat, the automatic front-
passenger front airbag deactivation system cat- egorises the person in the front-passenger seat.Depending on that result, the front-passenger
front airbag is either enabled or disabled. If a
rearward-facing child restraint system is fitted
to the front-passenger seat, the PASSENGER
AIR BAG OFF indicator lamp must light up after
the system self-test and remain lit. The front-
passenger front airbag is disabled.
The system does not disable:
R the sidebag
R the windowbag
R the seat belt tensioner
Make sure that your vehicle is equipped with the automatic front-passenger front airbag deacti-
vation system (Y page 57). If this is not the
case, always install a child restraint system on a
suitable rear seat (Y page 59).
If it is absolutely necessary to install a child
restraint system on the front-passenger seat, be sure to observe the correct positioning of the
child restraint system. Never place objects
under or behind the child restraint system, e.g. a
cushion. Fully retract the seat cushion length.
The entire base of the child restraint system
must always rest on the seat cushion of the
front-passenger seat. The backrest of a forward-
facing child restraint system must, as far as
possible, rest flat against the backrest of the
front-passenger seat. The child restraint system must not touch the roof or be put under strain bythe head restraint. Adjust the angle of the seat
backrest and the head restraint position accord-
ingly. Only then is the correct function of the
automatic front-passenger front airbag deacti-
vation system guaranteed. Always observe the
information on suitable positioning of the child
restraint system (Y page 59) in addition to the
child restraint system manufacturer's installa-
tion instructions. Operation of automatic front-passenger
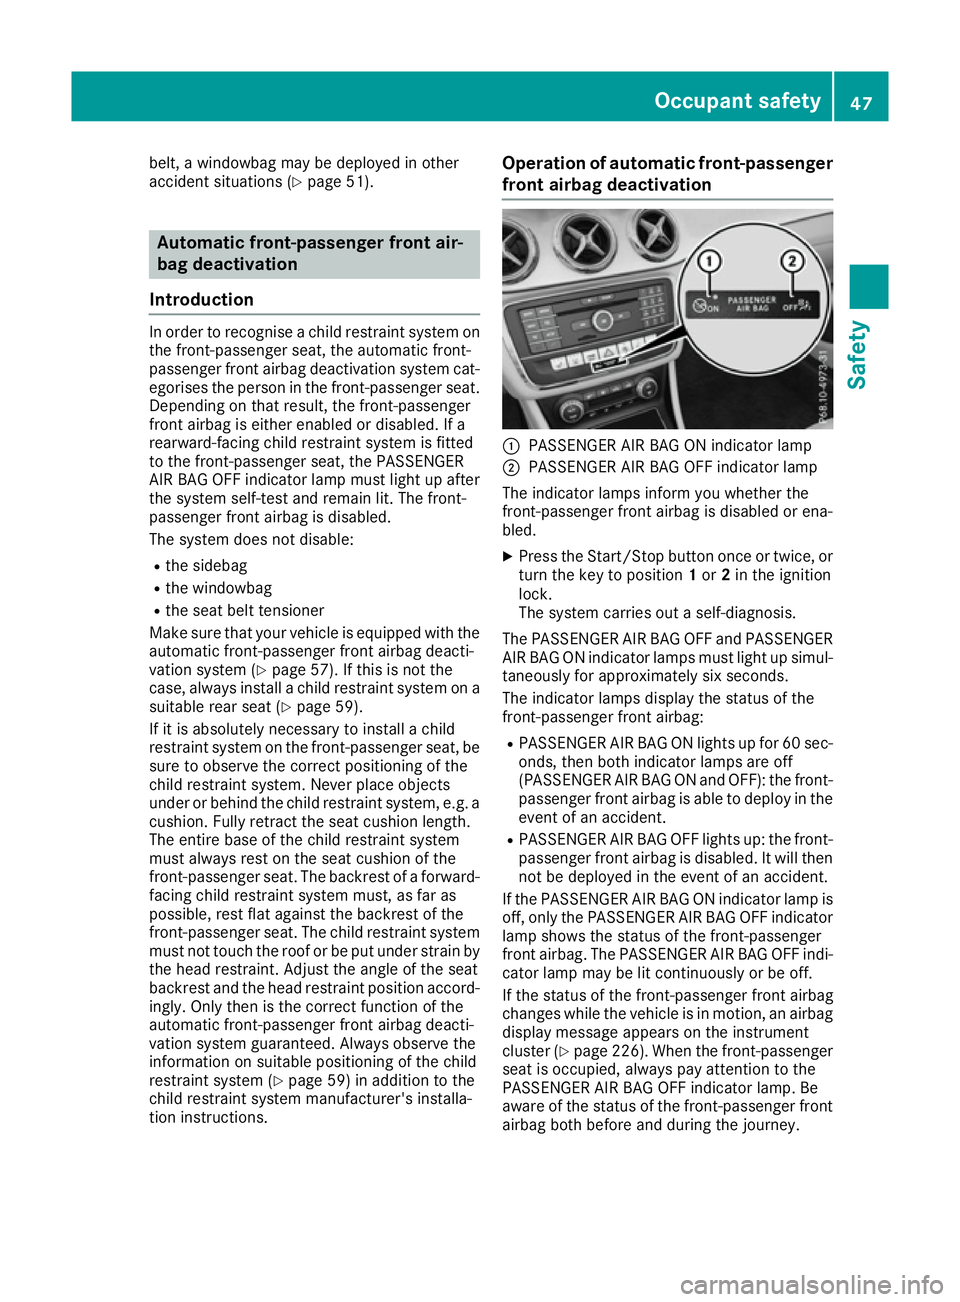
front airbag deactivation :
PASSENGER AIR BAG ON indicator lamp
; PASSENGER AIR BAG OFF indicator lamp
The indicator lamps inform you whether the
front-passenger front airbag is disabled or ena-
bled.
X Press the Start/Stop button once or twice, or
turn the key to position 1or 2in the ignition
lock.
The system carries out a self-diagnosis.
The PASSENGER AIR BAG OFF and PASSENGER
AIR BAG ON indicator lamps must light up simul- taneously for approximately six seconds.
The indicator lamps display the status of the
front-passenger front airbag:
R PASSENGER AIR BAG ON lights up for 60 sec-
onds, then both indicator lamps are off
(PASSENGER AIR BAG ON and OFF): the front-
passenger front airbag is able to deploy in the
event of an accident.
R PASSENGER AIR BAG OFF lights up: the front-
passenger front airbag is disabled. It will then
not be deployed in the event of an accident.
If the PASSENGER AIR BAG ON indicator lamp is
off, only the PASSENGER AIR BAG OFF indicator lamp shows the status of the front-passenger
front airbag. The PASSENGER AIR BAG OFF indi-
cator lamp may be lit continuously or be off.
If the status of the front-passenger front airbag
changes while the vehicle is in motion, an airbag display message appears on the instrument
cluster (Y page 226). When the front-passenger
seat is occupied, always pay attention to the
PASSENGER AIR BAG OFF indicator lamp. Be
aware of the status of the front-passenger front
airbag both before and during the journey. Occupant safety
47Safety Z
Page 56 of 345
on the front-passenger side deploys under the
following conditions:
- an occupant is detected in the front-
passenger seat or
- the seat belt buckle tongue is engaged in
the belt buckle of the front-passenger seat
R Windowbag on the side on which an impact
occurs, independently of seat belt usage and
regardless of whether the front-passenger
seat is occupied
R Seat belt tensioners, if the system determines
that deployment can offer additional protec-
tion for the vehicle occupants in this situation
i Not all airbags are deployed in an accident.
The different airbag systems work independ-
ently of each other.
How the airbag system works is determined
by the severity of the accident detected,
especially the vehicle deceleration or accel-
eration, and the apparent type of accident:
R frontal collision
R side impact PRE-SAFE
®
(anticipatory occupant
protection)
Introduction In certain hazardous situations, PRE-SAFE
®
takes pre-emptive measures to protect the vehi-
cle occupants.
Important safety notes !
Make sure that there are no objects in the
footwell or behind the seats. There is a risk
that the seats and/or the objects could be
damaged when PRE-SAFE ®
is activated.
Although your vehicle is equipped with PRE-
SAFE ®
, the possibility of injury in the event of an
accident cannot be ruled out. Always adapt your
driving style to suit the prevailing road and
weather conditions and maintain a safe distance from the vehicle in front. Drive carefully. Function PRE-SAFE
®
intervenes:
R in emergency braking situations, e.g. when
BAS is activated
R in critical driving situations, e.g. when physi-
cal limits are exceeded and the vehicle under- steers or oversteers severely
R when active Brake Assist intervenes power-
fully
PRE-SAFE ®
takes the following measures
depending on the hazardous situation detected:
R the front seat belts are pre-tensioned.
R if the vehicle skids, the side windows and the
panorama sliding sunroof are closed.
R vehicles with the memory function: the front-
passenger seat is adjusted if it is in an unfav-
ourable position.
If the hazardous situation passes without result- ing in an accident, PRE-SAFE ®
slackens the belt
pre-tensioning. All settings made by PRE-SAFE ®
can then be reversed.
If the seat belt pre-tensioning is not reduced:
X Move the seat backrest or seat back slightly
when the vehicle is stationary.
Seat belt pre-tensioning is reduced and the
locking mechanism is released.
The seat-belt adjustment is an integral part of
the PRE-SAFE ®
convenience function. Informa-
tion about the convenience function can be
found under "Belt adjustment" (Y page 43). Automatic measures after an acci-
dent
Immediately after an accident, the following
measures may be implemented, depending on
the type and severity of the impact: R the hazard warning lamps are activated
R the emergency lighting is activated
R the vehicle doors are unlocked
R the front side windows are lowered
R the engine is switched off and the fuel supply
is cut off
R vehicles with the Mercedes-Benz emergency
call system: automatic emergency call Occupant safety
53Safety Z
Page 62 of 345
Forward-facing child restraint system
If it is absolutely necessary to fit a forward-
facing child restraint system to the front-
passenger seat, always move the front-
passenger seat as far back as possible. Fully
retract the seat cushion length. The entire base of the child restraint system must always rest on
the seat cushion of the front-passenger seat.
The backrest of the child restraint system must, as far as possible, lie flat against the backrest of
the front-passenger seat. The child restraint sys- tem must not touch the roof or be put under
strain by the head restraint. Adjust the angle of
the seat backrest and the head restraint posi-
tion accordingly. Always make sure that the
shoulder belt strap is correctly routed from the
vehicle belt outlet to the shoulder belt guide on the child restraint system. The shoulder belt
strap must be routed forwards and downwards
from the vehicle belt outlet. If necessary, adjust
the vehicle belt outlet and the front-passenger
seat accordingly.
Always observe the information on suitable
positioning of the child restraint system
(Y page 59) in addition to the child restraint
system manufacturer's installation and operat-
ing instructions. Suitable positioning of the child
restraint system
Introduction Only child restraint systems approved in accord-
ance with ECE standards ECE R44 or ECE R129 (i-Size child restraint systems) are permitted for
use in the vehicle.
For certain child restraint systems in weight cat- egories II or III, this can mean that the area of
use is restricted. The maximum size setting of
the child restraint system may not be possible
due to possible contact with the roof.
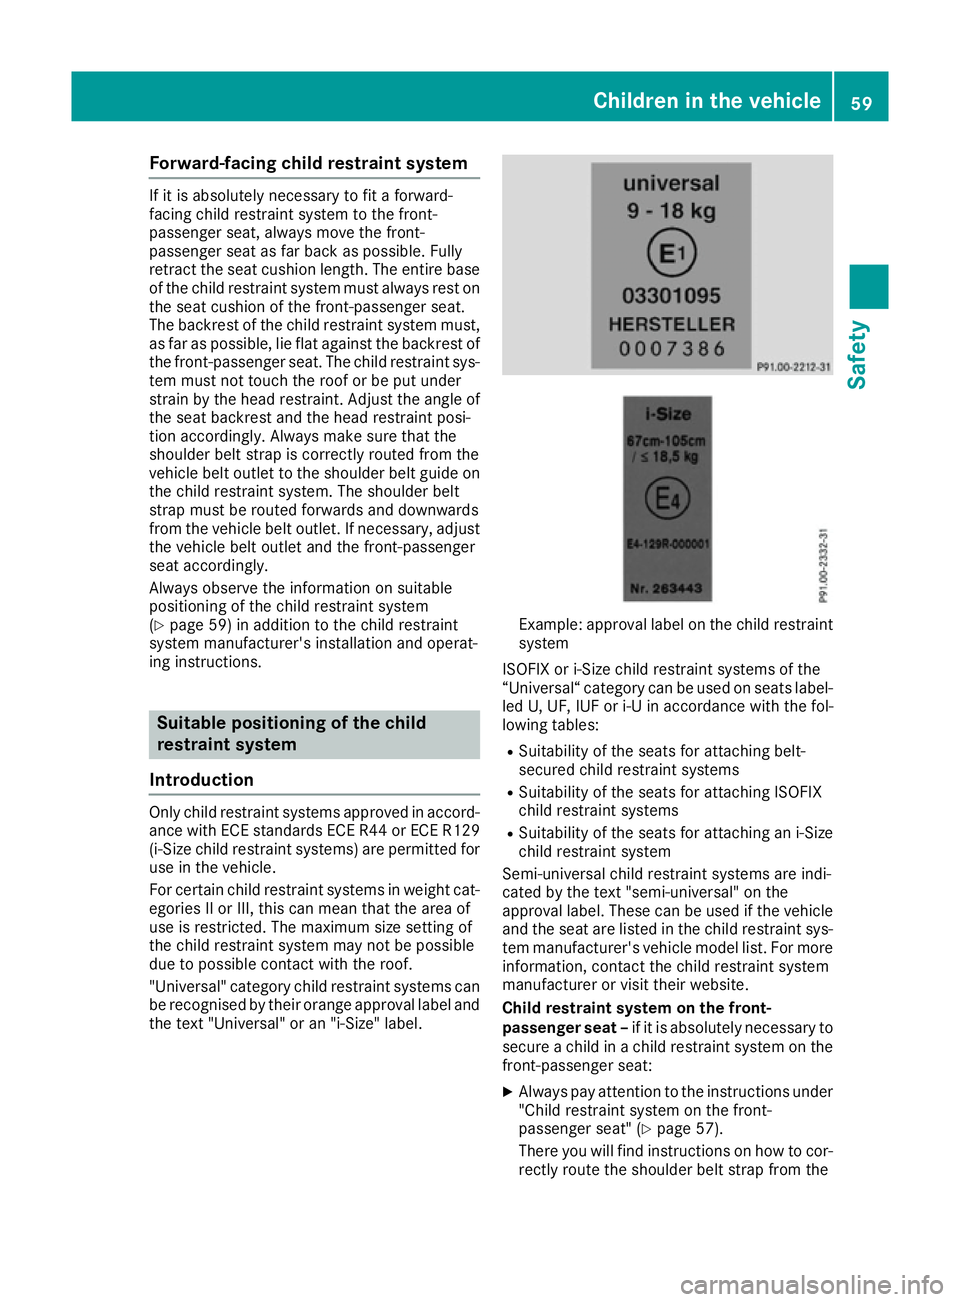
"Universal" category child restraint systems can
be recognised by their orange approval label and the text "Universal" or an "i-Size" label. Example: approval label on the child restraint
system
ISOFIX or i-Size child restraint systems of the
“Universal“ category can be used on seats label- led U, UF, IUF or i-U in accordance with the fol-
lowing tables:
R Suitability of the seats for attaching belt-
secured child restraint systems
R Suitability of the seats for attaching ISOFIX
child restraint systems
R Suitability of the seats for attaching an i-Size
child restraint system
Semi-universal child restraint systems are indi-
cated by the text "semi-universal" on the
approval label. These can be used if the vehicle and the seat are listed in the child restraint sys-
tem manufacturer's vehicle model list. For more
information, contact the child restraint system
manufacturer or visit their website.
Child restraint system on the front-
passenger seat – if it is absolutely necessary to
secure a child in a child restraint system on the front-passenger seat:
X Always pay attention to the instructions under
"Child restraint system on the front-
passenger seat" (Y page 57).
There you will find instructions on how to cor- rectly route the shoulder belt strap from the Children in the vehicle
59Safety Z
Page 63 of 345
vehicle belt outlet to the shoulder belt guide
on the child restraint system (Y page 59).
X Move the front-passenger seat as far back as
possible and fully retract the seat cushion
length.
If you secure a child in a forward-facing child
restraint system on the front-passenger seat,
you must also move the front-passenger seat to the highest position.
X Move the backrest to an almost vertical posi-
tion.
The entire base of the child restraint system
must always rest on the seat cushion of the front-passenger seat. The backrest of the
forward-facing child restraint system must, as far as possible, be resting on the backrest of
the front-passenger seat. The child restraint
system must not touch the roof or be put
under strain by the head restraint. Adjust the angle of the seat backrest and the head
restraint position accordingly. Also observe
the child restraint system manufacturer's
installation instructions.
X If possible, move the seat cushion angle to the
highest, most vertical position (Y page 98).
Suitability of the seats for attaching a belt-secured child restraint system If you use a baby car seat of category 0 or 0+ or a rearward-facing child restraint system of category
I on a rear seat, you must adjust the driver's or front-passenger seat so that the seat does not touch the child restraint system.
If you use a category I, forward-facing child restraint system, you should remove the head restraintfrom the respective seat, if possible (Y page 100). The backrest of the child restraint system must,
as far as possible, lie flat against the backrest of the seat.
Make sure that the child's feet do not touch the front seat. If necessary, move the front seat forward
slightly.
For certain child restraint systems in weight categories II or III, this can mean that the area of use is restricted. The maximum size setting of the child restraint system may not be possible due to
possible contact with the roof.
Always observe the notes in the "Child restraint system" section (Y page 54) and the child restraint
system manufacturer's installation instructions.
When you remove the child restraint system, you must replace the head restraints again immedi-
ately (Y page 99). All vehicle occupants must adjust their head restraints correctly before begin-
ning the journey.
Legend for the table:
XS eat that is unsuitable for children in this weight category.
US uitable for child restraint systems in the "Universal" category that are approved for use in this
weight category.
UF Suitable for forward-facing child restraint systems that belong to the "Universal" category and are approved for use in this weight category.
LS uitable for child restraint systems as recommended; see the "Recommended child restraint
systems" table (Y page 63). Suitable for semi-universal child restraint systems if the vehicle
and the seat are listed in the child restraint system manufacturer's vehicle model list. 60
Children in the vehicleSafety
Page 64 of 345
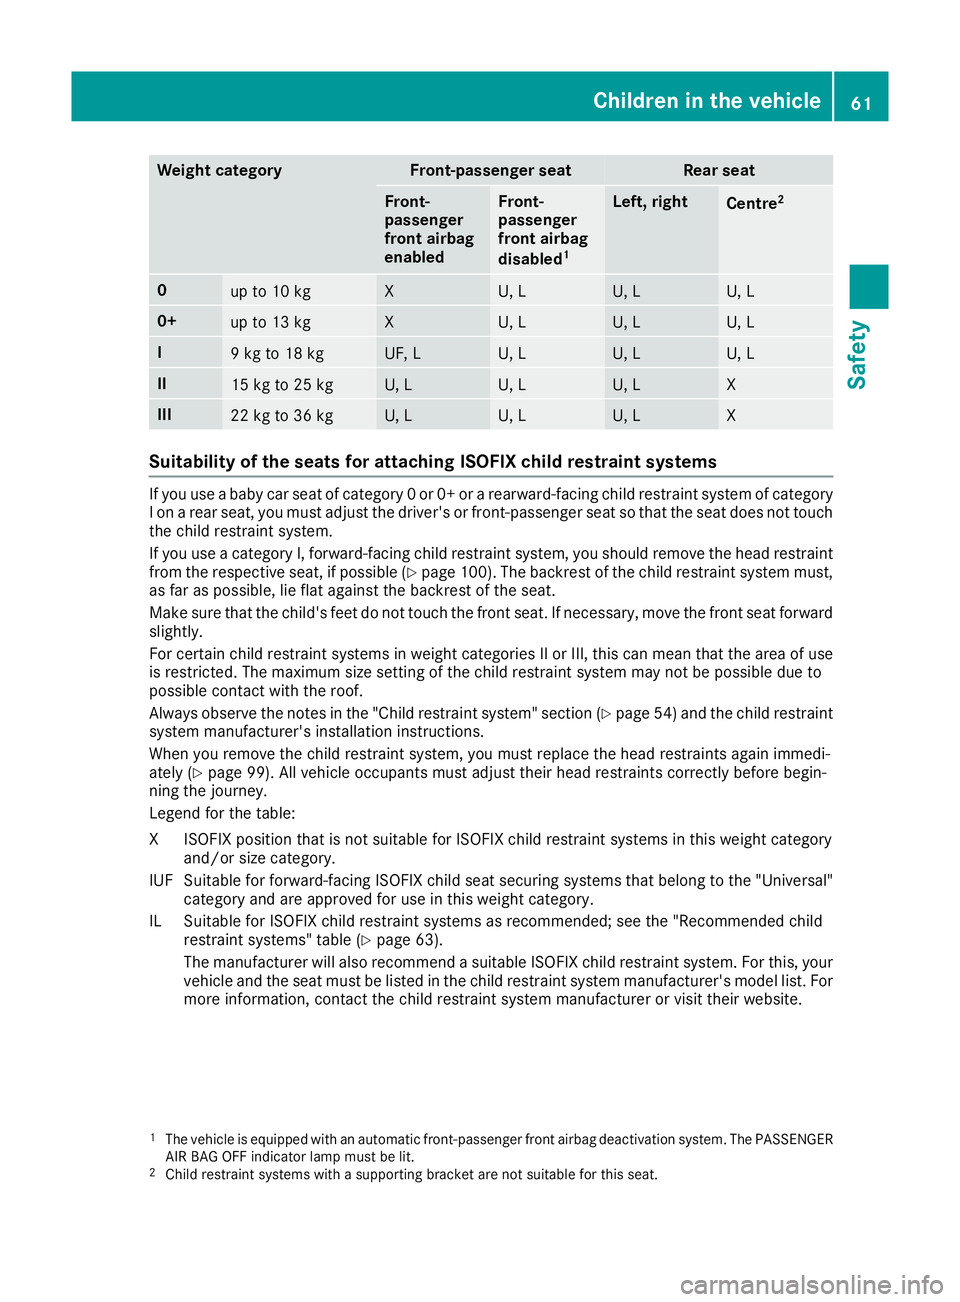
Weight category Front-passenger seat Rear seat
Front-
passenger
front airbag
enabled Front-
passenger
front airbag
disabled
1 Left, right
Centre
2 0
up to 10 kg X U, L U, L U, L
0+
up to 13 kg X U, L U, L U, L
I
9 kg to 18 kg UF, L U, L U, L U, L
II
15 kg to 25 kg U, L U, L U, L X
III
22 kg to 36 kg U, L U, L U, L X
Suitability of the seats for attaching ISOFIX child restraint systems
If you use a baby car seat of category 0 or 0+ or a rearward-facing child restraint system of category
I on a rear seat, you must adjust the driver's or front-passenger seat so that the seat does not touch the child restraint system.
If you use a category I, forward-facing child restraint system, you should remove the head restraintfrom the respective seat, if possible (Y page 100). The backrest of the child restraint system must,
as far as possible, lie flat against the backrest of the seat.
Make sure that the child's feet do not touch the front seat. If necessary, move the front seat forward
slightly.
For certain child restraint systems in weight categories II or III, this can mean that the area of use is restricted. The maximum size setting of the child restraint system may not be possible due to
possible contact with the roof.
Always observe the notes in the "Child restraint system" section (Y page 54) and the child restraint
system manufacturer's installation instructions.
When you remove the child restraint system, you must replace the head restraints again immedi-
ately (Y page 99). All vehicle occupants must adjust their head restraints correctly before begin-
ning the journey.
Legend for the table:
XI SOFIX position that is not suitable for ISOFIX child restraint systems in this weight category
and/or size category.
IUF Suitable for forward-facing ISOFIX child seat securing systems that belong to the "Universal" category and are approved for use in this weight category.
IL Suitable for ISOFIX child restraint systems as recommended; see the "Recommended child restraint systems" table (Y page 63).
The manufacturer will also recommend a suitable ISOFIX child restraint system. For this, your
vehicle and the seat must be listed in the child restraint system manufacturer's model list. For more information, contact the child restraint system manufacturer or visit their website.
1 The vehicle is equipped with an automatic front-passenger front airbag deactivation system. The PASSENGER
AIR BAG OFF indicator lamp must be lit.
2 Child restraint systems with a supporting bracket are not suitable for this seat. Children in the vehicle
61Safety Z
Page 65 of 345
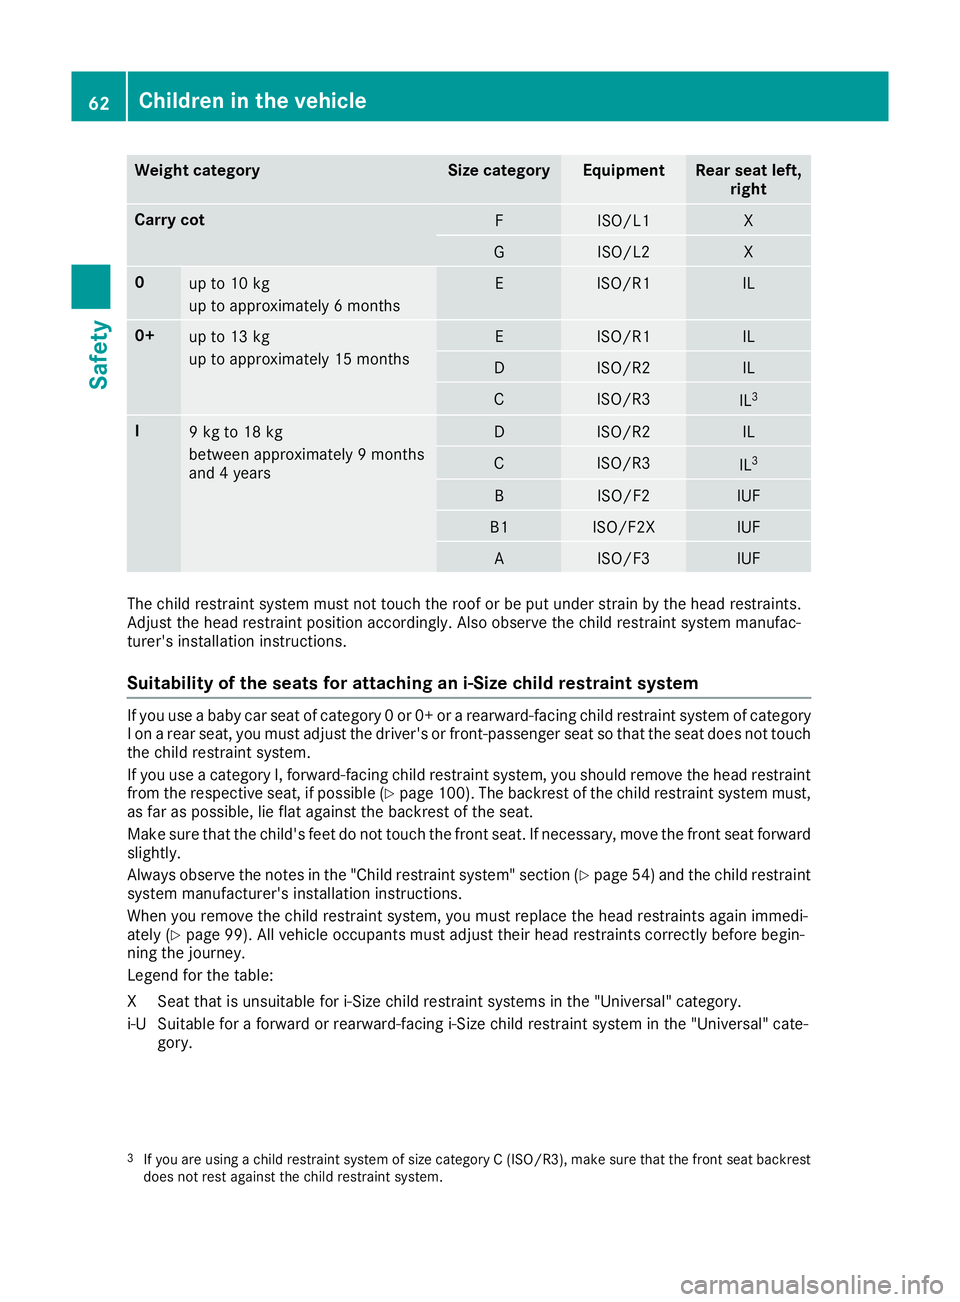
Weight category Size category Equipment Rear seat left,
right Carry cot
F ISO/L1 X
G ISO/L2 X
0
up to 10 kg
up to approximately 6 months E ISO/R1 IL
0+
up to 13 kg
up to approximately 15 months E ISO/R1 IL
D ISO/R2 IL
C ISO/R3
IL
3 I
9 kg to 18 kg
between approximately 9 months
and 4 years D ISO/R2 IL
C ISO/R3
IL
3 B ISO/F2 IUF
B1 ISO/F2X IUF
A ISO/F3 IUF
The child restraint system must not touch the roof or be put under strain by the head restraints.
Adjust the head restraint position accordingly. Also observe the child restraint system manufac-
turer's installation instructions.
Suitability of the seats for attaching an i-Size child restraint system If you use a baby car seat of category 0 or 0+ or a rearward-facing child restraint system of category
I on a rear seat, you must adjust the driver's or front-passenger seat so that the seat does not touch the child restraint system.
If you use a category I, forward-facing child restraint system, you should remove the head restraintfrom the respective seat, if possible (Y page 100). The backrest of the child restraint system must,
as far as possible, lie flat against the backrest of the seat.
Make sure that the child's feet do not touch the front seat. If necessary, move the front seat forward
slightly.
Always observe the notes in the "Child restraint system" section (Y page 54) and the child restraint
system manufacturer's installation instructions.
When you remove the child restraint system, you must replace the head restraints again immedi-
ately (Y page 99). All vehicle occupants must adjust their head restraints correctly before begin-
ning the journey.
Legend for the table:
XS eat that is unsuitable for i-Size child restraint systems in the "Universal" category.
i‑US uitable for a forward or rearward-facing i-Size child restraint system in the "Universal" cate-
gory.
3 If you are using a child restraint system of size category C (ISO/R3), make sure that the front seat backrest
does not rest against the child restraint system. 62
Children in the vehicleSafety
Page 67 of 345
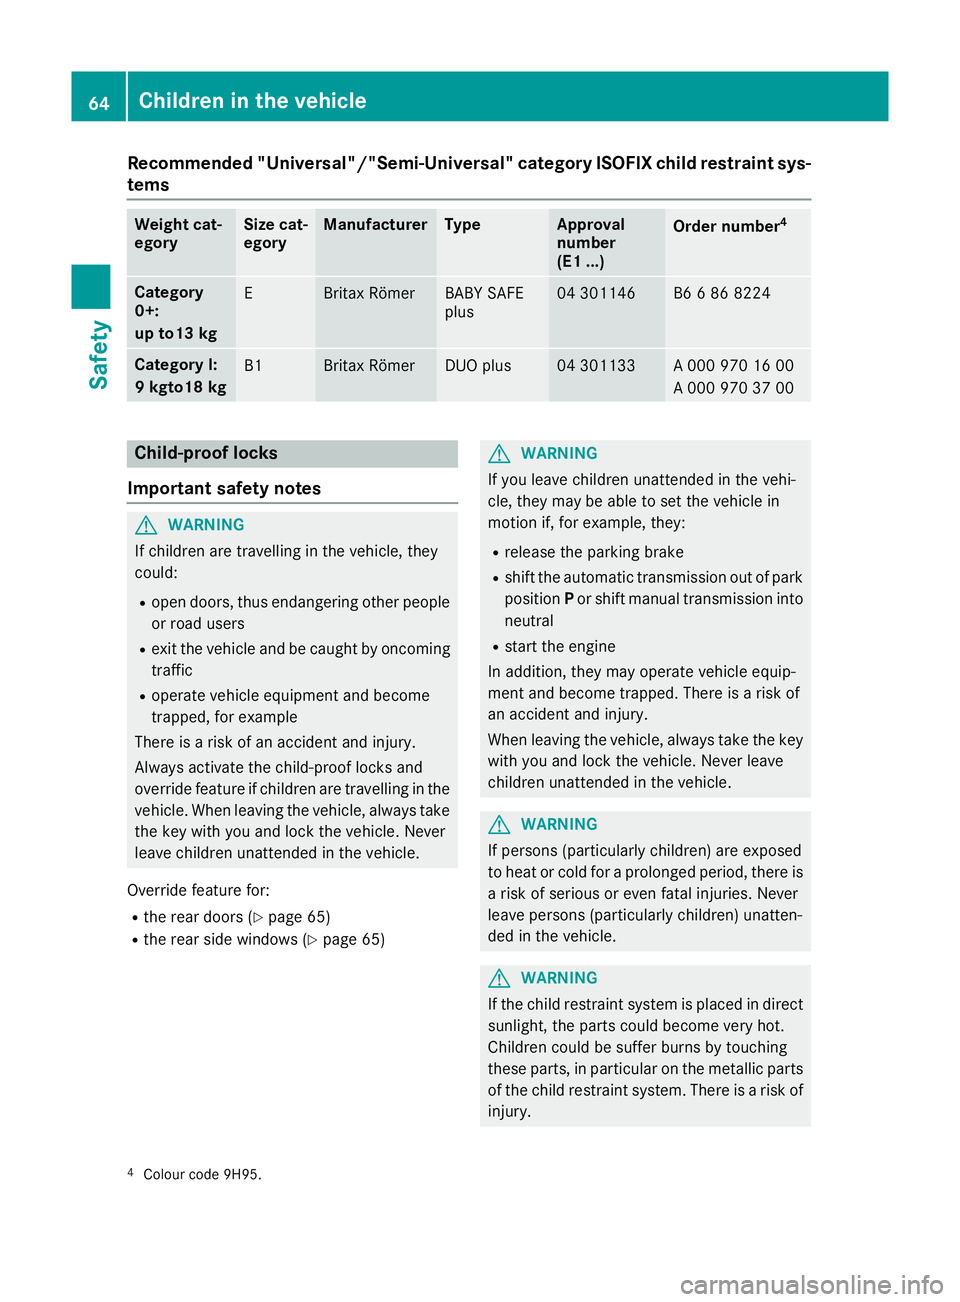
Recommended "Universal"/"Semi-Universal" category ISOFIX child restraint sys-
tems Weight cat-
egory Size cat-
egory Manufacturer Type Approval
number
(E1 ...)
Order number
4 Category
0+:
up to13 kg
E Britax Römer BABY SAFE
plus 04 301146 B6 6 86 8224
Category I:
9 kgto18 kg
B1 Britax Römer DUO plus 04 301133 A 000 970 16 00
A 000 970 37 00
Child-proof locks
Important safety notes G
WARNING
If children are travelling in the vehicle, they
could:
R open doors, thus endangering other people
or road users
R exit the vehicle and be caught by oncoming
traffic
R operate vehicle equipment and become
trapped, for example
There is a risk of an accident and injury.
Always activate the child-proof locks and
override feature if children are travelling in the vehicle. When leaving the vehicle, always take the key with you and lock the vehicle. Never
leave children unattended in the vehicle.
Override feature for:
R the rear doors (Y page 65)
R the rear side windows (Y page 65) G
WARNING
If you leave children unattended in the vehi-
cle, they may be able to set the vehicle in
motion if, for example, they:
R release the parking brake
R shift the automatic transmission out of park
position Por shift manual transmission into
neutral
R start the engine
In addition, they may operate vehicle equip-
ment and become trapped. There is a risk of
an accident and injury.
When leaving the vehicle, always take the key with you and lock the vehicle. Never leave
children unattended in the vehicle. G
WARNING
If persons (particularly children) are exposed
to heat or cold for a prolonged period, there is a risk of serious or even fatal injuries. Never
leave persons (particularly children) unatten-
ded in the vehicle. G
WARNING
If the child restraint system is placed in direct sunlight, the parts could become very hot.
Children could be suffer burns by touching
these parts, in particular on the metallic parts
of the child restraint system. There is a risk of injury.
4 Colour code 9H95. 64
Children in the vehicleSafety
Page 68 of 345
If you and your child leave the vehicle, always
make sure that the child restraint system is
not in direct sunlight. Cover it with a blanket, for example. If the child restraint system has
been exposed to direct sunlight, leave it to
cool down before securing the child in it.
Never leave children unattended in the vehi-
cle.
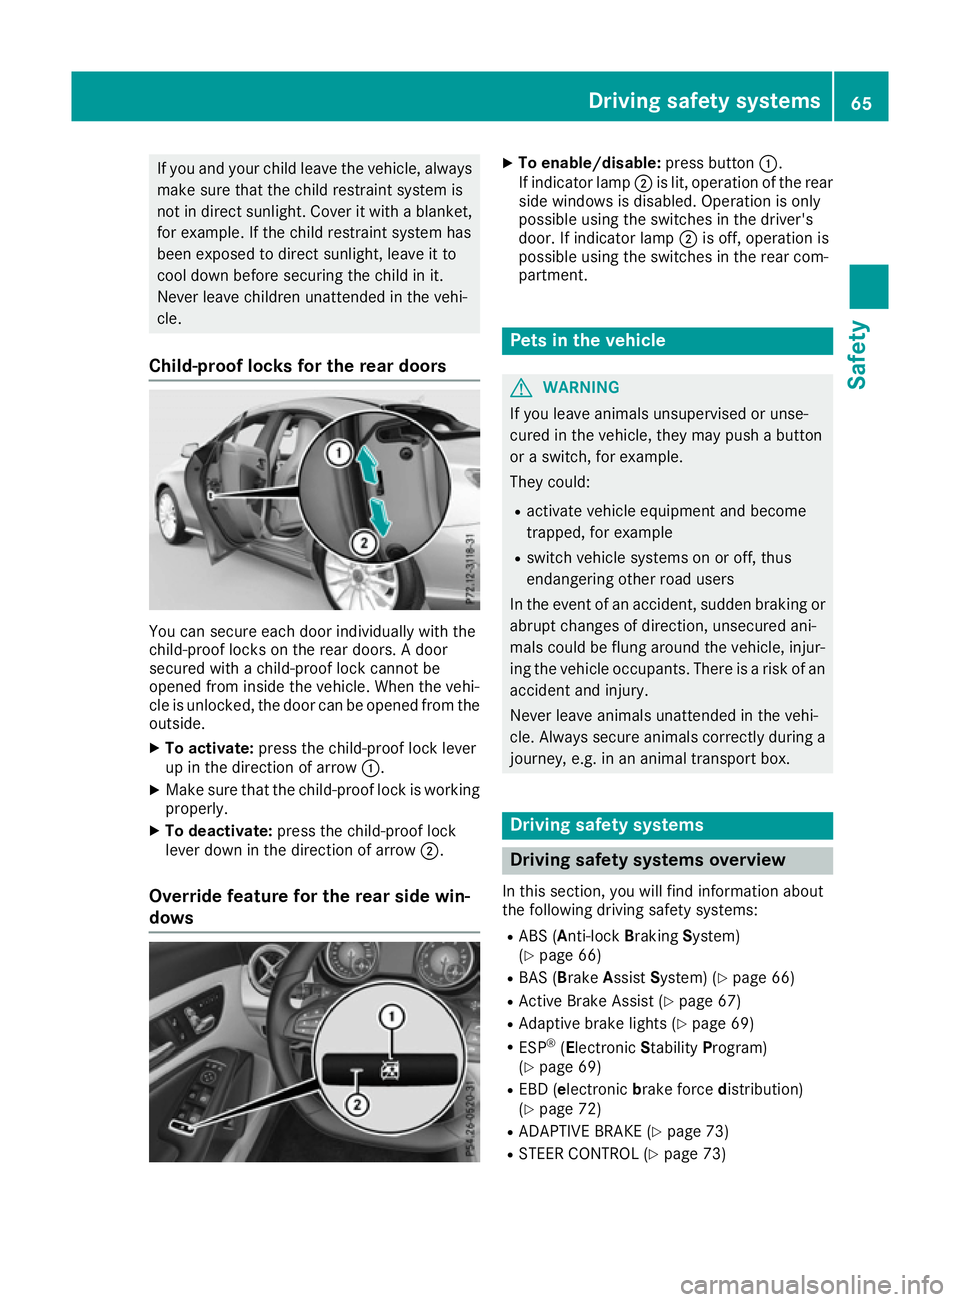
Child-proof locks for the rear doors You can secure each door individually with the
child-proof locks on the rear doors. A door
secured with a child-proof lock cannot be
opened from inside the vehicle. When the vehi-
cle is unlocked, the door can be opened from the
outside.
X To activate: press the child-proof lock lever
up in the direction of arrow :.
X Make sure that the child-proof lock is working
properly.
X To deactivate: press the child-proof lock
lever down in the direction of arrow ;.
Override feature for the rear side win-
dows X
To enable/disable: press button:.
If indicator lamp ;is lit, operation of the rear
side windows is disabled. Operation is only
possible using the switches in the driver's
door. If indicator lamp ;is off, operation is
possible using the switches in the rear com-
partment. Pets in the vehicle
G
WARNING
If you leave animals unsupervised or unse-
cured in the vehicle, they may push a button
or a switch, for example.
They could:
R activate vehicle equipment and become
trapped, for example
R switch vehicle systems on or off, thus
endangering other road users
In the event of an accident, sudden braking or
abrupt changes of direction, unsecured ani-
mals could be flung around the vehicle, injur-
ing the vehicle occupants. There is a risk of an accident and injury.
Never leave animals unattended in the vehi-
cle. Always secure animals correctly during a
journey, e.g. in an animal transport box. Driving safety systems
Driving safety systems overview
In this section, you will find information about
the following driving safety systems: R ABS (Anti-lock BrakingSystem)
(Y page 66)
R BAS ( Brake Assist System) (Y page 66)
R Active Brake Assist (Y page 67)
R Adaptive brake lights (Y page 69)
R ESP ®
(Electronic StabilityProgram)
(Y page 69)
R EBD ( electronic brake force distribution)
(Y page 72)
R ADAPTIVE BRAKE (Y page 73)
R STEER CONTROL (Y page 73) Driving safety systems
65Safety Z
Page 78 of 345
To prevent a false alarm, deactivate tow-away
protection if you lock your vehicle and it:
R is being transported
R is being loaded onto a ferry or car transporter,
for example
R is parked on a movable surface, e.g. in a split-
level garage Interior motion sensor
Function When the interior motion sensor is switched on,
a visual and audible alarm is triggered if move-
ment is detected in the vehicle interior. This can occur if someone reaches into the vehicle inte-
rior, for example.
Switching on X
Make sure that:
R the side windows are closed
R the panorama sliding sunroof is closed
R there are no objects, e.g. mascots, hanging
on the rear-view mirror or on the grab han- dles on the roof trim
This will prevent false alarms.
X Make sure that:
R the doors are closed
R the panorama sliding sunroof is closed
R the boot lid is closed
Only then is the interior motion sensor acti-
vated.
X Lock the vehicle with the key or KEYLESS-GO.
The interior motion sensor is primed after
approximately 30 seconds.
Switching off X
Unlock the vehicle with the key or KEYLESS-
GO.
or X Insert the key into the ignition lock.
or X Press the Start/Stop button.
The key must be in the vehicle.
The interior motion sensor is automatically
switched off. Deactivating
X
Remove the key from the ignition lock.
or X Vehicles with KEYLESS-GO start function
or KEYLESS-GO: switch off the engine using
the Start/Stop button and open the driver's
door.
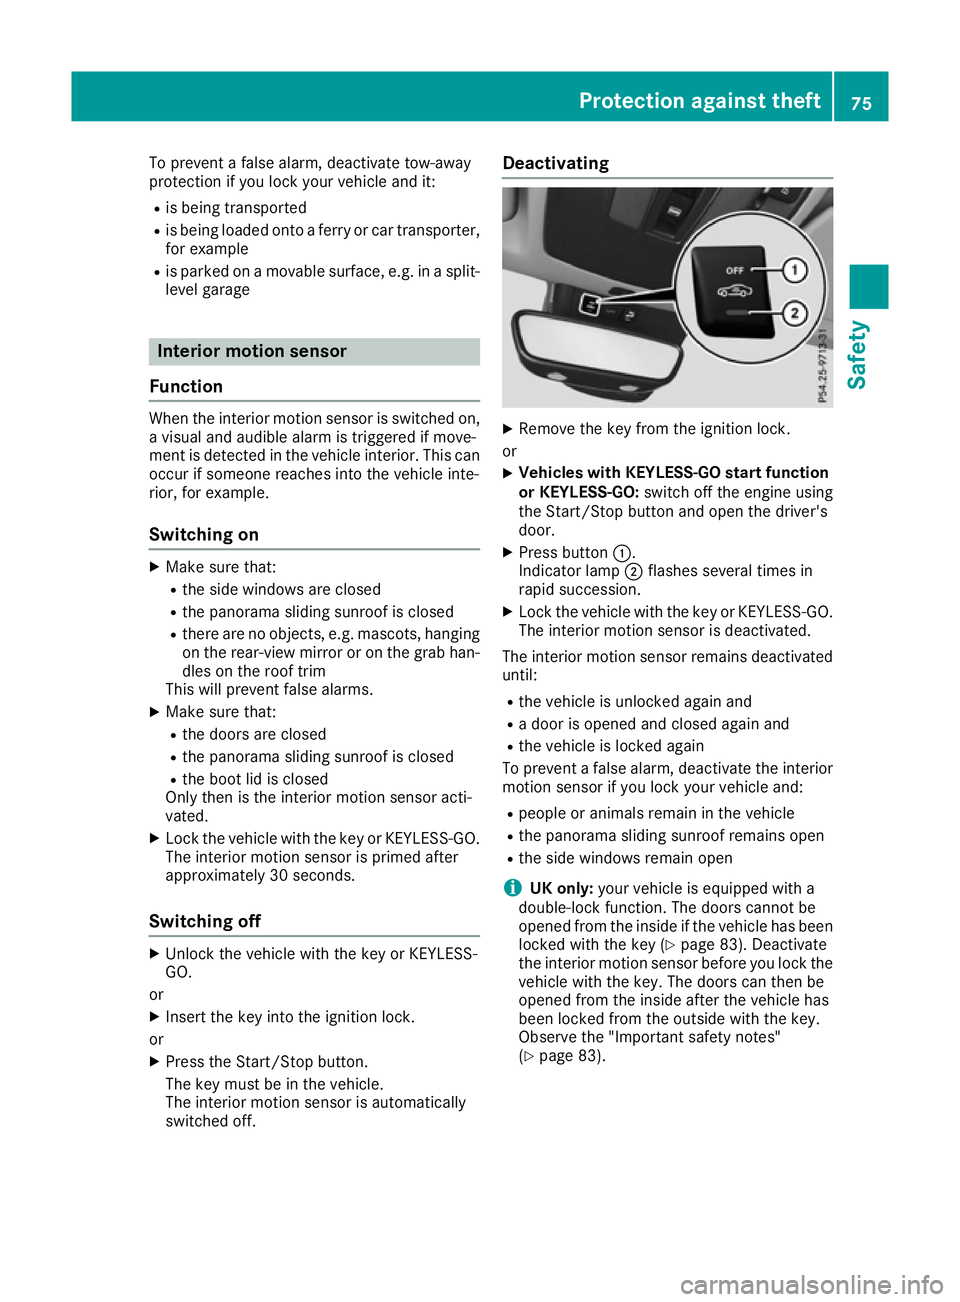
X Press button :.
Indicator lamp ;flashes several times in
rapid succession.
X Lock the vehicle with the key or KEYLESS-GO.
The interior motion sensor is deactivated.
The interior motion sensor remains deactivated
until:
R the vehicle is unlocked again and
R a door is opened and closed again and
R the vehicle is locked again
To prevent a false alarm, deactivate the interior
motion sensor if you lock your vehicle and:
R people or animals remain in the vehicle
R the panorama sliding sunroof remains open
R the side windows remain open
i UK only:
your vehicle is equipped with a
double-lock function. The doors cannot be
opened from the inside if the vehicle has been
locked with the key (Y page 83). Deactivate
the interior motion sensor before you lock the
vehicle with the key. The doors can then be
opened from the inside after the vehicle has
been locked from the outside with the key.
Observe the "Important safety notes"
(Y page 83). Protection against theft
75Safety Z
Page 79 of 345
Key
Important safety notes
G
WARNING
If children are left unsupervised in the vehicle, they could:
R open doors, thereby endangering other per-
sons or road users
R get out and be struck by oncoming traffic
R operate vehicle equipment and become
trapped, for example
In addition, the children could also set the
vehicle in motion, for example, if they:
R release the parking brake
R shift the automatic transmission out of park
position P or shift manual transmission into
neutral
R start the engine
There is a risk of an accident and injury.
When leaving the vehicle, always take the key with you and lock the vehicle. Never leave
children and animals unattended in the vehi-
cle. Keep the keys out of the reach of children. G
WARNING
If you attach heavy or large objects to the key, the key could be unintentionally turned in the
ignition lock. This could cause the engine to
be switched off. There is a risk of an accident.
Do not attach any heavy or large objects to the
key. Remove any bulky keyrings before insert-
ing the key into the ignition lock.
! Keep the key away from strong magnetic
fields. Otherwise, the remote control function could be affected.
Strong magnetic fields can occur in the vicin-
ity of powerful electrical installations.
Do not keep the key: R with electronic devices, e.g. a mobile phone
or another key
R with metallic objects, e.g. coins or metal foil
R inside metallic objects, e.g. a metal case
Vehicles with KEYLESS-GO start function: do
not keep the key in the boot. Otherwise, the key may not be detected, e.g. when starting the
engine using the Start/Stop button.
United Kingdom only: G
WARNING
When the double locks are activated, the
doors can no longer be opened from the
inside. People in the vehicle can no longer get out, e.g. in hazardous situations. There is a
risk of injury.
Therefore, do not leave any people unsuper-
vised in the vehicle, particularly children, eld-
erly people or people in need of special assis-
tance. Do not activate the double lock when
people are in the vehicle.
If the vehicle has been locked from the outside, the double lock function is activated as stand-
ard. It is then not possible to open the doors
from inside the vehicle. You can deactivate the
double lock function by deactivating the interior
motion sensor (Y page 75). The doors can then
be opened from the inside after the vehicle has
been locked from the outside. You can open the rear doors from inside the vehicle if they are not
secured by the child-proof locks (Y page 65).
The anti-theft alarm system is triggered if the
door is opened from the inside. Switch off the
alarm (Y page 73). Key functions
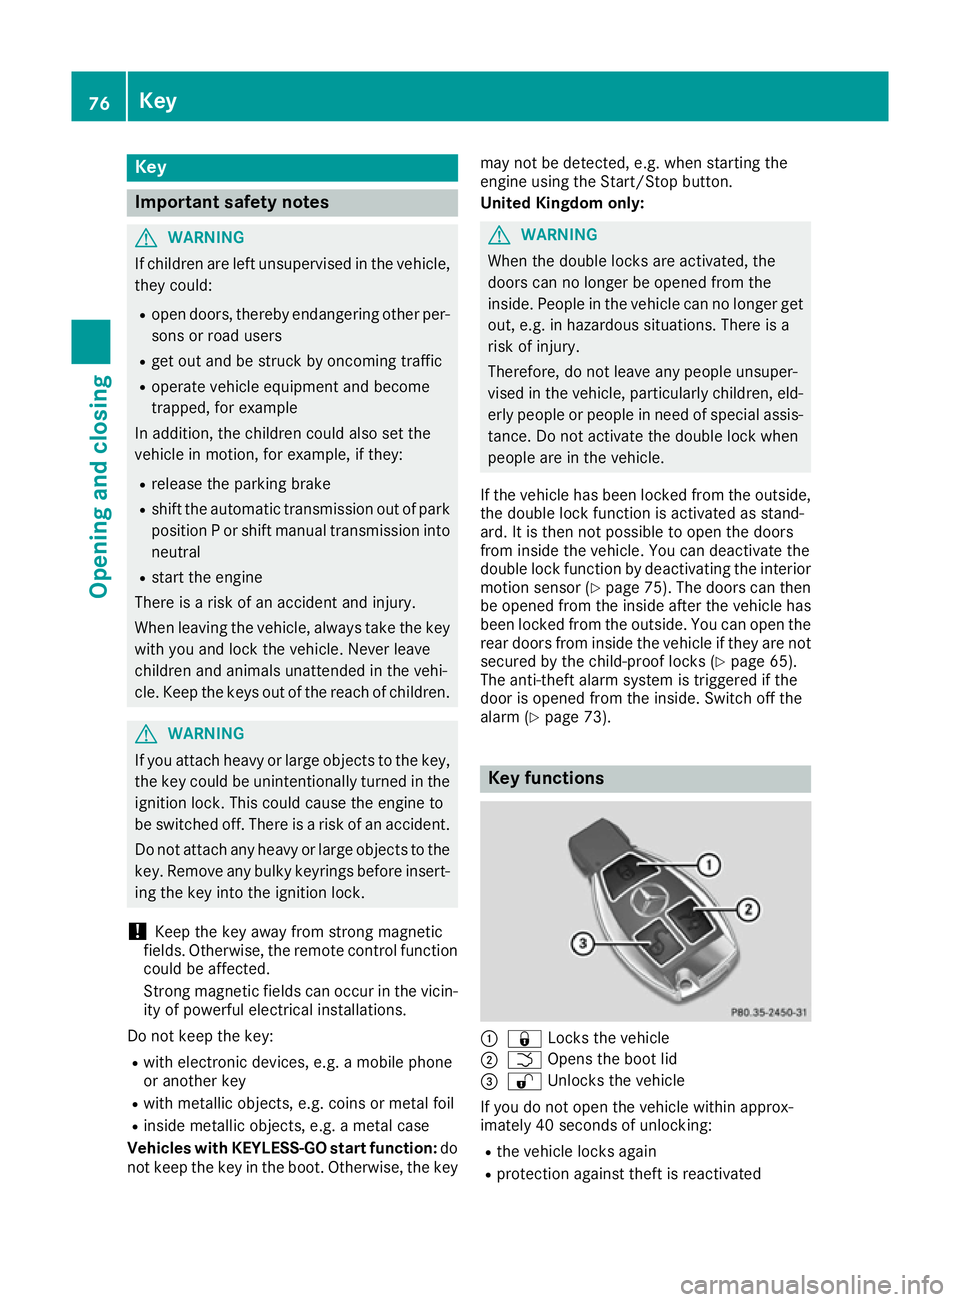
:
& Locks the vehicle
; F Opens the boot lid
= % Unlocks the vehicle
If you do not open the vehicle within approx-
imately 40 seconds of unlocking:
R the vehicle locks again
R protection against theft is reactivated 76
KeyOpening and closing