AUX MERCEDES-BENZ CLA COUPE 2016 Owners Manual
[x] Cancel search | Manufacturer: MERCEDES-BENZ, Model Year: 2016, Model line: CLA COUPE, Model: MERCEDES-BENZ CLA COUPE 2016Pages: 345, PDF Size: 12.41 MB
Page 8 of 345
Anti-Theft Alarm system
see ATA (Anti-Theft Alarm system)
Aquaplaning ...................................... .161
Ashtray ............................................... 275
Assistance display (on-board com-
puter) ................................................. .208
Assistance menu (on-board com-
puter) ................................................. .208
ASSYST PLUS
Displaying a service message ....... .285
Driving abroad ............................... 285
Hiding a service message .............. 285
Information about Service ............. 285
Resetting the service interval dis-
play ................................................ 285
Service message ............................ 284
Special service requirements ......... 285
ATA (Anti-Theft Alarm system)
Activating/deactivating ................... 73
Function .......................................... .73
Switching off the alarm .................... 73
ATTENTION ASSIST
Activating/deactivating ................. 209
Display message ............................ 234
Function/note s............................. 189
Audio 20
Switching on/of f........................... 259
Audio menu (on-board computer) .... 206
Authorised workshop
see Qualified specialist workshop
AUTO lights
Display message ............................ 230
see Lights
Automatic engine start (ECO start/
stop function) .................................... 138
Automatic engine switch-off (ECO
start/stop function) .......................... 137
Automatic front-passenger front
airbag deactivation
Display message ............................ 226
Automatic front-passenger front
airbag deactivation system
Operation ......................................... 47
Problems ......................................... 50
System self-test ............................... 49
Automatic headlamp mode .............. 107Automatic transmission
Accelerator pedal position ............. 147
Changing gear ............................... 147
DIRECT SELECT lever ..................... 144
Drive program display .................... 144
Drive programs .............................. 148
Driving tips .................................... 147
DYNAMIC SELECT button (all vehi-
cles except Mercedes-AMG vehi-
cles) ............................................... 141
DYNAMIC SELECT controller
(Mercedes-AMG vehicles) .............. 141
Emergency running mod e.............. 152
Engaging drive position .................. 145
Engaging neutral ............................ 145
Engaging park position
(Mercedes-AMG vehicles) .............. 146
Engaging park position automati-
cally ............................................... 144
Engaging reverse gear ................... 145
Engaging the park position ............ 144
Holding the vehicle stationary on
uphill gradients .............................. 148
Kickdown ....................................... 148
Manual shifting .............................. 150
Oil temperature (on-board com-
puter, Mercedes-AMG vehicles) ..... 213
Overview ........................................ 143
Problem (fault) ............................... 152
Pulling away ................................... 135
Selector lever ................................ 146
Starting the engine ........................ 135
Steering wheel gearshift paddle s... 150
Trailer towing ................................. 148
Transmission position display ........ 146
Transmission position display
(DIRECT SELECT lever) ................... 144
Transmission positions .................. 147
Automatic transmission emer-
gency running mode ......................... 152
Auxiliary heating
Activating/deactivating ................. 127
Activating/deactivating (on the
centre console ).............................. 127
Remote control .............................. 127
Setting ........................................... 211
Auxiliary heating/ventilation
Display message ............................ 245 Index
5
Page 9 of 345
Important safety notes .................. 126
Problem (display message) ............ 130
Setting the departure time .............1
28
Auxiliary ventilation
Activating/deactivating ................. 127
Activating/deactivating (on the
centre console ).............................. 127
Remote control .............................. 127
Axle load, permissible (trailer tow-
ing) ...................................................... 334 B
Back button ....................................... 260
Ball coupling
Folding in ....................................... 197
Folding in/out ................................ 197
Folding out ..................................... 197
BAS (Brake Assist System) ................. 66
Battery (key)
Checking .......................................... 79
Important safety notes .................... 79
Replacing ......................................... 79
Battery (vehicle)
Charging ........................................ 301
Display message ............................ 232
Important safety notes .................. 299
Jump starting ................................. 301
Belt
see Seat belts
Belt tensioner
Activation ......................................... 51
Blind Spot Assist
Activating/deactivating (on-
board computer) ............................ 209
Display message ............................ 235
Notes/function .............................. 192
Trailer towing ................................. 193
Blootooth ®
Connecting a different mobile
phone ............................................ 263
Bluetooth ®
Searching for a mobile phone ........ 263
See also Digital Owner's Manua l... 259
Telephony ...................................... 262
Bonnet
Active bonnet (pedestrian protec-tion) ............................................... 280 Closing ........................................... 282
Display message ............................ 244
Important safety notes .................. 280
Opening ......................................... 281
Boot
Emergency release .......................... 88
Important safety notes .................... 86
Opening (automatically from out-
side) ................................................. 87
Opening (from outside the vehi-
cle, HANDS-FREE ACCESS) .............. 87
Opening automatically from
inside ............................................... 88
Opening/closing (manually from
outside) ............................................ 86
Boot lid
Display message ............................ 244
Opening dimensions ...................... 333
Boot load (maximum) ........................ 333
Brake
EBD .................................................. 72
Brake Assist
see BAS (Brake Assist System)
Brake fluid
Display message ............................ 223
Notes ............................................. 331
Brake force distribution
see EBD (electronic brake force
distribution)
Brake lamp
Replacing bulb s............................. 113
Brake lamps
Adaptive ........................................... 69
Display message ............................ 229
Brakes
ABS .................................................. 66
BAS .................................................. 66
Brake fluid (notes) ......................... 331
Braking assistance appropriate to
the situation ..................................... 68
Display message ............................ 217
Driving tip s.................................... 160
Hill start assist ............................... 136
HOLD function ............................... 172
Important safety notes .................. 160
Parking brake ................................ 157
Warning lamp ................................. 249 6
Index
Page 10 of 345
Braking assistance appropriate to
the situation
Function/note s................................ 68
Breakdown
Where will I find...? ........................ 293
see Flat tyre
see Tow-starting
see Towing away
Buttons on the steering column ...... 201C
Calling up a fault see Display messages
Car
see Vehicle
Car wash (care) ................................. 286
Care
Automatic car wash ....................... 286
Carpets .......................................... 292
Display ........................................... 290
Exhaust pipe .................................. 290
Exterior lighting ............................. 289
Gear or selector lever .................... 291
High-pressure cleaner .................... 287
Interior ........................................... 290
Matt paintwork .............................. 287
Note s............................................. 286
Paint .............................................. 287
Plastic trim .................................... 290
Reversing camera .......................... 289
Roof lining ...................................... 292
Seat belt ........................................ 291
Seat cove r..................................... 291
Sensors ......................................... 289
Steering wheel ............................... 291
Trim pieces .................................... 291
Washing by hand ........................... 286
Wheels ........................................... 288
Windows ........................................ 288
Wiper blades .................................. 288
Wooden trim .................................. 291
CD
See also Digital Owner's Manua l... 259
CD player (on-board computer) ........ 206
Central locking
Automatic locking (on-board com-puter) ............................................. 211 Locking/unlocking (key) .................. 76
Centre console
Lower section .................................. 35
Upper section .................................. 34
Child
Restraint system .............................. 54
Child seat
Forward-facing restraint system ...... 59
i-Size ................................................ 55
ISOFIX .............................................. 55
On the front-passenger seat ............ 57
Rearward-facing restraint system .... 58
Recommendations ........................... 63
Suitable positions ............................ 59
Top Tether ....................................... 56
Child-proof locks
Important safety notes .................... 64
Rear doors ....................................... 65
Cigarette lighter ................................ 276
Cleaning
Mirror turn signal ........................... 289
Trailer tow hitch ............................. 290
Climate control
Air conditioning ............................. 118
Auxiliary heating/ventilation .......... 126
Controlling automaticall y............... 121
Convenience opening/closing
(air-recirculation mode) ................. 125
Cooling with air dehumidification .. 121
Demisting the windows .................. 124
Demisting the windscreen ............. 123
Indicator lamp ................................ 121
Information on using
THERMOTRONIC automatic cli-
mate control .................................. 120
Notes on using the air-condition-
ing system ..................................... 118
Overview of systems ...................... 117
Problem with the rear window
heating .......................................... 124
Problems with cooling with air
dehumidification ............................ 121
Setting the air distribution ............. 122
Setting the air vents ...................... 130
Setting the airflow ......................... 123
Setting the temperature ................ 122
Switching air-recirculation mode
on/of f............................................ 124 Index
7
Page 20 of 345
Rear-compartment seat belt sta-
tus indicator
........................................ 44
Rear-view mirror
Anti-dazzle mode (automatic) ........ 104
Dipping (manual) ........................... 103
Refuelling
Fuel gaug e....................................... 32
Important safety notes .................. 152
Notes for Mercedes‑ AMG vehi-
cles ................................................ 329
Refuelling process ......................... 153
see Fuel
Remote control
Auxiliary heating/ventilation .......... 127
Changing the batteries (auxiliary
heating) ......................................... 129
Replacing bulbs
Brake lamp .................................... 113
Dipped-beam headlamp s............... 112
Fitting/removing the cover (front
wheel arch) .................................... 112
Important safety notes .................. 111
Main-beam headlamp s................... 113
Overview of bulb types .................. 112
Rear fog lamp ................................ 113
Turn signals (front) ......................... 113
Turn signals (rear) .......................... 113
Replacing the battery (auxiliary
heating remote control) .................... 129
Rescue card ......................................... 28
Reserve (fuel tank)
see Fuel
Reserve fuel
Display message ............................ 234
Warning lamp ................................. 255
Residual heat (climate control) ........ 126
Restraint system
Display message ............................ 225
Introduction ..................................... 39
Warning lamp ................................. 254
Warning lamp (function) ................... 40
Rev counter ........................................ 200
Reverse gear
Engaging (manual transmission) .... 142
Reverse gear (selector lever) ........... 146
Reversing camera
"Reverse parking" function ............ 186 Cleaning instructions ..................... 289
Coupling up a trailer function ........ 188
Display in the multimedia system .. 185
Function/note s............................. 184
General notes ................................ 184
Switching on/of f........................... 185
Reversing feature
Panorama sliding sunroo f................ 93
Side windows ................................... 89
Reversing function
Roller sunblind ................................. 94
Reversing lamps
Display message ............................ 230
Roller sunblind
Panorama sliding sunroo f................ 94
Roof carrier ........................................ 273
Roof lining and carpets (cleaning
instructions) ...................................... 292
Roof load (maximum) ........................ 333
Route guidance
See also Digital Owner's Manua l... 259 S
Safety Children in the vehicle ..................... 54
see Occupant safety
Safety system
see Driving safety systems
SD card
Inserting ........................................ 267
Inserting/removing ........................ 267
Removing ....................................... 267
SD memory card
See also Digital Owner's Manua l... 259
Seat
Adjusting (Performance Seat) ........ 101
Folding the backrest (rear com-
partment) forwards/back .............. 271
Seat belt
Correct usage .................................. 42
Switching belt adjustment on/off
(on-board computer) ...................... 212
Seat belts
Adjusting the driver's and front-
passenger seat belt ......................... 43
Adjusting the height ......................... 43
Cleaning ......................................... 291 Index
17
Page 37 of 345
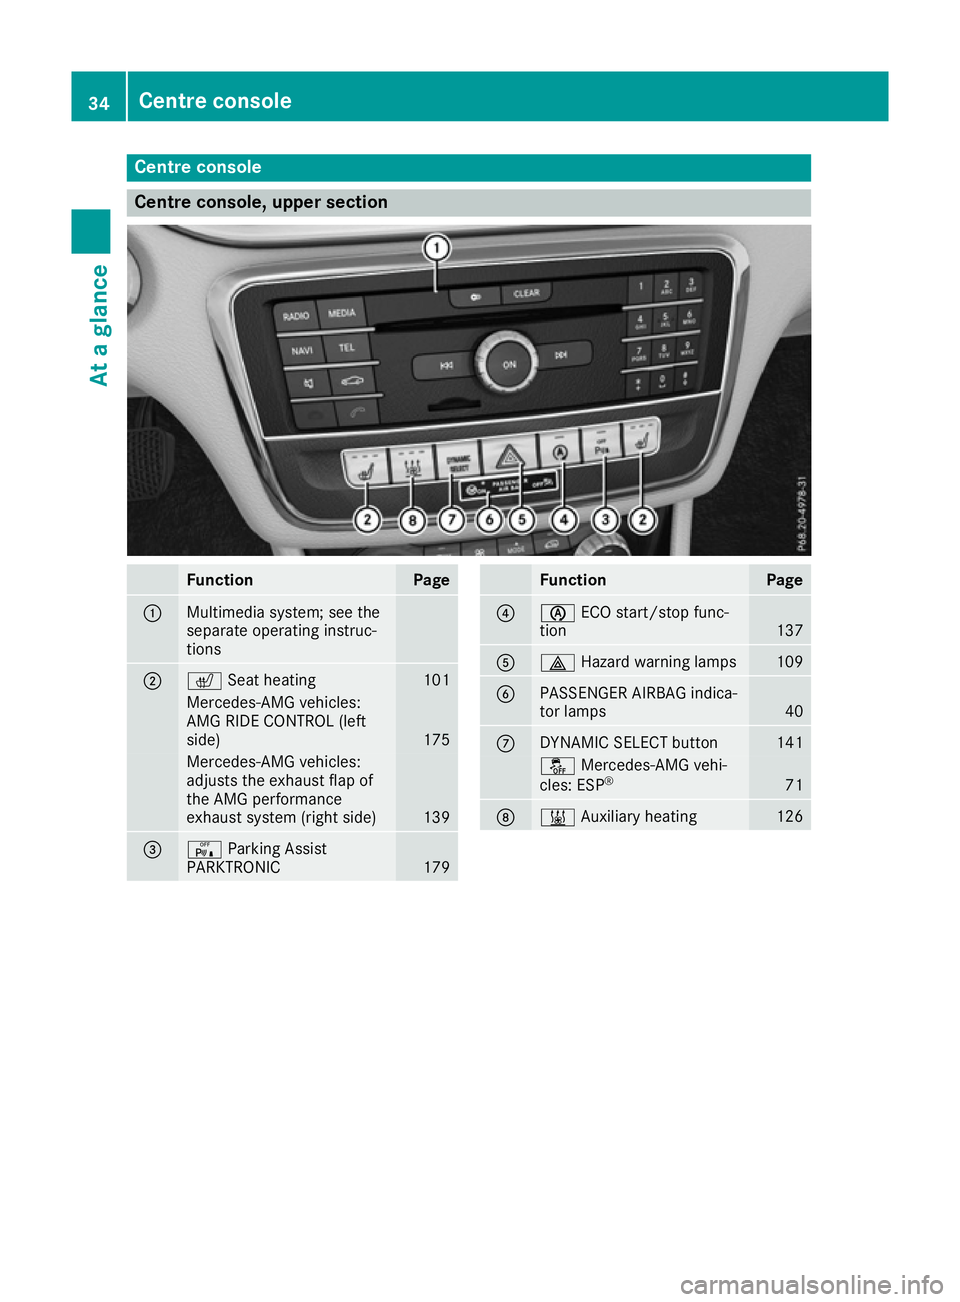
Centre console
Centre console, upper section
Function Page
:
Multimedia system; see the
separate operating instruc-
tions
;
c
Seat heating 101
Mercedes-AMG vehicles:
AMG RIDE CONTROL (left
side) 175
Mercedes-AMG vehicles:
adjusts the exhaust flap of
the AMG performance
exhaust system (right side) 139
=
c
Parking Assist
PARKTRONIC 179 Function Page
?
è
ECO start/stop func-
tion 137
A
£
Hazard warning lamps 109
B
PASSENGER AIRBAG indica-
tor lamps 40
C
DYNAMIC SELECT button 141
å
Mercedes-AMG vehi-
cles: ESP ® 71
D
&
Auxiliary heating 12634
Centre consoleAt a glance
Page 120 of 345
Overview of climate control systems
General notes
Observe the settings recommended on the fol-
lowing pages. Otherwise, the windows could
mist up.
To prevent the windows from misting up:
R switch off climate control only briefly
R activate air-recirculation mode only briefly
R switch on "Cooling with air dehumidification"
R activate the "Windscreen demisting" function
briefly, if required
The air-conditioning system or THERMOTRONIC
automatic climate control regulates the temper- ature and the humidity of the vehicle interior andfilters undesirable substances from the air.
The air-conditioning system or THERMOTRONIC automatic climate control can only be operatedwhen the engine is running. Optimum operationis only achieved with the side windows and pan-
orama sliding sunroof closed.
The residual heat function can only be activated or deactivated with the ignition switched off
(Y page 126).
Always keep the ventilation flaps behind the
side panelling clear (Y page 113). Otherwise the
vehicle will not be ventilated correctly.
i Ventilate the vehicle for a brief period during
warm weather, e.g. using the convenience
opening feature (Y page 90). This will speed up the cooling process and the desired inte-
rior temperature will be reached more
quickly.
i The integrated filter filters out most parti-
cles of dust and soot and completely filters
out pollen. With THERMOTRONIC automatic
climate control, gaseous pollutants and
odours will also be reduced. A clogged filter
reduces the amount of air supplied to the
vehicle interior. For this reason, you should
always observe the interval for replacing the
filter, which is specified in the Service Book-
let. As this depends on environmental condi-
tions, e.g. heavy air pollution, the interval may be shorter than stated in the Service Booklet.
i Vehicles with auxiliary heating:
Under
certain environmental conditions, the resid-
ual heat function may be activated automati-
cally an hour after the ignition key has been
removed in order to dry the automatic climate
control. The blue LED on the rocker switch in the centre console lights up when the active
function to dry the automatic climate control is on. The vehicle is then ventilated for
30 minutes.
Vehicles without auxiliary heating: Under
certain environmental conditions, the resid-
ual heat function may be activated automati-
cally an hour after the ignition key has been
removed in order to dry the automatic climate control. The vehicle is then ventilated for
30 minutes. Overview of climate control systems
117Climate control
Page 129 of 345
with the convenience closing feature, they
will remain in this position when opened using
the convenience opening feature. Switching the residual heat on/off
General notes The residual heat function is only available with
THERMOTRONIC automatic climate control.
It is possible to make use of the residual heat of the engine to continue heating the vehicle for
approximately 30 minutes after the engine has
been switched off. The heating time depends on
the set interior temperature.
i The blower will run at a low speed regardless
of the airflow setting.
i If you switch on the residual heat function at
high temperatures, only the ventilation will be
activated. The blower runs at medium speed.
i You cannot use the ventilation to cool the
vehicle interior to a temperature lower than
the outside temperature.
Activating/deactivating X
Turn the key to position 0in the ignition lock
or remove it (Y page 133).
X Press the Ìbutton.
The indicator lamp in the Ìbutton lights
up or goes out.
The indicator lamp in the button indicates that the respective function is activated.
i Residual heat is switched off automatically:
R after approximately 30 minutes
R when the ignition is switched on
R if the battery voltage drops
R when the auxiliary heating is switched on Auxiliary heating
Important safety notes G
DANGER
If the exhaust pipe is blocked or sufficient
ventilation is not possible, toxic exhaust
fumes can enter the vehicle, especially car- bon monoxide. This is the case, e.g. in
enclosed spaces, or if the vehicle is stuck in
snow. There is a risk of fatal injuries.
You should switch off the auxiliary heating in
enclosed spaces which do not have an extrac- tion system, e.g. a garage. If the vehicle is
stuck in snow and you must leave the auxiliary
heating running, keep the exhaust pipe and
the area around the vehicle clear of snow. To guarantee a sufficient supply of fresh air, open
a window on the side of the vehicle away from the wind. G
WARNING
When the auxiliary heating is switched on,
parts of the vehicle can become very hot.
Flammable materials such as leaves, grass or twigs may ignite if they come into contact
with:
R hot parts of the exhaust system
R the exhaust gas itself
There is a risk of fire.
When the auxiliary heating is switched on,
make sure that:
R no flammable materials come into contact
with hot vehicle components
R the exhaust gas can escape from the
exhaust pipe unhindered
R the exhaust gas does not come into contact
with flammable materials.
The auxiliary heating and the exhaust gas outlet are situated in front of the right-hand front
wheel.
! Operating the auxiliary heating/ventilation
draws on the vehicle battery. After you have
heated or ventilated the vehicle a maximum of two times, drive for a longer distance.
Switch the auxiliary heating on regularly once a
month for about ten minutes.
The auxiliary heating timer function calculates
the switch-on time according to the outside
temperature so that the vehicle is preheated by the departure time. When the departure time isreached, the auxiliary heating continues to heat
for a further five minutes and then switches off. 126
Operating the climate control systemClimate control
Page 130 of 345
The auxiliary heating heats the air in the vehicle
interior to the set temperature. This occurs with- out using the heat of the running engine. The
auxiliary heating is operated directly using the
vehicle's fuel. For this reason, the fuel tank must
be at least Õfull to ensure that the auxiliary
heating functions.
The auxiliary heating/ventilation automatically
adjusts to changes in temperature and weather conditions. For this reason, the auxiliary heating could switch from ventilation mode to heating
mode or from heating mode to ventilation mode.
The auxiliary heating switches off when the
engine is switched off. The auxiliary ventilation
switches off when you turn the key to key posi-
tion 2(Y page 133).
The auxiliary heating switches off automatically
after 50 minutes.
You cannot use the auxiliary ventilation to cool
the vehicle interior to a temperature lower than
the outside temperature.
Before switching on X
Turn the key to position 2in the ignition lock
(Y page 133).
X Set the desired temperature.
Auxiliary heating or ventilation can also be
switched on if the manually set climate control is
activated. Optimum comfort is attained by set-
ting the system to automatic mode. Set the tem-
perature to 22 †.
The auxiliary heating or auxiliary ventilation can be switched on/off using the button on the
centre console or the remote control.
The on-board computer can be used to specify
up to three departure times, one of which may
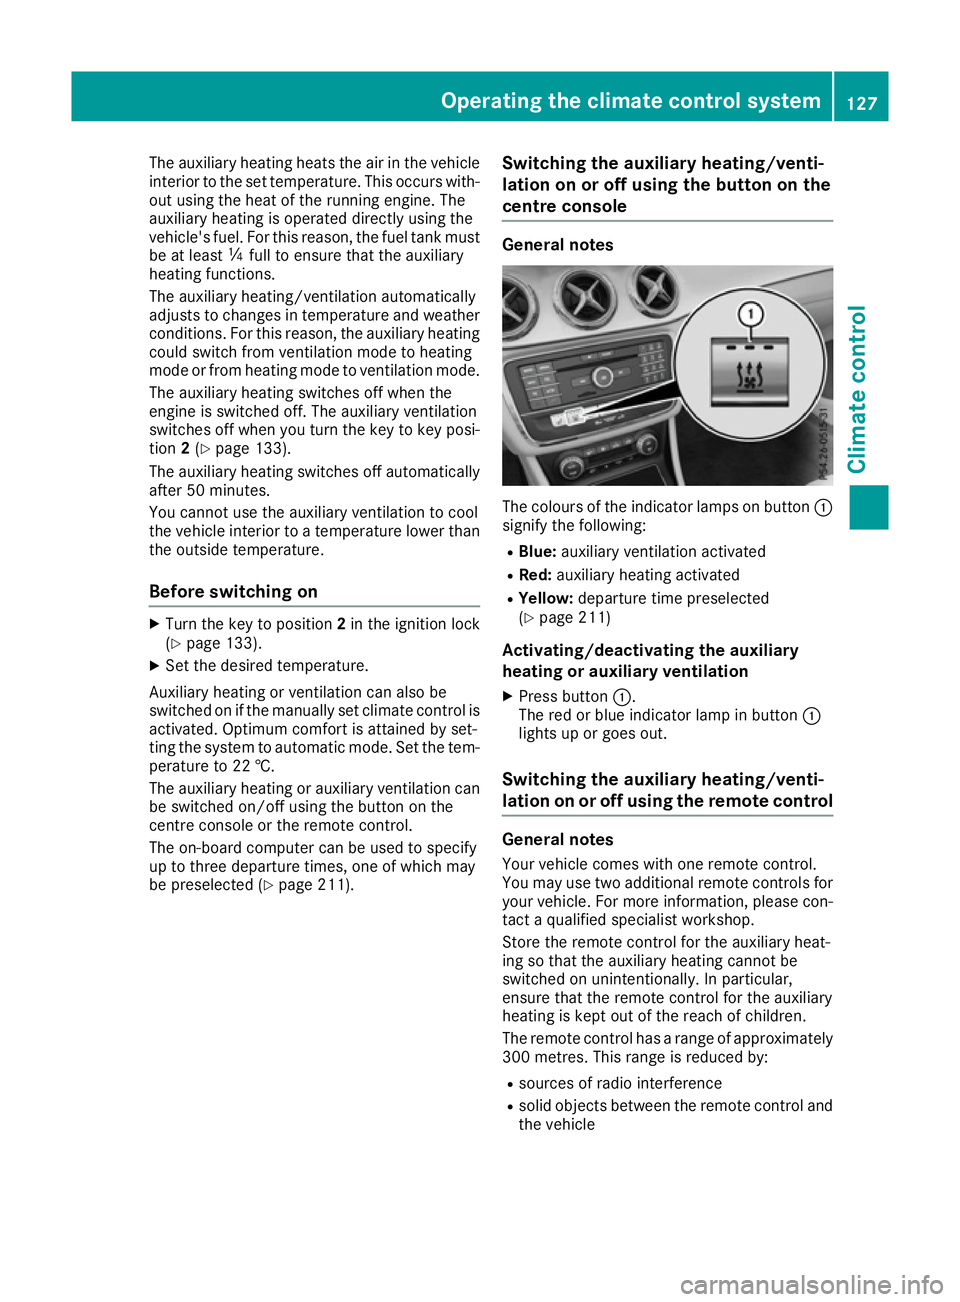
be preselected (Y page 211). Switching the auxiliary heating/venti-
lation on or off using the button on the
centre console General notes
The colours of the indicator lamps on button
:
signify the following:
R Blue: auxiliary ventilation activated
R Red: auxiliary heating activated
R Yellow: departure time preselected
(Y page 211)
Activating/deactivating the auxiliary
heating or auxiliary ventilation
X Press button :.
The red or blue indicator lamp in button :
lights up or goes out.
Switching the auxiliary heating/venti-
lation on or off using the remote control General notes
Your vehicle comes with one remote control.
You may use two additional remote controls for
your vehicle. For more information, please con-
tact a qualified specialist workshop.
Store the remote control for the auxiliary heat-
ing so that the auxiliary heating cannot be
switched on unintentionally. In particular,
ensure that the remote control for the auxiliary
heating is kept out of the reach of children.
The remote control has a range of approximately
300 metres. This range is reduced by:
R sources of radio interference
R solid objects between the remote control and
the vehicle Operating the climate control system
127Climate control Z
Page 131 of 345
R
the remote control being in an unfavourable
position in relation to the vehicle
R transmitting from an enclosed space
If the remote control battery is low, the battery
symbol on the left of the display is shown as
empty. Replace the remote control battery and
observe the important safety notes when doing so (Y page 129).
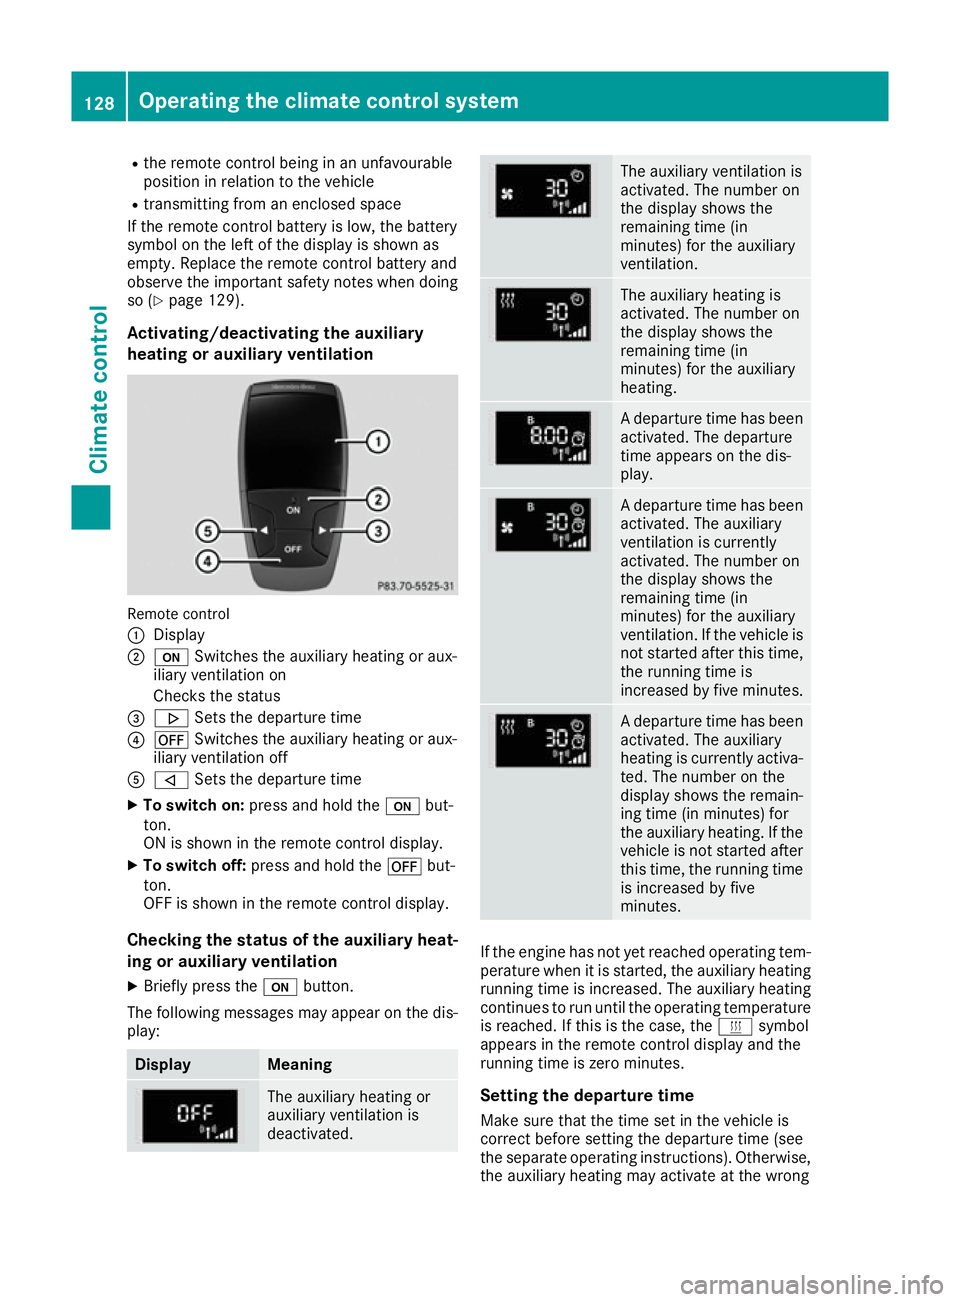
Activating/deactivating the auxiliary
heating or auxiliary ventilation Remote control
:
Display
; u Switches the auxiliary heating or aux-
iliary ventilation on
Checks the status
= . Sets the departure time
? ^ Switches the auxiliary heating or aux-
iliary ventilation off
A , Sets the departure time
X To switch on: press and hold the ubut-
ton.
ON is shown in the remote control display.
X To switch off: press and hold the ^but-
ton.
OFF is shown in the remote control display.
Checking the status of the auxiliary heat-
ing or auxiliary ventilation
X Briefly press the ubutton.
The following messages may appear on the dis- play: Display Meaning
The auxiliary heating or
auxiliary ventilation is
deactivated. The auxiliary ventilation is
activated. The number on
the display shows the
remaining time (in
minutes) for the auxiliary
ventilation.
The auxiliary heating is
activated. The number on
the display shows the
remaining time (in
minutes) for the auxiliary
heating.
A departure time has been
activated. The departure
time appears on the dis-
play. A departure time has been
activated. The auxiliary
ventilation is currently
activated. The number on
the display shows the
remaining time (in
minutes) for the auxiliary
ventilation. If the vehicle is
not started after this time, the running time is
increased by five minutes. A departure time has been
activated. The auxiliary
heating is currently activa-
ted. The number on the
display shows the remain-
ing time (in minutes) for
the auxiliary heating. If the
vehicle is not started after this time, the running time
is increased by five
minutes. If the engine has not yet reached operating tem-
perature when it is started, the auxiliary heating running time is increased. The auxiliary heating
continues to run until the operating temperature
is reached. If this is the case, the ysymbol
appears in the remote control display and the
running time is zero minutes.
Setting the departure time
Make sure that the time set in the vehicle is
correct before setting the departure time (see
the separate operating instructions). Otherwise, the auxiliary heating may activate at the wrong 128
Operating the climate control systemClimate control
Page 132 of 345
time and at an unsuitable location. When setting
the departure time, observe the important
safety notes (Y page 126).
X Briefly press the ubutton.
X Press the ,or. button repeatedly
until the time to be changed appears in the
display.
X Press the uand^ buttons at the same
time.
The Îsymbol in the remote control display
flashes.
X Press the ,or. button to set the
desired departure time.
i The longer you press the
,or. but-
ton, the faster the time changes.
X Press the uand^ buttons at the same
time.
The new departure time is stored.
Activating the set departure time X Briefly press the ubutton.
X Press the ,or. button repeatedly
until the desired departure time appears in
the display.
X Press the ubutton.
The Ísymbol, the departure time and,
depending on the selected departure time,
the letter A, BorCappear in the display.
Deactivating the set departure time
X Briefly press the ubutton.
The status of the auxiliary heating is shown on
the display.
X Press the .button.
The first departure time stored appears on the
display.
X Press the ^button.
OFF is shown in the remote control display.
Replacing the remote control battery Important safety notes
G
WARNING
Batteries contain toxic and corrosive substan- ces. If batteries are swallowed, it can result in
severe health problems. There is a risk of fatal injury. Keep batteries out of the reach of children. If
a battery is swallowed, seek medical attention
immediately. H
Environmental note Batteries contain pollutants.
It is illegal to dispose of them
with the household rubbish.
They must be collected sep-
arately and disposed of in anenvironmentally responsible
recycling system. Dispose of batteries in an
environmentally responsible
manner. Take discharged
batteries to a qualified spe-
cialist workshop or to a col-
lection point for used batter-
ies.
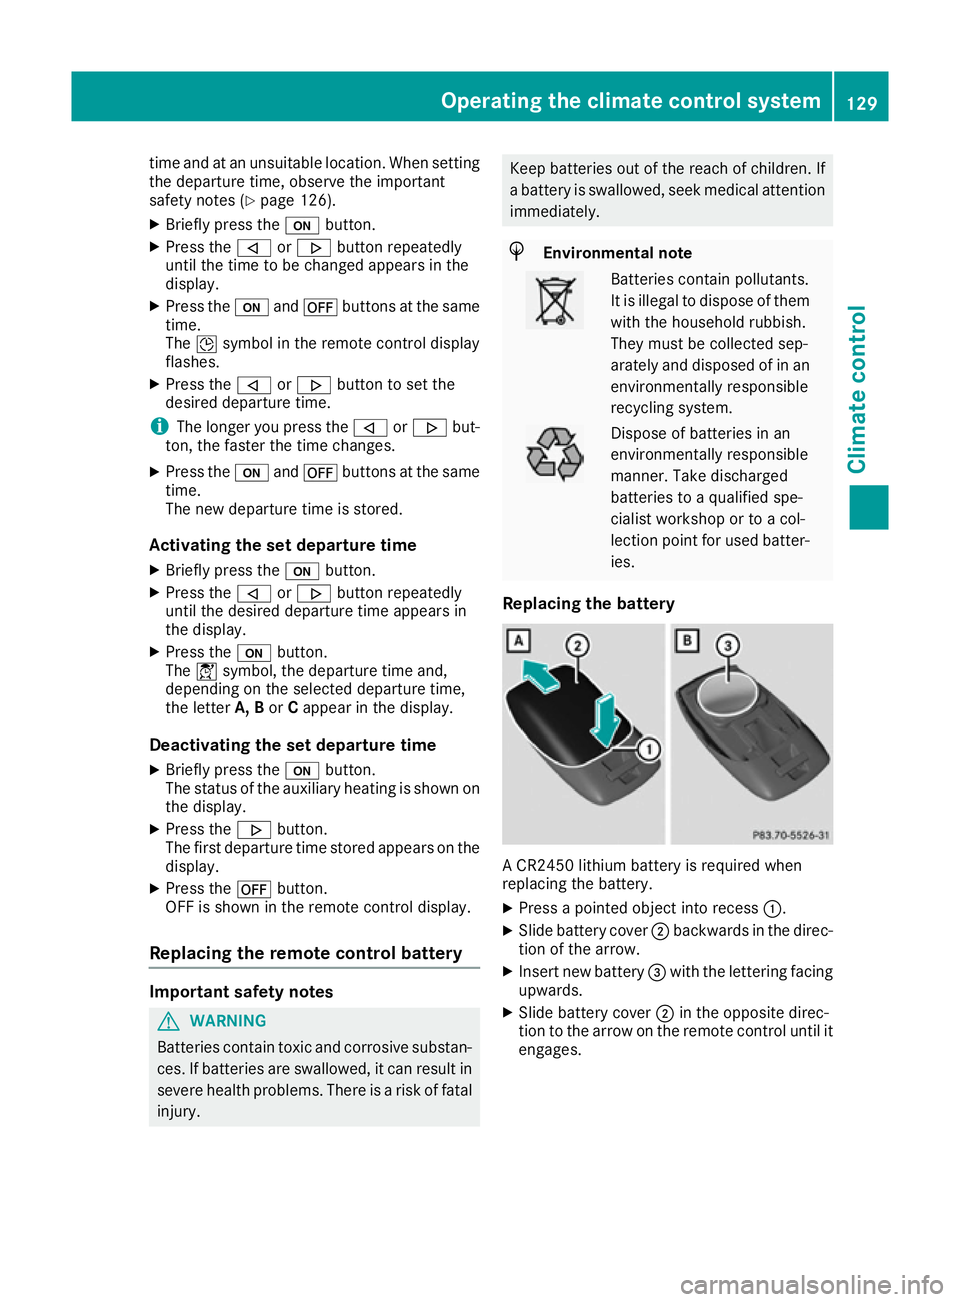
Replacing the battery A CR2450 lithium battery is required when
replacing the battery.
X Press a pointed object into recess :.
X Slide battery cover ;backwards in the direc-
tion of the arrow.
X Insert new battery =with the lettering facing
upwards.
X Slide battery cover ;in the opposite direc-
tion to the arrow on the remote control until it engages. Operating the climate control system
129Climate control Z