buttons MERCEDES-BENZ CLA COUPE 2016 Owners Manual
[x] Cancel search | Manufacturer: MERCEDES-BENZ, Model Year: 2016, Model line: CLA COUPE, Model: MERCEDES-BENZ CLA COUPE 2016Pages: 345, PDF Size: 12.41 MB
Page 10 of 345
Braking assistance appropriate to
the situation
Function/note s................................ 68
Breakdown
Where will I find...? ........................ 293
see Flat tyre
see Tow-starting
see Towing away
Buttons on the steering column ...... 201C
Calling up a fault see Display messages
Car
see Vehicle
Car wash (care) ................................. 286
Care
Automatic car wash ....................... 286
Carpets .......................................... 292
Display ........................................... 290
Exhaust pipe .................................. 290
Exterior lighting ............................. 289
Gear or selector lever .................... 291
High-pressure cleaner .................... 287
Interior ........................................... 290
Matt paintwork .............................. 287
Note s............................................. 286
Paint .............................................. 287
Plastic trim .................................... 290
Reversing camera .......................... 289
Roof lining ...................................... 292
Seat belt ........................................ 291
Seat cove r..................................... 291
Sensors ......................................... 289
Steering wheel ............................... 291
Trim pieces .................................... 291
Washing by hand ........................... 286
Wheels ........................................... 288
Windows ........................................ 288
Wiper blades .................................. 288
Wooden trim .................................. 291
CD
See also Digital Owner's Manua l... 259
CD player (on-board computer) ........ 206
Central locking
Automatic locking (on-board com-puter) ............................................. 211 Locking/unlocking (key) .................. 76
Centre console
Lower section .................................. 35
Upper section .................................. 34
Child
Restraint system .............................. 54
Child seat
Forward-facing restraint system ...... 59
i-Size ................................................ 55
ISOFIX .............................................. 55
On the front-passenger seat ............ 57
Rearward-facing restraint system .... 58
Recommendations ........................... 63
Suitable positions ............................ 59
Top Tether ....................................... 56
Child-proof locks
Important safety notes .................... 64
Rear doors ....................................... 65
Cigarette lighter ................................ 276
Cleaning
Mirror turn signal ........................... 289
Trailer tow hitch ............................. 290
Climate control
Air conditioning ............................. 118
Auxiliary heating/ventilation .......... 126
Controlling automaticall y............... 121
Convenience opening/closing
(air-recirculation mode) ................. 125
Cooling with air dehumidification .. 121
Demisting the windows .................. 124
Demisting the windscreen ............. 123
Indicator lamp ................................ 121
Information on using
THERMOTRONIC automatic cli-
mate control .................................. 120
Notes on using the air-condition-
ing system ..................................... 118
Overview of systems ...................... 117
Problem with the rear window
heating .......................................... 124
Problems with cooling with air
dehumidification ............................ 121
Setting the air distribution ............. 122
Setting the air vents ...................... 130
Setting the airflow ......................... 123
Setting the temperature ................ 122
Switching air-recirculation mode
on/of f............................................ 124 Index
7
Page 22 of 345
SPORT handling mode
Deactivating/activating
(Mercedes-AMG vehicles) ................71
Warning lamp ................................. 253
Start-off assist
Activating ....................................... 174
Important safety notes .................. 174
Start/Stop button
Removing ....................................... 134
Starting the engine ........................ 135
Start/stop function
see ECO start/stop function
Starting (engine) ................................ 134
STEER CONTROL ..................................73
Steering
Display message ............................2 45
Steering assistant STEER CON-
TROL
see STEER CONTROL
Steering wheel
Adjusting (manually) ...................... 102
Button overview ............................... 33
Buttons (on-board computer) ......... 201
Cleaning ......................................... 291
Gearshift paddle s........................... 150
Important safety notes .................. 102
Steering wheel gearshift paddles .... 150
Stopwatch (RACETIMER) ................... 214
Stowage compartment
Map pockets .................................. 270
Stowage compartments
Armrest (front) ............................... 269
Armrest (under) ............................. 270
Centre console .............................. 269
Centre console (rear) ..................... 270
Cup holde r..................................... 273
Glove compartment ....................... 269
Important safety information ......... 268
Spectacles compartment ............... 269
Under driver's seat/front-
passenger sea t.............................. 270
Stowage net ....................................... 270
Stowage space
Stowage net ................................... 270
Stowage well beneath the boot
floor .................................................... 272
Summer tyres .................................... 312 Sun visor
............................................ 275
Suspension
Adaptive Damping System ............. 176
Suspension settings
AMG RIDE CONTROL sports sus-
pension .......................................... 175
Switching on media mode
Via the device list .......................... 266 T
Tail lamps Display message ............................ 229
see Lights
Tank
see Fuel tank
Technical data
Capacities ...................................... 327
Information .................................... 325
Trailer load s................................... 334
Tyres/wheels ................................. 323
Vehicle data ................................... 333
Telephone
Accepting a call (multifunction
steering wheel) .............................. 207
Authorising a mobile phone (con-
necting) ......................................... 263
Connecting a Mobile phone (gen-
eral information) ............................ 262
Display message ............................ 246
Introduction ................................... 207
Menu (on-board computer) ............ 207
Number from the phone book ........ 207
Redialling ....................................... 208
Rejecting/ending a call ................. 207
See also Digital Owner's Manua l... 259
Switching between mobile
phones ........................................... 263
Telephone compartment ................ 270
Telephone module with Bluetooth ®
(SAP profile) Activating and connecting the
module ........................................... 264
Charging a mobile phone ............... 266
Connecting the mobile phone ........ 265
Connecting the module via a USB
cable .............................................. 264
Data modem mode ........................ 265 Index
19
Page 26 of 345
Introduction
The printed Owner's Manual provides informa-
tion about the safe operation of your vehicle.
The Digital Owner's Manual provides compre-
hensive and specifically adapted information on
your vehicle's equipment and multimedia sys-
tem. You can call up the Digital Owner's Manual
via the multimedia system.
i You will not incur any costs when calling up
the Digital Owner's Manual. The Digital Own-
er's Manual works without connecting to the
internet.
There are three ways to access the topics of the Digital Owner's Manual:
R Visual search
The visual search allows you to explore your
vehicle "virtually". Starting from either the
vehicle exterior view or interior view, you can
access many of the different topics covered
by the Digital Owner's Manual. To access the vehicle interior section, select the "Vehicle
interior" view.
R Keyword search
The keyword search allows you to search for a
keyword by entering characters.
R Contents
You can select individual sections in the con-
tents.
i The Digital Owner's Manual is deactivated
for safety reasons while driving. Operation
Calling up the Digital Owner's Manual
X Press the Øbutton on the centre console.
The vehicle overview appears.
X Select the "Owner's Manual" menu item by
turning 3or pressing 7the controller.
X Acknowledge 7the message about the
warning and safety notes.
The basic menu for the Digital Owner's Man-
ual appears. Operating the Digital Owner's Manual
General notes Please observe the information about the oper-
ation of the controller (Y page 260).
Content pages You can access the pages of content by means
of a visual search or a keyword search or by
using the table of contents.
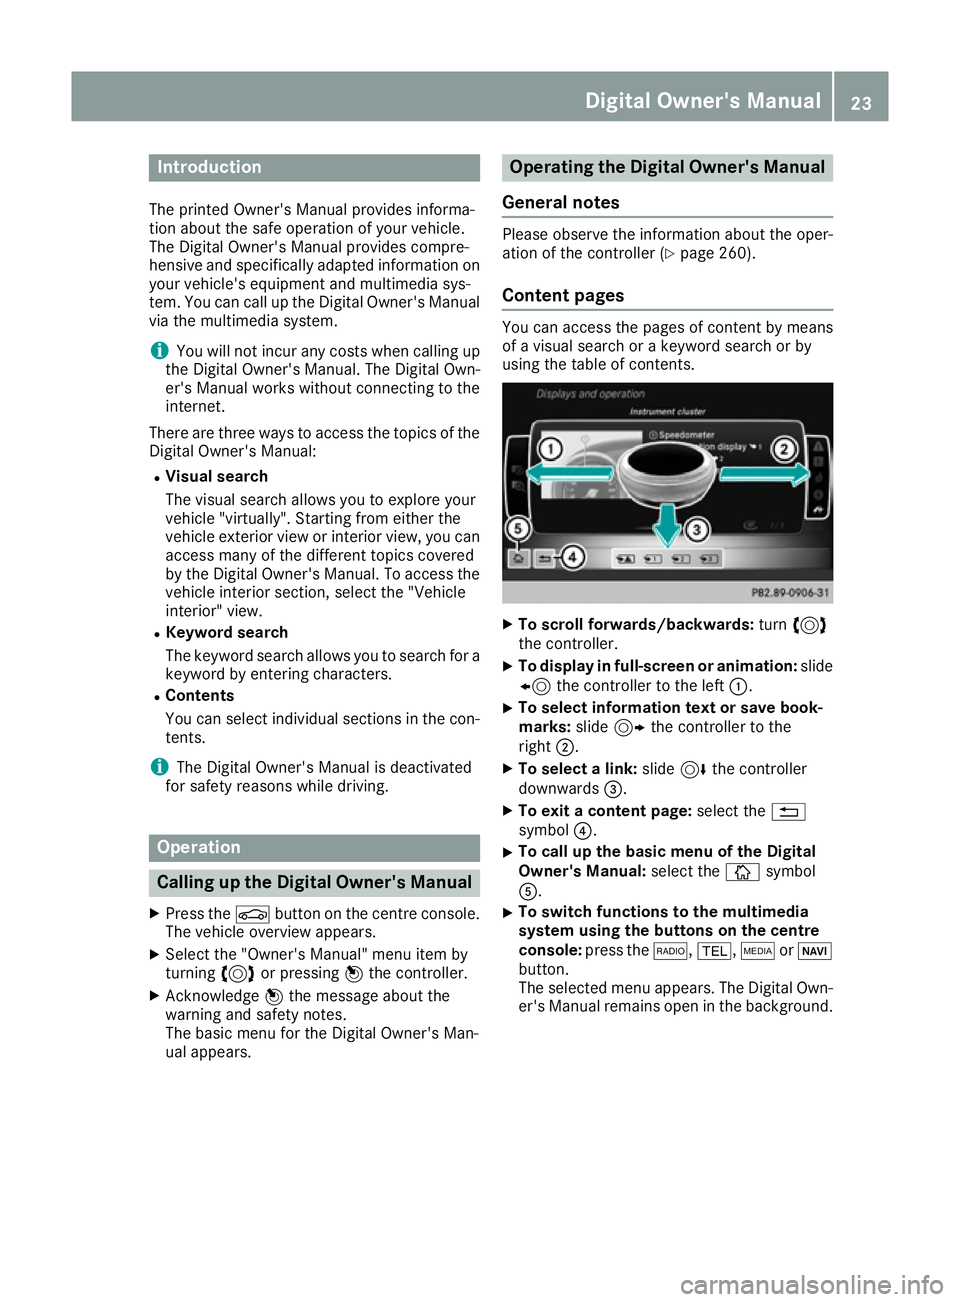
X
To scroll forwards/backwards: turn3
the controller.
X To display in full-screen or animation: slide
8 the controller to the left :.
X To select information text or save book-
marks:
slide9 the controller to the
right ;.
X To select a link: slide6the controller
downwards =.
X To exit a content page: select the%
symbol ?.
X To call up the basic menu of the Digital
Owner's Manual:
select theÞsymbol
A.
X To switch functions to the multimedia
system using the buttons on the centre
console: press the $,%,ÕorØ
button.
The selected menu appears. The Digital Own- er's Manual remains open in the background. Digital Owner's Manual
23
Page 81 of 345
X
To deactivate: press the&button on the
key twice in rapid succession.
The battery check lamp of the key flashes
twice briefly and lights up once; KEYLESS-GO is deactivated (Y page 79).
X To activate: press any button on the key.
or X Insert the key into the ignition lock.
KEYLESS-GO and all its associated features
are available again. KEYLESS-GO start function
General notes Bear in mind that the engine can be started by
any of the vehicle occupants if there is a key in
the vehicle. Changing the settings of the locking
system
You can change the settings of the locking sys-
tem. This means that only the driver's door and the fuel filler flap are unlocked when the vehicle
is unlocked. This is useful if you frequently travel alone.
X To change the setting: press and hold down
the % and& buttons simultaneously
for about six seconds until the battery indica-
tor lamp flashes twice (Y page 79).
If the setting of the locking system is changed
within the signal range of the vehicle, pressing
the & or% button:
R locks or
R unlocks the vehicle
The key now functions as follows:
X To unlock: press the%button once.
X To unlock centrally: press the%button
twice.
X To lock centrally: press the&button. The KEYLESS-GO function is changed as fol-
lows:
X
To unlock the driver's door: touch the inner
surface of the door handle on the driver's
door.
X To unlock centrally: touch the inner surface
of the door handle on the front-passenger
door or the rear door.
X To lock centrally: touch the outer sensor
surface on one of the door handles.
X To restore the factory settings: press and
hold down the %and& buttons simul-
taneously for approximately six seconds until
the battery check lamp flashes twice
(Y page 79). Emergency key element
General notes If the vehicle can no longer be unlocked with the
key or KEYLESS-GO, use the emergency key ele-
ment.
If you use the emergency key element to unlock
and open the driver's door or the boot lid, the
anti-theft alarm system will be triggered
(Y page 73).
There are several ways to deactivate the alarm:
X To deactivate the alarm with the key: press
the % or& button on the key.
or X Insert the key into the ignition lock.
or X To deactivate the alarm with KEYLESS-GO:
press the Start/Stop button in the ignition
lock. The key must be in the vehicle.
or X Lock or unlock the vehicle using KEYLESS-
GO. The key must be outside the vehicle.
If you unlock the vehicle using the emergency
key element, the fuel filler flap will not be
unlocked automatically.
X To unlock the fuel filler flap: insert the key
into the ignition lock. 78
KeyOpening and closing
Page 83 of 345
X
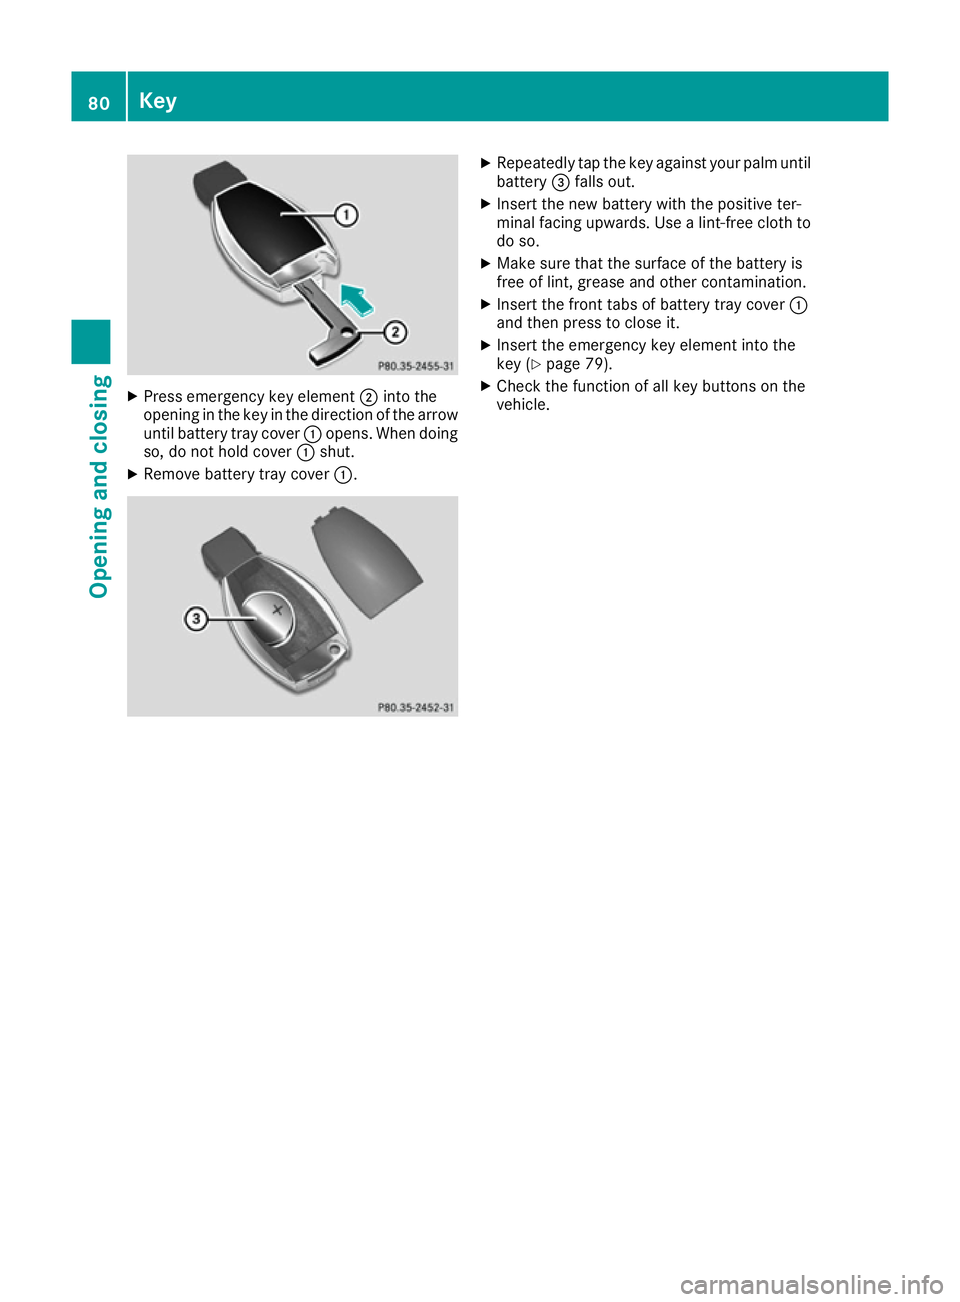
Press emergency key element ;into the
opening in the key in the direction of the arrow
until battery tray cover :opens. When doing
so, do not hold cover :shut.
X Remove battery tray cover :. X
Repeatedly tap the key against your palm until
battery =falls out.
X Insert the new battery with the positive ter-
minal facing upwards. Use a lint-free cloth to
do so.
X Make sure that the surface of the battery is
free of lint, grease and other contamination.
X Insert the front tabs of battery tray cover :
and then press to close it.
X Insert the emergency key element into the
key (Y page 79).
X Check the function of all key buttons on the
vehicle. 80
KeyOpening and closing
Page 88 of 345
Automatic locking feature
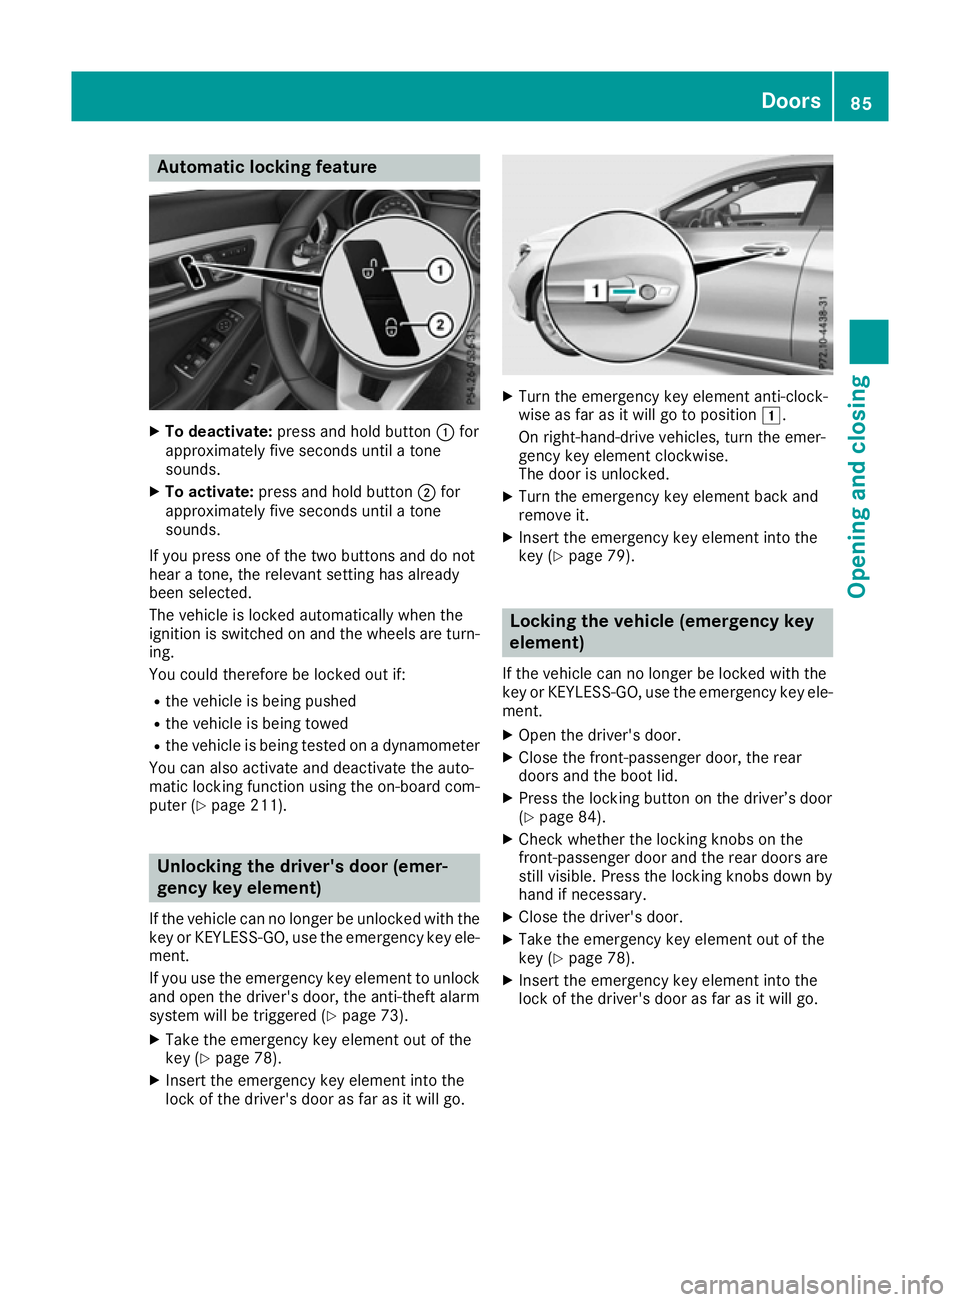
X
To deactivate: press and hold button :for
approximately five seconds until a tone
sounds.
X To activate: press and hold button ;for
approximately five seconds until a tone
sounds.
If you press one of the two buttons and do not
hear a tone, the relevant setting has already
been selected.
The vehicle is locked automatically when the
ignition is switched on and the wheels are turn-
ing.
You could therefore be locked out if:
R the vehicle is being pushed
R the vehicle is being towed
R the vehicle is being tested on a dynamometer
You can also activate and deactivate the auto-
matic locking function using the on-board com- puter (Y page 211). Unlocking the driver's door (emer-
gency key element)
If the vehicle can no longer be unlocked with the key or KEYLESS-GO, use the emergency key ele-
ment.
If you use the emergency key element to unlock
and open the driver's door, the anti-theft alarm
system will be triggered (Y page 73).
X Take the emergency key element out of the
key (Y page 78).
X Insert the emergency key element into the
lock of the driver's door as far as it will go. X
Turn the emergency key element anti-clock-
wise as far as it will go to position 1.
On right-hand-drive vehicles, turn the emer-
gency key element clockwise.
The door is unlocked.
X Turn the emergency key element back and
remove it.
X Insert the emergency key element into the
key (Y page 79). Locking the vehicle (emergency key
element)
If the vehicle can no longer be locked with the
key or KEYLESS-GO, use the emergency key ele-
ment.
X Open the driver's door.
X Close the front-passenger door, the rear
doors and the boot lid.
X Press the locking button on the driver’s door
(Y page 84).
X Check whether the locking knobs on the
front-passenger door and the rear doors are
still visible. Press the locking knobs down by
hand if necessary.
X Close the driver's door.
X Take the emergency key element out of the
key (Y page 78).
X Insert the emergency key element into the
lock of the driver's door as far as it will go. Doors
85Opening and closing Z
Page 101 of 345
G
WARNING
If the driver's seat is not correctly engaged, it could unexpectedly move while driving. This
could cause you to lose control of the vehicle. There is a risk of an accident.
Always ensure that the driver's seat is
engaged before starting the vehicle. G
WARNING
You could lose control of the vehicle while
driving if you:
R adjust the driver's seat, steering wheel or
mirrors
R fasten the seat belt
There is a risk of an accident.
Adjust the driver's seat, head restraint, steer-
ing wheel and mirrors and fasten your seat
belt before starting the engine. G
WARNING
If you adjust the seat height carelessly, you or other vehicle occupants could be trapped andthereby injured. Children in particular could
accidentally press the electrical seat adjust-
ment buttons and become trapped. There is a
risk of injury.
While moving the seats, make sure that your
hands or other body parts do not get under the
lever assembly of the seat adjustment sys-
tem.
! To avoid damage to the seats and the seat
heating, observe the following information:
R do not spill any liquids on the seats. If liquid
is spilled on the seats, dry them as soon aspossible.
R if the seat covers are damp or wet, do not
switch on the seat heating. The seat heat-
ing should also not be used to dry the seats.
R clean the seat covers as recommended;
see the "Interior care" section.
R do not transport heavy loads on the seats.
Do not place sharp objects on the seat
cushions, e.g. knives, nails or tools. The seats should only be occupied by passen-
gers, if possible.
R when the seat heating is in operation, do
not cover the seats with insulating materi-
als, e.g. blankets, coats, bags, seat covers,
child seats or booster seats.
! Make sure that there are no objects in the
footwell under or behind the seats when mov-
ing the seats back. There is a risk that the
seats and/or the objects could be damaged.
i Further related subjects:
R Luggage compartment enlargement (fold-
ing down the rear seats) (Y page 271) Adjusting the seats manually
Vehicles without the seating comfort
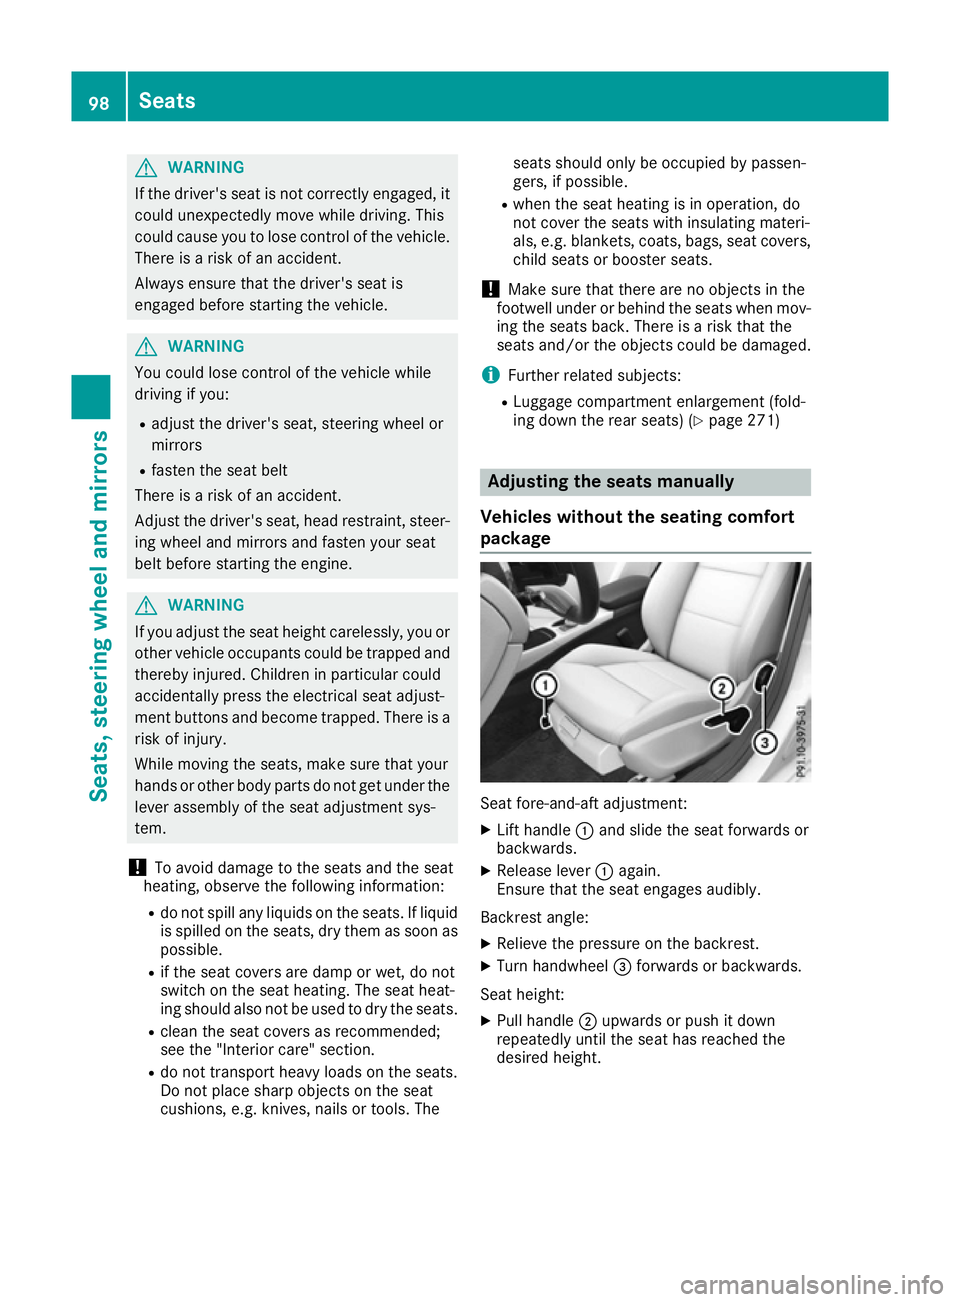
package Seat fore-and-aft adjustment:
X
Lift handle :and slide the seat forwards or
backwards.
X Release lever :again.
Ensure that the seat engages audibly.
Backrest angle:
X Relieve the pressure on the backrest.
X Turn handwheel =forwards or backwards.
Seat height: X Pull handle ;upwards or push it down
repeatedly until the seat has reached the
desired height. 98
SeatsSeats, steering wheel and mirrors
Page 123 of 345
I
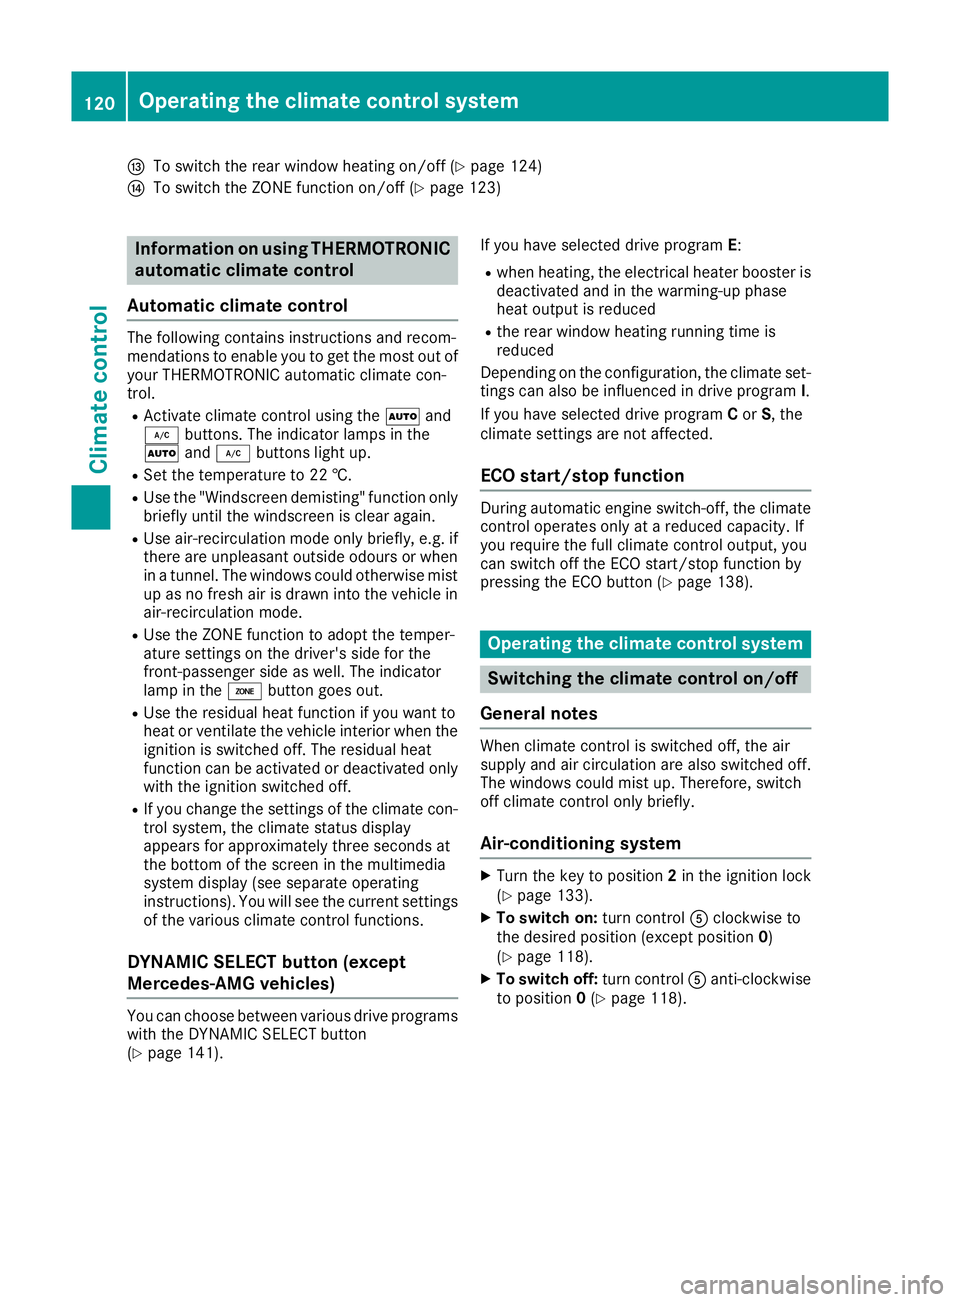
To switch the rear window heating on/off (Y page 124)
J To switch the ZONE function on/off (Y page 123)Information on using THERMOTRONIC
automatic climate control
Automatic climate control The following contains instructions and recom-
mendations to enable you to get the most out of
your THERMOTRONIC automatic climate con-
trol.
R Activate climate control using the Ãand
¿ buttons. The indicator lamps in the
à and¿ buttons light up.
R Set the temperature to 22 †.
R Use the "Windscreen demisting" function only
briefly until the windscreen is clear again.
R Use air-recirculation mode only briefly, e.g. if
there are unpleasant outside odours or when
in a tunnel. The windows could otherwise mist up as no fresh air is drawn into the vehicle in
air-recirculation mode.
R Use the ZONE function to adopt the temper-
ature settings on the driver's side for the
front-passenger side as well. The indicator
lamp in the ábutton goes out.
R Use the residual heat function if you want to
heat or ventilate the vehicle interior when the
ignition is switched off. The residual heat
function can be activated or deactivated only
with the ignition switched off.
R If you change the settings of the climate con-
trol system, the climate status display
appears for approximately three seconds at
the bottom of the screen in the multimedia
system display (see separate operating
instructions). You will see the current settings
of the various climate control functions.
DYNAMIC SELECT button (except
Mercedes-AMG vehicles) You can choose between various drive programs
with the DYNAMIC SELECT button
(Y page 141). If you have selected drive program
E:
R when heating, the electrical heater booster is
deactivated and in the warming-up phase
heat output is reduced
R the rear window heating running time is
reduced
Depending on the configuration, the climate set-
tings can also be influenced in drive program I.
If you have selected drive program Cor S, the
climate settings are not affected.
ECO start/stop function During automatic engine switch-off, the climate
control operates only at a reduced capacity. If
you require the full climate control output, you
can switch off the ECO start/stop function by
pressing the ECO button (Y page 138). Operating the climate control system
Switching the climate control on/off
General notes When climate control is switched off, the air
supply and air circulation are also switched off.
The windows could mist up. Therefore, switch
off climate control only briefly.
Air-conditioning system X
Turn the key to position 2in the ignition lock
(Y page 133).
X To switch on: turn controlAclockwise to
the desired position (except position 0)
(Y page 118).
X To switch off: turn controlAanti-clockwise
to position 0(Y page 118). 120
Operating the climate control systemClimate control
Page 125 of 345
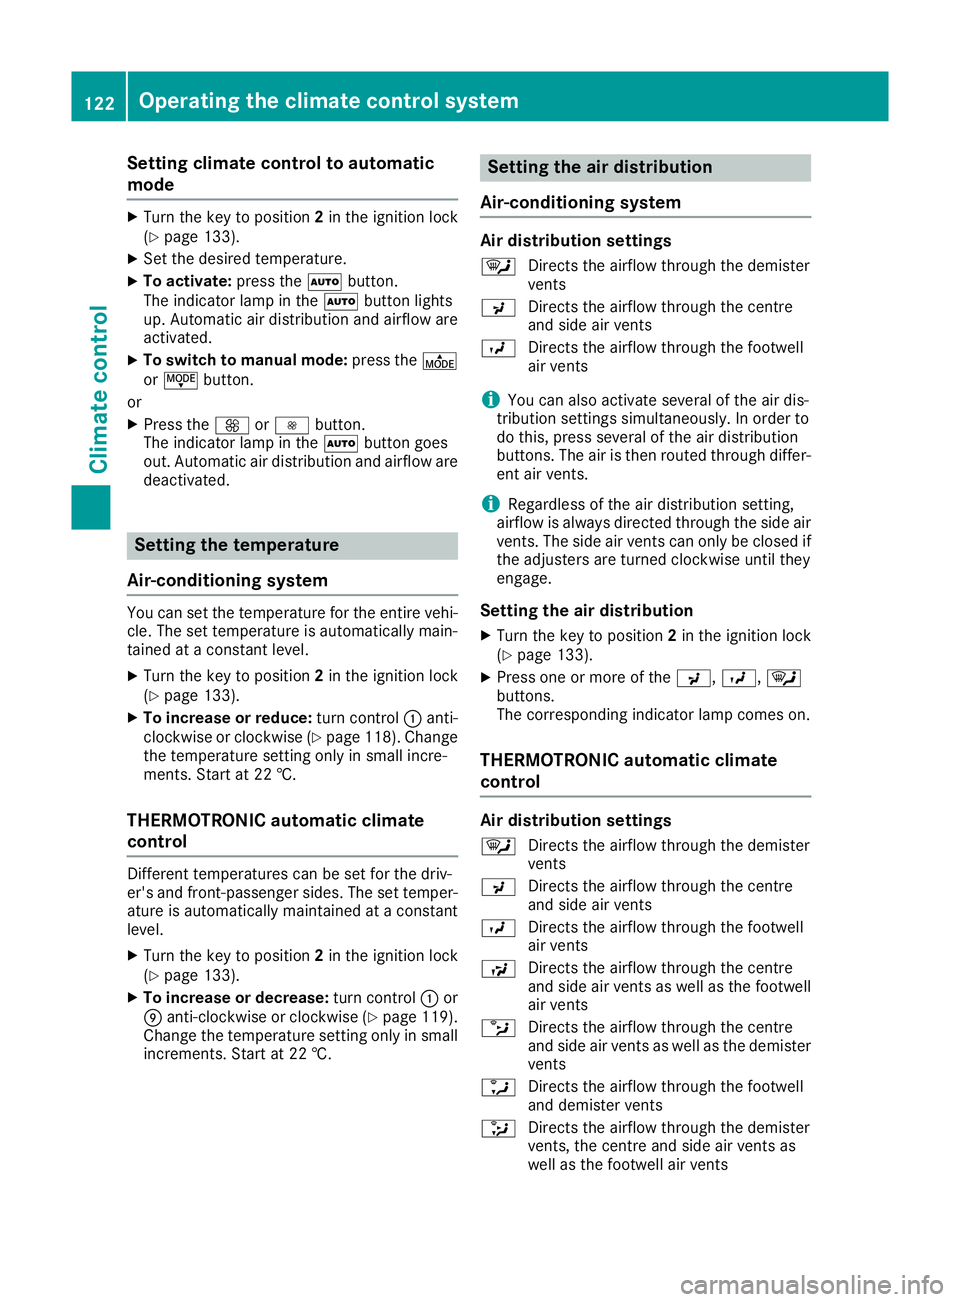
Setting climate control to automatic
mode X
Turn the key to position 2in the ignition lock
(Y page 133).
X Set the desired temperature.
X To activate: press theÃbutton.
The indicator lamp in the Ãbutton lights
up. Automatic air distribution and airflow are
activated.
X To switch to manual mode: press theÉ
or Ë button.
or
X Press the KorI button.
The indicator lamp in the Ãbutton goes
out. Automatic air distribution and airflow are deactivated. Setting the temperature
Air-conditioning system You can set the temperature for the entire vehi-
cle. The set temperature is automatically main-
tained at a constant level.
X Turn the key to position 2in the ignition lock
(Y page 133).
X To increase or reduce: turn control:anti-
clockwise or clockwise (Y page 118). Change
the temperature setting only in small incre-
ments. Start at 22 †.
THERMOTRONIC automatic climate
control Different temperatures can be set for the driv-
er's and front-passenger sides. The set temper- ature is automatically maintained at a constant
level.
X Turn the key to position 2in the ignition lock
(Y page 133).
X To increase or decrease: turn control:or
E anti-clockwise or clockwise (Y page 119).
Change the temperature setting only in small
increments. Start at 22 †. Setting the air distribution
Air-conditioning system Air distribution settings
¯ Directs the airflow through the demister
vents
P Directs the airflow through the centre
and side air vents
O Directs the airflow through the footwell
air vents
i You can also activate several of the air dis-
tribution settings simultaneously. In order to
do this, press several of the air distribution
buttons. The air is then routed through differ-
ent air vents.
i Regardless of the air distribution setting,
airflow is always directed through the side air vents. The side air vents can only be closed if
the adjusters are turned clockwise until they
engage.
Setting the air distribution X Turn the key to position 2in the ignition lock
(Y page 133).
X Press one or more of the P,O,¯
buttons.
The corresponding indicator lamp comes on.
THERMOTRONIC automatic climate
control Air distribution settings
¯ Directs the airflow through the demister
vents
P Directs the airflow through the centre
and side air vents
O Directs the airflow through the footwell
air vents
S Directs the airflow through the centre
and side air vents as well as the footwell
air vents
b Directs the airflow through the centre
and side air vents as well as the demister
vents
a Directs the airflow through the footwell
and demister vents
_ Directs the airflow through the demister
vents, the centre and side air vents as
well as the footwell air vents 122
Operating the climate control systemClimate control
Page 132 of 345
time and at an unsuitable location. When setting
the departure time, observe the important
safety notes (Y page 126).
X Briefly press the ubutton.
X Press the ,or. button repeatedly
until the time to be changed appears in the
display.
X Press the uand^ buttons at the same
time.
The Îsymbol in the remote control display
flashes.
X Press the ,or. button to set the
desired departure time.
i The longer you press the
,or. but-
ton, the faster the time changes.
X Press the uand^ buttons at the same
time.
The new departure time is stored.
Activating the set departure time X Briefly press the ubutton.
X Press the ,or. button repeatedly
until the desired departure time appears in
the display.
X Press the ubutton.
The Ísymbol, the departure time and,
depending on the selected departure time,
the letter A, BorCappear in the display.
Deactivating the set departure time
X Briefly press the ubutton.
The status of the auxiliary heating is shown on
the display.
X Press the .button.
The first departure time stored appears on the
display.
X Press the ^button.
OFF is shown in the remote control display.
Replacing the remote control battery Important safety notes
G
WARNING
Batteries contain toxic and corrosive substan- ces. If batteries are swallowed, it can result in
severe health problems. There is a risk of fatal injury. Keep batteries out of the reach of children. If
a battery is swallowed, seek medical attention
immediately. H
Environmental note Batteries contain pollutants.
It is illegal to dispose of them
with the household rubbish.
They must be collected sep-
arately and disposed of in anenvironmentally responsible
recycling system. Dispose of batteries in an
environmentally responsible
manner. Take discharged
batteries to a qualified spe-
cialist workshop or to a col-
lection point for used batter-
ies.
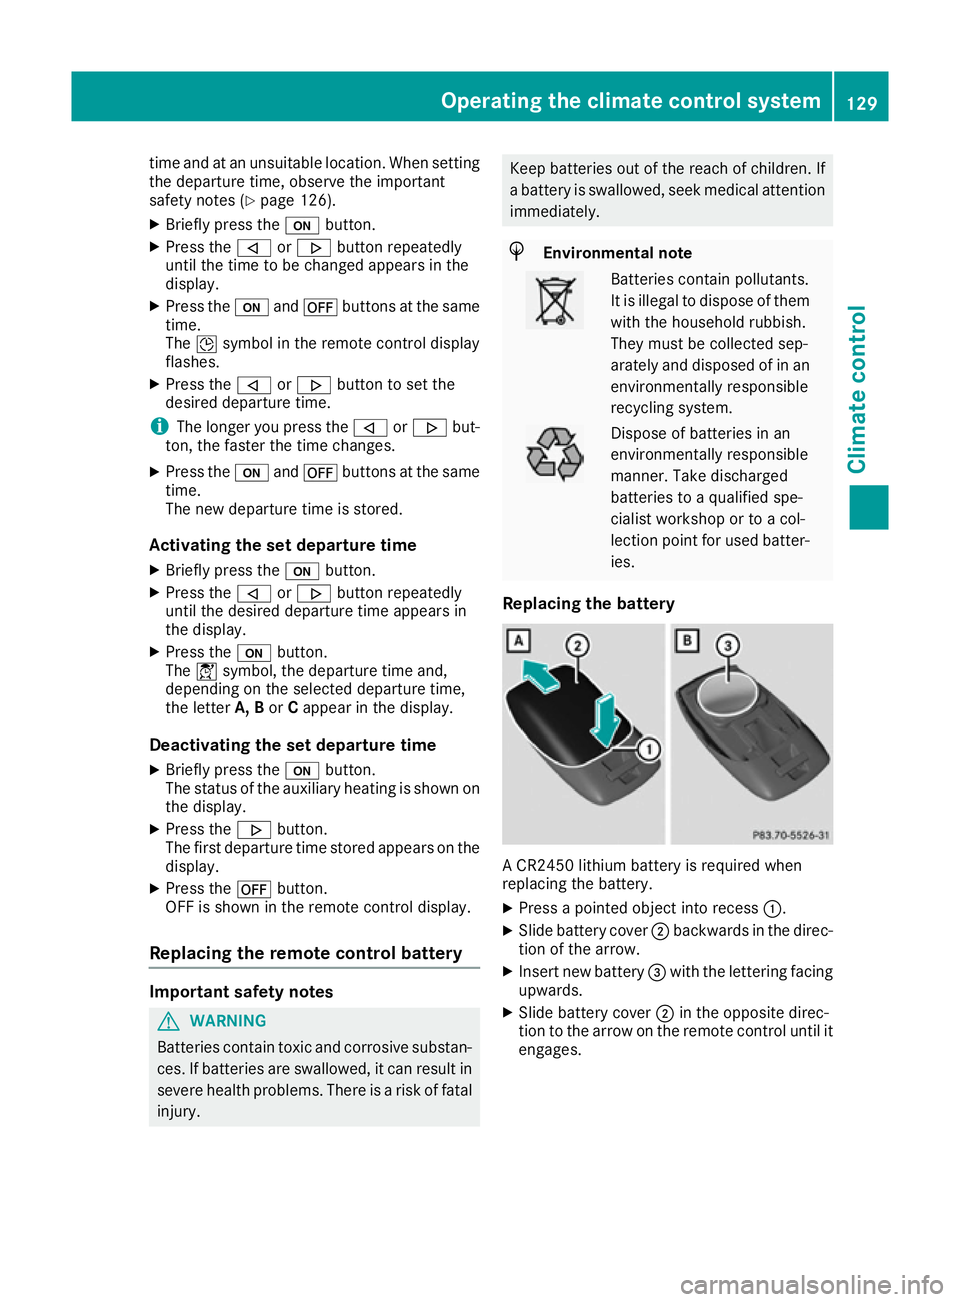
Replacing the battery A CR2450 lithium battery is required when
replacing the battery.
X Press a pointed object into recess :.
X Slide battery cover ;backwards in the direc-
tion of the arrow.
X Insert new battery =with the lettering facing
upwards.
X Slide battery cover ;in the opposite direc-
tion to the arrow on the remote control until it engages. Operating the climate control system
129Climate control Z