child lock MERCEDES-BENZ CLA COUPE 2016 Owners Manual
[x] Cancel search | Manufacturer: MERCEDES-BENZ, Model Year: 2016, Model line: CLA COUPE, Model: MERCEDES-BENZ CLA COUPE 2016Pages: 345, PDF Size: 12.41 MB
Page 10 of 345
Braking assistance appropriate to
the situation
Function/note s................................ 68
Breakdown
Where will I find...? ........................ 293
see Flat tyre
see Tow-starting
see Towing away
Buttons on the steering column ...... 201C
Calling up a fault see Display messages
Car
see Vehicle
Car wash (care) ................................. 286
Care
Automatic car wash ....................... 286
Carpets .......................................... 292
Display ........................................... 290
Exhaust pipe .................................. 290
Exterior lighting ............................. 289
Gear or selector lever .................... 291
High-pressure cleaner .................... 287
Interior ........................................... 290
Matt paintwork .............................. 287
Note s............................................. 286
Paint .............................................. 287
Plastic trim .................................... 290
Reversing camera .......................... 289
Roof lining ...................................... 292
Seat belt ........................................ 291
Seat cove r..................................... 291
Sensors ......................................... 289
Steering wheel ............................... 291
Trim pieces .................................... 291
Washing by hand ........................... 286
Wheels ........................................... 288
Windows ........................................ 288
Wiper blades .................................. 288
Wooden trim .................................. 291
CD
See also Digital Owner's Manua l... 259
CD player (on-board computer) ........ 206
Central locking
Automatic locking (on-board com-puter) ............................................. 211 Locking/unlocking (key) .................. 76
Centre console
Lower section .................................. 35
Upper section .................................. 34
Child
Restraint system .............................. 54
Child seat
Forward-facing restraint system ...... 59
i-Size ................................................ 55
ISOFIX .............................................. 55
On the front-passenger seat ............ 57
Rearward-facing restraint system .... 58
Recommendations ........................... 63
Suitable positions ............................ 59
Top Tether ....................................... 56
Child-proof locks
Important safety notes .................... 64
Rear doors ....................................... 65
Cigarette lighter ................................ 276
Cleaning
Mirror turn signal ........................... 289
Trailer tow hitch ............................. 290
Climate control
Air conditioning ............................. 118
Auxiliary heating/ventilation .......... 126
Controlling automaticall y............... 121
Convenience opening/closing
(air-recirculation mode) ................. 125
Cooling with air dehumidification .. 121
Demisting the windows .................. 124
Demisting the windscreen ............. 123
Indicator lamp ................................ 121
Information on using
THERMOTRONIC automatic cli-
mate control .................................. 120
Notes on using the air-condition-
ing system ..................................... 118
Overview of systems ...................... 117
Problem with the rear window
heating .......................................... 124
Problems with cooling with air
dehumidification ............................ 121
Setting the air distribution ............. 122
Setting the air vents ...................... 130
Setting the airflow ......................... 123
Setting the temperature ................ 122
Switching air-recirculation mode
on/of f............................................ 124 Index
7
Page 16 of 345
ISOFIX child seat securing system
.... 55J
Jack Declaration of conformity ................ 26
Storage location ............................ 294
Using ............................................ .320
Jump starting (engine) ......................301 K
Key Changing the battery ....................... 79
Checking the battery ....................... 79
Convenience closing feature ............ 90
Convenience opening feature .......... 90
Display message ............................ 246
Door central locking/unlocking ....... 76
Emergency key element ................... 78
Important safety notes .................... 76
KEYLESS-GO start function .............. 78
Loss ................................................. 81
Modifying the programming ............. 78
Positions (ignition lock) ................. 133
Problem (malfunction) ..................... 81
Starting the engine ........................ 135
Key positions
Start/Stop button .......................... 133
Key positions (ignition lock) ............ 133
KEYLESS-GO
Convenience closing ........................ 90
Deactivation ..................................... 77
Locking ............................................ 77
Unlocking ......................................... 77
Kickdown
Driving tips ................................... .148
Manual gearshifting ....................... 152
Kneebag ............................................... 46 L
Lamps see Warning and indicator lamps
Lane Keeping Assist
Activating/deactivating (on-
board computer) ............................ 209
Display message ............................ 235
Function/informatio n.................... 193 Lane package
..................................... 191
Lap time (RACETIMER) ...................... 214
Lashing eyelets ................................. 272
Licence plate lamp (display mes-
sage) ................................................... 229
Light sensor (display message) ....... 230
Lighting
see Lights
Lights
Adaptive Highbeam Assist ............. 109
Automatic headlamp mod e............ 107
Dipped-beam headlamp s............... 108
Driving abroad ............................... 107
Hazard warning lamps ................... 109
Headlamp flashe r........................... 109
Headlamp rang e............................ 108
Light switch ................................... 107
Main-beam headlamp s................... 109
Misted up headlamp s.................... 110
Parking lamps ................................ 108
Rear foglamp ................................. 108
Setting exterior lighting ................. 107
Side lamps ..................................... 108
Switching the daytime driving
lights on/off (on-board com-
puter) ............................................. 211
Turn signals ................................... 109
LIM indicator lamp
Cruise control ................................ 163
Distance Pilot DISTRONIC ............. 168
Variable limite r.............................. 165
Limiter
Calling up the speed ...................... 166
Deactivating, variable .................... 166
Function/note s............................. 165
LIM indicator lamp ......................... 165
Permanent ..................................... 166
Setting a speed .............................. 166
Storing the current speed .............. 166
Switching to passive ...................... 166
Variabl e......................................... 165
Limiting the speed
Speed limiter ................................. 165
Loading guidelines ............................ 268
Locking
see Central locking Index
13
Page 42 of 345
Panic alarm
X
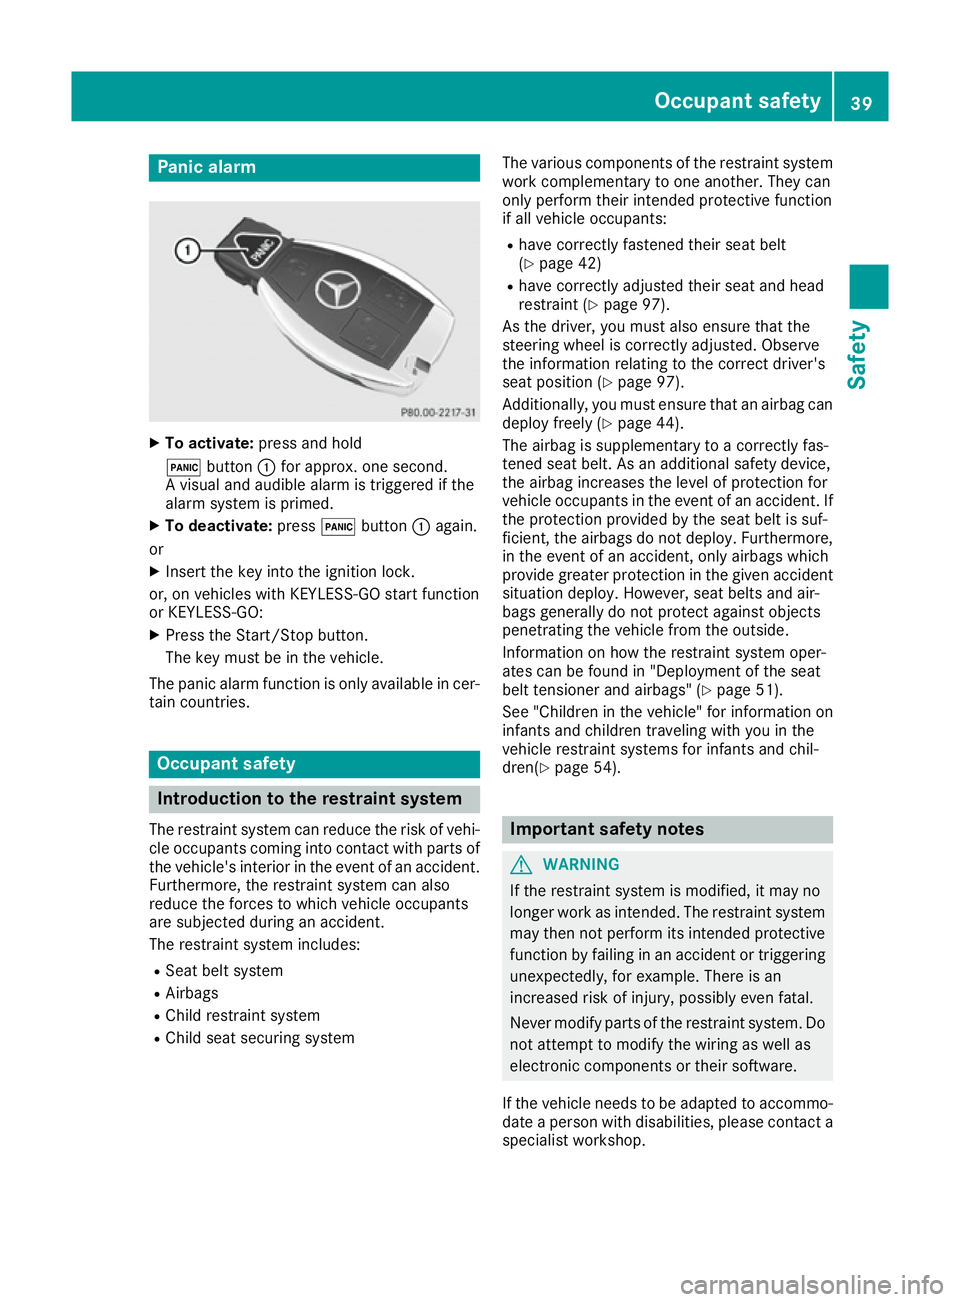
To activate: press and hold
! button :for approx. one second.
A visual and audible alarm is triggered if the
alarm system is primed.
X To deactivate: press!button :again.
or
X Insert the key into the ignition lock.
or, on vehicles with KEYLESS-GO start function
or KEYLESS ‑GO:
X Press the Start/Stop button.
The key must be in the vehicle.
The panic alarm function is only available in cer-
tain countries. Occupant safety
Introduction to the restraint system
The restraint system can reduce the risk of vehi-
cle occupants coming into contact with parts of
the vehicle's interior in the event of an accident. Furthermore, the restraint system can also
reduce the forces to which vehicle occupants
are subjected during an accident.
The restraint system includes:
R Seat belt system
R Airbags
R Child restraint system
R Child seat securing system The various components of the restraint system
work complementary to one another. They can
only perform their intended protective function
if all vehicle occupants:
R have correctly fastened their seat belt
(Y page 42)
R have correctly adjusted their seat and head
restraint (Y page 97).
As the driver, you must also ensure that the
steering wheel is correctly adjusted. Observe
the information relating to the correct driver's
seat position (Y page 97).
Additionally, you must ensure that an airbag can
deploy freely (Y page 44).
The airbag is supplementary to a correctly fas-
tened seat belt. As an additional safety device,
the airbag increases the level of protection for
vehicle occupants in the event of an accident. If
the protection provided by the seat belt is suf-
ficient, the airbags do not deploy. Furthermore, in the event of an accident, only airbags which
provide greater protection in the given accident
situation deploy. However, seat belts and air-
bags generally do not protect against objects
penetrating the vehicle from the outside.
Information on how the restraint system oper-
ates can be found in "Deployment of the seat
belt tensioner and airbags" (Y page 51).
See "Children in the vehicle" for information on
infants and children traveling with you in the
vehicle restraint systems for infants and chil-
dren(Y page 54). Important safety notes
G
WARNING
If the restraint system is modified, it may no
longer work as intended. The restraint system
may then not perform its intended protective function by failing in an accident or triggering
unexpectedly, for example. There is an
increased risk of injury, possibly even fatal.
Never modify parts of the restraint system. Do not attempt to modify the wiring as well as
electronic components or their software.
If the vehicle needs to be adapted to accommo- date a person with disabilities, please contact a
specialist workshop. Occupant safety
39Safety Z
Page 44 of 345
tion system" (Y
page 47) and on "Children in
the vehicle" (Y page 54).
R All other persons: the PASSENGER AIR BAG
OFF indicator lamp must be off. The front-
passenger front airbag is enabled. Depending
on the stature of the person on the front-
passenger seat, the PASSENGER AIR BAG
OFF indicator lamp may light up. The front-
passenger front airbag is disabled. It will then
not be deployed in the event of an accident. In this case, the front-passenger seat should not
be used.
It is imperative to observe the notes on the
"Automatic front-passenger front airbag
deactivation system" (Y page 47) as well as
on "Seat belts" (Y page 41) and "Airbags"
(Y page 44). There, you can also find infor-
mation on the correct seat position. Seat belts
Introduction A correctly worn seat belt is the most effective
means of restraining the movement of vehicle
occupants in the event of a collision or if the
vehicle overturns. This reduces the risk of vehi-
cle occupants coming into contact with parts of
the vehicle interior or being ejected from it. The seat belt also helps to keep the vehicle occu-
pants in the best position in relation to the air-
bag being deployed.
The seat belt system consists of:
R seat belts
R belt tensioners for the front seat belts and the
outer seat belts in the rear
R belt force limiters for the front seat belts and
the outer seat belts in the rear
If the seat belt is pulled quickly or sharply from
the belt outlet, the inertia reel locks. The belt
strap cannot be pulled out any further.
The belt tensioner tightens the seat belt in the
event of a collision so that it fits tightly across
your body. However, it does not pull the vehicle
occupants back in the direction of the seat
backrest.
The belt tensioner does not, however, correct an
incorrect seat position or correct the routing of a seat belt that is worn incorrectly.
When triggered, seat belt force limiters help to
reduce the peak force exerted by the seat belt
on the vehicle occupant. The belt force limiters on the front seats are
synchronised with the front airbags, which take
on a part of the deceleration force. This can
reduce the forces to which the vehicle occu-
pants are subjected during an accident.
! If the co-driver's seat is not occupied, do not
engage the seat belt tongue in the buckle on
the co-driver's seat. Otherwise, the belt ten-
sioner could be triggered in the event of an
accident and would have to be replaced.
Important safety notes G
WARNING
If the seat belt is worn incorrectly, it cannot
perform its intended protective function. Fur- thermore, an incorrectly worn seat belt can
cause additional injuries, e.g. in the event of
an accident, heavy braking or sudden
changes of direction. There is an increased
risk of injury, possibly even fatal.
Always ensure that all vehicle occupants havetheir seat belts fastened correctly and are sit-
ting properly. G
WARNING
The seat belt does not offer the intended level of protection if you have not moved the back-
rest to an almost vertical position. When brak-
ing or in the event of an accident, you could
slide underneath the seat belt and sustain
abdomen or neck injuries, for example. This
poses an increased risk of injury or even fatal injury.
Adjust the seat properly before beginning
your journey. Always ensure that the backrest
is in an almost vertical position and that the
shoulder section of your seatbelt is routed
across the centre of your shoulder. G
WARNING
Persons under 1.50 mtall cannot wear the
seat belts correctly without an additional suit- able restraint system. If the seat belt is worn
incorrectly, it cannot perform its intended
protective function. Furthermore, an incor-
rectly worn seat belt can cause additional
injuries, e.g. in the event of an accident, heavy Occupant safety
41Safety
Z
Page 50 of 345
belt, a windowbag may be deployed in other
accident situations (Y page 51).Automatic front-passenger front air-
bag deactivation
Introduction In order to recognise a child restraint system on
the front-passenger seat, the automatic front-
passenger front airbag deactivation system cat- egorises the person in the front-passenger seat.Depending on that result, the front-passenger
front airbag is either enabled or disabled. If a
rearward-facing child restraint system is fitted
to the front-passenger seat, the PASSENGER
AIR BAG OFF indicator lamp must light up after
the system self-test and remain lit. The front-
passenger front airbag is disabled.
The system does not disable:
R the sidebag
R the windowbag
R the seat belt tensioner
Make sure that your vehicle is equipped with the automatic front-passenger front airbag deacti-
vation system (Y page 57). If this is not the
case, always install a child restraint system on a
suitable rear seat (Y page 59).
If it is absolutely necessary to install a child
restraint system on the front-passenger seat, be sure to observe the correct positioning of the
child restraint system. Never place objects
under or behind the child restraint system, e.g. a
cushion. Fully retract the seat cushion length.
The entire base of the child restraint system
must always rest on the seat cushion of the
front-passenger seat. The backrest of a forward-
facing child restraint system must, as far as
possible, rest flat against the backrest of the
front-passenger seat. The child restraint system must not touch the roof or be put under strain bythe head restraint. Adjust the angle of the seat
backrest and the head restraint position accord-
ingly. Only then is the correct function of the
automatic front-passenger front airbag deacti-
vation system guaranteed. Always observe the
information on suitable positioning of the child
restraint system (Y page 59) in addition to the
child restraint system manufacturer's installa-
tion instructions. Operation of automatic front-passenger
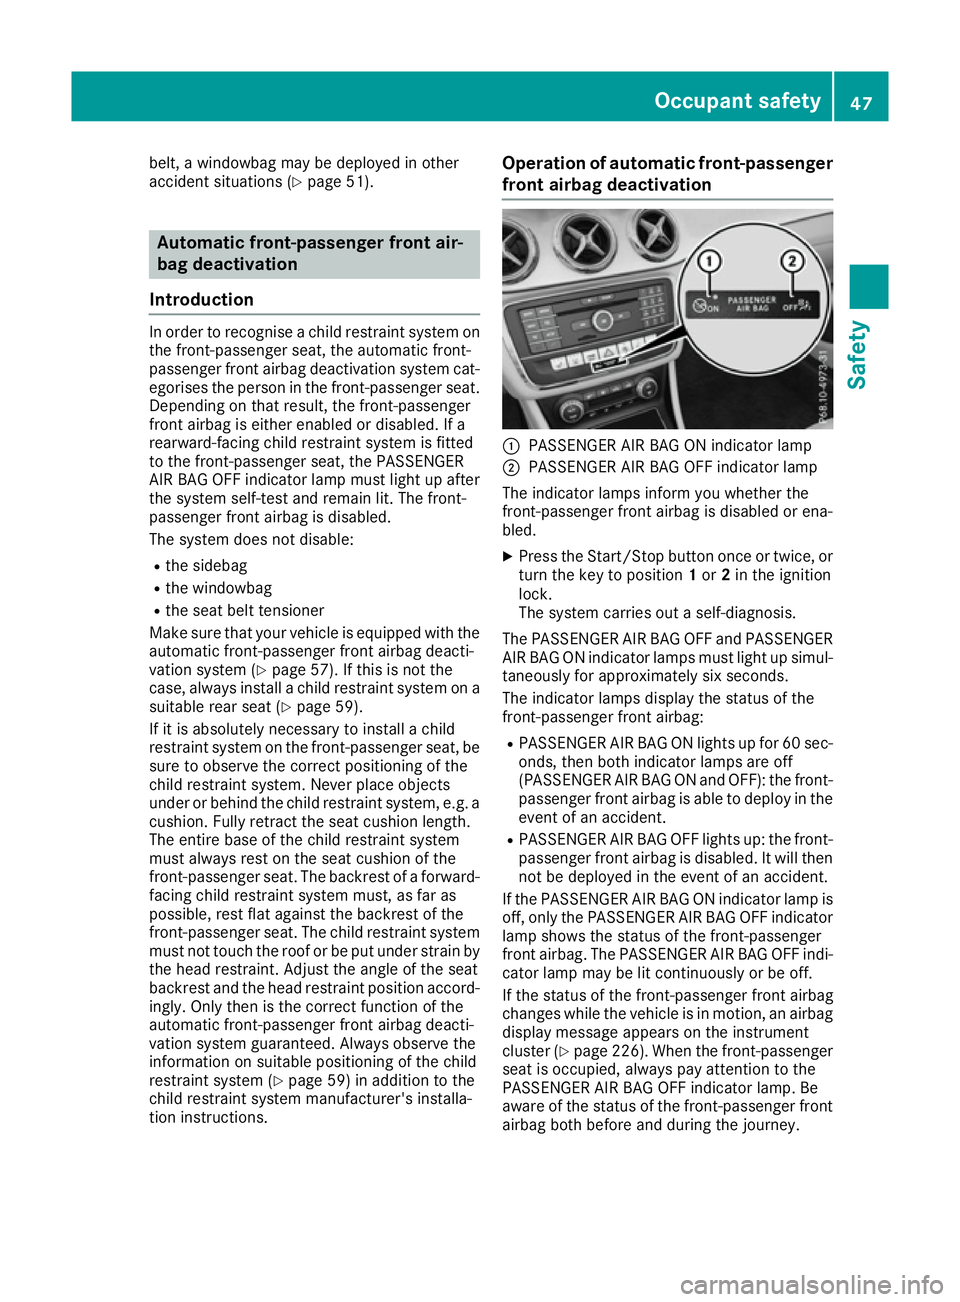
front airbag deactivation :
PASSENGER AIR BAG ON indicator lamp
; PASSENGER AIR BAG OFF indicator lamp
The indicator lamps inform you whether the
front-passenger front airbag is disabled or ena-
bled.
X Press the Start/Stop button once or twice, or
turn the key to position 1or 2in the ignition
lock.
The system carries out a self-diagnosis.
The PASSENGER AIR BAG OFF and PASSENGER
AIR BAG ON indicator lamps must light up simul- taneously for approximately six seconds.
The indicator lamps display the status of the
front-passenger front airbag:
R PASSENGER AIR BAG ON lights up for 60 sec-
onds, then both indicator lamps are off
(PASSENGER AIR BAG ON and OFF): the front-
passenger front airbag is able to deploy in the
event of an accident.
R PASSENGER AIR BAG OFF lights up: the front-
passenger front airbag is disabled. It will then
not be deployed in the event of an accident.
If the PASSENGER AIR BAG ON indicator lamp is
off, only the PASSENGER AIR BAG OFF indicator lamp shows the status of the front-passenger
front airbag. The PASSENGER AIR BAG OFF indi-
cator lamp may be lit continuously or be off.
If the status of the front-passenger front airbag
changes while the vehicle is in motion, an airbag display message appears on the instrument
cluster (Y page 226). When the front-passenger
seat is occupied, always pay attention to the
PASSENGER AIR BAG OFF indicator lamp. Be
aware of the status of the front-passenger front
airbag both before and during the journey. Occupant safety
47Safety Z
Page 57 of 345
Children in the vehicle
Important safety notes
Accident statistics show that children secured
in the rear seats are safer than children secured in the front seats. For this reason, Mercedes-
Benz strongly advises that you fit a child
restraint system on a rear seat. Children are
generally better protected there.
If a child younger than twelve years old and
under 1.50 min height is travelling in the vehi-
cle:
R always secure the child in a child restraint
system suitable for Mercedes-Benz vehicles.
The child restraint system must be appropri-
ate to the age, weight and size of the child.
R be sure to observe the instructions and safety
notes in this section in addition to the child
restraint system manufacturer's installation
instructions
R be sure to observe the instructions and safety
notes on the automatic front-passenger front airbag deactivation system (Y page 47).G
WARNING
If you leave children unattended in the vehi-
cle, they may be able to set the vehicle in
motion if, for example, they:
R release the parking brake
R shift the automatic transmission out of park
position Por shift manual transmission into
neutral
R start the engine
In addition, they may operate vehicle equip-
ment and become trapped. There is a risk of
an accident and injury.
When leaving the vehicle, always take the key with you and lock the vehicle. Never leave
children unattended in the vehicle. G
WARNING
If persons (particularly children) are exposed
to heat or cold for a prolonged period, there is a risk of serious or even fatal injuries. Never
leave persons (particularly children) unatten-
ded in the vehicle. G
WARNING
If the child restraint system is placed in direct sunlight, the parts could become very hot.
Children could be suffer burns by touching
these parts, in particular on the metallic parts
of the child restraint system. There is a risk of injury.
If you and your child leave the vehicle, always
make sure that the child restraint system is
not in direct sunlight. Cover it with a blanket, for example. If the child restraint system has
been exposed to direct sunlight, leave it to
cool down before securing the child in it.
Never leave children unattended in the vehi-
cle.
Always ensure that all vehicle occupants have
their seat belts fastened correctly and are sitting
properly. Particular attention must be paid to
children.
Observe the safety notes on the seat belt
(Y page 41) and the notes on how to use the seat
belt properly (Y page 42). Child restraint system
If you fit a rearward-facing child restraint system
on the centre rear seat, the rear seat armrest
must be folded back as far as it will go.
Be sure to observe the correct use of the child
restraint system (Y page 59).
For safety reasons, Mercedes-Benz recom-
mends that you only use a child restraint system recommended by Mercedes-Benz
(Y page 63). G
WARNING
If the child restraint system is incorrectly fit-
ted on the seat position suitable for this pur-
pose, it cannot perform its intended protec-
tive function. In the event of an accident,
sharp braking or a sudden change in direction, the child may not be held securely. There is an
increased risk of serious or even fatal injuries.
Observe the manufacturer's installation
instructions and the correct use for the child
restraint system. Make sure that the entire
surface of the child restraint system is resting 54
Children in the vehicleSafety
Page 59 of 345
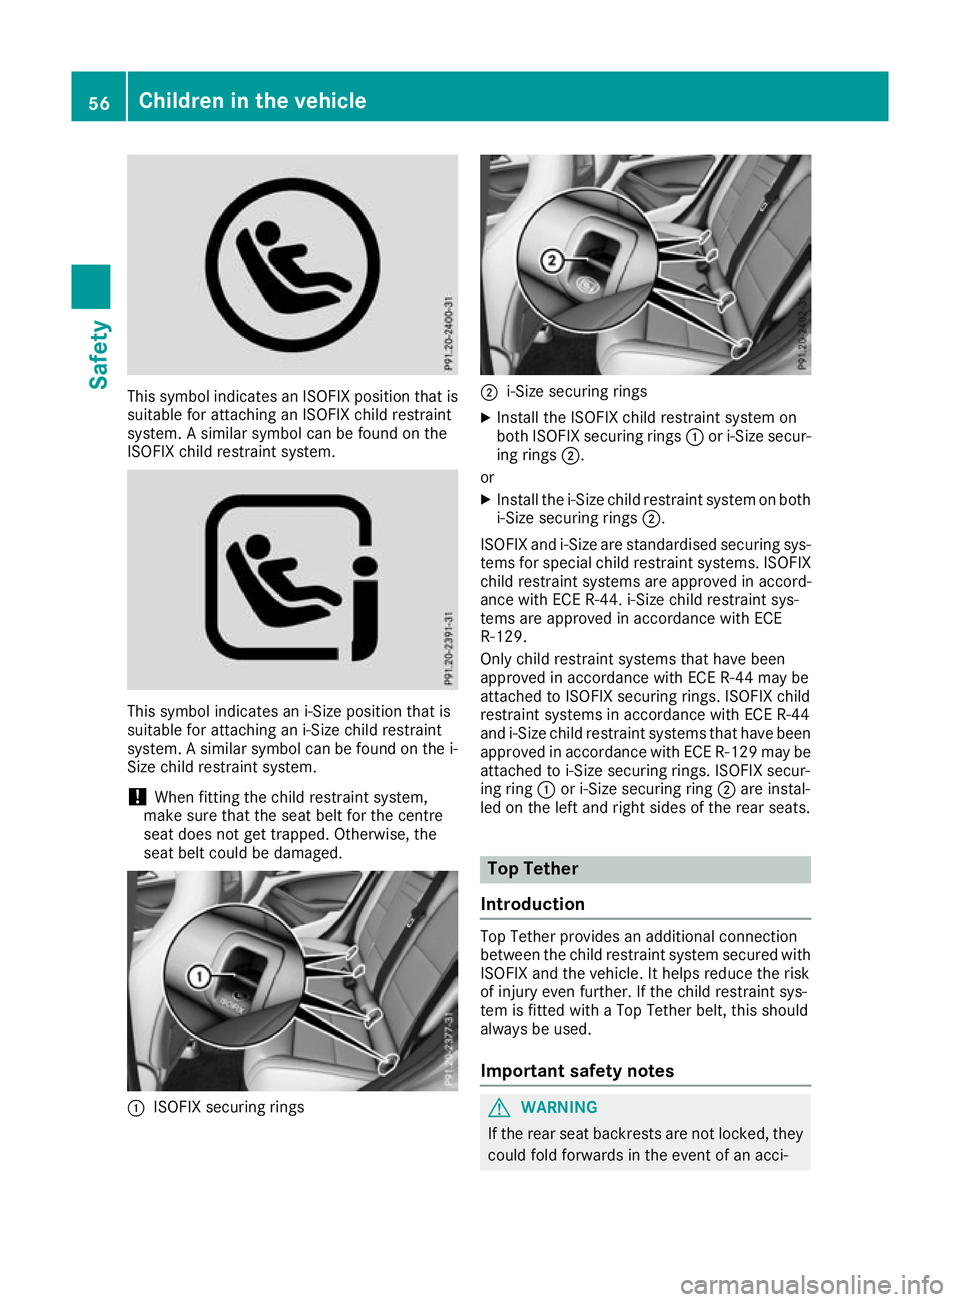
This symbol indicates an ISOFIX position that is
suitable for attaching an ISOFIX child restraint
system. A similar symbol can be found on the
ISOFIX child restraint system. This symbol indicates an i
‑Size position that is
suitable for attaching an i-Size child restraint
system. A similar symbol can be found on the i- Size child restraint system.
! When fitting the child restraint system,
make sure that the seat belt for the centre
seat does not get trapped. Otherwise, the
seat belt could be damaged. :
ISOFIX securing rings ;
i-Size securing rings
X Install the ISOFIX child restraint system on
both ISOFIX securing rings :or i-Size secur-
ing rings ;.
or
X Install the i-Size child restraint system on both
i-Size securing rings ;.
ISOFIX and i-Size are standardised securing sys-
tems for special child restraint systems. ISOFIX child restraint systems are approved in accord-
ance with ECE R-44. i-Size child restraint sys-
tems are approved in accordance with ECE
R-129.
Only child restraint systems that have been
approved in accordance with ECE R-44 may be
attached to ISOFIX securing rings. ISOFIX child
restraint systems in accordance with ECE R-44
and i ‑Size child restraint systems that have been
approved in accordance with ECE R-129 may be attached to i-Size securing rings. ISOFIX secur-
ing ring :or i-Size securing ring ;are instal-
led on the left and right sides of the rear seats. Top Tether
Introduction Top Tether provides an additional connection
between the child restraint system secured with
ISOFIX and the vehicle. It helps reduce the risk
of injury even further. If the child restraint sys-
tem is fitted with a Top Tether belt, this should
always be used.
Important safety notes G
WARNING
If the rear seat backrests are not locked, they
could fold forwards in the event of an acci- 56
Children in the vehicleSafety
Page 60 of 345
dent, heavy braking or sudden changes of
direction. As a result, child restraint systems
cannot perform their intended protective
function. Rear seat backrests that are not
locked can also cause additional injuries, e.g. in the event of an accident. This poses an
increased risk of injury or even fatal injury.
Always lock rear seat backrests after fitting a Top Tether belt. Observe the lock verificationindicator. Adjust the rear seat backrests so
that they are in an upright position.
If the rear backrest is not engaged and locked,
the red lock verification indicator will be visible
(Y page 271).
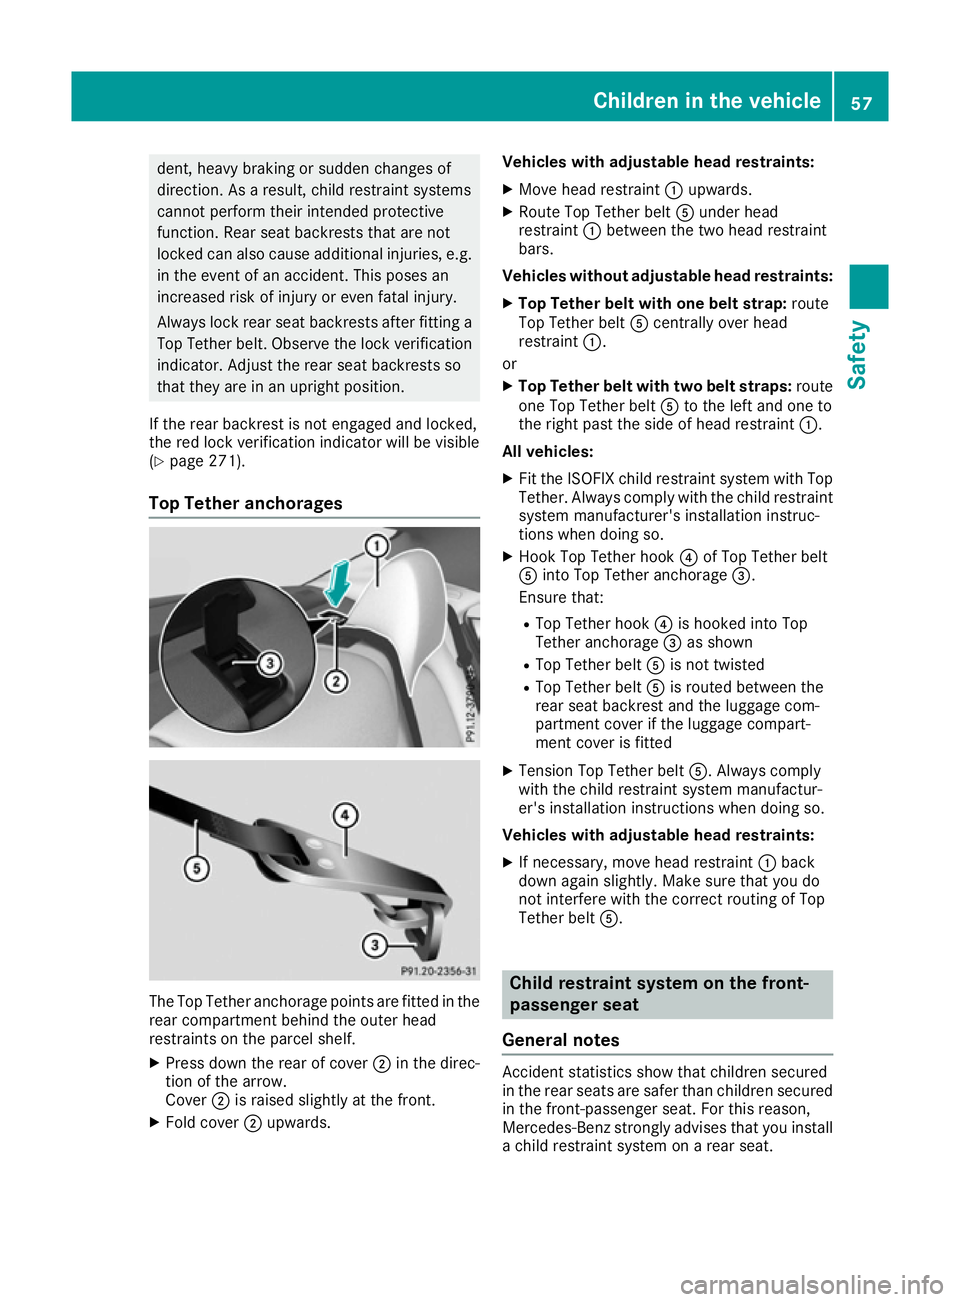
Top Tether anchorages The Top Tether anchorage points are fitted in the
rear compartment behind the outer head
restraints on the parcel shelf.
X Press down the rear of cover ;in the direc-
tion of the arrow.
Cover ;is raised slightly at the front.
X Fold cover ;upwards. Vehicles with adjustable head restraints:
X Move head restraint :upwards.
X Route Top Tether belt Aunder head
restraint :between the two head restraint
bars.
Vehicles without adjustable head restraints:
X Top Tether belt with one belt strap: route
Top Tether belt Acentrally over head
restraint :.
or
X Top Tether belt with two belt straps: route
one Top Tether belt Ato the left and one to
the right past the side of head restraint :.
All vehicles:
X Fit the ISOFIX child restraint system with Top
Tether. Always comply with the child restraint
system manufacturer's installation instruc-
tions when doing so.
X Hook Top Tether hook ?of Top Tether belt
A into Top Tether anchorage =.
Ensure that:
R Top Tether hook ?is hooked into Top
Tether anchorage =as shown
R Top Tether belt Ais not twisted
R Top Tether belt Ais routed between the
rear seat backrest and the luggage com-
partment cover if the luggage compart-
ment cover is fitted
X Tension Top Tether belt A. Always comply
with the child restraint system manufactur-
er's installation instructions when doing so.
Vehicles with adjustable head restraints:
X If necessary, move head restraint :back
down again slightly. Make sure that you do
not interfere with the correct routing of Top
Tether belt A. Child restraint system on the front-
passenger seat
General notes Accident statistics show that children secured
in the rear seats are safer than children secured
in the front-passenger seat. For this reason,
Mercedes-Benz strongly advises that you install a child restraint system on a rear seat. Children in the vehicle
57Safety Z
Page 61 of 345
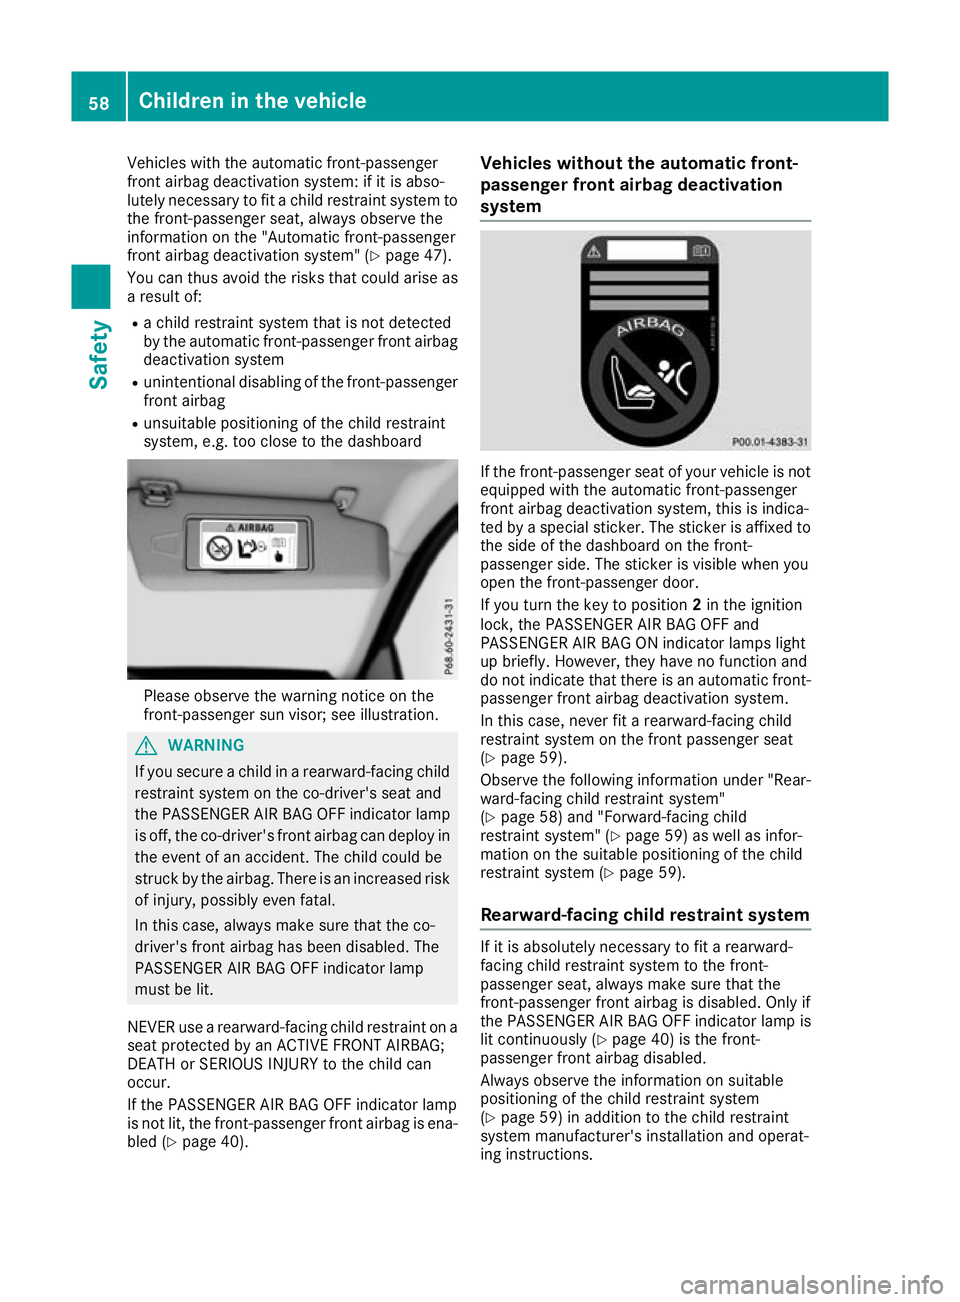
Vehicles with the automatic front-passenger
front airbag deactivation system: if it is abso-
lutely necessary to fit a child restraint system to the front-passenger seat, always observe the
information on the "Automatic front-passenger
front airbag deactivation system" (Y page 47).
You can thus avoid the risks that could arise as
a result of:
R a child restraint system that is not detected
by the automatic front-passenger front airbag
deactivation system
R unintentional disabling of the front-passenger
front airbag
R unsuitable positioning of the child restraint
system, e.g. too close to the dashboard Please observe the warning notice on the
front-passenger sun visor; see illustration. G
WARNING
If you secure a child in a rearward-facing child
restraint system on the co-driver's seat and
the PASSENGER AIR BAG OFF indicator lamp
is off, the co-driver's front airbag can deploy in the event of an accident. The child could be
struck by the airbag. There is an increased risk
of injury, possibly even fatal.
In this case, always make sure that the co-
driver's front airbag has been disabled. The
PASSENGER AIR BAG OFF indicator lamp
must be lit.
NEVER use a rearward-facing child restraint on a
seat protected by an ACTIVE FRONT AIRBAG;
DEATH or SERIOUS INJURY to the child can
occur.
If the PASSENGER AIR BAG OFF indicator lamp
is not lit, the front-passenger front airbag is ena- bled (Y page 40). Vehicles without the automatic front-
passenger front airbag deactivation
system If the front-passenger seat of your vehicle is not
equipped with the automatic front-passenger
front airbag deactivation system, this is indica-
ted by a special sticker. The sticker is affixed to
the side of the dashboard on the front-
passenger side. The sticker is visible when you
open the front-passenger door.
If you turn the key to position 2in the ignition
lock, the PASSENGER AIR BAG OFF and
PASSENGER AIR BAG ON indicator lamps light
up briefly. However, they have no function and
do not indicate that there is an automatic front- passenger front airbag deactivation system.
In this case, never fit a rearward-facing child
restraint system on the front passenger seat
(Y page 59).
Observe the following information under "Rear-
ward-facing child restraint system"
(Y page 58) and "Forward-facing child
restraint system" (Y page 59) as well as infor-
mation on the suitable positioning of the child
restraint system (Y page 59).
Rearward-facing child restraint system If it is absolutely necessary to fit a rearward-
facing child restraint system to the front-
passenger seat, always make sure that the
front-passenger front airbag is disabled. Only if
the PASSENGER AIR BAG OFF indicator lamp is lit continuously (Y page 40) is the front-
passenger front airbag disabled.
Always observe the information on suitable
positioning of the child restraint system
(Y page 59) in addition to the child restraint
system manufacturer's installation and operat-
ing instructions. 58
Children in the vehicleSafety
Page 67 of 345
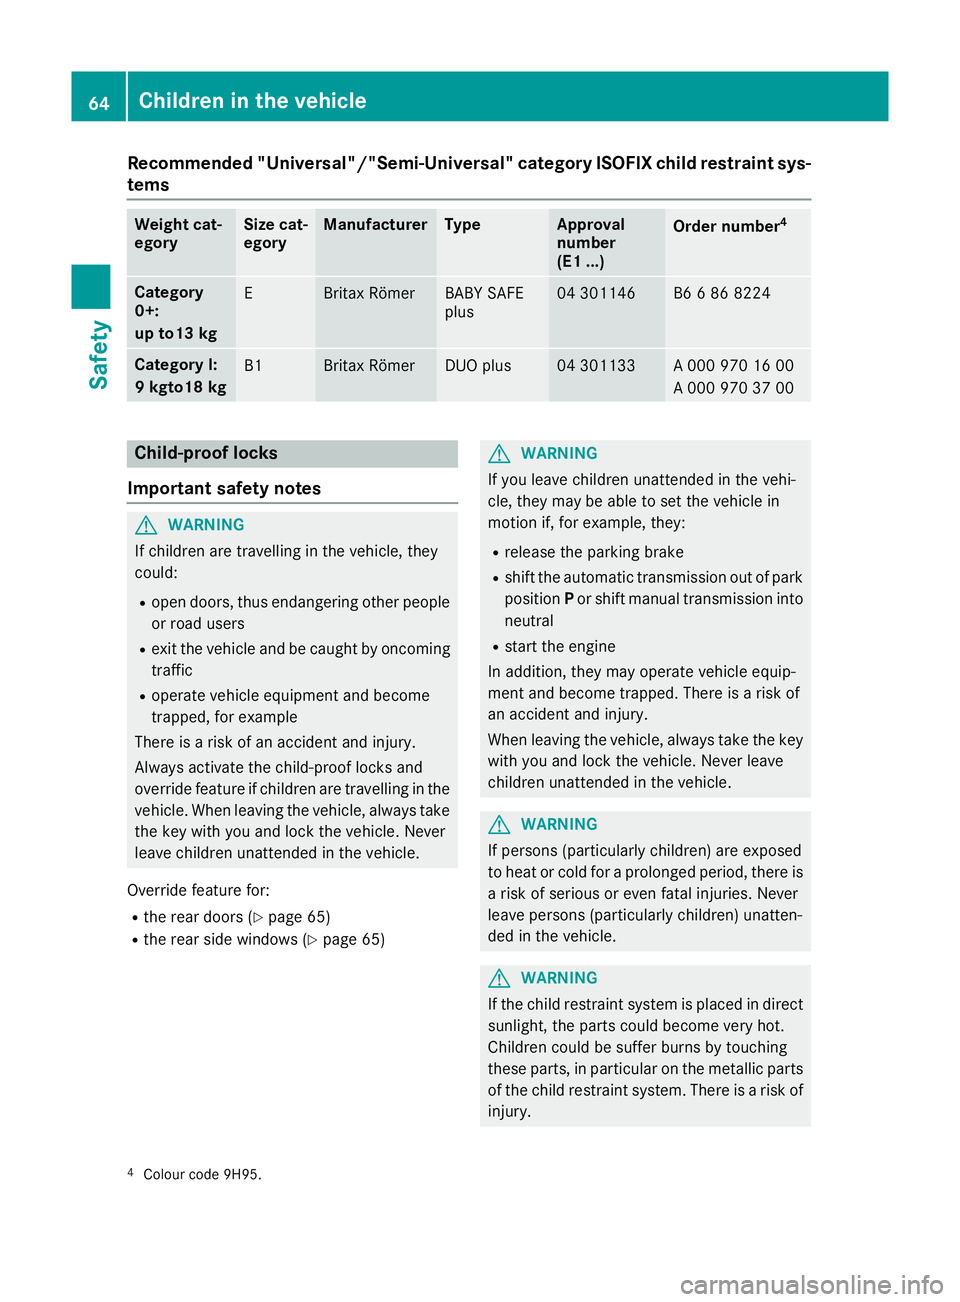
Recommended "Universal"/"Semi-Universal" category ISOFIX child restraint sys-
tems Weight cat-
egory Size cat-
egory Manufacturer Type Approval
number
(E1 ...)
Order number
4 Category
0+:
up to13 kg
E Britax Römer BABY SAFE
plus 04 301146 B6 6 86 8224
Category I:
9 kgto18 kg
B1 Britax Römer DUO plus 04 301133 A 000 970 16 00
A 000 970 37 00
Child-proof locks
Important safety notes G
WARNING
If children are travelling in the vehicle, they
could:
R open doors, thus endangering other people
or road users
R exit the vehicle and be caught by oncoming
traffic
R operate vehicle equipment and become
trapped, for example
There is a risk of an accident and injury.
Always activate the child-proof locks and
override feature if children are travelling in the vehicle. When leaving the vehicle, always take the key with you and lock the vehicle. Never
leave children unattended in the vehicle.
Override feature for:
R the rear doors (Y page 65)
R the rear side windows (Y page 65) G
WARNING
If you leave children unattended in the vehi-
cle, they may be able to set the vehicle in
motion if, for example, they:
R release the parking brake
R shift the automatic transmission out of park
position Por shift manual transmission into
neutral
R start the engine
In addition, they may operate vehicle equip-
ment and become trapped. There is a risk of
an accident and injury.
When leaving the vehicle, always take the key with you and lock the vehicle. Never leave
children unattended in the vehicle. G
WARNING
If persons (particularly children) are exposed
to heat or cold for a prolonged period, there is a risk of serious or even fatal injuries. Never
leave persons (particularly children) unatten-
ded in the vehicle. G
WARNING
If the child restraint system is placed in direct sunlight, the parts could become very hot.
Children could be suffer burns by touching
these parts, in particular on the metallic parts
of the child restraint system. There is a risk of injury.
4 Colour code 9H95. 64
Children in the vehicleSafety