steering MERCEDES-BENZ CLA SHOOTING BRAKE 2015 Manual PDF
[x] Cancel search | Manufacturer: MERCEDES-BENZ, Model Year: 2015, Model line: CLA SHOOTING BRAKE, Model: MERCEDES-BENZ CLA SHOOTING BRAKE 2015Pages: 421, PDF Size: 12.52 MB
Page 328 of 421
dling changes. If you exceed the maximum
roof load, the handling as well as steering and braking characteristics are severely affected.
There is a risk of an accident.
Always observe the maximum roof load and
adapt your driving style.
! Mercedes-Benz recommends that you
only use roof carriers that have been tested and approved for Mercedes-Benz vehicles.
This helps to prevent damage to the vehi-
cle.
Position the load on the roof carrier in such
a way that the vehicle will not sustain dam-
age even when it is in motion.
Ensure that, depending on the vehicle's
equipment, you can raise the panorama
sliding sunroof fully and open the tailgate
fully when the roof carrier is fitted.
You will find information on the maximum roof
load in the "Technical data" section
(Y page 410).
An incorrectly secured roof carrier or roof
load may become detached from the vehicle.
You must therefore ensure that you observe
the roof carrier manufacturer's installation
instructions.
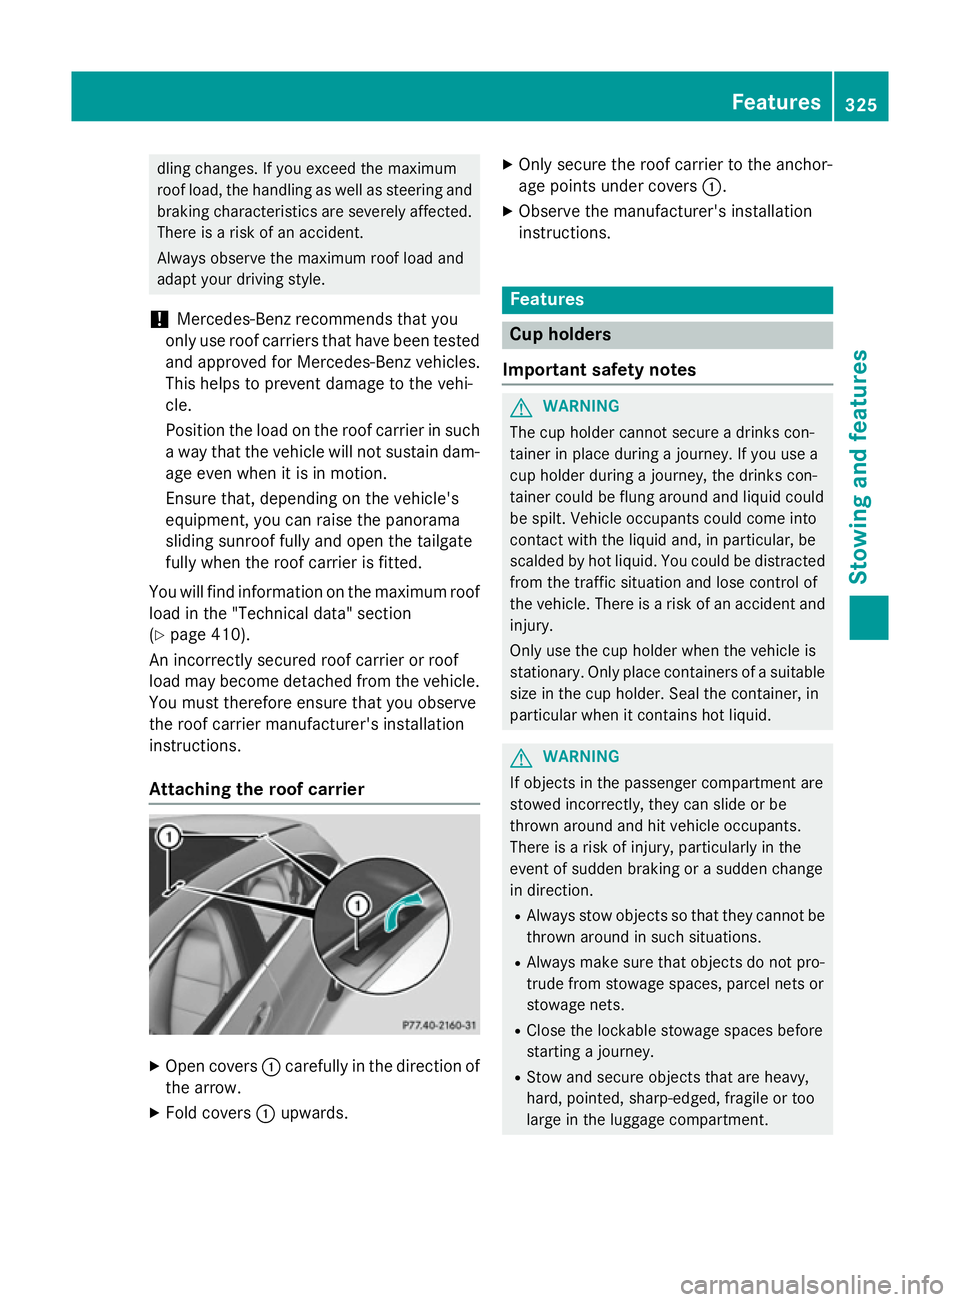
Attaching the roof carrier X
Open covers :carefully in the direction of
the arrow.
X Fold covers :upwards. X
Only secure the roof carrier to the anchor-
age points under covers :.
X Observe the manufacturer's installation
instructions. Features
Cup holders
Important safety notes G
WARNING
The cup holder cannot secure a drinks con-
tainer in place during a journey. If you use a
cup holder during a journey, the drinks con-
tainer could be flung around and liquid could
be spilt. Vehicle occupants could come into
contact with the liquid and, in particular, be
scalded by hot liquid. You could be distracted
from the traffic situation and lose control of
the vehicle. There is a risk of an accident and
injury.
Only use the cup holder when the vehicle is
stationary. Only place containers of a suitable size in the cup holder. Seal the container, in
particular when it contains hot liquid. G
WARNING
If objects in the passenger compartment are
stowed incorrectly, they can slide or be
thrown around and hit vehicle occupants.
There is a risk of injury, particularly in the
event of sudden braking or a sudden change
in direction. R Always stow objects so that they cannot be
thrown around in such situations.
R Always make sure that objects do not pro-
trude from stowage spaces, parcel nets or
stowage nets.
R Close the lockable stowage spaces before
starting a journey.
R Stow and secure objects that are heavy,
hard, pointed, sharp-edged, fragile or too
large in the luggage compartment. Features
325Stowing and features Z
Page 333 of 421
You must observe the legal requirements for
the country in which you are currently driving when operating mobile communications
equipment in the vehicle.
If it is permitted by law to operate communi-
cations equipment while the vehicle is in
motion, you may only do so if the traffic sit-
uation permits. You may otherwise be dis-
tracted from the traffic conditions, cause an
accident and injure yourself and others.
Excessive levels of electromagnetic radiation
may cause damage to your health and to the
health of others. The use of an exterior aerial
takes into consideration the scientific discus- sion surrounding the possible health risk
posed by electromagnetic fields.
Mercedes-Benz recommends the use of an
approved exterior aerial. This ensures:
R optimal mobile phone reception quality in
the vehicle
R that mutual interference between the vehi-
cle electronics and mobile phones is mini-
mised
An exterior aerial has the following advan-
tages:
R it conducts the electromagnetic fields gen-
erated by a wireless device to the exterior
R the field strength in the vehicle interior is
lower than in a vehicle that does not have
an exterior aerial
Information on retrofitting two-way radios
and mobile phones (RF transmitters)
(Y page 400).
General notes There are various mobile phone brackets that
may be fitted in your vehicle; in some cases,
these are country-specific. More information on suitable mobile phones,
mobile phone brackets and on connecting
Bluetooth ®
-capable mobile phones to
COMAND Online/Audio 20 can be obtained:
R at your Mercedes-Benz Service Centre
R on the Internet at http://www.mercedes-
benz.com/connect
The functions and services available when
you use the phone depend on your mobile
phone model and service provider.
Using a mobile phone To connect a mobile phone to the exterior
aerial and charge it, insert it into the mobile
phone bracket.
X Open the telephone compartment
(Y page 318).
X Place the mobile phone bracket into the
pre-installed fitting; see the separate instal-
lation instructions for the mobile phone fit-
ting.
X Insert the mobile phone into the mobile
phone bracket; see the separate installa-
tion instructions for the mobile phone fit-
ting.
i The mobile phone can also be operated
without being in the bracket. However, the charging function and aerial function are
not available.
In order to use Bluetooth ®
(SAP profile) on
your telephone module, you must first insert
the telephone module into the pre-installed
fitting. This connects it to the exterior aerial.
If you wish to charge the mobile phone, then
you must connect it to a USB port.
Further information on the telephone module
with Bluetooth ®
(SAP profile) can be found in
the Digital Owner's Manual.
Operating the mobile phone You can operate the telephone using the
6 and~ buttons on the multifunction
steering wheel. You can operate other mobile 330
FeaturesStowing and features
Page 349 of 421
carried out by a qualified specialist work-
shop. Interior care
Cleaning the display !
For cleaning, do not use any of the fol-
lowing:
R alcohol-based thinner or petrol
R abrasive cleaning agents
R commercially-available household clean-
ing agents
These may damage the display surface. Do not put pressure on the display surface
when cleaning. This could lead to irrepara-
ble damage to the display.
X Before cleaning the display, make sure that
it is switched off and has cooled down.
X Clean the display surface using a commer-
cially available microfibre cloth and
TFT/LCD display cleaner.
X Dry the display surface using a dry micro-
fibre cloth.
Cleaning the plastic trim G
WARNING
Care products and cleaning agents containing solvents can cause surfaces in the cockpit to
become porous. This could result in plastic
parts breaking away when the airbags are
deployed. There is a danger of injury.
Do not use care products and cleaning agents containing solvents to clean the cockpit.
! Do not affix the following to plastic surfa-
ces:
R stickers
R films
R scented oil bottles or similar items
You could otherwise damage the plastic.
! Do not allow cosmetics, insect repellent
or sunscreen to come in contact with the plastic trim. This maintains the high-quality
look of the surfaces.
X Wipe the plastic trim with a damp, lint-free
cloth, e.g. a microfibre cloth.
X Heavy soiling: use car care and cleaning
products recommended and approved by
Mercedes-Benz.
The surface may change colour tempora-
rily. Wait until the surface is dry again.
Cleaning the steering wheel and gear or selector lever X
Thoroughly wipe with a damp cloth or use
leather care agents that have been recom-
mended and approved by Mercedes-Benz.
Cleaning wooden trim and trim ele-
ments !
Do not use solvent-based cleaning agents
such as tar remover, wheel cleaners, pol-
ishes or waxes. There is otherwise a risk of damaging the surface.
X Wipe the wooden trim and trim elements
with a damp, lint-free cloth, e.g. a microfi-
bre cloth.
X Heavy soiling: use car care and cleaning
products recommended and approved by
Mercedes-Benz.
Cleaning the seat covers General notes
! Do not use a microfibre cloth to clean
covers made out of real leather, artificial
leather or DINAMICA. If used frequently,
this can damage the cover.
Note that regular care is essential to make
sure that the appearance and comfort of the
covers are retained over time. 346
CareMaintenance and care
Page 356 of 421
In addition to the vehicle load, the driving dis-
tance possible depends upon:
R vehicle speed
R road condition
R outside temperature
The driving distance possible in run-flat mode may be reduced by extreme driving condi-
tions/manoeuvres, or it can be increased
through a moderate style of driving.
The driving distance possible in run-flat mode
is counted from the moment the tyre pressure loss warning appears in the multifunction dis-
play.
You must not exceed a maximum speed of
80 km/h.
When replacing one or all tyres, observe the
following specifications for your vehicle's
tyres:
R size
R type and
R the "MOExtended" mark.
If a tyre has gone flat and cannot be replaced
with an MOExtended tyre, a standard tyre
may be used as a temporary measure. Make
sure that you use the proper size and type
(summer or winter tyre).
Vehicles with MOExtended tyres are not
equipped with a TIREFIT kit at the factory. It is therefore recommended that you additionally
equip your vehicle with a TIREFIT kit if you fit tyres that do not feature run-flat characteris- tics, e.g. winter tyres. A TIREFIT kit can be
obtained from a qualified specialist work-
shop.
Important safety notes G
WARNING
When driving in emergency mode, the driving characteristics deteriorate, e.g. when corner-
ing, accelerating quickly and when braking.
There is a risk of accident.
Do not exceed the stated maximum speed.
Avoid abrupt steering and driving manoeu-
vres, and driving over obstacles (kerbs, pot- holes, off-road). This applies in particular to a
laden vehicle.
Stop driving in emergency mode if:
R you hear banging noises.
R the vehicle starts to shake.
R you see smoke and smell rubber.
R ESP ®
is intervening constantly.
R there are tears in the sidewalls of the tyre.
After driving in emergency mode, have the
wheel rims checked at a qualified specialist
workshop with regard to their further use. The faulty tyre must be replaced. TIREFIT kit
Important safety notes TIREFIT is a tyre sealant.
You can use TIREFIT to seal punctures of up to
4 mm, particularly those in the tyre tread. You
can use TIREFIT at outside temperatures
down to Ò20 †. G
WARNING
In the following situations, the tyre sealant is
unable to provide sufficient breakdown assis- tance, as it is unable to seal the tyre properly:
R there are cuts or punctures in the tyre
larger than those mentioned above.
R the wheel rim is damaged.
R you have driven at very low tyre pressures
or on a flat tyre.
There is a risk of an accident.
Do not drive any further. Contact a qualified
specialist workshop. G
WARNING
The tyre sealant is harmful and causes irrita-
tion. It must not come into contact with your
skin, eyes or clothing or be swallowed. Do not inhale TIREFIT fumes. Keep tyre sealant away
from children. There is a risk of injury. Flat tyre
353Breakdown assistance
Z
Page 360 of 421
G
WARNING
Work carried out incorrectly on the battery
can lead, for example, to a short circuit and
thus damage the vehicle electronics. This can lead to function restrictions applying to
safety-relevant systems, e.g the lighting sys-
tem, the ABS (anti-lock braking system) or the
ESP ®
(Electronic Stability Program). The oper-
ating safety of your vehicle may be restricted.
You could lose control of the vehicle, for
example:
R when braking
R in the event of abrupt steering manoeuvres
and/or when the vehicle's speed is not
adapted to the road conditions
There is a risk of an accident.
In the event of a short circuit or a similar inci- dent, contact a qualified specialist workshop
immediately. Do not drive any further. Always have work on the battery carried out at a
qualified specialist workshop.
Further information about ABS (Y page 73)
and ESP ®
(Y page 76). G
WARNING
Electrostatic build-up can lead to the creation of sparks, which could ignite the highly explo-
sive gases of a battery. There is a risk of an
explosion.
Before handling the battery, touch the vehicle body to remove any existing electrostatic
build-up.
The highly flammable gas mixture is created
while the battery is charging and when jump-
starting.
Always make sure that neither you nor the
battery is electrostatically charged. Electro-
static charge is created, for example:
R by wearing synthetic fibre clothing
R by friction between clothing and the seat
R when you pull or push the battery across
carpet or other synthetic materials
R when you rub the battery with a cloth G
WARNING
During the charging process, a battery produ- ces hydrogen gas. If a short circuit occurs or
sparks are created, the hydrogen gas can
ignite. There is a risk of an explosion.
R Make sure that the positive terminal of a
connected battery does not come into con-
tact with vehicle parts.
R Never place metal objects or tools on a bat-
tery.
R It is important that you observe the descri-
bed order of the battery terminals when
connecting and disconnecting a battery.
R When jump-starting, make sure that the
battery poles with identical polarity are
connected.
R It is particularly important to observe the
described order when connecting and dis-
connecting the jump leads.
R Never connect or disconnect the battery
terminals while the engine is running. G
WARNING
Battery acid is caustic. There is a risk of injury. Avoid contact with the skin, eyes or clothing.
Do not breathe in any battery gases. Do not
lean over the battery. Keep the batteries out
of the reach of children. Immediately rinse off
battery acid thoroughly with plenty of clean
water and seek medical attention at once. H
Environmental note Batteries contain pollutants.
It is illegal to dispose of them
with the household rubbish.
They must be collected sep-
arately and disposed of in anenvironmentally responsible
recycling system. Dispose of batteries in an
environmentally responsible
manner. Take discharged
batteries to a qualified spe-
cialist workshop or to a col- Battery (vehicle)
357Breakdown assistance
Z
Page 365 of 421
X
Start the engine of the donor vehicle and run it at idling speed.
X Connect negative terminal ?of donor battery Bto earth point Aof your vehicle using the
jump lead, connecting the jump lead to donor battery Bfirst.
X If the battery is fully discharged, leave the battery that is being used to jump-start connected
for a few minutes before attempting to start. This charges the empty battery a little.
X Start the engine.
X Before disconnecting the jump leads, let the engines run for several minutes.
X First, remove the jump leads from earth point Aand negative terminal ?, then from pos-
itive clamp ;and positive terminal =. Begin each time at the contacts on your own vehicle
first.
X Close cover :of positive clamp ;after removing the jump leads.
X Close the bonnet.
X Have the battery checked at a qualified specialist workshop.
i Jump-starting is not considered to be a normal operating condition.
i Jump-starting cables and further information regarding jump starting can be obtained at
any qualified specialist workshop. Towing away and tow-starting
Important safety notes
G
WARNING
Safety relevant functions are restricted or no
longer available if:
R the engine is not running
R the brake system or power steering is mal-
functioning
R there is a malfunction in the voltage supply
or the vehicle's electrical system
When your vehicle is towed away or towed
started, you may require considerably more
effort to steer and brake. There is a risk of an
accident.
In such cases use a rigid towing bar. Before
being towed away or tow started, make sure
the steering moves freely. G
WARNING
If the steering wheel lock is engaged, the vehi- cle can no longer be steered. There is a risk of
an accident.
Always switch on the ignition when towing
with a tow rope or a towing bar. G
WARNING
When towing or tow-starting another vehicle
and its weight is greater than the permissible gross weight of your vehicle, the:
R towing eye may be torn off
R car/trailer combination may swerve or
even overturn
There is a risk of an accident.
When towing or tow-starting another vehicle,
its weight should not be greater than the per- missible gross weight of your vehicle.
Details on the permissible gross vehicle
weight of your vehicle can be found on the
vehicle identification plate (Y page 402).
! When COLLISION PREVENTION ASSIST
PLUS, DISTRONIC PLUS or the HOLD func- tion is activated, the vehicle brakes auto-
matically in certain situations. To avoid
damage to the vehicle, deactivate these
systems in the following or similar situa-
tions:
R when towing away
R in a car wash 362
Towing away and tow-startingBreakdown assistance
Page 368 of 421
X
Deactivate tow-away protection
(Y page 82).
X Deactivate automatic locking (Y page 260).
X Switch on the hazard warning lamps
(Y page 129).
X Turn the key in the ignition lock to position
0 and leave the key in the ignition lock. Towing the vehicle with both axles on
the ground
It is important that you observe the safety
instructions when towing away your vehicle
(Y page 362).
X On vehicles with KEYLESS-GO or the
KEYLESS-GO start function: you must
use the key instead of the Start/Stop but-
ton (Y page 167).
Vehicles with automatic transmission: the
automatic transmission automatically shifts
to position Pwhen you open the driver's or
front-passenger door or when you remove the
key from the ignition lock. In order to ensure that the automatic transmission stays in posi- tion Nwhen towing away the vehicle, you
must observe the following points:
X Make sure that the vehicle is stationary.
X Turn the key to position 2in the ignition
lock.
X Depress the brake pedal and keep it
depressed.
X Shift the automatic transmission to posi-
tion N.
Vehicles with manual transmission: X Turn the key to position 2in the ignition
lock.
X When the vehicle is stationary, depress the
brake pedal and keep it depressed.
X Depress the clutch pedal fully and shift to
neutral. Vehicles with manual or automatic trans-
mission:
X Leave the key in position 2in the ignition
lock.
X Release the brake pedal.
X Release the electric parking brake.
X Switch on the hazard warning lamps
(Y page 129).
i In order to signal a change of direction
when towing the vehicle with the hazard
warning lamps switched on, use the com-
bination switch as usual. In this case, only
the turn signals for the desired direction
flash. When you reset the combination
switch, the hazard warning lamps start
flashing again. Transporting the vehicle
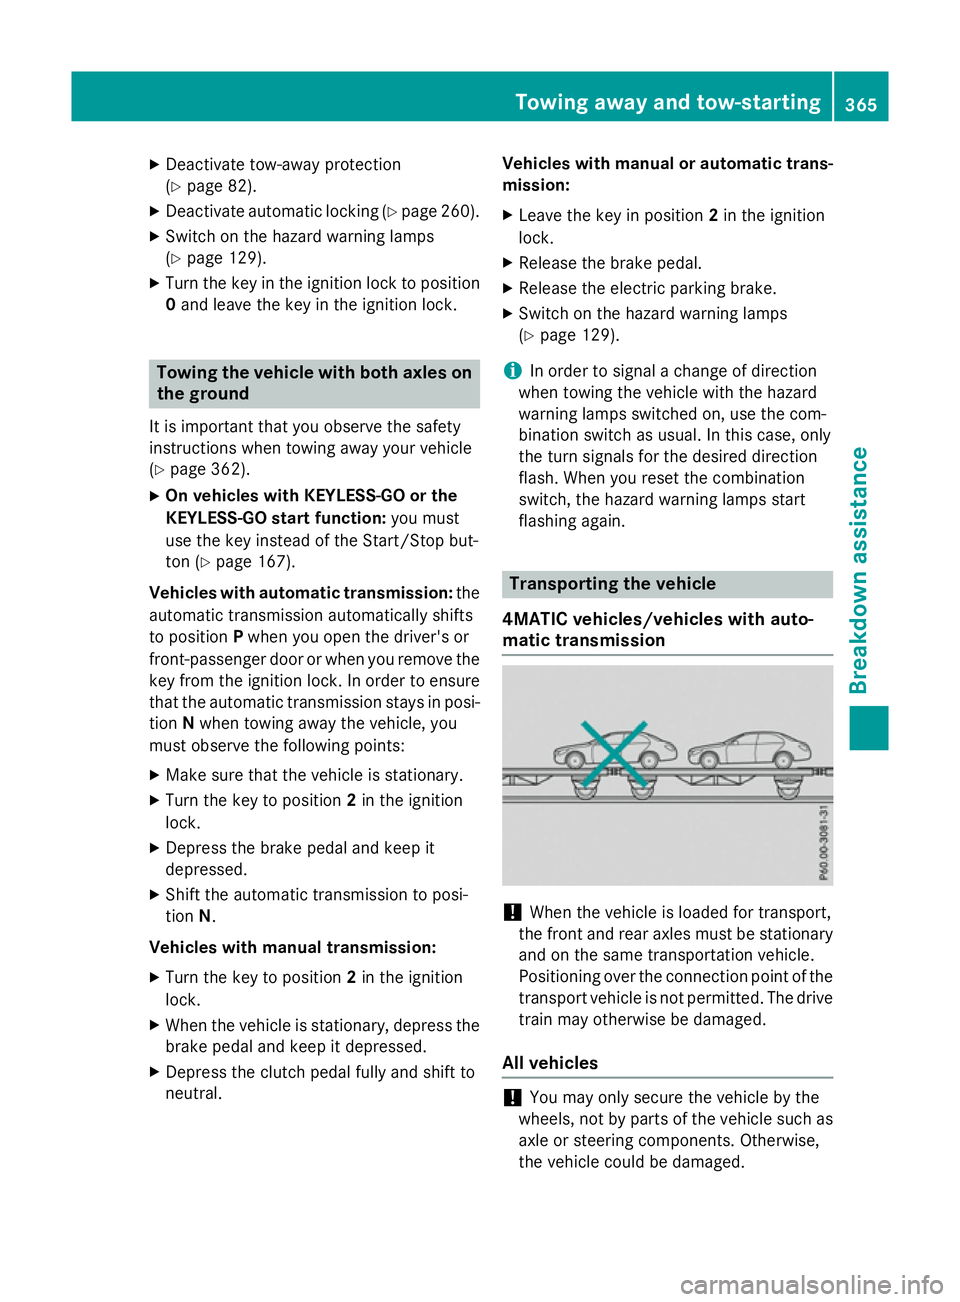
4MATIC vehicles/vehicles with auto-
matic transmission !
When the vehicle is loaded for transport,
the front and rear axles must be stationary
and on the same transportation vehicle.
Positioning over the connection point of the transport vehicle is not permitted. The drive
train may otherwise be damaged.
All vehicles !
You may only secure the vehicle by the
wheels, not by parts of the vehicle such as
axle or steering components. Otherwise,
the vehicle could be damaged. Towing away and tow-starting
365Breakdown assistance Z
Page 378 of 421
does not permit any reliable conclusion about
the tyre pressure. On vehicles fitted with the
electronic tyre pressure monitor, the tyre
pressure can be checked using the on-board
computer.
If possible, only correct tyre pressures when
the tyres are cold.
The tyres are cold:
R if the vehicle has been parked with the tyres
out of direct sunlight for at least three
hours and
R if the vehicle has not been driven further
than 1.6 km
Depending on the ambient temperature, the
vehicle speed and the load on the tyres, the
tyre temperature and thus the tyre pressure
changes by approximately 10 kPa (0.1 bar/
1.5 psi) per 10 †. Take this into account
when checking the pressure of warm tyres.
Only correct the tyre pressure if it is too low
for the current operating conditions.
Driving with tyre pressure that is too high or
too low can:
R shorten the service life of the tyres
R cause increased tyre damage
R have a negative effect on handling charac-
teristics and thus driving safety (e.g. aqua- planing)
The tyre pressure values given for low loads
are minimum values which offer you good ride
comfort characteristics.
However, you can also use the values given
for higher loads. These are permissible and
will not adversely affect the running of the
vehicle. Tyre pressure loss warning system
General notes While the vehicle is in motion, the tyre pres-
sure loss warning system monitors the set
tyre pressure using the rotational speed of
the wheels. This enables the system to detect significant pressure loss in a tyre. If the speed of rotation of a wheel changes as a result of a
loss of pressure, a corresponding warning
message will appear in the multifunction dis-
play.
You can recognise the tyre pressure loss
warning by the Run Flat Indicator
Run Flat Indicator
active Restart with OK active Restart with OK message which
appears in the multifunction display in the
Serv.
Serv.menu. Information on the message dis-
play can be found in the "Restarting the tyre
pressure loss warning system" section
(Y page 376).
Important safety notes The tyre pressure warning system does not
warn you of an incorrectly set tyre pressure.
Observe the notes on the recommended tyre
pressure (Y page 374).
The tyre pressure loss warning does not
replace the need to regularly check the tyre
pressures. An even loss of pressure on sev-
eral tyres at the same time cannot be detec-
ted by the tyre pressure loss warning system.
The tyre pressure monitor is not able to warn
you of a sudden loss of pressure, e.g. if the
tyre is penetrated by a foreign object. In the
event of a sudden loss of pressure, bring the
vehicle to a halt by braking carefully. Avoid
abrupt steering manoeuvres.
The function of the tyre pressure loss warning system is limited or delayed if:
R snow chains are fitted to your vehicle's
tyres.
R road conditions are wintry.
R you are driving on sand or gravel.
R you adopt a very sporty driving style (cor-
nering at high speeds or driving with high
rates of acceleration).
R you are towing a very heavy or large trailer.
R you are driving with a heavy load (in the
vehicle or on the roof). Tyre pressure
375Wheels and tyres Z
Page 379 of 421
Restarting the tyre pressure loss warn-
ing system Restart the tyre pressure loss warning system
if you have:
R changed the tyre pressure
R changed the wheels or tyres
R fitted new wheels or tyres
X Before restarting, make sure that the tyre
pressures are set properly on all four tyres
for the respective operating conditions.
The recommended tyre pressures can be
found in the tyre pressure table on the fuel
filler flap.
The tyre pressure loss warning system can only give reliable warnings if you have set
the correct tyre pressure. If an incorrect
tyre pressure is set, these incorrect values
will be monitored.
X Observe the notes in the section on tyre
pressures (Y page 374).
X Make sure that the key is in position 2in the
ignition lock (Y page 165).
X Press =or; on the steering wheel
to select the Serv.
Serv.menu.
X Press the 9or: button to select
Tyre pressure
Tyre pressure .
X Press the abutton.
The Run Flat Indicator active Run Flat Indicator active
Restart
Restart with
withOK
OKmessage appears in the
multifunction display.
If you wish to confirm the restart: X Press the abutton.
The Tyre press. now OK?
Tyre press. now OK? message
appears in the multifunction display.
X Press the 9or: button to select
Yes
Yes.
X Press the abutton.
The Run Flat Indicator restarted
Run Flat Indicator restarted
message appears in the multifunction dis-
play.
After a teach-in period, the tyre pressure
loss warning system will monitor the set
tyre pressures of all four tyres. If you wish to cancel the restart:
X Press the %button.
or X If the Tyre press. now OK?
Tyre press. now OK? message
appears, press the 9or: button to
select Cancel Cancel.
X Press the abutton.
The tyre pressure values stored at the last
restart will continue to be monitored. Tyre pressure monitor
General notes If a tyre pressure monitor system is fitted, the
vehicle's wheels have sensors fitted that
monitor the tyre pressures in all four tyres.
The tyre pressure monitor warns you if the
pressure drops in one or more of the tyres.
The tyre pressure monitor only functions if
the corresponding sensors are fitted to all
wheels.
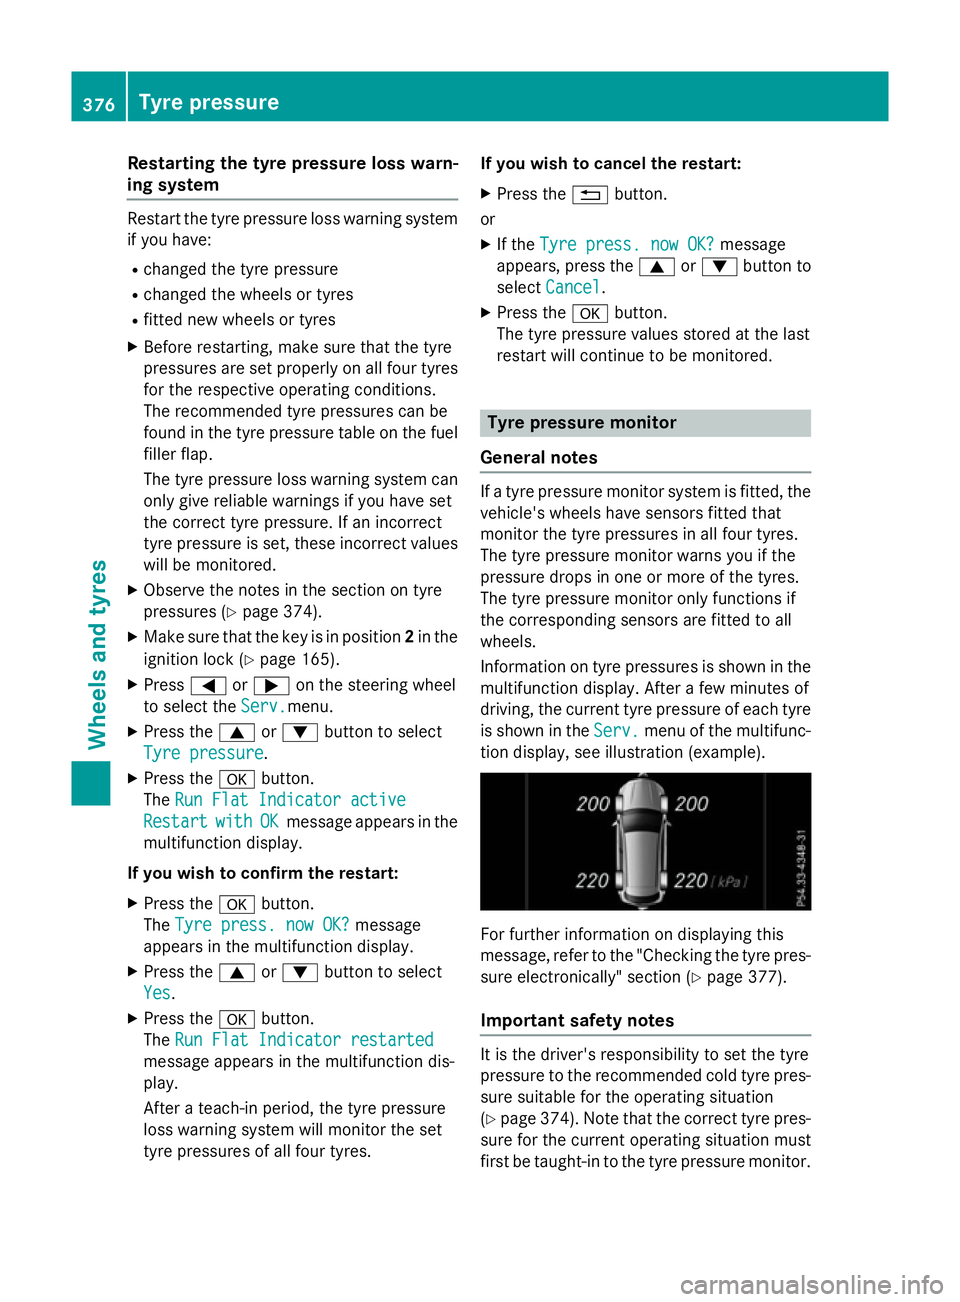
Information on tyre pressures is shown in the multifunction display. After a few minutes of
driving, the current tyre pressure of each tyre
is shown in the Serv. Serv.menu of the multifunc-
tion display, see illustration (example). For further information on displaying this
message, refer to the "Checking the tyre pres-
sure electronically" section (Y page 377).
Important safety notes It is the driver's responsibility to set the tyre
pressure to the recommended cold tyre pres-
sure suitable for the operating situation
(Y page 374). Note that the correct tyre pres-
sure for the current operating situation must
first be taught-in to the tyre pressure monitor. 376
Tyre pressureWheels and tyres
Page 380 of 421
If there is a substantial loss of pressure, the
warning threshold for the warning message is aligned to the reference values taught-in.
Restart the tyre pressure monitor after
adjusting to the cold tyre pressure
(Y page 378). The current pressures are
saved as new reference values. This will
ensure that a warning message will only
appear if the tyre pressure drops significantly.
The tyre pressure monitor does not warn you of an incorrectly set tyre pressure. Observe
the notes on the recommended tyre pressure
(Y page 374).
The tyre pressure monitor is not able to warn you of a sudden loss of pressure, e.g. if the
tyre is penetrated by a foreign object. In the
event of a sudden loss of pressure, bring the
vehicle to a halt by braking carefully. Avoid
abrupt steering manoeuvres.
The tyre pressure monitor has a yellow warn-
ing lamp in the instrument cluster for indicat-
ing a pressure loss or malfunction. Depending on how the warning lamp flashes or lights up,
a tyre pressure that is too low or a malfunc-
tion in the tyre pressure monitor is indicated:
R if the warning lamp is lit continuously, the
tyre pressure on one or more tyres is sig-
nificantly too low. The tyre pressure moni-
tor is not malfunctioning.
R if the warning lamp flashes for around a
minute and then remains lit constantly, the
tyre pressure monitor is malfunctioning.
In addition to the warning lamp, a message
appears in the multifunction display. Observe
the information on display messages
(Y page 292).
It may take up to ten minutes for a malfunc-
tion of the tyre pressure monitor to be indi-
cated. A malfunction will be indicated by the
tyre pressure warning lamp flashing for
approximately one minute and then remain-
ing lit. When the fault has been rectified, the
tyre pressure warning lamp goes out after you
have driven for a few minutes.
The tyre pressure values indicated by the on- board computer may differ from those meas- ured at a filling station using a pressure
gauge. The tyre pressures shown by the on-
board computer refer to those measured at
sea level. At high altitudes, the tyre pressure
values indicated by a pressure gauge are
higher than those shown by the on-board
computer. In this case, do not reduce the tyre
pressures.
The operation of the tyre pressure monitor
can be affected by interference from radio
transmitting equipment (e.g. radio head-
phones, two-way radios) that may be being
operated in or near the vehicle.
Checking the tyre pressure electroni-
cally X
Make sure that the key is in position 2in the
ignition lock (Y page 165).
X Press =or; on the steering wheel
to select the Serv.
Serv.menu.
X Press the 9or: button to select
Tyre pressure Tyre pressure.
X Press the abutton.
The current tyre pressure for each wheel
will be displayed in the multifunction dis-
play.
If the vehicle was parked for longer than
20 minutes, the Tyre Tyrepressures
pressures will
willbe
be
displayed after a few minutes of
displayed after a few minutes of
driving driving message is shown.
After a teach-in period, the tyre pressure
monitor automatically detects new wheels or
new sensors. As long as a clear allocation of
the tyre pressure values to the individual
wheels is not possible, the Tyre pressure Tyre pressure
monitor active
monitor active message is shown instead
of the tyre pressure display. The tyre pres-
sures are already being monitored.
If an emergency spare wheel is fitted, for a
few minutes the system may continue to
show the tyre pressure of the wheel that has been removed. If this occurs, note that the
value displayed for the position where the
spare wheel is fitted is not the same as the
current tyre pressure of the emergency spare wheel. Tyre pressure
377Wheels and tyres Z