open bonnet MERCEDES-BENZ CLA SHOOTING BRAKE 2015 Owners Manual
[x] Cancel search | Manufacturer: MERCEDES-BENZ, Model Year: 2015, Model line: CLA SHOOTING BRAKE, Model: MERCEDES-BENZ CLA SHOOTING BRAKE 2015Pages: 421, PDF Size: 12.52 MB
Page 9 of 421
Activating/deactivating (on the
centre console) .............................. 157
Remote contro l.............................. 157
Axle load, permissible (trailer tow-
ing) ...................................................... 412 B
Bag hook ............................................ 321
Ball coupling
Folding in ....................................... 241
Folding out ..................................... 240
BAS (Brake Assist System) ................. 73
Battery (key)
Checking .......................................... 90
Important safety notes .................... 89
Replacing ......................................... 90
Battery (vehicle)
Charging ........................................ 359
Display message ............................ 284
Important safety notes .................. 356
Jump starting ................................. 360
Belt
see Seat belts
Belt tensioner
Activation ......................................... 57
Blind Spot Assist
Activating/deactivating (on-
board computer) ............................ 257
Display message ............................ 288
Notes/function .............................. 234
Trailer towing ................................. 236
Bonnet
Active bonnet (pedestrian protec-tion) ............................................... 334
Closing ........................................... 336
Display message ............................ 297
Important safety notes .................. 334
Opening ......................................... 335
Boot lid
see Tailgate
Boot load (maximum) ........................ 410
Brake
EBD .................................................. 80
Brake Assist
see BAS (Brake Assist System)
Brake fluid
Display message ............................ 273 Notes ............................................. 408
Brake force distribution
see EBD (electronic brake force
distribution)
Brake lamps
Adaptive ........................................... 76
Changing bulb s.............................. 137
Display message ............................ 280
Brakes
ABS .................................................. 73
Adaptive Brake Assist ...................... 75
BAS .................................................. 73
Brake fluid (notes) ......................... 408
Display message ............................ 266
Driving tips .................................... 197
Hill start assist ............................... 169
HOLD function ............................... 211
Important safety notes .................. 197
Parking brake ................................ 193
Warning lamp ................................. 303
Breakdown
Where will I find...? ........................ 350
see Flat tyre
see Tow-starting
see Towing away
Brightness control (instrument
cluster lighting) ................................... 32
Buttons on the steering column ...... 247 C
Calling up a fault see Display messages
Car
see Vehicle
Car wash (care) ................................. 341
Care
Automatic car wash ....................... 341
Carpets .......................................... 347
Display ........................................... 346
Exhaust pipe .................................. 345
Exterior lighting ............................. 344
Gear or selector lever .................... 346
High-pressure cleaner .................... 342
Interior ........................................... 346
Matt paintwork .............................. 342
Note s............................................. 340
Paint .............................................. 342 6
Index
Page 33 of 421
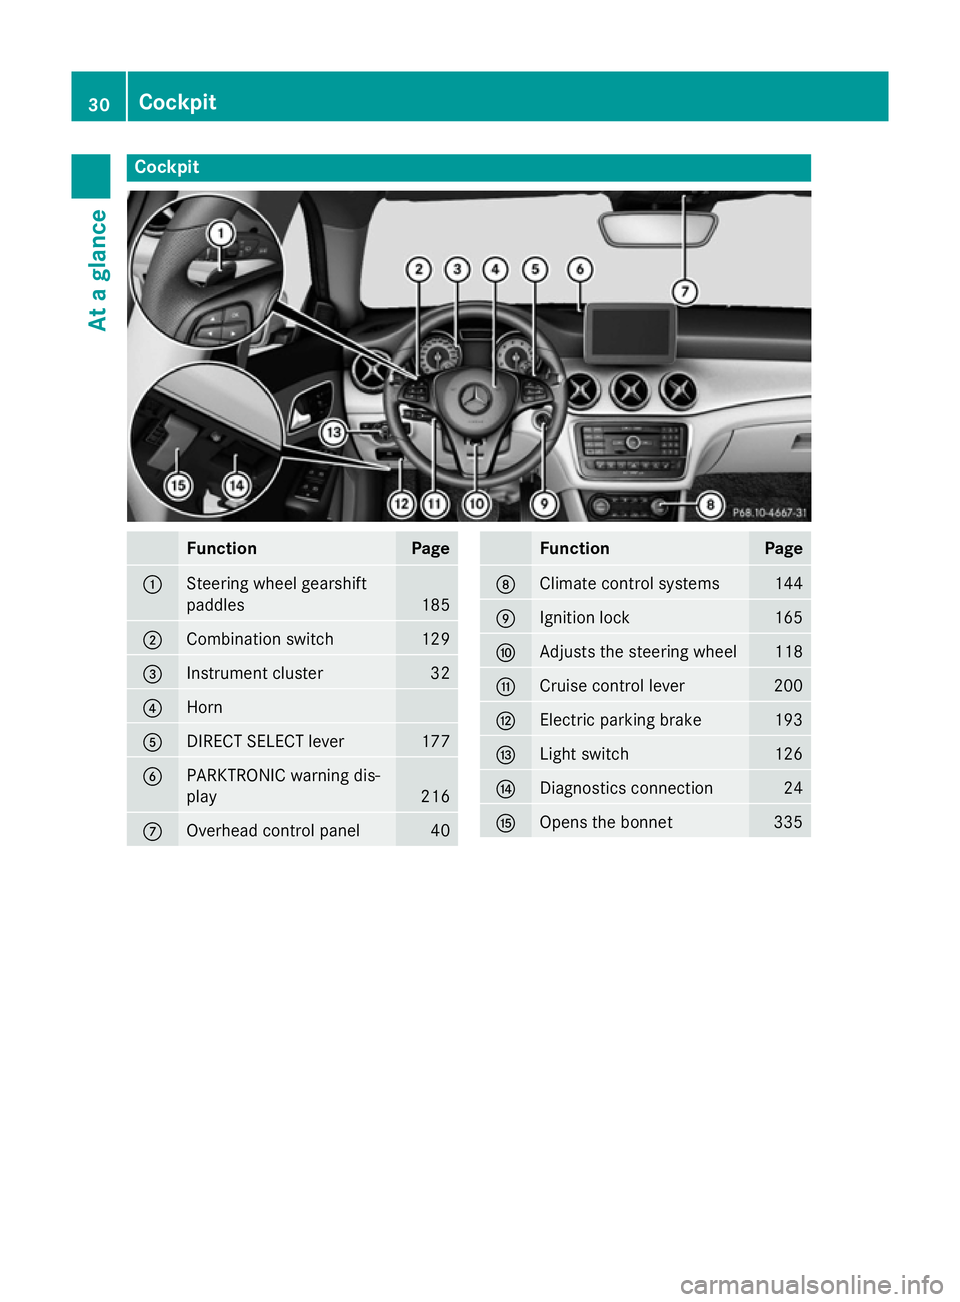
Cockpit
Function Page
:
Steering wheel gearshift
paddles
185
;
Combination switch 129
=
Instrument cluster 32
?
Horn
A
DIRECT SELECT lever 177
B
PARKTRONIC warning dis-
play
216
C
Overhead control panel 40 Function Page
D
Climate control systems 144
E
Ignition lock 165
F
Adjusts the steering wheel 118
G
Cruise control lever 200
H
Electric parking brake 193
I
Light switch 126
J
Diagnostics connection 24
K
Opens the bonnet 33530
CockpitAt a glance
Page 34 of 421
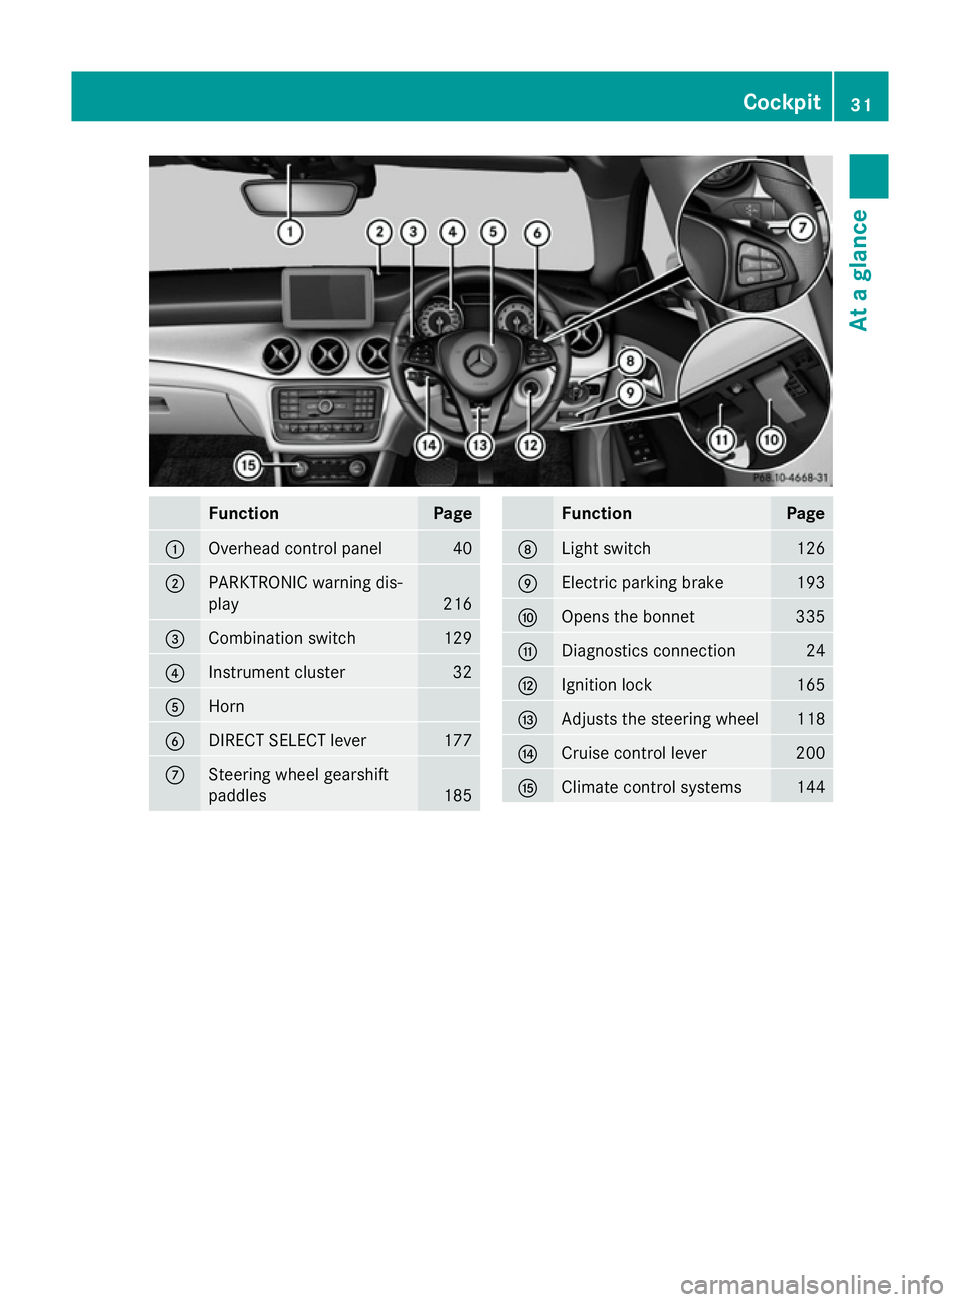
Function Page
:
Overhead control panel 40
;
PARKTRONIC warning dis-
play 216
=
Combination switch 129
?
Instrument cluster 32
A
Horn
B
DIRECT SELECT lever 177
C
Steering wheel gearshift
paddles
185 Function Page
D
Light switch 126
E
Electric parking brake 193
F
Opens the bonnet 335
G
Diagnostics connection 24
H
Ignition lock 165
I
Adjusts the steering wheel 118
J
Cruise control lever 200
K
Climate control systems 144Cockpit
31At a glance
Page 84 of 421
X
To activate with the key: remove the key
from the ignition lock.
X To activate with KEYLESS-GO start func-
tion or KEYLESS-GO: switch the ignition
off and open the driver's door.
X To deactivate: switch on the ignition.
When leaving the vehicle, always take the key with you and lock the vehicle. Anyone can
start the engine if a valid key has been left
inside the vehicle.
i The immobiliser is always deactivated
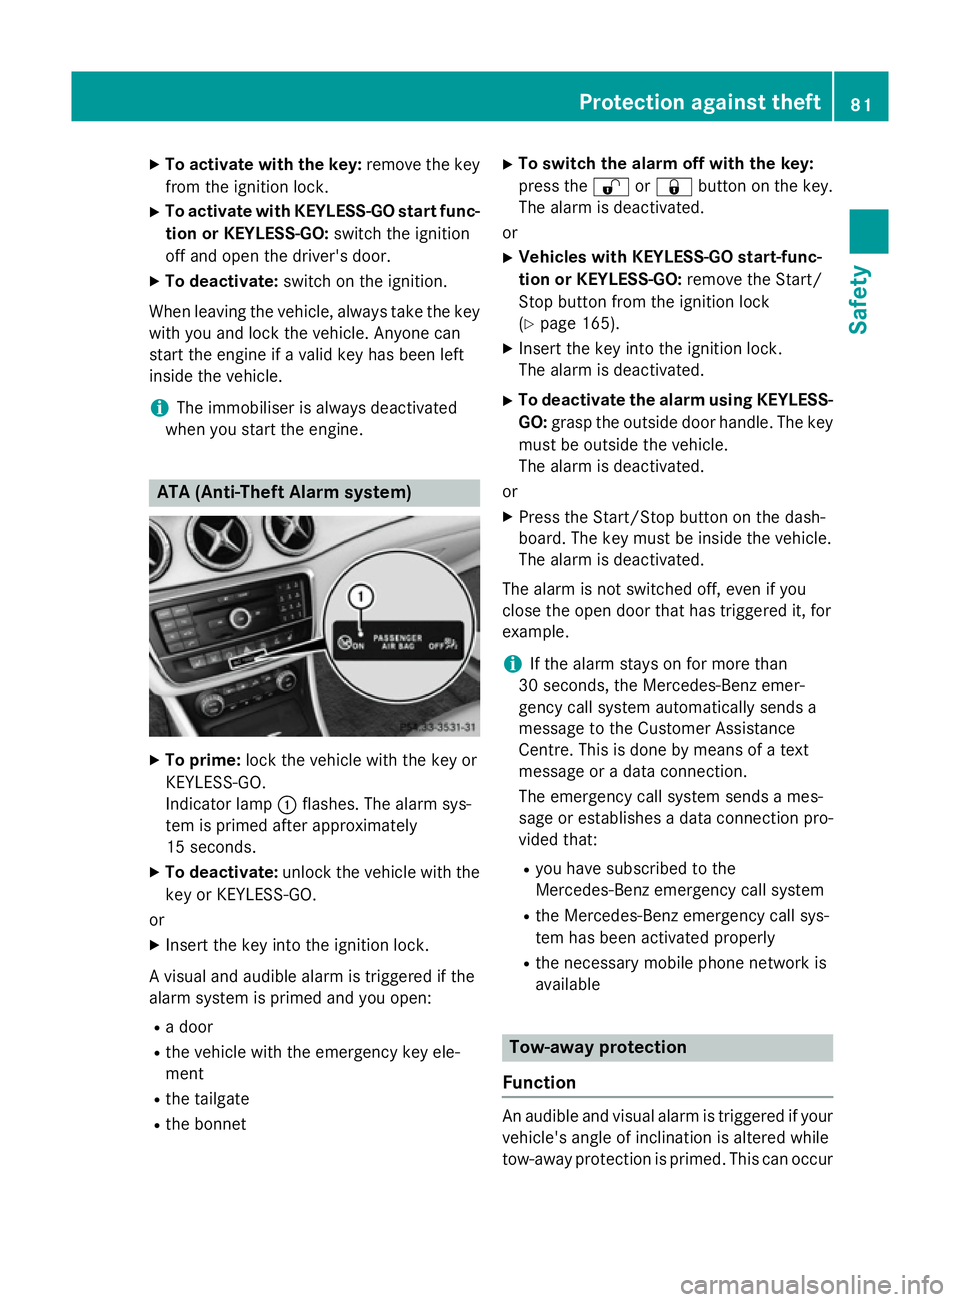
when you start the engine. ATA (Anti-Theft Alarm system)
X
To prime: lock the vehicle with the key or
KEYLESS-GO.
Indicator lamp :flashes. The alarm sys-
tem is primed after approximately
15 second s.
X To deactivate: unlock the vehicle with the
key or KEYLESS-GO.
or X Insert the key into the ignition lock.
A visual and audible alarm is triggered if the
alarm system is primed and you open:
R a door
R the vehicle with the emergency key ele-
ment
R the tailgate
R the bonnet X
To switch the alarm off with the key:
press the %or& button on the key.
The alarm is deactivated.
or X Vehicles with KEYLESS-GO start-func-
tion or KEYLESS-GO: remove the Start/
Stop button from the ignition lock
(Y page 165).
X Insert the key into the ignition lock.
The alarm is deactivated.
X To deactivate the alarm using KEYLESS-
GO: grasp the outside door handle. The key
must be outside the vehicle.
The alarm is deactivated.
or
X Press the Start/Stop button on the dash-
board. The key must be inside the vehicle.
The alarm is deactivated.
The alarm is not switched off, even if you
close the open door that has triggered it, for
example.
i If the alarm stays on for more than
30 seconds, the Mercedes‑ Benz emer-
gency call system automatically sends a
message to the Customer Assistance
Centre. This is done by means of a text
message or a data connection.
The emergency call system sends a mes-
sage or establishes a data connection pro-
vided that:
R you have subscribed to the
Mercedes‑Benz emergency call system
R the Mercedes‑ Benz emergency call sys-
tem has been activated properly
R the necessary mobile phone network is
available Tow-away protection
Function An audible and visual alarm is triggered if your
vehicle's angle of inclination is altered while
tow-away protection is primed. This can occur Protection against theft
81Safety Z
Page 139 of 421
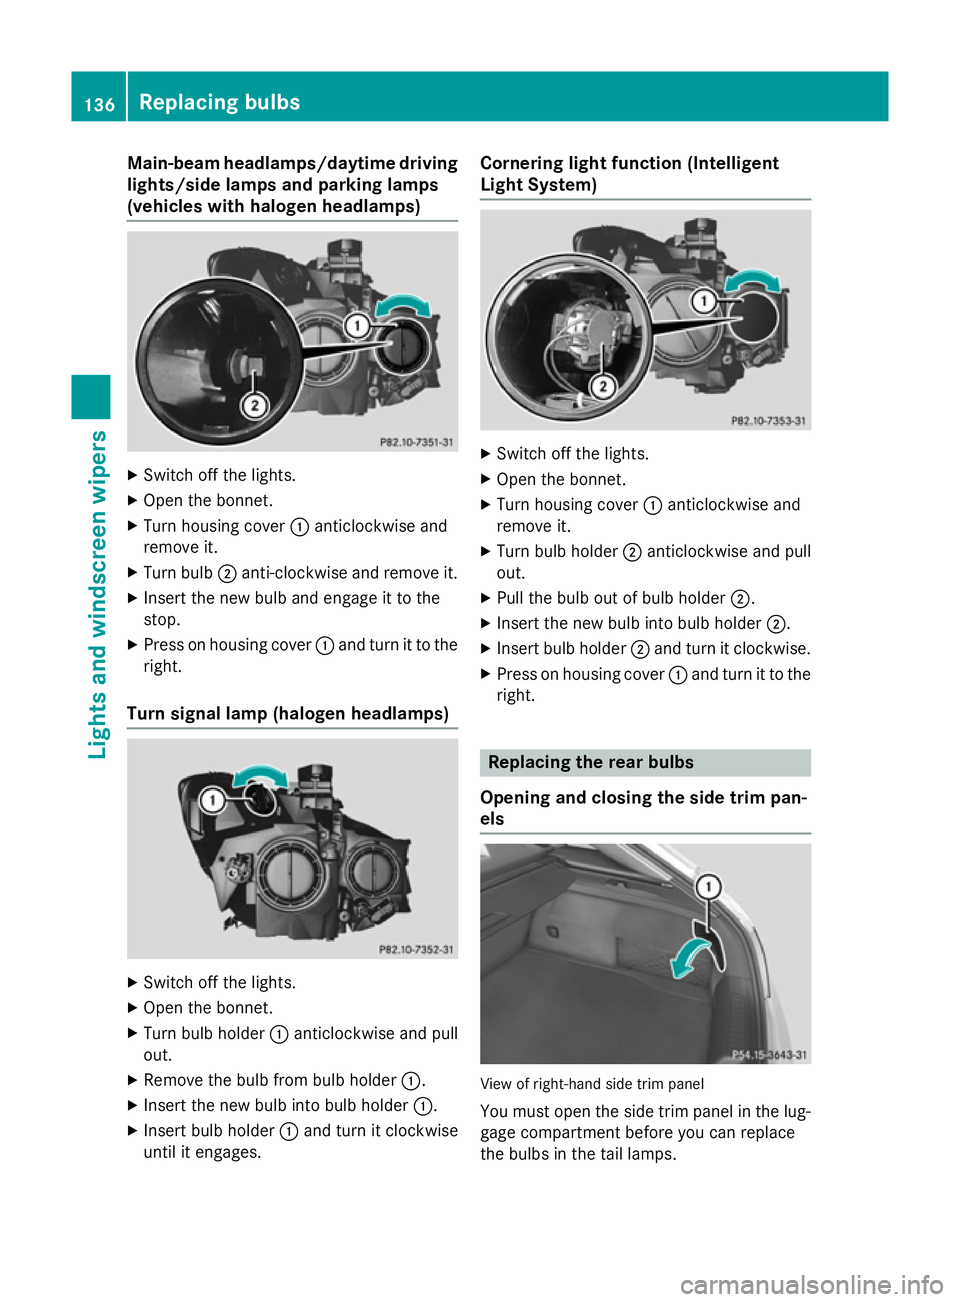
Main-beam headlamps/daytime driving
lights/side lamps and parking lamps
(vehicles with halogen headlamps) X
Switch off the lights.
X Open the bonnet.
X Turn housing cover :anticlockwise and
remove it.
X Turn bulb ;anti-clockwise and remove it.
X Insert the new bulb and engage it to the
stop.
X Press on housing cover :and turn it to the
right.
Turn signal lamp (halogen headlamps) X
Switch off the lights.
X Open the bonnet.
X Turn bulb holder :anticlockwise and pull
out.
X Remove the bulb from bulb holder :.
X Insert the new bulb into bulb holder :.
X Insert bulb holder :and turn it clockwise
until it engages. Cornering light function (Intelligent
Light System)
X
Switch off the lights.
X Open the bonnet.
X Turn housing cover :anticlockwise and
remove it.
X Turn bulb holder ;anticlockwise and pull
out.
X Pull the bulb out of bulb holder ;.
X Insert the new bulb into bulb holder ;.
X Insert bulb holder ;and turn it clockwise.
X Press on housing cover :and turn it to the
right. Replacing the rear bulbs
Opening and closing the side trim pan-
els View of right-hand side trim panel
You must open the side trim panel in the lug-
gage compartment before you can replace
the bulbs in the tail lamps. 136
Replacing bulbsLights and windscreen wipers
Page 142 of 421
!
Never open the bonnet/tailgate if a wiper
arm is folded away from the windscreen/
rear window.
Never fold a windscreen wiper arm without a wiper blade back onto the windscreen/
rear window.
Hold the windscreen wiper arm firmly when
you change the wiper blade. If you release
the wiper arm without a wiper blade and it
falls onto the windscreen/rear window, the windscreen/rear window may be damaged
by the force of the impact.
Mercedes-Benz recommends that you have the wiper blades changed at a qualified
specialist workshop.
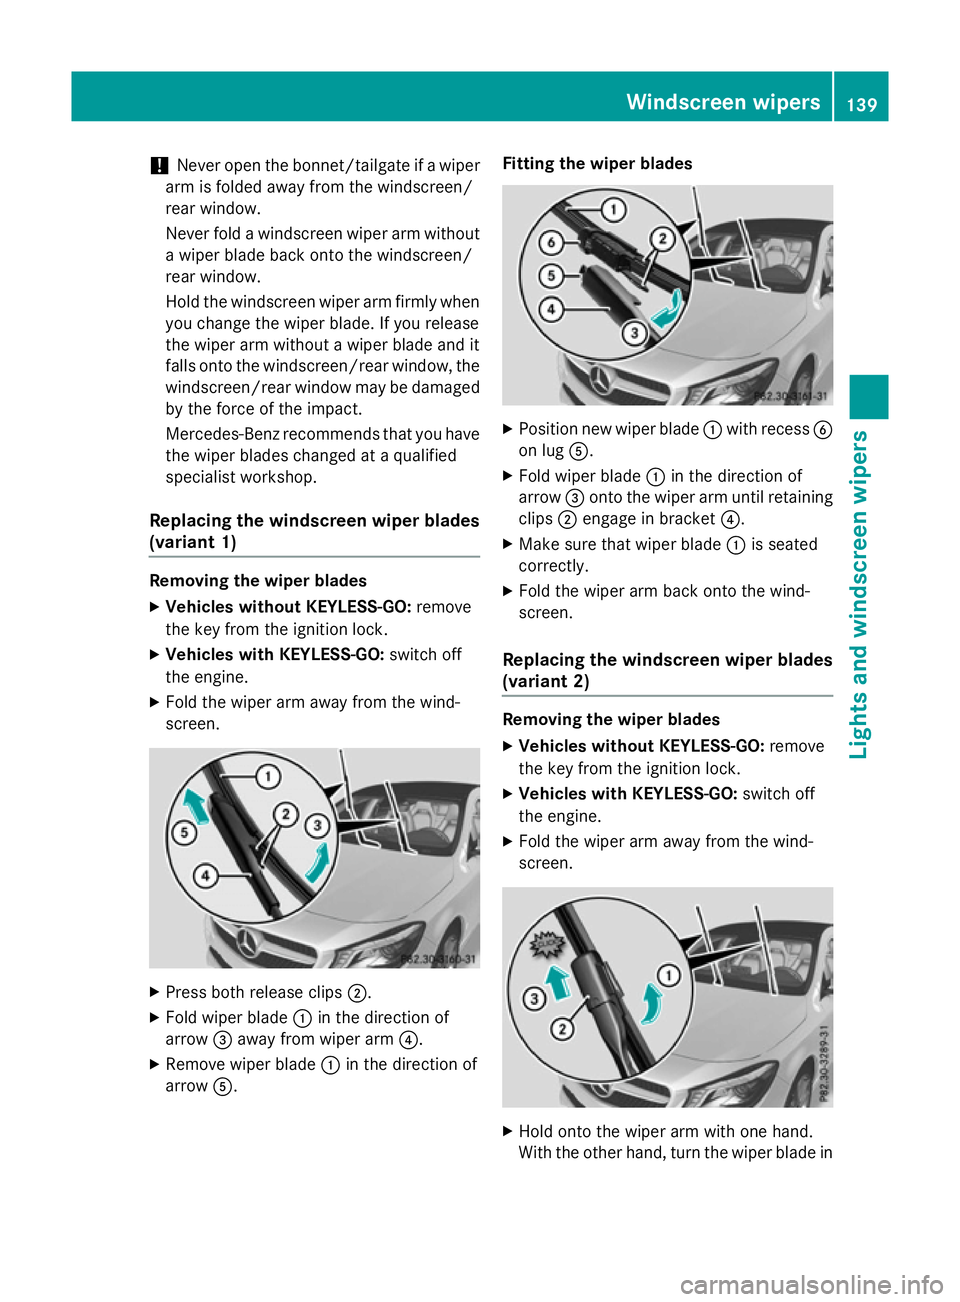
Replacing the windscreen wiper blades
(variant 1) Removing the wiper blades
X Vehicles without KEYLESS-GO: remove
the key from the ignition lock.
X Vehicles with KEYLESS-GO: switch off
the engine.
X Fold the wiper arm away from the wind-
screen. X
Press both release clips ;.
X Fold wiper blade :in the direction of
arrow =away from wiper arm ?.
X Remove wiper blade :in the direction of
arrow A. Fitting the wiper blades
X
Position new wiper blade :with recess B
on lug A.
X Fold wiper blade :in the direction of
arrow =onto the wiper arm until retaining
clips ;engage in bracket ?.
X Make sure that wiper blade :is seated
correctly.
X Fold the wiper arm back onto the wind-
screen.
Replacing the windscreen wiper blades
(variant 2) Removing the wiper blades
X Vehicles without KEYLESS-GO: remove
the key from the ignition lock.
X Vehicles with KEYLESS-GO: switch off
the engine.
X Fold the wiper arm away from the wind-
screen. X
Hold onto the wiper arm with one hand.
With the other hand, turn the wiper blade in Windscreen wipers
139Lights and windscreen wipers Z
Page 164 of 421
Problems with the auxiliary heating/ventilation
Problem
Possible causes/consequences and
M
MSolutions FAIL¨ The signal transmission between the transmitter and the vehicle is
faulty.
X Change your position in relation to the vehicle, moving closer if
necessary.
X Make another attempt to switch the auxiliary heating/ventila-
tion on or off using the remote control. FAIL The auxiliary heating cannot be switched on or has switched itself
off.
The starter battery is not sufficiently charged.
X Charge the starter battery.
X Make another attempt to switch on the auxiliary heating/venti-
lation using the remote control. The auxiliary heating cannot be switched on or has switched itself
off.
The fuel tank content is below the reserve fuel level.
X Refuel at the nearest filling station.
X Make another attempt to switch on the auxiliary heating using
the remote control. The auxiliary heating/ventilation cannot be switched on or has
switched itself off.
The auxiliary heating/ventilation is malfunctioning.
X Have the auxiliary heating/ventilation checked at a qualified
specialist workshop. Air vents
Important safety notes
G
WARNING
Very hot or very cold air can flow from the air vents. This could result in burns or frostbite in the immediate vicinity of the air vents. There
is a risk of injury.
Make sure that all vehicle occupants always
maintain a sufficient distance to the air out-
lets. If necessary, redirect the airflow to
another area of the vehicle interior. In order to ensure the direct flow of fresh air
through the air vents into the vehicle interior,
please observe the following notes:
R keep the air inlet between the windscreen
and the bonnet free of blockages, such as
ice, snow or leaves
R never cover the vents or ventilation grilles
in the vehicle interior
i Optimal climate control function is ach-
ieved by opening the air vents fully and set- ting the adjusters to the middle position. Air vents
161Climate control Z
Page 250 of 421
The segments between the speed of the
vehicle in front and the stored speed light
up. Rev counter
! Do not drive in the overrevving range.
Doing so will damage the engine.
The red band in the rev counter indicates the
engine's overrevving range.
The engine is limited within a range to protect the engine when the red band is reached. Outside temperature display
You should pay special attention to road con-
ditions when temperatures are around freez-
ing point.
Bear in mind that the outside temperature
display indicates the measured air tempera-
ture and not the road surface temperature.
The outside temperature display is in the mul- tifunction display (Y page 249).
There is a short delay before a change in out- side temperature appears in the multifunc-
tion display. Coolant temperature gauge
G
WARNING
If you open the bonnet while the engine is
overheating or while there is a fire in the
engine compartment, you could come into
contact with hot gases or other leaking ser-
vice products. There is a danger of injury.
Allow an overheating engine to cool down
before opening the bonnet. If there is a fire in the engine compartment, leave the bonnet
closed and notify the fire brigade.
The coolant temperature gauge is in the
instrument cluster on the right-hand side
(Y page 32). Under normal operating conditions and with
the specified coolant level, the coolant tem-
perature may rise to 120 †.
At high outside temperatures and when driv-
ing uphill, the coolant temperature may rise
to the end of the scale. Operating the on-board computer
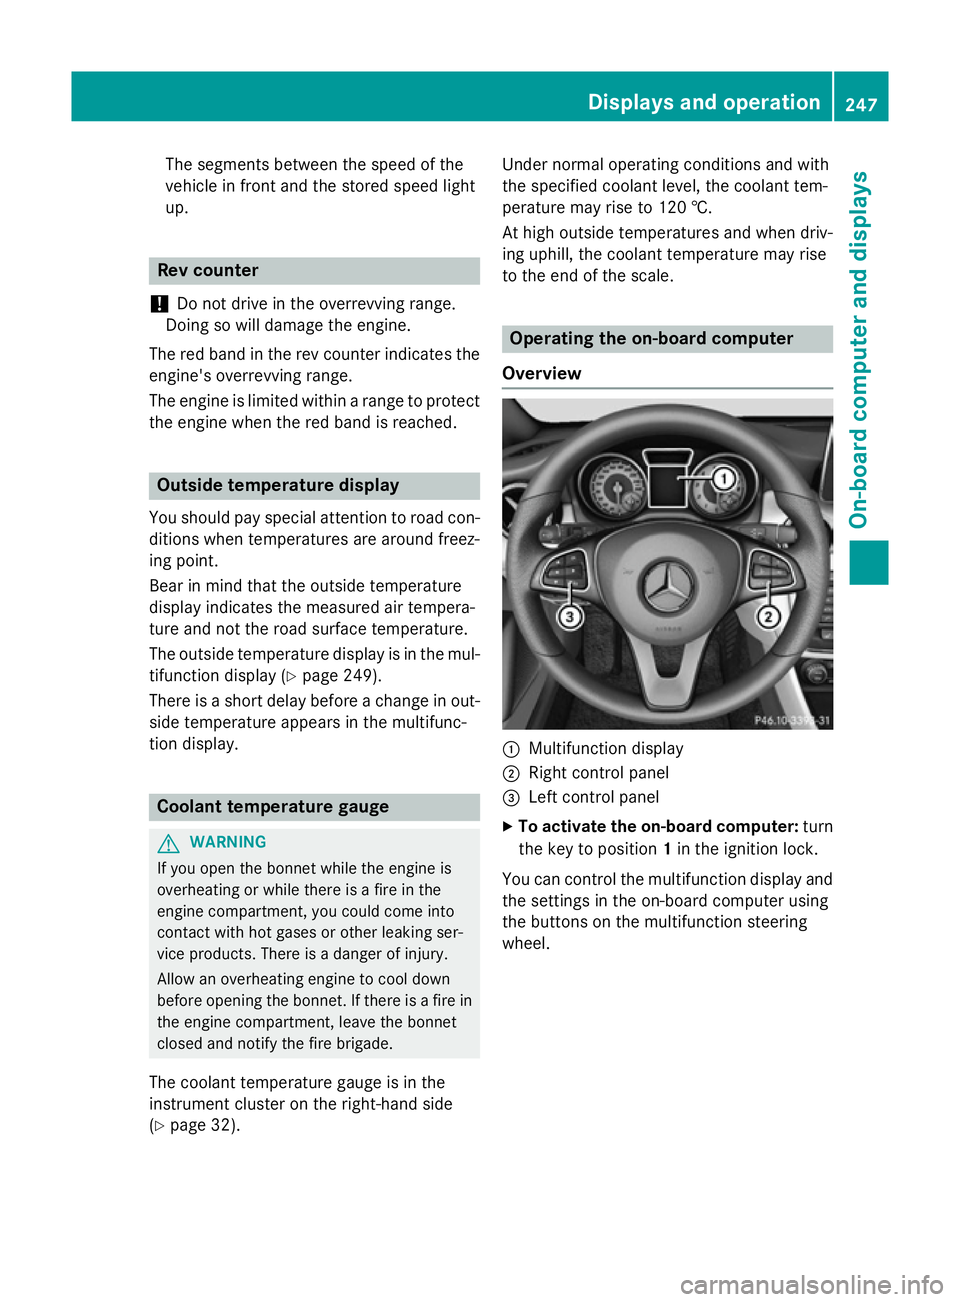
Overview :
Multifunction display
; Right control panel
= Left control panel
X To activate the on-board computer: turn
the key to position 1in the ignition lock.
You can control the multifunction display and
the settings in the on-board computer using
the buttons on the multifunction steering
wheel. Displays and operation
247On-board computer and displays Z
Page 287 of 421
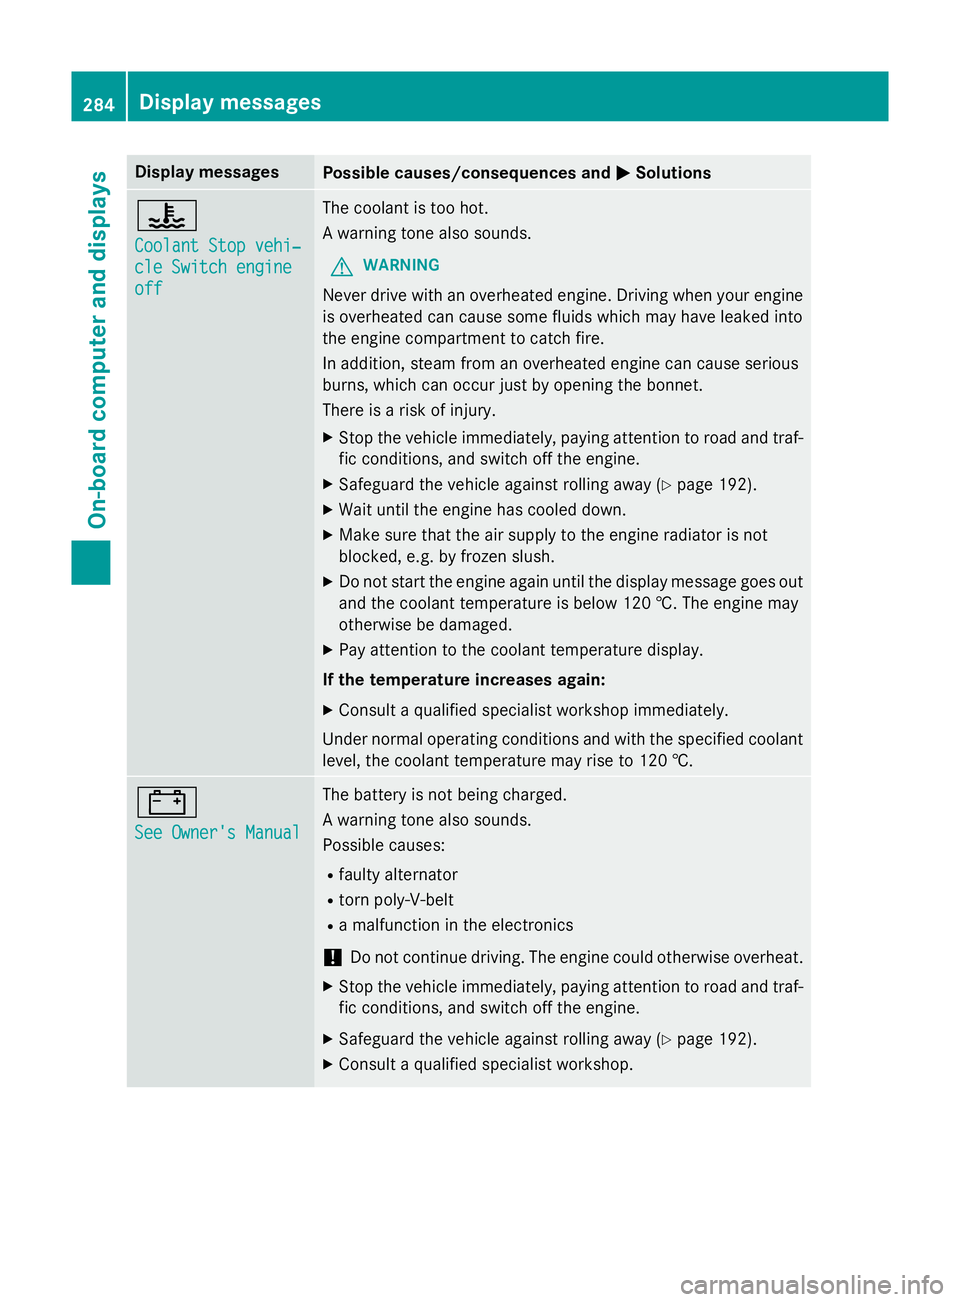
Display messages
Possible causes/consequences and
M
MSolutions ?
Coolant Stop vehi‐ Coolant Stop vehi‐
cle Switch engine cle Switch engine
off off The coolant is too hot.
A warning tone also sounds.
G WARNING
Never drive with an overheated engine. Driving when your engine is overheated can cause some fluids which may have leaked into
the engine compartment to catch fire.
In addition, steam from an overheated engine can cause serious
burns, which can occur just by opening the bonnet.
There is a risk of injury.
X Stop the vehicle immediately, paying attention to road and traf-
fic conditions, and switch off the engine.
X Safeguard the vehicle against rolling away (Y page 192).
X Wait until the engine has cooled down.
X Make sure that the air supply to the engine radiator is not
blocked, e.g. by frozen slush.
X Do not start the engine again until the display message goes out
and the coolant temperature is below 120 †. The engine may
otherwise be damaged.
X Pay attention to the coolant temperature display.
If the temperature increases again:
X Consult a qualified specialist workshop immediately.
Under normal operating conditions and with the specified coolant
level, the coolant temperature may rise to 120 †. #
See Owner's Manual See Owner's Manual The battery is not being charged.
A warning tone also sounds.
Possible causes:
R faulty alternator
R torn poly-V-belt
R a malfunction in the electronics
! Do not continue driving. The engine could otherwise overheat.
X Stop the vehicle immediately, paying attention to road and traf-
fic conditions, and switch off the engine.
X Safeguard the vehicle against rolling away (Y page 192).
X Consult a qualified specialist workshop. 284
Display
messagesOn-board computer and displays
Page 300 of 421

Display messages
Possible causes/consequences and
M
MSolutions The engine has stalled while pulling away, e.g. because the clutch
pedal was released too quickly.
X Depress the clutch pedal again.
The engine starts automatically.
X Slowly release the clutch pedal to pull away. Trans. Trans.
oil
oiloverhea‐
overhea‐
ted Drive on with
ted Drive on with
care care Mercedes-AMG vehicles: the transmission oil has overheated.
Manual drive program
Mand the temporarily active manual drive
program are no longer available. Engine power output is reduced.
X Allow the vehicle to cool down. 4matic currently 4matic currently
unavailable unavailable 4MATIC has overheated. The vehicle is only driven by the front
wheels.
X Drive on.
The airflow cools 4MATIC more quickly.
When the display message goes out, 4MATIC is available again
and the vehicle is driven by all four wheels. 4matic inoperative 4matic inoperative 4MATIC is malfunctioning. The vehicle is only driven by the front
wheels.
X Consult a qualified specialist workshop. A The tailgate is open.
G WARNING
When the engine is running, exhaust gases can enter the vehicle
interior if the tailgate is open.
There is a risk of poisoning.
X Close the tailgate. ? The bonnet is open.
A warning tone also sounds.
G WARNING
The open bonnet may then block your view when the vehicle is in
motion.
There is a risk of an accident.
X Pull over and stop the vehicle safely as soon as possible, paying
attention to road and traffic conditions.
X Safeguard the vehicle against rolling away (Y page 192).
X Close the bonnet. Display
messages
297On-board computer and displays Z