display MERCEDES-BENZ CLK CABRIOLET 2000 A208 Repair Manual
[x] Cancel search | Manufacturer: MERCEDES-BENZ, Model Year: 2000, Model line: CLK CABRIOLET, Model: MERCEDES-BENZ CLK CABRIOLET 2000 A208Pages: 323, PDF Size: 9.32 MB
Page 75 of 323

Rear view mirrors
Te ch n ica l
data Instruments
and controlsOperationDrivingInstrument
cluster displayPractical hints Car care Index Inside rear view mirror
Manually adjust the mirror.
Use your inside mirror to determine the size and
distance of objects seen in the passenger side convex
mirror.
Antiglare night position
With the electronic key in steering lock position 2, the
mirror reflection brightness responds to changes in
light sensitivity.
With gear selector lever in position “R”, or with the
interior lamp switched on, the mirror brightness does
not respond to changes in light sensitivity.Note:
The automatic antiglare function does not react, if
incoming light is not aimed directly at sensors in the
mirror.
Wa r n i n g !
In the case of an accident liquid electrolyte may
escape the mirror housing when the mirror glass
breaks.Electrolyte has an irritating effect. Do not allow the
liquid come into contact with eyes, skin, clothing,
or respiratory system. In cases it does, immediately
flush affected area with water, and seek medical
help if necessary.
75
Page 76 of 323
Rear view mirrors
Te ch n ica l
data Instruments
and controlsOperationDrivingInstrument
cluster displayPractical hints Car care Index
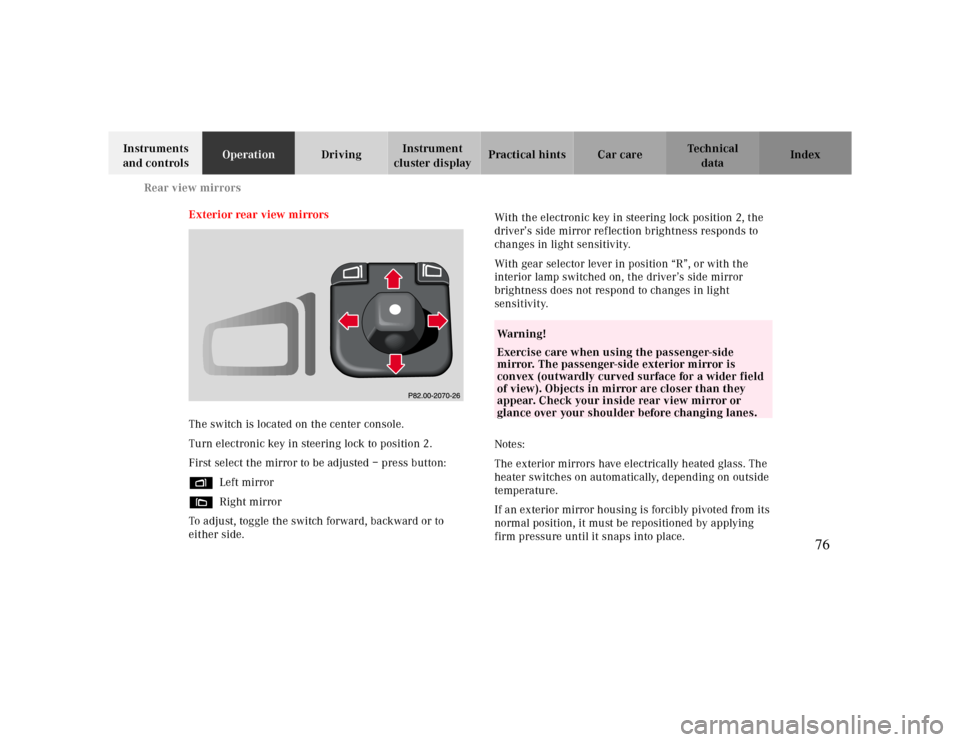
Exterior rear view mirrors
The switch is located on the center console.
Turn electronic key in steering lock to position 2.
First select the mirror to be adjusted – press button:
%Left mirror
&Right mirror
To adjust, toggle the switch forward, backward or to
either side.
1With the electronic key in steering lock position 2, the
driver’s side mirror reflection brightness responds to
changes in light sensitivity.
With gear selector lever in position “R”, or with the
interior lamp switched on, the driver’s side mirror
brightness does not respond to changes in light
sensitivity.
Notes:
The exterior mirrors have electrically heated glass. The
heater switches on automatically, depending on outside
temperature.
If an exterior mirror housing is forcibly pivoted from its
normal position, it must be repositioned by applying
firm pressure until it snaps into place.
Wa r n i n g !
Exercise care when using the passenger-side
mirror. The passenger-side exterior mirror is
convex (outwardly curved surface for a wider field
of view). Objects in mirror are closer than they
appear. Check your inside rear view mirror or
glance over your shoulder before changing lanes.
76
Page 77 of 323
Rear view mirrors
Te ch n ica l
data Instruments
and controlsOperationDrivingInstrument
cluster displayPractical hints Car care Index Important!
Electrolyte drops coming into contact with the vehicle
paint finish can only be completely removed while in
their liquid state, by applying plenty of water.
Warning!
In the case of an accident liquid electrolyte may
escape the mirror housing when the mirror glass
breaks.Electrolyte has an irritating effect. Do not allow the
liquid come into contact with eyes, skin, clothing,
or respiratory system. In cases it does, immediately
flush affected area with water, and seek medical
help if necessary.
77
Page 78 of 323

Rear view mirrors
Te ch n ica l
data Instruments
and controlsOperationDrivingInstrument
cluster displayPractical hints Car care Index Storing mirror positions in memory
The exterior rear view mirror positions are stored in
memory with the seat/head restraint position and can
be recalled when necessary, see page
47.Parking position
The passenger-side exterior mirror can be adjusted and
programmed to assist the driver during parking
maneuvers (e.g. to observe the curb or other objects
close to the vehicle).
With electronic key in steering lock position 2, and the
exterior rear view mirror switch in the passenger side
position, the passenger-side mirror will be turned
downward when placing the gear selector lever in “R”
Reverse.
The mirror position can now be adjusted as desired.
78
Page 79 of 323

Rear view mirrors
Te ch n ica l
data Instruments
and controlsOperationDrivingInstrument
cluster displayPractical hints Car care Index
At speeds above approx. 6 mph (10 km/h), upon shifting
gear selector lever from “R” Reverse, or upon pressing
the driver’s side mirror button, the passenger-side
mirror will return to its previous position.
Readjust the mirror as desired.
One passenger-side mirror position can be stored in
memory. To do so:
1. Turn electronic key to steering lock position 2.
The vehicle must be stationary.
2. Select passenger-side mirror
downward.
3. Place gear selector in "R" Reverse. The mirror will turnPress green memory button located in switch cluster
for driver seat . 4. Using the toggle switch, select the final downward
6. While holding green memory button pull the mirror
7. Release the green button and toggle switch.toggle switch rearward.
The mirror position is now stored in memory. 5. position for the mirror.
79
Page 81 of 323
Instrument cluster
Te ch n ica l
data Instruments
and controlsOperationDrivingInstrument
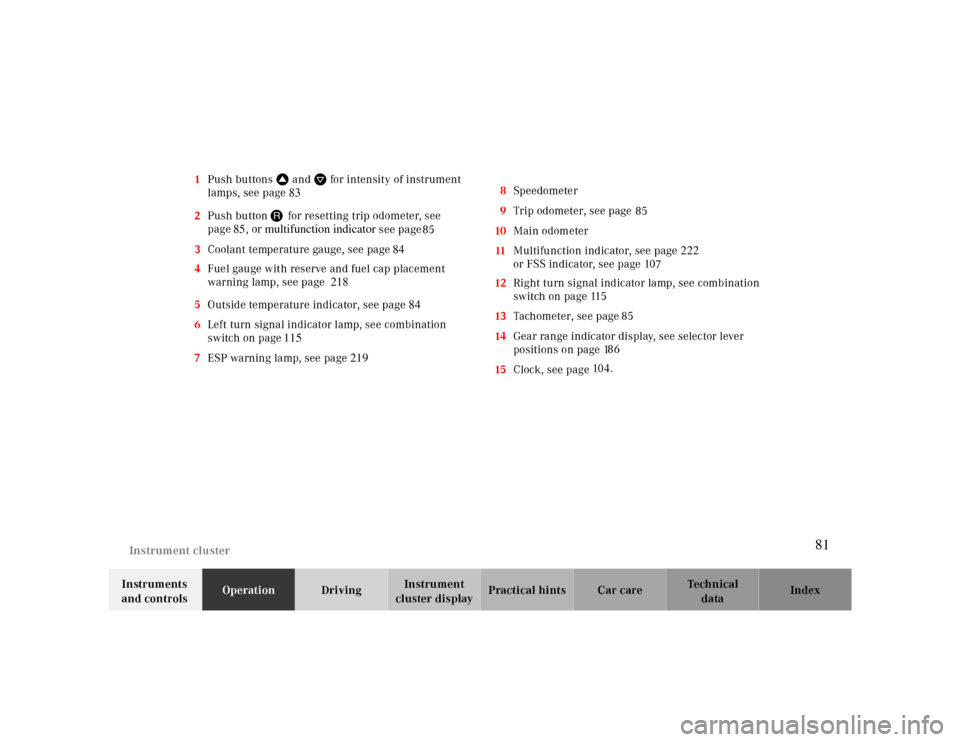
cluster displayPractical hints Car care Index 1Push buttonsVandWfor intensity of instrument
lamps, see page 83
85 2Push buttonJ for resetting trip odometer, see
page85, or
multifunction indicator
see page
104. 3Coolant temperature gauge, see page 84
4Fuel gauge with reserve and fuel cap placement
warning lamp, see page 218
5Outside temperature indicator, see page 84
6Left turn signal indicator lamp, see combination
switch on page115
7ESP warning lamp, see page 2198Speedometer
9Trip odometer, see page
10Main odometer
11Multifunction indicator, see page 222
or FSS indicator, see page 10
12Right turn signal indicator lamp, see combination
switch on page 11
13Tachometer, see page 7
14Gear range indicator display, see selector lever
positions on page 1
15Clock, see page 85 85
86 5
81
Page 82 of 323
Instrument cluster
Te ch n ica l
data Instruments
and controlsOperationDrivingInstrument
cluster displayPractical hints Car care Index
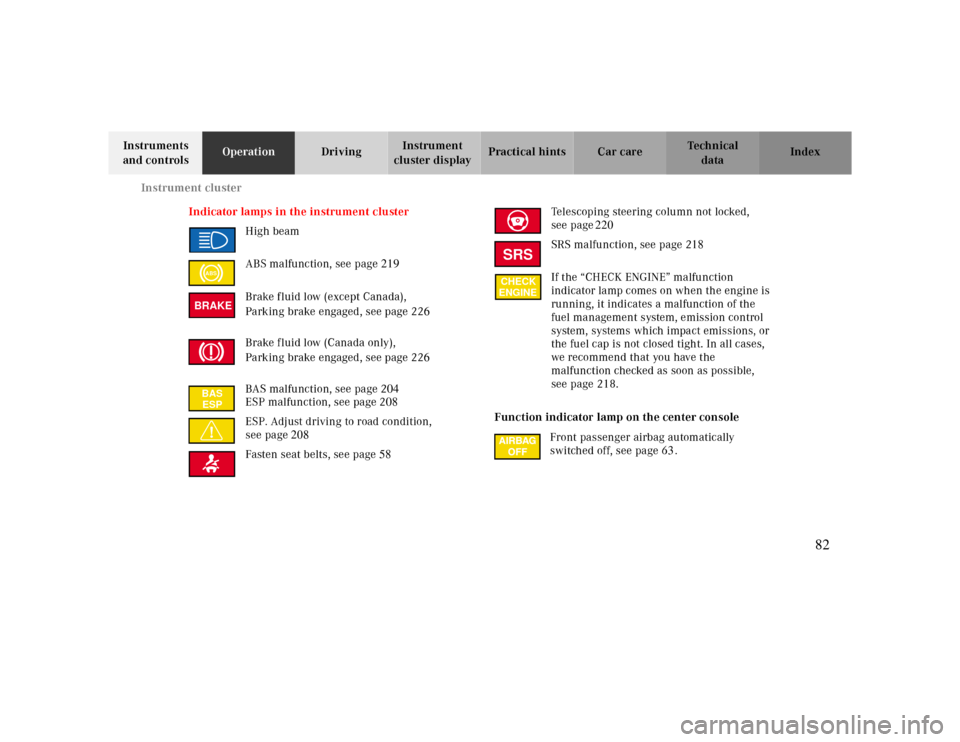
Indicator lamps in the instrument cluster
High beam
ABS malfunction, see page 219
Brake fluid low (except Canada),
Parking brake engaged, see page 226
Brake fluid low (Canada only),
Parking brake engaged, see page 226
BAS malfunction, see page 204
ESP malfunction, see page 208
ESP. Adjust driving to road condition,
see page208
Fasten seat belts, see page58Telescoping steering column not locked,
see page220
SRS malfunction, see page 218
If the “CHECK ENGINE” malfunction
indicator lamp comes on when the engine is
running, it indicates a malfunction of the
fuel management system, emission control
system, systems which impact emissions, or
the fuel cap is not closed tight. In all cases,
we recommend that you have the
malfunction checked as soon as possible,
see page 218.
Function indicator lamp on the center console
Front passenger airbag automatically
switched off, see page 63.
ABSBRAKEBAS
ESP
SRSCHECK
ENGINE
82
Page 83 of 323

Instrument cluster
Te ch n ica l
data Instruments
and controlsOperationDrivingInstrument
cluster displayPractical hints Car care Index Activating instrument cluster display
The instrument cluster is activated by:
•Opening the door.
•Pressing buttonJ, VorWon the instrument
cluster.
•Turning the electronic key in steering lock to
position 1 or 2.
•Switching on the exterior lamps.
Display illumination
The display for temperature, odometer, multifunction
indicator, FSS indicator and clock is illuminated briefly
when opening the driver’s door.
The display illumination brightness responds
automatically according to changes in the surrounding
light sensitivity.
To briefly illuminate the display (with electronic key
removed or in steering lock position 0), press buttonJ.Instrument lamps
Activate the instrument cluster.
PressVorWbutton to vary intensity of instrument
lamps.
P54.30-2767-26
83
Page 84 of 323
Instrument cluster
Te ch n ica l
data Instruments
and controlsOperationDrivingInstrument
cluster displayPractical hints Car care Index
Coolant temperature gauge (3)
During severe operating conditions and stop-and-go city
traffic, the coolant temperature may rise close to the red
marking.
The engine should not be operated with the coolant
temperature in the red zone. Doing so may cause
serious engine damage which is not covered by the
Mercedes-Benz Limited Warranty.Outside temperature indicator (5)
The temperature sensor is located in the front bumper
area. Due to its location, the sensor can be affected by
road or engine heat during idling or slow driving. This
means that the accuracy of the displayed temperature
can only be verified by comparison to a thermometer
placed next to the sensor, not by comparison to external
displays (e.g. bank signs etc.).
Adaptation to ambient temperature takes place in steps
and depends on the prevailing driving conditions (stop-
and-go or moderate, constant driving) and amount of
temperature change.
Warning!
• Driving when your engine is badly overheated
can cause some fluids which may have leaked
into the engine compartment to catch fire. You
could be seriously burned.• Steam from an overheated engine can cause
serious burns and can occur just by opening
the engine hood. Stay away from the engine if
you see or hear steam coming from it.Turn off the engine, get out of the vehicle and do
not stand near the vehicle until it cools down.
Wa r n i n g !
The outside temperature indicator is not designed
to serve as an Ice-Warning Device and is therefore
unsuitable for that purpose. Indicated
temperatures just above the freezing point do not
guarantee that the road surface is free of ice.
84
Page 85 of 323
Instrument cluster
Te ch n ica l
data Instruments
and controlsOperationDrivingInstrument
cluster displayPractical hints Car care Index Trip odometer (9)
To reset to “0” miles/km:
Activate the instrument cluster if it is not already
activated by pressing the J button on the instrument
cluster.
Press button è or ÿ on the multifunction
steering wheel repeatedly until the trip odometer
appears if it is not displayed. See page 92.
Press button J on the instrument cluster to reset trip
odometer.Tachometer (13)
The red marking on tachometer denotes excessive
engine speed.
Avoid this engine speed, as it may result in serious
engine damage that is not covered by the
Mercedes-Benz Limited Warranty.
To help protect the engine, the fuel supply is interrupted
if the engine is operated within the red marking.
85