service MERCEDES-BENZ CLK-CLASS 2001 User Guide
[x] Cancel search | Manufacturer: MERCEDES-BENZ, Model Year: 2001, Model line: CLK-CLASS, Model: MERCEDES-BENZ CLK-CLASS 2001Pages: 325, PDF Size: 8.4 MB
Page 92 of 325
89 Multifunction steering wheel, multifunction display
Te ch n ica l
data Instruments
and controlsOperationDrivingInstrument
cluster displayPractical hints Car care Index Depending on your vehicle’s equipment, you may use
the buttons on the multifunction steering wheel to call
up, control and set the following systems in the
multifunction display:
1Trip odometer and main odometer, see page 92
Vehicle speed, see page 92
Flexible service system (FSS), see page 109
Engine oil level indicator, see page 112
2Audio systems, see page 93
Radio, see page 93
CD player (optional), see page 94
Cassette player, see page 95
3Navigation system (optional), see page 101
4Malfunction message memory, see page 104
5Individual settings, see page 106
6Trip computer, see page 102
After start
After reset
Fuel tank content
7Telephone (if so equipped), see page 96Press the è or ÿ button repeatedly until the
required system is displayed.
Pressing the è button advances the display to the
next system.
Pressing the Ăż button returns the display to the
previous system.
You may call up additional displays within some of these
categories by pressing the j or k button.
Wa r n i n g !
A driver’s attention to the road must always be his/
her primary focus when driving. For your safety and the safety of others, selecting
features through the multifunction steering wheel
should only be done by the driver when traffic and
road conditions permit it to be done safely.
Programming individual settings in the system can
only be made while the vehicle is at standstill.
ProCarManuals.com
Page 95 of 325
92 Multifunction steering wheel, multifunction display
Te ch n ica l
data Instruments
and controlsOperationDrivingInstrument
cluster displayPractical hints Car care Index
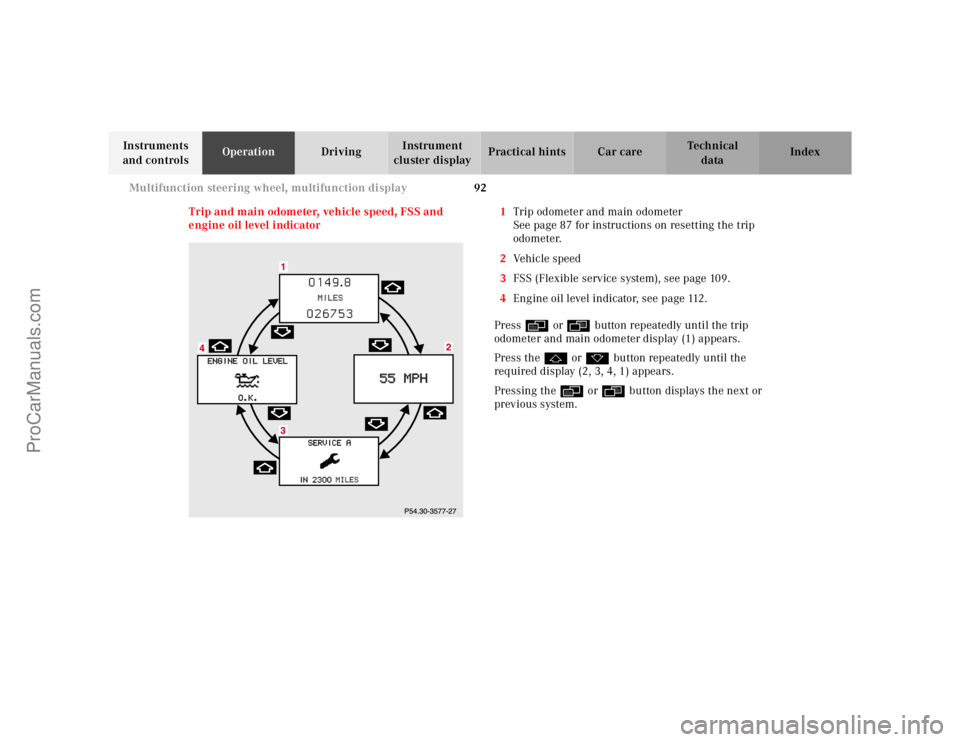
Trip and main odometer, vehicle speed, FSS and
engine oil level indicator1Trip odometer and main odometer
See page 87 for instructions on resetting the trip
odometer.
2Vehicle speed
3FSS (Flexible service system), see page 109.
4Engine oil level indicator, see page 112.
Press è or ÿ button repeatedly until the trip
odometer and main odometer display (1) appears.
Press the j or k button repeatedly until the
required display (2, 3, 4, 1) appears.
Pressing the è or ÿ button displays the next or
previous system.
ProCarManuals.com
Page 112 of 325
109 Flexible service system
Te ch n ica l
data Instruments
and controlsOperationDrivingInstrument
cluster displayPractical hints Car care Index Flexible service system (FSS)
(service indicator)
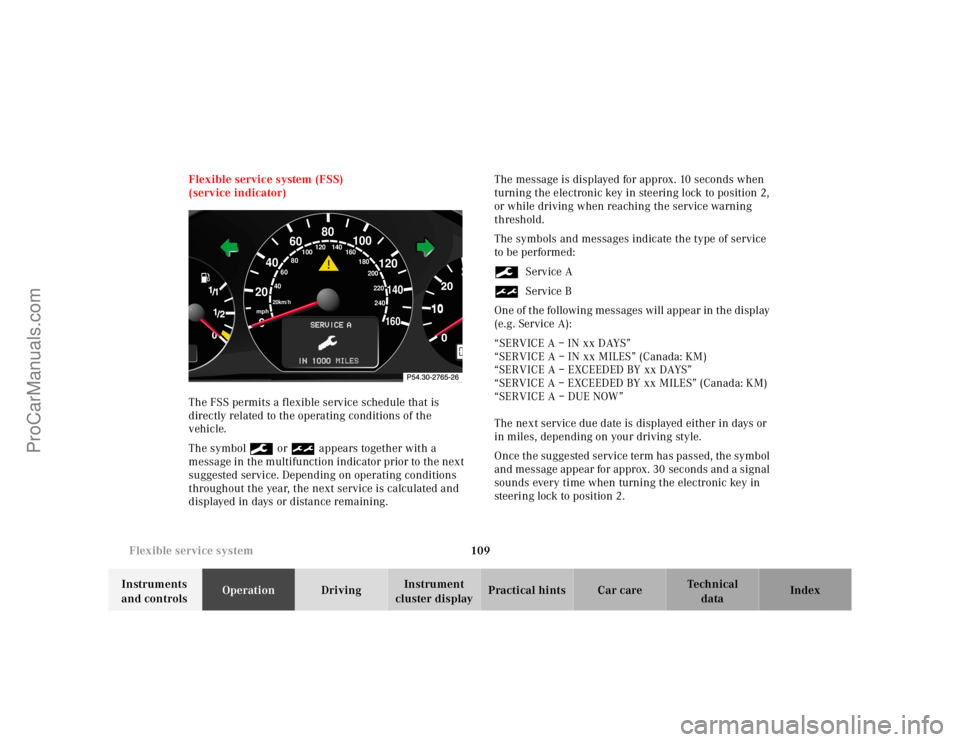
The FSS permits a flexible service schedule that is
directly related to the operating conditions of the
vehicle.
The symbol 9 or ½ appears together with a
message in the multifunction indicator prior to the next
suggested service. Depending on operating conditions
throughout the year, the next service is calculated and
displayed in days or distance remaining.The message is displayed for approx. 10 seconds when
turning the electronic key in steering lock to position 2,
or while driving when reaching the service warning
threshold.
The symbols and messages indicate the type of service
to be performed:
9Service A
½Service B
One of the following messages will appear in the display
(e.g. Service A):
“SERVICE A – IN xx DAYS”
“SERVICE A – IN xx MILES” (Canada: KM)
“SERVICE A – EXCEEDED BY xx DAYS”
“SERVICE A – EXCEEDED BY xx MILES” (Canada: KM)
“SERVICE A – DUE NOW”
The next service due date is displayed either in days or
in miles, depending on your driving style.
Once the suggested service term has passed, the symbol
and message appear for approx. 30 seconds and a signal
sounds every time when turning the electronic key in
steering lock to position 2.
10
0
406080
60
40
mph
20km/h
20100
120
140160
80
100
180
200
220
240 160 120 140
ProCarManuals.com
Page 113 of 325
110 Flexible service system
Te ch n ica l
data Instruments
and controlsOperationDrivingInstrument
cluster displayPractical hints Car care Index
The service indicator disappears automatically after
30 seconds or if button J on the instrument cluster is
pressed.
Calling up service indicator manually:
Turn the electronic key in steering lock to position 1.
Call up the trip odometer and main odometer by
pressing button è or ÿ on the multifunction
steering wheel until the display appears. See page 92.
Press button j or k until the FSS indicator
appears.
Pressing the è or ÿ button displays the next or
previous system.
Important!
The FSS indicator is not an engine oil level indicator.
See page 112 for engine oil level indicator.Notes:
When disconnecting vehicle battery for one or more
days at a time, such days will not be counted. Any such
days not counted by the FSS can be added by your
Mercedes-Benz Center.
The interval between services is determined by the type
of driving for which the vehicle is used. For example,
driving at extreme speeds, and cold starts combined
with short distance driving in which the engine does not
reach operating normal temperature, reduce the interval
between services.
ProCarManuals.com
Page 114 of 325
111 Flexible service system
Te ch n ica l
data Instruments
and controlsOperationDrivingInstrument
cluster displayPractical hints Car care Index Following a completed A or B service the
Mercedes-Benz Center sets the counter mileage to
10 000 miles (Canada: 15 000 km) and 365 days.
The counter can also be set by any individual. To do so:
Turn the electronic key in steering lock to position 2.
To call up the trip odometer and main odometer, press
button è or ÿ on the multifunction steering
wheel until the display appears. See page 88.
Press button j or k until the FSS indicator
appears.
Press button Jon the instrument cluster for
approximately 2 seconds.The multifunction display will show the question:
“DO YOU WANT TO RESET SERVICE INTERVAL? –
CONFIRM BY PRESSING R”
Press button J on the instrument cluster again, and
hold until a signal sounds. The message “SERVICE
INTERVAL HAS BEEN RESET” appears in the
multifunction display.
The new service indicator is displayed with the reset
distance of 10 000 miles (Canada 15 000 km).
If the FSS counter was inadvertently reset, have a
Mercedes-Benz Center correct it.
However you choose to set your reference numbers, the
scheduled services as posted in the Service Booklet
must be followed to properly care for your vehicle.
ProCarManuals.com
Page 116 of 325
113 Engine oil level indicator
Te ch n ica l
data Instruments
and controlsOperationDrivingInstrument
cluster displayPractical hints Car care Index One of the following messages will subsequently appear
on the indicator:
“ENGINE OIL LEVEL – O.K.”
No oil needs to be added.
“ENGINE OIL LEVEL – ADD 1.0 QUART”
(Canada: 1.0 L)
“ENGINE OIL LEVEL – ADD 1.5 QUART”
(Canada: 1.5 L)
“ENGINE OIL LEVEL – ADD 2.0 QUART”
(Canada: 2.0 L)
See page 251 for instructions on adding engine oil.
“ENGINE OIL LEVEL – REDUCE OIL LEVEL”
Do not overfill the engine.
Excessive oil must be siphoned or drained off. It could
cause damage to the engine and catalytic converter not
covered by the Mercedes-Benz Limited Warranty.
The message “PERF. SERV. ON TIME” (perform service
[engine oil level check] on time) will be displayed if a
proper oil level check cannot be performed. The engine
oil level check can be repeated after a short time.Perform the engine oil level check with the dipstick, if it
cannot be completed via the multifunction display.
See page 251.
In this case we recommend that you have the system
checked at a Mercedes-Benz Center.
Note:
See malfunction and warning messages on page 231
and page 241 if an engine oil level indicator appears on
the multifunction display when the engine is running.
The engine oil level cannot be checked while the engine
is running. The “ENGINE OIL LEVEL – NOT WHEN
ENGINE ON” message will appear.
Engine oil consumption
Engine oil consumption checks should only be made
after the break-in period. During the break-in period,
higher oil consumption may be noticed and is normal.
Frequent driving at high engine speeds results in
increased consumption.
ProCarManuals.com
Page 130 of 325
127 Audio system
Te ch n ica l
data Instruments
and controlsOperationDrivingInstrument
cluster displayPractical hints Car care Index Audio and telephone, operation
These instructions are intended to help you become
acquainted with your Mercedes-Benz vehicle radio.
They contain useful tips and a detailed description of
the user functions.
The right to correct errors and make technical amendments is
reserved.
Operating safety1 Optional equipment
Dolby and the double-D symbol
Ă™
are trademarks of Dolby
laboratories Licensing Corporation. The Dolby noise reduction
system is manufactured under licence from Dolby Laboratories
Licensing Corporation.
Wa r n i n g !
In order to avoid distraction which could lead to an
accident, system settings should be entered with
the vehicle at standstill and systems should be
operated by the driver only when traffic conditions
permit. Always pay full attention to traffic
conditions first before operating system controls
while driving.Bear in mind that at a speed of just 30 mph
(approximately 50 km/h), your vehicle is covering
a distance of approximately 50 feet (approximately
14 m ) e v e r y s e c o n d .
Wa r n i n g !
Any alternations made to electronic components
can cause malfunctions.The radio, cassette deck, CD changer
1 and
telephone
1 are interconnected. Therefore, when
one of the components is defective or has not been
removed/replaced properly this may impair the
function of other components.
These malfunctions might seriously impair the
operating safety of your vehicle.We recommend that you have any service work or
alternations on electronic components done in an
authorized Mercedes-Benz Center.
ProCarManuals.com
Page 142 of 325
139 Audio system
Te ch n ica l
data Instruments
and controlsOperationDrivingInstrument
cluster displayPractical hints Car care Index CD mode
General notes on CD mode
Should excessive temperatures occur while in CD mode,
“TEMP HIGH” will appear in the display and muting
will take place. The unit will then switch back to radio
mode until the temperature has decreased to a safe
operating level.
Should temperatures occur while in CD mode which are
too low, “TEMP LOW” will be displayed, but the CD will
play. It will be sensitive to skipping if you are driving
over rough roads.
Handle CDs carefully to prevent interference during
playback.
Avoid fingerprints and dust on CDs. Do not write on the
CDs or apply any label to the CDs.
Clean CDs from time to time with a commercially
available cleaning cloth. No solvents, anti-static sprays,
etc. should be used. Replace the CD in its container after use. Protect CDs
from heat and direct sunlight.
1 Optional equipmentWa r n i n g !
The CD changer
1 is a Class 1 laser product. There is
a danger of invisible laser radiation if the cover is
opened or damaged.
Do not remove the cover. The CD changer
1 does not
contain any parts which can be serviced by the
user. For safety reasons, have any service work
which may be necessary performed only by
qualified personnel.
ProCarManuals.com
Page 156 of 325
153 Interior equipment
Te ch n ica l
data Instruments
and controlsOperationDrivingInstrument
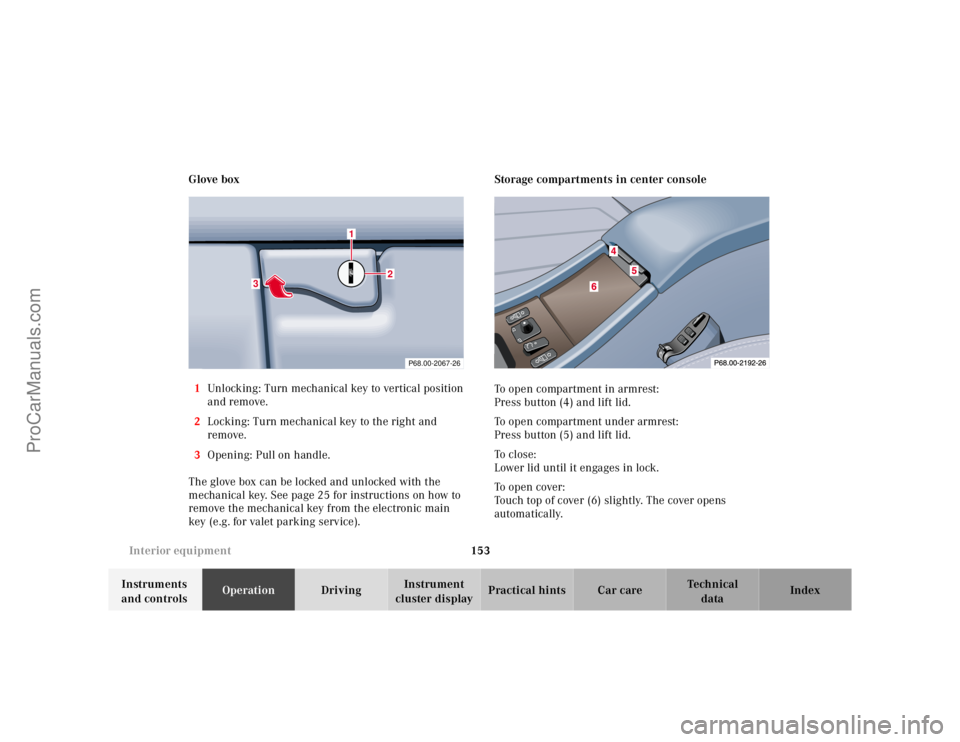
cluster displayPractical hints Car care Index Glove box
1Unlocking: Turn mechanical key to vertical position
and remove.
2Locking: Turn mechanical key to the right and
remove.
3Opening: Pull on handle.
The glove box can be locked and unlocked with the
mechanical key. See page 25 for instructions on how to
remove the mechanical key from the electronic main
key (e.g. for valet parking service).Storage compartments in center console
To open compartment in armrest:
Press button (4) and lift lid.
To open compartment under armrest:
Press button (5) and lift lid.
To c l o s e :
Lower lid until it engages in lock.
To o p e n c o ve r :
Touch top of cover (6) slightly. The cover opens
automatically.
P68.00-2067-26
3
1
2
ProCarManuals.com
Page 167 of 325
164 Garage door opener
Te ch n ica l
data Instruments
and controlsOperationDrivingInstrument
cluster displayPractical hints Car care Index
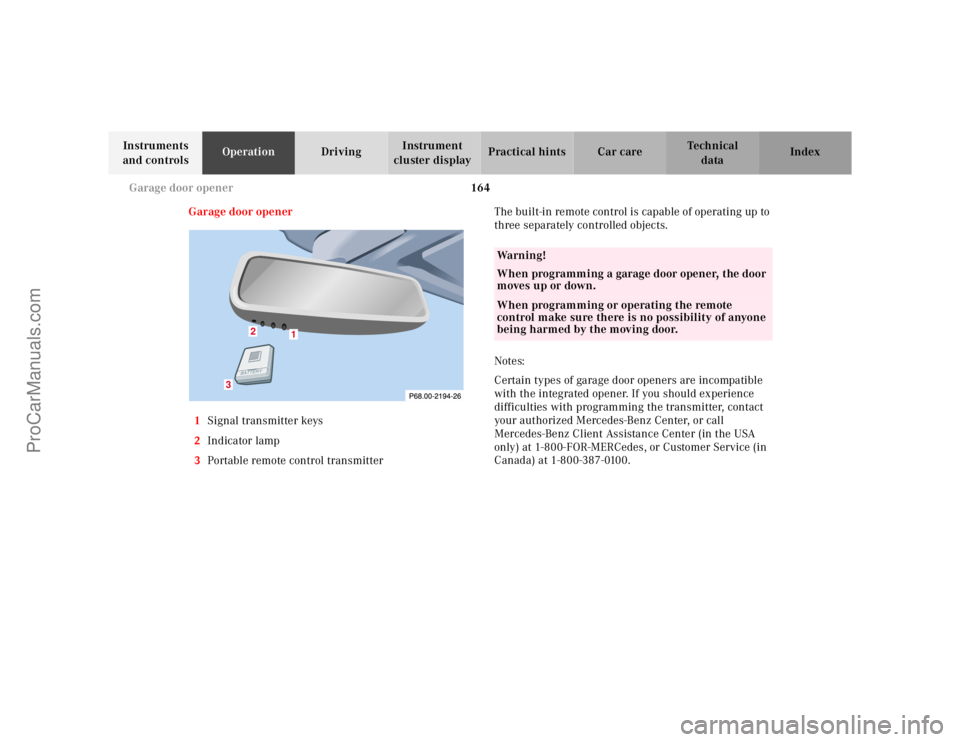
Garage door opener
1Signal transmitter keys
2Indicator lamp
3Portable remote control transmitterThe built-in remote control is capable of operating up to
three separately controlled objects.
Notes:
Certain types of garage door openers are incompatible
with the integrated opener. If you should experience
difficulties with programming the transmitter, contact
your authorized Mercedes-Benz Center, or call
Mercedes-Benz Client Assistance Center (in the USA
only) at 1-800-FOR-MERCedes, or Customer Service (in
Canada) at 1-800-387-0100.
1
2
3
Wa r n i n g !
When programming a garage door opener, the door
moves up or down.When programming or operating the remote
control make sure there is no possibility of anyone
being harmed by the moving door.
ProCarManuals.com