high beam MERCEDES-BENZ CLK320 CABRIOLET 2002 A208 Owner's Manual
[x] Cancel search | Manufacturer: MERCEDES-BENZ, Model Year: 2002, Model line: CLK320 CABRIOLET, Model: MERCEDES-BENZ CLK320 CABRIOLET 2002 A208Pages: 346
Page 87 of 346
84 Instrument cluster
Technical
data Instruments
and controlsOperationDrivingInstrument
cluster displayPractical hints Car care Index
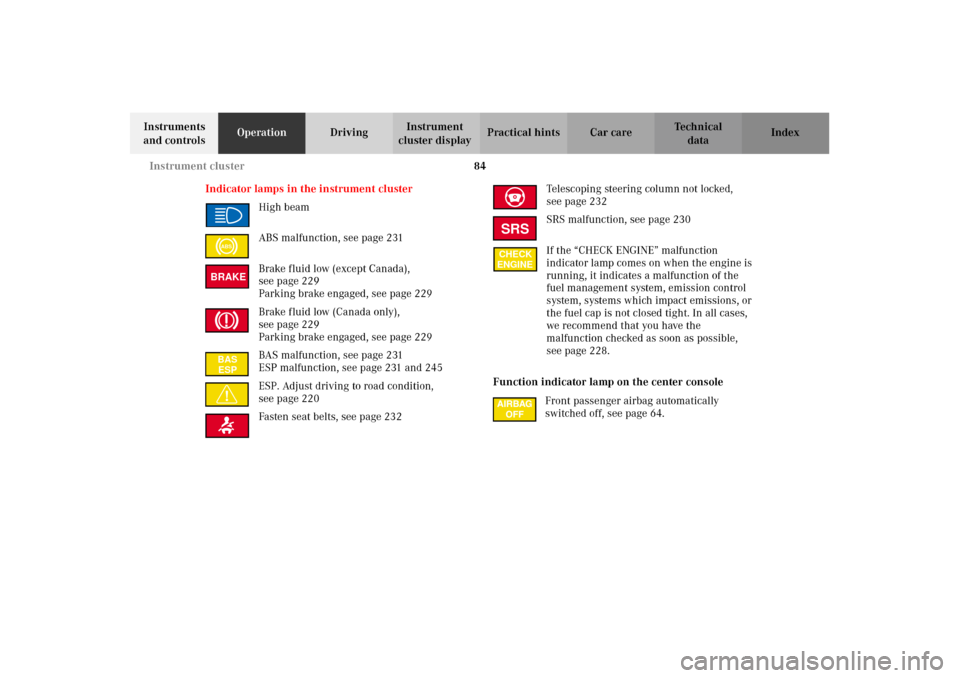
Indicator lamps in the instrument cluster
High beam
ABS malfunction, see page 231
Brake fluid low (except Canada),
seepage229
Parking brake engaged, see page 229
Brake fluid low (Canada only),
seepage229
Parking brake engaged, see page 229
BAS malfunction, see page 231
ESP malfunction, see page 231 and 245
ESP. Adjust driving to road condition,
seepage220
Fasten seat belts, see page 232Telescoping steering column not locked,
seepage232
SRS malfunction, see page 230
If the “CHECK ENGINE” malfunction
indicator lamp comes on when the engine is
running, it indicates a malfunction of the
fuel management system, emission control
system, systems which impact emissions, or
the fuel cap is not closed tight. In all cases,
we recommend that you have the
malfunction checked as soon as possible,
seepage228.
Function indicator lamp on the center console
Front passenger airbag automatically
switched off, see page 64.
ABSBRAKEBAS
ESP
SRSCHECK
ENGINE
J_A208.book Seite 84 Donnerstag, 31. Mai 2001 9:35 09
Page 117 of 346
114 Exterior lamp switch
Technical
data Instruments
and controlsOperationDrivingInstrument
cluster displayPractical hints Car care Index
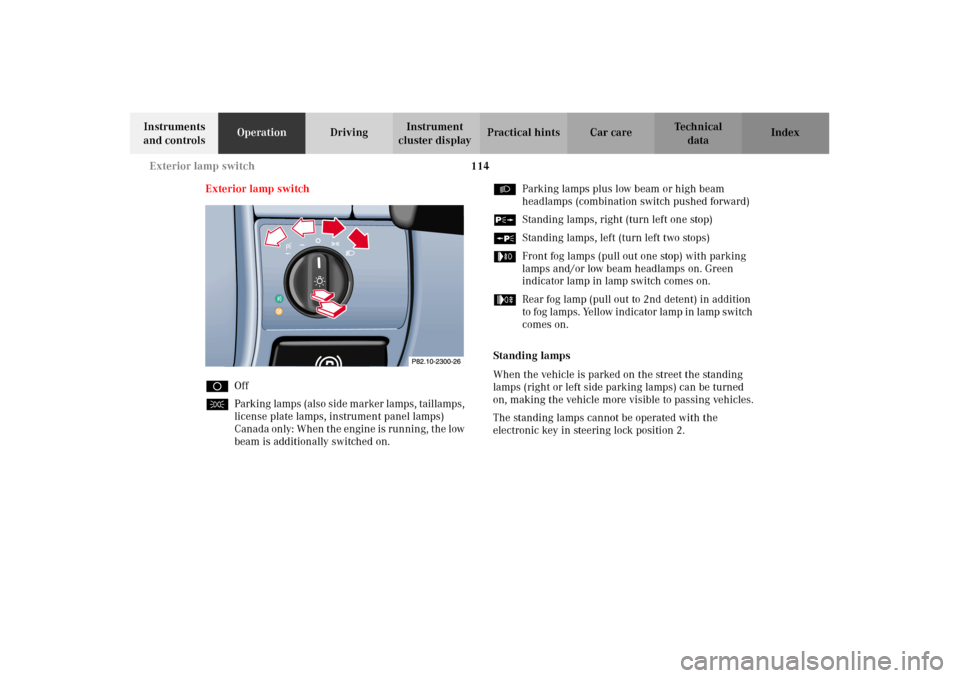
Exterior lamp switch
DOff
CParking lamps (also side marker lamps, taillamps,
license plate lamps, instrument panel lamps)
Canada only: When the engine is running, the low
beam is additionally switched on.BParking lamps plus low beam or high beam
headlamps (combination switch pushed forward)
ˆStanding lamps, right (turn left one stop)
‚Standing lamps, left (turn left two stops)
…Front fog lamps (pull out one stop) with parking
lamps and/or low beam headlamps on. Green
indicator lamp in lamp switch comes on.
„Rear fog lamp (pull out to 2nd detent) in addition
to fog lamps. Yellow indicator lamp in lamp switch
comes on.
Standing lamps
When the vehicle is parked on the street the standing
lamps (right or left side parking lamps) can be turned
on, making the vehicle more visible to passing vehicles.
The standing lamps cannot be operated with the
electronic key in steering lock position 2.
J_A208.book Seite 114 Donnerstag, 31. Mai 2001 9:35 09
Page 118 of 346
115 Exterior lamp switch
Technical
data Instruments
and controlsOperationDrivingInstrument
cluster displayPractical hints Car care Index Notes:
With the electronic key removed and the driver’s door
open, a warning sounds and the message “SWITCH OFF
LIGHTS” in the multifunction indicator appears if the
vehicle’s exterior lamps (except standing lamps) are not
switched off.
Fog lamps will operate with the parking lamps and/or
the low beam headlamps on. Fog lamps should only be
used in conjunction with low beam headlamps. Consult
your State or Province Motor Vehicle Regulations
regarding allowable lamp operation.
Fog lamps are automatically switched off when the
exterior lamp switch is turned to position D.Daytime running lamps (Canada only)
When the engine is running and the selector lever is in
a driving position, the low beam headlamps (includes
parking lamps, side marker lamps, taillamps and
license plate lamps) are automatically switched on.
When shifting from a driving position to position “N”
or “P”, the low beam switches off (2 seconds delay).
For nighttime driving the exterior lamp switch should
be turned to position B to permit activation of the
high beam headlamps.
Night security illumination
When exiting the vehicle after driving with the exterior
lamps on, they switch on again for added illumination
for approximately 30 seconds after closing the last door.
The lamp-on time period can be changed at your
Mercedes-Benz Center.
J_A208.book Seite 115 Donnerstag, 31. Mai 2001 9:35 09
Page 120 of 346
117 Combination switch
Technical
data Instruments
and controlsOperationDrivingInstrument
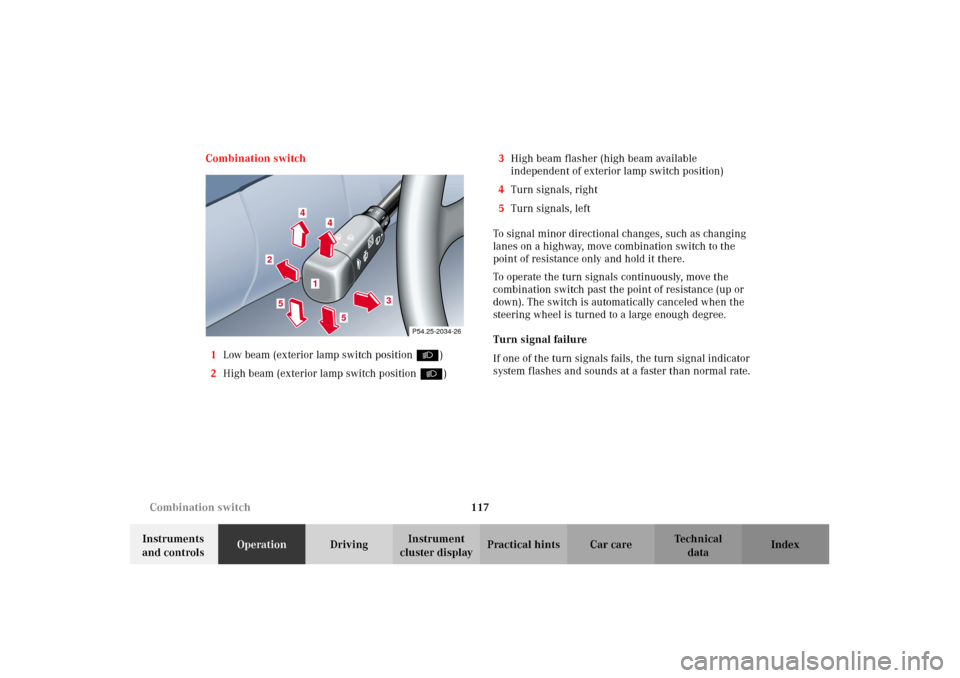
cluster displayPractical hints Car care Index Combination switch
1Low beam (exterior lamp switch position B)
2High beam (exterior lamp switch position B)3High beam flasher (high beam available
independent of exterior lamp switch position)
4Turn signals, right
5Turn signals, left
To signal minor directional changes, such as changing
lanes on a highway, move combination switch to the
point of resistance only and hold it there.
To operate the turn signals continuously, move the
combination switch past the point of resistance (up or
down). The switch is automatically canceled when the
steering wheel is turned to a large enough degree.
Turn signal failure
If one of the turn signals fails, the turn signal indicator
system flashes and sounds at a faster than normal rate.
P54.25-2034-26
2
3
4
4
5
5
1
J_A208.book Seite 117 Donnerstag, 31. Mai 2001 9:35 09
Page 228 of 346
225 What you should know at the gas station
Technical
data Instruments
and controlsOperationDrivingInstrument
cluster displayPractical hints Car care Index •Engine oil
Engine oil level check, see page 112 and page 256.
Fill quantity between upper and lower dipstick
marking level: 2.1 US qt (2.0 l).
Recommended engine oils, see Approved Service
Products sheet.
• Coolant
For normal replenishing, use water (potable water
quality).
For further information (e.g. anticorrosion/
antifreeze), see page 318.
• Spark plugs
Approved spark plugs, see page 316.
• Tire pressure
For tire pressure, refer to tire pressure label inside
the fuel filler flap. See page 271 for further details.•Air conditioner
R-134a refrigerant and special PAG lubricant, see
page 318.
•Bulbs
High and low beams: H7 (55 W),
low beam: Xenon (optional)
fog lamps: H1 (55 W),
turn signal lamps,
front 1156 NA (26.9/5 W/32/4 cp),
parking and standing lamps, front: H 6W (6 W),
side marker lamps, front: 5 W/4 cp,
turn signal lamps, rear: 21 W/24 cp,
stop, tail, parking and side marker lamps: 21/4 W,
tail and parking lamp: 5 W/4 cp,
rear fog lamp, driver’s side: 21 W/32 cp,
backup lamps: 21 W/32 cp,
license plate lamps: 5 W/4 cp.
J_A208.book Seite 225 Donnerstag, 31. Mai 2001 9:35 09
Page 284 of 346
281 Exterior lamps
Technical
data Instruments
and controlsOperation DrivingInstrument
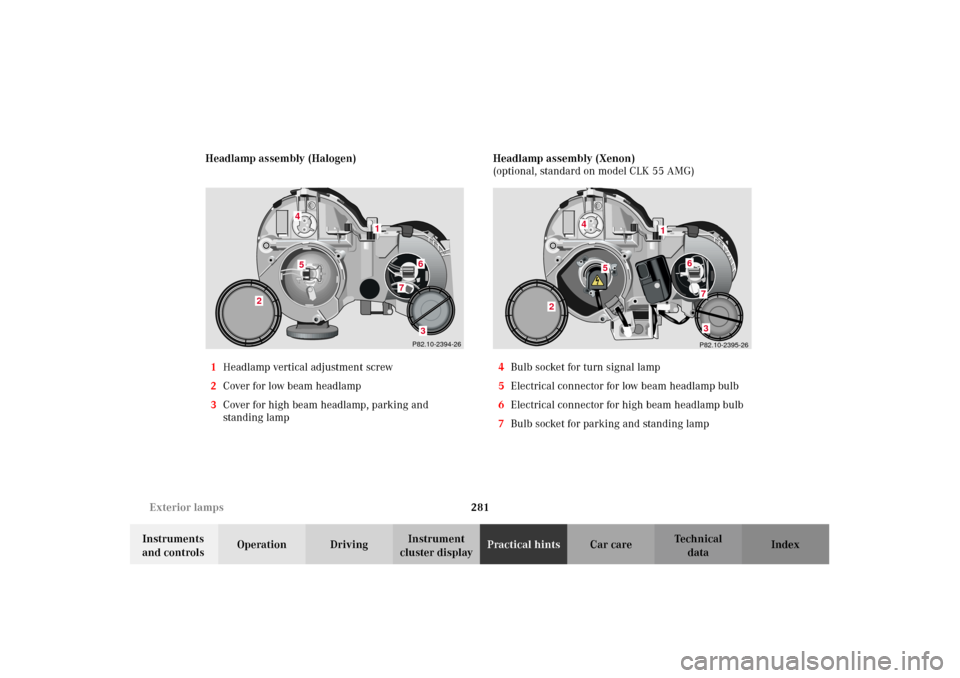
cluster displayPractical hintsCar care Index Headlamp assembly (Halogen)
1Headlamp vertical adjustment screw
2Cover for low beam headlamp
3Cover for high beam headlamp, parking and
standing lampHeadlamp assembly (Xenon)
(optional, standard on model CLK 55 AMG)
4Bulb socket for turn signal lamp
5Electrical connector for low beam headlamp bulb
6Electrical connector for high beam headlamp bulb
7Bulb socket for parking and standing lamp
P82.10-2394-26
4
1
5
6
7
2
3
4
6
7
2
3P82.10-2395-26
5
1
J_A208.book Seite 281 Donnerstag, 31. Mai 2001 9:35 09
Page 285 of 346
282 Exterior lamps
Technical
data Instruments
and controlsOperation DrivingInstrument
cluster displayPractical hintsCar care Index
Bulbs for low or high beam
H7 (55 W)
Open hood.
Rotate cover (2 or 3) counterclockwise and remove. Pull
off electrical connector (5 or 6). Unhook clamping ring
and remove bulb.
Insert new bulb (seating properly in cutouts of bulb
socket), mount clamping ring. Reinstall and push
electrical connector on securely.
Reinstall cover (2 or 3).
Xenon (optional)
Bulb for low beamTurn signal lamp
1156 NA (26.9/5 W/32/4 cp bulb)
Open hood.
Twist bulb socket (4) counterclockwise and pull out.
Push bulb into socket, turn counterclockwise and
remove.
Insert new bulb in socket, push in and twist clockwise.
Reinstall bulb socket. Reinstall lamp assembly until
properly seated.
Parking and standing lamp
H6W (6Wbulb)
Open hood.
Rotate cover (3) counterclockwise and remove.
Twist bulb socket (7) counterclockwise and pull out.
Push bulb into socket, turn counterclockwise and
remove.
Insert new bulb in socket, push in and twist clockwise.
Reinstall bulb socket. Reinstall lamp assembly until
properly seated.
Reinstall cover (3).
Wa r n i n g !
Because of high voltage in Xenon lamps, it is
dangerous to replace the bulb or repair the lamp
and its components. We recommend that you have
such work done by a qualified technician.
J_A208.book Seite 282 Donnerstag, 31. Mai 2001 9:35 09
Page 288 of 346
285 Exterior lamps
Technical
data Instruments
and controlsOperation DrivingInstrument
cluster displayPractical hintsCar care Index High mounted stop lamp,
Additional turn signals on the exterior mirror
The high mounted stop lamp (3rd brake lamp), and the
additional turn signals on the exterior mirrors are
equipped with LEDs.
Have the system checked at an authorized
Mercedes-Benz Center if a fault or defect occurs.Adjusting headlamp aim
Correct headlamp adjustment is extremely important.
To check and readjust a headlamp, follow steps 1
through 5.
Please note:
•Low beam adjustments simultaneously aim the high
beam.
•Vehicle should have a normal trunk load.
1. Park vehicle on level surface approximately 25 ft.
(7.6 m) from a vertical test screen or wall. The
centerline of the vehicle must be at a 90
° angle to
the test screen.
J_A208.book Seite 285 Donnerstag, 31. Mai 2001 9:35 09
Page 289 of 346
286 Exterior lamps
Technical
data Instruments
and controlsOperation DrivingInstrument
cluster displayPractical hintsCar care Index
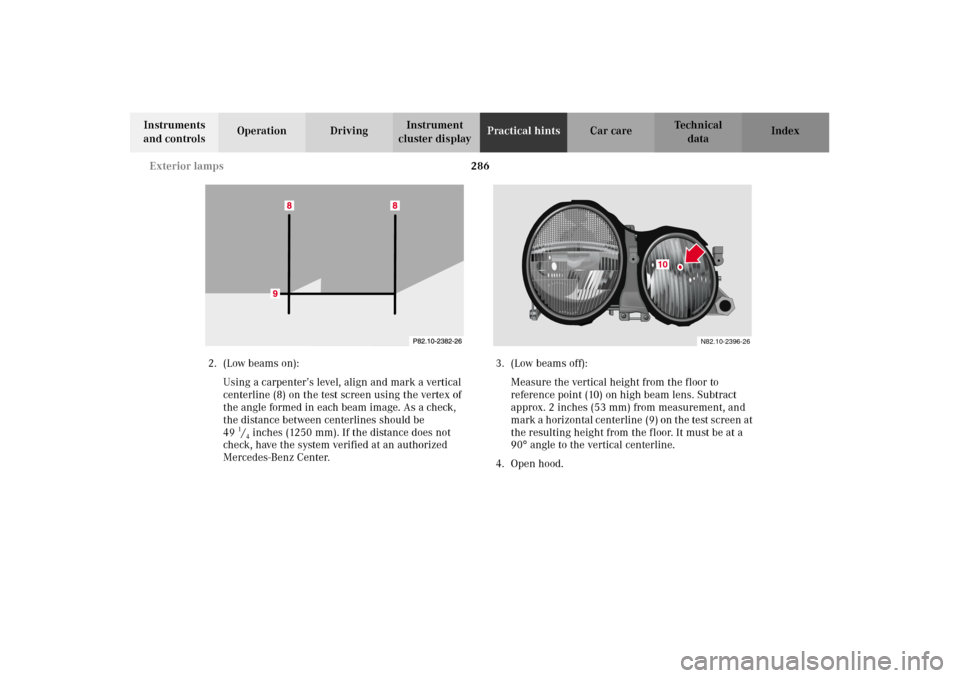
2. (Low beams on):
Using a carpenter’s level, align and mark a vertical
centerline (8) on the test screen using the vertex of
the angle formed in each beam image. As a check,
the distance between centerlines should be
49
1/4 inches (1250 mm). If the distance does not
check, have the system verified at an authorized
Mercedes-Benz Center.3. (Low beams off):
Measure the vertical height from the floor to
reference point (10) on high beam lens. Subtract
approx. 2 inches (53 mm) from measurement, and
mark a horizontal centerline (9) on the test screen at
the resulting height from the floor. It must be at a
90
°angle to the vertical centerline.
4. Open hood.
10
N82.10-2396-26
J_A208.book Seite 286 Donnerstag, 31. Mai 2001 9:35 09
Page 333 of 346
330 Index
Technical
data Instruments
and controlsOperation DrivingInstrument
cluster displayPractical hints Car careIndex
Exterior lamp malfunction
and warning message ..............................................242
Exterior lamp switch ......................................................114
Exterior lamps ................................................................ 280
Adjusting headlamp aim .......................................... 285
Fog lamps ....................................................................114
Headlamps ......................114, 242, 243, 281, 285, 305
Low and high beam .......................................... 117, 282
Parking lamps ...................................................114, 282
Replacing bulbs ......................................................... 280
Side marker lamp, front ........................................... 284
Standing lamps ..................................................114, 282
Taillamp assemblies ................................................. 283
Turn signal lamp ............................................... 117, 282
FFirst aid kit ..................................................................... 250
Flat tire
See changing wheels ................................................266
Flexible service system (FSS) ...................................... 109
Fuel
Gasoline additives ....................................................322
Premium unleaded gasoline .................. 180, 319, 321Fuel cap placement warning ....................................... 230
Fuel filler flap
Manual release ......................................................... 299
Fuel requirements .........................................................321
Fuel reserve warning .................................................... 230
Fuels, coolants, lubricants etc. - capacities ............... 318
Fuse box ......................................................................... 252
Fuses, electrical ............................................................. 252
GGarage door opener ....................................................... 158
Gasoline
Additives .................................................................... 322
Fuel requirements ....................................................321
Premium unleaded ...................................................321
General notes on the central locking system .............. 26
Global locking
See Central locking system ....................................... 29
Glove box ......................................................................... 151
J_A208.book Seite 330 Donnerstag, 31. Mai 2001 9:35 09