roof MERCEDES-BENZ CLS 2012 User Guide
[x] Cancel search | Manufacturer: MERCEDES-BENZ, Model Year: 2012, Model line: CLS, Model: MERCEDES-BENZ CLS 2012Pages: 356, PDF Size: 14.25 MB
Page 82 of 356
Unlocking and opening doors from
the inside
You can open a door from inside the vehicle
even if it has been locked. You can only open
the rear doors from inside the vehicle if they
are not secured by the child-proof locks
( Y page 59).
Only open the door when the traffic situation
permits.
If the vehicle was previously locked with the
SmartKey or with KEYLESS-GO, opening the
vehicle from the inside will activate the anti-
theft alarm system. Switch off the alarm
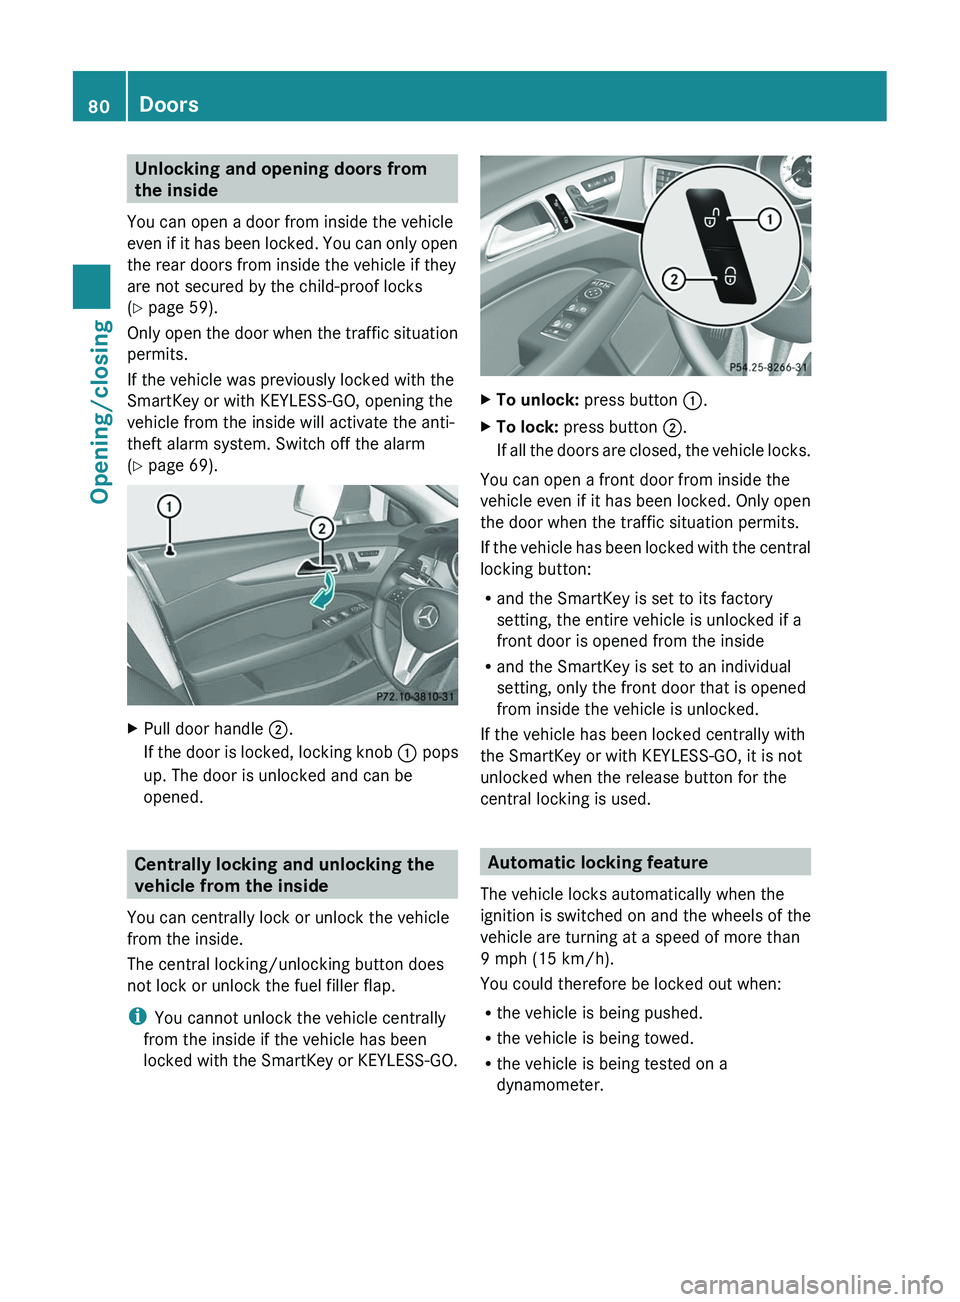
( Y page 69).XPull door handle ;.
If the door is locked, locking knob : pops
up. The door is unlocked and can be
opened.
Centrally locking and unlocking the
vehicle from the inside
You can centrally lock or unlock the vehicle
from the inside.
The central locking/unlocking button does
not lock or unlock the fuel filler flap.
i You cannot unlock the vehicle centrally
from the inside if the vehicle has been
locked with the SmartKey or KEYLESS-GO.
XTo unlock: press button :.XTo lock: press button ;.
If all the doors are closed, the vehicle locks.
You can open a front door from inside the
vehicle even if it has been locked. Only open
the door when the traffic situation permits.
If the vehicle has been locked with the central
locking button:
R and the SmartKey is set to its factory
setting, the entire vehicle is unlocked if a
front door is opened from the inside
R and the SmartKey is set to an individual
setting, only the front door that is opened
from inside the vehicle is unlocked.
If the vehicle has been locked centrally with
the SmartKey or with KEYLESS-GO, it is not
unlocked when the release button for the
central locking is used.
Automatic locking feature
The vehicle locks automatically when the
ignition is switched on and the wheels of the
vehicle are turning at a speed of more than
9 mph (15 km/h).
You could therefore be locked out when:
R the vehicle is being pushed.
R the vehicle is being towed.
R the vehicle is being tested on a
dynamometer.
80DoorsOpening/closing
Page 89 of 356
Convenience opening feature
You can ventilate the vehicle before you start
driving. To do this, the key is used to carry out
the following functions simultaneously:
R unlock the vehicle
R open the side windows
R open the sliding sunroof
R switch on the seat ventilation for the
driver's seat
i The convenience opening feature can
only be operated using the SmartKey. The
SmartKey must be close to the driver's
door handle.XPoint the tip of the SmartKey at the driver's
door handle.XPress and hold the % button until the
side windows and the sliding sunroof are in
the desired position.XTo interrupt convenience opening:
release the % button.
Convenience closing
General information
When you lock the vehicle, you can
simultaneously:
R close the side windows
R close the sliding sunroof
GWARNING
When closing the door windows and the
sliding sunroof, make sure that there is no
danger of anyone being harmed by the closing
procedure.
If potential danger exists, proceed as follows:
R Release the & button to stop the closing
procedure. To open, press and hold the
% button. To continue the closing
procedure after making sure that there is
no danger of anyone being harmed by the
closing procedure, press and hold the
& button.
Vehicles with KEYLESS-GO:
R Release the sensor surface on the outside
door handle to stop the closing procedure.
R Immediately pull on the same outside door
handle and hold firmly. The door windows
and the sliding sunroof will open for as long
as the door handle is held but the door is
not opened.
Using the SmartKey
i The SmartKey must be close to the
driver's door handle.
XPoint the tip of the SmartKey at the driver's
door handle.XPress and hold the & button until the
side windows and the sliding sunroof are
fully closed.XMake sure that all the side windows and the
sliding sunroof are closed.XTo interrupt convenience closing:
release the & button.
Using KEYLESS-GO
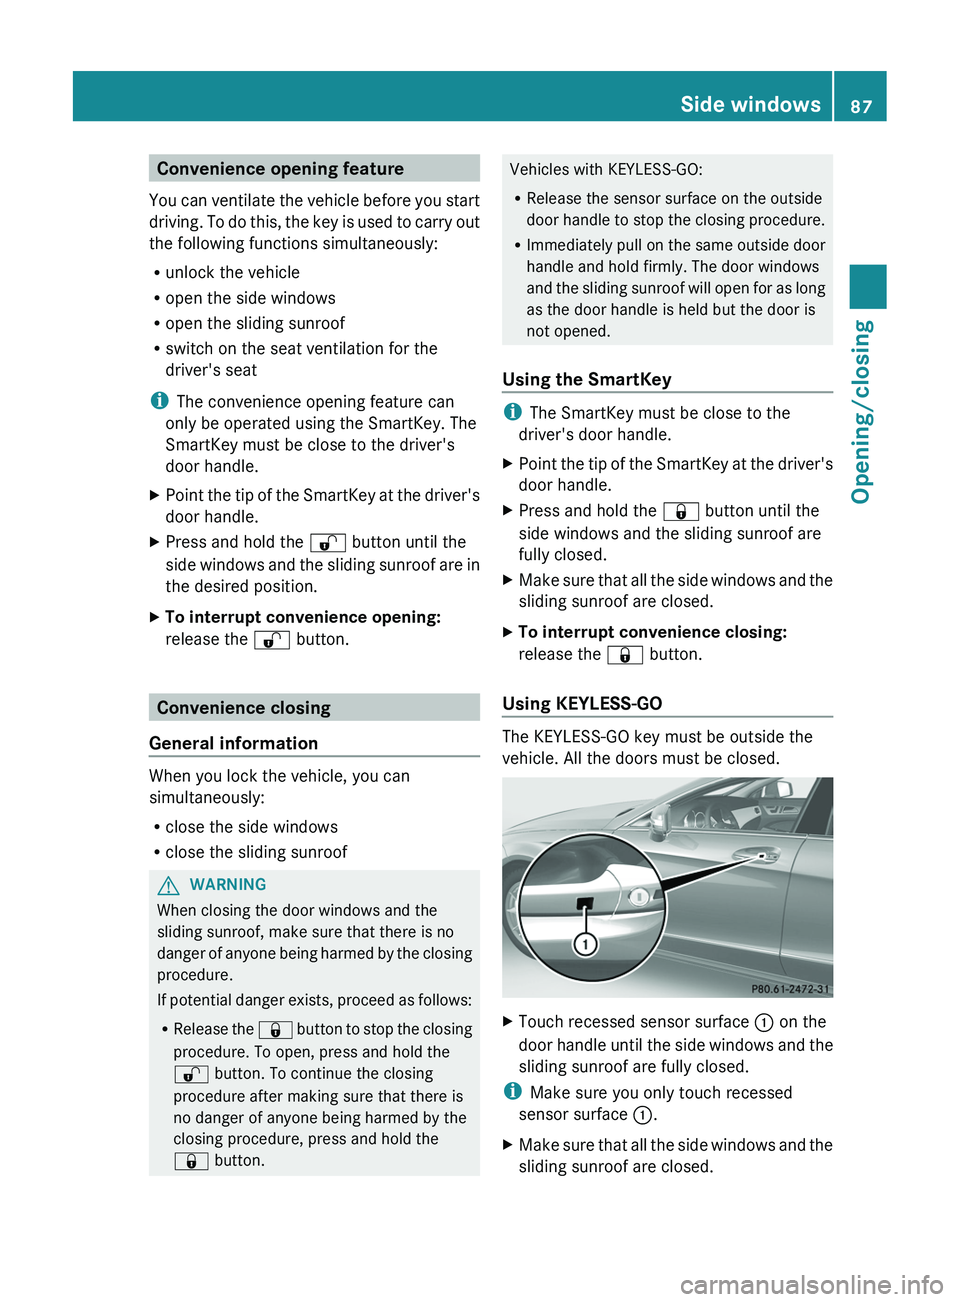
The KEYLESS-GO key must be outside the
vehicle. All the doors must be closed.
XTouch recessed sensor surface : on the
door handle until the side windows and the
sliding sunroof are fully closed.
i Make sure you only touch recessed
sensor surface :.
XMake sure that all the side windows and the
sliding sunroof are closed.Side windows87Opening/closingZ
Page 90 of 356
XTo interrupt convenience closing:
release recessed sensor surface : on the
door handle.
Resetting the side windows
You must reset each side window if a side
window can no longer be closed fully.
XClose all the doors.XTurn the SmartKey to position 1 or 2 in the
ignition lock.XPull the corresponding switch on the door
control panel until the side window is
completely closed. ( Y page 86)XHold the switch for an additional second.
If the side window opens again slightly:
XImmediately pull the corresponding switch
on the door control panel until the side
window is completely closed ( Y page 86).XHold the switch for an additional second.XIf the corresponding side window remains
closed after the button has been released,
the side window has been reset correctly.
If this is not the case, repeat the steps
above again.
Problems with the side windows
Problem: a side window cannot be closed
because it is blocked by objects, e.g.
leaves in the window guide.
XRemove the objects.XClose the side window.
Problem: a side window cannot be closed
and you cannot see the cause.
GWARNING
Closing the side windows with increased force
or without the anti-entrapment feature could
lead to serious or even fatal injury. Make sure
that nobody can become trapped when
closing the side windows.
If a side window is obstructed during closing
and reopens again slightly:XImmediately after the window blocks, pull
the corresponding switch again until the
side window has closed.
The side window is closed with increased
force.
If a side window is obstructed again during
closing and reopens again slightly:
XImmediately after the window blocks, pull
the corresponding switch again until the
side window has closed.
The side window is closed without the anti-
entrapment feature.GWARNING
Pulling and holding the switch to close the
door window immediately after it had been
blocked two times will cause the door window
to close without the anti-entrapment feature
for as long as you hold the switch.
Sliding sunroof
Important safety notes
GWARNING
When opening or closing the sliding sunroof,
make sure that there is no danger of anyone
being harmed by the opening/closing
procedure.
The sliding sunroof is equipped with
automatic operation and the anti-entrapment
feature. If the movement of the sliding sunroof
is blocked during the closing procedure, the
sliding sunroof will stop and open slightly.
The sliding sunroof operates differently when
the sliding sunroof switch is pressed and held.
See the "Problems with the sliding sunroof"
section for more details.
The opening/closing procedure of the sliding
sunroof can be immediately halted by
releasing the sliding sunroof switch or, if the
sliding sunroof switch was moved past the
88Sliding sunroofOpening/closing
Page 91 of 356
resistance point and released, by moving the
sliding sunroof switch in any direction.GWARNING
The sliding sunroof is made out of glass. In the
event of an accident, the glass may shatter.
This may result in an opening in the roof.
In a vehicle rollover, occupants not wearing
their seat belts or not wearing them properly
may be thrown out of the opening. Such an
opening also presents a potential for injury for
occupants wearing their seat belts properly,
as entire body parts or portions of them may
protrude from the passenger compartment.
! Only open the sliding sunroof if it is free
of snow and ice. Otherwise, malfunctions
may occur.
Do not allow anything to protrude from the
sliding sunroof. Otherwise, the seals could
be damaged.
! The weather can change abruptly. It could
start to rain or snow. Make sure that the
sliding sunroof is closed when you leave the
vehicle. The vehicle electronics can be
damaged if water enters the vehicle
interior.
i Resonance noises can occur in addition
to the usual airflow noises when the sliding
sunroof is open. They are caused by minor
pressure fluctuations in the vehicle interior.
Change the position of the sliding sunroof
or open a side window slightly to reduce or
eliminate these noises.
Operating the sliding sunroof
Opening and closing
i You can continue to operate the sliding
sunroof after switching off the engine or
removing the SmartKey from the ignition
lock. This function is available for up to five
minutes or until the driver's or front-
passenger door is opened.
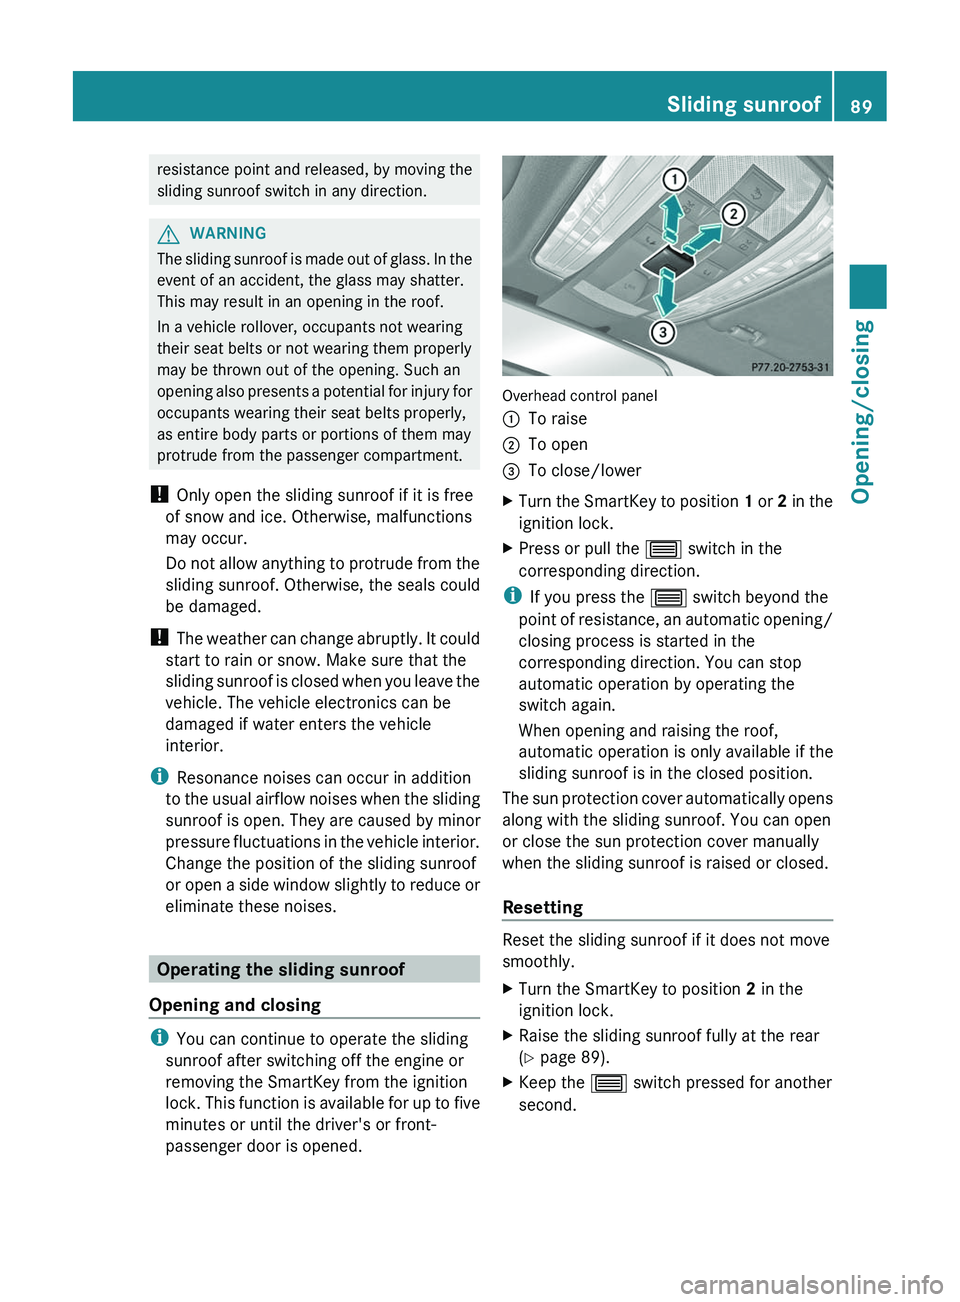
Overhead control panel
:To raise;To open=To close/lowerXTurn the SmartKey to position 1 or 2 in the
ignition lock.XPress or pull the 3 switch in the
corresponding direction.
i If you press the 3 switch beyond the
point of resistance, an automatic opening/
closing process is started in the
corresponding direction. You can stop
automatic operation by operating the
switch again.
When opening and raising the roof,
automatic operation is only available if the
sliding sunroof is in the closed position.
The sun protection cover automatically opens
along with the sliding sunroof. You can open
or close the sun protection cover manually
when the sliding sunroof is raised or closed.
Resetting
Reset the sliding sunroof if it does not move
smoothly.
XTurn the SmartKey to position 2 in the
ignition lock.XRaise the sliding sunroof fully at the rear
( Y page 89).XKeep the 3 switch pressed for another
second.Sliding sunroof89Opening/closingZ
Page 92 of 356
XMake sure that the sliding sunroof can be
fully opened and closed again (Y page 89).XIf this is not the case, repeat the steps
above again.
! If the sliding sunroof still cannot be
opened or closed fully after resetting,
contact a qualified specialist workshop.
Problems with the sliding sunroof
Problem: the sunroof cannot be closed
and you cannot see the cause.
GWARNING
You could be severely or even fatally injured
when closing the sliding sunroof with
increased closing force or if the anti-
entrapment feature is deactivated. Make sure
that nobody can become trapped when
closing the sliding sunroof.
If the sliding sunroof is obstructed during
closing and reopens again slightly:
XImmediately after the sliding sunroof
blocks, pull the 3 switch in the
overhead control panel down to the point
of resistance and hold it until the sliding
sunroof is closed.
The sliding sunroof is closed with increased
force.
If the sliding sunroof is obstructed again
during closing and reopens again slightly:
XImmediately after the sliding sunroof
blocks, pull the 3 switch in the
overhead control panel down to the point
of resistance and hold it until the sliding
sunroof is closed.
The sliding sunroof is closed without the
anti-entrapment feature.GWARNING
Pressing and holding the sliding sunroof
switch to close the sliding sunroof
immediately after it had been blocked two
times will cause the sliding sunroof to close
without the anti-entrapment feature for as
long as you hold the switch.
! If the sliding sunroof still cannot be
opened or closed due to a malfunction,
contact a qualified specialist workshop,
e.g. an authorized Mercedes-Benz Center.90Sliding sunroofOpening/closing
Page 100 of 356
The system automatically switches down
from level 2 to level 1 after approximately ten
minutes.
The system automatically switches off
approximately 20 minutes after it is set to
level 1.XMake sure that the SmartKey is in position
2 in the ignition lock.XTo switch on: press button : repeatedly
until the desired heating level is set.XTo switch off: press button : repeatedly
until all the indicator lamps go out.
Problems with the seat heating
The seat heating has switched off
prematurely or cannot be switched on. The
vehicle's electrical system voltage is too low
because too many electrical consumers are
switched on.
XSwitch off electrical consumers which you
do not need, such as the rear window
defroster or interior lighting.
Switching the seat ventilation on/off
Switching on/off
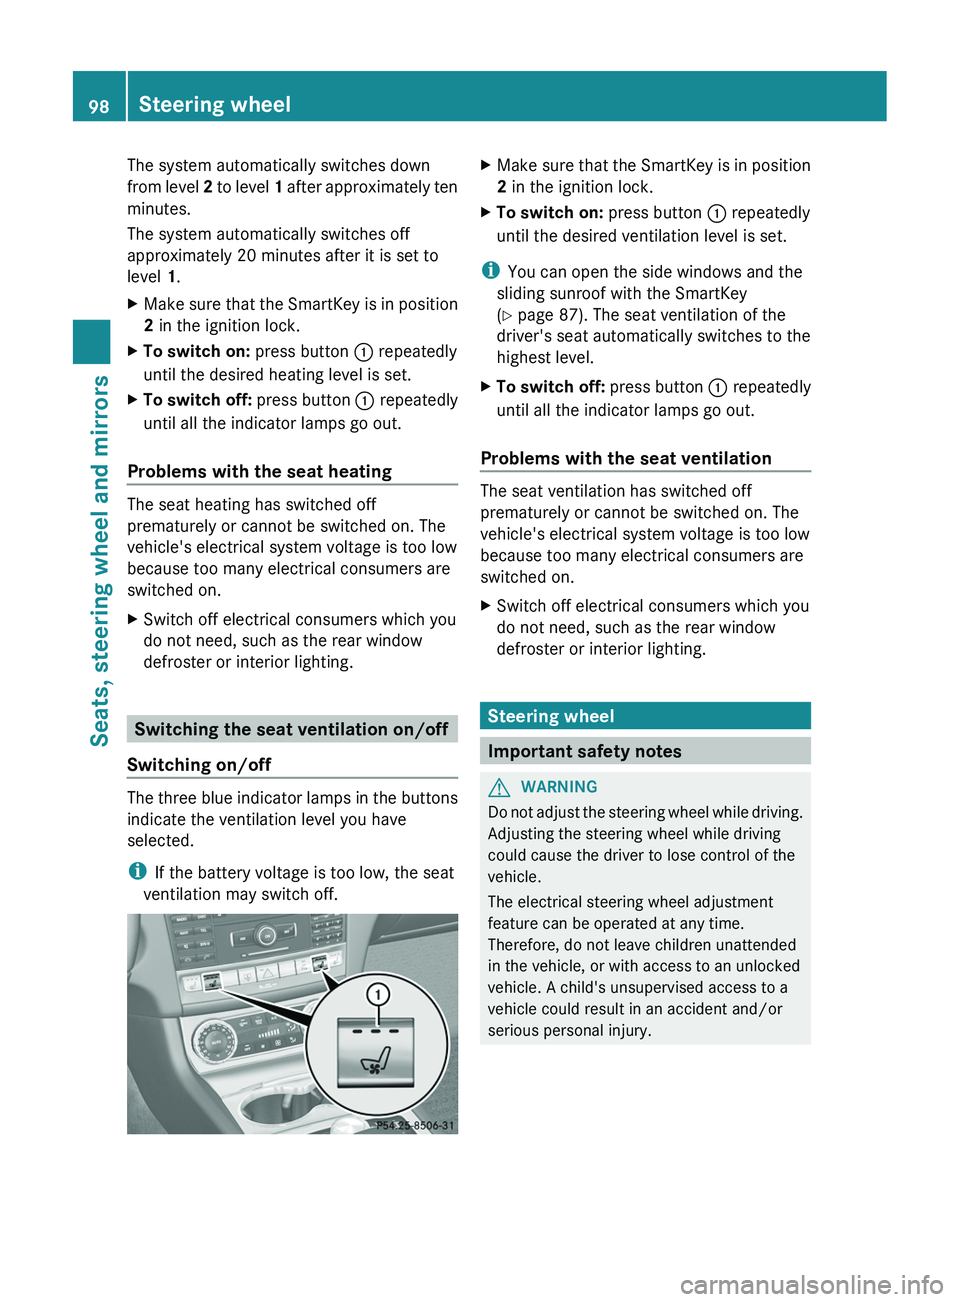
The three blue indicator lamps in the buttons
indicate the ventilation level you have
selected.
i If the battery voltage is too low, the seat
ventilation may switch off.
XMake sure that the SmartKey is in position
2 in the ignition lock.XTo switch on: press button : repeatedly
until the desired ventilation level is set.
i You can open the side windows and the
sliding sunroof with the SmartKey
( Y page 87). The seat ventilation of the
driver's seat automatically switches to the
highest level.
XTo switch off: press button : repeatedly
until all the indicator lamps go out.
Problems with the seat ventilation
The seat ventilation has switched off
prematurely or cannot be switched on. The
vehicle's electrical system voltage is too low
because too many electrical consumers are
switched on.
XSwitch off electrical consumers which you
do not need, such as the rear window
defroster or interior lighting.
Steering wheel
Important safety notes
GWARNING
Do not adjust the steering wheel while driving.
Adjusting the steering wheel while driving
could cause the driver to lose control of the
vehicle.
The electrical steering wheel adjustment
feature can be operated at any time.
Therefore, do not leave children unattended
in the vehicle, or with access to an unlocked
vehicle. A child's unsupervised access to a
vehicle could result in an accident and/or
serious personal injury.
98Steering wheelSeats, steering wheel and mirrors
Page 120 of 356
Useful information
i This Operator's Manual describes all
models and all standard and optional
equipment of your vehicle available at the
time of publication of the Operator's
Manual. Country-specific differences are
possible. Please note that your vehicle may
not be equipped with all features
described. This also applies to safety-
related systems and functions.
i Please read the information on qualified
specialist workshops ( Y page 22).
Overview of climate control systems
Important safety notes
GWARNING
Severe conditions (e.g. strong air pollution)
may require replacement of the filter before
its scheduled replacement interval. A clogged
filter will reduce the air volume to the interior
and the windows could fog up, impairing
visibility and endangering you and others.
Have a blocked filter replaced at a Mercedes-
Benz Center as soon as possible.
GWARNING
Follow the recommended settings for heating
and cooling given on the following pages.
Otherwise, the windows could fog up,
impairing visibility and endangering you and
others.
The automatic climate control/automatic
climate control controls the temperature and
the humidity of the vehicle interior and filters
out undesirable substances from the air.
The automatic climate control is only
operational when the engine is running. 10
Optimum operation is only achieved if you
drive with the side windows and sliding
sunroof/panorama roof with power tilt/
sliding panel closed.
i Ventilate the vehicle for a brief period
during warm weather, e.g. using the
convenience opening feature ( Y page 87).
This will speed up the cooling process and
the desired vehicle interior temperature
will be reached more quickly.
i The integrated filter can filter out most
particles of dust and completely filters out
pollen. A clogged filter reduces the amount
of air supplied to the vehicle interior. For
this reason, you should always observe the
interval for replacing the filter, which is
specified in the Service Booklet. As it
depends on environmental conditions, e.g.
heavy air pollution, the interval may be
shorter than stated in the Service Booklet.10 The residual heat function can only be activated/deactivated when the ignition is switched off.118Overview of climate control systemsClimate control
Page 156 of 356
! Vehicles with 4MATIC: as the ESP®
system operates automatically, the engine
and the ignition system must be switched
off (SmartKey in position 0 or 1 in the
ignition lock or Start/Stop button in
position 0 or 1) when:
R testing the parking brake on a brake
dynamometer.
R you intend to have the vehicle towed with
one of the axles raised.
Braking maneuvers triggered automatically
by ESP ®
may seriously damage the brake
system.
If your brake system is subject only to
moderate loads, you should test the
functionality of your brakes at regular
intervals by pressing firmly on the brake pedal
at high speeds. This improves the grip of the
brake pads.GWARNING
Make sure that you do not endanger other
road users when you apply the brakes.
You can find a description of Brake Assist
(BAS) on ( Y page 62) or of BAS PLUS on
( Y page 62).
Winter driving
General information
GWARNING
If the vehicle becomes trapped in snow,
ensure that snow is kept away from the
exhaust pipe and from around the vehicle as
long as the engine is running. Otherwise,
poisonous carbon monoxide (CO) may enter
the vehicle, resulting in loss of consciousness
and even death.
To assure sufficient fresh air ventilation, open
a window slightly on the side of the vehicle
not facing the wind.
At the onset of winter, have your vehicle
winterproofed at a qualified specialist
workshop, e.g. at an authorized Mercedes-
Benz Center.
Observe the notes in the "Winter operation"
section ( Y page 316).
Driving with summer tires
Observe the notes in the "Winter operation"
section ( Y page 316).
Slippery road surfaces
GWARNING
The outside temperature indicator is not
designed to serve as an ice-warning device
and is therefore unsuitable for that purpose.
Indicated temperatures just above the
freezing point do not guarantee that the road
surface is free of ice. The road may still be icy,
especially in wooded areas or on bridges.
GWARNING
On slippery road surfaces, never downshift in
order to obtain braking action. This could
result in drive wheel slip and reduced vehicle
control. Your vehicle's ABS will not prevent
this type of loss of control.
Drive particularly carefully on slippery road
surfaces. Avoid sudden acceleration, steering
and braking maneuvers. Do not use cruise
control or DISTRONIC PLUS.
If the vehicle threatens to skid or cannot be
stopped when moving at low speed:
XShift the transmission to position N.
i
For more information on driving with
snow chains, see ( Y page 317).
GWARNING
Make sure that you do not endanger other
road users when you apply the brakes.
154Driving tipsDriving and parking
Page 263 of 356
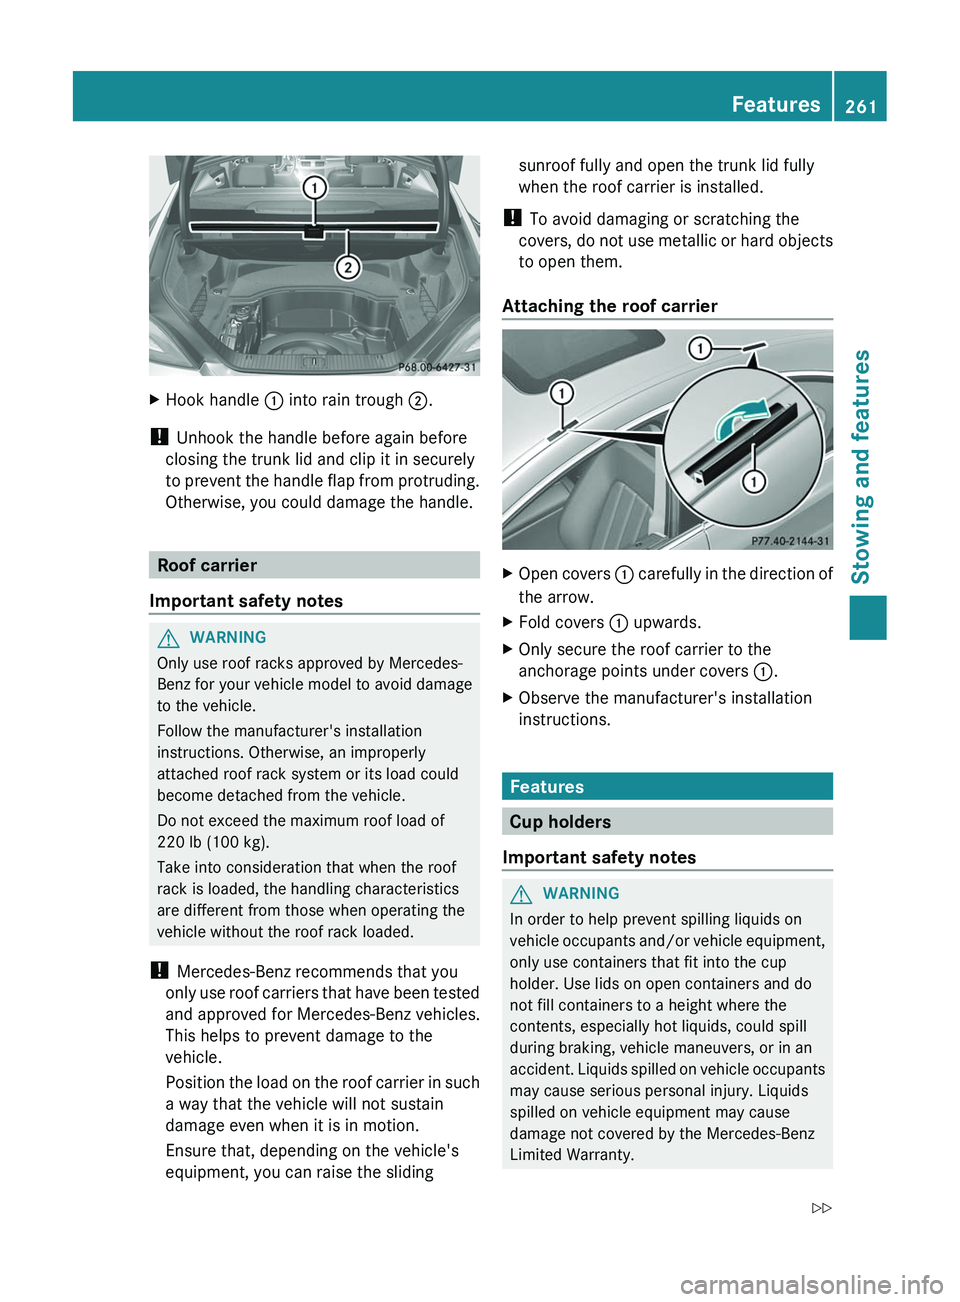
XHook handle : into rain trough ;.
!
Unhook the handle before again before
closing the trunk lid and clip it in securely
to prevent the handle flap from protruding.
Otherwise, you could damage the handle.
Roof carrier
Important safety notes
GWARNING
Only use roof racks approved by Mercedes-
Benz for your vehicle model to avoid damage
to the vehicle.
Follow the manufacturer's installation
instructions. Otherwise, an improperly
attached roof rack system or its load could
become detached from the vehicle.
Do not exceed the maximum roof load of
220 lb (100 kg).
Take into consideration that when the roof
rack is loaded, the handling characteristics
are different from those when operating the
vehicle without the roof rack loaded.
! Mercedes-Benz recommends that you
only use roof carriers that have been tested
and approved for Mercedes-Benz vehicles.
This helps to prevent damage to the
vehicle.
Position the load on the roof carrier in such
a way that the vehicle will not sustain
damage even when it is in motion.
Ensure that, depending on the vehicle's
equipment, you can raise the sliding
sunroof fully and open the trunk lid fully
when the roof carrier is installed.
! To avoid damaging or scratching the
covers, do not use metallic or hard objects
to open them.
Attaching the roof carrierXOpen covers : carefully in the direction of
the arrow.XFold covers : upwards.XOnly secure the roof carrier to the
anchorage points under covers :.XObserve the manufacturer's installation
instructions.
Features
Cup holders
Important safety notes
GWARNING
In order to help prevent spilling liquids on
vehicle occupants and/or vehicle equipment,
only use containers that fit into the cup
holder. Use lids on open containers and do
not fill containers to a height where the
contents, especially hot liquids, could spill
during braking, vehicle maneuvers, or in an
accident. Liquids spilled on vehicle occupants
may cause serious personal injury. Liquids
spilled on vehicle equipment may cause
damage not covered by the Mercedes-Benz
Limited Warranty.
Features261Stowing and featuresZ
Page 288 of 356

! Do not park the vehicle for an extended
period straight after cleaning it, particularly
after having cleaned the wheels with wheel
cleaner. Wheel cleaners could cause
increased corrosion of the brake discs and
brake pads/linings. For this reason, you
should drive for a few minutes after
cleaning. Braking heats the brake discs and
the brake pads/linings, thus drying them.
The vehicle can then be parked.
Exterior care
Automatic car wash
GWARNING
Braking efficiency is reduced after washing
the vehicle. This could cause an accident. For
this reason, you must drive particularly
carefully after washing the vehicle until the
brakes have dried.
GWARNING
The vehicle is braked when the HOLD function
or DISTRONIC PLUS is activated. Therefore,
deactivate the HOLD function and DISTRONIC
PLUS before the vehicle is washed in an
automatic car wash.
You can wash the vehicle in an automatic car
wash from the very start.
! Never clean your vehicle in a Touchless
Automatic Car Wash as these use special
cleaning agents. These cleaning agents can
damage the paintwork or plastic parts.
If the vehicle is very dirty, pre-wash it before
cleaning it in an automatic car wash.
! In car washes with a towing mechanism,
make sure that the automatic transmission
is in transmission position N, otherwise the
vehicle could be damaged.
R Vehicles with a SmartKey:
Do not remove the SmartKey from the
ignition lock. Do not open the driver's
door or front-passenger door when the
engine is switched off. Otherwise, the
automatic transmission selects park
position P automatically and locks the
wheels. You can prevent this by shifting
the automatic transmission to N
beforehand.
R Vehicles with KEYLESS-GO:
Do not open the driver's door or front-
passenger door when the engine is
switched off. Otherwise, the automatic
transmission selects park position P
automatically and locks the wheels.
Observe the following to make sure that the
automatic transmission stays in position N:XMake sure the vehicle is stationary and the
ignition is switched off.XTurn the SmartKey to position
2 (Y page 132) in the ignition lock.
Use the SmartKey instead of the Start/
Stop button on vehicles with KEYLESS-GO.XDepress and hold the brake pedal.XShift the automatic transmission to
position N.XRelease the brake pedal.XRelease the parking brake.XSwitch off the ignition and leave the
SmartKey in the ignition lock.
! Make sure that:
R the side windows and the sliding sunroof
are fully closed.
R the ventilation/heating is switched off
(the OFF button has been pressed).
R the windshield wiper switch is in position
0 .
Otherwise, the vehicle might be damaged.
After using an automatic car wash, wipe off
wax from the windshield and the wiper
blades. This will prevent smears and reduce
wiping noises caused by residue on the
windshield.
286CareMaintenance and care