spare tire MERCEDES-BENZ CLS 2012 Owners Manual
[x] Cancel search | Manufacturer: MERCEDES-BENZ, Model Year: 2012, Model line: CLS, Model: MERCEDES-BENZ CLS 2012Pages: 356, PDF Size: 14.25 MB
Page 9 of 356
Setting the temperature (rear
compartment) ................................ 124
Switching air-recirculation mode
on/off ............................................ 126
Switching on/off ........................... 122
Switching residual heat on/off ......127
Switching the rear window
heating on/off ............................... 126
Switching the ZONE function on/
off .................................................. 125
Cockpit
Overview .......................................... 26
see Instrument cluster
Collapsible spare wheel
Inflating ......................................... 300
see Emergency spare wheel
COMAND
see separate operating instructions
Combination switch .......................... 108
Compass Calibrating ..................................... 278
Calling up ....................................... 277
Setting ........................................... 277
Consumption statistics (on-board
computer) .......................................... 201
Convenience closing feature .............. 87
Convenience opening feature ............ 87
Coolant (engine) Checking the level .........................282
Display message ............................ 226
Notes ............................................. 350
Temperature (on-board computer) . 213
Temperature gauge ........................ 196
Warning lamp ................................. 249
Cooling
see Climate control
Cornering light (display message) ... 224
Cornering light function Function/notes ............................. 109
Crash-responsive emergency
lighting ............................................... 111
Cruise control Cruise control lever .......................155
Deactivating ................................... 156
Display message ............................ 234
Driving system ............................... 155
Function/notes ............................. 155
Important safety notes ..................155LIM indicator lamp .........................155
Setting a speed .............................. 156
Storing and maintaining current
speed ............................................. 155
Cup holder
Center console .............................. 262
Important safety notes ..................261
Rear compartment .........................262
Customer Assistance Center (CAC) ... 23
Customer Relations Department ....... 23
D
Dashboard see Cockpit
Daytime running lamp mode
see Daytime running lamps
Daytime running lamps
Display message ............................ 225
Switching on/off (on-board
computer) ...................................... 209
Switching on/off (switch) ..............107
Delayed switch-off
Exterior lighting (on-board
computer) ...................................... 210
Interior lighting .............................. 210
Digital speedometer ......................... 201
DIRECT SELECT lever see Automatic transmission
Display (cleaning instructions) ........ 290
Display messages Calling up (on-board computer) .....216
Driving systems ............................. 229
Engine ............................................ 226
General notes ................................ 216
Hiding (on-board computer) ...........216
Key ................................................ 239
KEYLESS-GO .................................. 239
Lights ............................................. 224
Safety systems .............................. 217
Service interval display ..................284
Tires ............................................... 234
Vehicle ........................................... 237
Distance display (on-board
computer) .......................................... 206
Distance recorder ............................. 201
see Odometer
see Trip odometer
Index7
Page 12 of 356
F
Filler cap see Fuel filler flap
First-aid kit ......................................... 294
Flat tire Changing a wheel/mounting the
spare wheel ................................... 296
MOExtended run-flat system .........302
Preparing the vehicle .....................296
Raising the vehicle .........................297
Floormat ............................................. 278
Frequencies Garage door opener .......................277
Front windshield
see Windshield
Fuel
Additives ........................................ 348
Consumption statistics ..................201
Displaying the current
consumption .................................. 201
Displaying the range ......................201
Fuel gauge ....................................... 27
Important safety notes ..................347
Premium-grade unleaded gasoline . 348
Problem (malfunction) ...................150
Refueling ........................................ 147
Specifications ................................ 348
Tank content/reserve fuel .............347
Fuel filler flap
Emergency release ........................149
Opening/closing ............................ 148
Fuel level
Calling up the range (on-board
computer) ...................................... 201
Fuel tank
Capacity ........................................ 347
Problem (malfunction) ...................150
Fuse allocation chart (vehicle tool
kit) ...................................................... 294
Fuses Allocation chart ............................. 310
Before changing ............................. 310
Fuse box in the engine
compartment ................................. 310
Fuse box in the trunk .....................310
Important safety notes ..................309G
Garage door opener Clearing the memory .....................276
Frequencies ................................... 277
Notes ............................................. 273
Opening/closing the garage door ..276
Programming (button in the rear-
view mirror) ................................... 274
Gasoline ............................................. 147
Gear indicator (on-board
computer) .......................................... 213
Gear or selector lever (cleaning
guidelines) ......................................... 291
Genuine Mercedes-Benz parts ......... 344
Glove box ........................................... 256
H
Handbrake see Parking brake
Hazard warning lamps ...................... 108
Headlamp cleaning system Notes ............................................. 351
Headlamps
Adding fluid to cleaning system .....283
Cleaning system (function) ............107
Misting up ...................................... 110
see Automatic headlamp mode
Head restraints
Adjusting ......................................... 94
Adjusting (electrically) .....................94
Adjusting (rear) ................................ 95
Installing/removing (rear) ................95
Luxury .............................................. 94
see NECK-PRO head restraints/
NECK-PRO luxury head restraints
Heating
see Climate control
High-beam headlamps
Display message ............................ 225
Switching Adaptive Highbeam
Assist on/off ................................. 109
Switching on/off ........................... 108
Hill start assist .................................. 135
HOLD function Display message ............................ 230
Function/notes ............................. 166
10Index
Page 18 of 356
Sliding sunroofImportant safety notes ....................88
Opening/closing .............................. 89
Problem (malfunction) .....................90
Resetting ......................................... 89
SmartKey
Changing the battery .......................76
Changing the programming .............75
Checking the battery .......................76
Convenience closing feature ............87
Convenience opening feature ..........87
Display message ............................ 239
Door central locking/unlocking .......72
Important safety notes ....................72
Loss ................................................. 78
Mechanical key ................................ 75
Positions (ignition lock) .................132
Problem (malfunction) .....................78
Starting the engine ........................134
Snow chains ...................................... 317
Socket Under the armrest .........................266
Sockets
Center console .............................. 267
Points to observe before use .........266
Rear compartment .........................267
Trunk ............................................. 267
Spare wheel
Notes/data .................................... 341
Storage location ............................ 295
Stowing .......................................... 295
see Emergency spare wheel
Specialist workshop ............................ 22
Speed, controlling see Cruise control
Speedometer
Digital ............................................ 201
In the Instrument cluster .................27
Segments ...................................... 197
Selecting the unit of
measurement ................................ 208
see Instrument cluster
SPORT handling mode
Activating/deactivating (AMG
vehicles) .......................................... 65
Warning lamp ................................. 246SRS (Supplemental Restraint
System) Display message ............................ 221
Introduction ..................................... 36
Warning lamp ................................. 247
Warning lamp (function) ................... 36
Standing lamps
Display message ............................ 225
Switching on/off ........................... 106
Starting (engine) ................................ 134
Station see Radio
Steering (display message) .............. 239
Steering wheel Adjusting (electrically) .....................99
Button overview ............................... 29
Buttons (on-board
computer) ...................................... 197
Important safety notes ....................98
Paddle shifters ............................... 144
Steering wheel heating ....................99
Storing settings (memory
function) ........................................ 102
Steering wheel (cleaning
instructions) ...................................... 291
Steering wheel heating Indicator lamp (malfunction) ............99
Switching on/off .............................. 99
Steering wheel paddle shifters ........ 144
Stopwatch (RACETIMER) ................... 213
Stowage compartments Armrest (under) ............................. 257
Glove box ....................................... 256
Parcel net ...................................... 258
Rear ............................................... 258
Under driver's seat/front-
passenger seat .............................. 258
Stowage space
Center console .............................. 257
Cup holders ................................... 261
Important safety information .........256
Stowage well beneath the trunk
floor .................................................... 260
Summer opening see Convenience opening feature
Summer tires ..................................... 316
Sun visor ............................................ 26316Index
Page 66 of 356
Application of the brakes by ESP®
may
otherwise destroy the brake system.
i Only use wheels with the recommended
tire sizes. Only then will ESP ®
function
properly.
ETS/4ETS (Electronic Traction System)GWARNING
Observe "Important safety notes"
( Y page 60).
Traction control is part of ESP ®
.
Traction control brakes the drive wheels
individually if they spin. This enables you to
pull away and accelerate on slippery surfaces,
for example if the road surface is slippery on
one side. On vehicles with 4MATIC, more
drive torque is also transferred to the wheel
or wheels with traction.
Traction control remains active if you
deactivate ESP ®
.
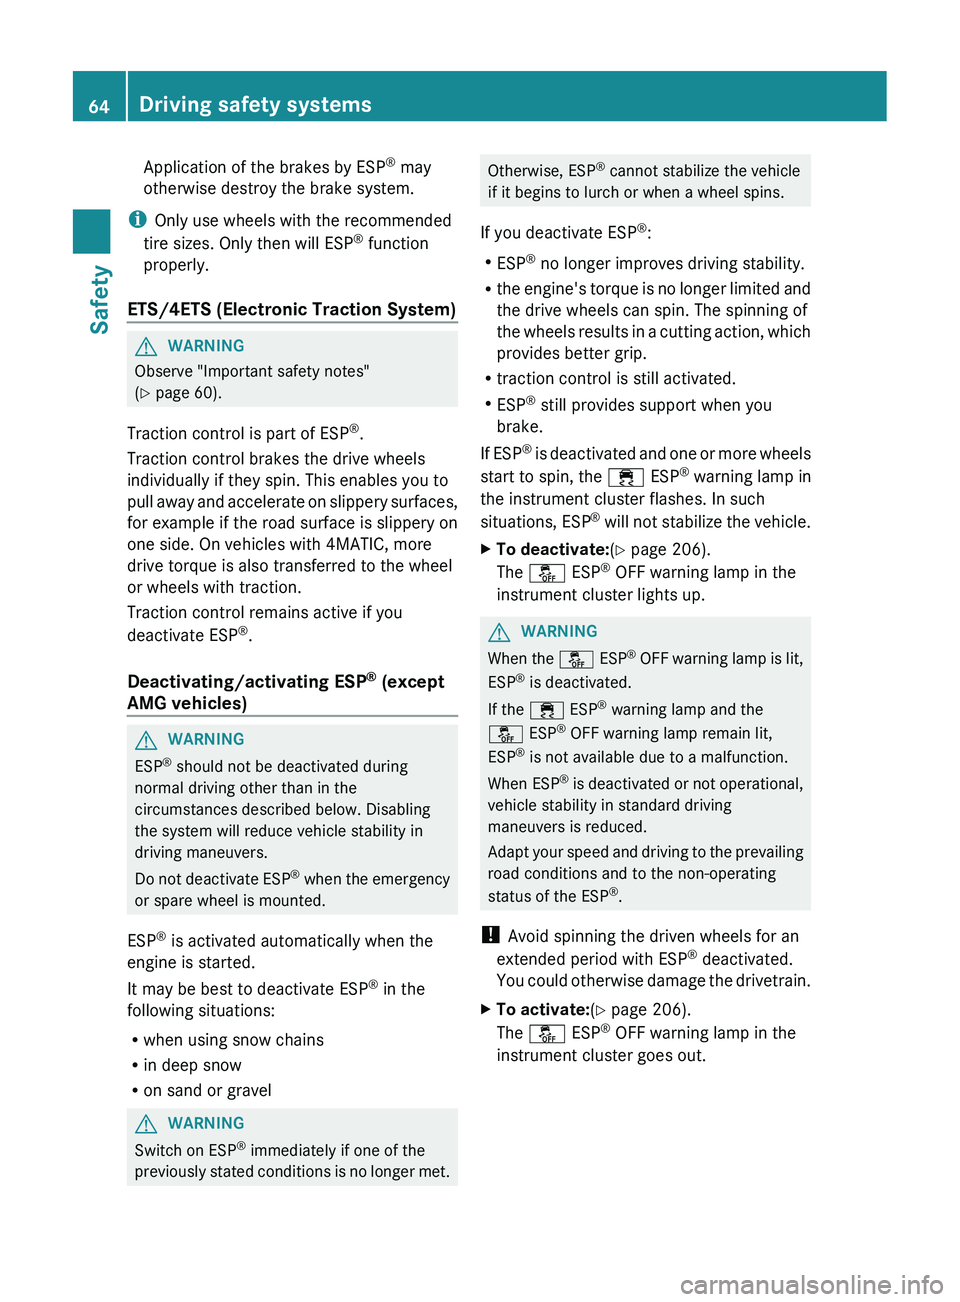
Deactivating/activating ESP ®
(except
AMG vehicles)
GWARNING
ESP ®
should not be deactivated during
normal driving other than in the
circumstances described below. Disabling
the system will reduce vehicle stability in
driving maneuvers.
Do not deactivate ESP ®
when the emergency
or spare wheel is mounted.
ESP ®
is activated automatically when the
engine is started.
It may be best to deactivate ESP ®
in the
following situations:
R when using snow chains
R in deep snow
R on sand or gravel
GWARNING
Switch on ESP ®
immediately if one of the
previously stated conditions is no longer met.
Otherwise, ESP ®
cannot stabilize the vehicle
if it begins to lurch or when a wheel spins.
If you deactivate ESP ®
:
R ESP ®
no longer improves driving stability.
R the engine's torque is no longer limited and
the drive wheels can spin. The spinning of
the wheels results in a cutting action, which
provides better grip.
R traction control is still activated.
R ESP ®
still provides support when you
brake.
If ESP ®
is deactivated and one or more wheels
start to spin, the ÷ ESP®
warning lamp in
the instrument cluster flashes. In such
situations, ESP ®
will not stabilize the vehicle.XTo deactivate: (Y page 206).
The å ESP®
OFF warning lamp in the
instrument cluster lights up.GWARNING
When the å ESP®
OFF warning lamp is lit,
ESP ®
is deactivated.
If the ÷ ESP®
warning lamp and the
å ESP®
OFF warning lamp remain lit,
ESP ®
is not available due to a malfunction.
When ESP ®
is deactivated or not operational,
vehicle stability in standard driving
maneuvers is reduced.
Adapt your speed and driving to the prevailing
road conditions and to the non-operating
status of the ESP ®
.
! Avoid spinning the driven wheels for an
extended period with ESP ®
deactivated.
You could otherwise damage the drivetrain.
XTo activate: (Y page 206).
The å ESP®
OFF warning lamp in the
instrument cluster goes out.64Driving safety systemsSafety
Page 178 of 356
GWARNING
Objects located above the height range of
Active Parking Assist will not be detected
when the parking space is measured. These
are not taken into account when the parking
procedure is calculated, e.g. overhanging
loads, tail sections or loading ramps of goods
vehicles. In some circumstances, Active
Parking Assist may therefore guide you into
the parking space too early. This may lead to
a collision. For this reason, you should avoid
using Active Parking Assist in such situations.
GWARNING
The front of the vehicle will veer out in the
direction of the oncoming traffic during the
parking operation. In some cases, the vehicle
will also take you onto sections of the
oncoming lane during the parking procedure.
You are responsible for safety at all times and
must pay attention to any road users
approaching or passing. Stop the vehicle if
necessary or cancel the Active Parking Assist
parking procedure.
GWARNING
Make sure no persons or animals are in or
near the area in which you are parking/
maneuvering. Otherwise, they could be
injured.
Use Active Parking Assist for parking spaces:
R that are parallel to the direction of travel
R that are on straight roads, not bends
R that are on the same level as the road, e.g.
not on the pavement
Parking tips:
R on narrow roads, drive past the parking
space as close as possible.
R parking spaces that are littered, overgrown
or partially occupied by trailer drawbars
might be identified incorrectly or not at all.
R snowfall or heavy rain may lead to a parking
space being measured inaccurately.
R pay attention to the PARKTRONIC
( Y page 173) warning messages during the
parking procedure.
R you can intervene in the steering procedure
to correct it at any time. Active Parking
Assist will then be canceled.
R when transporting a load which protrudes
from your vehicle, you should not use
Active Parking Assist.
R never use Active Parking Assist when snow
chains or an emergency spare wheel are
mounted.
R make sure that the tire pressures are
always correct. This has a direct influence
on the parking characteristics of the
vehicle.
R the way your vehicle is positioned in the
parking space after parking is dependent
on various factors. These include the
position and shape of the vehicles parked
in front and behind it and the conditions of
the location. In some cases, Active Parking
Assist may guide you too far into a parking
space, or not far enough into it. In some
cases, it may also lead you across or onto
the curb. If necessary, you should abort the
parking procedure with Active Parking
Assist.
R you can also engage forward gear
prematurely. The vehicle redirects and
does not drive as far into the parking space.
Should the gear change occur too soon to
achieve a sensible parking position, the
parking procedure will be aborted.
! If unavoidable, you should drive over
obstacles such as curbs slowly and not at
a sharp angle. Otherwise, you may damage
the wheels or tires.
Detecting a parking space
Active Parking Assist is switched on
automatically when driving forwards. The
system is operational at speeds of up to
approximately 22 mph (35 km/h). While in
operation, the system independently locates
176Driving systemsDriving and parking
Page 254 of 356
TiresProblemPossible causes/consequences and M Solutionsh
USA only:
The yellow tire pressure
monitor warning lamp
(pressure loss/
malfunction) is lit.
Canada only:
The yellow tire pressure
monitor warning lamp
(pressure loss) is lit.GRisk of accident
The tire pressure monitor has detected a loss of pressure in at
least one of the tires.
XStop the vehicle without making any sudden steering or braking
maneuvers. Pay attention to the traffic conditions as you do so.XObserve the additional display messages in the multifunction
display.XCheck the tire pressure. If necessary, correct the tire pressure
( Y page 322).XIf necessary, change a wheel ( Y page 338).h
USA only:
The yellow tire pressure
monitor warning lamp
(pressure loss/
malfunction) flashes for
60 seconds and then
remains lit.The tire pressure monitor is faulty.XObserve the additional display messages in the multifunction
display.XVisit a qualified specialist workshop.GWARNING
Each tire, including the spare (if provided), should be checked at least every two weeks when
cold and inflated to the pressure recommended by the vehicle manufacturer on the Tire and
Loading Information placard on the driver's door B-pillar or, if available, the tire pressure label
on the inside of the fuel filler flap. If your vehicle has tires of a different size than the size indicated
on the Tire and Loading Information placard or the tire pressure label, you should determine the
proper tire pressure for those tires.
As an added safety feature, your vehicle has been equipped with a tire pressure monitoring
system (TPMS) that illuminates a low tire pressure telltale when one or more of your tires are
significantly underinflated. Accordingly, when the low tire pressure telltale illuminates, you should
stop and check your tires as soon as possible, and inflate them to the proper pressure. Driving
on a significantly underinflated tire causes the tire to overheat and can lead to tire failure.
Underinflation also reduces fuel efficiency and tire tread life, and may affect the vehicle's handling
and stopping ability. Please note that the TPMS is not a substitute for proper tire maintenance,
and it is the driver's responsibility to maintain correct tire pressure, even if underinflation has
not reached the level to trigger illumination of the TPMS low tire pressure telltale.
USA only:
Your vehicle has also been equipped with a TPMS malfunction indicator to indicate when the
system is not operating properly. The TPMS malfunction indicator is combined with the low tire
pressure telltale. When the system detects a malfunction, the telltale will flash for approximately
1 minute and then remain continuously illuminated. This sequence will continue upon subsequent
252Warning and indicator lamps in the instrument clusterOn-board computer and displays
Page 297 of 356
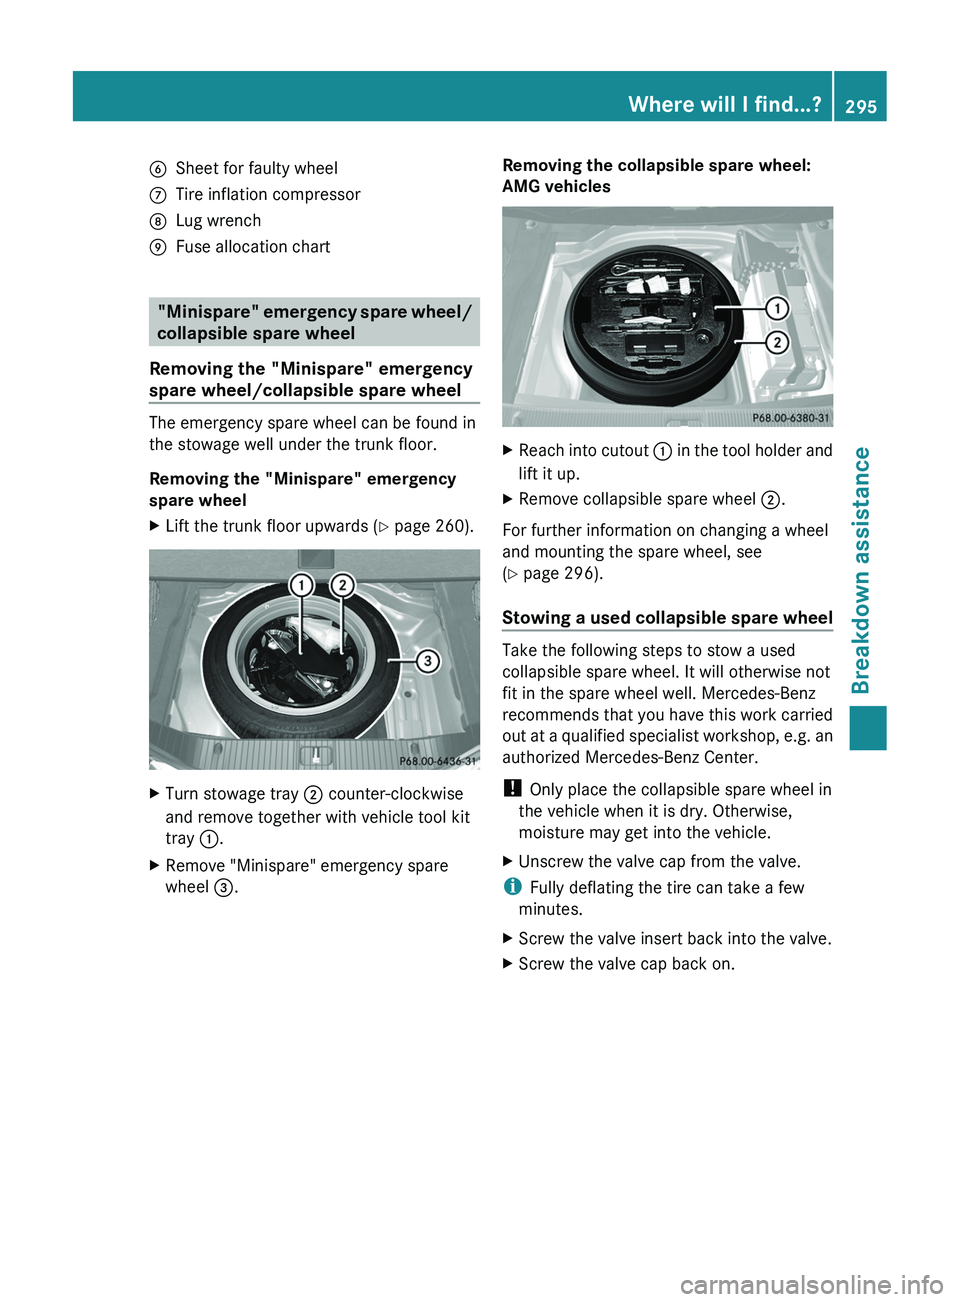
BSheet for faulty wheelCTire inflation compressorDLug wrenchEFuse allocation chart
"Minispare" emergency spare wheel/
collapsible spare wheel
Removing the "Minispare" emergency
spare wheel/collapsible spare wheel
The emergency spare wheel can be found in
the stowage well under the trunk floor.
Removing the "Minispare" emergency
spare wheel
XLift the trunk floor upwards ( Y page 260).XTurn stowage tray ; counter-clockwise
and remove together with vehicle tool kit
tray :.XRemove "Minispare" emergency spare
wheel =.Removing the collapsible spare wheel:
AMG vehiclesXReach into cutout : in the tool holder and
lift it up.XRemove collapsible spare wheel ;.
For further information on changing a wheel
and mounting the spare wheel, see
( Y page 296).
Stowing a used collapsible spare wheel
Take the following steps to stow a used
collapsible spare wheel. It will otherwise not
fit in the spare wheel well. Mercedes-Benz
recommends that you have this work carried
out at a qualified specialist workshop, e.g. an
authorized Mercedes-Benz Center.
! Only place the collapsible spare wheel in
the vehicle when it is dry. Otherwise,
moisture may get into the vehicle.
XUnscrew the valve cap from the valve.
i Fully deflating the tire can take a few
minutes.
XScrew the valve insert back into the valve.XScrew the valve cap back on.Where will I find...?295Breakdown assistance
Page 298 of 356
Flat tire
Preparing the vehicle
Your vehicle may be equipped with:
R a "Minispare" emergency spare wheel
R a collapsible spare wheel
R MOExtended tires (tires with run-flat
properties) ( Y page 302)
i Vehicle preparation is not necessary on
vehicles with MOExtended tires.
XVehicles with AIRMATIC: make sure that
"normal" level is selected ( Y page 168).XStop the vehicle as far away as possible
from traffic on solid, non-slippery and level
ground.XSwitch on the hazard warning lamps.XBring the front wheels into the straight-
ahead position.XMove the DIRECT SELECT lever to P.XSwitch off the engine.XVehicles without KEYLESS-GO: remove
the SmartKey from the ignition lock.XVehicles with KEYLESS-GO: open the
driver's door.
The on-board electronics have status 0,
which is the same as the SmartKey having
been removed.XVehicles with KEYLESS-GO: remove the
Start/Stop button from the ignition lock
( Y page 133).XAll occupants must get out of the vehicle.
Make sure that they are not endangered as
they do so.XMake sure that no one is near the danger
area while a wheel is being changed.
Anyone who is not directly assisting in the
wheel change should, for example, stand
behind the barrier.XGet out of the vehicle. Pay attention to
traffic conditions when doing so.XClose the driver's door.Changing a wheel and mounting the
spare wheel
Preparing the vehicleGWARNING
The wheel and tire size of the emergency
spare wheel/spare wheel may differ to that of
the damaged wheel. When using an
emergency spare wheel/spare wheel the
handling characteristics of the vehicle may
change.
Adapt your style of driving accordingly.
Never operate the vehicle with more than one
emergency spare wheel/spare wheel that
differs in size.
Only use an emergency spare wheel/spare
wheel of a differing size briefly and do not
switch off ESP ®
.
When using an emergency spare wheel, you
must not exceed the maximum speed of
50 mph (80 km/h).
GWARNING
Have the emergency spare wheel/spare
wheel replaced with a new wheel as soon as
possible at a qualified specialist workshop
which has the necessary specialist knowledge
and tools to carry out the work required.
Mercedes-Benz recommends that you use an
authorized Mercedes-Benz Center for this
purpose. In particular, work relevant to safety
or on safety-related systems must be carried
out at a qualified specialist workshop.
i Vehicles without a spare wheel/
emergency spare wheel are not equipped
with a tire-change tool kit at the factory. For
more information on which tools are
required to perform a wheel change on your
vehicle, e.g. wheel chock, lug wrench or
alignment bolt, consult an authorized
Mercedes-Benz Center.
296Flat tireBreakdown assistance
Page 299 of 356

XPrepare the vehicle as described
( Y page 296).XRemove the following items (depending on
the vehicle's equipment) from the stowage
well under the trunk floor:
R the emergency spare wheel
R the tire inflation compressor
R the vehicle tool kit
R the folding wheel chock
R the jackXSecure the vehicle to prevent it from rolling
away.
Securing the vehicle to prevent it from
rolling away
GWARNING
Only jack up the vehicle on level ground or on
slight inclines/declines. The vehicle could
otherwise fall off the jack and injure you or
others.
If your vehicle is equipped with a wheel chock,
it can be found in the vehicle tool kit
( Y page 294).
The folding wheel chock is an additional
securing measure to prevent the vehicle from
rolling away, for example when changing a
wheel.
XFold both plates upwards :.XFold out lower plate ;.XGuide the lugs on the lower plate fully into
the openings in base plate =.
Securing the vehicle on level ground
XOn level ground: place chocks or other
suitable items under the front and rear of
the wheel that is diagonally opposite the
wheel you wish to change.
Securing the vehicle on slight downhill gradients
XOn downhill gradients: place chocks or
other suitable items in front of the wheels
of the front and rear axle.
Raising the vehicle
GWARNING
When jacking up the vehicle, only use the jack
which has been specifically approved by
Mercedes-Benz for your vehicle.
The jack is designed exclusively for jacking up
the vehicle at the jacking points built into both
sides of the vehicle. The jack saddle must be
placed centrally under the jacking point. The
jack must always be vertical when in use,
especially on inclines or declines.
The jack is intended only for lifting the vehicle
briefly for wheel changes. It is not suited for
Flat tire297Breakdown assistanceZ
Page 302 of 356
Alternatively, you can use a second
alignment bolt.XSlide the emergency spare wheel onto the
alignment bolt and push it on.XTighten the wheel bolts until they are
finger-tight.XUnscrew the alignment bolt.XTighten the last wheel bolt until it is finger-
tight.XVehicles with a collapsible spare
wheel: inflate the collapsible spare wheel
( Y page 300) and then lower the vehicle
( Y page 301).
or
XVehicles with the "Minispare"
emergency spare wheel: lower the
vehicle ( Y page 301).
Inflating the collapsible spare wheel
GWARNING
Inflate the collapsible spare wheel only after
the wheel is properly attached.
Inflate the collapsible spare wheel using the
tire inflation compressor before lowering the
vehicle.
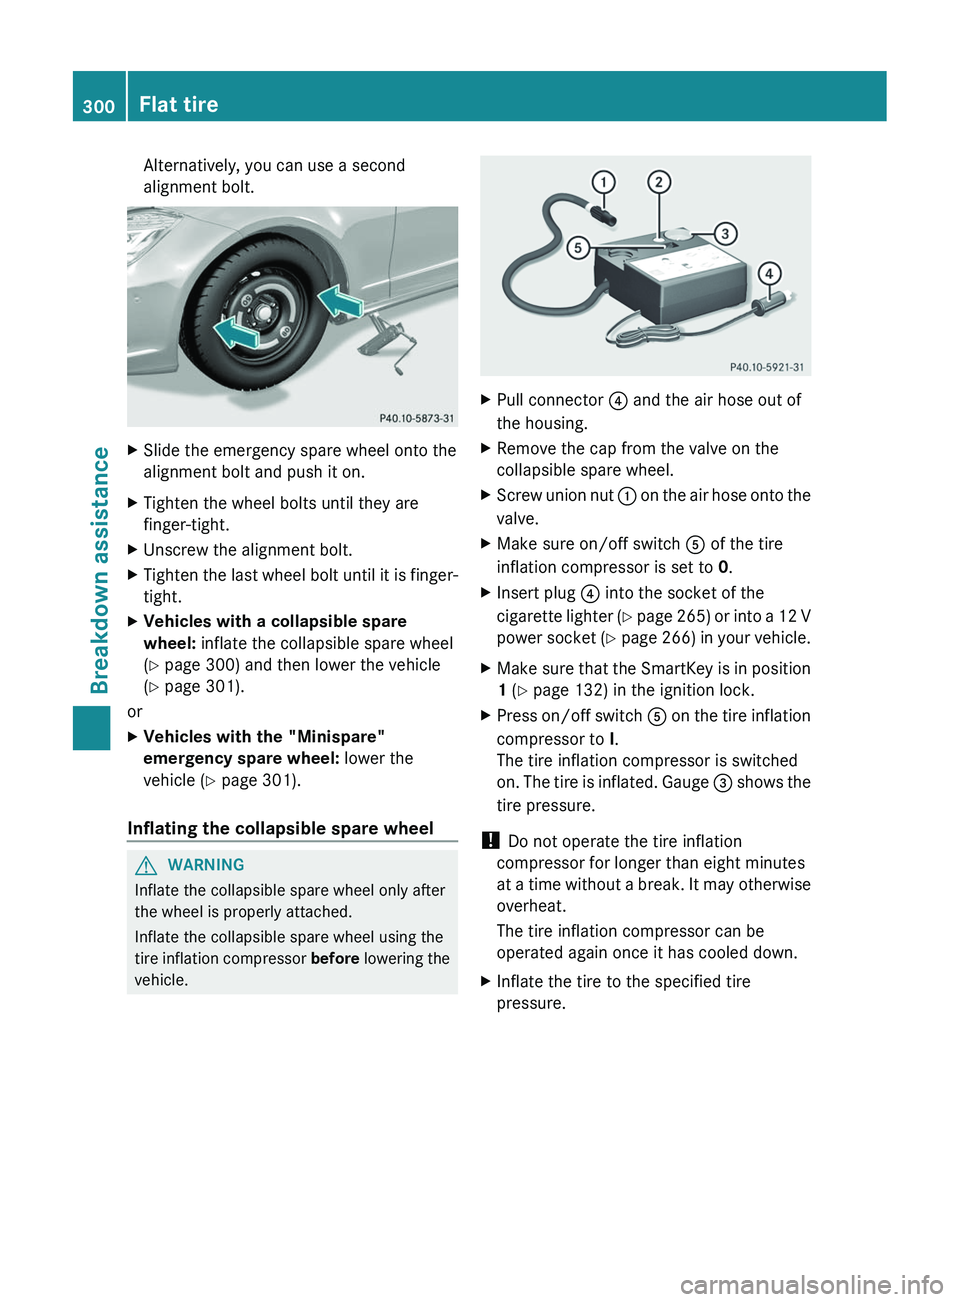
XPull connector ? and the air hose out of
the housing.XRemove the cap from the valve on the
collapsible spare wheel.XScrew union nut : on the air hose onto the
valve.XMake sure on/off switch A of the tire
inflation compressor is set to 0.XInsert plug ? into the socket of the
cigarette lighter (Y page 265) or into a 12 V
power socket (Y page 266) in your vehicle.XMake sure that the SmartKey is in position
1 (Y page 132) in the ignition lock.XPress on/off switch A on the tire inflation
compressor to I.
The tire inflation compressor is switched
on. The tire is inflated. Gauge = shows the
tire pressure.
! Do not operate the tire inflation
compressor for longer than eight minutes
at a time without a break. It may otherwise
overheat.
The tire inflation compressor can be
operated again once it has cooled down.
XInflate the tire to the specified tire
pressure.300Flat tireBreakdown assistance