key MERCEDES-BENZ CLS-Class 2014 W218 Owner's Guide
[x] Cancel search | Manufacturer: MERCEDES-BENZ, Model Year: 2014, Model line: CLS-Class, Model: MERCEDES-BENZ CLS-Class 2014 W218Pages: 382, PDF Size: 5.36 MB
Page 89 of 382
closing are
aduring the closing process .There
is ar isk of injury.
Make sure that nobody is in the vicinity of the
closing area during the closing process.
Use one of the following options to stop the
closing process:
R Press the 000Bbutton on the key.
R press the remote operating switch on the
driver's door.
R Press the closing or locking button on the
trunk lid.
R Pull the trunk lid handle. G
WARNING
The trunk lid can be automatically opened or
closed even if the SmartKey is not in the
vehicle. If children are left unsupervised in the
vehicle, they could activate the functions.
There is arisk of injury.
When leaving the vehicle, always take the
SmartKey with you and lock the vehicle. Never
leave children unsupervised in the vehicle. G
WARNING
Combustion engines emit poisonous exhaust
gases such as carbon monoxide. Exhaust
gases can enter the vehicle interior if the
trunk lid is open when the engine is running,
especially if the vehicle is in motion. There is
ar isk of poisoning.
Always switch off the engine before opening
the trunk lid. Never drive with the trunk lid
open.
i Opening dimensions of the trunk lid
(Y page 379). Opening and closing X
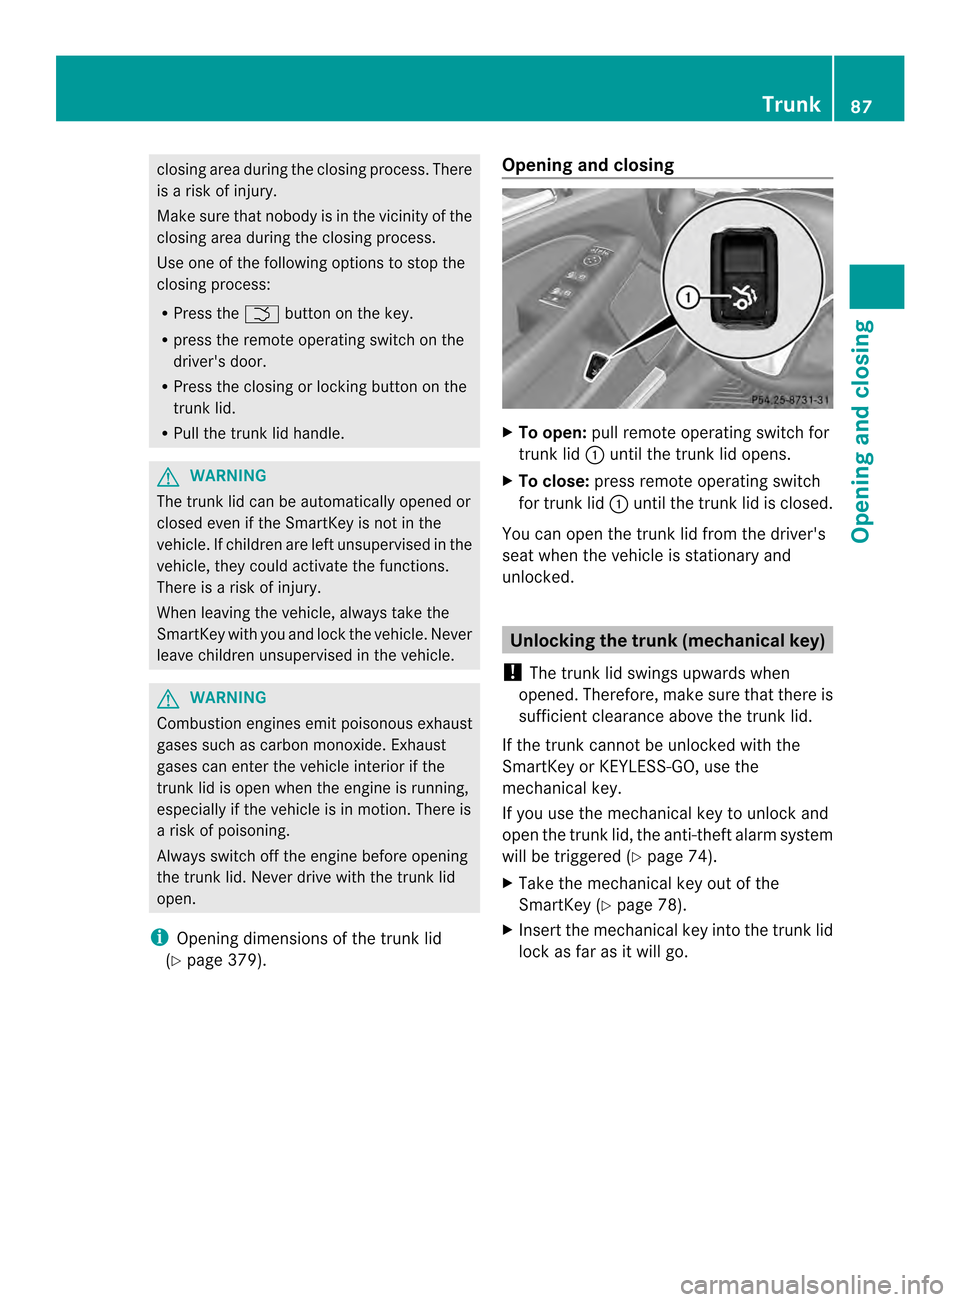
To open: pull remote operating switch for
trunk lid 001Auntil the trunk lid opens.
X To close: press remote operating switch
for trunk lid 001Auntil the trunk lid is closed.
You can open the trunk lid from the driver's
seat when the vehicle is stationary and
unlocked. Unlocking the trunk (mechanical key)
! The trunk lid swings upwards when
opened. Therefore, make sure that there is
sufficient clearance above the trunk lid.
If the trunk cannot be unlocked with the
SmartKey or KEYLESS-GO, use the
mechanical key.
If you use the mechanical key to unlock and
open the trunk lid, the anti-theft alarm system
will be triggered (Y page 74).
X Take the mechanical key out of the
SmartKey (Y page 78).
X Insert the mechanical key into the trunk lid
lock as far as it will go. Trunk
87Opening and closing Z
Page 90 of 382

0001
Neutral position.
0002 To unlock
X Turn the mechanical key counter-clockwise
from position 0001as far as it willgoto
position 0002.
The trunk is unlocked.
X Turn the mechanical key back to position
0001 and remove it.
X Insert the mechanical key into the
SmartKey. Trunk emergencyr
elease
You can open th etrunk lid from inside the
vehicle with th eemergency releas ebutton. X
Pres semergency releas ebutton 001Abriefly.
The trunk lid unlock sand opens.
The trunk lid can be unlocked and opened
with th etrunk lid emergency releas ewhen
th ev ehicle is stationar yorwhile driving.
The trunk lid emergency releas edoes not
open th etrunk lid if th ebattery is
disconnecte dordischarged. Trun
klid emergency release light:
R emergency release button 001Aflashes for
30 minutes after the trunk lid is opened
R emergency release button 001Aflashes for
60 minutes after the trunk lid is closed Side windows
Important safety notes
G
WARNING
While opening the side windows ,body parts
could become trapped between the side
window and the door fram easthe side
window moves. There is arisk of injury.
Make sure that nobody touches the side
window durin gthe opening procedure. If
somebody becomes trapped, release the
switc horp ull the switc htoclosethe side
window again. G
WARNING
While opening the side windows ,body parts
in the closing area could become trapped.
There is arisk of injury.
Make sure that no body part sare in close
proximit ydurin gthe closing procedure. If
somebody becomes trapped, release the
switc horp ress the switc htoopen the side
window again. G
WARNING
If children operat ethe side windows they
could become trapped, particularly if the yare
left unsupervised. There is arisk of injury.
Activate the override feature for the rear side
windows .When leaving the vehicle, always
take the SmartKey with you and lock the
vehicle. Never leave children unsupervised in
the vehicle. Side window reversing feature
The side windows are equipped with an
automatic reversing feature. If asolid object 88
Side windowsOpening and closing
Page 91 of 382
block
sorrestrict saside window during the
closin gprocess, the side window opens again
automatically. However ,the automatic
reversing feature is only an aid and does not
relieve you of the responsibility of paying
attention when closin gaside window. G
WARNING
The reversing feature does not react:
R to soft ,light and thin objects, e.g. small
fingers
R over the last 4mmofthe closing movement
R during resetting
R when closing the side window again
manually immediately after automatic
reversing
This means that the reversing feature cannot
prevent someone being trapped in these
situations. There is arisk of injury.
Make sure that no body parts are in close
proximity during the closing procedure. If
someone becomes trapped, press the switch
to open the side window again. Opening and closing the side
windows
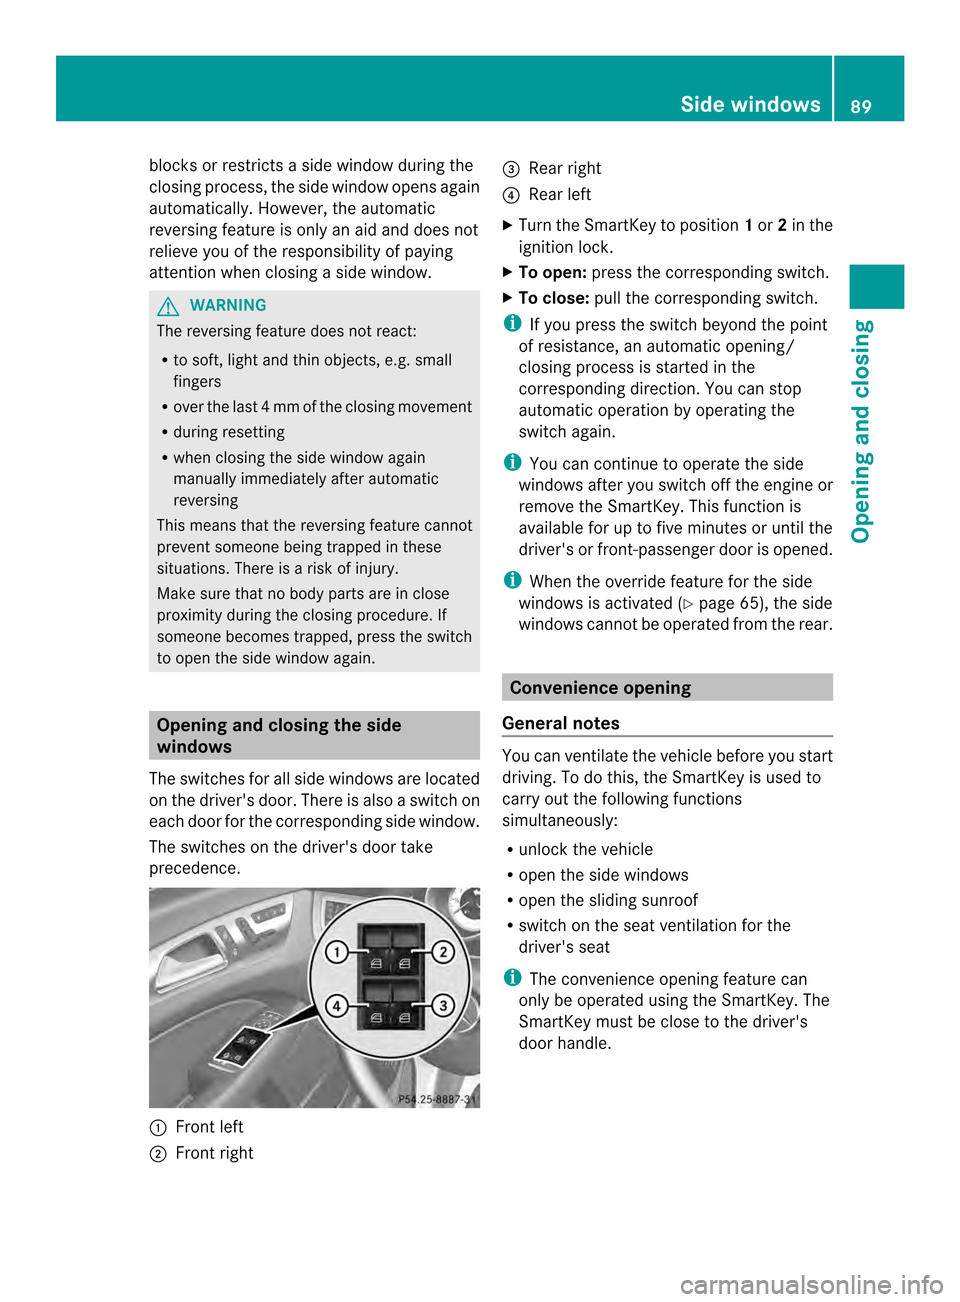
The switches for all side windows are located
on the driver's door. There is also aswitch on
each door for the corresponding side window.
The switches on the driver's door take
precedence. 001A
Front left
0010 Front right 0024
Rear right
0021 Rear left
X Turn the SmartKey to position 1or 2in the
ignition lock.
X To open: press the corresponding switch.
X To close: pull the corresponding switch.
i If you press the switch beyond the point
of resistance, an automatic opening/
closing process is started in the
corresponding direction. You can stop
automatic operation by operating the
switch again.
i You can continue to operate the side
windows after you switch off the engine or
remove the SmartKey. This function is
available for up to five minutes or until the
driver's or front-passenger door is opened.
i When the override feature for the side
windows is activated (Y page 65), the side
windows cannot be operated from the rear. Convenienceo
pening
General notes You can ventilate the vehicle before you start
driving. To do this, the SmartKey is used to
carry out the following functions
simultaneously:
R
unlock the vehicle
R open the side windows
R open the sliding sunroof
R switch on the seat ventilation for the
driver's seat
i The convenience opening feature can
only be operated using the SmartKey. The
SmartKey must be close to the driver's
door handle. Side windows
89Opening and closing Z
Page 92 of 382

Convenience opening
X
Poin tthe tip of the SmartKey at the driver's
door handle.
X Press and hold the 0014button until the
side windows and the sliding sunroof are in
the desired position.
X To interrupt convenienceo pening:
release the 0014button. Conveniencec
losing feature
Important safety notes Information on the side window reversing
feature (Y
page 88). G
WARNING
The reversing feature does not react:
R to soft, light and thin objects, e.g. small
fingers
R over the last 4mmofthe closing movement
R during resetting
R when closing the sliding sunroof again
manually immediately after automatic
reversing
This means that the reversing feature cannot
prevent someone being trapped in these
situations. There is arisk of injury.
Make sure that no body parts are in close
proximity during the closing procedure.
If somebody becomes trapped:
R release the switch immediately, or
R during automatic operation, push the
switch briefly in any direction
The closing process is stopped. G
WARNING
When the convenience closing feature is
operating, parts of the body could become
trapped in the closing area of the side window
and the sliding sunroof. There is arisk of
injury.
Observe the complete closing procedure
when the convenience closing feature is operating. Make sure that no body parts are
in close proximity during the closing
procedure.
Proceed as follows if someone is trapped:
With the SmartKey:
R release the 000Fbutton.
R press and hold the 0014button until the
side windows and the sliding sunroof or the
panorama roof with power tilt/sliding
panel open again.
Using KEYLESS-GO:
R release the sensor surface on the door
handle.
R pull the door handle immediately and hold
it.
The side windows and the sliding sunroof
or the panorama roof with power tilt/
sliding panel open.
General notes When you lock the vehicle, you can
simultaneously:
R
close the side windows
R close the sliding sunroof
Using the SmartKey The SmartKey must be close to the driver's
door handle.
X
Point the tip of the SmartKey at the driver's
door handle.
X Press and hold the 000Fbutton until the
side windows and the sliding sunroof are
fully closed.
X Make sure that all the side windows and the
sliding sunroof are closed.
X To interrupt conveniencec losing:
release the 000Fbutton.
Using KEYLESS-GO The KEYLESS-GO key must be outside the
vehicle. All the doors must be closed.90
Side windowsOpening and closing
Page 93 of 382
X
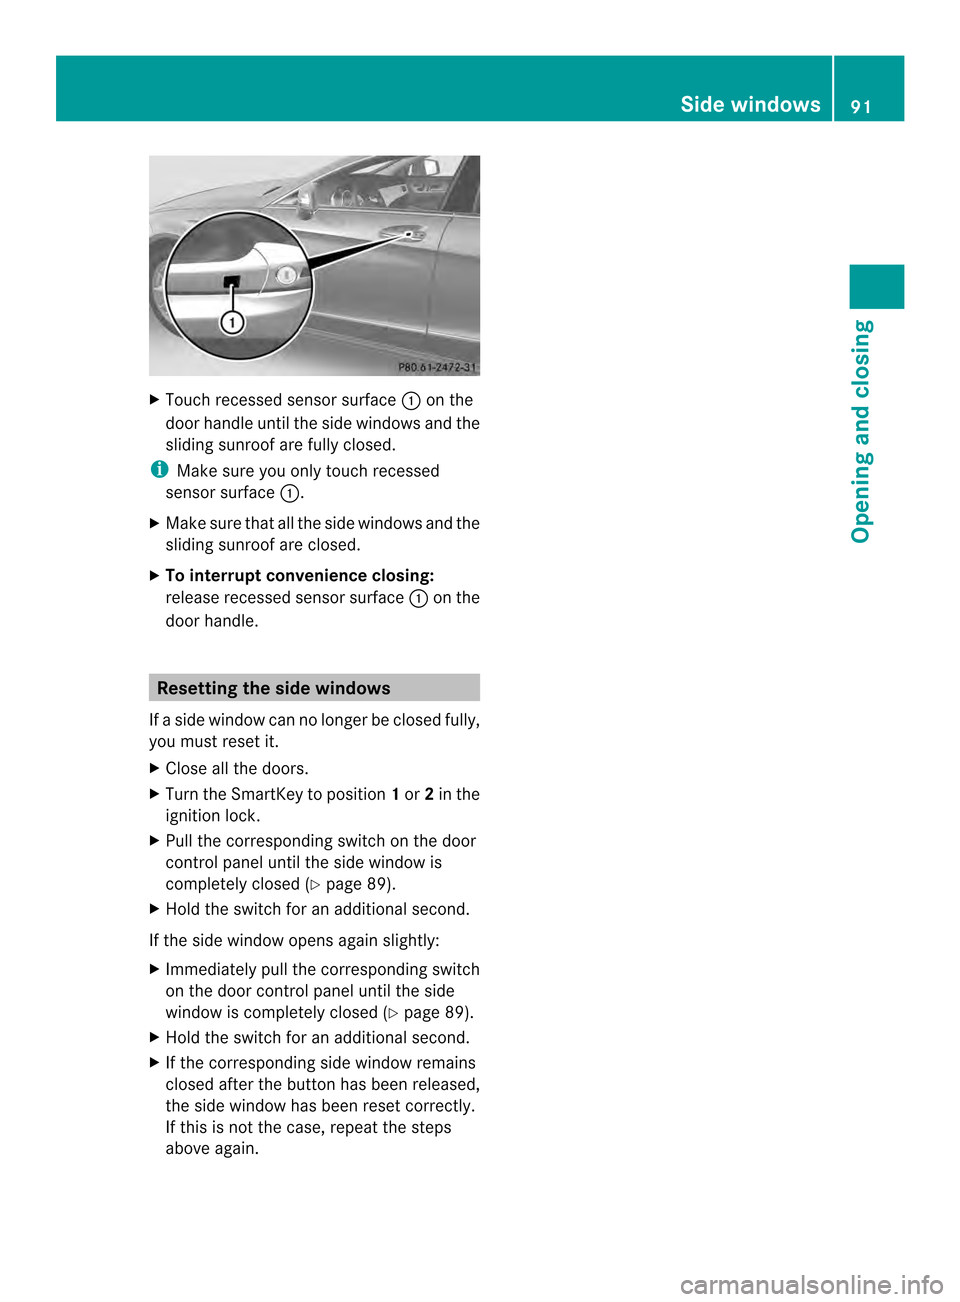
Touch recessed sensor surface 001Aon the
door handle until the side windows and the
sliding sunroof are fully closed.
i Make sure you only touch recessed
sensor surface 001A.
X Make sure that all the side windows and the
sliding sunroof are closed.
X To interrupt convenience closing:
release recessed sensor surface 001Aon the
door handle. Resetting the side windows
If as ide window can no longer be closed fully,
you must reset it.
X Close all the doors.
X Turn the SmartKey to position 1or 2in the
ignition lock.
X Pull the corresponding switch on the door
control panel until the side window is
completely closed (Y page 89).
X Hold the switch for an additional second.
If the side window opens again slightly:
X Immediately pull the corresponding switch
on the door control panel until the side
window is completely closed (Y page 89).
X Hold the switch for an additional second.
X If the corresponding side window remains
closed after the button has been released,
the side window has been reset correctly.
If this is not the case, repeat the steps
above again. Side windows
91Opening and closing Z
Page 94 of 382
Problems with the side windows
G
WARNING
If you close aside window again immediately after it has been blocked or reset, the side window
closes with increased or maximum force. The reversing feature is then not active. Parts of the
body could be trapped in the closing area in the process. This poses an increased risk of injury
or even fatal injury.
Make sure that no parts of the body are in the closing area. To stop the closing process, release
the switch or push the switch again to reopen the side window. Problem Possible causes/consequences and
000B Solutions
As
ide window cannot
be closed because it is
blocked by objects, e.g.
leaves in the window
guide. X
Remove the objects.
X Close the side window. As
ide window cannot
be closed and you
cannot see the cause. If
as ide window is obstructed durin gclosing and reopen sagain
slightly:
X Immediately after the window blocks, pull the corresponding
switc hagain until the side window has closed.
The side window is closed with increased force.
If as ide window is obstructed again durin gclosing and reopens
again slightly:
X Immediately after the window blocks, pull the corresponding
switc hagain until the side window has closed.
The side window is closed without the anti-entrapmen tfeature. Sliding sunroof
Important safet
ynotes G
WARNING
While opening and closing the sliding sunroof,
body parts in close proximity could become
trapped. There is arisk of injury.
Make sure that no body parts are in close
proximity during the opening and closing
procedures.
If somebody becomes trapped:
R release the switch immediately, or
R during automatic operation ,push the
switch briefly in any direction The openin
gorclosing procedure will be
stopped. G
WARNING
If children operate the sliding sunroof they
could become trapped, particularly if they are
left unsupervised. There is arisk of injury.
When leaving the vehicle, alway stake the
SmartKey with you and lock the vehicle. Never
leave children unsupervised in the vehicle.
! Only open the sliding sunroof if it is free
of snow and ice. Otherwise, malfunctions
may occur. 92
Sliding sunroofOpening and closing
Page 95 of 382

Do not allo
wanything to protrude fro mthe
sliding sunroof. Otherwise, the seals could
be damaged.
! The weather can change abruptly. It could
start to rain or snow. Make sure that the
sliding sunroof is closed when you leave the
vehicle. The vehicle electronicsc an be
damaged if water enters the vehicle
interior.
i Resonance noises can occur in addition
to the usuala irflow noises when the sliding
sunroof is open. They are caused by minor
pressure fluctuations in the vehicle interior.
Change the position of the sliding sunroof
or open aside window slightly to reduce or
eliminate these noises. Sliding sunroof reversing feature
The sliding sunroof is equipped with an
automatic reversing feature. If asolid object
blocks or restrictst he sliding sunroof during
the closing process, the sliding sunroof opens
again automatically .However, the automatic
reversing feature is only an aid and does not
relieve you of the responsibility of paying
attention when closing the sliding sunroof. G
WARNING
The reversing feature does not react:
R to soft, light and thin objects, e.g. small
fingers
R over the last 4mmofthe closing movement
R during resetting
R when closing the sliding sunroof again
manually immediately after automatic
reversing
This means that the reversing feature cannot
prevent someone being trapped in these
situations. There is arisk of injury.
Make sure that no body parts are in close
proximity during the closing procedure. If somebody becomes trapped:
R
release the switch immediately, or
R during automatic operation, push the
switch briefly in any direction
The closing process is stopped. Operating the sliding sunroof
Opening and closing Overhead control panel
001A
To raise
0010 To open
0024 To close/lower
X Turn the SmartKey to position 1or 2in the
ignition lock.
X Press or pull the 0006switch in the
corresponding direction.
i If you press the 0006switch beyond the
point of resistance, an automatic opening/
closing process is started in the
corresponding direction. You can stop
automatic operation by operating the
switch again.
i The automatic opening and raising
feature is available only when the sliding
sunroof is closed.
The sun protection cover automatically opens
along with the sliding sunroof. You can open
or close the sun protection cover manually
when the sliding sunroof is raised or closed.
i You can continue to operate the sliding
sunroof after switching off the engine or Sliding sunroof
93Opening and closing Z
Page 96 of 382
removing the SmartKey from the ignition
lock. This function remains active for five
minutes or until you open
afront door.
Resetting !
If the sliding sunroof still cannot be
opened or closed full yafter resetting,
contact aqualified specialist workshop.
Reset the sliding sunroof if it does not move
smoothly.
X Turn the SmartKey to position 2in the
ignitio nlock.
X Raise the sliding sunroof fully at the rear
(Y page 93).
X Keep the 0006switch pressed for another
second.
X Make sure that the sliding sunroof can be
fully opened and closed again (Y page 93).
X If this is not the case, repeat the steps
above again. 94
Sliding sunroofOpening and closing
Page 101 of 382
The seat belt should:
R
fit snugly across your body
R be routed across the middle of your
shoulder
R be routed in your pelvic area across the hip
joints
X Before starting off, adjust the rear-view
mirror and the exterior mirrors in such a
way that you have agood view of road and
traffic conditions (Y page 109).
X Vehicles with amemor yfunction: save
the seat, steerin gwheel and exterior mirror
settings with the memory function
(Y page 112). Seats
Important safety notes
G
WARNING
Children could become trapped if they adjust
the seats, particularly when unattended.
There is arisk of injury.
When leaving the vehicle, alway stake the
SmartKey with you and lock the vehicle. Never
leave children unsupervised in the vehicle. G
WARNING
You could lose control of your vehicle if you
do the following while driving:
R adjust the driver's seat, head restraint,
steerin gwheel or mirrors
R fasten the seat belt
There is arisk of an accident.
Adjust the driver's seat, head restraint,
steerin gwheel and mirror and fasten your
seat belt before starting the engine. G
WARNING
If you adjust the seat height carelessly, you or
other vehicle occupant scould be trapped and
thereby injured. Children in particular could
accidentally press the electrical seat adjustmen
tbutton sand become trapped.
Ther eisar iskofi njury.
While moving the seats, make sure tha tyour
hands or other body parts do not get under
the lever assembly of the seat adjustment
system. G
WARNING
When you adjust aseat, you or other vehicle
occupant scould become trapped, e.g. on the
seat guide rail. There is arisk of injury.
Make sure when adjusting aseat that no one
has any body parts in the sweep of the seat. G
WARNING
If head restraints are not installed and
adjusted correctly, they cannot provide
protection as intended. There is an increased
risk of injury in the head and neck area, e.g.
in the event of an accident or when braking.
Always drive with the head restraints
installed. Befor edriving off, make sure for
every vehicle occupant that the center of the
head restraint supports the back of the head
at about eye level. G
WARNING
The seat belt does not offer the intended level
of protection if the backrest is not in the
upright position .When braking or in the event
of an accident, you could slide underneath the
seat belt and sustain abdomen or neck
injuries, for example. This poses an increased
risk of injury or even fatal injury.
Adjust the seat properly before beginning
your journey. Always make sure that the seat
is in the upright position. G
WARNING
According to accident statistics, children are
safer when properly restrained on the rear
seats than on the front-passenger seat. Thus,
we strongly recommendt hat children be
placed in the rear seat whenever possible.
Regardless of seating position, children 12
years old and under must be seated and Seats
99Seats, steering wheela nd mirrors
Z
Page 104 of 382

Adjusting th
erears eat hea drestraint
angle X
Pull or push th etop of th ehead restraint
until it is in th edesired position.
Removing and installing th erears eat
hea drestraints G
WARNING
If head restraints are not installe dand
adjusted correctly, they cannot provide
protection as intended. Ther eisanincreased
risk of injury in th ehead and nec karea, e.g.
in th eeven tofana ccidentorwhen braking.
Always driv ewith th ehead restraints
installed. Before driving off ,makes ure for
ever yvehicle occupant that th ecenter of the
head restrain tsupports th eback of th ehead
at about eye level.
! Mak esure that th erear window roller
sunblin dhas been retracte dbefore the rear
head restraint sare removed. You could
otherwise damage the roller sunblind. X
To remove: pull the head restraint up to
the stop.
X Press release catch 001Aand pull the head
restraint out of the guides.
X To re-install: insert the head restraint so
that the notches on the bar are on the left
when viewed in the direction of travel.
X Push the head restraint down until you hear
it engage in position. Adjusting the multicontour seat
The multicontour seat function is only
available for vehicles in Canada. 001A
To adjust the thigh cushion
0010 To adjust the backrest contour in the
lumbar region
0024 To adjust the backrest contour in the
upper back region
0021 To adjust the side bolsters of the seat
backrest
You can adjust the contour of the fron tseats
individually so as to provide optimum support
for your back and sides.
X Turn the SmartKey to position 2in the
ignition lock (Y page 147).102
SeatsSeats, steering wheel and mirrors