set clock MERCEDES-BENZ CLS-Class 2014 W218 Owner's Manual
[x] Cancel search | Manufacturer: MERCEDES-BENZ, Model Year: 2014, Model line: CLS-Class, Model: MERCEDES-BENZ CLS-Class 2014 W218Pages: 382, PDF Size: 5.36 MB
Page 90 of 382

0001
Neutral position.
0002 To unlock
X Turn the mechanical key counter-clockwise
from position 0001as far as it willgoto
position 0002.
The trunk is unlocked.
X Turn the mechanical key back to position
0001 and remove it.
X Insert the mechanical key into the
SmartKey. Trunk emergencyr
elease
You can open th etrunk lid from inside the
vehicle with th eemergency releas ebutton. X
Pres semergency releas ebutton 001Abriefly.
The trunk lid unlock sand opens.
The trunk lid can be unlocked and opened
with th etrunk lid emergency releas ewhen
th ev ehicle is stationar yorwhile driving.
The trunk lid emergency releas edoes not
open th etrunk lid if th ebattery is
disconnecte dordischarged. Trun
klid emergency release light:
R emergency release button 001Aflashes for
30 minutes after the trunk lid is opened
R emergency release button 001Aflashes for
60 minutes after the trunk lid is closed Side windows
Important safety notes
G
WARNING
While opening the side windows ,body parts
could become trapped between the side
window and the door fram easthe side
window moves. There is arisk of injury.
Make sure that nobody touches the side
window durin gthe opening procedure. If
somebody becomes trapped, release the
switc horp ull the switc htoclosethe side
window again. G
WARNING
While opening the side windows ,body parts
in the closing area could become trapped.
There is arisk of injury.
Make sure that no body part sare in close
proximit ydurin gthe closing procedure. If
somebody becomes trapped, release the
switc horp ress the switc htoopen the side
window again. G
WARNING
If children operat ethe side windows they
could become trapped, particularly if the yare
left unsupervised. There is arisk of injury.
Activate the override feature for the rear side
windows .When leaving the vehicle, always
take the SmartKey with you and lock the
vehicle. Never leave children unsupervised in
the vehicle. Side window reversing feature
The side windows are equipped with an
automatic reversing feature. If asolid object 88
Side windowsOpening and closing
Page 127 of 382

could burn yoursel
fonthese components.
There is arisk of injury.
Allow these components to cool down before
changing abulb.
There are bulbs other than Xenon and LED
bulbs that you cannot replace. Replace only
the bulbs listed (Y page 125). Have the bulbs
that you cannot replace yourself changed at
aq ualified specialist workshop.
If you require assistance changing bulbs,
consult aqualified specialist workshop.
Do not touch the glass tube of new bulbs with
your bare hands. Even minor contamination
can burn into the glass surface and reduce
the service life of the bulbs. Always use alint-
free cloth or only touch the base of the bulb
when installing.
Only use bulbs of the correct type.
If the new bulb still does not light up, consult
aq ualified specialist workshop.
Bulbs and lamps are an important aspect of
vehicle safety. You must therefore make sure
that these function correctly at all times.
Have the headlamp settingc hecked regularly.Overview: changing bulbs/bulb types
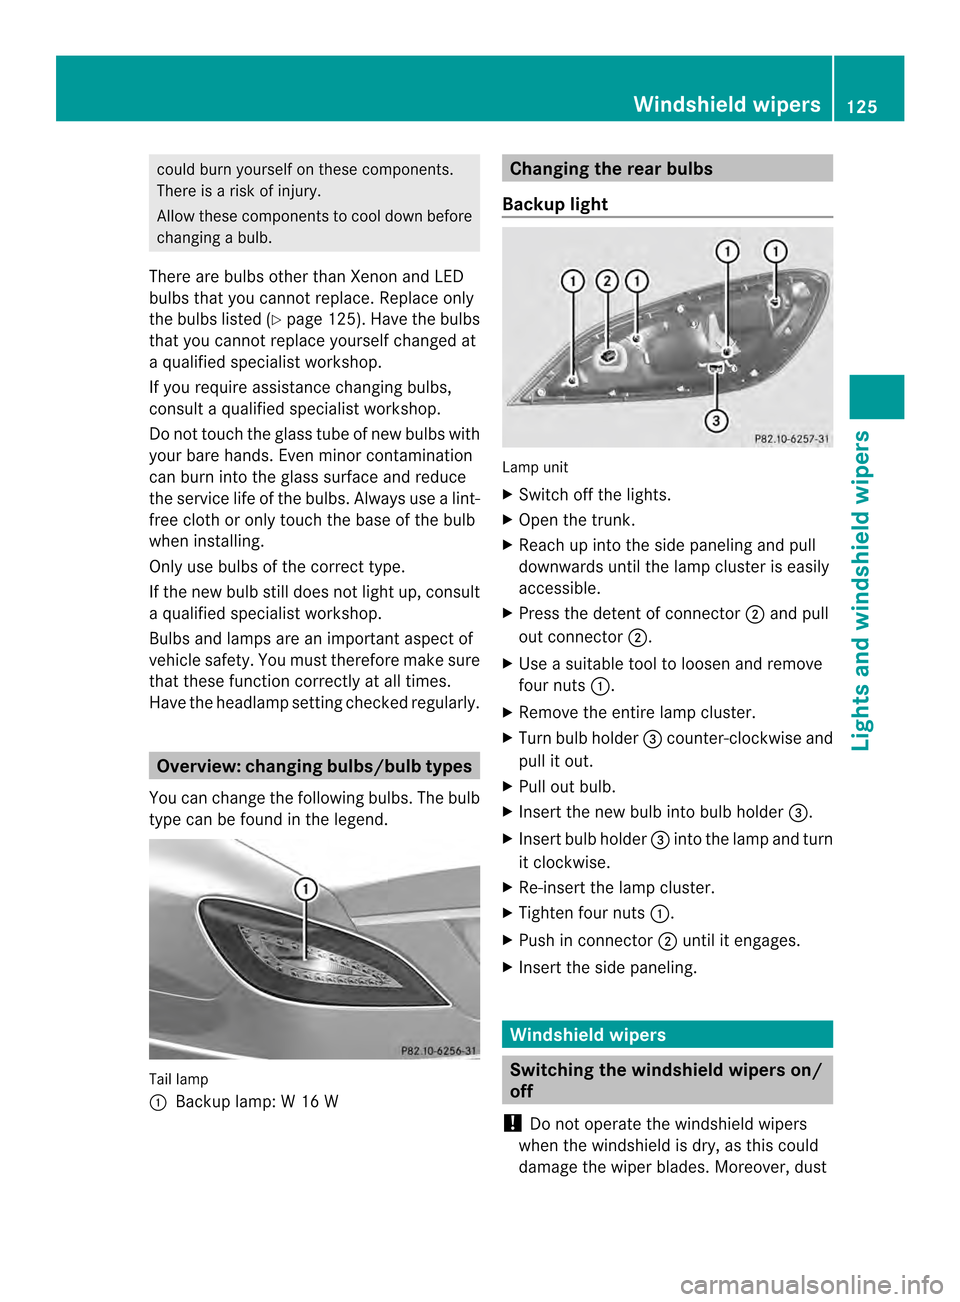
You can change the following bulbs. The bulb
type can be found in the legend. Tail lamp
001A
Backup lamp: W16W Changing the rear bulbs
Backup light Lamp unit
X
Switch off the lights.
X Open the trunk.
X Reach up into the side paneling and pull
downwards until the lamp cluster is easily
accessible.
X Press the detent of connector 0010and pull
out connector 0010.
X Use asuitable tool to loosen and remove
four nuts 001A.
X Remove the entire lamp cluster.
X Turn bulb holder 0024counter-clockwise and
pull it out.
X Pull out bulb.
X Insert the new bulb into bulb holder 0024.
X Insert bulb holder 0024into the lamp and turn
it clockwise.
X Re-insert the lamp cluster.
X Tighten four nuts 001A.
X Push in connector 0010until it engages.
X Insert the side paneling. Windshield wipers
Switching the windshield wipers
on/
off
! Do not operat ethe windshield wipers
when the windshield is dry, as this could
damage the wiper blades. Moreover, dust Windshield wipers
125Lights and windshield wipers Z
Page 140 of 382

Setting the temperature
Dual-zone automatic climate control Differen
ttemperatures can be set for the
driver's and front-passenger sides.
X Turn the SmartKey to position 2in the
ignition lock (Y page 147).
X To increase/reduce: turn temperature
control 001Aor0025 clockwise or counter-
clockwise (Y page 131).
Only change the temperature settingin
small increments. Start at 72 ‡(22 †).
3-zone automatic climate control Automatic climate control zones
You can select different temperature settings
for the driver's and front-passenger sides as
well as for the rear compartment.
X Turn the SmartKey to position 2in the
ignition lock (Y page 147).
X To increase/reduce the temperature in
the front compartment: turn temperature
control 001Aor0025 clockwise or counter-
clockwise (Y page 134).
Only change the temperature settingin
small increments. Start at 72 ‡(22 †).
X To increase/reduce the temperature in
the rear compartment using the front
control panel: press the0010button.
The indicator lamp in the 0010button goes
out.
X Turn temperature control 001Aclockwise or
counter-clockwise (Y page 134). Only change the temperature settingin
small increments. Start at 72
‡(22 †).
The temperature settingf or the driver's
side is adopted for the rear compartment
and the front-passenger side.
X To increase/reduce the temperature in
the rear compartment using the rear
control panel: press the0003or0002
button on the rear control panel.
Only change the temperature settingin
small increments. Start at 72 ‡(22 †). Setting the air distribution
Air distribution settings 000E
Directsa ir through the center and side
air vents
001A Directsa ir through the footwell air
vents
0012 Directsa ir through the center, side and
footwell vents
0001 Directsa ir through the defroster vents
001B Directst he airflow through the
defroster, center and side air vents
(Canada only)
0015 Directsa ir through the defroster and
footwell vents
000F Directst he airflow through the
defroster, center and side air vents, as
well as the footwell air vents( Canada
only)
i Regardless of the air distribution setting,
airflow is always directed through the side
air vents. The side air ventsc an only be
closed when the controls on the side air
ventsa re turned downwards.
Setting the air distribution X
Turn the SmartKey to position 2in the
ignition lock (Y page 147).
X Press the 000Fbutton repeatedly until the
desired symbol appears in the display. 138
Operating the climate control systemsClimate control
Page 141 of 382

Setting the airflow
X Turn the SmartKey to position 2in the
ignition lock (Y page 147).
X To increase: press the000Bbutton.
X To reduce: press the0004button.
i You can use 3-zone automatic climate
control to set the airflow in the rear
compartmen tseparately.
If the batter yisnot sufficiently charged,
blower output may be reduced. As soon as
the batter yissufficiently charged, full blower
output will be available. Switching the ZONE function on/off
X To activate: press the0010button.
The indicator lamp above the 0010button
lights up.
Dual-zone automatic climate control: the
temperature setting for the driver's side is
not adopted for the front-passenger side.
3-zone automatic climate control: the
temperature setting for the driver's side is
not adopted for the front-passenger side
and the rear compartment.
X To deactivate: press the0010button.
The indicator lamp above the 0010button
goes out.
Dual-zone automatic climate control: the
temperature setting for the driver's side is
adopted for the front-passenger side.
3-zone automatic climate control: the
temperature setting for the driver's side is
adopted for the front-passenger side and
the rear compartment. Defrosting the windshield
You can use this function to defrost the
windshield or to defrost the inside of the
windshield and the side windows. Switc
hoff the "Windshield defrosting"
function as soon as the windshield is clear
again.
X Turn the SmartKey to position 2in the
ignition lock (Y page 147).
X To activate: press the0013button.
The indicator lamp in the 0013button lights
up.
The climate control system switches to the
following functions:
R high airflow
R high temperature
R air distribution to the windshield and
fron tside windows
R air-recirculation mode off
If the battery is not sufficiently charged,
blower output may be reduced. Onc ethe
battery is sufficiently charged again, full
blower output will be available again.
X To deactivate: press the0013button.
The indicator lamp in the 0013button goes
out. The previously selected settings are
restored. Air-recirculation mode remains
deactivated.
or
X Press the 000Dbutton.
The indicator lamp in the 0013button goes
out. Airflow and air distribution are set to
automatic mode.
or
X Dual-zon eautomatic climate control: turn
temperature controls 001Aor0025 clockwise
or counter-clockwise (Y page 131).
3-zon eautomatic climate control: turn
temperature controls 001Aor0025 clockwise
or counter-clockwise (Y page 134).
or
X Press the 000Bor0004 button. MAX COOL maximum cooling
The MAX COOL function is only available in
vehicles for the USA. Operating thec
limate control systems
139Climate control
Page 145 of 382

dehumidification" function
.Otherwise,
temperature-sensitive items stored in the
glove bo xcould be damaged. 001A
Air vent thumbwheel
0010 Air vent
When automatic climate control is activated,
the glove box can be ventilated, for instance
to cool its contents.T he level of airflow
depends on the airflow and air distribution
settings.
X To open/close: turn thumbwheel 001A
clockwise or counter-clockwise. Setting the rear-compartment air
vents
Setting the center vents in the rear
compartment 001A
Rear-compartment air vent thumbwheel
0010 Rear-compartment air vent,r ight0024
Rear control panel, only for Canada with
3-zone automatic climate control
0021 Rear-compartment air vent,l eft
X To open/close: turn thumbwheel 001Aup or
down. Setting the air vents
143Climatecontrol Z
Page 326 of 382

The battery and the cover of the positive
terminal clamp must be installed securely
during operation.
Comply with safety precautions and take
protective measures when handling
batteries. Risk of explosion.
Fire, open flames and smokin
gare
prohibited when handling the
battery. Avoid creatin gsparks. Battery acid is caustic. Avoid
contact with skin, eyes or clothing.
Wear suitable protective clothing,
especially gloves, apron and
faceguard.
Rinse any acid spills immediately
with clear water. Contact a
physician if necessary.
Wear eye protection.
Keep children away.
Observe this Operator's Manual.
For safety reasons, Mercedes-Benz
recommends that you only use batteries
which have been tested and approved for
your vehicle by Mercedes-Benz.T hese
batteries provide increased impact
protection to prevent vehicle occupants from
suffering acid burns should the battery be
damaged in the event of an accident.
In order for the battery to achieve the
maximum possible service life, it must always
be sufficiently charged.
The vehicle battery, like other batteries, can
discharge over time if you do not use the
vehicle. In this case, have the battery disconnected at
aqualified specialist
workshop. You can also charge the battery
with acharger recommended by Mercedes-
Benz.C ontactaqualified specialist workshop
for further information.
Have the battery condition of charge checked
more frequently if you use the vehicle mainly
for short trips or if you leave it standin gidle
for alengthy period. Consult aqualified
specialist workshop if you wish to leave your
vehicle parked for along period of time.
i Remove the SmartKey if you park the
vehicle and do not require any electrical
consumers. The vehicle will then use very
little energy, thus conserving battery
power.
i If the power supply has been interrupted,
e.g. if you reconnect the battery, you will
have to:
R set the clock.I nformation on setting the
clock can be found in the separate
operating instructions.
On vehicles with COMAND and a
navigation system, the clock is set
automatically.
R reset the function for folding the exterior
mirrors in/out automatically, by folding
the mirrors out once (Y page 110). Charging the battery
G
WARNING
During charging and jump-starting, explosive
gases can escape from the battery. There is a
risk of an explosion.
Particularly avoid fire, open flames, creating
sparks and smoking. Ensure there is sufficient
ventilation while charging and jump-starting.
Do not lean over abattery. G
WARNING
Battery acid is caustic. There is arisk of injury.
Avoid contact with the skin, eyes or clothing.
Do not inhale any battery gases. Do not lean 324
Battery (vehicle)Breakdown assistance
Page 332 of 382

X
Take cover 0010off the opening.
X Screw in and tighten the towing eye
clockwise to the stop.
Removing the towing eye X
Unscrew and remove the towing eye.
X Position the top of cover 001Ain the bumper
and press it in at the bottom until it
engages.
X Attach cover 0010to the bumper and press
until it engages.
X Place the towing eye in the vehicle tool kit. Towing the vehicle with the rear axle
raised
! The ignition must be switched off if you
are towing the vehicle with the rear axle
raised. Intervention by ESP ®
could
otherwise damage the brake system.
Only possible for vehicles without
4MATIC.
X Switc hont he hazard warning lamps
(Y page 120).
X Turn the SmartKey to position 0in the
ignition lock and remove the SmartKey
from the ignition lock.
X When leaving the vehicle, take the
SmartKey or the KEYLESS-GO key with you.
When towing your vehicle with the rear axle
raised, it is importan tthat you observe the
safety instructions (Y page 328).Towing
avehicle with both axles on
th eg round
It is importan tthat you observe the safety
instructions when towing away your vehicle
(Y page 328). The automatic transmission automatically
shifts to position
Pwhen you open the driver's
or front-passenger door or when you remove
the SmartKey from the ignition lock. In order
to ensure that the automatic transmission
stays in position Nwhen towing the vehicle,
you must observe the following points:
X Make sure that the vehicle is stationary and
the SmartKey in the ignition lock is in
position 0.
X Turn the SmartKey to position 2in the
ignition lock.
On vehicles with KEYLESS-GO, use the
SmartKey instead of the Start/Stop button
(Y page 147).
X Depress and hold the brake pedal.
X Shift the automatic transmission to
position N.
X Release the brake pedal.
X Release the parking brake.
X Switch on the hazard warning lamps
(Y page 120).
X Leave the SmartKey in position 2in the
ignition lock.
i When towing with the hazard warning
lamps switched on, use the combination
switch as usualtos ignalachange of
direction. In this case, only the indicator
lamps for the direction of travel flash. After
resetting the combination switch, the
hazard warning lamp starts flashing again. Transporting the vehicle
! Only lash the vehicle down by the wheels
or wheel rims, not by parts of the vehicle
such as axle or steering components.
Otherwise, the vehicle could be damaged.
The towing eye can be used to pull the vehicle
onto atrailer or transporter for transporting
purposes. 330
Towing and tow-startingBreakdown assistance