MERCEDES-BENZ CLS-Class 2015 W218 Manual Online
Manufacturer: MERCEDES-BENZ, Model Year: 2015, Model line: CLS-Class, Model: MERCEDES-BENZ CLS-Class 2015 W218Pages: 398, PDF Size: 7.43 MB
Page 81 of 398
Important safety notes
i
Observe the "Important safety notes" sec-
tion for driving safety systems (Y page 70).G
WARNING
If EBD is malfunctioning, the rear wheels can
lock, e.g. under full braking. This increases the risk of skidding and an accident.
You should therefore adapt your driving style
to the different handling characteristics. Have the brake system checked at a qualified spe-
cialist workshop.
Observe information regarding indicator and
warning lamps (Y page 276) as well as dis-
play messages (Y page 248). ADAPTIVE BRAKE
i Observe the "Important safety notes" sec-
tion (Y page 70).
ADAPTIVE BRAKE enhances braking safety
and offers increased braking comfort. In addi-
tion to the braking function, ADAPTIVE BRAKE
also has the HOLD function (Y page 191) and
hill start assist (Y page 152). PRE-SAFE
®
Brake
General information i
Observe the "Important safety notes" sec-
tion (Y page 70).
PRE ‑SAFE ®
Brake is only available for vehi-
cles with the Driving Assistance package.
For PRE-SAFE ®
Brake to assist you when driv-
ing, the radar sensor system and the camera
system must be switched on and be opera-
tional.
With the help of the radar sensor system and
the camera system, PRE-SAFE ®
Brake can
detect obstacles that are in front of your vehi-
cle for an extended period of time.
In addition, pedestrians in the path of your
vehicle can be detected. PRE-SAFE
®
Brake detects pedestrians using
typical characteristics such as the body con-
tours and posture of a person standing
upright.
Observe the restrictions described in the
"Important safety notes" sec-
tion“ (Y page 79).
PRE-SAFE ®
Brake can help you to minimize
the risk of a collision with a vehicle ahead or a pedestrian, and reduce the effects of such a
collision. If PRE-SAFE ®
Brake has detected a
risk of collision, you will be warned visually
and acoustically as well as by automatic brak- ing.
Important safety notes G
WARNING
PRE-SAFE ®
Brake will initially brake your vehi-
cle by a partial application of the brakes if a
danger of collision is detected. There may be
a collision unless you brake yourself. Even
after subsequent full application of the brakes
a collision cannot always be avoided, partic-
ularly when approaching at too high a speed.
There is a risk of an accident.
Always apply the brakes yourself and try to
take evasive action, provided it is safe to do
so. G
WARNING
PRE-SAFE ®
Brake cannot always clearly iden-
tify objects and complex traffic conditions.
In these cases, PRE-SAFE ®
Brake may:
R give an unnecessary warning and then
brake the vehicle
R not give a warning or intervene
There is a risk of an accident.
Always pay particular attention to the traffic
situation and be ready to brake, especially if
PRE-SAFE ®
Brake warns you. Terminate the
intervention in a non-critical driving situation. Driving safety systems
79Safety Z
Page 82 of 398
In order to maintain the appropriate distance
to the vehicle in front and thus prevent a col- lision, you must apply the brakes yourself.
PRE-SAFE ®
Brake can also brake the vehicle
automatically under the following conditions:
R the driver and front-passenger have their
seat belts fastened
and
R the vehicle speed is between approx-
imately 4 mph (7 km/h) and 124 mph
(200 km/h)
At a speed of up to approximately 44 mph
(70 km/h), PRE-SAFE ®
Brake can also detect:
R stationary objects in the path of your vehi-
cle, e.g. stopped or parked vehicles
R pedestrians in the path of your vehicle G
WARNING
PRE-SAFE ®
Brake does not react:
R to small people, e.g. children
R to animals
R to oncoming vehicles
R to crossing traffic
R when cornering
As a result, PRE-SAFE ®
Brake may neither
give warnings nor intervene in all critical sit-
uations. There is a risk of an accident.
Always pay careful attention to the traffic sit- uation and be ready to brake.
In the event of snowfall or heavy rain, the rec-
ognition can be impaired.
Recognition by the radar sensor system is
also impaired in the event of:
R there is dirt on the sensors or anything else
covering the sensors
R there is interference by other radar sources
R there are strong radar reflections, for
example in parking garages
R a narrow vehicle traveling in front, e.g. a
motorbike
R a vehicle traveling in front on a different line
relative to the center of your vehicle Recognition by the camera system is also
impaired in the event of:
R dirt on the camera or if the camera is cov-
ered
R there is glare on the camera system, e.g.
from the sun being low in the sky
R darkness
R if:
- pedestrians move quickly, e.g. into the
path of the vehicle
- the camera system no longer recognizes
a pedestrian as a person due to special
clothing or other objects
- a pedestrian is concealed by other
objects
- the typical outline of a person is not dis-
tinguishable from the background
Following damage to the front end of the vehi- cle, have the configuration and operation of
the radar sensors checked at a qualified spe-
cialist workshop. This also applies to colli-
sions at low speeds where there is no visible
damage to the front of the vehicle.
Following damage to the windshield, have the
configuration and operation of the camera
system checked at a qualified specialist work- shop.
Function X
To activate/deactivate: activate or deac-
tivate PRE-SAFE ®
Brake in the on-board
computer (Y page 236).
If the PRE-SAFE ®
Brake is not activated, the
æ symbol appears in the multifunction
display.
Starting at a speed of around 4 mph (7 km/h),
this function warns you if you rapidly
approach a vehicle in front. An intermittent
warning tone will then sound and the ·
distance warning lamp will light up in the
instrument cluster. 80
Driving safety systemsSafety
Page 83 of 398
X
Brake immediately to defuse the situation.
or X Take evasive action provided it is safe to do
so.
If there is an increased risk of collision, pre-
ventive passenger protection measures (PRE-
SAFE ®
) are activated.
If the risk of collision with the vehicle in front
remains and you do not brake, take evasive
action or accelerate significantly, the vehicle
may perform automatic emergency braking,
up to the point of full brake application. Auto-
matic emergency braking is not performed
until immediately prior to an imminent acci-
dent.
You can prevent the intervention of the PRE-
SAFE ®
Brake at any time by:
R depressing the accelerator pedal further.
R activating kickdown.
R releasing the brake pedal.
The braking action of PRE-SAFE ®
Brake is
ended automatically if:
R you maneuver to avoid the obstacle.
R there is no longer a risk of collision.
R there is no longer an obstacle detected in
front of your vehicle. Protection against theft
Immobilizer
The immobilizer prevents your vehicle from
being started without the correct SmartKey. X To activate with the SmartKey: remove
the SmartKey from the ignition lock.
X To activate with KEYLESS-GO: switch the
ignition off and open the driver's door.
X To deactivate: switch on the ignition.
When leaving the vehicle, always take the
SmartKey with you and lock the vehicle. Any-
one can start the engine if a valid SmartKey
has been left inside the vehicle. i
The immobilizer is always deactivated
when you start the engine.
In the event that the engine cannot be star- ted (yet the vehicle's battery is charged),
the system is not operational. Contact an
authorized Mercedes-Benz Center or call
1-800-FOR-MERCede s (in the USA) or
1-800-387-010 0(in Canada). ATA (anti-theft alarm system)
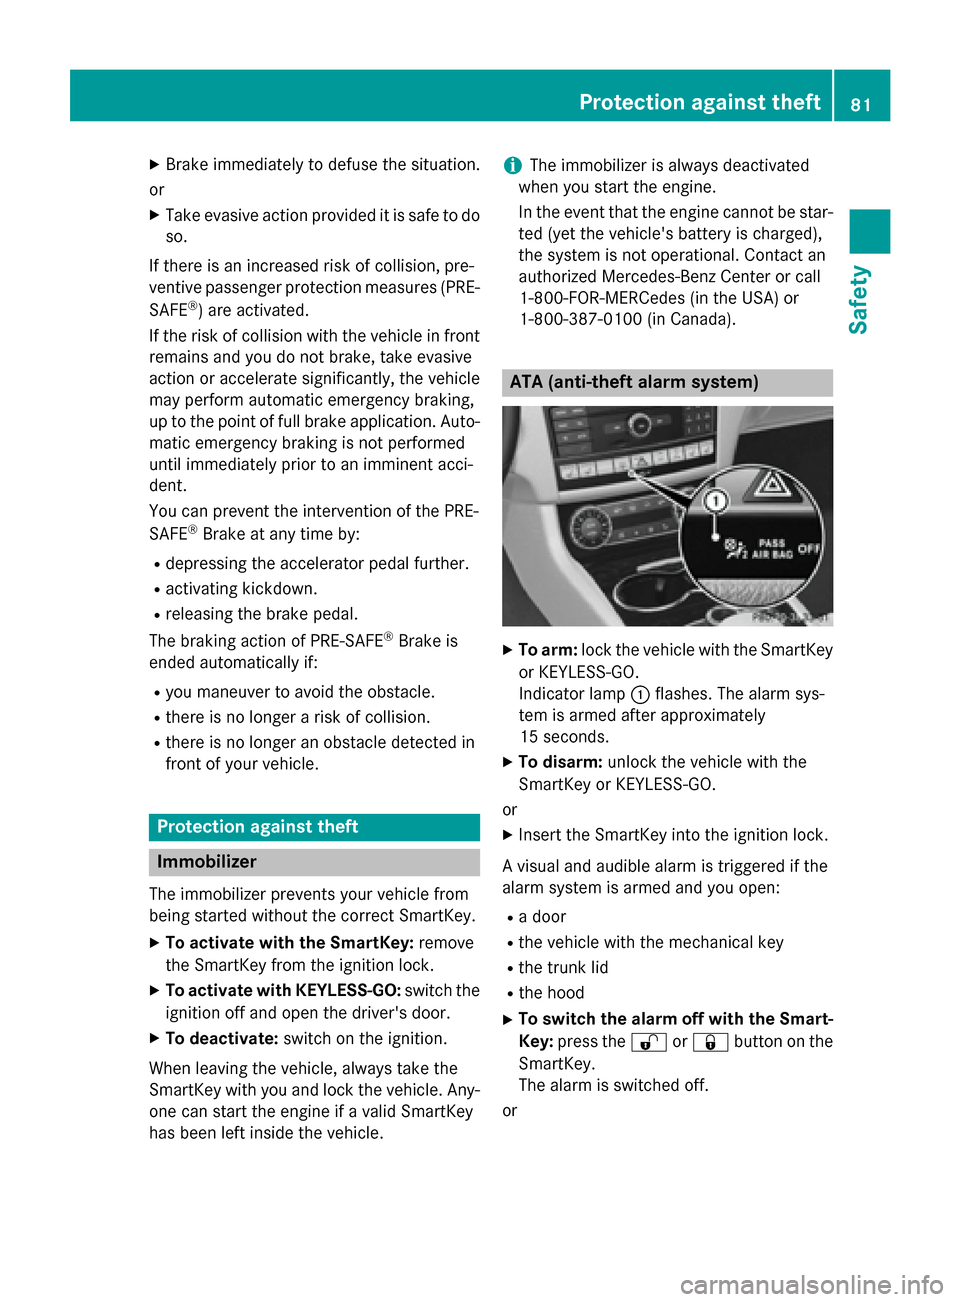
X
To arm: lock the vehicle with the SmartKey
or KEYLESS-GO.
Indicator lamp :flashes. The alarm sys-
tem is armed after approximately
15 seconds.
X To disarm: unlock the vehicle with the
SmartKey or KEYLESS-GO.
or X Insert the SmartKey into the ignition lock.
A visual and audible alarm is triggered if the
alarm system is armed and you open:
R a door
R the vehicle with the mechanical key
R the trunk lid
R the hood
X To switch the alarm off with the Smart-
Key: press the %or& button on the
SmartKey.
The alarm is switched off.
or Protection against theft
81Safety Z
Page 84 of 398
X
Remove the Start/Stop button from the
ignition lock.
X Insert the SmartKey into the ignition lock.
The alarm is switched off.
X To stop the alarm using KEYLESS-GO:
grasp the outside door handle. The Smart-
Key must be outside the vehicle.
The alarm is switched off.
or
X Press the Start/Stop button on the dash-
board. The SmartKey must be inside the
vehicle.
The alarm is switched off.
The alarm is not switched off, even if you
close the open door that triggered it, for
example.
i If the alarm continues for more than
30 seconds, the mbrace emergency call
system automatically notifies the Cus-
tomer Assistance Center. This is done
either by text message or data connection.
The emergency call system sends the mes-sage or data provided that:
R you have subscribed to the mbrace ser-
vice.
R the mbrace service has been activated
properly.
R the necessary mobile phone network is
available. 82
Protection against theftSafety
Page 85 of 398

Useful information
..............................84
SmartKey ............................................. 84
Doors .................................................... 90
Trunk .................................................... 92
Side windows ...................................... 97
Sliding sunroof .................................. 100 83Opening and closing
Page 86 of 398
Useful information
i This Operator's Manual describes all
models and all standard and optional equip- ment of your vehicle available at the time of
publication of the Operator's Manual.
Country-specific differences are possible.
Please note that your vehicle may not be
equipped with all features described. This
also applies to safety-related systems and
functions.
i Read the information on qualified special-
ist workshops (Y page 26). SmartKey
Important safety notes
G
WARNING
If children are left unsupervised in the vehicle, they could:
R open the doors, thus endangering other
people or road users.
R get out and disrupt traffic.
R operate the vehicle's equipment.
Additionally, children could set the vehicle in
motion if, for example, they:
R release the parking brake.
R shifting the automatic transmission out of
park position P
R Start the engine.
There is a risk of an accident and injury.
When leaving the vehicle, always take the
SmartKey with you and lock the vehicle. Never
leave children or animals unattended in the
vehicle. Always keep the SmartKey out of
reach of children. G
WARNING
If you attach heavy or large objects to the
SmartKey, the SmartKey could be uninten-
tionally turned in the ignition lock. This could
cause the engine to be switched off. There is a risk of an accident. Do not attach any heavy or large objects to the
SmartKey. Remove any bulky key rings before
inserting the SmartKey into the ignition lock.
! Keep the SmartKey away from strong
magnetic fields. Otherwise, the remote
control function could be affected.
Strong magnetic fields can occur in the
vicinity of powerful electrical installations.
Do not keep the SmartKey: R with electronic devices, e.g. a mobile
phone or another SmartKey.
R with metallic objects, e.g. coins or metal
foil.
R inside metallic objects, e.g. a metal case.
This can affect the functionality of the
SmartKey. SmartKey functions
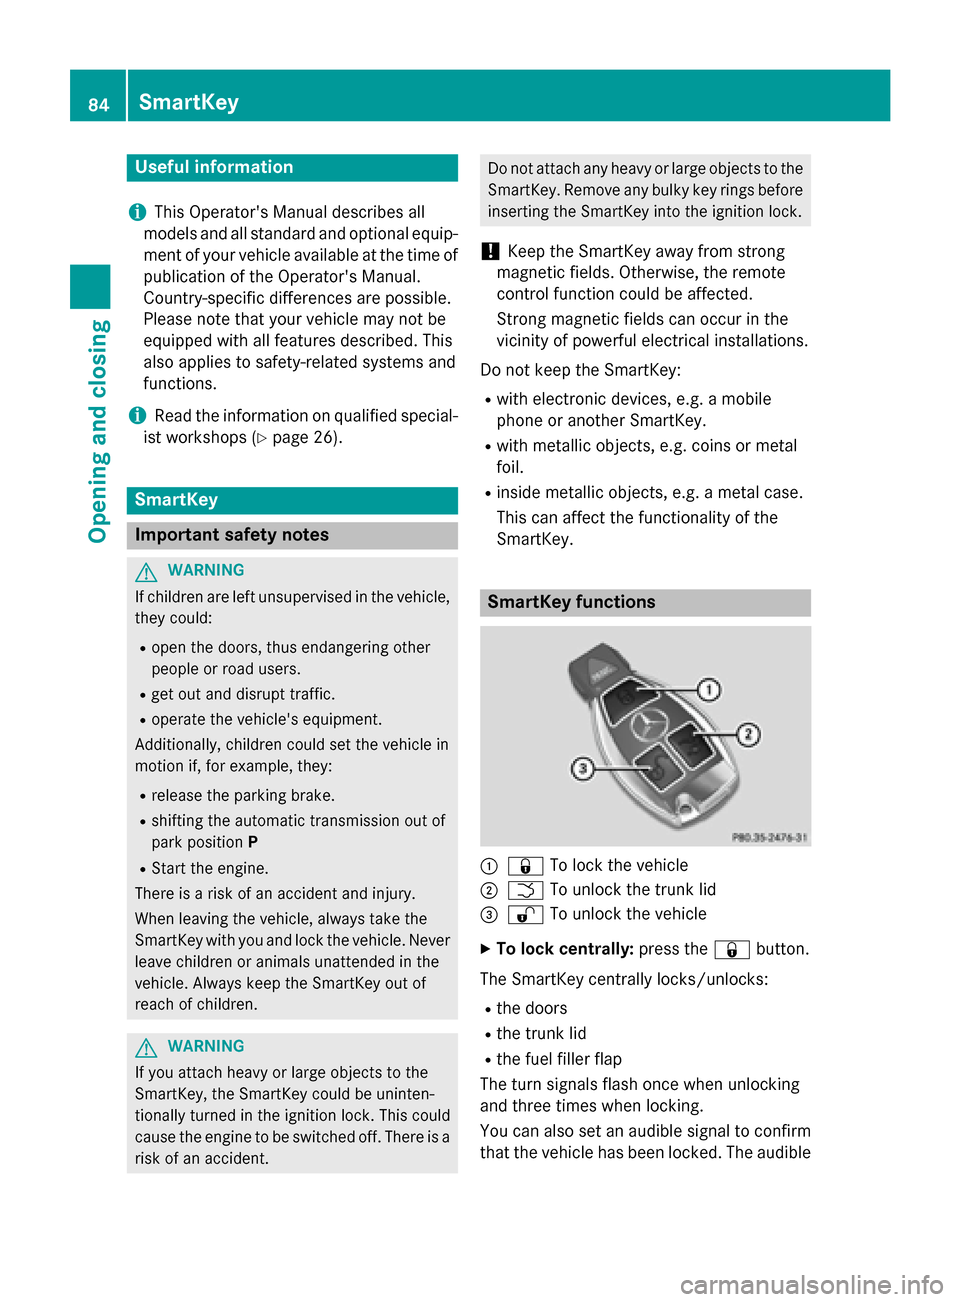
:
& To lock the vehicle
; F To unlock the trunk lid
= % To unlock the vehicle
X To lock centrally: press the&button.
The SmartKey centrally locks/unlocks: R the doors
R the trunk lid
R the fuel filler flap
The turn signals flash once when unlocking
and three times when locking.
You can also set an audible signal to confirm that the vehicle has been locked. The audible 84
SmartKeyOpening and closing
Page 87 of 398
signal can be activated and deactivated using
the on-board computer (Y page 240).
When it is dark, the surround lighting also
comes on if it is activated in the on-board
computer (Y page 239). KEYLESS-GO
General notes Bear in mind that the engine can be started by
any of the vehicle occupants if there is a KEY- LESS-GO key in the vehicle.
Locking/unlocking centrally You can start, lock or unlock the vehicle using
KEYLESS-GO. To do this, you only need carry
the SmartKey with you. You can combine the functions of KEYLESS-GO with those of a con-
ventional SmartKey. Unlock the vehicle by
using KEYLESS-GO, for instance, and lock it
using the &button on the SmartKey.
When locking or unlocking with KEYLESS-GO,
the distance between the SmartKey and the
corresponding door handle must not be
greater than 3 ft (1 m).
A check which periodically establishes a radio
connection between the vehicle and the
SmartKey determines whether a valid Smart- Key is in the vehicle. This occurs, for example:
R when the external door handles are
touched
R when starting the engine
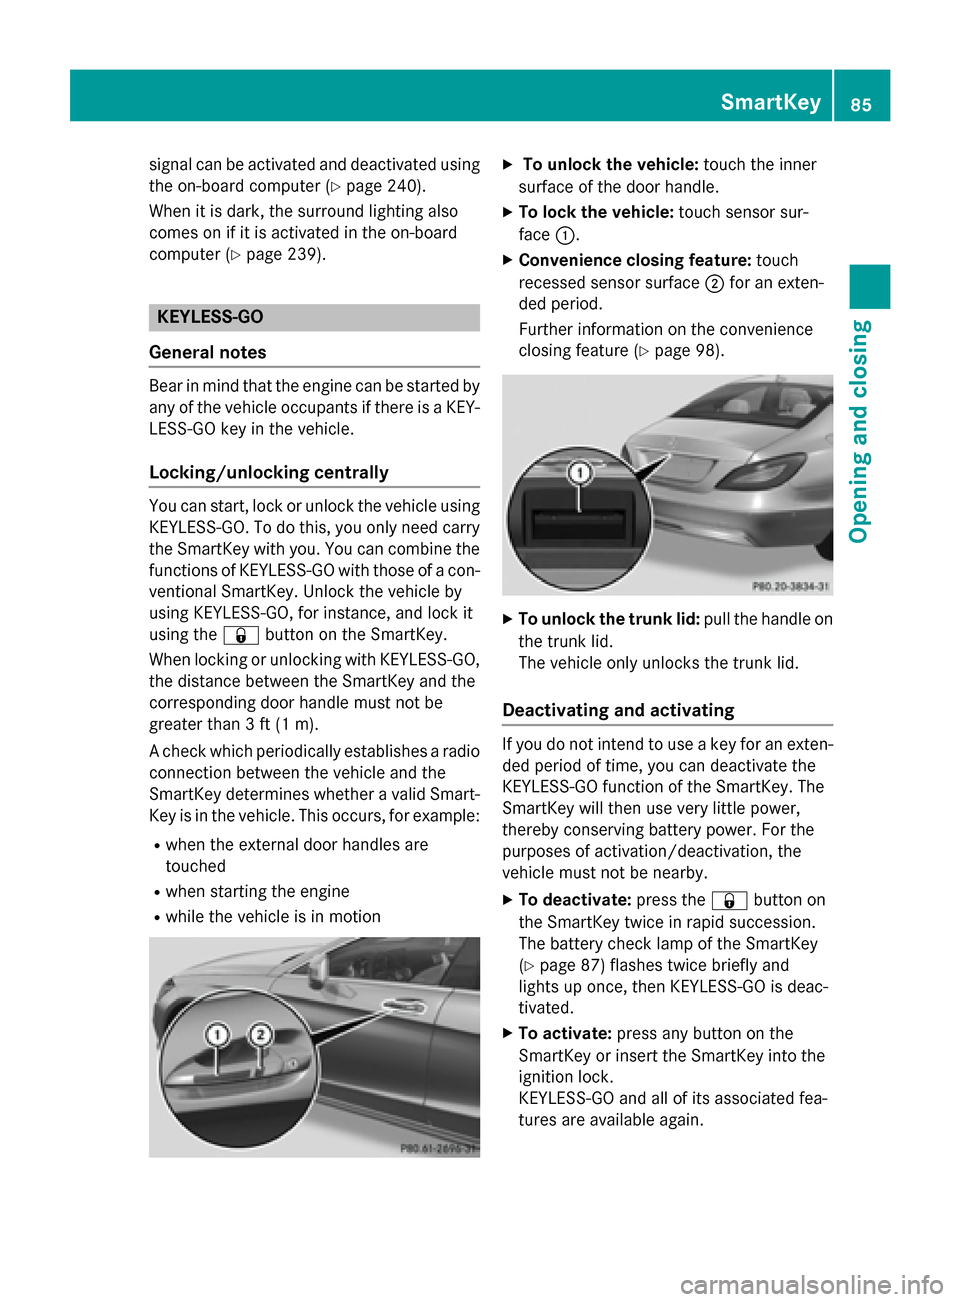
R while the vehicle is in motion X
To unlock the vehicle: touch the inner
surface of the door handle.
X To lock the vehicle: touch sensor sur-
face :.
X Convenience closing feature: touch
recessed sensor surface ;for an exten-
ded period.
Further information on the convenience
closing feature (Y page 98). X
To unlock the trunk lid: pull the handle on
the trunk lid.
The vehicle only unlocks the trunk lid.
Deactivating and activating If you do not intend to use a key for an exten-
ded period of time, you can deactivate the
KEYLESS-GO function of the SmartKey. The
SmartKey will then use very little power,
thereby conserving battery power. For the
purposes of activation/deactivation, the
vehicle must not be nearby.
X To deactivate: press the&button on
the SmartKey twice in rapid succession.
The battery check lamp of the SmartKey
(Y page 87) flashes twice briefly and
lights up once, then KEYLESS-GO is deac-
tivated.
X To activate: press any button on the
SmartKey or insert the SmartKey into the
ignition lock.
KEYLESS-GO and all of its associated fea-
tures are available again. SmartKey
85Opening and closing Z
Page 88 of 398
Changing the settings of the locking
system
You can change the settings of the locking
system. This means that only the driver's door
and the fuel filler flap are unlocked when the
vehicle is unlocked. This is useful if you fre-
quently travel on your own.
X To change the setting: press and hold
down the %and& buttons on the
SmartKey simultaneously for approx-
imately six seconds until the battery check
lamp flashes twice (Y page 87).
i If the setting of the locking system is
changed within the signal range of the vehi- cle, pressing the &or% button:
R locks or
R unlocks the vehicle
The SmartKey now functions as follows:
X To unlock the driver's door: press the
% button once.
X To unlock centrally: press the%but-
ton twice.
X To lock centrally: press the&button.
The KEYLESS-GO function is changed as fol-
lows:
X To unlock the driver's door: touch the
inner surface of the door handle on the
driver's door.
X To unlock centrally: touch the inner sur-
face of the door handle on the front-
passenger door or the rear door.
X To lock centrally: touch the outer sensor
surface on one of the door handles.
X To restore the factory settings: press
and hold down the %and& buttons
simultaneously for approximately six sec-
onds until the battery check lamp flashes
twice (Y page 87). Mechanical key
General notes If the vehicle can no longer be locked or
unlocked with the SmartKey, use the
mechanical key.
If you use the mechanical key to unlock and
open the driver's door or the trunk lid, the
anti-theft alarm system will be triggered
(Y page 81).
There are several ways to turn off the alarm:
X To deactivate the alarm with the Smart-
Key: press the %or& button on the
SmartKey.
or
X Insert the SmartKey into the ignition lock.
or
X To deactivate the alarm with KEYLESS-
GO: press the Start/Stop button in the igni-
tion lock. The SmartKey must be in the
vehicle.
or
X Lock or unlock the vehicle using KEYLESS-
GO. The SmartKey must be outside the
vehicle.
If you unlock the vehicle using the mechanical key, the fuel filler flap will not be unlocked
automatically.
X To unlock the fuel filler flap: insert the
SmartKey into the ignition lock.
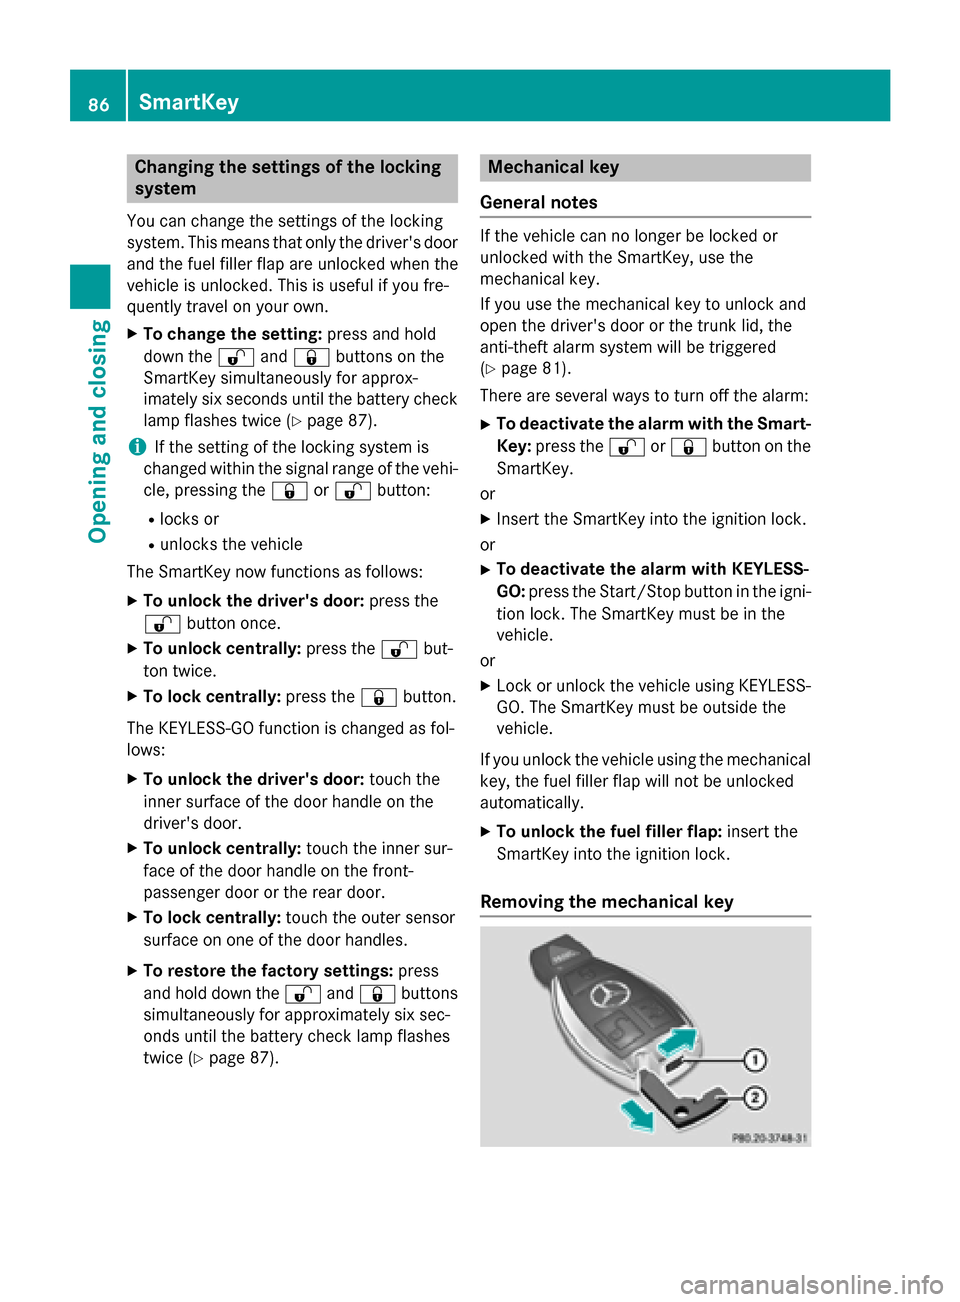
Removing the mechanical key 86
SmartKeyOpening and closing
Page 89 of 398
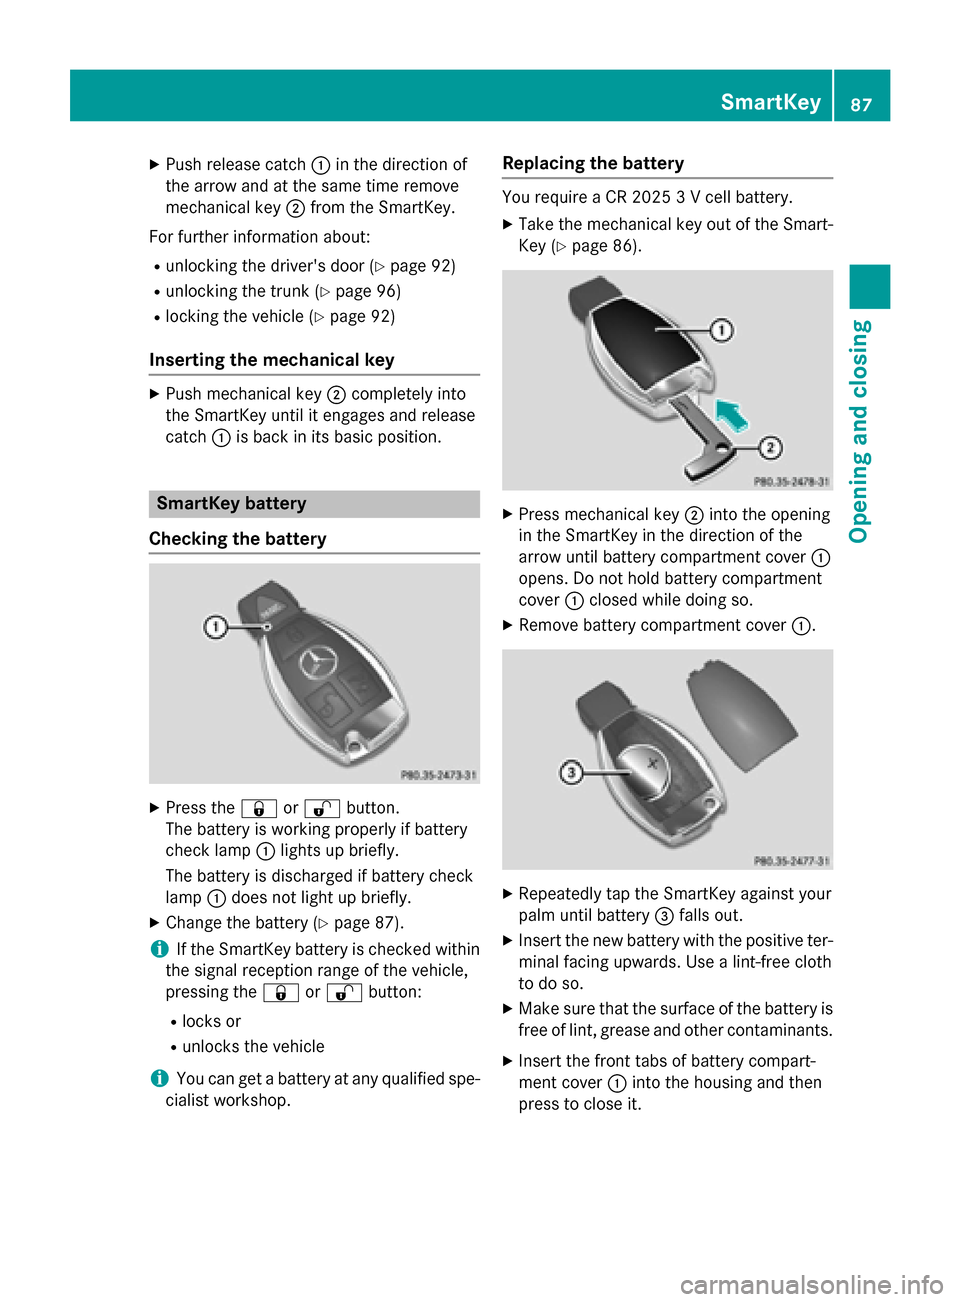
X
Push release catch :in the direction of
the arrow and at the same time remove
mechanical key ;from the SmartKey.
For further information about: R unlocking the driver's door (Y page 92)
R unlocking the trunk (Y page 96)
R locking the vehicle (Y page 92)
Inserting the mechanical key X
Push mechanical key ;completely into
the SmartKey until it engages and release
catch :is back in its basic position. SmartKey battery
Checking the battery X
Press the &or% button.
The battery is working properly if battery
check lamp :lights up briefly.
The battery is discharged if battery check
lamp :does not light up briefly.
X Change the battery (Y page 87).
i If the SmartKey battery is checked within
the signal reception range of the vehicle,
pressing the &or% button:
R locks or
R unlocks the vehicle
i You can get a battery at any qualified spe-
cialist workshop. Replacing the battery You require a CR 2025 3 V cell battery.
X Take the mechanical key out of the Smart-
Key (Y page 86). X
Press mechanical key ;into the opening
in the SmartKey in the direction of the
arrow until battery compartment cover :
opens. Do not hold battery compartment
cover :closed while doing so.
X Remove battery compartment cover :. X
Repeatedly tap the SmartKey against your
palm until battery =falls out.
X Insert the new battery with the positive ter-
minal facing upwards. Use a lint-free cloth
to do so.
X Make sure that the surface of the battery is
free of lint, grease and other contaminants.
X Insert the front tabs of battery compart-
ment cover :into the housing and then
press to close it. SmartKey
87Opening and closing Z
Page 90 of 398

X
Insert mechanical key ;into the Smart-
Key.
X Check the function of all SmartKey buttons
on the vehicle. 88
SmartKeyOpening and closing