display MERCEDES-BENZ CLS-Class 2016 W218 Comand Manual
[x] Cancel search | Manufacturer: MERCEDES-BENZ, Model Year: 2016, Model line: CLS-Class, Model: MERCEDES-BENZ CLS-Class 2016 W218Pages: 246, PDF Size: 6.72 MB
Page 58 of 246
XCallupVehicle Settings(Ypage 54 ).
XTo select Consumption: turn and press the
controller.
The fuel consumption for the last
15 minutes of the journey isshown.
Switching the ionization on/off
The ionization has a cleansing effect on the air
in the veh icleinterior. You can find further
information on the ionization inthe vehicle
Operator's Manual.
XCall upVehicle Settings(Ypage 54 ).
XTo select Ionization: turn and press the
controller.
The ionization isswitched on or off ,
depe nding on the previous status: press
and turn the controller.
Ex iting a menu
XPress the %button.
Seats
Overview
You can configure the following seat func-
tionsinthe menu:
RBackrest sidebolsters
RLumbar
RSeat cushion
RMassage
RDynamics
RSeat heating balance
iThere may befewer settings or none
depe nding on your vehicle's equipment.
Selecting the adjustment function
and seat
XPress the Øbutton on the COMAND
control panel.
or
XTo select Vehiclefrom the main function
bar: turn and press the controller.
The veh iclemenu is disp layed.
XTo select Seat Settings: turn and press
the controller.
The seat settings menu isshown.
or
XPress the Tbutton on the controller.
The seat settings menu isshown.
XTo select the required seat function: turn
and press the controller.
XTo switch between DriverandFront
Passenger: slide 1 the controller.
Adjustment functions
Adjusting the backrest side bolsters
XCall up the seat functions (Ypage 56 ).
XTo select Backrest Sides: turn and press
the controller.
XTo change the setting: turn the controller.
You willsee the changes you have made in
the settings display.
XTo exit the menu: press the %button.
Adjusting the seat contour in the lum-
bar region of the seat backrest
This function allows you to adjust the air
cushions inthe lumbar region of the backrest
(4-way lumbar support ).
XCallup the seat functions (Ypage 56).
XTo select Lumbar: turn and press the con-
troller.
XTo act ivate the setting element: press the
controller.
XTo change the setting: slide 4or1
the controller.
The change will be visible in the setting ele-
ment.
XTo exit the menu: press the %button.
56Seats
Vehicle functions
Page 59 of 246
Adjusting the seat cushion
XCall up theseat function s (Ypage 56).
XTo select SeatSurfac e:tur nand press
th econtroller .
XTo selectaseat :slide 1 thecontroller .
XTo changeth esetting :tur nth econtroller .
You will see th echanges you hav emade in
th esetting sdisplay.
XTo exit th emenu: press th e% button.
Adjusting the driving dynamics
XCall up th eseat function s (Ypage 56).
XTo selectaseat :slide 1 thecontroller .
XTo select DynamicMulticontour Sea t:
tur nand press th econtroller .
You can select :
R0: Off
R1:Level 1(weak )
R2:Level 2(strong)
XTo select th esetting :tur nth econtroller .
XTo exit th emenu: press th e% button.
Massage programs
Overview
You can select th efollowin gmassage pro -
grams:
RRelaxing Massag e
Massage theentire back, rising waves,
soothing downward movement s
RActivatingMassag e
Mobilizing massage and rising and
descendin gdynamic wave s
RClassicMassag e
Single and twi nwave smoving upwards
across th eentire bac k
RMobilizin gMassag e
Mobilization via stronger single and twi n
wave smoving upward sacross th eentire
bac k
Selecting a massage program
XCall up th eseat function s (Ypage 56).
XTo select Massage:tur nand pre ssthecon-
troller .
XTo select aseat :slide 1 thecontroller .
XTo select massage program s:tur nand
pre ssthecontroller .
The massage program run sfor approx -
imately 15 to 25 minute s,depending on th e
setting .
XTo exit th emenu: pressthe% button.
Seat heating balance
The balance function control sth edistribution
of heat for th eseat backr estand seat cush-
ion .
The balance function influence sth ecurrentl y
set heating level of th eseat heating (see th e
vehicl eOperator' sManual).
XCall up th eseat function s (Ypage 56).
XTo selectSeatHeatin gBalanc e:tur n
and pre ssthecontroller .
XTo selectaseat :slide 1 thecontroller .
XTo changeth esetting :tur nth econtroller .
You will seethechanges you hav emade in
th e setting sdisplay.
The setting srepresen tth efollowing:
R0— thebackrest and seat cushion are
evenly heated according to th e setting
selected wit hth eseat heating button.
R1to 3—th eheat output to th eseat cushion
is reduce don elevel at atime.
R-1to -3—th eheat output to th ebackr estis
reduce don elevel at atime.
XTo exit th emenu: press th e% button.
Resetting all ad justments
XCall up th eseat function s (Ypage 56).
XSelect aseat .
Seats57
Vehicle functions
Z
Page 60 of 246
XTo selectReset: turn and press the con-
troller.
XTo select a seat: slide 1the controller.
XTo reset: press the controller.
A prompt appears.
XTo select YesorNo: turn and press the con-
troller.
If you select No
the process is canceled.
After selecting Yes
all seat adjustments are
reset to the default values (factory setting).
360° camera
General notes
The 360° camera surveys the vehicle sur-
roundings and assists you, for example when
parking or at exits with reduced visibility.
The 360° camera is only an aid. It is not a
replacement for your attention to your imme-
diate surroundings. You are always responsi-
ble for safe maneuvering and parking. Make
sure that no persons or animals are in the
maneuvering range.
Further information on the 360°camera can
be found in the vehicle Operator's Manual.
Displaying the 360° camera image
The 360° camera image can be displayed if:
Ryour vehicle is equipped with a 360° cam-
era
Rthe 360° Camerafunction is activated;
(see the vehicle Operator's Manual)
XPress the Øbutton on the COMAND
control panel.
or
XPress Vehiclein the main function bar.
The vehicle menu is displayed.
XSelect 360° Camera.
The 360° camera image appears in split-
screen mode. You will see the previous view on the display
if, when the function is switched on:
Ryou turn the SmartKey to position
1in the
ignition lock
Ryou select transmission position P
Rwhen you are driving at moderate speeds
Switching the display off manually
XTo select &: slide 6and press the con-
troller.
Switching the display on automatically
XYou can automatically switch the 360 cam-
era display using reverse gear
(
Ypage 58).
Switching the 360° camera auto-
matic mode on/off
This function activates the 360° camera
when reverse gear is engaged.
XPress the Øbutton on the COMAND
control panel.
or
XPress Vehiclein the main function bar.
The vehicle menu is displayed.
XTo switch to the menu bar: slide6the
controller.
XTo select System Settings: turn and
press the controller.
XTo select 360°Camera: turn and press the
controller.
The 360° Camera
menu appears.
XSelect Activation by R gear.
The function is switched on Oor off ª,
depending on the previous status.
Opening the camera cover for clean-
ing
XTo select OpenCameraCoverin the 360°
camera menu: turn the controller and press
to confirm.
The Please
Wait...message appears for
approximately three seconds.
58360° camera
Vehicle functions
Page 61 of 246
The camera cover opens.
The camera cover closes automatically if:
Rthe ignition is switched off
Rthe vehicle exceeds a moderate speed
Rear view camera
General notes
The rear view camera covers the immediate
surroundings of the vehicle and assists you
when parking.
The rear view camera is only an aid. It is not a
replacement for your attention to your imme-
diate surroundings. You are always responsi- ble for safe maneuvering and parking. When
maneuvering or parking, make sure that there
are no persons, animals or objects in the area in which you are maneuvering.
You can find further information about the
rear view camera in the vehicle Operator's
Manual.
Switching the rear view camera auto-
matic mode on/off
This function activates the rear view camera
when reverse gear is engaged.
XPress the Øbutton on the COMAND
control panel.
or
XPress Vehiclein the main function bar.
The vehicle menu is displayed.
XSlide 6the controller.
XTo select System Settings: turn and
press the controller.
XSelect Rear View Camera.
The Rear View Camera
menu appears.
XSelect Activation by R gear.
The function is switched on Oor off ª,
depending on the previous status.
When you start the vehicle and engage
reverse gear, the area behind the vehicle is
shown with guide lines in the display. You can find further information about the rear
view camera in the vehicle Operator's Man-
ual.
Opening the camera cover for clean-
ing
XTo select
Open Camera Coverin the rear
view camera menu: turn and press the con-
troller.
The Please
Wait...message appears for
approximately three seconds.
The camera cover opens.
The camera cover closes automatically if:
Rthe ignition is switched off
Rthe vehicle pulls away
DYNAMIC SELECT
General notes
Press DYNAMIC SELECTto configure the fol-
lowing settings and adjustment values for the
Individual
drive program:
RDrive system
RSuspension
RSteering
RClimate control
RECO start/stop function
iIn a few countries, the ECO start/stop
function is deactivated at the factory due to the available fuel grade. In this case, the
ECO start/stop function is not available
regardless of the display in the COMAND
display.
For Mercedes-AMG GLE 63 vehicles, press
DYNAMIC SELECT
to configure the following
settings and adjustment values for the Indi‐
vidualdrive program:
RDrive system
RSuspension
RTransmission
DYNAMIC SELECT59
Vehicle functions
Z
Page 62 of 246
iThere may be fewer settings or none
depending on your vehicle's equipment.
For further information on the Individual
drive program, see the vehicle Operator's
Manual.
Configuration via the controller
XPress theØbutton.
or
XPress Vehiclein the main function bar.
The vehicle menu is displayed.
XTo select DYNAMIC SELECT: turn and press
the controller.
The menu for setting the Individual
drive
program appears.
XTo select Drive,Suspension, Steering,
Climate Control
or Eco Start/Stop
Function: turn and press the controller.
XFor Mercedes-AMG GLE 63 vehicles, to
select Drive
,Suspensionor Transmis‐
sion: turn and press the controller.
XTo select individual settings: turn and
press the controller.
Configuration via the DYNAMIC
SELECT controller
i
There may be fewer settings depending
on your vehicle's equipment.
XUse the DYNAMIC SELECT controller to
select the Individual
drive program (see
the vehicle Operator's Manual).
A window appears after a short while.
XTo confirm Adjust: press the controller.
The menu for setting the Individual
drive
program appears.
XTo select Drive,Suspension, Steering,
Climate Control
or Eco Start/Stop
Function: turn and press the controller.
XFor Mercedes-AMG GLE 63 vehicles, to
select Drive
,Suspensionor Transmis‐
sion: turn and press the controller.
XTo select individual settings: turn and
press the controller.
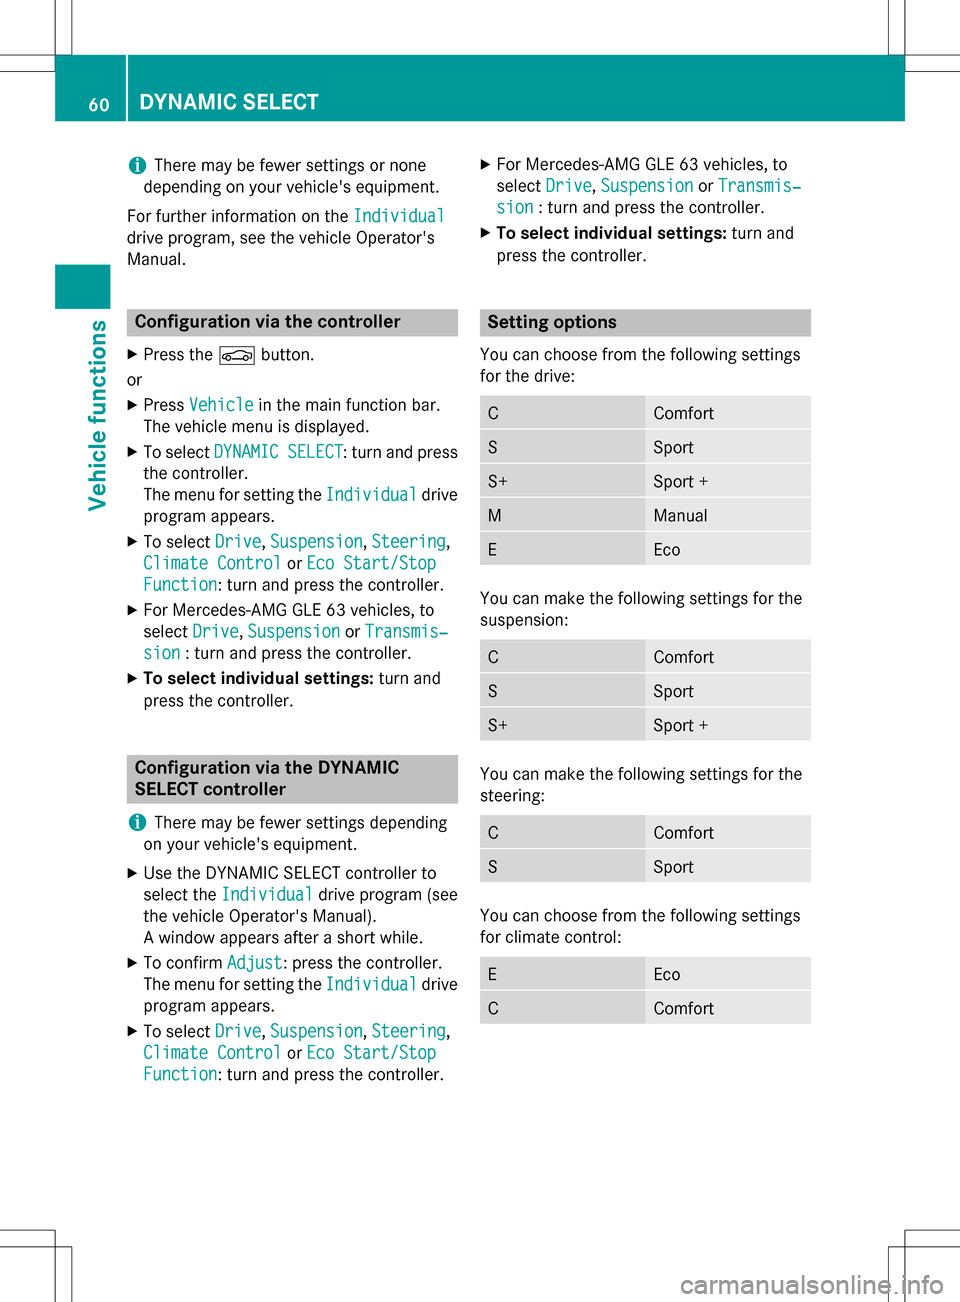
Setting options
You can choose from the following settings
for the drive:
CComfort
SSport
S+Sport +
MManual
EEco
You can make the following settings for the
suspension:
CComfort
SSport
S+Sport +
You can make the following settings for the
steering:
CComfort
SSport
You can choose from the following settings
for climate control:
EEco
CComfort
60DYNAMIC SELECT
Vehicle functions
Page 66 of 246
Your COMANDequipment
i
These operatin ginstruction sdescribe all
th estandar dan doptional equipmen tof
your COMAN Dsystem, as available at th e
time of going to print .Country-specifi cdif -
ference sare possible. Bear in min dthat
your vehicle may no tfeature all function s
described here. Thi salso applies to safety-
relevant systems an dfunctions.
iRead th einformation on qualified special-
ist workshop sin th evehicle Operator's
Manual.
Introduction
Important safet ynotes
GWARNING
If you operat einformation systems an dcom-
munication equipment integrated in th evehi-
cl e whil edriving, you will be distracted from
traffic conditions. You could also los econtro l
of th evehicle. There is aris kof an accident.
Only operat eth eequipment when th etraffic
situation permits. If you are no tsur ethat this
is possible, par kth evehicle payin gattention
to traffic condition san doperat eth eequip-
men twhen th evehicle is stationary.
You mus tobserv eth elega lrequirements fo r
th ecountry in whic hyou are currentl ydrivin g
when operatin gCOMAND.
COMAN Dcalculates th erout eto th edestina -
tion without taking accoun tof th efollowing,
fo rexample:
Rtraffic lights
Rstop an dyield signs
Rmergin glanes
Rparking or stoppin gin ano parking/n o
stoppin gzone
Rother road an dtraffic rule san dregulation s
Rnarrow bridge s
COMAN Dcan giv eincorrec tnavigation com-
mands if th eactual street/traffic situation doe
sno tcorrespon dwit hth edigita lmap's
data. Digital map sdo no tcover all areas no r
all routes in an area. Fo rexamp
le,arou
t emay
hav ebee ndiverted or th edirection of aone-
way stree tmay hav echanged .
Fo rthis reason ,you mus talways observ e
road an dtraffic rule san dregulation sdurin g
your journey. Road an dtraffic rule san dreg -
ulation salways hav epriorit yover th esys -
tem' sdrivin grecommendations.
Navigation announcement sare intended to
direc tyou whil edrivin gwithout divertin gyour
attention from th eroad an ddriving.
Please always use this feature instead of con-
sultin gth emap display fo rdirections. Look -
in g at th eicon sor map display can distract
you from traffic condition san ddriving, an d
increase th eris kof an accident.
General notes
Operationa lreadines sof th enavigation
syste m
The navigation syste mmus tdetermin eth e
position of th evehicle befor efirst use or
wheneve roperational status is restored .
Therefore, you may hav eto drive fo r awhil e
befor eprecise rout eguidance is possible.
GP Sreception
Amon gother things, correc tfunctionin gof
th enavigation syste mdepend son GPS recep-
tion .In certain situations, GPS reception may
be impaired, there may be interferenc eor
there may be no reception at all, e.g. in tun-
nels or parking garages .
iUsing roof carriers may impair th ecorrec t
functionin gof aroof antenn a(phone, sat -
ellite radio, GPS).
Entry restriction
Fo rvehicles in certain countries, there is a
dat aentr yrestriction .
64Introduction
Navigation
Page 70 of 246
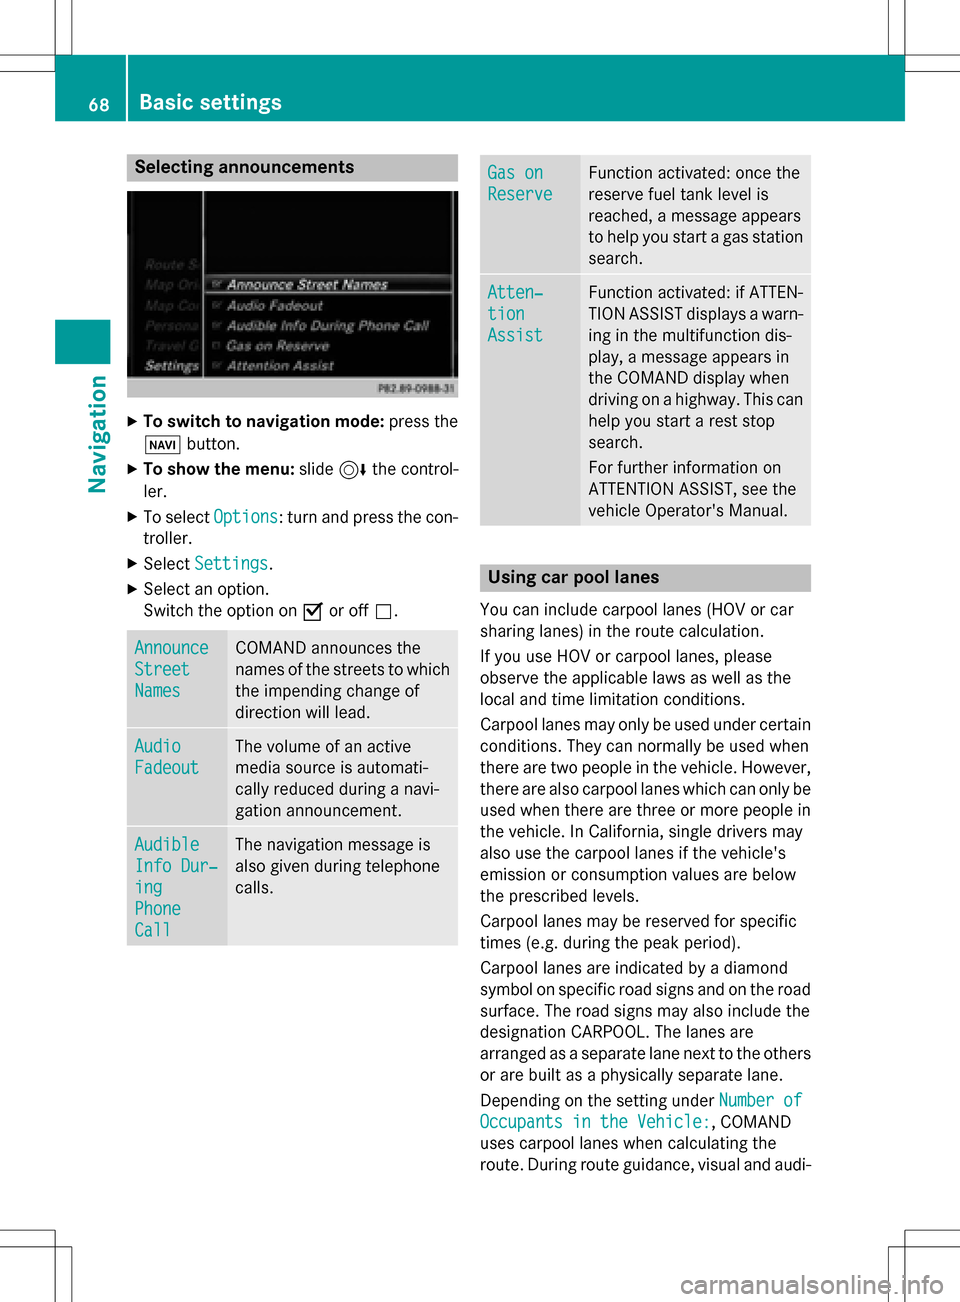
Selecting announcements
XTo switch to navigation mode:press the
Ø button.
XTo show the menu: slide6the control-
ler.
XTo select Options: turn and press the con-
troller.
XSelect Settings.
XSelect an option.
Switch the option on Oor off ª.
Announce
Street
Names
COMAND announces the
names of the streets to which
the impending change of
direction will lead.
Audio
Fadeout
The volume of an active
media source is automati-
cally reduced during a navi-
gation announcement.
Audible
Info Dur‐
ing
Phone
Call
The navigation message is
also given during telephone
calls.
Gas on
Reserve
Function activated: once the
reserve fuel tank level is
reached, a message appears
to help you start a gas station
search.
Atten‐
tion
Assist
Function activated: if ATTEN-
TION ASSIST displays a warn-
ing in the multifunction dis-
play, a message appears in
the COMAND display when
driving on a highway. This can
help you start a rest stop
search.
For further information on
ATTENTION ASSIST, see the
vehicle Operator's Manual.
Using car pool lanes
You can include carpool lanes (HOV or car
sharing lanes) in the route calculation.
If you use HOV or carpool lanes, please
observe the applicable laws as well as the
local and time limitation conditions.
Carpool lanes may only be used under certain
conditions. They can normally be used when
there are two people in the vehicle. However,
there are also carpool lanes which can only be
used when there are three or more people in
the vehicle. In California, single drivers may
also use the carpool lanes if the vehicle's
emission or consumption values are below
the prescribed levels.
Carpool lanes may be reserved for specific
times (e.g. during the peak period).
Carpool lanes are indicated by a diamond
symbol on specific road signs and on the road
surface. The road signs may also include the
designation CARPOOL. The lanes are
arranged as a separate lane next to the others
or are built as a physically separate lane.
Depending on the setting under Number of
Occupants in the Vehicle:, COMAND
uses carpool lanes when calculating the
route. During route guidance, visual and audi-
68Basic settings
Navigation
Page 73 of 246
RCenter
Entering a center will delete a previously
entered street.
RIntersection
Entering an intersection will delete a previ-
ously entered house number.
XSe lect the address entry menu (Ypage 69).
XTo select State/Province,ZIP Code,
Ctr.
or Intersection: turn, slide 6and
press the controller.
XSe lect an entry (Ypage 70).
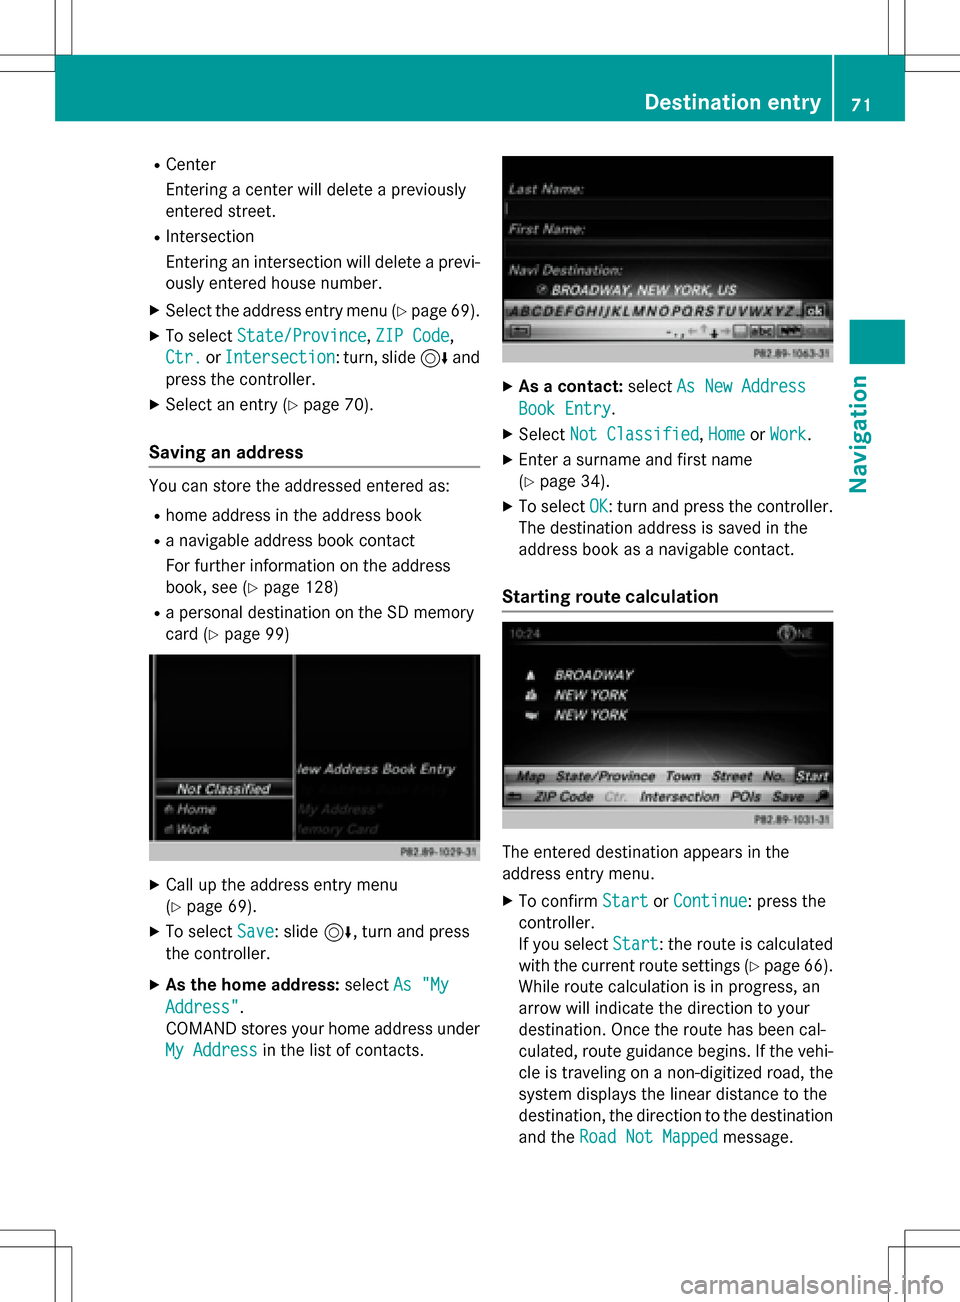
Saving an address
You can store the addressed entered as:
Rhome address in the address book
Ra nav igable address book contact
For further information on the address
book, see (
Ypage 128)
Ra personal destination on the SDmemory
card (
Ypage 99)
XCall up the address entry menu
(
Ypage 69).
XTo select Save: slide6, turn and press
the controller.
XAs the home address: selectAs "My
Address".
COMAND stores your home address under
My Address
in the list of contacts.
XAs a contact: selectAs New Address
Book Entry.
XSelect Not Classified,Homeor Work.
XEnter a surname and first name
(
Ypage 34).
XTo select OK: turn and press the controller.
The destination address issaved inthe
address book as a nav igablecontact.
Starting route calculation
The entered destination appears inthe
address entry menu.
XTo confirm StartorContinue: press the
controller.
If you select Start
: the route iscalculated
wit h the current route settings (
Ypage 66).
While route calculation is inprogress, an
arrow willindicate the direction to your
destination. Once the route has been cal-
culated, route guidance begins. Ifthe veh i-
cle istraveling on a non-digitized road, the
system displays the linear distance to the
destination, the direction to the destination
and the Road Not Mapped
message.
Destination entry71
Navigation
Z
Page 74 of 246
SelectionContinue: IfCalculateAlter‐
native Routesis activated, alternative
routes are calculated (
Ypage 67). You can
display these and select them for route
guidance (
Ypage 92).
If route guidance has already been activa-
ted, a prompt will appear asking whether
you wish to end the current route guidance.
XTo select YesorSet as Intermediate
Destination: turn and press the control-
ler.
Yes
cancels the current route guidance and
starts route calculation to the new destina-
tion.
Set as Intermediate Destination
adds the new destination in addition to the
existing destination and opens the inter-
mediate destinations list.
iThe route is calculated using the digital
map data. The calculation time depends on the distance from the destination, for
example.
The route may differ from the ideal route,
e.g. due to incomplete map data. Please
also refer to the notes about the digital map
(
Ypage 106).
Calling up the keyword search
XTo select the magnifying glass symbol:
while in the address entry menu, slide 6,
turn and then press the controller.
Keyword search
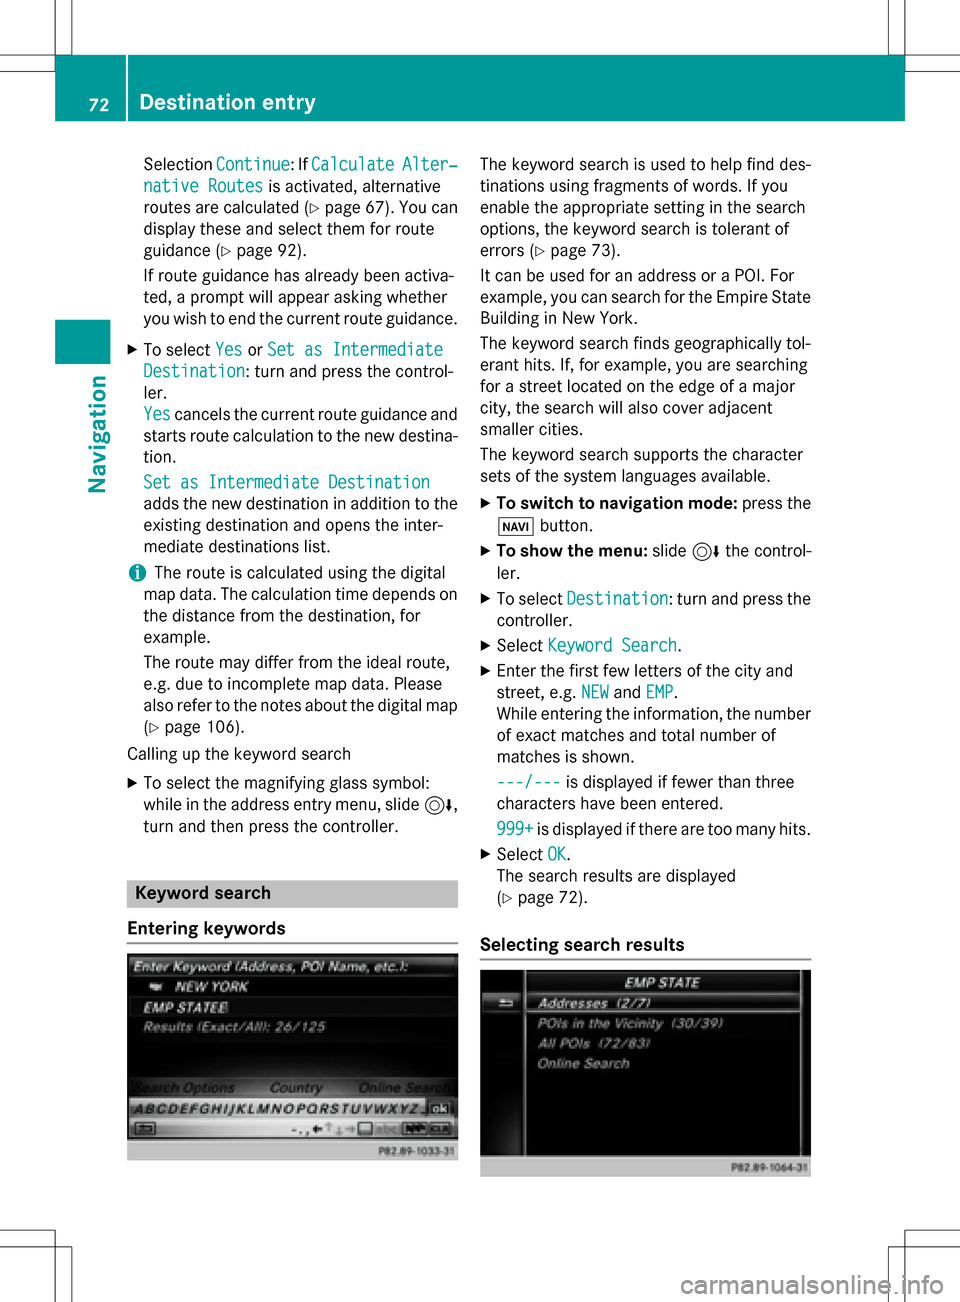
Entering keywords
The keyword search is used to help find des-
tinations using fragments of words. If you
enable the appropriate setting in the search
options, the keyword search is tolerant of
errors (
Ypage 73).
It can be used for an address or a POI. For
example, you can search for the Empire State
Building in New York.
The keyword search finds geographically tol-
erant hits. If, for example, you are searching
for a street located on the edge of a major
city, the search will also cover adjacent
smaller cities.
The keyword search supports the character
sets of the system languages available.
XTo switch to navigation mode: press the
Ø button.
XTo show the menu: slide6the control-
ler.
XTo select Destination: turn and press the
controller.
XSelect Keyword Search.
XEnter the first few letters of the city and
street, e.g. NEW
andEMP.
While entering the information, the number
of exact matches and total number of
matches is shown.
---/---
is displayed if fewer than three
characters have been entered.
999+
is displayed if there are too many hits.
XSelect OK.
The search results are displayed
(
Ypage 72).
Selecting search results
72Destination entry
Navigation
Page 75 of 246
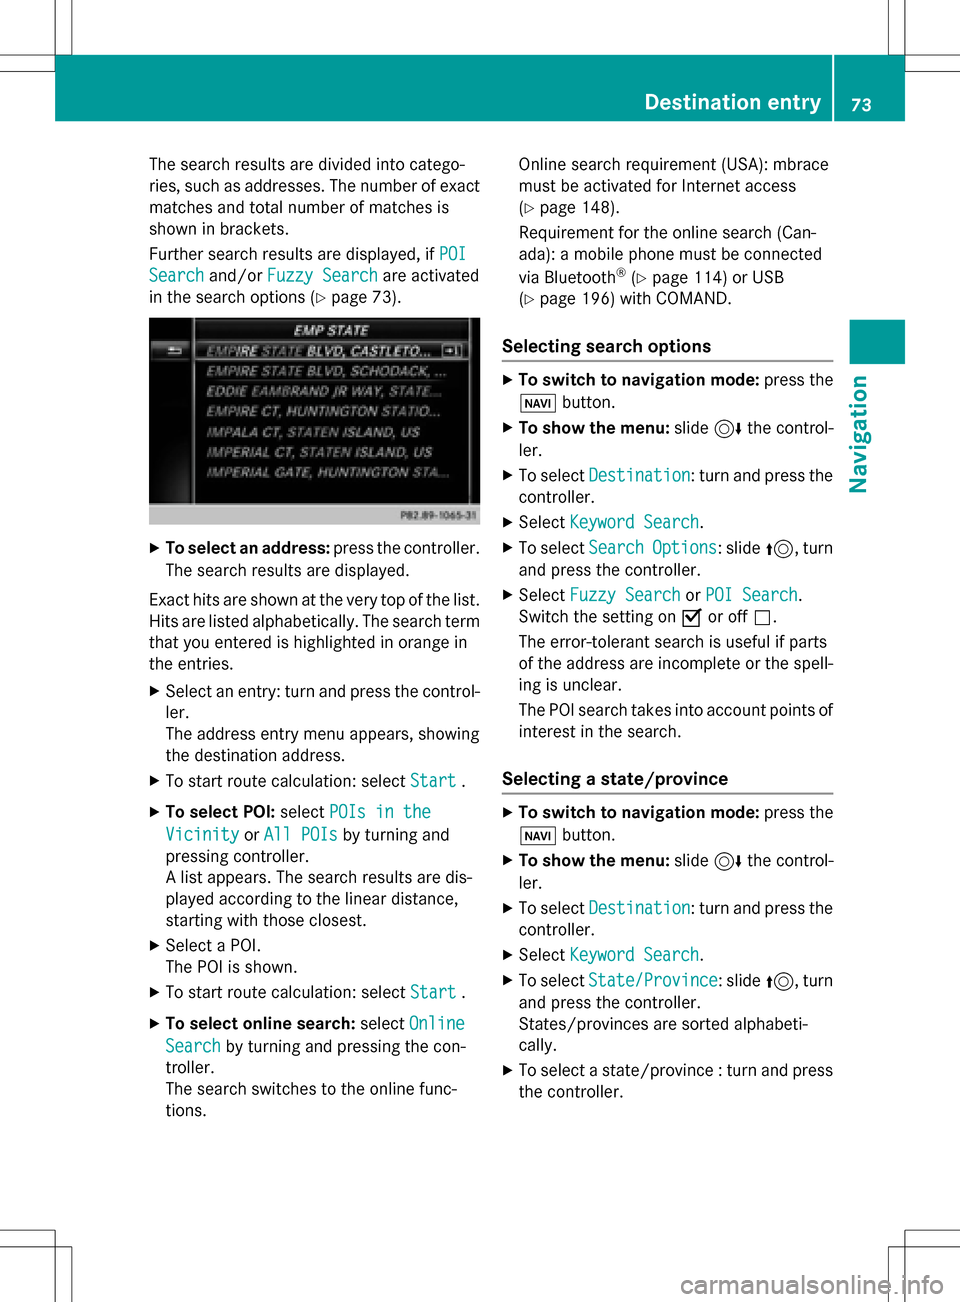
The search results are divided into catego-
ries, such as addresses. The number of exact
matches and total number of matches is
shown in brackets.
Further search results are displayed, ifPOI
Searchand/orFuzzy Searchare activated
in the search options (
Ypage 73).
XTo select an address: press the controller.
The search results are displayed.
Exact hits are shown at the very top of the list.
Hits are listed alphabetically. The search term that you entered is highlighted in orange in
the entries.
XSelect an entry: turn and press the control-ler.
The address entry menu appears, showing
the destination address.
XTo start route calculation: select Start.
XTo select POI:selectPOIs in the
VicinityorAll POIsby turning and
pressing controller.
A list appears. The search results are dis-
played according to the linear distance,
starting with those closest.
XSelect a POI.
The POI is shown.
XTo start route calculation: select Start.
XTo select online search:selectOnline
Searchby turning and pressing the con-
troller.
The search switches to the online func-
tions. Online search requirement (USA): mbrace
must be activated for Internet access
(
Ypage 148).
Requirement for the online search (Can-
ada): a mobile phone must be connected
via Bluetooth
®(Ypage 114) or USB
(
Ypage 196) with COMAND.
Selecting search options
XTo switch to navigation mode: press the
Ø button.
XTo show the menu: slide6the control-
ler.
XTo select Destination: turn and press the
controller.
XSelect Keyword Search.
XTo select SearchOptions: slide5, turn
and press the controller.
XSelect Fuzzy SearchorPOI Search.
Switch the setting on Oor off ª.
The error-tolerant search is useful if parts
of the address are incomplete or the spell-
ing is unclear.
The POI search takes into account points of interest in the search.
Selecting a state/province
XTo switch to navigation mode: press the
Ø button.
XTo show the menu: slide6the control-
ler.
XTo select Destination: turn and press the
controller.
XSelect Keyword Search.
XTo select State/Province: slide5, turn
and press the controller.
States/provinces are sorted alphabeti-
cally.
XTo select a state/province : turn and press
the controller.
Destination entry73
Navigation
Z