ignition MERCEDES-BENZ CLS-Class 2016 W218 Owner's Manual
[x] Cancel search | Manufacturer: MERCEDES-BENZ, Model Year: 2016, Model line: CLS-Class, Model: MERCEDES-BENZ CLS-Class 2016 W218Pages: 342, PDF Size: 8.28 MB
Page 13 of 342
Head restraintsAdjusting .........................................9 6
Adjusting (electrically) ..................... 96
Adjusting (rear) ................................ 96
Installing/removing (rear) ................ 97
Luxury .............................................. 96
see NECK-PRO head restraints
see NECK-PRO luxury head restraints
Headlamps
Cleaning system (notes) ................ 335
Fogging up .....................................1 10
see Automatic headlamp mode
Heating
see Climate control
High beam flasher .............................1 08
High-beam headlamps
Adaptive Highbeam Assist ............. 109
Display message ............................ 221
Switching on/off ........................... 108
Hill start assist .................................. 130
HOLD function
Activating ....................................... 165
Deactivating ................................... 165
Display message ............................ 225
Function/notes .............................1 64
Home address
see also Digital Operator's Man-
ual ..................................................2 45
Hood
Closing ...........................................2 75
Display message ............................ 233
Important safety notes .................. 274
Opening ......................................... 274
Horn ...................................................... 33
Hydroplaning ..................................... 152
I
Ignition lock
see Key positions
Immobilizer .......................................... 74
Indicator and warning lamps
COLLISION PREVENTION ASSIST
PLUS .............................................. 243
Indicator lamps
see Warning and indicator lamps
Indicators
see Turn signals Instrument cluster
Overview .......................................... 34
Settings ......................................... 205
Warning and indicator lamps ........... 34
Instrument cluster lighting .............. 206
Interior lighting
Automatic control .......................... 111
Delayed switch-off (on-board
computer) ...................................... 207
Overview ........................................ 110
Reading lamp ................................. 110
Setting the brightness of the
ambient lighting (on-board com-
puter) ............................................. 206
Setting the brightness of the dis-
play/switch (on-board computer) .. 206
Setting the color of the ambient
lighting (on-board computer) ......... 207
iPod
®
see also Digital Operator's Man-
ual ..................................................2 45
J
Jack
Storage location ............................ 286
Using ............................................. 322
Jump starting (engine) ......................294
K
Key positions
KEYLESS-GO .................................. 127
SmartKey ....................................... 127
KEYLESS-GO
Convenience closing feature ............ 88
Deactivation ..................................... 76
Display message ............................ 234
Locking ............................................ 76
Removing the Start/Stop button ... 128
Start/Stop button .......................... 127
Starting the engine ........................ 129
Unlocking ......................................... 76
Kickdown
Driving tips ....................................1 38
Manual drive program .................... 142
Knee bag .............................................. 47
Index11
Page 19 of 342
Service menu (on-board com-
puter).................................................. 205
Service message
see ASSYST PLUS
Service products
Brake fluid .....................................3 34
Coolant (engine) ............................ 334
Engine oil ....................................... 333
Fuel ................................................ 332
Important safety notes .................. 331
Refrigerant (air-conditioning sys-
tem) ............................................... 335
Washer fluid ................................... 335
Setting the air distribution ...............121
Setting the airflow ............................ 122
Setting the date/time format
see also Digital Operator's Man-
ual ..................................................2 45
Setting the language
see also Digital Operator's Man-
ual ..................................................2 45
Setting the time
see also Digital Operator's Man-
ual ..................................................2 45
Settings
Factory (on-board computer) ......... 209
On-board computer ....................... 205
SETUP (on-board computer) ............. 209
Side impact air bag .............................4 8
Side marker lamp (display mes-
sage) ................................................... 221
Side windows
Cleaning ......................................... 281
Convenience closing feature ............ 88
Convenience opening feature ..........8 8
Important safety information ........... 86
Opening/closing .............................. 87
Problem (malfunction) .....................9 0
Resettin g........................................ .89
Reversin gfeature ............................ .87
SIRIUS services
see also Digital Operator's Man-
ual ................................. ................. 245
Sliding sunroof
Important safet
y notes .................... 90
Opening/closing .............................. 91
Problem (malfunction) ..................... 93 Resetting ......................................... 91
SmartKey
Changing the battery ....................... 79
Changing the programming .............7 7
Checking the battery ...................... .79
Convenience closing feature ............ 88
Convenience opening feature .......... 88
Dis play message ............................ 234
Door central locking/unlocking ...... .76
Important safety notes .................... 76
Loss .................................................8 0
Mechanical key ................................ 78
Overview .......................................... 76
Positions (ignition lock) ................. 127
Problem (malfunction) ..................... 80
Starting the engine ........................ 129
SMS
see also Digital Operator's Man-
ual .................................................. 245
Snow chains ...................................... 303
Sockets
Center console .............................. 262
General notes ................................ 262
Rear compartment .........................2 63
Sound
Switching on/off ........................... 246
Spare wheel
Stowing .......................................... 327
Special seat belt retractor .................. 59
Specialist workshop ............................ 29
Speed, controlling
see Cruise control
Speedometer
Digital ............................................ 199
In the Instru
ment cluster ................. 34
Segments ...................................... 196
Selecting the display unit ...............2 05
SPORT handling mode
Deactivating/activating
(Mercedes-AMG vehicles) ................ 71
Warning lamp ................................. 240
Standing lamps
Display message ............................ 221
Switching on/off ........................... 108
Start/stop function
see ECO start/stop function
Starting (engine) ................................ 128
Index17
Page 35 of 342
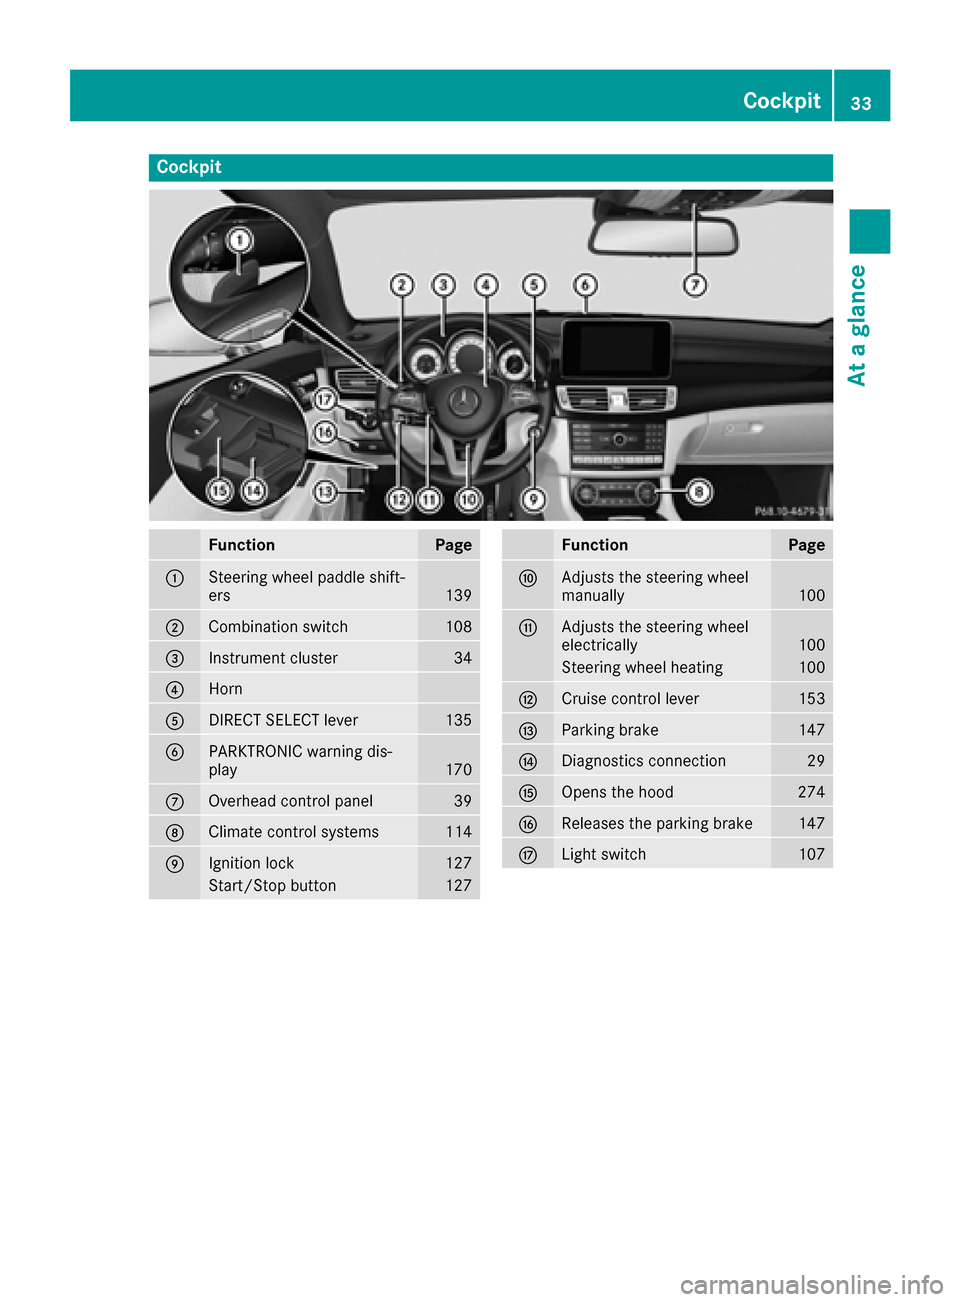
Cockpit
FunctionPage
:Steering wheel paddle shift-
ers139
;Combination switch108
=Instrument cluster34
?Horn
ADIRECT SELECT lever135
BPARKTRONIC warning dis-
play170
COverhead control panel39
DClimate control systems114
EIgnition lock127
Start/Stop button127
FunctionPage
FAdjusts the steering wheel
manually100
GAdjusts the steering wheel
electrically100
Steering wheel heating100
HCruise control lever153
IParking brake147
JDiagnostics connection29
KOpens the hood274
LReleases the parking brake147
MLight switch107
Cockpit33
At a glance
Page 43 of 342
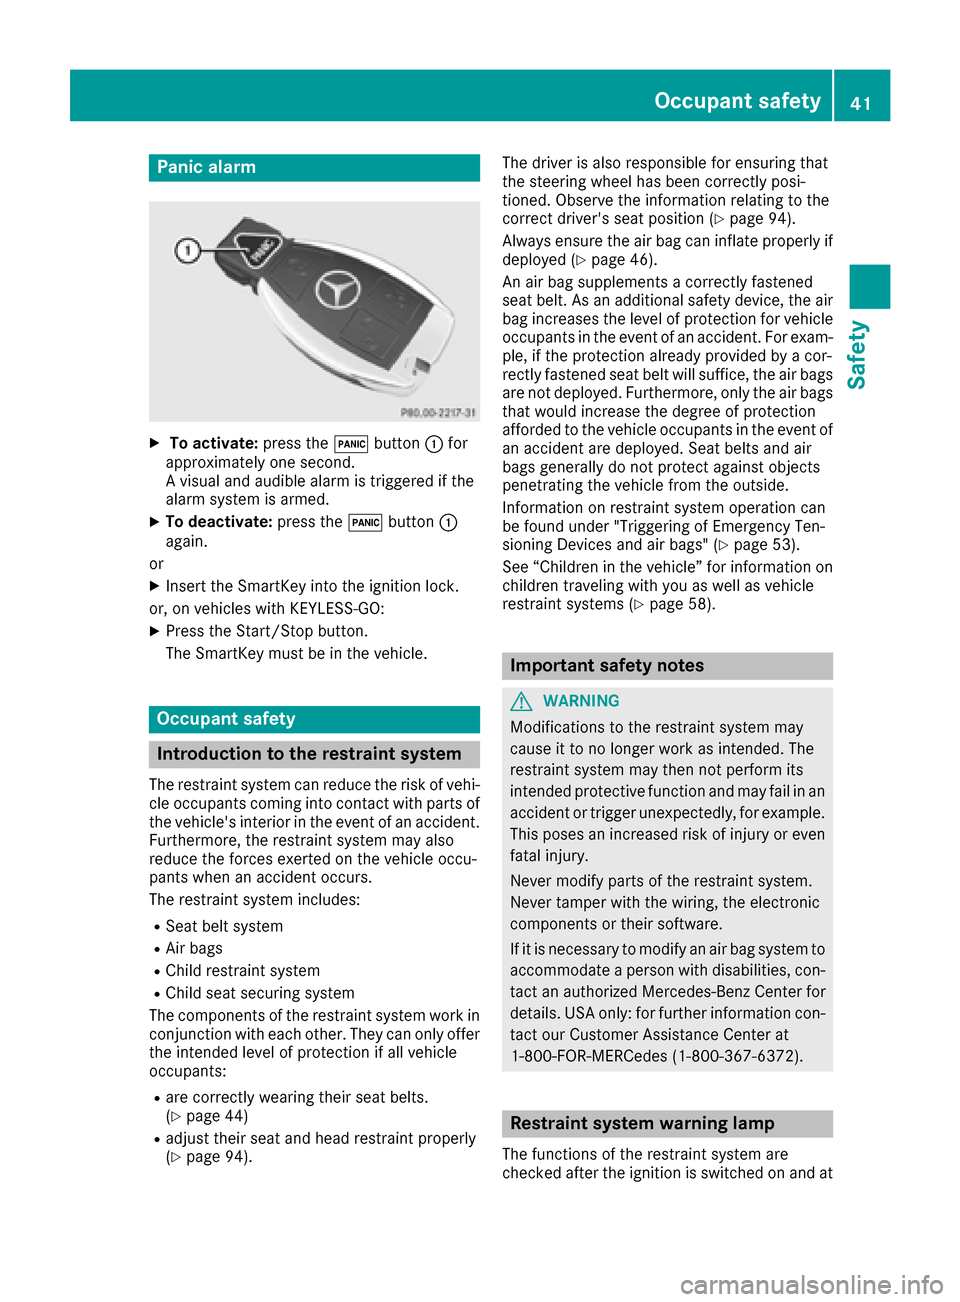
Panic alarm
XTo activate:press the!button :for
approximately one second.
A visual and audible alarm is triggered if the
alarm system is armed.
XTo deactivate: press the!button :
again.
or
XInsert the SmartKey into the ignition lock.
or, on vehicles with KEYLESS‑GO:
XPress the Start/Stop button.
The SmartKey must be in the vehicle.
Occupant safety
Introduction to the restraint system
The restraint system can reduce the risk of vehi- cle occupants coming into contact with parts of
the vehicle's interior in the event of an accident.
Furthermore, the restraint system may also
reduce the forces exerted on the vehicle occu-
pants when an accident occurs.
The restraint system includes:
RSeat belt system
RAir bags
RChild restraint system
RChild seat securing system
The components of the restraint system work in
conjunction with each other. They can only offer
the intended level of protection if all vehicle
occupants:
Rare correctly wearing their seat belts.
(Ypage 44)
Radjust their seat and head restraint properly
(Ypage 94). The driver is also responsible for ensuring that
the steering wheel has been correctly posi-
tioned. Observe the information relating to the
correct driver's seat position (
Ypage 94).
Always ensure the air bag can inflate properly if
deployed (
Ypage 46).
An air bag supplements a correctly fastened
seat belt. As an additional safety device, the air
bag increases the level of protection for vehicle
occupants in the event of an accident. For exam-
ple, if the protection already provided by a cor-
rectly fastened seat belt will suffice, the air bags
are not deployed. Furthermore, only the air bags that would increase the degree of protection
afforded to the vehicle occupants in the event of
an accident are deployed. Seat belts and air
bags generally do not protect against objects
penetrating the vehicle from the outside.
Information on restraint system operation can
be found under "Triggering of Emergency Ten-
sioning Devices and air bags" (
Ypage 53).
See “Children in the vehicle” for information on
children traveling with you as well as vehicle
restraint systems (
Ypage 58).
Important safety notes
GWARNING
Modifications to the restraint system may
cause it to no longer work as intended. The
restraint system may then not perform its
intended protective function and may fail in an
accident or trigger unexpectedly, for example.
This poses an increased risk of injury or even fatal injury.
Never modify parts of the restraint system.
Never tamper with the wiring, the electronic
components or their software.
If it is necessary to modify an air bag system to
accommodate a person with disabilities, con-
tact an authorized Mercedes-Benz Center for
details. USA only: for further information con-
tact our Customer Assistance Center at
1-800-FOR-MERCedes (1‑800‑367‑6372).
Restraint system warning lamp
The functions of the restraint system are
checked after the ignition is switched on and at
Occupant safety41
Safety
Z
Page 44 of 342
regular intervals while the engine is running.
Therefore, malfunctions can be detected in
good time.
The6 restraint system warning lamp in the
instrument cluster lights up when the ignition is
switched on. It goes out no later than a few sec-
onds after the vehicle is started. The compo-
nents of the restraint system are in operational
readiness.
A malfunction has occurred if the 6restraint
system warning lamp:
Rdoes not light up after the ignition is switched
on
Rdoes not go out after a few seconds with the
engine running
Rlights up again while the engine is running
GWARNING
If restraint system is malfunctioning, restraint
system components may be triggered unin-
tentionally or might not be triggered at all in
the event of an accident with a high rate of
vehicle deceleration. This can affect the Emer- gency Tensioning Device or air bag, for exam-
ple. This poses an increased risk of injury or
even fatal injury.
Have the restraint system checked and
repaired in a qualified specialist workshop as
soon as possible.
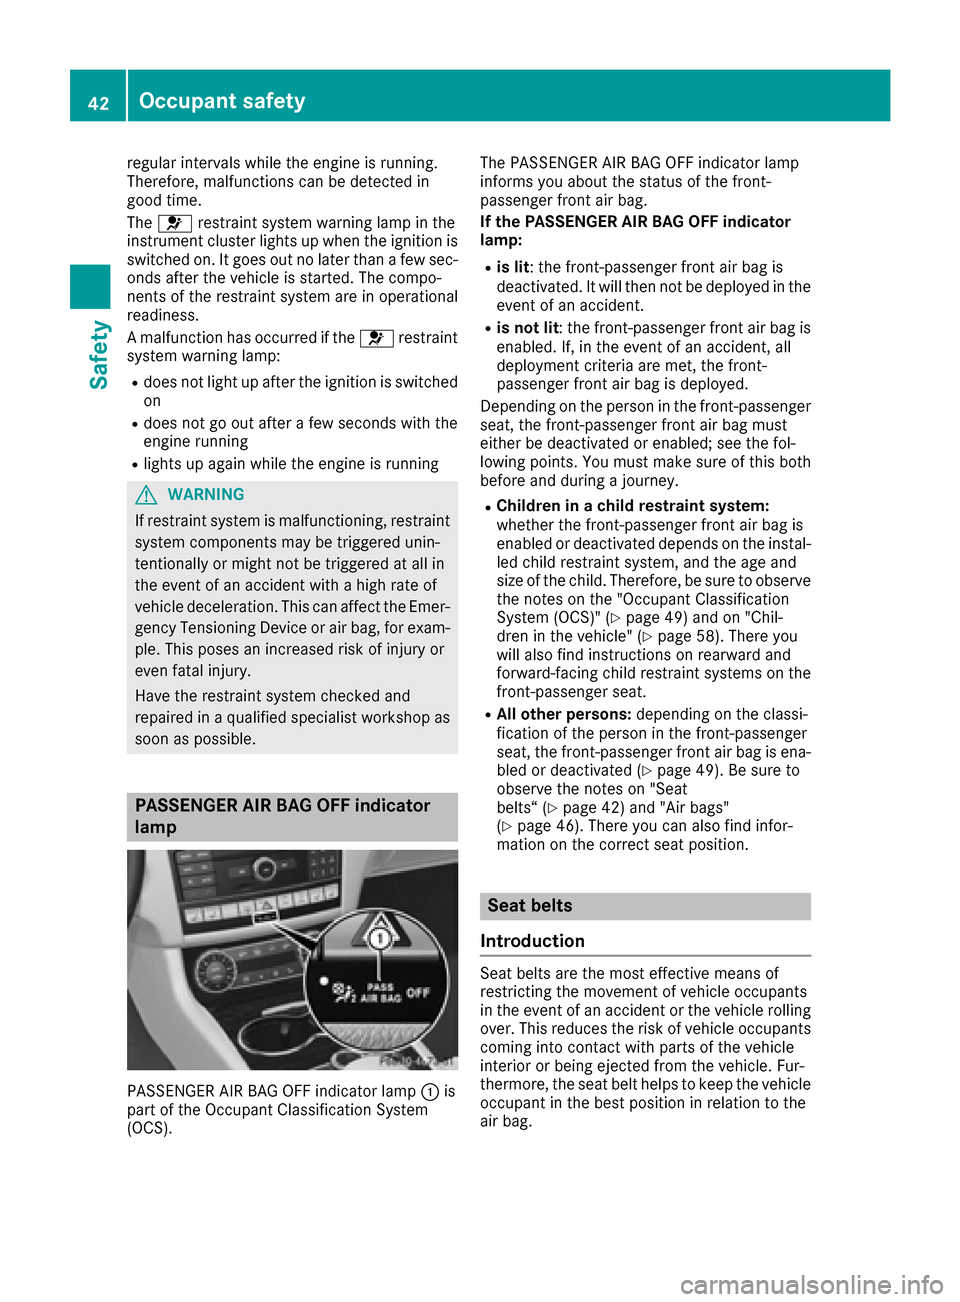
PASSENGER AIR BAG OFF indicator
lamp
PASSENGER AIR BAG OFF indicator lamp :is
part of the Occupant Classification System
(OCS). The PASSENGER AIR BAG OFF indicator lamp
informs you about the status of the front-
passenger front air bag.
If the PASSENGER AIR BAG OFF indicator
lamp:
Ris lit: the front-passenger front air bag is
deactivated. It will then not be deployed in the
event of an accident.
Ris not lit
: the front-passenger front air bag is
enabled. If, in the event of an accident, all
deployment criteria are met, the front-
passenger front air bag is deployed.
Depending on the person in the front-passenger
seat, the front-passenger front air bag must
either be deactivated or enabled; see the fol-
lowing points. You must make sure of this both
before and during a journey.
RChildren in a child restraint system:
whether the front-passenger front air bag is
enabled or deactivated depends on the instal-
led child restraint system, and the age and
size of the child. Therefore, be sure to observe the notes on the "Occupant Classification
System (OCS)" (
Ypage 49) and on "Chil-
dren in the vehicle" (Ypage 58). There you
will also find instructions on rearward and
forward-facing child restraint systems on the
front-passenger seat.
RAll other persons: depending on the classi-
fication of the person in the front-passenger
seat, the front-passenger front air bag is ena-
bled or deactivated (
Ypage 49). Be sure to
observe the notes on "Seat
belts“ (
Ypage 42) and "Air bags"
(Ypage 46). There you can also find infor-
mation on the correct seat position.
Seat belts
Introduction
Seat belts are the most effective means of
restricting the movement of vehicle occupants
in the event of an accident or the vehicle rolling
over. This reduces the risk of vehicle occupants coming into contact with parts of the vehicle
interior or being ejected from the vehicle. Fur-
thermore, the seat belt helps to keep the vehicle
occupant in the best position in relation to the
air bag.
42Occupant safety
Safety
Page 47 of 342
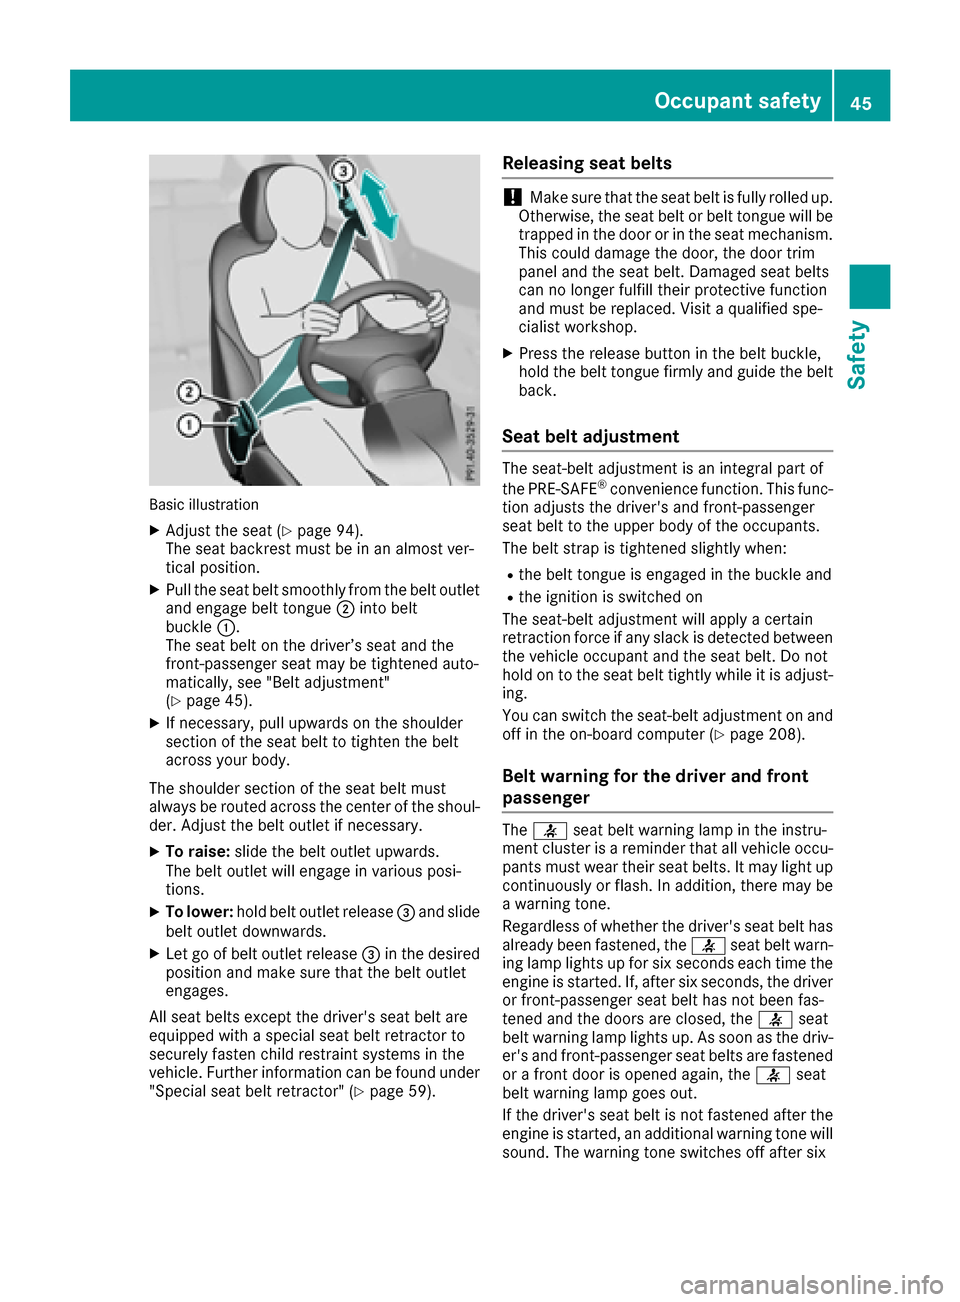
Basic illustration
XAdjust the seat (Ypage 94).
The seat backrest must be in an almost ver-
tical position.
XPull the seat belt smoothly from the belt outlet
and engage belt tongue ;into belt
buckle :.
The seat belt on the driver’s seat and the
front-passenger seat may be tightened auto-
matically, see "Belt adjustment"
(
Ypage 45).
XIf necessary, pull upwards on the shoulder
section of the seat belt to tighten the belt
across your body.
The shoulder section of the seat belt must
always be routed across the center of the shoul-
der. Adjust the belt outlet if necessary.
XTo raise: slide the belt outlet upwards.
The belt outlet will engage in various posi-
tions.
XTo lower: hold belt outlet release =and slide
belt outlet downwards.
XLet go of belt outlet release =in the desired
position and make sure that the belt outlet
engages.
All seat belts except the driver's seat belt are
equipped with a special seat belt retractor to
securely fasten child restraint systems in the
vehicle. Further information can be found under
"Special seat belt retractor" (
Ypage 59).
Releasing seat belts
!Make sure that the seat belt is fully rolled up.
Otherwise, the seat belt or belt tongue will be
trapped in the door or in the seat mechanism.
This could damage the door, the door trim
panel and the seat belt. Damaged seat belts
can no longer fulfill their protective function
and must be replaced. Visit a qualified spe-
cialist workshop.
XPress the release button in the belt buckle,
hold the belt tongue firmly and guide the belt
back.
Seat belt adjustment
The seat-belt adjustment is an integral part of
the PRE-SAFE®convenience function. This func-
tion adjusts the driver's and front-passenger
seat belt to the upper body of the occupants.
The belt strap is tightened slightly when:
Rthe belt tongue is engaged in the buckle and
Rthe ignition is switched on
The seat-belt adjustment will apply a certain
retraction force if any slack is detected between
the vehicle occupant and the seat belt. Do not
hold on to the seat belt tightly while it is adjust-
ing.
You can switch the seat-belt adjustment on and
off in the on-board computer (
Ypage 208).
Belt warning for the driver and front
passenger
The 7 seat belt warning lamp in the instru-
ment cluster is a reminder that all vehicle occu-
pants must wear their seat belts. It may light up
continuously or flash. In addition, there may be
a warning tone.
Regardless of whether the driver's seat belt has
already been fastened, the 7seat belt warn-
ing lamp lights up for six seconds each time the engine is started. If, after six seconds, the driver
or front-passenger seat belt has not been fas-
tened and the doors are closed, the 7seat
belt warning lamp lights up. As soon as the driv-
er's and front-passenger seat belts are fastened
or a front door is opened again, the 7seat
belt warning lamp goes out.
If the driver's seat belt is not fastened after the
engine is started, an additional warning tone will
sound. The warning tone switches off after six
Occupant safety45
Safety
Z
Page 52 of 342
PASSENGER AIRBAG OFF indicator lamp:
indicates whether the front-passenger front air
bag is disabled.
XTurn the SmartKey to position 1or 2in the
ignition lock, or in vehicles with KEYLESS-GO, press the start/stop button once or twice.
The system carries out a self-diagnosis test.
The PASSENGER AIR BAG OFF indicator lamp
must light up for about six seconds.
The PASSENGER AIR BAG OFF indicator lamp
then shows the status of the front-passenger
front air bag. If the status of the front-passenger
front air bag changes whilst the vehicle is in
motion, an air bag display message may appear
in the instrument cluster (
Ypage 219). Always
observe the PASSENGER AIR BAG OFF indicator
lamp when the front-passenger seat is occu-
pied. Make sure that the status of the front-
passenger front air bag is correct before and
during a journey.
If the PASSENGER AIRBAG OFF indicator
lamp:
Rlights up, the front-passenger front air bag is
disabled. It will then not be deployed in the
event of an accident.
Rdoes not light up, the front-passenger front
air bag is enabled. If, in the case of an acci-
dent, all deployment criteria are met, the
front-passenger front air bag is deployed.
GWARNING
If the PASSENGER AIR BAG OFF indicator
lamp is lit, the front-passenger front air bag is
disabled. It will not be deployed in the event of
an accident and cannot perform its intended
protective function. A person in the front-
passenger seat could then, for example, come
into contact with the vehicle's interior, espe-
cially if the person is sitting too close to the
dashboard. This poses an increased risk of
injury or even fatal injury.
When the front-passenger seat is occupied,
always ensure that:
Rthe classification of the person in the front- passenger seat is correct and the front-
passenger front air bag is enabled or disa-
bled in accordance with the person in the
front-passenger seat
Rthe front-passenger seat has been moved
back as far back as possible.
Rthe person is seated correctly.
Make sure, both before and during the jour-
ney, that the status of the front-passenger
front air bag is correct.
GWARNING
If you secure a child in a child restraint system on the front-passenger seat and the
PASSENGER AIR BAG OFF indicator lamp is
off, the front-passenger front air bag can
deploy in the event of an accident. The child
could be struck by the air bag. This poses an
increased risk of injury or even fatal injury.
Make sure that the front-passenger front air
bag has been disabled. The PASSENGER AIR
BAG OFF indicator lamp must be lit.
GWARNING
If you secure a child in a forward-facing child
restraint system on the front-passenger seat
and you position the front-passenger seat too close to the dashboard, the child could, in the
event of an accident:
Rcome into contact with the vehicle's inte-
rior if the PASSENGER AIR BAG OFF indi-
cator lamp is lit, for example
Rbe struck by the air bag if the PASSENGER
AIR BAG OFF indicator lamp is off
This poses an increased risk of injury or even
fatal injury.
Move the front-passenger seat as far back as
possible. Always make sure that the shoulder
belt strap is correctly routed from the vehicle
belt sash guide to the shoulder belt guide on
the child restraint system. The shoulder belt
strap must be routed forwards and down-
wards from the vehicle belt sash guide. If nec- essary, adjust the vehicle belt sash guide and
the front-passenger seat accordingly. Always
observe the child restraint system manufac-
turer's installation instructions.
50Occupant safety
Safety
Page 56 of 342

Have the vehicle towed to a qualified special-
ist workshop in order to have a deployed air
bag replaced.
It is important for your safety and that of your
passenger to have deployed air bags replaced
and to have any malfunctioning air bags
repaired. This will help to make sure the air bags
continue to perform their protective function for
the vehicle occupants in the event of a crash.
GWARNING
Pyrotechnic Emergency Tensioning Devices
that have been deployed are no longer opera-
tional and are unable to perform their inten-
ded protective function. This poses an
increased risk of injury or even fatal injury.
Therefore, have pyrotechnic Emergency Ten-
sioning Devices which have been triggered
immediately replaced at a qualified specialist workshop.
An electric motor is used by PRE-SAFE
®to trig-
ger the tightening of the seat belt in hazardous
situations. This procedure is reversible.
If Emergency Tensioning Devices are triggered
or air bags are deployed, you will hear a bang,
and a small amount of powder may also be
released. The 6restraint system warning
lamp lights up.
Only in rare cases will the bang affect your hear-
ing. The powder that is released generally does
not constitute a health hazard, but it may cause
short-term breathing difficulties in people with
asthma or other respiratory problems. Provided
it is safe to do so, you should leave the vehicle
immediately or open the window in order to pre-
vent breathing difficulties.
Air bags and pyrotechnic Emergency Tensioning
Devices (ETDs) contain perchlorate material,
which may require special handling and regard
for the environment. National guidelines must
be observed during disposal. In California, see
www.dtsc.ca.gov/HazardousWaste/
Perchlorate/index.cfm.
Method of operation
During the first stage of a collision, the restraint
system control unit evaluates important physi-
cal data relating to vehicle deceleration or accel-
eration, such as:
Rduration
Rdirection
Rintensity
Based on the evaluation of this data, the
restraint system control unit triggers the Emer-
gency Tensioning Devices during a frontal or
rear collision.
An Emergency Tensioning Device can only be
triggered, if:
Rthe ignition is switched on
Rthe components of the restraint system are
operational. You can find further information
under: "Restraint system warning lamp"
(
Ypage 41)
Rthe belt tongue is engaged in the buckle on
the respective front-passenger seat
The Emergency Tensioning Devices in the rear
compartment are triggered independently of the
lock status of the seat belts.
If the restraint system control unit detects a
more severe accident, further components of
the restraint system are activated independ-
ently of each other in certain frontal collision
situations:
RFront air bags and driver's knee bag
RWindow curtain air bag, if the system deter-
mines that deployment can offer additional
protection to that provided by the seat belt
The front-passenger front air bag is activated or
deactivated depending on the person on the
front-passenger seat. The front-passenger front
air bag can only deploy in an accident if the
PASSENGER AIR BAG OFF indicator lamp is off. Observe the information on the PASSENGER AIR
BAG OFF indicator lamp (
Ypage 42).
Your vehicle has two-stage front air bags. During the fi
rst deployment stage, the front air bag is
filled with propellant gas to reduce the risk of
injuries. The front air bag is fully deployed with
the maximum amount of propellant gas if a sec-
ond deployment threshold is reached within a
few milliseconds.
The activation threshold of the Emergency Ten-
sioning Devices and the air bag are determined
by evaluating the rate of vehicle deceleration or
acceleration which occurs at various points in
54Occupant safety
Safety
Page 66 of 342
Never leave animals unattended in the vehi-
cle. Always secure animals properly during
the journey, e.g. use a suitable animal trans-
port box.
Driving safety systems
Overview of driving safety systems
In this section, you will find information about
the following driving safety systems:
RABS (Anti-lock Braking System)
(Ypage 64)
RBAS ( Brake Assist System) (Ypage 65)
RBAS PLUS ( BrakeAssist System PLUS) with
Cross-Traffic Assist (Ypage 65)
RCOLLISION PREVENTION ASSIST PLUS
(Ypage 67)
RESP®(Electronic StabilityProgram)
(Ypage 69)
REBD ( Electronic Brake force Distribution)
(Ypage 72)
RADAPTIVE BRAKE (Ypage 72)
RPRE-SAFE®Brake (Ypage 73)
Important safety notes
If you fail to adapt your driving style or if you are
inattentive, the driving safety systems can nei-
ther reduce the risk of an accident nor override the laws of physics. Driving safety systems are
merely aids designed to assist driving. You are
responsible for maintaining the distance to the
vehicle in front, for vehicle speed, for braking in
good time, and for staying in lane. Always adapt
your driving style to suit the prevailing road and weather conditions and maintain a safe distance
from the vehicle in front. Drive carefully.
The driving safety systems described only work
as effectively as possible when there is ade-
quate contact between the tires and the road
surface. Please pay special attention to the
notes on tires, recommended minimum tire
tread depths, etc. (
Ypage 301).
In wintry driving conditions, always use winter
tires (M+S tires) and if necessary, snow chains.
Only in this way will the driving safety systems
described in this section work as effectively as
possible.
ABS (Anti-lock Braking System)
General information
ABS regulates brake pressure in such a way that
the wheels do not lock when you brake. This
allows you to continue steering the vehicle when
braking.
The ! ABS warning lamp in the instrument
cluster lights up when the ignition is switched
on. It goes out when the engine is running.
ABS works from a speed of about 5 mph
(8 km/h), regardless of road-surface conditions.
ABS works on slippery surfaces, even when you
only brake gently.
Important safety notes
iObserve the "Important safety notes" sec-
tion (Ypage 64).
GWARNING
If ABS is faulty, the wheels could lock when
braking. The steerability and braking charac-
teristics may be severely impaired. Addition-
ally, further driving safety systems are deac-
tivated. There is an increased danger of skid-
ding and accidents.
Drive on carefully. Have ABS checked imme-
diately at a qualified specialist workshop.
When ABS is malfunctioning, other systems,
including driving safety systems, will also
become inoperative. Observe the information
on the ABS warning lamp (
Ypage 238) and dis-
play messages which may be shown in the
instrument cluster (
Ypage 213).
Braking
XIf ABS intervenes: continue to depress the
brake pedal vigorously until the braking sit-
uation is over.
XTo make a full brake application: depress
the brake pedal with full force.
If ABS intervenes when braking, you will feel a
pulsing in the brake pedal.
The pulsating brake pedal can be an indication
of hazardous road conditions, and functions as a reminder to take extra care while driving.
64Driving safety systems
Safety
Page 77 of 342
XTo activate with the SmartKey:remove the
SmartKey from the ignition lock.
XTo activate with KEYLESS-GO: switch the
ignition off and open the driver's door.
XTo deactivate: switch on the ignition.
When leaving the vehicle, always take the
SmartKey with you and lock the vehicle. Anyone
can start the engine if a valid SmartKey has been
left inside the vehicle.
iThe immobilizer is always deactivated when
you start the engine.
In the event that the engine cannot be started
(yet the vehicle's battery is charged), the sys-
tem is not operational. Contact an authorized
Mercedes-Benz Center or call
1-800-FOR-MERCedes (in the USA) or
1-800-387-0100 (in Canada).
ATA (anti-theft alarm system)
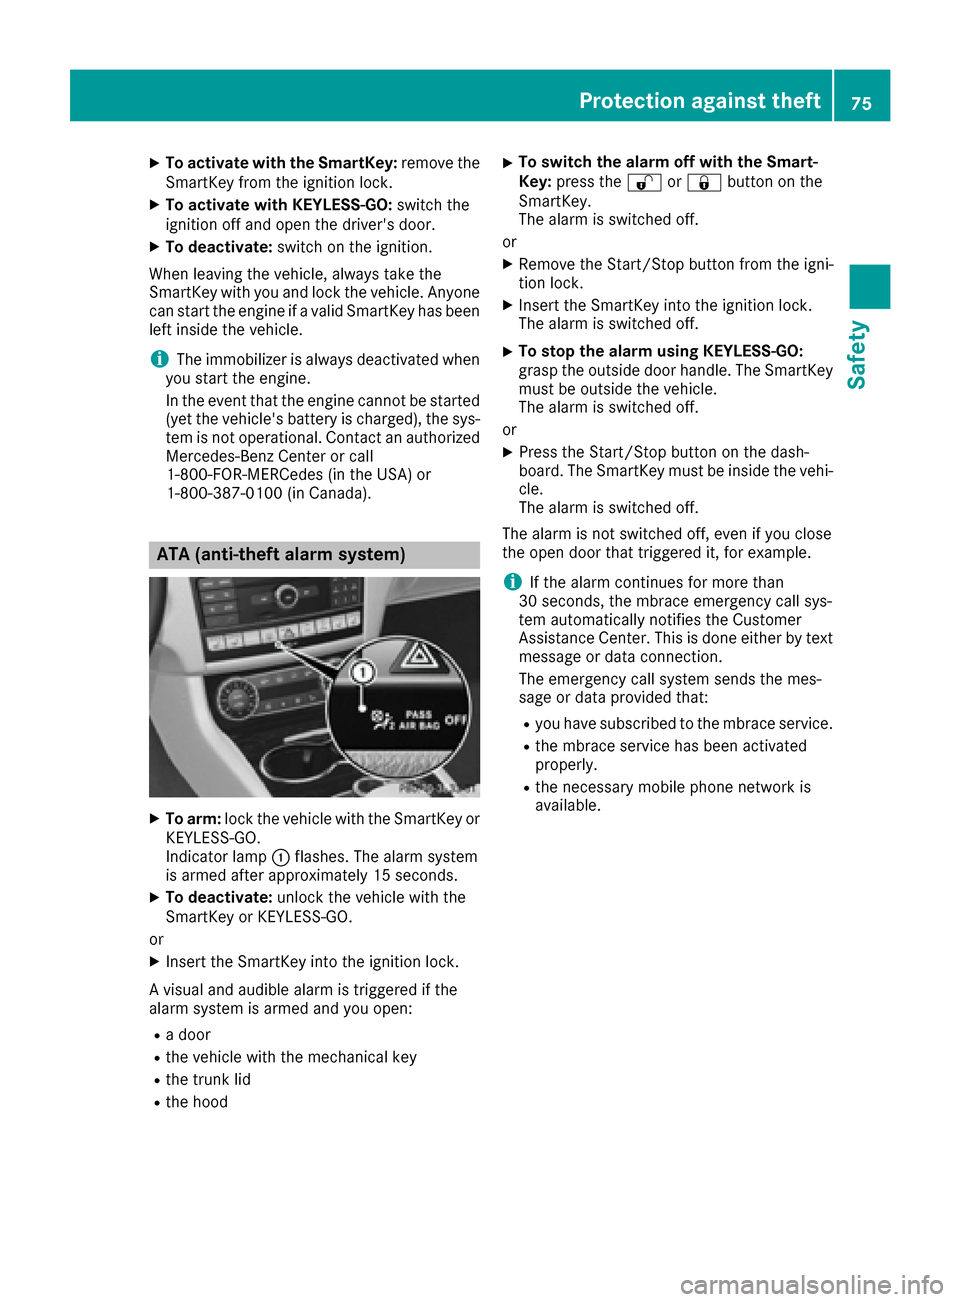
XTo arm: lock the vehicle with the SmartKey or
KEYLESS-GO.
Indicator lamp :flashes. The alarm system
is armed after approximately 15 seconds.
XTo deactivate: unlock the vehicle with the
SmartKey or KEYLESS-GO.
or
XInsert the SmartKey into the ignition lock.
A visual and audible alarm is triggered if the
alarm system is armed and you open:
Ra door
Rthe vehicle with the mechanical key
Rthe trunk lid
Rthe hood
XTo switch the alarm off with the Smart-
Key: press the %or& button on the
SmartKey.
The alarm is switched off.
or
XRemove the Start/Stop button from the igni-
tion lock.
XInsert the SmartKey into the ignition lock.
The alarm is switched off.
XTo stop the alarm using KEYLESS-GO:
grasp the outside door handle. The SmartKey
must be outside the vehicle.
The alarm is switched off.
or
XPress the Start/Stop button on the dash-
board. The SmartKey must be inside the vehi-
cle.
The alarm is switched off.
The alarm is not switched off, even if you close
the open door that triggered it, for example.
iIf the alarm continues for more than
30 seconds, the mbrace emergency call sys-
tem automatically notifies the Customer
Assistance Center. This is done either by text message or data connection.
The emergency call system sends the mes-
sage or data provi
ded that:
Ryou have subscribed to the mbrace service.
Rthe mbrace service has been activated
properly.
Rthe necessary mobile phone network is
available.
Protection against theft75
Safety
Z