mirror MERCEDES-BENZ CLS COUPE 2010 User Guide
[x] Cancel search | Manufacturer: MERCEDES-BENZ, Model Year: 2010, Model line: CLS COUPE, Model: MERCEDES-BENZ CLS COUPE 2010Pages: 337, PDF Size: 7.36 MB
Page 86 of 337
Vehicle equipment
..............................84
Correct driver's seat position ............84
Seats .................................................... 85
Steering wheel .................................... 90
Mirrors ................................................. 92
Memor yfunctions ............................... 95 83Seats, steering wheel and mirrors
Page 87 of 337
Vehicle equipment
i This manual describes all the standard
and optional equipment of your vehicle
available at the time of publicatio nofthe
Owner's Manual. Country-specific differen-
ces are possible. Please note that your
vehicle may not be equipped with all fea-
tures described. This also applies to safety-
relevant systems and functions. Correct driver's seat position
Observe the safety guidelines on
(Y
page 85).
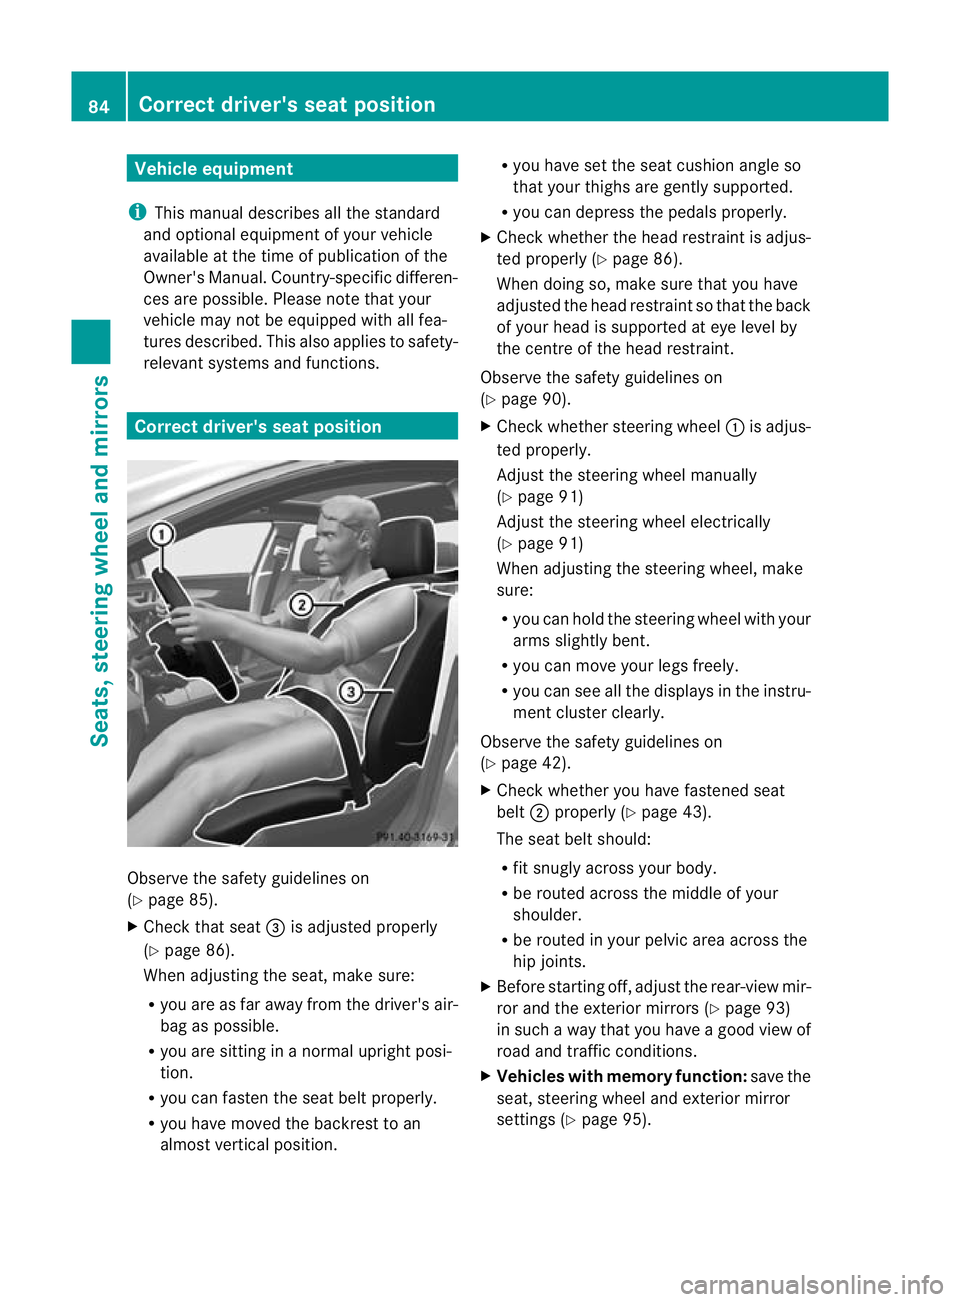
X Check that seat =is adjusted properly
(Y page 86).
When adjusting the seat, make sure:
R you are as far away from the driver's air-
bag as possible.
R you are sitting in a normal upright posi-
tion.
R you can fasten the seat belt properly.
R you have moved the backrest to an
almost vertical position. R
you have set the seat cushion angle so
that your thighs are gently supported.
R you can depress the pedals properly.
X Check whether the head restraint is adjus-
ted properly (Y page 86).
When doing so, make sure that you have
adjusted the head restraint so that the back
of your head is supported at eye level by
the centre of the head restraint.
Observe the safety guidelines on
(Y page 90).
X Check whether steering wheel :is adjus-
ted properly.
Adjust the steering wheel manually
(Y page 91)
Adjust the steering wheel electrically
(Y page 91)
When adjusting the steering wheel, make
sure:
R you can hold the steering wheel with your
arms slightly bent.
R you can move your legs freely.
R you can see all the displays in the instru-
ment cluster clearly.
Observe the safety guidelines on
(Y page 42).
X Check whether you have fastened seat
belt ;properly (Y page 43).
The seat belt should:
R fit snugly across your body.
R be routed across the middle of your
shoulder.
R be routed in your pelvic area across the
hip joints.
X Before starting off, adjust the rear-view mir-
ror and the exterior mirrors (Y page 93)
in such a way that you have a good view of
road and traffic conditions.
X Vehicles with memory function: save the
seat, steering wheel and exterior mirror
settings (Y page 95). 84
Correct driver's seat positionSeats, steering wheel and mirrors
Page 88 of 337
Seats
Important safety notes
G
Risk of injury
The seats can still be adjusted when there is
no key in the ignition lock. For this reason,
children should never be left unsupervised in
the vehicle. They could adjust the seats and
become trapped. G
Risk of accident
Only adjust the driver's seat when the vehicle
is stationary. You will otherwise be distracted
from the road and traffic conditions and you
could lose control of the vehicle as a result of
the seat moving. This could cause an acci-
dent. G
Risk of injury
Make sure that nobody can become trapped
when adjusting the seats.
Observe the notes on airbags.
Secure children as recommended; see the
"Children in the vehicle" section. G
Risk of injury
Make sure that the back of your head is sup-
ported at eye level by the central area of the
head restraint .Ifyour head is not supported
correctly by the head restraint, you could suf-
fer a severe neck injury in the event of an
accident .Never drive if the head restraints are
not engaged and set correctly. G
Risk of injury
Occupants should only travel sitting on seats
which have the head restraints fitted. On a
seat which is occupied, move the head
restraint into the upright position .This
reduces the risk of injury to the passenger in
the event of an accident. !
To avoid damage to the seats and the seat
heating, observe the following information:
R do not spill any liquids on the seats. If
liquid is spilled on the seats, dry them as
soon as possible.
R if the seat covers are damp or wet, do not
switch on the seat heating. The seat
heating should also not to be used to dry
the seats.
R clean the seat covers as recommended;
see the "Interior care" section.
R do not transport heavy loads on the
seats. Do not place sharp objects on the
seat cushions, e.g. knives, nails or tools.
The seats should only be occupied by
passengers, if possible.
R when the seat heating is in operation, do
not cover the seats with insulating mate-
rials, e.g. blankets, coats, bags, seat cov-
ers, child seats or booster seats.
! When you move the seats, make sure that
there are no objects in the footwell or
behind the seats. Otherwise, you could
damage the seats and the objects.
i The head restraints in the front seats are
fitted with the NECK-PRO system
(Y page 41). For this reason, it is not pos-
sible to remove the head restraints from
the front seats.
Please contact a Mercedes-Benz Service
Centre for more information.
i Related topics:
R Through-loading feature, rear bench seat Seats
85Seats, steering wheel and mirrors Z
Page 89 of 337
Adjusting the sea
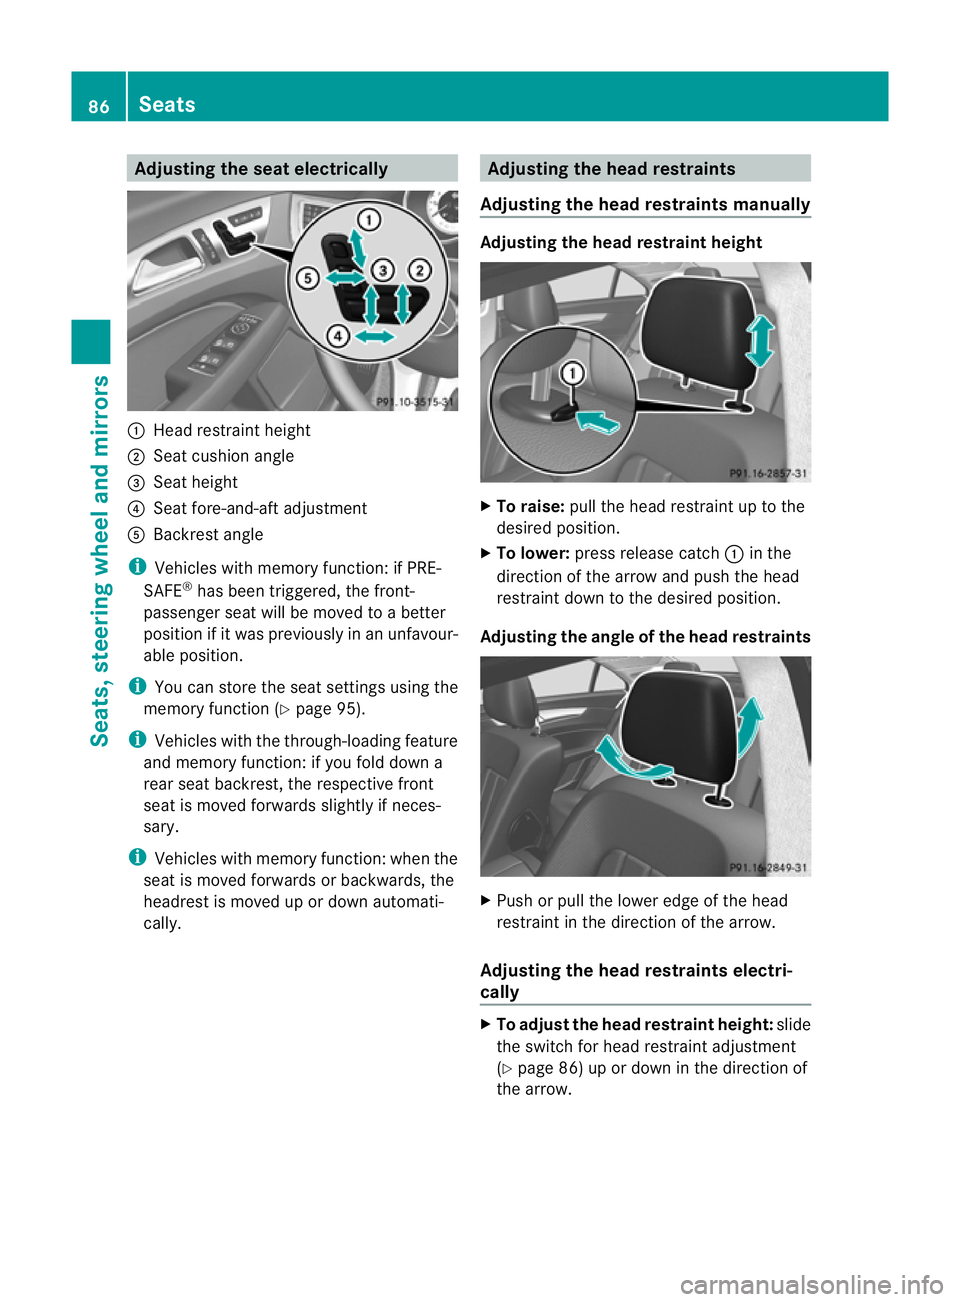
telectrically :
Head restraint height
; Seat cushio nangle
= Sea theight
? Seat fore-and-aft adjustment
A Backrest angle
i Vehicles with memory function: if PRE-
SAFE ®
has been triggered, the front-
passenger seat will be moved to a better
position if it was previously in an unfavour-
able position.
i You can store the seat settings using the
memory function (Y page 95).
i Vehicles with the through-loading feature
and memory function: if you fold down a
rear seat backrest, the respective front
seat is moved forwards slightly if neces-
sary.
i Vehicles with memory function :when the
seat is moved forwards or backwards, the
headrest is moved up or down automati-
cally. Adjusting the head restraints
Adjusting the head restraints manually Adjusting the head restraint height
X
To raise: pull the head restraint up to the
desired position.
X To lower: press release catch :in the
direction of the arrow and push the head
restraint down to the desired position.
Adjusting the angle of the head restraints X
Push or pull the lower edge of the head
restraint in the direction of the arrow.
Adjusting the head restraints electri-
cally X
To adjust the head restraint height: slide
the switch for head restraint adjustment
(Y page 86) up or down in the direction of
the arrow. 86
SeatsSeats, steering wheel and mirrors
Page 90 of 337
Adjusting the luxury head restraints
G
Risk of injury
When folding bac kthe head restraint side bol-
sters, do not put your hands between the side
bolster and the cushion holder. There is a
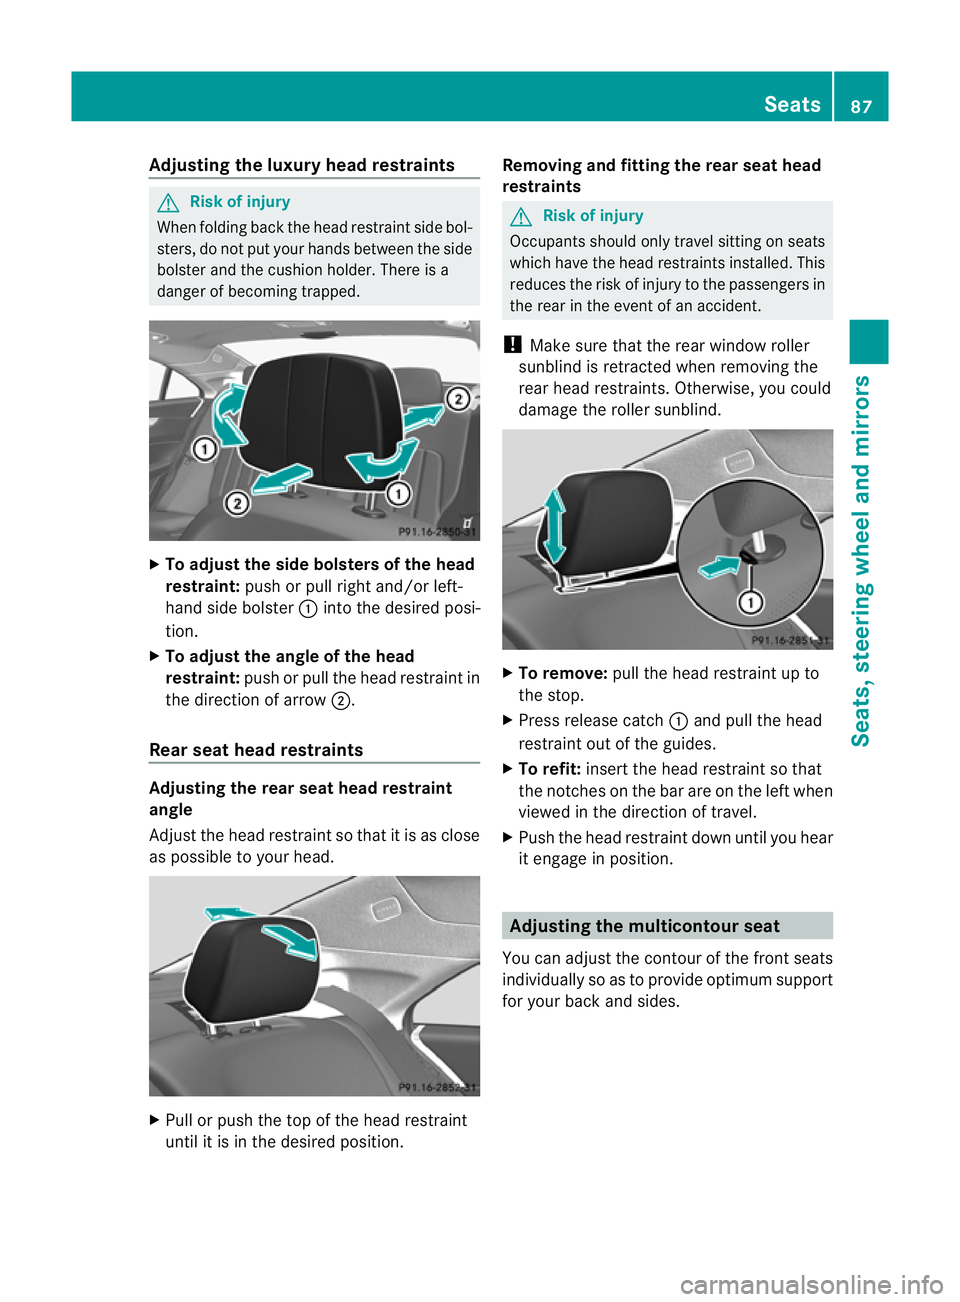
danger of becoming trapped. X
To adjust the side bolsters of the head
restraint: push or pull right and/or left-
hand side bolster :into the desired posi-
tion.
X To adjust the angle of the head
restraint: push or pull the head restraint in
the direction of arrow ;.
Rear seat head restraints Adjusting the rear seat head restraint
angle
Adjust the head restraint so that it is as close
as possible to your head. X
Pull or push the top of the head restraint
until it is in the desired position. Removing and fitting the rear seat head
restraints G
Risk of injury
Occupants should only travel sitting on seats
which have the head restraints installed. This
reduces the risk of injury to the passengers in
the rear in the event of an accident.
! Make sure that the rear window roller
sunblind is retracted when removing the
rear head restraints. Otherwise, you could
damage the roller sunblind. X
To remove: pull the head restraint up to
the stop.
X Press release catch :and pull the head
restraint out of the guides.
X To refit: insert the head restraint so that
the notches on the bar are on the left when
viewed in the direction of travel.
X Push the head restraint down until you hear
it engage in position. Adjusting the multicontour seat
You can adjust the contour of the front seats
individually so as to provide optimum support
for your back and sides. Seats
87Seats, steering wheel and mirrors Z
Page 91 of 337
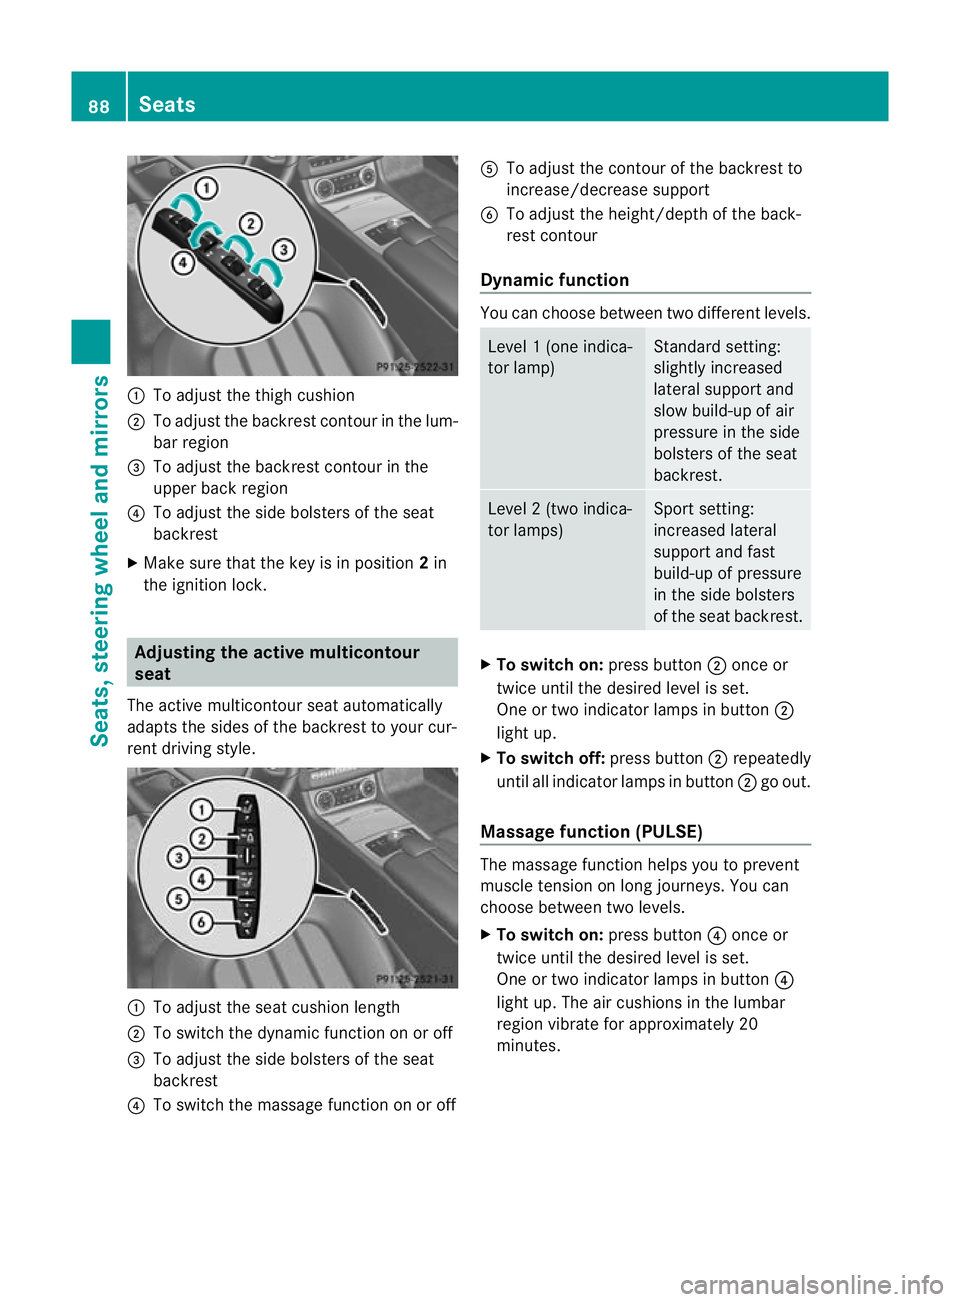
:
To adjust the thigh cushion
; To adjust the backrest contour in the lum-
bar region
= To adjust the backrest contour in the
upper back region
? To adjust the side bolsters of the seat
backrest
X Make sure that the key is in position 2in
the ignition lock. Adjusting the active multicontour
seat
The active multicontour seat automatically
adapts the sides of the backrest to your cur-
rent driving style. :
To adjust the seat cushion length
; To switch the dynamic function on or off
= To adjust the side bolsters of the seat
backrest
? To switch the massage function on or off A
To adjust the contour of the backrest to
increase/decrease support
B To adjust the height/depth of the back-
rest contour
Dynamic function You can choose between two different levels.
Level
1(one indica-
tor lamp) Standard setting:
slightly increased
lateral support and
slow build-up of air
pressure in the side
bolsters of the seat
backrest. Level
2(two indica-
tor lamps) Sport setting:
increased lateral
support and fast
build-up of pressure
in the side bolsters
of the seat backrest.
X
To switc hon:press button ;once or
twice until the desired level is set.
One or two indicator lamps in button ;
light up.
X To switch off: press button;repeatedly
until all indicator lamps in button ;go out.
Massage function (PULSE) The massage function helps you to prevent
muscle tension on long journeys. You can
choose between two levels.
X To switch on: press button?once or
twice until the desired level is set.
One or two indicator lamps in button ?
light up. The air cushions in the lumbar
region vibrate for approximately 20
minutes. 88
SeatsSeats, steering wheel and mirrors
Page 92 of 337
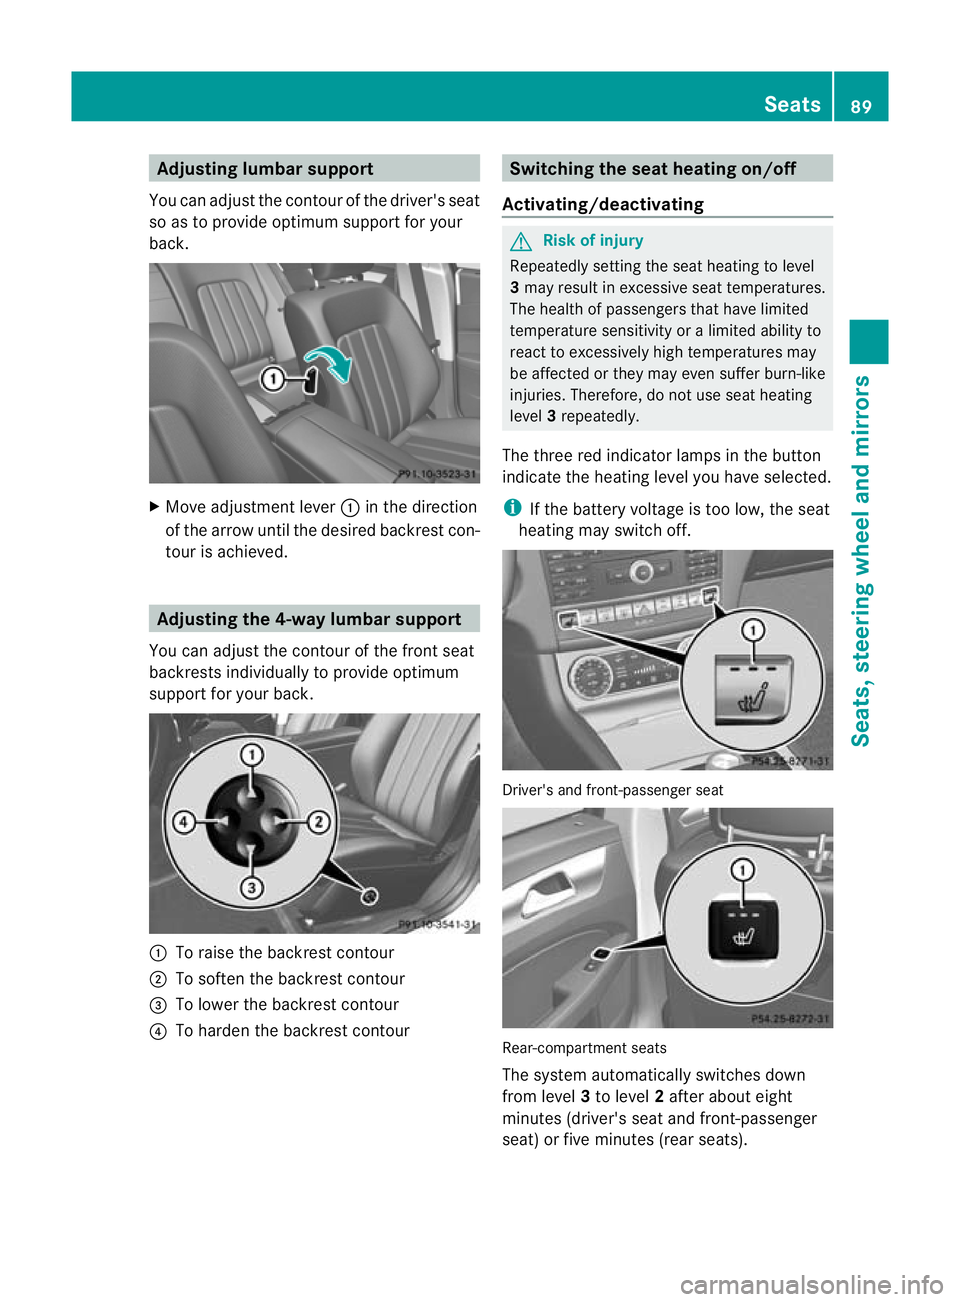
Adjusting lumbar support
You can adjust the contour of the driver's seat
so as to provide optimum support for your
back. X
Move adjustmen tlever :in the direction
of the arrow until the desired backrest con-
tour is achieved. Adjusting the 4-way lumbar support
You can adjust the contour of the front seat
backrests individually to provide optimum
support for your back. :
To raise the backrest contour
; To soften the backrest contour
= To lower the backrest contour
? To harden the backrest contour Switching the seat heating on/off
Activating/deactivating G
Risk of injury
Repeatedly setting the seat heating to level
3 may result in excessive seat temperatures.
The health of passengers that have limited
temperature sensitivity or a limited ability to
react to excessively high temperatures may
be affected or they may even suffer burn-like
injuries. Therefore, do not use seat heating
level 3repeatedly.
The three red indicator lamps in the button
indicate the heating level you have selected.
i If the battery voltage is too low, the seat
heating may switch off. Driver's and front-passenger seat
Rear-compartment seats
The system automatically switches down
from level
3to level 2after about eight
minutes (driver's seat and front-passenger
seat) or five minutes (rear seats). Seats
89Seats, steering wheel and mirrors Z
Page 93 of 337
The system automatically switches down
from level
2to level 1after approximately ten
minutes.
The system automatically switches off
approximately 20 minutes after it is set to
level 1.
X Make sure that the key is in position 1or
2 in the ignition lock.
X To switch on: press button:repeatedly
until the desired heating level is set.
X To switch off: press button:repeatedly
until all the indicator lamps go out.
Problems with the seat heating The seat heating has switched off prema-
turely or cannot be switched on. The vehicle's
electrical system voltage is too low because
too many electrical consumers are switched
on.
X
Switch off electrical consumers which you
do not need, such as the rear window heat-
ing or interior lighting. Switching the seat ventilation on/off
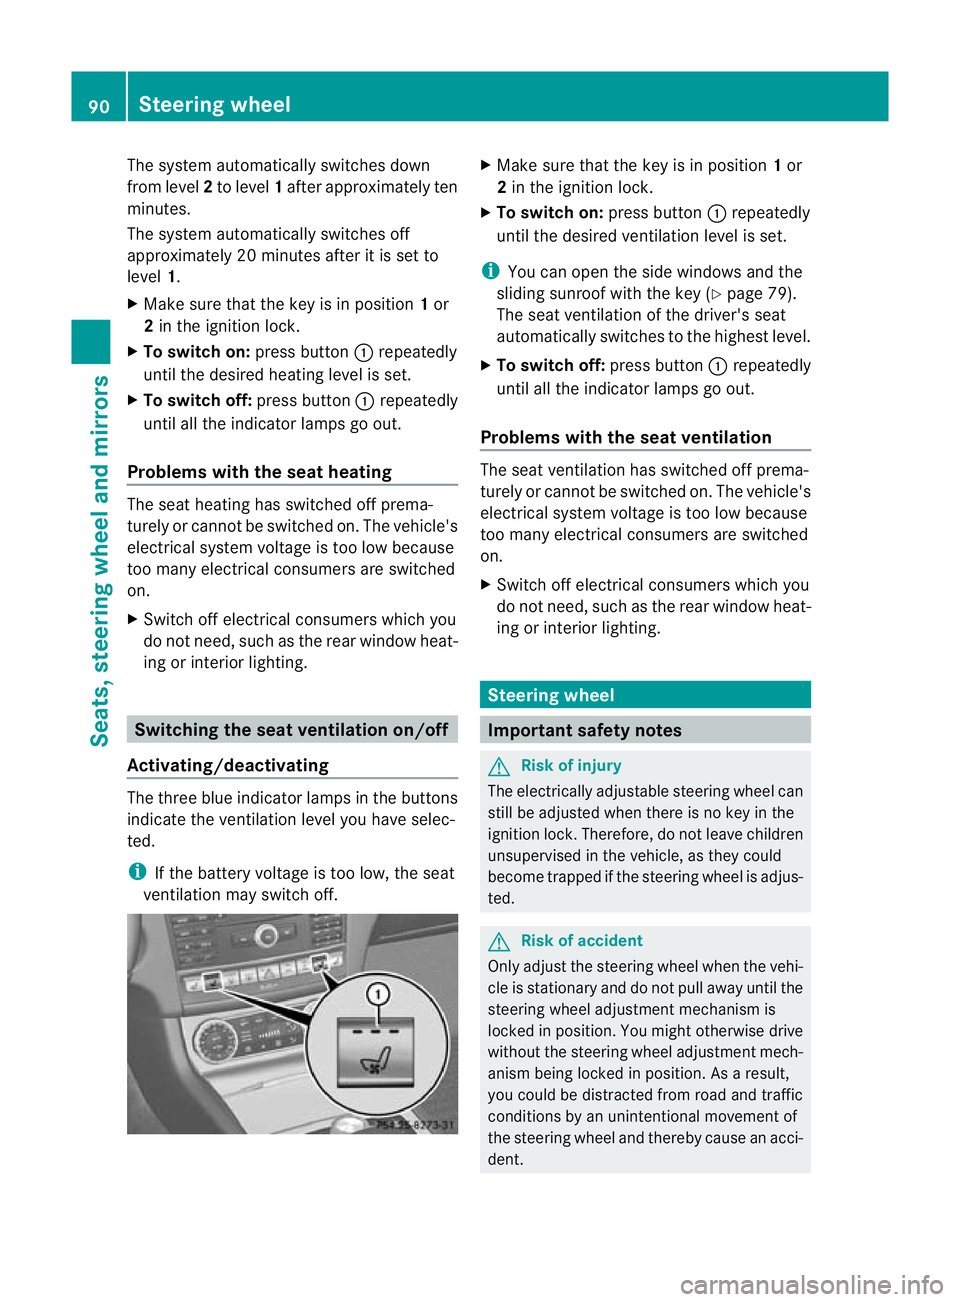
Activating/deactivating The three blue indicator lamps in the buttons
indicate the ventilation level you have selec-
ted.
i
If the battery voltage is too low, the seat
ventilation may switch off. X
Make sure that the key is in position 1or
2 in the ignition lock.
X To switch on: press button:repeatedly
until the desired ventilation level is set.
i You can open the side windows and the
sliding sunroof with the key (Y page 79).
The seat ventilation of the driver's seat
automatically switches to the highest level.
X To switch off: press button:repeatedly
until all the indicator lamps go out.
Problems with the seat ventilation The seat ventilation has switched off prema-
turely or cannot be switched on. The vehicle's
electrical system voltage is too low because
too many electrical consumers are switched
on.
X Switch off electrical consumers which you
do not need, such as the rear window heat-
ing or interior lighting. Steering wheel
Important safety notes
G
Risk of injury
The electrically adjustable steering wheel can
still be adjusted when there is no key in the
ignition lock. Therefore, do not leave children
unsupervised in the vehicle, as they could
become trapped if the steering wheel is adjus-
ted. G
Risk of accident
Only adjust the steering wheel when the vehi-
cle is stationary and do not pull away until the
steering wheel adjustmen tmechanism is
locked in position .You might otherwise drive
without the steering wheel adjustmen tmech-
anism being locked in position .As a result,
you could be distracted from road and traffic
conditions by an unintentional movement of
the steering wheel and thereby cause an acci-
dent. 90
Steering wheelSeats, steering wheel and mirrors
Page 94 of 337

However, the steerability of the vehicle is not
affected. Adjusting the steering wheel man-
ually
:
Release lever
; To adjust the steering wheel height
= To adjust the steering wheel position
(fore-and-aft adjustment)
X Push release lever :dow ncompletely.
The steering column is unlocked.
X Adjust the steering wheel to the desired
position.
X Push release lever :up completely.
The steering column is locked.
X Check if the steering column is locked.
When doing so, try to push the steering
wheel up or down or try to move it in the
fore-and-aft direction. Adjusting the steering wheel electri-
cally
:
To adjust the steering wheel height
; To adjust the steering wheel position
(fore-and-aft adjustment)
i Related topics:
R EASY-ENTRY/EXIT feature
(Y page 92)
R storing settings (Y page 95) Steering wheel heating
Switching on/off X
Make sure that the key is in position 2in
the ignition lock.
X To switch on/off: turn the lever in the
direction of arrow :or;.
Indicator lamp =lights up or goes out.
i The steering wheel heating does not
switch off automatically. Steering wheel
91Seats, steering wheel and mirrors Z
Page 95 of 337
Problems with the steering wheel heat-
ing
If the steering wheel heating indicator lamp
on the lower left lever of the steering column
is flashing, the steering wheel heating has
switched off automatically. The vehicle's
electrical system voltage is too low because
too many electrical consumers are switched
on.
X
Switch off electrical consumers which you
do not need, such as the rear window heat-
ing or interior lighting.
Once the battery is sufficiently charged, the
steering wheel heating will switch back on
automatically. EASY-ENTRY/EXIT system
G
Risk of injury
Make sure that nobody can become trapped
when you activate the EASY-ENTRY/EXIT fea-
ture.
If there is a risk of someone becoming trap-
ped, stop the adjustment procedure. To halt
the procedure:
R move the switch for steering wheel adjust-
ment in the opposite direction to that in
which the steering wheel is moving.
R press one of the memory function position
buttons.
Never leave children unsupervised in the vehi-
cle. They could open the driver's door and
thereby unintentionally activate the EASY-
ENTRY/EXIT feature and become trapped.
The EASY-ENTRY/EXIT feature makes getting
in and out of your vehicle easier.
The steering wheel swings upwards when
you:
R remove the key from the ignition lock
R open the driver's door and KEYLESS-GO is
in position 1
R open the driver's door and the key is in
position 0or 1in the ignition lock i
The steering wheel only moves upwards if
it has not already reached the upper end
stop.
If you insert the key into the ignition lock with
the driver's door closed, the steering wheel is
automatically moved to the previously set
position.
The last position of the steering wheel is
stored after each manual setting or when you
store the setting with the memory function
(Y page 95).
You can activate and deactivate the EASY-
ENTRY/EXIT feature in the on-board com-
puter (Y page 211).
i If the crash-responsive EASY-EXIT feature
is triggered in an accident, the steering col-
umn will move upwards when the driver's
door is opened. This occurs irrespective of
the position of the key in the ignition lock.
This makes it easier to exit the vehicle and
rescue the occupants.
The crash-responsive EASY-EXIT feature is
only operational after an accident if the
EASY-EXIT/ENTRY feature is activated in
the on-board computer. Mirrors
Rear-view mirror
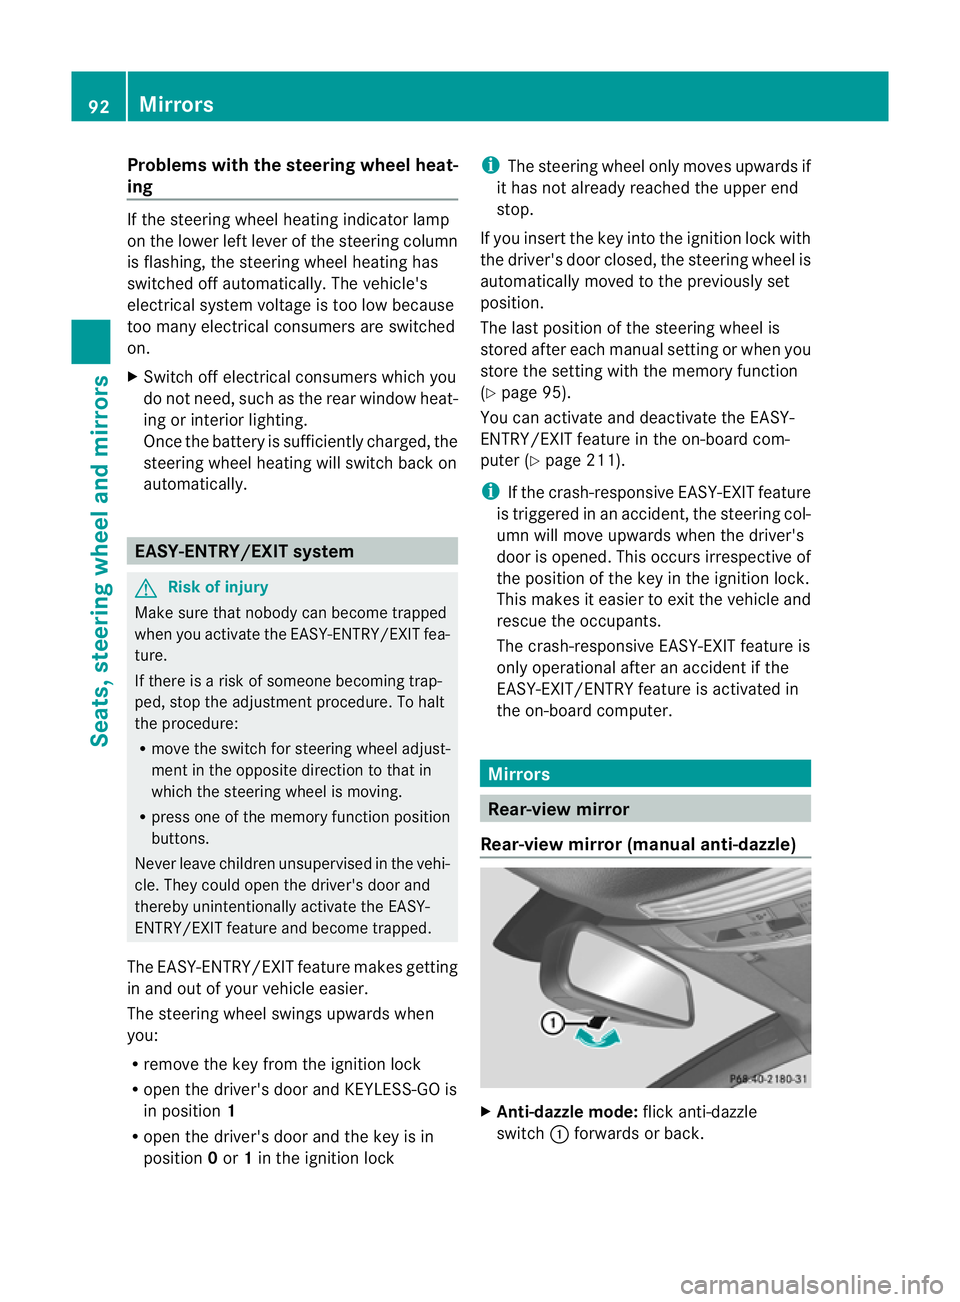
Rear-view mirror (manual anti-dazzle) X
Anti-dazzle mode: flick anti-dazzle
switch :forwards or back. 92
MirrorsSeats, steering wheel and mirrors