air condition MERCEDES-BENZ CLS COUPE 2010 Owners Manual
[x] Cancel search | Manufacturer: MERCEDES-BENZ, Model Year: 2010, Model line: CLS COUPE, Model: MERCEDES-BENZ CLS COUPE 2010Pages: 337, PDF Size: 7.36 MB
Page 7 of 337
1, 2, 3 ...
12 Vsocket ........................................ 258
4ETS see ETS/4ETS A
ABS (Anti-lock Braking System) Display message ............................ 219
Function/notes ................................ 57
Warning lamp ................................. 241
Active Blin dSpot Assist
Activating/deactivating (on-
board computer) ............................ 204
Display message ............................ 229
Function/notes ............................. 186
Active Driving Assistance package .186
Active Lane Keeping Assist Activating/deactivating (on-
board computer) ............................ 205
Display message ............................ 228
Function/informatio n.................... 189
Active multicontour seat ....................88
Active Park Assist Display message ............................ 229
Active Parking Assist
Function/notes ............................. 173
Active Service Syste mPLUS
see ASSYS TPLUS service interval
display
ADAPTIVE BRAKE .................................61
Adaptive brake lamps .........................58
Adaptive Highbeam Assist Activating/deactivating .................100
Adaptive Main-Beam Assist
Display message ............................ 223
Switching on/off (on-board com-
puter) ............................................. 208
Additives
Engine oil ....................................... 321
Airbag
Important safety guidelines .............36
Airbags
Activation ......................................... 35
Front airbag (driver, front
passenger )....................................... 38
Kneebag .......................................... .38Pelvis airbag
.................................... 39
Sidebag ............................................ 38
Windowba g...................................... 39
Airc onditioning
3-zone THERMOTRONIC luxury
automatic air conditioning .............112
Activating/deactivating .................113
Activating/deactivating air-recir-
culation mode ................................ 117
Auxiliary heating/ventilation .......... 119
Controlling automatically ...............114
Cooling with aird ehumidification..114
Demisting the windscreen .............116
Rea rcontrol panel ......................... 113
Setting the aird istribution.............115
Setting the airflow .........................116
Setting the airv ents...................... 124
Setting the temperature ................115
Setting the temperature (rear
compartment) ................................ 115
Switching the residual hea tfunc-
tion on/off ..................................... 118
THERMATIC 2-zone automatic cli-
mate control .................................. 111
Air-conditioning system
see Climate control
Air dehumidification
Activating/deactivating with cool-
ing................................................. 114
Aird istribution
Settin g........................................... 115
Airf ilter (white display message) ....225
Airflow Setting ........................................... 116
AIRF LOW ........................................... 114
AIRMATIC Display message ............................ 226
Function/notes ............................. 167
Suspensio ntunin g......................... 168
Vehicle leve l.................................. 167
Air pressure
see Tyre pressure
Air-recirculation mode
Activating/deactivating .................117
Airv ents ............................................ .124
Glove compartment .......................124
Important safety information .........123
Rea r............................................... 1244
Index
Page 13 of 337
Flat tyre
Changing a wheel/fitting the
spar ewheel ................................... 284
MOExtended tyres (tyre swith run-
flat characteristics) ........................289
Preparing the vehicle .....................281
Raising the vehicle .........................285
TIREFIT kit ...................................... 281
Floormat ............................................ .264
Frequencies Garage door opene r....................... 264
Mobile phone ................................. 317
Two-way radio ................................ 317
Fuel
Notes ............................................. 319
Notes about consumption .............320
Refuelling ...................................... .142
Tank content/reserve fuel .............319
Troubleshooting ............................. 146
Fuel consumption
Current (on-board computer) .........198
see Technical data
Fuel filler flap
Emergency release ........................145
Opening/closing ............................ 144
Fuel filte r(white display message) .225
Fuel level Calling up the range (on-board
computer) ...................................... 198
Gauge .............................................. 26
Fuel tank
Capacity ........................................ 319
Fuse allocation chart (vehicle tool
kit) ...................................................... 279
Fuses Fuse box in the boot ......................299
Fuse box in the engine compart-
ment .............................................. 299
Notes ............................................. 298G
Garage door opener Clearing the memory .....................263
Frequencies ................................... 264
Notes ............................................. 261Opening/closing the garage door
..262
Programming (button in the rear-
view mirror) ................................... 261
Gear indicator (on-board com-
puter) ................................................. .212
Genuine Mercedes-Benz parts .........316
Genuine wood trim and trim strips
(cleaning instructions) ......................275
Glove compartment ..........................248 H
Hazard warning lamps ......................101
Headlamp cleaning system ..............102
Headlamp flasher .............................. 101
Headlamps Misting up ...................................... 103
Head restraints
Adjusting (electrically). ....................86
Adjusting (manually )........................ 86
Adjusting (rear) ................................ 87
Fitting/removing (rear) ....................87
Luxury .............................................. 87
see NECK-PRO head restraints/
NECK-PRO luxury head restraints
Heating
see Air conditioning
High-pressure cleaners ....................272
Hill start assist .................................. 131
HOLD function Display message ............................ 227
Function/notes ............................. 165 I
Immobiliser .......................................... 63
Indicator and warning lamps ABS ................................................ 241
Brakes ........................................... 238
Coolant .......................................... 244
Distance warning signa l................. 246
DISTRONI CPLUS ........................... 246
Engine diagnostics .........................244
ESP ®
.............................................. 242
ESP ®
OFF ....................................... 243
Fuel tank ........................................ 244
Overview .......................................... 28
Reserve fuel ................................... 24410
Index
Page 43 of 337
the vehicle occupants on the side of the vehi-
cle on which the impact occurs.
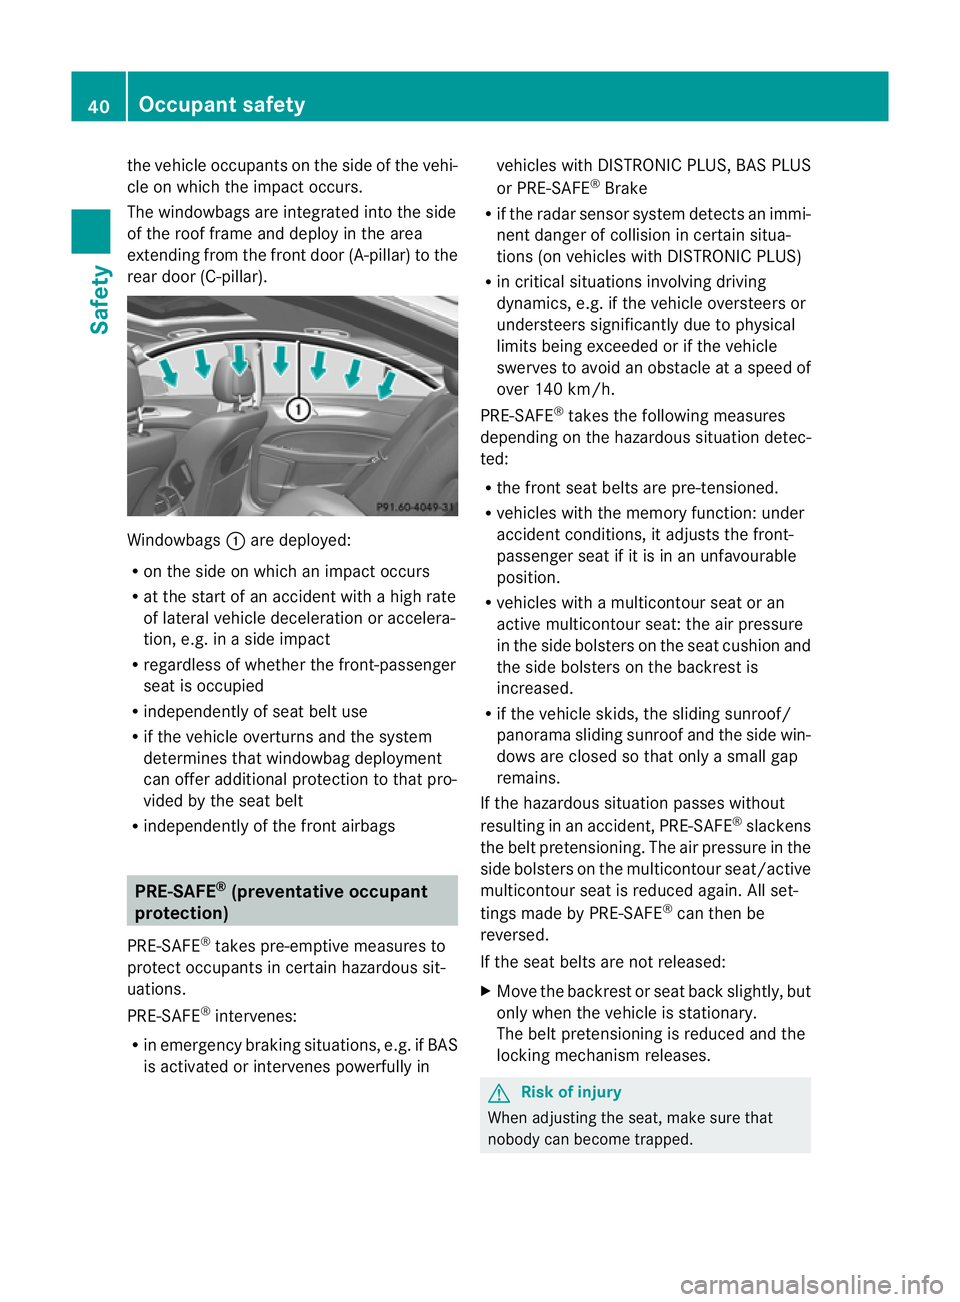
The windowbags are integrated into the side
of the roo
fframe and deploy in the area
extending from the front door (A-pillar) to the
rear door (C-pillar). Windowbags
:are deployed:
R on the side on which an impact occurs
R at the start of an accident with a high rate
of lateral vehicle deceleratio noraccelera-
tion, e.g. in a side impact
R regardless of whethe rthe front-passenger
seat is occupied
R independently of seat belt use
R if the vehicle overturns and the system
determines that windowbag deployment
can offer additional protection to that pro-
vided by the seat belt
R independently of the front airbags PRE-SAFE
®
(preventative occupant
protection)
PRE-SAFE ®
takes pre-emptive measures to
protect occupants in certain hazardous sit-
uations.
PRE-SAFE ®
intervenes:
R in emergency braking situations, e.g. if BAS
is activated or intervenes powerfully in vehicles with DISTRONIC PLUS, BAS PLUS
or PRE-SAFE ®
Brake
R if the radar sensor system detects an immi-
nent danger of collision in certain situa-
tions (on vehicles with DISTRONIC PLUS)
R in critical situations involving driving
dynamics, e.g. if the vehicle oversteers or
understeers significantly due to physical
limits being exceeded or if the vehicle
swerves to avoid an obstacle at a speed of
over 140 km/h.
PRE-SAFE ®
takes the following measures
depending on the hazardous situation detec-
ted:
R the front seat belts are pre-tensioned.
R vehicles with the memory function: under
accident conditions, it adjusts the front-
passenger seat if it is in an unfavourable
position.
R vehicles with a multicontour seat or an
active multicontour seat: the air pressure
in the side bolsters on the seat cushion and
the side bolsters on the backrest is
increased.
R if the vehicle skids, the sliding sunroof/
panorama sliding sunroof and the side win-
dows are closed so that only a small gap
remains.
If the hazardous situation passes without
resulting in an accident, PRE-SAFE ®
slackens
the belt pretensioning. The air pressure in the
side bolsters on the multicontour seat/active
multicontour seat is reduced again. All set-
tings made by PRE-SAFE ®
can then be
reversed.
If the seat belts are not released:
X Move the backrest or seat back slightly, but
only when the vehicle is stationary.
The belt pretensioning is reduced and the
locking mechanism releases. G
Risk of injury
When adjusting the seat, make sure that
nobody can become trapped. 40
Occupant safetySafety
Page 65 of 337
This function will issue a warning at speeds of
around 30 km/h or more if:
R
for a period of several seconds, the dis-
tance to the vehicle in fronti s too short for
the speed at which you are travelling. The
· distance warning lamp in the instru-
ment cluster will light up.
R you are rapidly approaching the vehicle in
front. An intermittent warning tone will
then sound and the ·distance warning
lamp will light up in the instrument cluster.
Due to the nature of the system, particularly
complicated driving conditions may cause the
system to display an unnecessary warning. G
Risk of accident
Pay particular attention to the traffic condi-
tions if the ·distance warning lamp in the
instrument cluster lights up or an intermittent
warning tone sounds. If necessary, brake or
manoeuvre to avoid an obstacle.
If the driver and passengers have fastened
their seat belts, PRE-SAFE ®
Brake can also
can also perform the following at speeds of
above approximately 30 km/h:
R brake the vehicle automatically from a
speed of up to approximately 200 km/h
R trigger preventative passenger protection
measures (PRE-SAFE ®
) G
Risk of accident
PRE-SAFE ®
Brake is only an aid to assist you
when driving. You are responsible for main-
taining a safe distance from other vehicles,
the vehicle's speed and for braking in good
time. Always pay attention to the traffic con-
ditions. Otherwise, you may recognise dan-
gers too late, cause an accident and injure
yourselfa nd others.
With the help of the rada rsensor system,
PRE-SAFE ®
Brake can detect obstacles that
are in front of your vehicle for an extended
period of time. If you approach an obstacle
and PRE-SAFE ®
Brake detects a risk of a col-
lision, the system will initially alert you both visually and acoustically. If you do not brake
or steer, the vehicle will at first automatically
brake slightly. In the event of an increased
risk of a collision, PRE-SAFE
®
is activated
(Y page 40). If the risk of collision remains
and you do not brake, take evasive action or
accelerate significantly, the vehicle may per-
form automatic emergency braking. G
Risk of accident
Only clearly detected obstacles will trigger a
warning and initiate braking assistance by
PRE-SAFE ®
Brake.
In particular, the detection of obstacles can
be impaired if there is:
R dirt on the sensors or the sensors are cov-
ered
R snow or heavy rain
R interference by other radar sources
R the possibility of strong radar reflections,
for example in multi-storey car parks
PRE-SAFE ®
Brake does not react to persons,
animals, oncoming vehicles, crossing traffic
or when cornering.
PRE-SAFE ®
Brake may not detect narrow
vehicles such as motorcycles and vehicles
driving on a different line. G
Risk of accident
Depending on the current speed, PRE-SAFE ®
Brake decelerates your vehicle by up to
4 m/s 2
before performing possible emer-
gency braking. This is equivalent to approx-
imately 40 % of the maximum braking power
of the vehicle. You must additionally apply the
brakes yourself in order to preven tacollision
or minimis ean impact. Automatic emergency
braking is not performed until immediately
prior to an accident in the event that you are
unable to avoid one by, for instance, taking
evasive action.
In order to maintain the appropriate distance
to the vehicle in front and thus prevent a col-
lision, you must apply the brakes yourself. 62
Driving safety systemsSafety
Page 87 of 337
Vehicle equipment
i This manual describes all the standard
and optional equipment of your vehicle
available at the time of publicatio nofthe
Owner's Manual. Country-specific differen-
ces are possible. Please note that your
vehicle may not be equipped with all fea-
tures described. This also applies to safety-
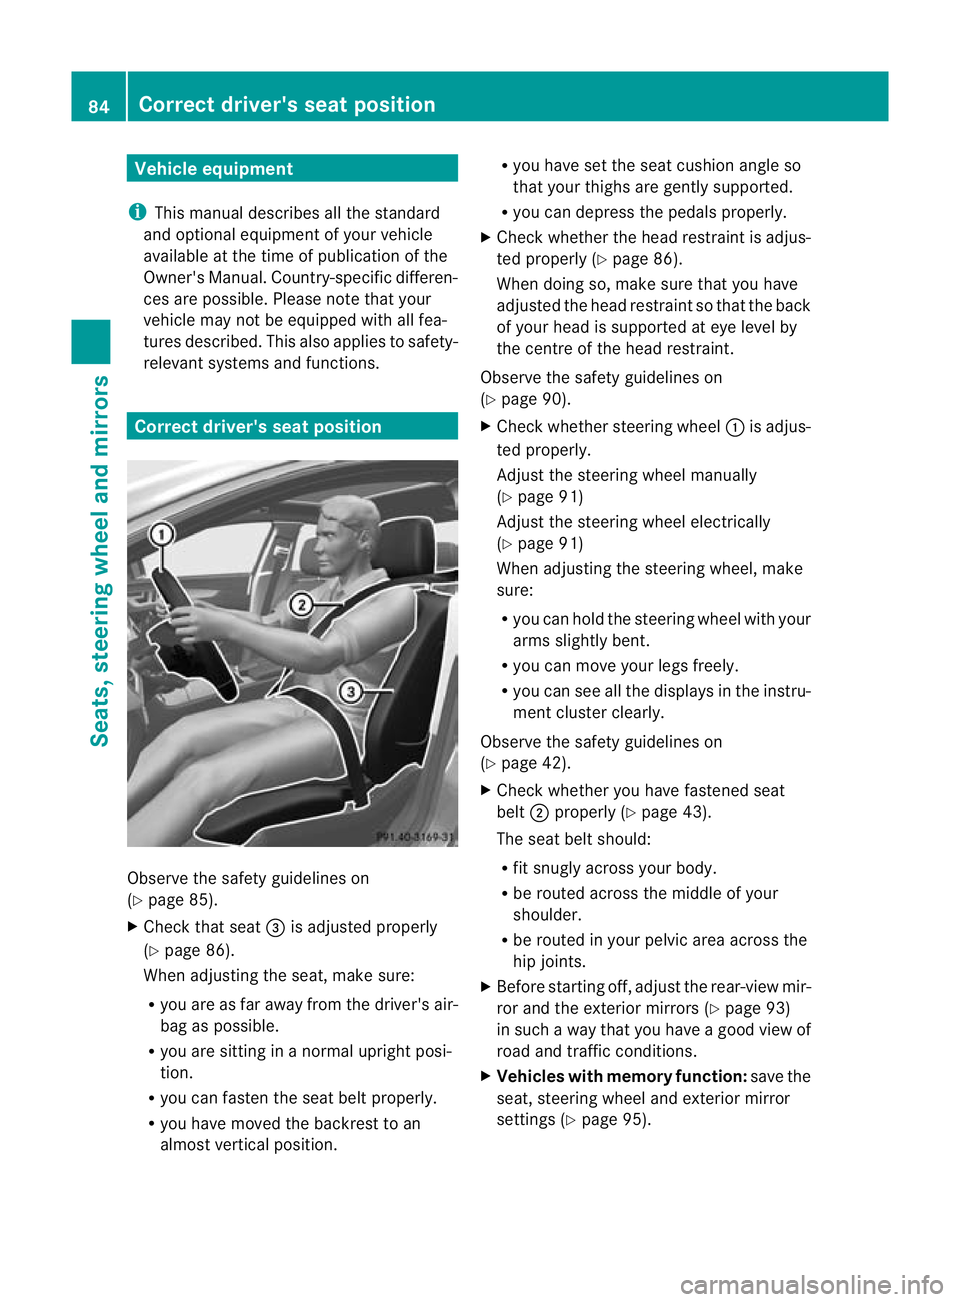
relevant systems and functions. Correct driver's seat position
Observe the safety guidelines on
(Y
page 85).
X Check that seat =is adjusted properly
(Y page 86).
When adjusting the seat, make sure:
R you are as far away from the driver's air-
bag as possible.
R you are sitting in a normal upright posi-
tion.
R you can fasten the seat belt properly.
R you have moved the backrest to an
almost vertical position. R
you have set the seat cushion angle so
that your thighs are gently supported.
R you can depress the pedals properly.
X Check whether the head restraint is adjus-
ted properly (Y page 86).
When doing so, make sure that you have
adjusted the head restraint so that the back
of your head is supported at eye level by
the centre of the head restraint.
Observe the safety guidelines on
(Y page 90).
X Check whether steering wheel :is adjus-
ted properly.
Adjust the steering wheel manually
(Y page 91)
Adjust the steering wheel electrically
(Y page 91)
When adjusting the steering wheel, make
sure:
R you can hold the steering wheel with your
arms slightly bent.
R you can move your legs freely.
R you can see all the displays in the instru-
ment cluster clearly.
Observe the safety guidelines on
(Y page 42).
X Check whether you have fastened seat
belt ;properly (Y page 43).
The seat belt should:
R fit snugly across your body.
R be routed across the middle of your
shoulder.
R be routed in your pelvic area across the
hip joints.
X Before starting off, adjust the rear-view mir-
ror and the exterior mirrors (Y page 93)
in such a way that you have a good view of
road and traffic conditions.
X Vehicles with memory function: save the
seat, steering wheel and exterior mirror
settings (Y page 95). 84
Correct driver's seat positionSeats, steering wheel and mirrors
Page 88 of 337
Seats
Important safety notes
G
Risk of injury
The seats can still be adjusted when there is
no key in the ignition lock. For this reason,
children should never be left unsupervised in
the vehicle. They could adjust the seats and
become trapped. G
Risk of accident
Only adjust the driver's seat when the vehicle
is stationary. You will otherwise be distracted
from the road and traffic conditions and you
could lose control of the vehicle as a result of
the seat moving. This could cause an acci-
dent. G
Risk of injury
Make sure that nobody can become trapped
when adjusting the seats.
Observe the notes on airbags.
Secure children as recommended; see the
"Children in the vehicle" section. G
Risk of injury
Make sure that the back of your head is sup-
ported at eye level by the central area of the
head restraint .Ifyour head is not supported
correctly by the head restraint, you could suf-
fer a severe neck injury in the event of an
accident .Never drive if the head restraints are
not engaged and set correctly. G
Risk of injury
Occupants should only travel sitting on seats
which have the head restraints fitted. On a
seat which is occupied, move the head
restraint into the upright position .This
reduces the risk of injury to the passenger in
the event of an accident. !
To avoid damage to the seats and the seat
heating, observe the following information:
R do not spill any liquids on the seats. If
liquid is spilled on the seats, dry them as
soon as possible.
R if the seat covers are damp or wet, do not
switch on the seat heating. The seat
heating should also not to be used to dry
the seats.
R clean the seat covers as recommended;
see the "Interior care" section.
R do not transport heavy loads on the
seats. Do not place sharp objects on the
seat cushions, e.g. knives, nails or tools.
The seats should only be occupied by
passengers, if possible.
R when the seat heating is in operation, do
not cover the seats with insulating mate-
rials, e.g. blankets, coats, bags, seat cov-
ers, child seats or booster seats.
! When you move the seats, make sure that
there are no objects in the footwell or
behind the seats. Otherwise, you could
damage the seats and the objects.
i The head restraints in the front seats are
fitted with the NECK-PRO system
(Y page 41). For this reason, it is not pos-
sible to remove the head restraints from
the front seats.
Please contact a Mercedes-Benz Service
Centre for more information.
i Related topics:
R Through-loading feature, rear bench seat Seats
85Seats, steering wheel and mirrors Z
Page 103 of 337
=
Headlamp flasher
? Turn signal, left
X To indicate briefly: press the combination
switch briefly to the pressure point in the
directio nofarrow;or?.
The corresponding turn signal flashes three
times.
X To indicate: press the combination switch
beyond the pressure point in the direction
of arrow ;or?.
Main-beam headlamps X
To switch on the main-beam head-
lamps: turn the key in the ignition lock to
position 2or start the engine.
X Turn the light switch to Lorc.
X Press the combination switch beyond the
pressure point in the direction of
arrow :.
In the cposition, the main-beam head-
lamps are only switched on when it is dark
and the engine is running.
The K indicator lamp in the instrument
cluster lights up when the main-beam head-
lamps are switched on.
X To switch off the main-beam head-
lamps: move the combination switch back
to its normal position.
The K indicator lamp in the instrument
cluster goes out.
Adaptive Highbeam Assist G
Risk of accident
Adaptive Highbeam Assist is only an aid
designed to assist driving. The drive ris
responsible for adjusting the vehicle's lighting
to the prevailing light, visio nand traffic con-
ditions. The system may be impaired or deactivated:
R if there is poor visibility, e.g .due to snow,
rain, fog or spray
R if the area of the windscree naround the
optical sensor is dirty, misted up or covered
up, e.g. by a sticker
The system may not recognise the following
road users:
R road users that have no lighting, e.g. pedes-
trians
R road users that have poor lighting, e.g.
cyclists
R road users whose lighting is not clearly visi-
ble, e.g. road users behind a crash barrier
R on rare occasions: road users that have
lights that may be recognised too late or not
at all
The automatic main-bea mheadlamps will not
be deactivated, or they may be activated
despite road users travelling in fron tofor
approaching the vehicle.
Thus, you could cause an acciden tand injure
yoursel fand others. Alway sobserve traffic
conditions and, if necessary, dip the lights
manually.
You can use this function to set the head-
lamps to change between dipped beam and
main beam automatically. The system recog-
nises vehicles with their lights on, either
approaching from the opposite direction or
travelling in fron tofyour vehicle, and conse-
quently switches the headlamps from main
beam to dipped beam.
The system automatically adapts the dipped-
beam headlamp range depending on the dis-
tance to the other vehicle. Once the system
no longer detects any other vehicles, it reac-
tivates the main-beam headlamps.
The system's optical sensor is located behind
the windscreen near the overhead control
panel. 100
Exterior lightingLights and windscreen wipers
Page 113 of 337
Vehicle equipment
i This manual describes all the standard
and optional equipment of your vehicle
available at the time of publicatio nofthe
Owner's Manual. Country-specific differen-
ces are possible. Please note that your
vehicle may not be equipped with all fea-
tures described. This also applies to safety-
relevant systems and functions. Overview of climate control systems
Important safety notes
G
Risk of accident
Observe the settings recommended on the
following pages. Otherwise, the windows
could mist up. This may obstruct your view of
the traffic situation and, as a result, you may
cause an accident.
THERMATIC 2-zone automatic climate con-
trol/THERMOTRONIC luxury 3-zone auto-
matic climate control controls the tempera-
ture and the humidity of the vehicle interior
and filters out undesirable substances from
the air.
THERMATIC 2-zone automatic climate con-
trol/THERMOTRONIC luxury 3-zone auto-
matic climate control is only operational
when the engine is running 24
.O ptimum oper-
ation is only achieved if you drive with the side
windows and sliding sunroof/panorama slid-
ing sunroof closed.
i Ventilate the vehicle for a brief period
during warm weather, e.g. using the con-
venience opening feature (Y page 79). This
will speed up the cooling process and the
desired vehicle interior temperature will be
reached more quickly.
i The integrated filter can filter out most
particles of dust and completely filters out
pollen. Aclogged filter reduces the amount of air supplied to the vehicle interior
.For
this reason, you should always observe the
interval for replacing the filter, which is
specified in the Service Booklet .As it
depends on environmental conditions, e.g.
heavy air pollution, the interval may be
shorter than stated in the Service Booklet.
24 THERMOTRONIC luxury 3-zone automatic climate control: the residual heat function can only be switched
on/off if the ignition is switched off. 110
Overview of climate control systemsClimate control
Page 117 of 337
Activating/deactivating
X
Turn the key to position 2in the ignition
lock.
X To activate: press theÃbutton.
The indicator lamp in the Ãbuttonlights
up. Airflow and air distribution are set to
automatic mode.
or
X Press the ^button.
The indicator lamp in the ^button goes
out. The previously selected settings come
into effect again.
X To deactivate: press the^button.
The indicator lamp in the ^button lights
up. Switching cooling with air dehumidi-
fication on/off
Important information The cooling with air dehumidification function
is only available when the engine is running.
The air inside the vehicle is cooled and dehu-
midified according to the temperature selec-
ted.
G
Risk of accident
If the "cooling with air dehumidification" func-
tion is deactivated, the air inside the vehicle
will not be cooled (during warm weather) or
dehumidified. The windows could mist up
more quickly. This may prevent you from
observing the traffic conditions, thereby caus-
ing an accident.
Condensatio nmay drip from the underside of
the vehicle when THERMOTRONIC is in cool-
ing mode. This is normal and no tasign that
there is a malfunction.
i The cooling with air dehumidification
function uses refrigerant R134a. This cool-
ant does not contain chlorofluorocarbons,
and therefore does not damage the ozone
layer. Activating/deactivating X
To switch on: press the¿button.
The indicator lamp in the ¿button lights
up.
X To deactivate: press the¿button.
The indicator lamp in the ¿button goes
out. The cooling with air dehumidification
function has a delayed switch-off feature.
Problems with the cooling with air
dehumidification function When you press the
¿button, the indica-
tor lamp in the button flashes three times or
remains off. You can no longer switch on the
cooling with air dehumidification function.
X Consult a qualified specialist workshop. Setting climate control to automatic
In automatic mode, the set temperature is
maintained automatically at a constant level.
The system automatically regulates the tem-
perature of the dispensed air, the airflow and
the air distribution.
Automatic mode will achieve optimal opera-
tion if cooling with air dehumidification is also
activated. If desired, cooling with air dehu-
midification can be deactivated. Adjusts the climate control settings
This function is only available with
THERMOTRONIC luxury 3-zone automatic cli-
mate control.
The climate mode setting is especially effec-
tive at high temperatures.
You can select the following climate mode
settings in automatic mode:
FOCUS High airflow; slightly cooler setting
MEDIUM Mediuma irflow; standard setting
DIFFUSE Low airflow; slightly warmer air with less of a draught 114
Operating the climate control systemClimate control
Page 120 of 337
X
Press the Ãbutton.
The indicator lamp in the ¬button goes
out. Airflow and air distribution are set to
automatic mode.
or
X Turn controls :orB clockwise or anti-
clockwise (Y page 111), (Y page 112).
or
X Press the KorI button. Demisting the windows
Windows misted up on the inside X
Activate the ¿cooling with air dehu-
midification function.
X Activate automatic mode Ã.
X If the windows continue to mist up, activate
the demisting function (Y page 116).
i You should only select this setting until
the windscreen is clear again.
Windows misted up on the outside X
Activate the windscreen wipers.
X Press the _button repeatedly until the
P orO symbol appears in the dis-
play.
i You should only select this setting until
the windscreen is clear again. Rear window heating
Activating/deactivating G
Risk of accident
Clear all windows of ice or snow before setting
off. Otherwise, impaired visibility could
endanger you and others.
The rear window heating has ahigh current
draw. You should therefore switch it off as
soon as the window is clear, as it only
switches off automatically after several
minutes. If the battery voltage is too low, the rear win-
dow heating may switch off.
X Turn the key to position 2in the ignition
lock.
X Press the ¤button.
The indicator lamp in the ¤button lights
up or goes out.
Problems with the rea rwindow heating The rear window heating has switched off
prematurely or cannot be activated.
X
Switch off any consumers that are not
required, e.g. reading lamps or interior
lighting.
When the battery is sufficiently charged,
the rear window heating is activated again
automatically. Activating/deactivating air-recircula-
tion mode
You can deactivate the flow of fresh air if
unpleasan todours are entering the vehicle
from outside. The air already inside the vehi-
cle will then be recirculated.
The operation of the air-recirculation mode is
the same for all contro lpanels. G
Ris
kofa ccident
Only switch ove rto air-recirculation mode
briefly at low outside temperatures. Other-
wise, the windows could mist up, thus impair-
ing visibility and endangering yourself and
others. This may prevent you from observing
the traffic conditions, thereby causing an
accident.
X Turn the key to position 2in the ignition
lock.
X To switch on: press thegbutton.
The indicator lamp in the gbutton lights
up. Operating the climate control system
117Climate control Z