stop start MERCEDES-BENZ CLS COUPE 2010 Owners Manual
[x] Cancel search | Manufacturer: MERCEDES-BENZ, Model Year: 2010, Model line: CLS COUPE, Model: MERCEDES-BENZ CLS COUPE 2010Pages: 337, PDF Size: 7.36 MB
Page 8 of 337
Setting the centre air vents
...........124
Setting the side air vents ...............124
Alarm system
see ATA
Alertness Assistant
see ATTENTION ASSIST
Ambient lighting
Setting the brightness (on-board
computer) ...................................... 208
Setting the colou r(on-board com-
puter) ............................................ .208
AMGMenu (on-board computer) ....... 212
AMG RIDE CONTROL sports sus-
pension (CLS 63 AMG) ......................169
Anti-glare film .................................... 264
Anti-lock Brake System see ABS
Anti-Theft Alarm system
see ATA
Anti-theft system
ATA (Anti-Theft Alarm system) .........63
Immobiliser ...................................... 63
Interior motion sensor .....................64
Tow-away protection ........................ 64
Aquaplaning ....................................... 151
Ashtray ............................................... 257
Assistance menu (on-board com-
puter) ................................................. .203
ASSYST PLUS see ASSYST PLUS service interval
display
ASSYST PLUS service interval dis-
play ..................................................... 269
Displaying a service message (on-
board computer) ............................ 270
ATA (Anti-Theft Alarm system)
Activating/deactivating ...................63
Function .......................................... .63
Switching off the alarm ....................63
ATTENTIO NASSIST
Activating/deactivating (on-
board computer) ............................ 204
Display message ............................ 226
Function/notes ............................. 177
Audio menu (on-board computer) ....200
Automatic car wash ..........................271Automatic engine start
With ECO start/stop function ........133
Automatic engine switch-off
With ECO start/stop function ........132
Automatic transmission
DIRECT SELECT leve r..................... 136
Display message ............................ 234
Driving tips .................................... 138
Emergency running mode ..............142
Kickdow n....................................... 138
Malfunction ................................... .142
Progra mselecto rbutton ................ 138
Pulling away ................................... 131
Selector leve r................................ 136
Starting .......................................... 130
Auxiliary heating ............................... 119
Adjusting (on-board computer) ......210
Display message ............................ 236
Important safety information .........119
Auxiliary heating/ventilation ...........120
Display message ............................ 123
Remote control .............................. 120
Auxiliary ventilation ..........................119 B
Bag hook ............................................ 252
BAS (Brake Assist System) .................57
BAS PLUS (Brake Assist System
Plus) ...................................................... 57
Battery Changing (auxiliary heating
remote control) .............................. 121
Changing (key )................................. 71
Charging ........................................ 292
Checking (key )................................. 70
Disconnecting ................................ 292
Display message ............................ 225
Important safety guidelines (key )..... 70
Installatio nlocation ....................... 291
Jump-starting ................................. 294
Reconnecting ................................. 293
Removing/fitting ........................... 292
Safety notes .................................. 290
Belt
see Seat belt Index
5
Page 12 of 337
EBD (Electronic Brake-force Distri-
bution) Display message ............................ 220
Function/notes ................................ 61
ECO start/stop function
General information .......................131
Switching on/off (AMG vehicles) ...133
Switching on/off (except AMG
vehicles) ........................................ 133
Electrical fuses
see Fuses
Electronic Brake-force Distribution
see EBD
Electronic Stability Program
see ESP ®
Electronic Traction System see ETS/4ETS
Emergency key element
Function/notes ................................ 69
Emergency locking
Vehicle ............................................. 75
Emergency release
Fuel filler fla p................................. 145
Emergency running mode
Automatic transmission .................142
Emergency spare wheel
Inflating the collapsible spare
wheel ............................................. 288
Notes/data .................................... 313
Storage location ............................ 280
Stowing .......................................... 280
Emergency unlocking
Boot ................................................. 77
Vehicle ............................................. 75
Engine
Running irregularl y......................... 134
Starting problems ..........................134
Starting the engine with the key ....130
Starting with KEYLESS GO .............130
Stopping ........................................ 148
Warning lamp (engine diagnos-
tics) ............................................... 244
Engine electronics .............................316
Malfunction ................................... .134
Engine number .................................. 319Engine oil
Additives ........................................ 321
Checking the oil level ..................... 267
Display message ............................ 225
Filling capacity ............................... 321
Notes about oil grades ................... 320
Temperature (on-board computer) .212
Topping up ..................................... 268
Viscosity ........................................ 321
Environmental protection
Note ................................................ .19
Returning an end-of-life vehicle .......19
Error messages
see Display messages
ESP ®
(Electronic Stability Pro-
gram) Activating/deactivating (AMG
vehicles) .......................................... 60
Activating/deactivating (except
AMG vehicles) .................................. 59
Activating/deactivating (on-
board computer) ............................ 204
ETS/4ETS ........................................ 59
Important safety guidelines .............58
Warning lamp ................................. 242
ETS/4ETS (Electronic Traction Sys-
tem) ...................................................... 59
Exhaus ttail pipe (cleaning instruc-
tions) .................................................. 274
Exterior mirrors Adjusting ......................................... 93
Anti-dazzle mode (automatic) ..........94
Folding in/ou t(automatically) .........93
Folding in/ou t(electrically) .............93
Folding in whe nlocking (on-board
computer) ...................................... 211
Out of position ................................. 94
Parking position ............................... 94
Resetting ......................................... 93
Storing settings (memory func-
tion) ................................................. 95 F
Fatigue Assist see ATTENTION ASSIST
Fire extinguisher ............................... 278
First-aid kit ......................................... 278 Index
9
Page 27 of 337
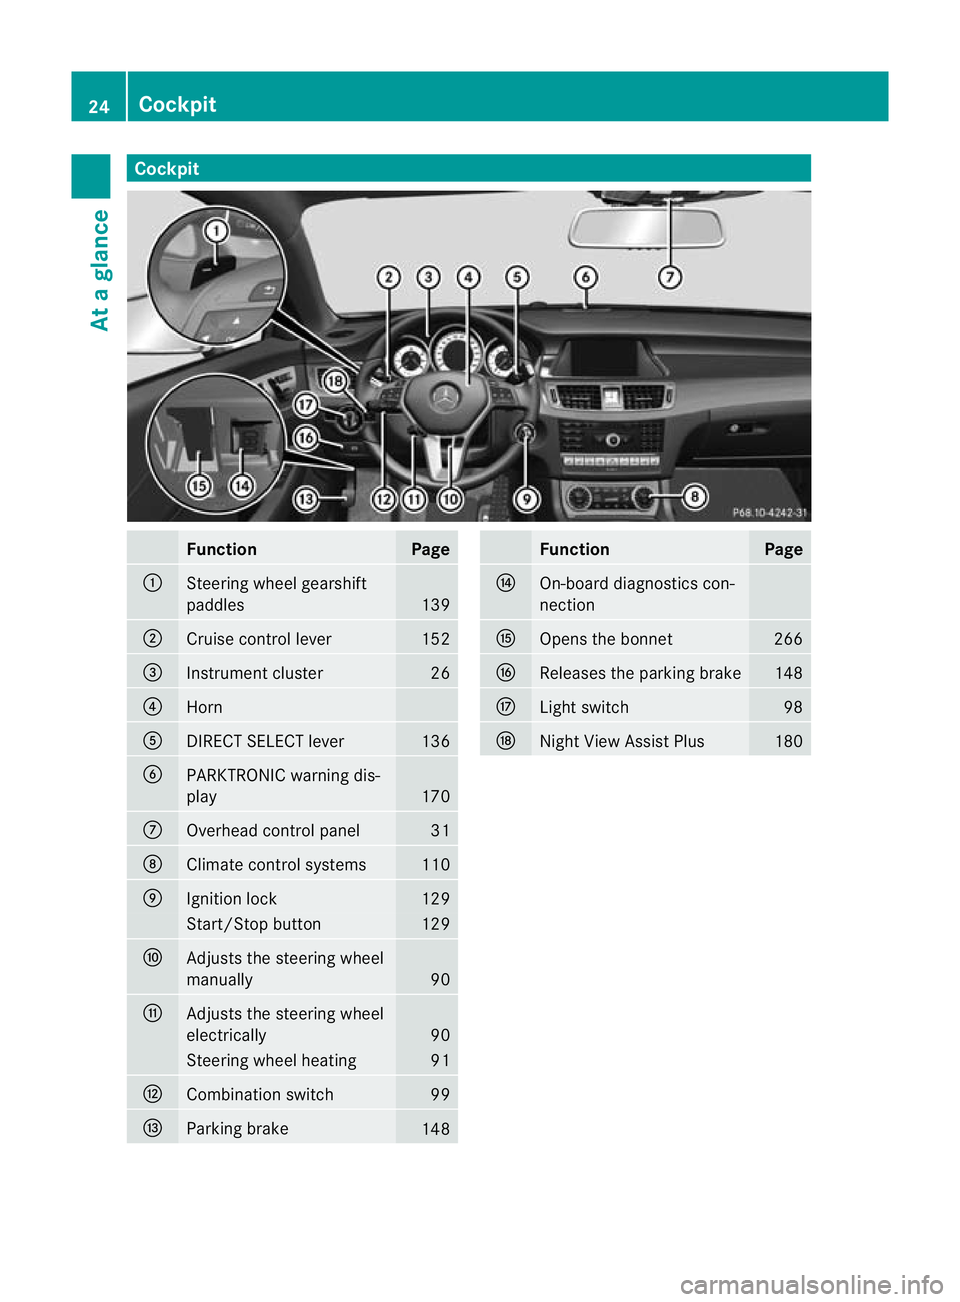
Cockpit
Function Page
:
Steering wheel gearshift
paddles
139
;
Cruise control lever 152
=
Instrument cluster 26
?
Horn
A
DIRECT SELECT lever 136
B
PARKTRONIC warning dis-
play
170
C
Overhead control panel 31
D
Climate control systems 110
E
Ignition lock 129
Start/Stop button 129
F
Adjusts the steering wheel
manually
90
G
Adjusts the steering wheel
electrically
90
Steering wheel heating 91
H
Combination switch 99
I
Parking brake
148 Function Page
J
On-board diagnostics con-
nection K
Opens the bonnet 266
L
Releases the parking brake 148
M
Ligh
tswitch 98
N
Night View Assist Plus 18024
CockpitAt a glance
Page 28 of 337
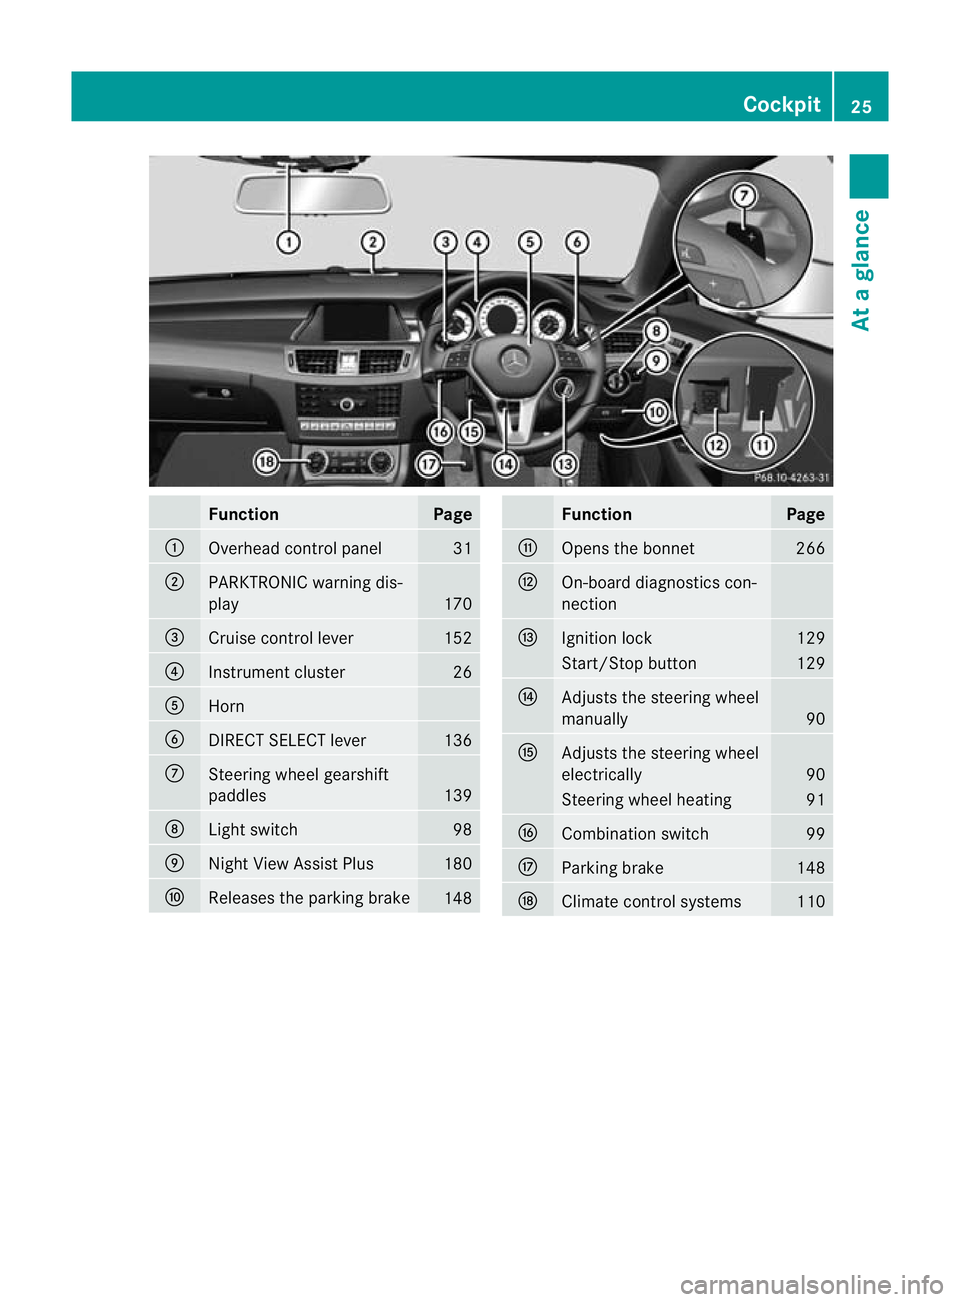
Function Page
:
Overhead control panel 31
;
PARKTRONIC warning dis-
play
170
=
Cruise control lever 152
?
Instrument cluster 26
A
Horn
B
DIRECT SELECT lever 136
C
Steering wheel gearshift
paddles
139
D
Ligh
tswitch 98
E
Nigh
tView Assist Plus 180
F
Releases the parking brake
148 Function Page
G
Opens the bonnet 266
H
On-board diagnostics con-
nection
I
Ignition lock 129
Start/Stop button 129
J
Adjusts the steering wheel
manually
90
K
Adjusts the steering wheel
electrically
90
Steering wheel heating 91
L
Combination switch 99
M
Parking brake 148
N
Climate control systems 110Cockpit
25At a glance
Page 33 of 337
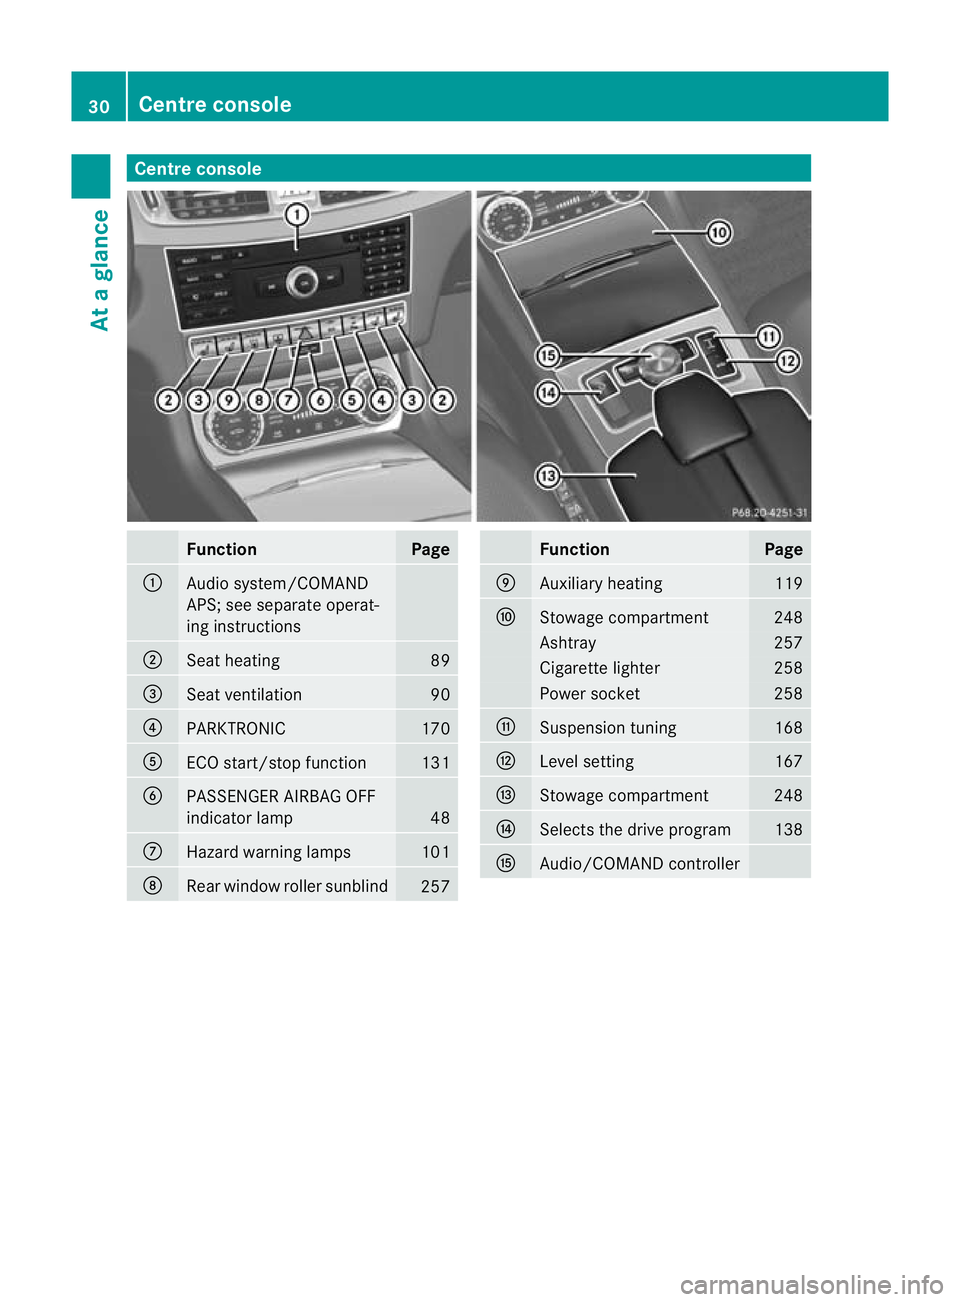
Centre console
Function Page
:
Audio system/COMAND
APS; see separate operat-
ing instructions
;
Seat heating 89
=
Seat ventilation 90
?
PARKTRONIC 170
A
ECO start/stop function 131
B
PASSENGER AIRBAG OFF
indicator lamp
48
C
Hazard warning lamps 101
D
Rear window roller sunblind
257 Function Page
E
Auxiliary heating 119
F
Stowage compartment 248
Ashtray 257
Cigarette lighter 258
Power socket 258
G
Suspension tuning 168
H
Level setting 167
I
Stowage compartment 248
J
Selects the drive program 138
K
Audio/COMAND controller30
Centre consoleAt a glance
Page 66 of 337
At speeds up to approximately 70 km/h,
PRE-SAFE ®
Brake may also detect stationary
obstacles, for example stoppe dorparked
vehicles. G
Ris
kofa ccident
If, in a critical driving situation, you do not
receive a visual and acoustic warning:
R PRE-SAFE ®
Brake did no tdetec tthe risk of
a collision
R PRE-SAFE ®
Brake is switched off
R PRE-SAFE ®
Brake has failed
You must then brake to avoid a collision.
X To activate/deactivate: activate or deac-
tivate PRE-SAFE ®
Brake in the on-board
computer (Y page 204).
After activation, the Äsymbol is dis-
played on the left in the instrumentc luster.
The radar sensor system is switched off auto-
matically in the vicinity of radio telescope
facilities ( Ypage 327).
Vehicles without COMAND and navigation,
and vehicles for Australia: near radio tele-
scope installations, the radar sensor system
must be switched off with the on-board com-
puter (Y page 210).
For PRE-SAFE ®
Brake to assist you when driv-
ing, the radar sensor system must be
switched on (Y page 210) and operational.
PRE-SAFE ®
Brake does not always detect
complex traffic situations properly. You can
terminate the braking action of PRE-SAFE ®
Brake in a non-critical driving situation at any
time if:
R an acoustic and visual warning occurs.
R the vehicle brakes.
To end this, you can either depress the accel-
erator pedal further, activate kickdown or
release the brake pedal. The braking action of PRE-SAFE
®
Brake is
ended automatically if:
R you manoeuvre to avoid the obstacle.
R you drive slower than approximately
15 km/h.
R there is no longer an obstacle detected in
front of your vehicle.
R there is no longer any dange rofacollision.
Following a collisio norcollision-related dam-
age to the front end of the vehicle, have the
configuration and operation of the radar sen-
sors checked. Choose a qualified specialist
workshop which has the necessary specialist
knowledge and tools for the work required.
Mercedes-Benz recommends that you use a
Mercedes-Benz Service Centre for this pur-
pose. Anti-theft systems
Immobiliser
The immobiliser prevents your vehicle from
being started without the correc tkey.
X To activate with the key: remove the key
from the ignition lock.
X To activate with KEYLESS-GO: switch the
ignition off and open the driver's door.
X To deactivate: switch on the ignition.
i The immobiliser is always deactivated
when you start the engine. ATA (Anti-Theft Alarm system)
Av isual and audible alarm is triggered if the
alarm system is primed and you open:
R a door
R the vehicle with the emergency key ele-
ment
R the boot lid
R the bonnet
The alarm is not switched off, even if you
close the open door that has triggered it, for
example. Anti-theft systems
63Safety Z
Page 67 of 337
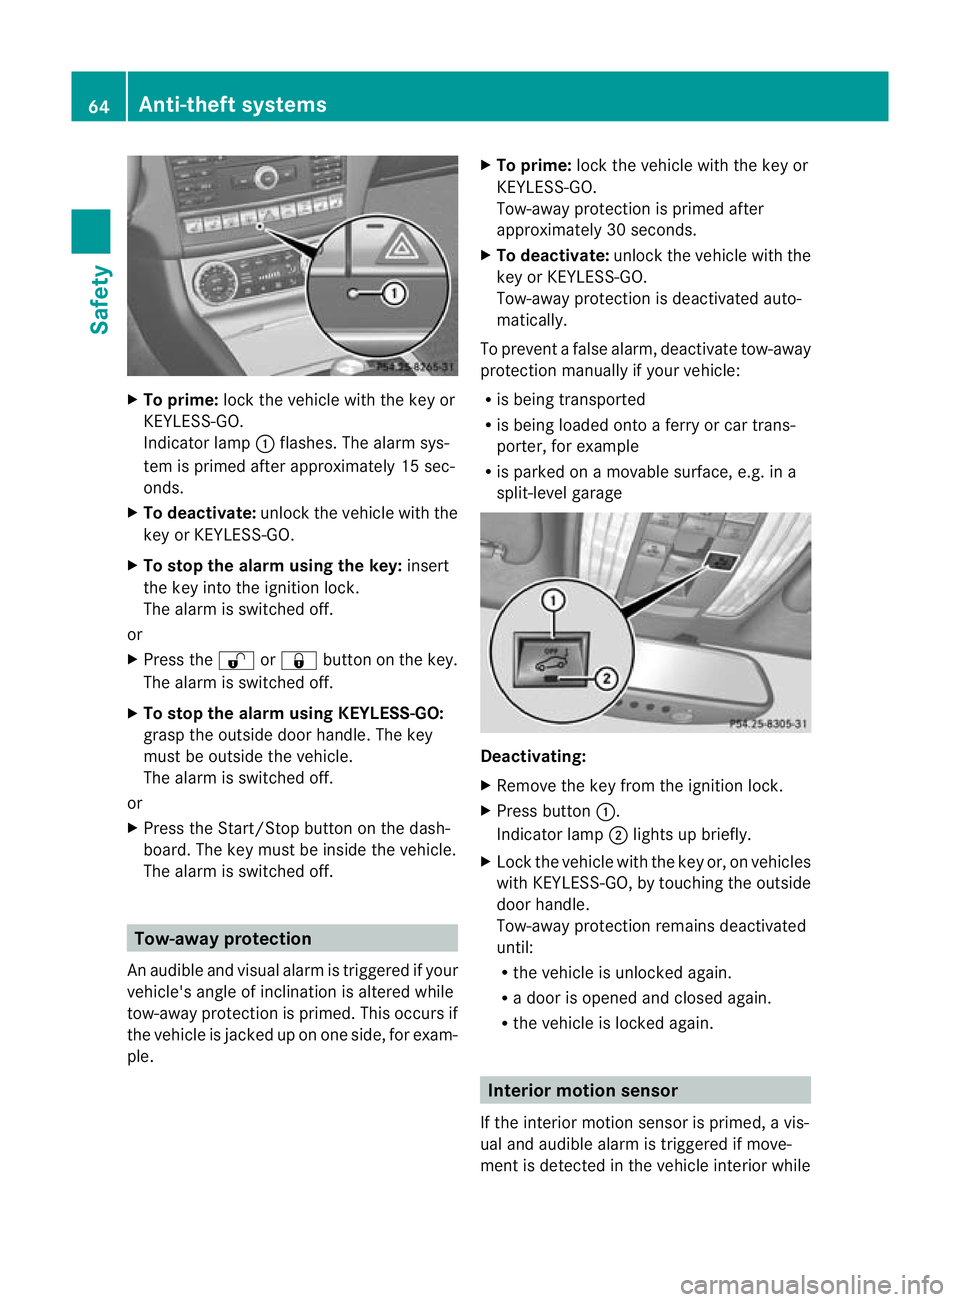
X
To prime: lock the vehicle with the key or
KEYLESS-GO.
Indicato rlamp :flashes. The alarm sys-
te mi s primed after approximately 15 sec-
onds.
X To deactivate: unlock the vehicle with the
key or KEYLESS-GO.
X To stop the alarm using the key: insert
the key into the ignition lock.
The alarm is switched off.
or
X Press the %or& button on the key.
The alarm is switched off.
X To stop the alarm using KEYLESS-GO:
grasp the outside door handle. The key
must be outside the vehicle.
The alarm is switched off.
or
X Press the Start/Stop button on the dash-
board. The key must be inside the vehicle.
The alarm is switched off. Tow-away protection
An audible and visual alarm is triggered if your
vehicle's angle of inclination is altered while
tow-away protection is primed. This occurs if
the vehicle is jacked up on one side, for exam-
ple. X
To prime: lock the vehicle with the key or
KEYLESS-GO.
Tow-away protection is primed after
approximately 30 seconds.
X To deactivate: unlock the vehicle with the
key or KEYLESS-GO.
Tow-away protection is deactivated auto-
matically.
To prevent a false alarm, deactivate tow-away
protection manually if your vehicle:
R is being transported
R is being loaded onto a ferry or car trans-
porter, for example
R is parked on a movable surface, e.g. in a
split-level garage Deactivating:
X
Remove the key from the ignition lock.
X Press button :.
Indicator lamp ;lights up briefly.
X Lock the vehicle with the key or, on vehicles
with KEYLESS-GO, by touching the outside
door handle.
Tow-away protection remains deactivated
until:
R the vehicle is unlocked again.
R a door is opened and closed again.
R the vehicle is locked again. Interior motion sensor
If the interior motion sensor is primed, a vis-
ual and audible alarm is triggered if move-
ment is detected in the vehicle interior while 64
Anti-theft systemsSafety
Page 73 of 337
lid, the anti-theft alarm system will be trig-
gered (Y
page 63).
There are several ways to tur noff the alarm:
X To deactivate the alarm with the key:
press the %or& button on the key.
or
X Insert the key into the ignition lock.
or
X To deactivate the alarm with KEYLESS-
GO: press the Start/Stop button in the igni-
tion lock. The key must be in the vehicle.
or
X Lock or unlock the vehicle using KEYLESS-
GO. The key must be outside the vehicle.
If you unlock the vehicle using the emergency
key element, the fuel filler flap will not be
unlocked automatically.
X To unlock the fuel filler flap: insert the
key in the ignition lock.
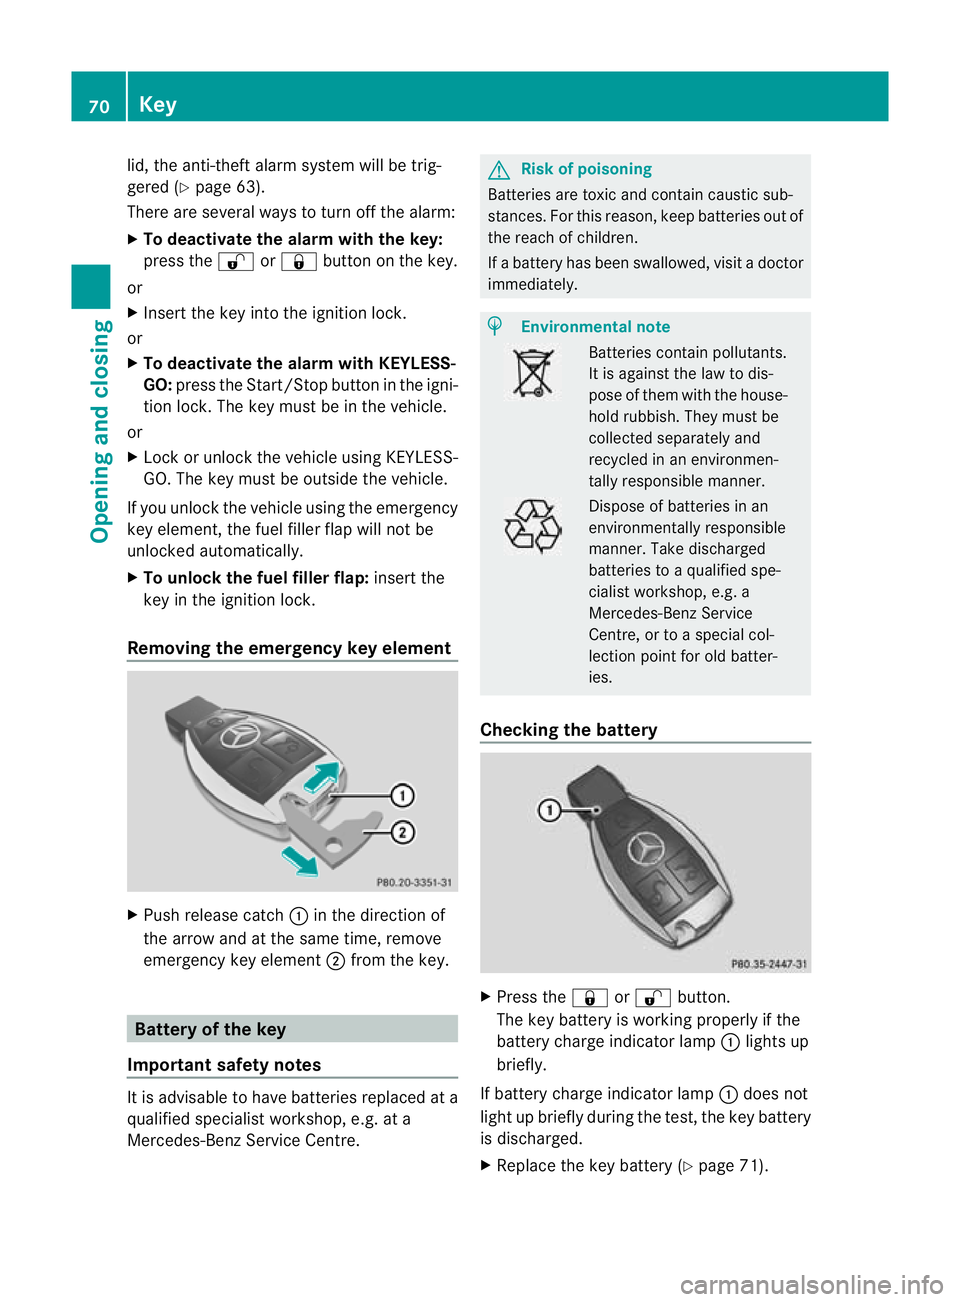
Removing the emergency key element X
Push release catch :in the direction of
the arrow and at the same time, remove
emergency key element ;from the key. Battery of the key
Important safety notes It is advisable to have batteries replaced at a
qualified specialist workshop, e.g. at a
Mercedes-Benz Service Centre. G
Risk of poisoning
Batteries are toxic and contain caustic sub-
stances. For this reason, keep batteries out of
the reach of children.
If a battery has been swallowed, visi tadoctor
immediately. H
Environmental note Batteries contain pollutants.
It is against the law to dis-
pose of them with the house-
hold rubbish. They must be
collected separately and
recycled in an environmen-
tally responsible manner. Dispose of batteries in an
environmentally responsible
manner. Take discharged
batteries to a qualified spe-
cialist workshop, e.g. a
Mercedes-Benz Service
Centre, or to a special col-
lection point for old batter-
ies.
Checking the battery X
Press the &or% button.
The key battery is working properly if the
battery charge indicator lamp :lights up
briefly.
If battery charge indicator lamp :does not
light up briefly during the test, the key battery
is discharged.
X Replace the key battery (Y page 71).70
KeyOpening and closing
Page 82 of 337
X
Turn the key to position 2in the ignition
lock.
X To open: press the corresponding switch.
X To close: pull the corresponding switch.
i If you press the switch beyond the point
of resistance, an automatic opening/clos-
ing process is started in the corresponding
direction .You can stop automatic opera-
tion by pressing again.
i You can continue to operate the side win-
dows after you switch off the engine. This
function remains active for five minutes or
until one of the front doors is opened. Convenience opening feature
You can ventilate the vehicle before you start
driving. To do this, you can use the key to
simultaneously:
R open the side windows
R open the sliding sunroof
R switch on the seat ventilation
i The convenience opening feature can
only be operated using the key. The key
must be close to the driver's door handle.
X Point the tip of the key at the driver's door
handle.
X Unlock the vehicle by pressing the %
button.
X Press and hold the %button until the
side windows and the sliding sunroof are in
the desired position. Convenience closing feature
General notes When you lock the vehicle, you can simulta-
neously:
R close the side windows
R close the sliding sunroof G
Risk of injury
When using the convenience closing feature,
make sure that nobody can become trapped.
Proceed as follows if there is a risk of entrap-
ment:
With the key:
R release the &button.
R press and hold the %button until the
side windows and the sliding sunroof open
again.
With KEYLESS-GO:
R release the sensor surface on the door han-
dle.
R pull the door handle immediately and hold
it.
The side windows and the sliding sunroof
open.
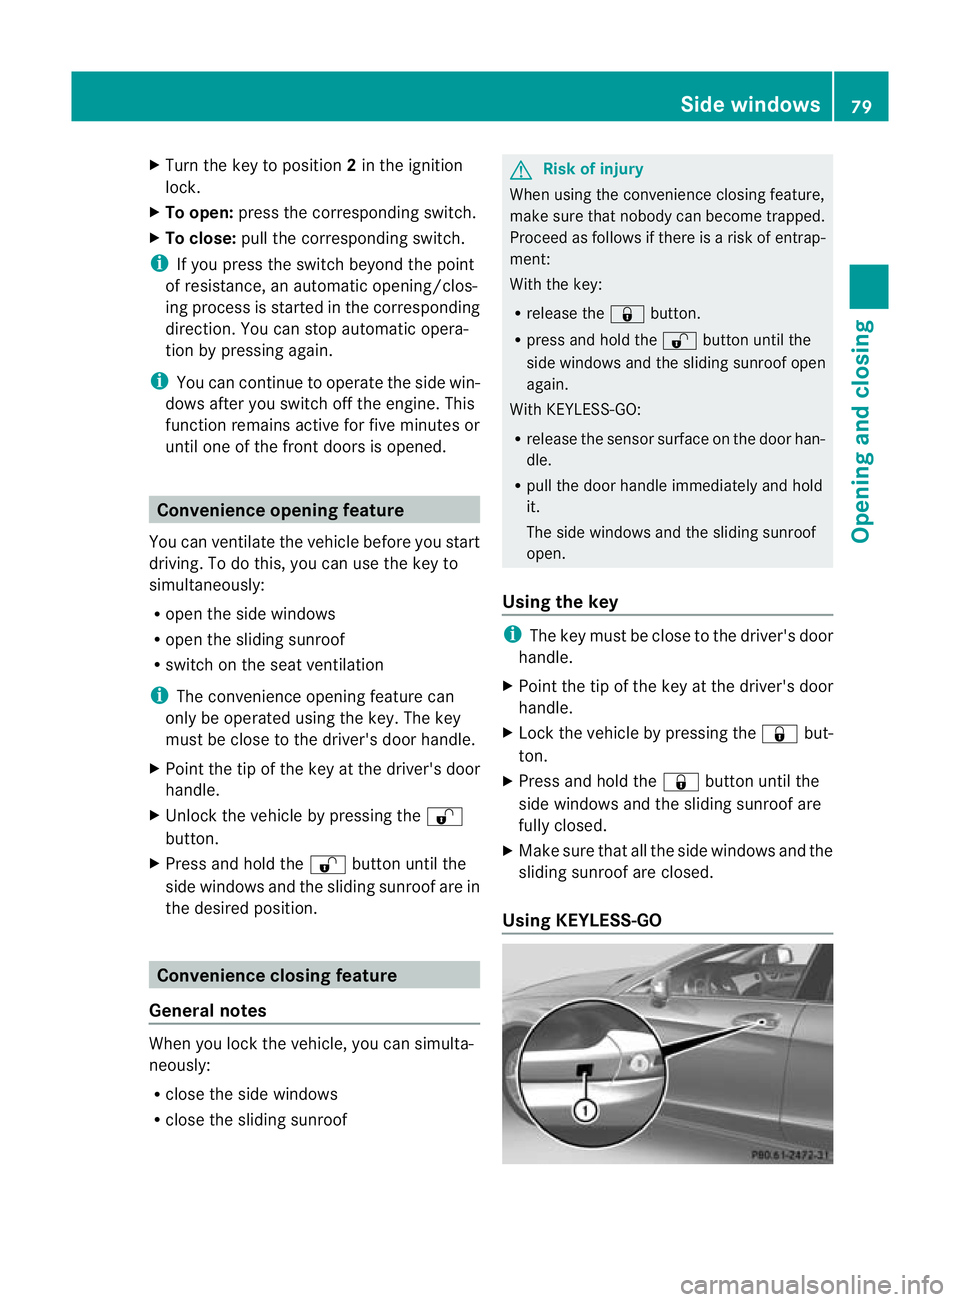
Using the key i
The key must be close to the driver's door
handle.
X Point the tip of the key at the driver's door
handle.
X Lock the vehicle by pressing the &but-
ton.
X Press and hold the &button until the
side windows and the sliding sunroof are
fully closed.
X Make sure that all the side windows and the
sliding sunroof are closed.
Using KEYLESS-GO Side windows
79Opening and closing Z
Page 84 of 337
!
Only open the panorama sliding sunroof
if it is free of snow and ice. Otherwise, mal-
functions may occur.
Do not allow anything to protrude from the
sliding sunroof. Otherwise, the seals could
be damaged.
i Resonance noises can occur in addition
to the usual airflow noises when the sliding
sunroof is open. They are caused by minor
pressure fluctuations in the vehicle interior.
Change the position of the sliding sunroof
or open a side window slightly to reduce or
eliminate these noises. Operating the sliding sunroof
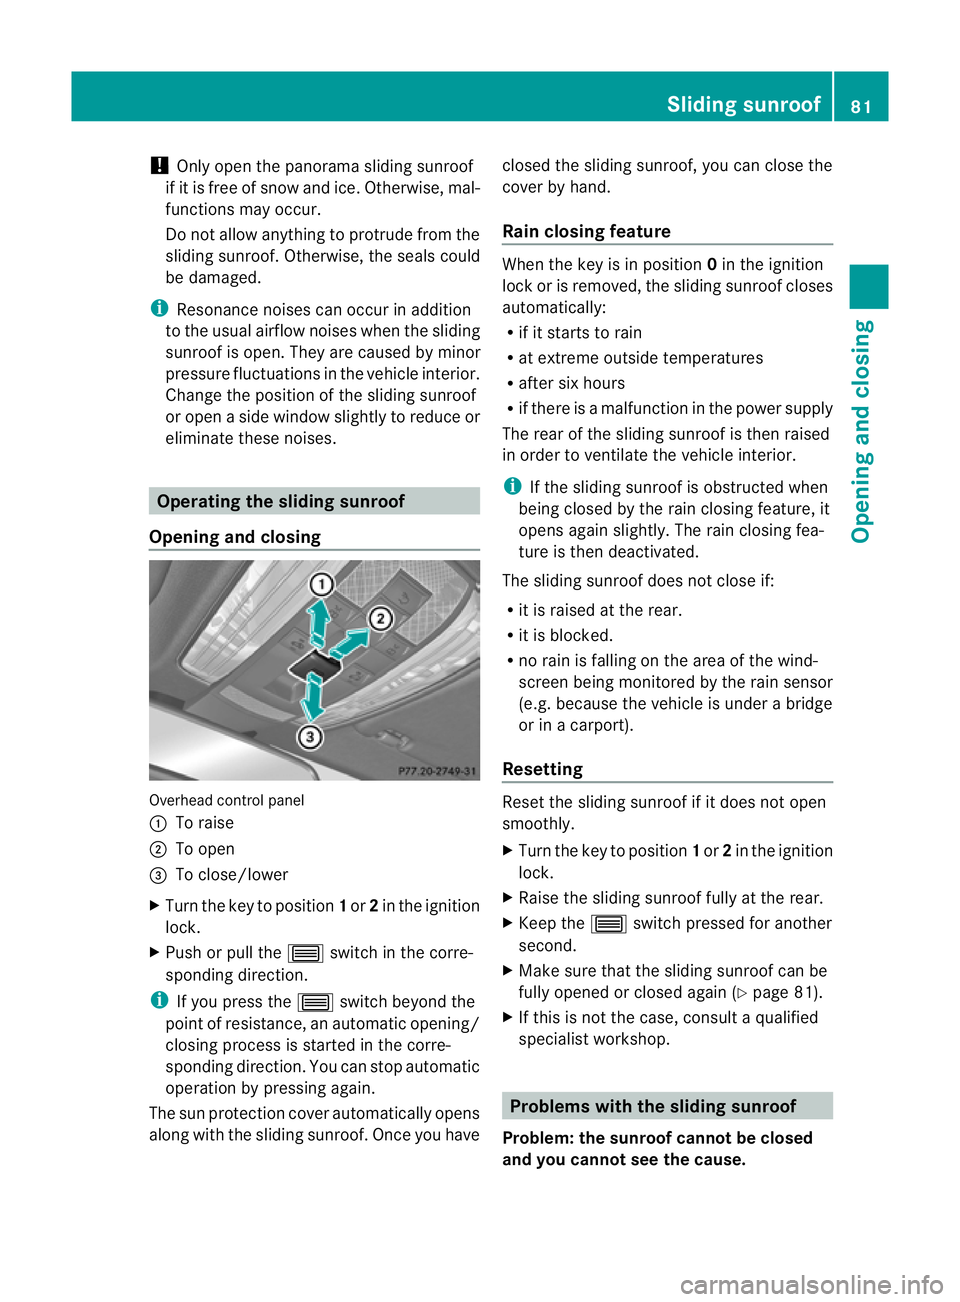
Opening and closing Overhead control panel
:
To raise
; To open
= To close/lower
X Turn the key to position 1or 2in the ignition
lock.
X Push or pull the 3switch in the corre-
sponding direction.
i If you press the 3switch beyond the
point of resistance, an automatic opening/
closing process is started in the corre-
sponding direction. You can stop automatic
operation by pressing again.
The sun protection cover automatically opens
along with the sliding sunroof. Once you have closed the sliding sunroof, you can close the
cover by hand.
Rain closing feature When the key is in position
0in the ignition
lock or is removed, the sliding sunroof closes
automatically:
R if it starts to rain
R at extreme outside temperatures
R after six hours
R if there is a malfunction in the power supply
The rear of the sliding sunroof is then raised
in order to ventilate the vehicle interior.
i If the sliding sunroof is obstructed when
being closed by the rain closing feature, it
opens agains lightly. The rain closing fea-
ture is the ndeactivated.
The sliding sunroof does not close if:
R it is raised at the rear.
R it is blocked.
R no rain is falling on the area of the wind-
screen being monitored by the rain sensor
(e.g. because the vehicle is under a bridge
or in a carport).
Resetting Reset the sliding sunroof if it does not open
smoothly.
X
Turn the key to position 1or 2in the ignition
lock.
X Raise the sliding sunroof fully at the rear.
X Keep the 3switch pressed for another
second.
X Make sure that the sliding sunroof can be
fully opened or closed again (Y page 81).
X If this is not the case, consult a qualified
specialist workshop. Problems with the sliding sunroof
Problem: the sunroof cannot be closed
and you cannot see the cause. Sliding sunroof
81Opening and closing Z