display MERCEDES-BENZ CLS COUPE 2011 Owner's Manual
[x] Cancel search | Manufacturer: MERCEDES-BENZ, Model Year: 2011, Model line: CLS COUPE, Model: MERCEDES-BENZ CLS COUPE 2011Pages: 337, PDF Size: 7.37 MB
Page 63 of 337
If the
÷ warning lamp and åwarning
lamp are lit continuously, ESP ®
is not availa-
ble due to a malfunction.
There is an increased risk of yourv ehicle skid-
ding in certain situations.
You should always adapt your driving style to
suit the prevailing road and weather condi-
tions.
X To activate:(Y page 204).
The å ESP®
OFF warning lamp in the
instrument cluster goes out.
Deactivating/activating ESP ®
(AMG
vehicles) Activating/deactivating SPORT handling
mode
ESP
®
is activated automatically when the
engine is started.
It may be best to activate SPORT handling
mode in the following situations:
R when using snow chains
R in deep snow
R on sand or gravel
Otherwise, you should only use SPORT han-
dling mode on designated race circuits. G
Risk of accident
Deactivate SPORT handling mode and acti-
vate ESP ®
as soon as the situations described
above no longer apply. Otherwise, SPORT
handling mode will only be able to stabilise
the vehicle to a limited degree if the vehicle
starts to skid or a wheel starts to spin.
When SPORT handling mode is activated:
R ESP ®
only improves driving stability to a
limited degree.
R the engine's torque is restricted to a limited
degree and the drive wheels can spin. The
spinning of the wheels results in a cutting
action, which provides better grip. R
traction control is still activated.
R ESP ®
still provides support when you brake
firmly.
If SPORT handling mode is activated and one
or more wheels start to spin, the ÷ESP®
warning lamp in the instrument cluster
flashes. ESP ®
only stabilises the vehicle to a
limited degree. X
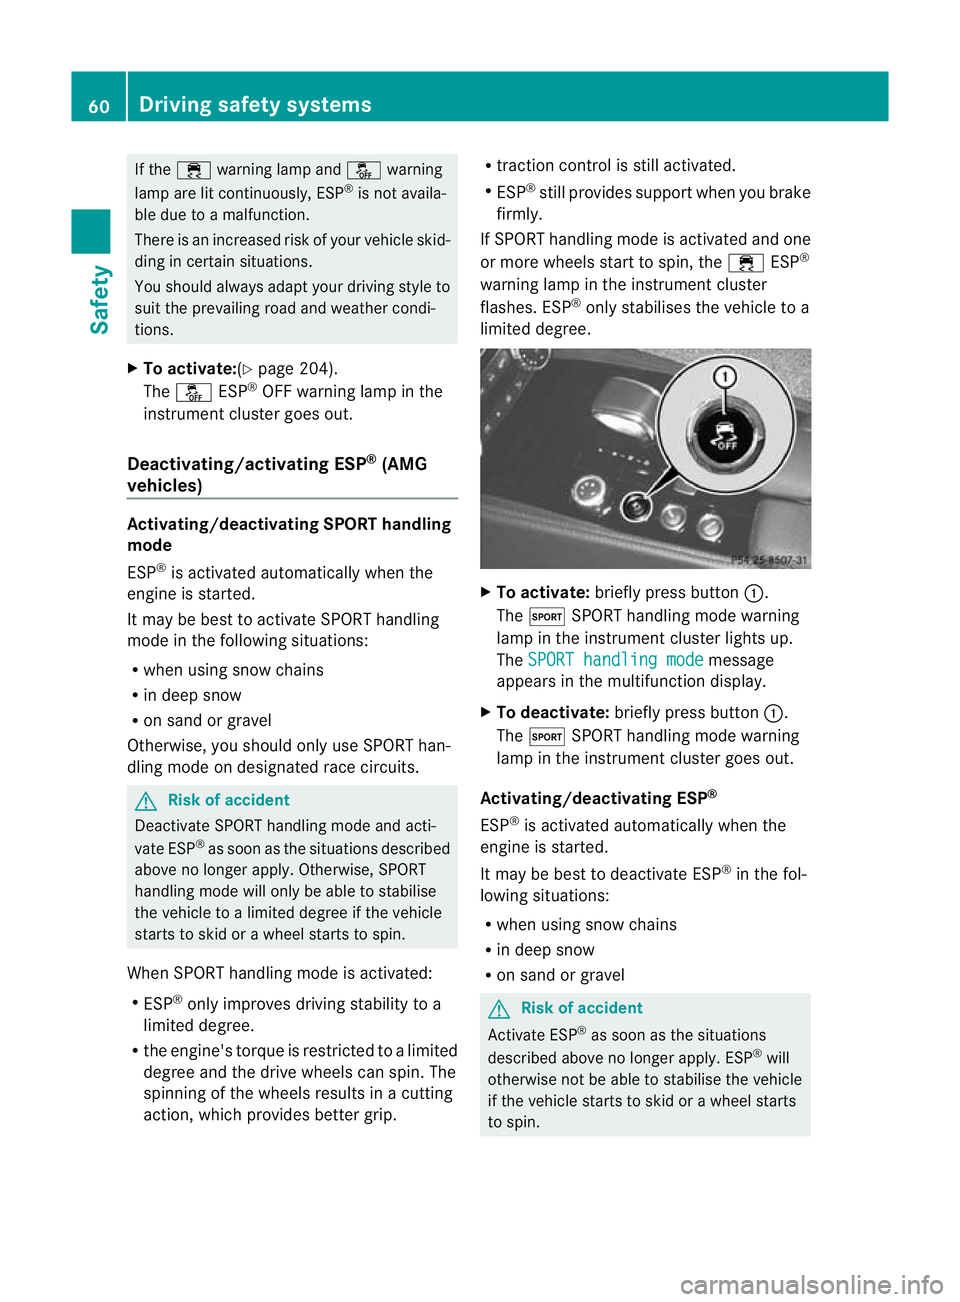
To activate: briefly press button :.
The M SPORT handling mode warning
lamp in the instrument cluster lights up.
The SPORT handling mode message
appears in the multifunction display.
X To deactivate: briefly press button :.
The M SPORT handling mode warning
lamp in the instrument cluster goes out.
Activating/deactivating ESP ®
ESP ®
is activated automatically when the
engine is started.
It may be best to deactivate ESP ®
in the fol-
lowing situations:
R when using snow chains
R in deep snow
R on sand or gravel G
Risk of accident
Activate ESP ®
as soon as the situations
described above no longer apply. ESP ®
will
otherwise not be able to stabilise the vehicle
if the vehicle starts to skid or a wheel starts
to spin. 60
Driving safet
ysystemsSafety
Page 64 of 337
If you deactivate ESP
®
:
R ESP ®
no longer improves driving stability.
R the engine's torque is no longer limited and
the drive wheels are able to spin. The spin-
ning of the wheels results in a cutting
action, which provides better grip.
R traction control is still activated.
R PRE-SAFE ®
is no longer available and is
also not activated if you brake firmly with
the assistance of ESP.
R PRE-SAFE ®
Brake is no longer available and
is also not activated if you brake firmly with
the assistance of ESP ®
.
R ESP ®
still provides support when you brake
firmly.
If ESP ®
is deactivated and one or more wheels
start to spin, the ÷ESP®
warning lamp in
the instrument cluster does not flash.Ins uch
situations, ESP ®
will no tstabilise the vehicle. X
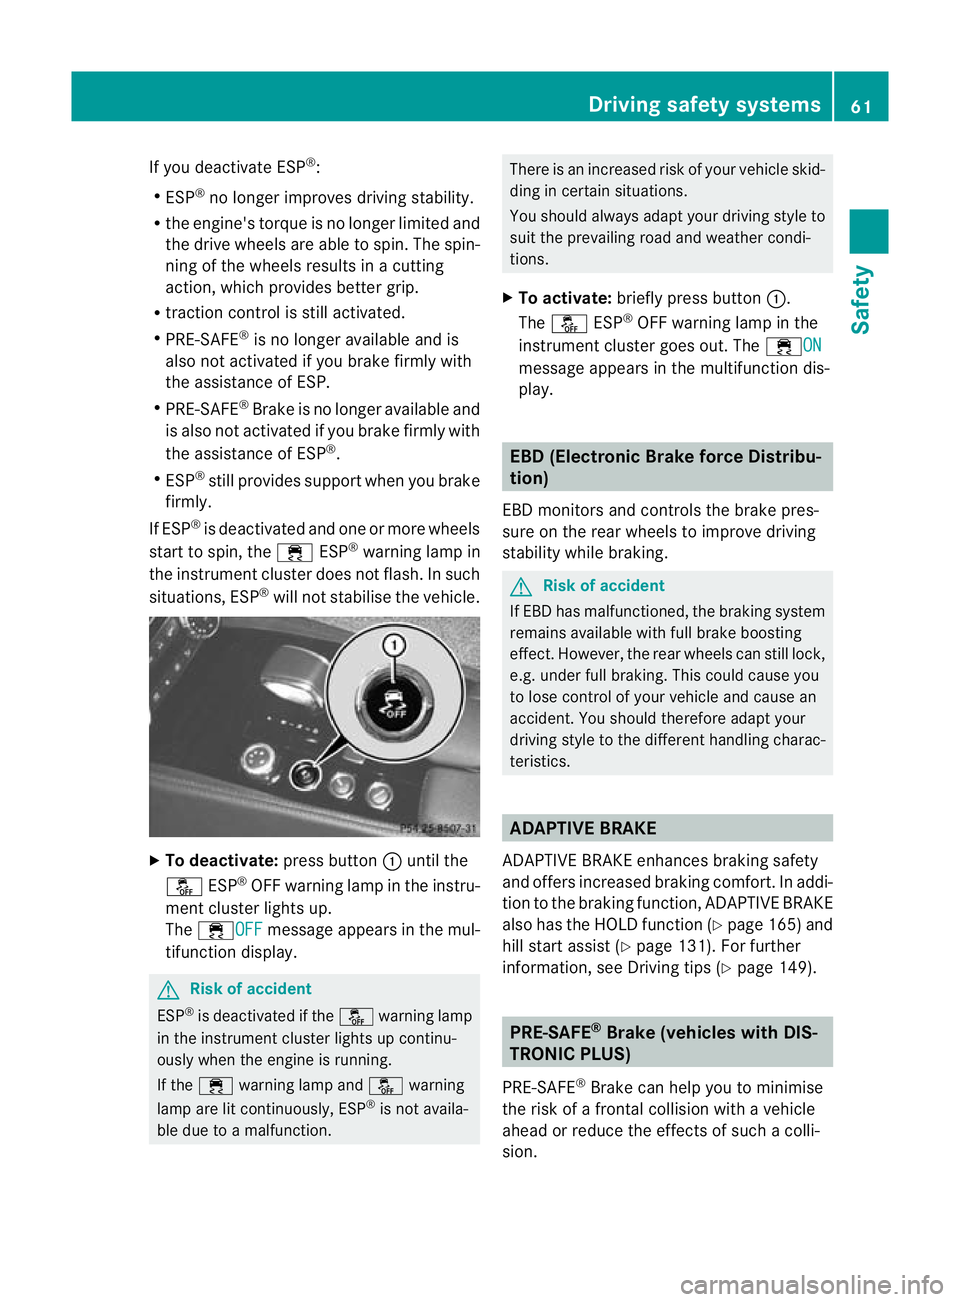
To deactivate: press button:until the
å ESP®
OFF warning lamp in the instru-
ment cluste rlights up.
The ÷OFF message appears in the mul-
tifunction display. G
Risk of accident
ESP ®
is deactivated if the åwarning lamp
in the instrument cluster lights up continu-
ously when the engine is running.
If the ÷ warning lamp and åwarning
lamp are lit continuously, ESP ®
is not availa-
ble due to a malfunction. There is an increased risk of your vehicle skid-
ding in certain situations.
You should always adapt your driving style to
suit the prevailing road and weathe
rcondi-
tions.
X To activate: briefly press button :.
The å ESP®
OFF warning lamp in the
instrument cluster goes out. The ÷ON message appears in the multifunction dis-
play. EBD (Electronic Brake force Distribu-
tion)
EBD monitors and controls the brake pres-
sure on the rear wheels to improve driving
stability while braking. G
Risk of accident
If EBD has malfunctioned, the braking system
remains available with full brake boosting
effect .However, the rear wheels can still lock,
e.g. under full braking. This could cause you
to lose control of your vehicle and cause an
accident .You should therefore adapt your
driving style to the different handling charac-
teristics. ADAPTIVE BRAKE
ADAPTIVE BRAKE enhances braking safety
and offers increased braking comfort. In addi-
tion to the braking function, ADAPTIVE BRAKE
also has the HOLD function (Y page 165) and
hill start assist (Y page 131). For further
information, see Driving tips (Y page 149). PRE-SAFE
®
Brake (vehicles with DIS-
TRONIC PLUS)
PRE-SAFE ®
Brake can help you to minimise
the risk of a frontal collision with a vehicle
ahead or reduce the effect sofsuch a colli-
sion. Driving safety systems
61Safety Z
Page 65 of 337
This function will issue a warning at speeds of
around 30 km/h or more if:
R
for a period of several seconds, the dis-
tance to the vehicle in fronti s too short for
the speed at which you are travelling. The
· distance warning lamp in the instru-
ment cluster will light up.
R you are rapidly approaching the vehicle in
front. An intermittent warning tone will
then sound and the ·distance warning
lamp will light up in the instrument cluster.
Due to the nature of the system, particularly
complicated driving conditions may cause the
system to display an unnecessary warning. G
Risk of accident
Pay particular attention to the traffic condi-
tions if the ·distance warning lamp in the
instrument cluster lights up or an intermittent
warning tone sounds. If necessary, brake or
manoeuvre to avoid an obstacle.
If the driver and passengers have fastened
their seat belts, PRE-SAFE ®
Brake can also
can also perform the following at speeds of
above approximately 30 km/h:
R brake the vehicle automatically from a
speed of up to approximately 200 km/h
R trigger preventative passenger protection
measures (PRE-SAFE ®
) G
Risk of accident
PRE-SAFE ®
Brake is only an aid to assist you
when driving. You are responsible for main-
taining a safe distance from other vehicles,
the vehicle's speed and for braking in good
time. Always pay attention to the traffic con-
ditions. Otherwise, you may recognise dan-
gers too late, cause an accident and injure
yourselfa nd others.
With the help of the rada rsensor system,
PRE-SAFE ®
Brake can detect obstacles that
are in front of your vehicle for an extended
period of time. If you approach an obstacle
and PRE-SAFE ®
Brake detects a risk of a col-
lision, the system will initially alert you both visually and acoustically. If you do not brake
or steer, the vehicle will at first automatically
brake slightly. In the event of an increased
risk of a collision, PRE-SAFE
®
is activated
(Y page 40). If the risk of collision remains
and you do not brake, take evasive action or
accelerate significantly, the vehicle may per-
form automatic emergency braking. G
Risk of accident
Only clearly detected obstacles will trigger a
warning and initiate braking assistance by
PRE-SAFE ®
Brake.
In particular, the detection of obstacles can
be impaired if there is:
R dirt on the sensors or the sensors are cov-
ered
R snow or heavy rain
R interference by other radar sources
R the possibility of strong radar reflections,
for example in multi-storey car parks
PRE-SAFE ®
Brake does not react to persons,
animals, oncoming vehicles, crossing traffic
or when cornering.
PRE-SAFE ®
Brake may not detect narrow
vehicles such as motorcycles and vehicles
driving on a different line. G
Risk of accident
Depending on the current speed, PRE-SAFE ®
Brake decelerates your vehicle by up to
4 m/s 2
before performing possible emer-
gency braking. This is equivalent to approx-
imately 40 % of the maximum braking power
of the vehicle. You must additionally apply the
brakes yourself in order to preven tacollision
or minimis ean impact. Automatic emergency
braking is not performed until immediately
prior to an accident in the event that you are
unable to avoid one by, for instance, taking
evasive action.
In order to maintain the appropriate distance
to the vehicle in front and thus prevent a col-
lision, you must apply the brakes yourself. 62
Driving safety systemsSafety
Page 87 of 337
Vehicle equipment
i This manual describes all the standard
and optional equipment of your vehicle
available at the time of publicatio nofthe
Owner's Manual. Country-specific differen-
ces are possible. Please note that your
vehicle may not be equipped with all fea-
tures described. This also applies to safety-
relevant systems and functions. Correct driver's seat position
Observe the safety guidelines on
(Y
page 85).
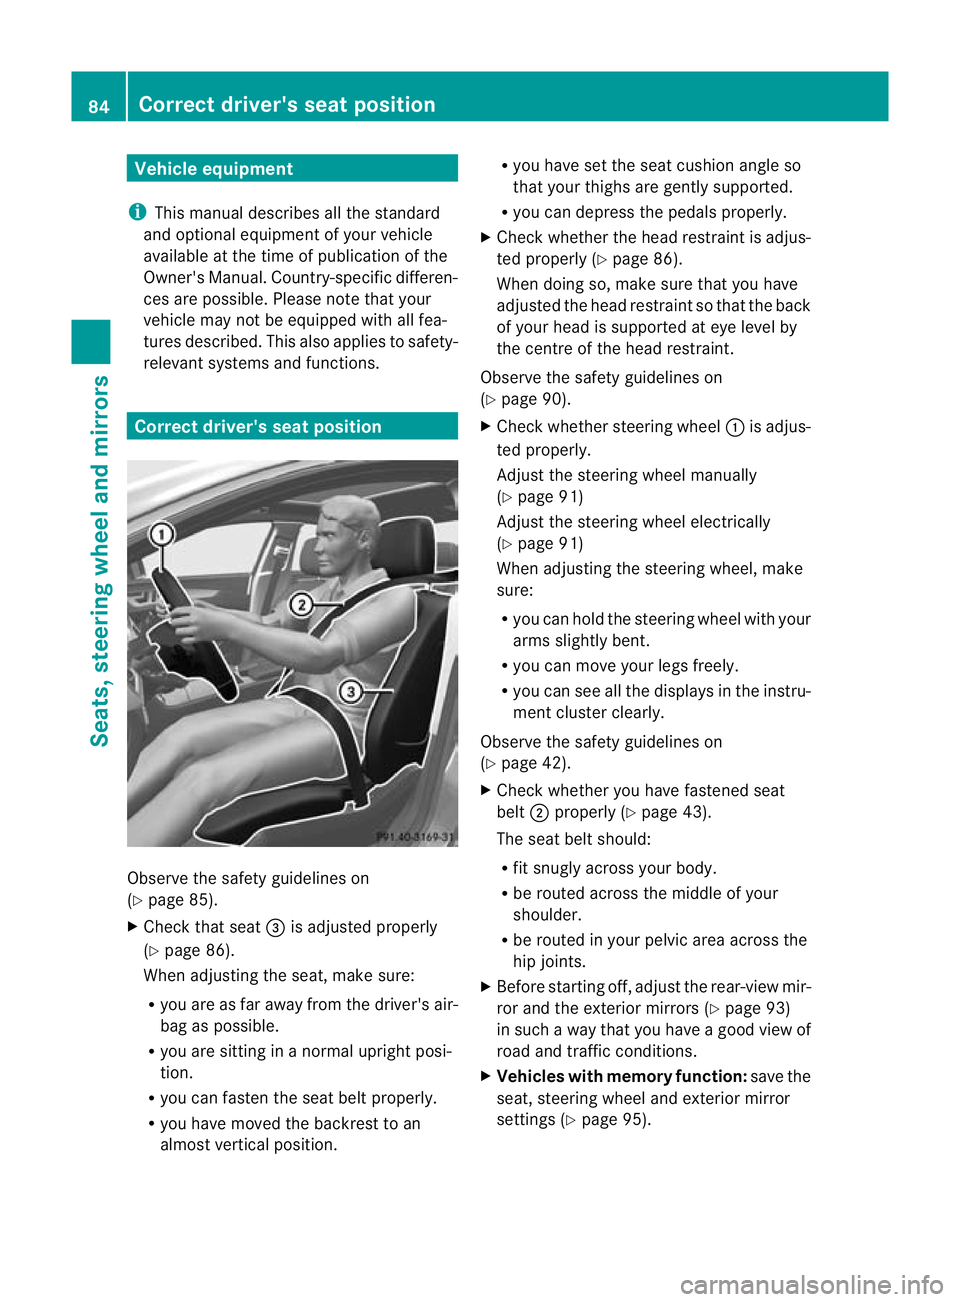
X Check that seat =is adjusted properly
(Y page 86).
When adjusting the seat, make sure:
R you are as far away from the driver's air-
bag as possible.
R you are sitting in a normal upright posi-
tion.
R you can fasten the seat belt properly.
R you have moved the backrest to an
almost vertical position. R
you have set the seat cushion angle so
that your thighs are gently supported.
R you can depress the pedals properly.
X Check whether the head restraint is adjus-
ted properly (Y page 86).
When doing so, make sure that you have
adjusted the head restraint so that the back
of your head is supported at eye level by
the centre of the head restraint.
Observe the safety guidelines on
(Y page 90).
X Check whether steering wheel :is adjus-
ted properly.
Adjust the steering wheel manually
(Y page 91)
Adjust the steering wheel electrically
(Y page 91)
When adjusting the steering wheel, make
sure:
R you can hold the steering wheel with your
arms slightly bent.
R you can move your legs freely.
R you can see all the displays in the instru-
ment cluster clearly.
Observe the safety guidelines on
(Y page 42).
X Check whether you have fastened seat
belt ;properly (Y page 43).
The seat belt should:
R fit snugly across your body.
R be routed across the middle of your
shoulder.
R be routed in your pelvic area across the
hip joints.
X Before starting off, adjust the rear-view mir-
ror and the exterior mirrors (Y page 93)
in such a way that you have a good view of
road and traffic conditions.
X Vehicles with memory function: save the
seat, steering wheel and exterior mirror
settings (Y page 95). 84
Correct driver's seat positionSeats, steering wheel and mirrors
Page 116 of 337
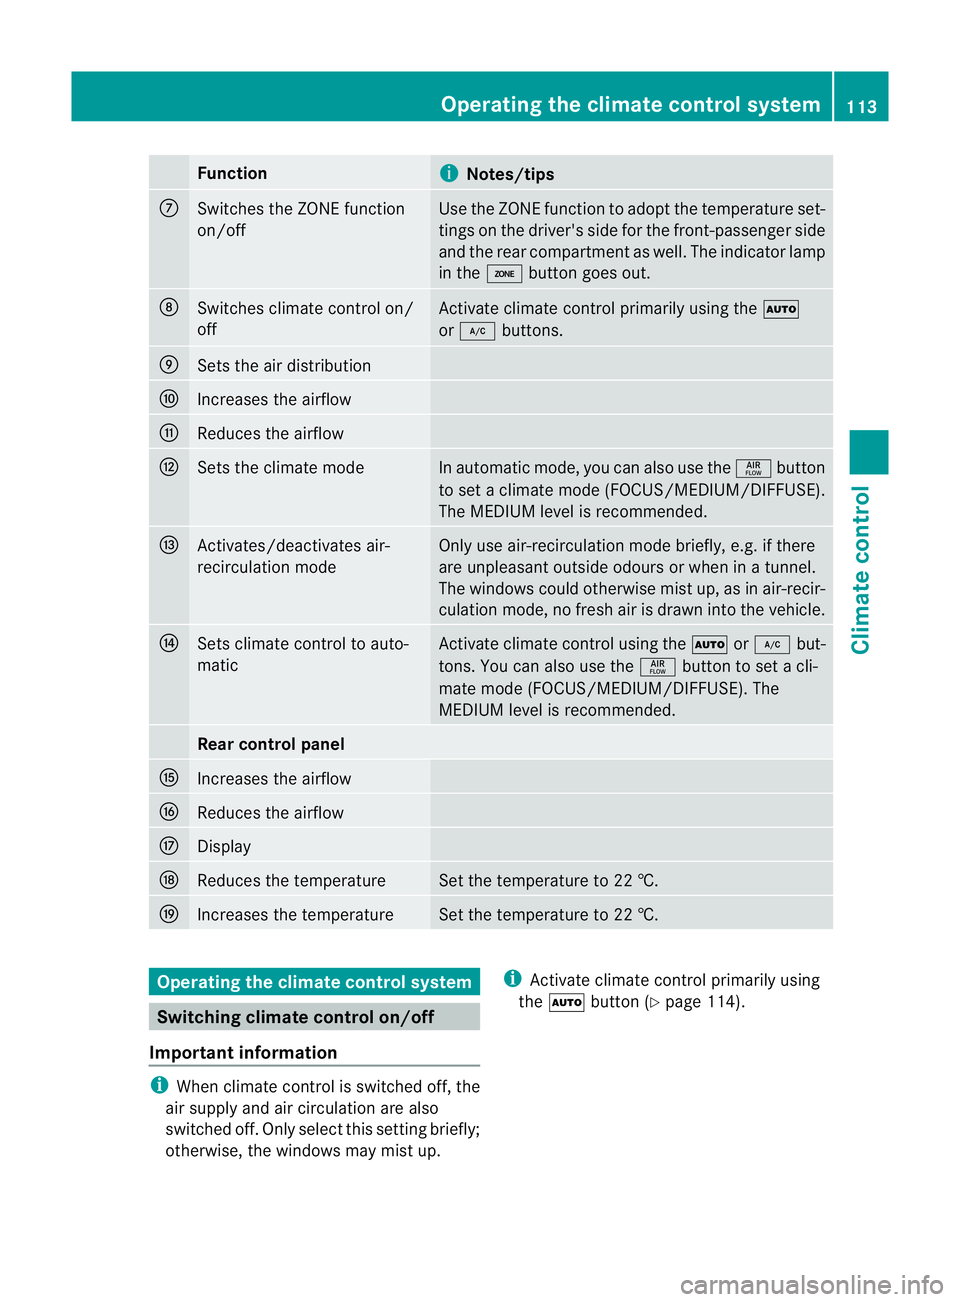
Function
i
Notes/tips
C
Switches the ZONE function
on/off Use the ZONE function to adopt the temperature set-
tings on the driver's side for the front-passenger side
and the rear compartmen tas well.T he indicator lamp
in the ábutton goes out. D
Switches climate control on/
off Activate climate control primarily using the
Ã
or ¿ buttons. E
Sets the air distribution
F
Increases the airflow
G
Reduces the airflow
H
Sets the climate mode In automatic mode, you can also use the
ñbutton
to set a climate mode (FOCUS/MEDIUM/DIFFUSE).
The MEDIUM level is recommended. I
Activates/deactivates air-
recirculation mode Only use air-recirculation mode briefly, e.g. if there
are unpleasant outside odours or when in a tunnel.
The windows could otherwise mist up, as in air-recir-
culation mode, no fresh air is drawn into the vehicle. J
Sets climate control to auto-
matic Activate climate control using the
Ãor¿ but-
tons. You can also use the ñbutton to set a cli-
mate mode (FOCUS/MEDIUM/DIFFUSE). The
MEDIUM level is recommended. Rear control panel
K
Increases the airflow
L
Reduces the airflow
M
Display
N
Reduces the temperature Set the temperature to 22 †.
O
Increases the temperature Set the temperature to 22 †.
Operating the climate control system
Switching climate control on/off
Important information i
When climate control is switched off, the
air supply and air circulation are also
switched off. Only select this setting briefly;
otherwise, the windows may mist up. i
Activate climate control primarily using
the à button (Y page 114). Operating the climate control system
113Climate control Z
Page 119 of 337
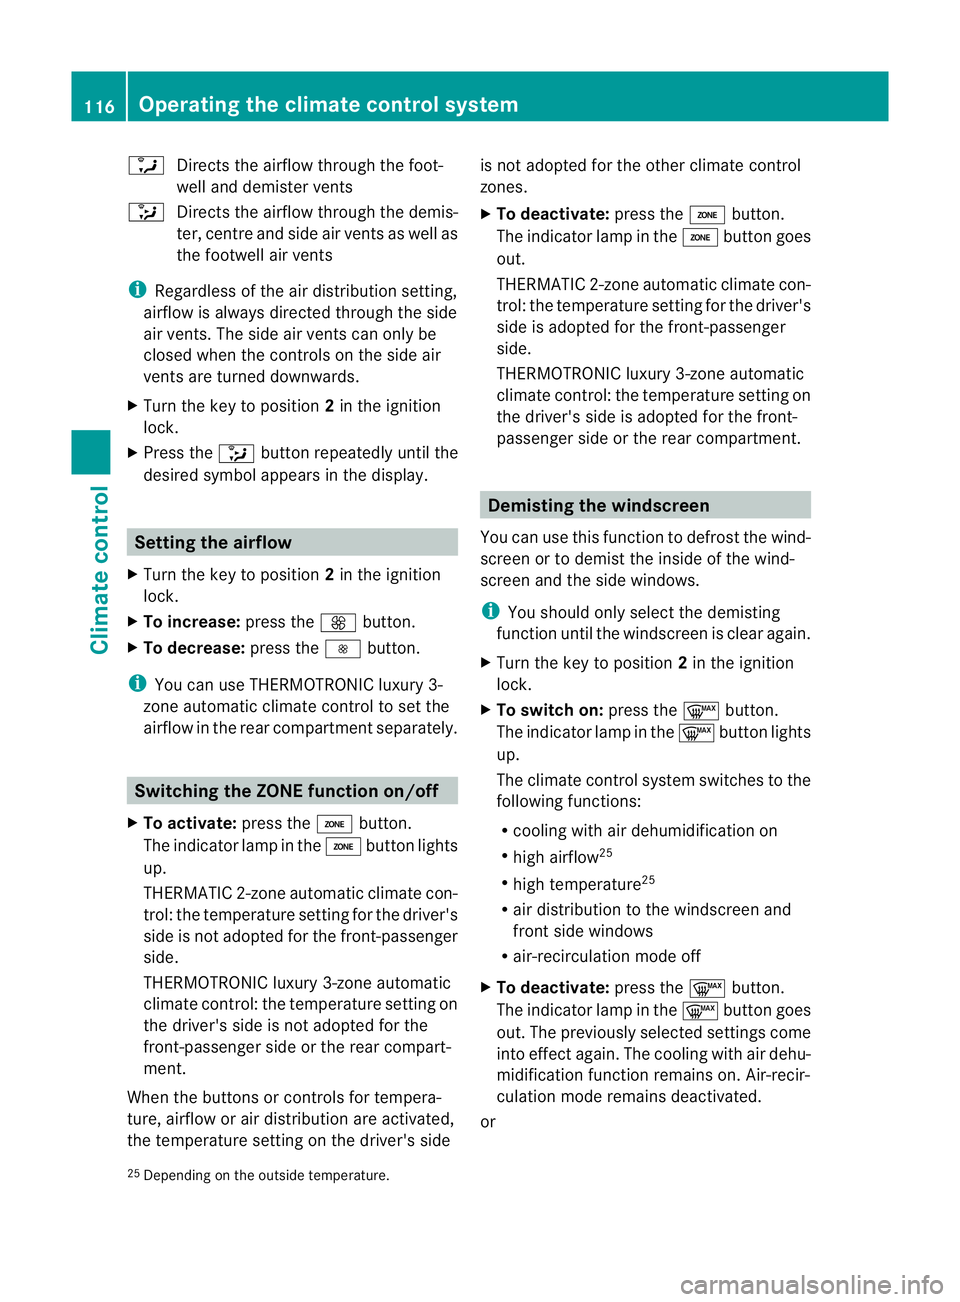
a
Directs the airflow throug hthe foot-
well and demister vents
_ Directs the airflow through the demis-
ter, centre and side air vents as well as
the footwell air vents
i Regardless of the air distribution setting,
airflow is always directed through the side
air vents. The side air vents can only be
closed when the controls on the side air
vents are turned downwards.
X Turn the key to position 2in the ignition
lock.
X Press the _button repeatedly until the
desired symbol appears in the display. Setting the airflow
X Turn the key to position 2in the ignition
lock.
X To increase: press theKbutton.
X To decrease: press theIbutton.
i You can use THERMOTRONIC luxury 3-
zone automatic climate control to set the
airflow in the rear compartments eparately.Switching the ZONE function on/off
X To activate: press theábutton.
The indicator lamp in the ábutton lights
up.
THERMATIC 2-zone automatic climate con-
trol: the temperature setting for the driver's
side is not adopted for the front-passenger
side.
THERMOTRONIC luxury 3-zone automatic
climate control: the temperature setting on
the driver's side is not adopted for the
front-passenger side or the rear compart-
ment.
When the buttons or controls for tempera-
ture, airflow or air distribution are activated,
the temperature setting on the driver's side is not adopted for the other climate control
zones.
X
To deactivate: press theábutton.
The indicator lamp in the ábutton goes
out.
THERMATIC 2-zone automatic climate con-
trol: the temperature setting for the driver's
side is adopted for the front-passenger
side.
THERMOTRONIC luxury 3-zone automatic
climate control: the temperature setting on
the driver's side is adopted for the front-
passenger side or the rear compartment. Demisting the windscreen
You can use this function to defrost the wind-
screen or to demist the inside of the wind-
screen and the side windows.
i You should only select the demisting
function until the windscreen is clear again.
X Turn the key to position 2in the ignition
lock.
X To switch on: press the¬button.
The indicator lamp in the ¬button lights
up.
The climate control system switches to the
following functions:
R cooling with air dehumidification on
R high airflow 25
R high temperature 25
R air distribution to the windscreen and
fron tside windows
R air-recirculation mode off
X To deactivate: press the¬button.
The indicator lamp in the ¬button goes
out. The previously selected settings come
into effect again. The cooling with air dehu-
midification function remains on. Air-recir-
culation mode remains deactivated.
or
25 Depending on the outside temperature. 116
Operating the climate control systemClimate control
Page 123 of 337
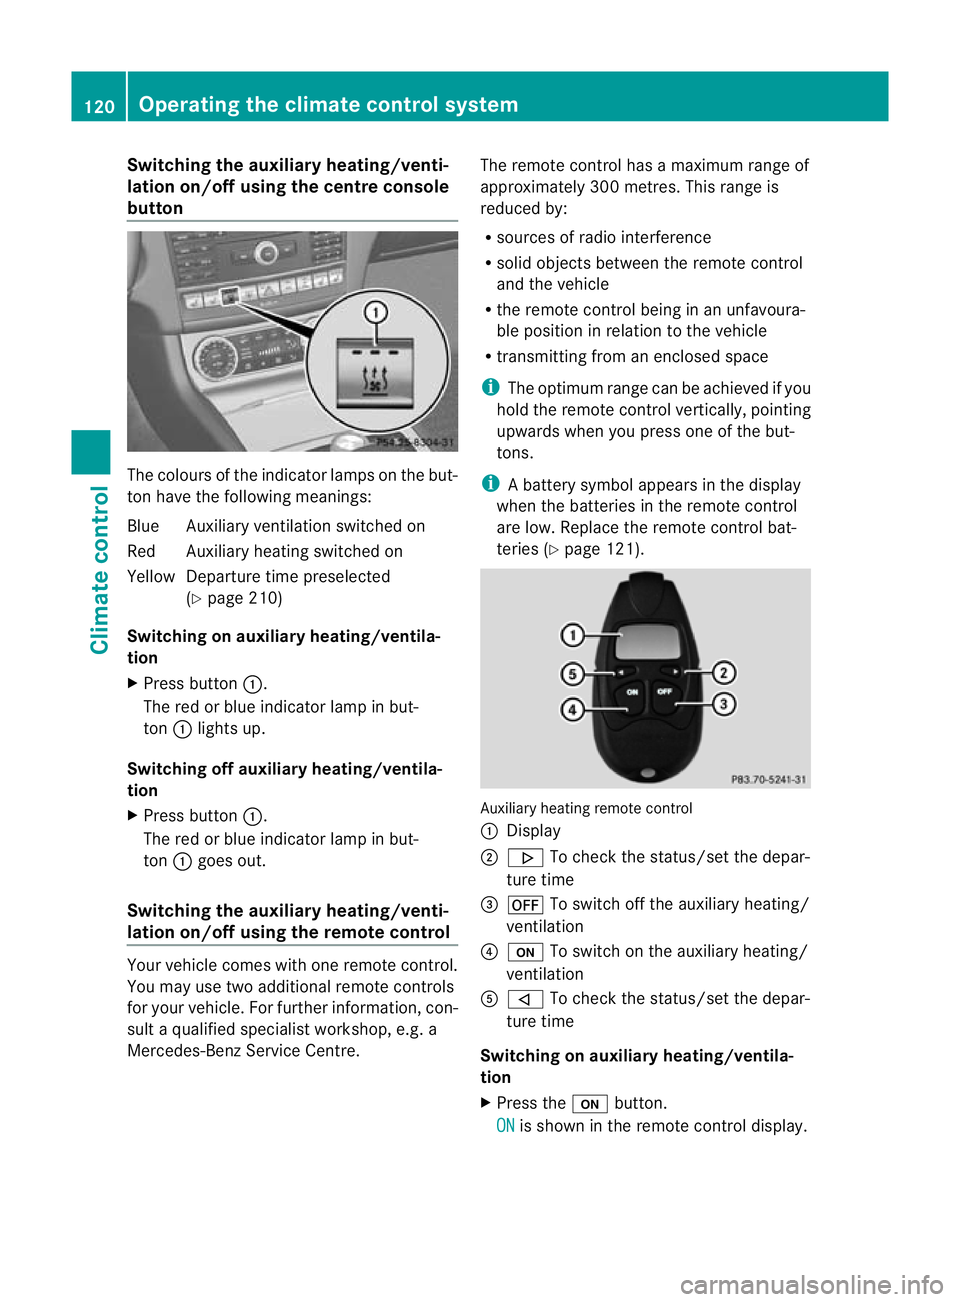
Switching the auxiliary heating/venti-
lation on/off using the centre console
button The colours of the indicator lamps on the but-
ton have the following meanings:
Blue Auxiliary ventilation switched on
Red Auxiliary heating switched on
Yellow Departure time preselected
(Ypage 210)
Switching on auxiliary heating/ventila-
tion
X Press button :.
The red or blue indicator lamp in but-
ton :lights up.
Switching off auxiliary heating/ventila-
tion
X Press button :.
The red or blue indicator lamp in but-
ton :goes out.
Switching the auxiliary heating/venti-
lation on/off using the remote control Your vehicle comes with one remote control.
You may use two additional remote controls
for your vehicle. For further information, con-
sult a qualified specialist workshop, e.g. a
Mercedes-Benz Service Centre. The remote control has a maximum range of
approximately 300 metres. This range is
reduced by:
R
sources of radio interference
R solid objects between the remote control
and the vehicle
R the remote control being in an unfavoura-
ble position in relation to the vehicle
R transmitting from an enclosed space
i The optimum range can be achieved if you
hold the remote control vertically, pointing
upwards when you press one of the but-
tons.
i Abattery symbol appears in the display
when the batteries in the remote control
are low. Replace the remot econtrol bat-
teries (Y page 121). Auxiliary heating remote control
:
Display
; . To check the status/set the depar-
ture time
= ^ To switch off the auxiliary heating/
ventilation
? u To switch on the auxiliary heating/
ventilation
A , To check the status/set the depar-
ture time
Switching on auxiliary heating/ventila-
tion
X Press the ubutton.
ON is shown in the remote control display.120
Operating the climate control systemClimate control
Page 124 of 337
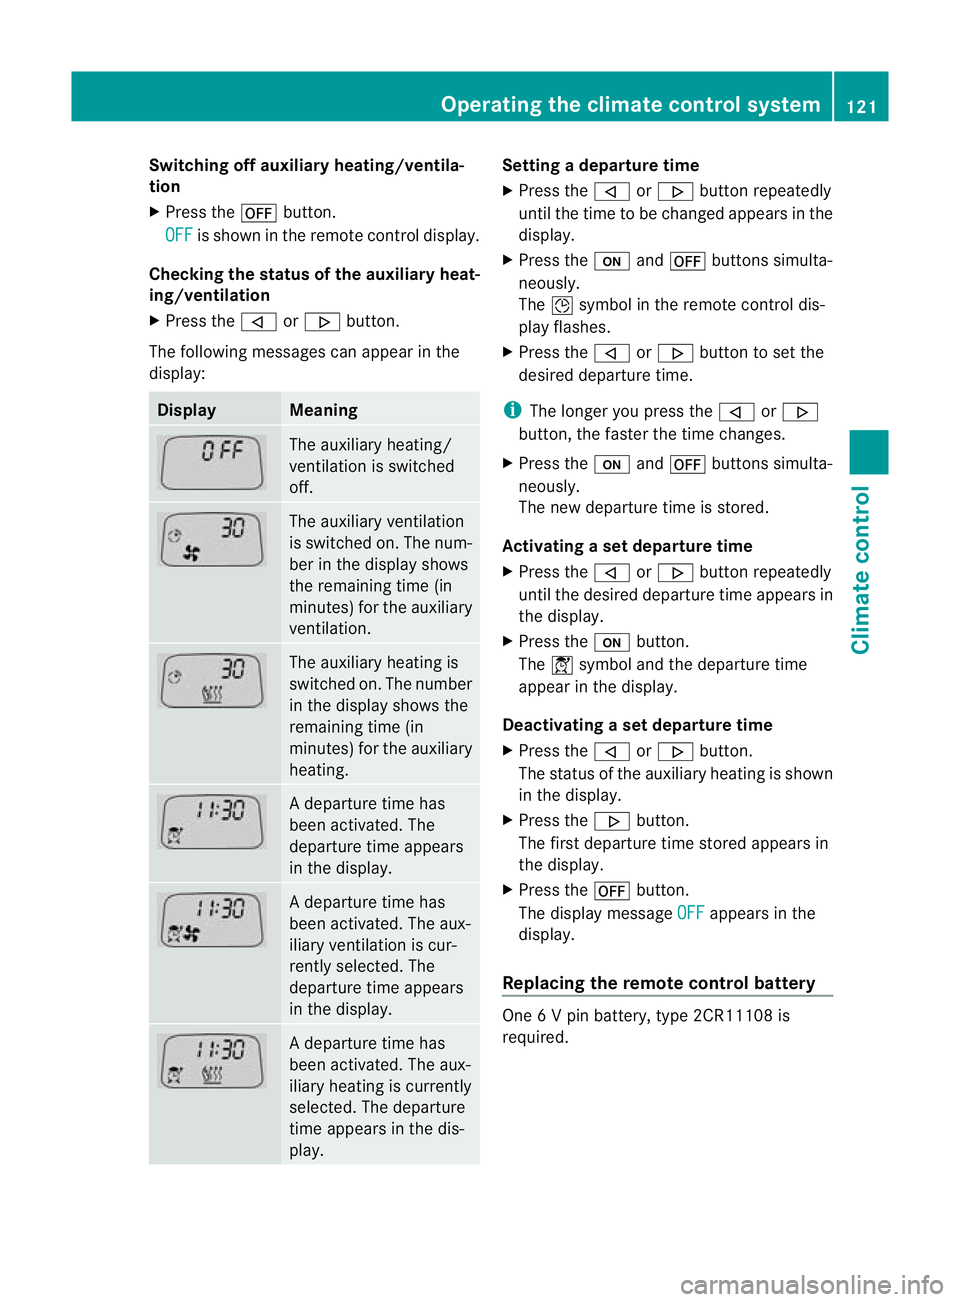
Switching off auxiliary heating/ventila-
tion
X
Press the ^button.
OFF is shown in the remote control display.
Checking the status of the auxiliary heat-
ing/ventilation
X Press the ,or. button.
The following messages can appearint he
display: Display Meaning
The auxiliary heating/
ventilation is switched
off.
The auxiliary ventilation
is switched on. The num-
ber in the display shows
the remaining time (in
minutes) for the auxiliary
ventilation. The auxiliary heating is
switched on. The number
in the display shows the
remaining time (in
minutes) for the auxiliary
heating. Ad
eparture time has
been activated. The
departure time appears
in the display. Ad
eparture time has
been activated. The aux-
iliary ventilation is cur-
rently selected. The
departure time appears
in the display. Ad
eparture time has
been activated. The aux-
iliary heating is currently
selected. The departure
time appears in the dis-
play. Setting a departure time
X
Press the ,or. button repeatedly
until the time to be changed appears in the
display.
X Press the uand^ buttons simulta-
neously.
The Îsymbol in the remote control dis-
play flashes.
X Press the ,or. button to set the
desired departure time.
i The longer you press the ,or.
button, the faster the time changes.
X Press the uand^ buttons simulta-
neously.
The new departure time is stored.
Activating a set departure time
X Press the ,or. button repeatedly
until the desired departure time appears in
the display.
X Press the ubutton.
The Ísymbol and the departure time
appear in the display.
Deactivating a set departure time
X Press the ,or. button.
The status of the auxiliary heating is shown
in the display.
X Press the .button.
The first departure time stored appears in
the display.
X Press the ^button.
The display message OFF appears in the
display.
Replacing the remote control battery One 6 V pin battery, type 2CR11108 is
required.Operating the climate control system
121Climate control Z
Page 126 of 337
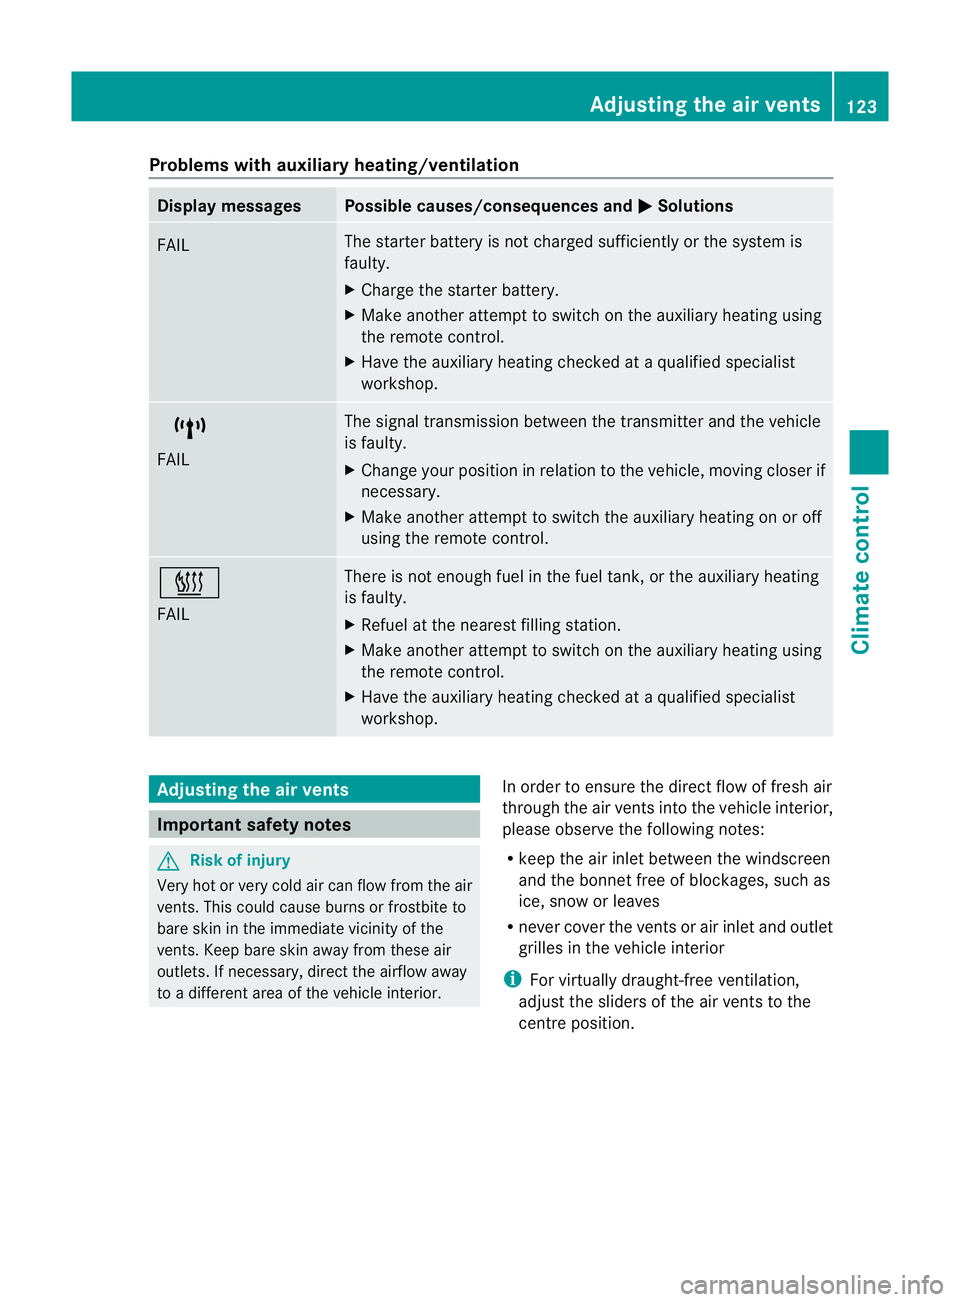
Problems with auxiliary heating/ventilation
Display messages Possible causes/consequences and
M Solutions
FAIL The starter battery is not charged sufficiently or the system is
faulty.
X
Charge the starter battery.
X Make another attempt to switch on the auxiliary heating using
the remote control.
X Have the auxiliary heating checked at a qualified specialist
workshop. $
FAIL The signal transmission between the transmitter and the vehicle
is faulty.
X Change your position in relation to the vehicle, moving closer if
necessary.
X Make another attempt to switch the auxiliary heating on or off
using the remote control. ©
FAIL There is not enough fuel in the fuel tank, or the auxiliary heating
is faulty.
X
Refuel at the nearest filling station.
X Make another attempt to switch on the auxiliary heating using
the remote control.
X Have the auxiliary heating checked at a qualified specialist
workshop. Adjusting the air vents
Important safety notes
G
Risk of injury
Very hot or very cold air can flow from the air
vents. This could cause burns or frostbite to
bare skin in the immediate vicinity of the
vents. Keep bare skin away from these air
outlets. If necessary, direct the airflow away
to a different area of the vehicle interior. In order to ensure the direct flow of fresh air
through the air vents into the vehicle interior,
please observe the following notes:
R
keep the air inlet between the windscreen
and the bonnet free of blockages, such as
ice, snow or leaves
R never cover the ventsora ir inlet and outlet
grilles in the vehicle interior
i For virtually draught-free ventilation,
adjust the sliders of the air vents to the
centre position. Adjusting the air vents
123Climate control Z
Page 133 of 337
is open, the power supply is deactivated
again.
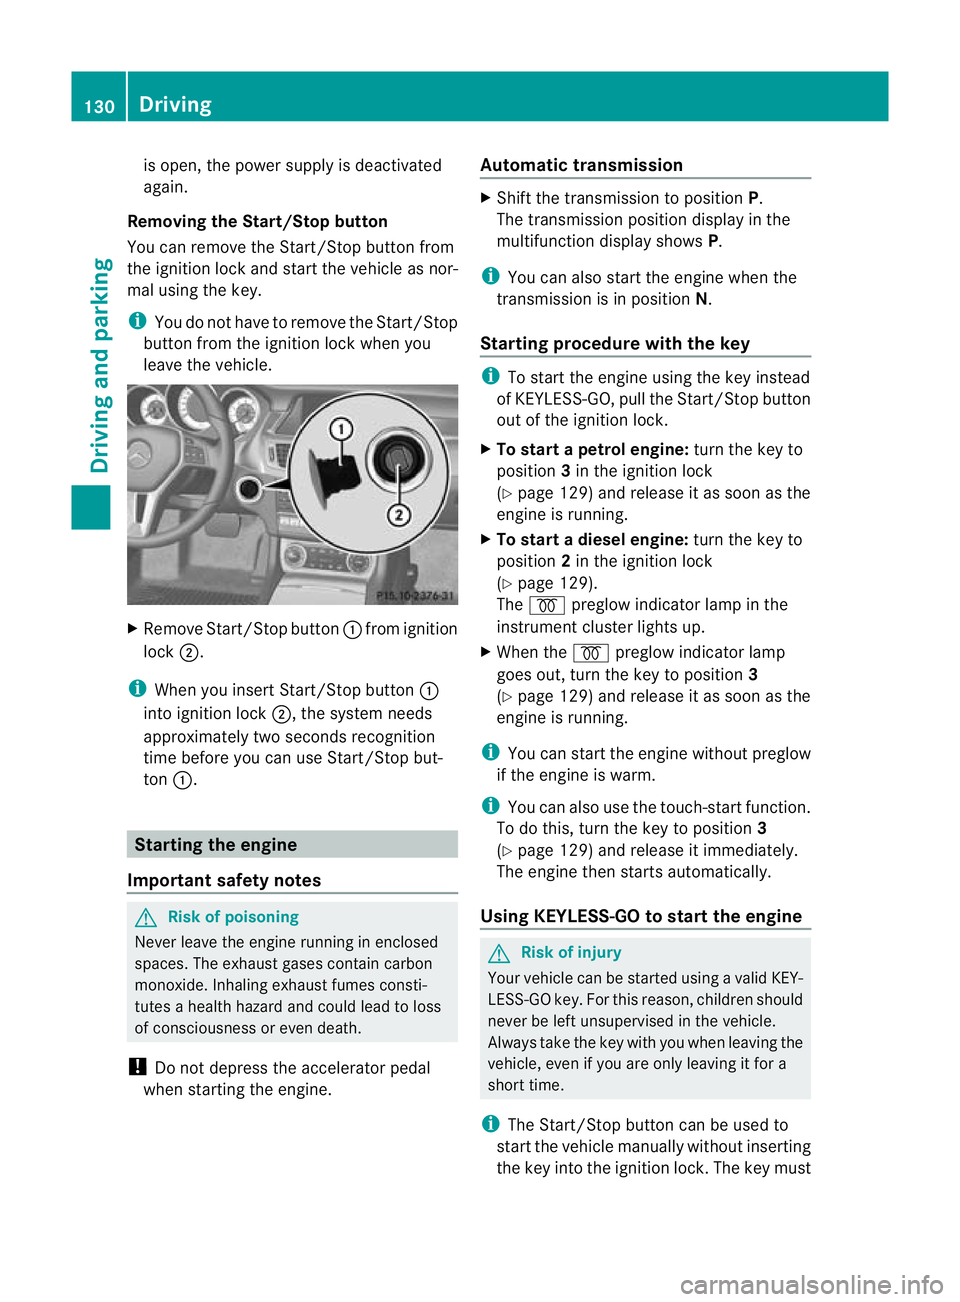
Removing the Start/Stop button
You can remove the Start/Stop button from
the ignition lock and start the vehicle as nor-
mal using the key.
i You do not have to remove the Start/Stop
button from the ignition lock when you
leave the vehicle. X
Remove Start/Stop button :fromi gnition
lock ;.
i When you insert Start/Stop button :
into ignition lock ;, the system needs
approximately two seconds recognition
time before you can use Start/Stop but-
ton :. Starting the engine
Important safety notes G
Risk of poisoning
Never leave the engine running in enclosed
spaces. The exhaust gases contain carbon
monoxide. Inhaling exhaust fumes consti-
tutes a health hazard and could lead to loss
of consciousness or even death.
! Do not depress the accelerator pedal
when starting the engine. Automatic transmission X
Shift the transmission to position P.
The transmission position display in the
multifunction display shows P.
i You can also start the engine when the
transmission is in position N.
Starting procedure with the key i
To start the engine using the key instead
of KEYLESS-GO, pull the Start/Stop button
out of the ignition lock.
X To start a petrol engine: turn the key to
position 3in the ignition lock
(Y page 129) and release it as soon as the
engine is running.
X To startad iesel engine: turn the key to
position 2in the ignition lock
(Y page 129).
The % preglow indicator lamp in the
instrumen tcluster lights up.
X When the %preglow indicator lamp
goes out, tur nthe key to position 3
(Y page 129) and release it as soon as the
engine is running.
i You can start the engine without preglow
if the engine is warm.
i You can also use the touch-start function.
To do this, turn the key to position 3
(Y page 129) and release it immediately.
The engine then starts automatically.
Using KEYLESS-GO to startt he engine G
Risk of injury
You rvehicle can be started using a valid KEY-
LESS-GO key. For this reason, children should
never be left unsupervised in the vehicle.
Always take the key with you when leaving the
vehicle, even if you are only leaving it for a
short time.
i The Start/Stop button can be used to
start the vehicle manually without inserting
the key into the ignition lock. The key must 130
DrivingDriving and parking