fuel pressure MERCEDES-BENZ CLS COUPE 2011 Owners Manual
[x] Cancel search | Manufacturer: MERCEDES-BENZ, Model Year: 2011, Model line: CLS COUPE, Model: MERCEDES-BENZ CLS COUPE 2011Pages: 337, PDF Size: 7.37 MB
Page 13 of 337
Flat tyre
Changing a wheel/fitting the
spar ewheel ................................... 284
MOExtended tyres (tyre swith run-
flat characteristics) ........................289
Preparing the vehicle .....................281
Raising the vehicle .........................285
TIREFIT kit ...................................... 281
Floormat ............................................ .264
Frequencies Garage door opene r....................... 264
Mobile phone ................................. 317
Two-way radio ................................ 317
Fuel
Notes ............................................. 319
Notes about consumption .............320
Refuelling ...................................... .142
Tank content/reserve fuel .............319
Troubleshooting ............................. 146
Fuel consumption
Current (on-board computer) .........198
see Technical data
Fuel filler flap
Emergency release ........................145
Opening/closing ............................ 144
Fuel filte r(white display message) .225
Fuel level Calling up the range (on-board
computer) ...................................... 198
Gauge .............................................. 26
Fuel tank
Capacity ........................................ 319
Fuse allocation chart (vehicle tool
kit) ...................................................... 279
Fuses Fuse box in the boot ......................299
Fuse box in the engine compart-
ment .............................................. 299
Notes ............................................. 298G
Garage door opener Clearing the memory .....................263
Frequencies ................................... 264
Notes ............................................. 261Opening/closing the garage door
..262
Programming (button in the rear-
view mirror) ................................... 261
Gear indicator (on-board com-
puter) ................................................. .212
Genuine Mercedes-Benz parts .........316
Genuine wood trim and trim strips
(cleaning instructions) ......................275
Glove compartment ..........................248 H
Hazard warning lamps ......................101
Headlamp cleaning system ..............102
Headlamp flasher .............................. 101
Headlamps Misting up ...................................... 103
Head restraints
Adjusting (electrically). ....................86
Adjusting (manually )........................ 86
Adjusting (rear) ................................ 87
Fitting/removing (rear) ....................87
Luxury .............................................. 87
see NECK-PRO head restraints/
NECK-PRO luxury head restraints
Heating
see Air conditioning
High-pressure cleaners ....................272
Hill start assist .................................. 131
HOLD function Display message ............................ 227
Function/notes ............................. 165 I
Immobiliser .......................................... 63
Indicator and warning lamps ABS ................................................ 241
Brakes ........................................... 238
Coolant .......................................... 244
Distance warning signa l................. 246
DISTRONI CPLUS ........................... 246
Engine diagnostics .........................244
ESP ®
.............................................. 242
ESP ®
OFF ....................................... 243
Fuel tank ........................................ 244
Overview .......................................... 28
Reserve fuel ................................... 24410
Index
Page 22 of 337
Protection of the environment
Notes
H
Environmental note
Daimler's declared policy is one of integrated
environmental protection.
The objectives are for the natural resources
which form the basis of our existence on this
planet to be used sparingly and in a manner
which takes the requirements of both nature
and humanity into account.
You too can help to protect the environment
by operating your vehicle in an environmen-
tally responsible manner.
Fuel consumption and the rate of engine,
transmission, brake and tyre wear depend on
the following factors:
R operating conditions of your vehicle
R your personal driving style
You can influence both factors. You should
bear the following in mind:
Operating conditions
R avoid short trips as these increase fuel con-
sumption.
R make sure that the tyre pressures are
always correct.
R do not carry any unnecessary weight.
R keep an eye on the vehicle's fuel consump-
tion.
R remove roof racks once you no longer need
them.
R a regularly serviced vehicle will contribute
to environmental protection. You should
therefore adhere to the service intervals.
R always have maintenance work carried out
at a qualified specialist workshop, e.g. a
Mercedes-Benz Service Centre.
Personal driving style
R do not depress the accelerator pedal when
starting the engine.
R do not warm up the engine with the vehicle
stationary. R
drive carefully and maintain a safe distance
from the vehicle in front.
R avoid frequent, sudden acceleration.
R change gear in good time and use each gear
only up to ⅔ofits maximum engine speed.
R switch off the engine in stationary traffic. Returning use
dvehicles
Mercedes-Ben zwill take back your
Mercedes-Ben zto dispose of it in an environ-
mentally responsible manner ,inaccordance
with the European Union (EU) End of Life
Vehicles Directive.
The End of Life Vehicles Directive applies to
vehicles of up to 3.5 tgross vehicle weight, in
accordance with national regulations. For
several years, Mercedes-Benz has been
meeting all the legal requirements for a
design which allows for recycling and reuse.
There is a network of return points and dis-
assembly plants which can recycle yourv ehi-
cle in an environmentally-responsible man-
ner. The options for recycling vehicles and
parts are constantly being developed and
improved. This means that your Mercedes-
Benz will also continue to meet even the
increased recycling quotas in the future in
good time. You can obtain further information
from your national Mercedes-Benzh omepage
or your national hotline number. Vehicle equipment
This manual describes all the standard and
optional equipment of your vehicle available
at the time of publication of the Owner's Man-
ual. Country-specific differences are possi-
ble. Bear in mind that your vehicle may not
feature all functions described here. This also
refers to safety-related systems and func-
tions. The equipment in your vehicle may
therefore differ from that shown in the
descriptions and illustrations. All the systems
found in your vehicle are listed in the original Introduction
19 Z
Page 31 of 337
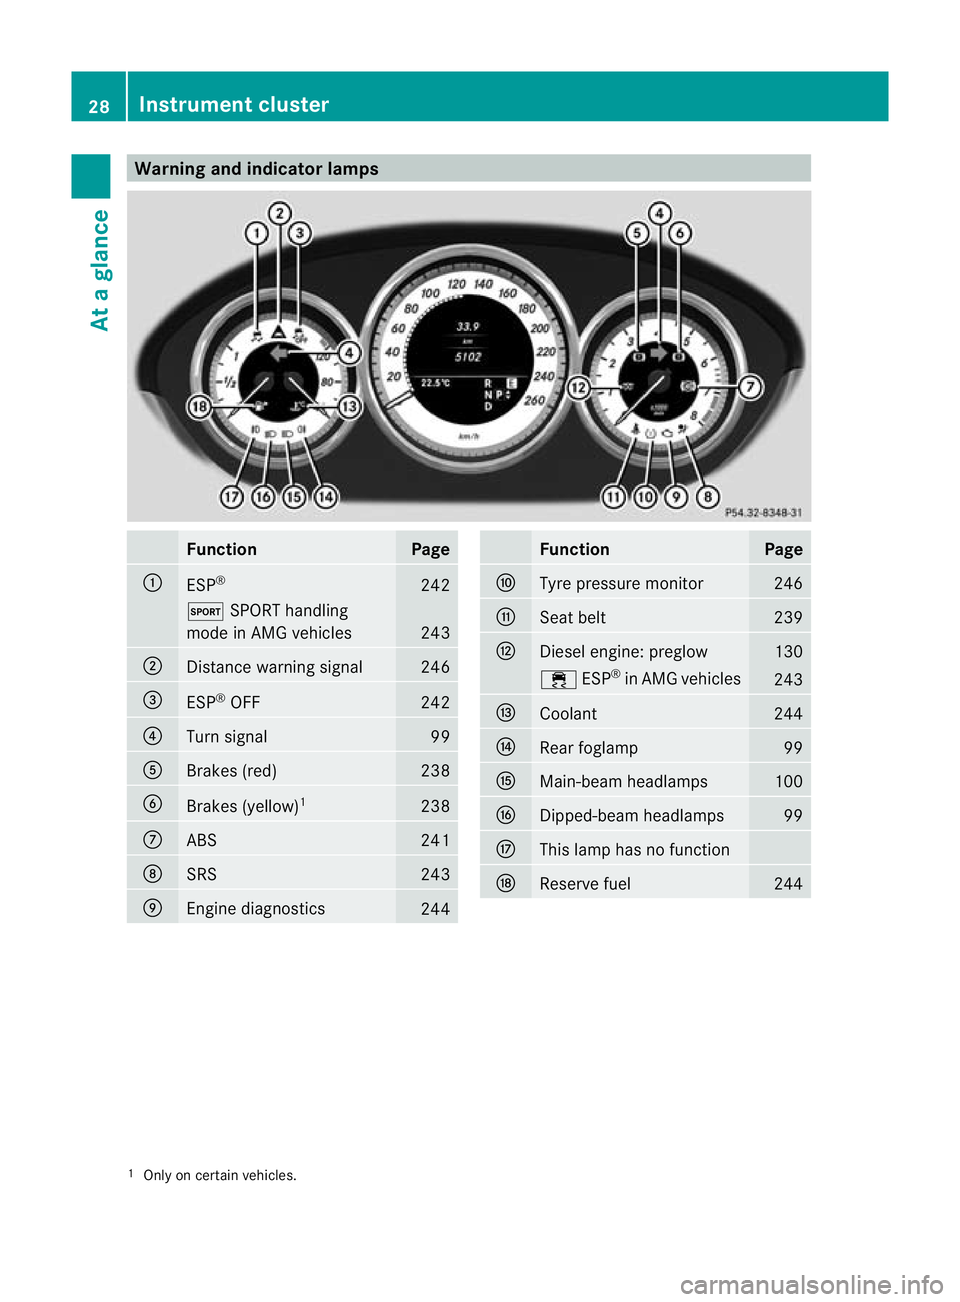
Warning and indicator lamps
Function Page
:
ESP
® 242
M
SPORT handling
mode in AMG vehicles 243
;
Distance warning signal 246
=
ESP
®
OFF 242
?
Turn signal 99
A
Brakes (red) 238
B
Brakes (yellow)
1 238
C
ABS 241
D
SRS 243
E
Engine diagnostics
244 Function Page
F
Tyre pressure monitor 246
G
Seat belt 239
H
Diesel engine: preglow 130
÷
ESP®
in AMG vehicles 243
I
Coolant 244
J
Rea
rfoglamp 99
K
Main-beam headlamps 100
L
Dipped-beam headlamps 99
M
This lamp has no function
N
Reserve fuel 244
1
Only on certain vehicles. 28
Instrument clusterAt a glance
Page 144 of 337
Selecting the ideal shift range
X
Pull the left-hand steering wheel gearshift
paddle and hold it in position.
The automatic transmission shifts to the
gear which allows optimum acceleration
and deceleration. To do this, the automatic
transmission shifts down one or more
gears. Manual drive program
Switching on the manual drive program AMG vehicles and vehicles with
aDIRECT
SELECT lever: you can select manual drive
program Musing the program selector or the
program selector button. In manual drive pro-
gram M, you can change gear yourself using
the steering wheel gearshif tpaddles if the
transmission is in position D.
X Press the program selecto rbutton
(Y page 138) repeatedly until Mappears in
the multifunction display.
X AMG vehicles: turn the program selector
(Y page 139) until Mappears in the multi-
function display.
The indicator Mon the program selector
lights up in red.
Upshifting X
Pull the right-hand steering wheel gearshift
paddle (Y page 139).
The automatic transmission shifts up to the
next gear.
Vehicles with AMG engines
! In manual gearshif tprogram M, the auto-
matic transmission does not shift up auto-
matically even when the engine limiting
speed for the current geari s reached.
When the engine limiting speed is reached,
the fuel supply is cut to prevent the engine
from overrevving. You must make sure that
the engine speed does not reach the red area of the rev counter. Otherwise, there is
a risk of engine damage.
X Shift up a gear if the colour in the multi-
function display in the speedometer
changes to red and UP appears in the rev
counter.
Downshifting X
Pull the left-hand steering wheel gearshift
paddle (Y page 139).
The automatic transmission shifts down to
the next gear.
i If you slow down or stop without shifting
down, the automatic transmission auto-
matically shifts down.
i For maximum acceleration, pull the left-
hand steering wheel gearshift paddle until
the transmission selects the optimum gear
for the current speed.
Kickdown i
Vehicles with an AMG engine: it is not
possible to use kickdown in manual drive
program M.
You can also use kickdown for maximum
acceleration in manual drive program M.
X Depress the accelerator pedal beyond the
pressure point.
The transmission shifts to a lower gear
depending on the engine speed.
X Shift back up once the desired speed is
reached.
Switching off the manual drive program X
Standard vehicles with the DIRECT
SELECT lever: press the program selector
button (Y page 138) until Eor Sis shown
in the multifunction display.
X AMG vehicles: turn the program selector
(Y page 139) until C,Sor S+ appears in the
multifunction display. Automatic transmission
141Driving and parking Z
Page 148 of 337
:
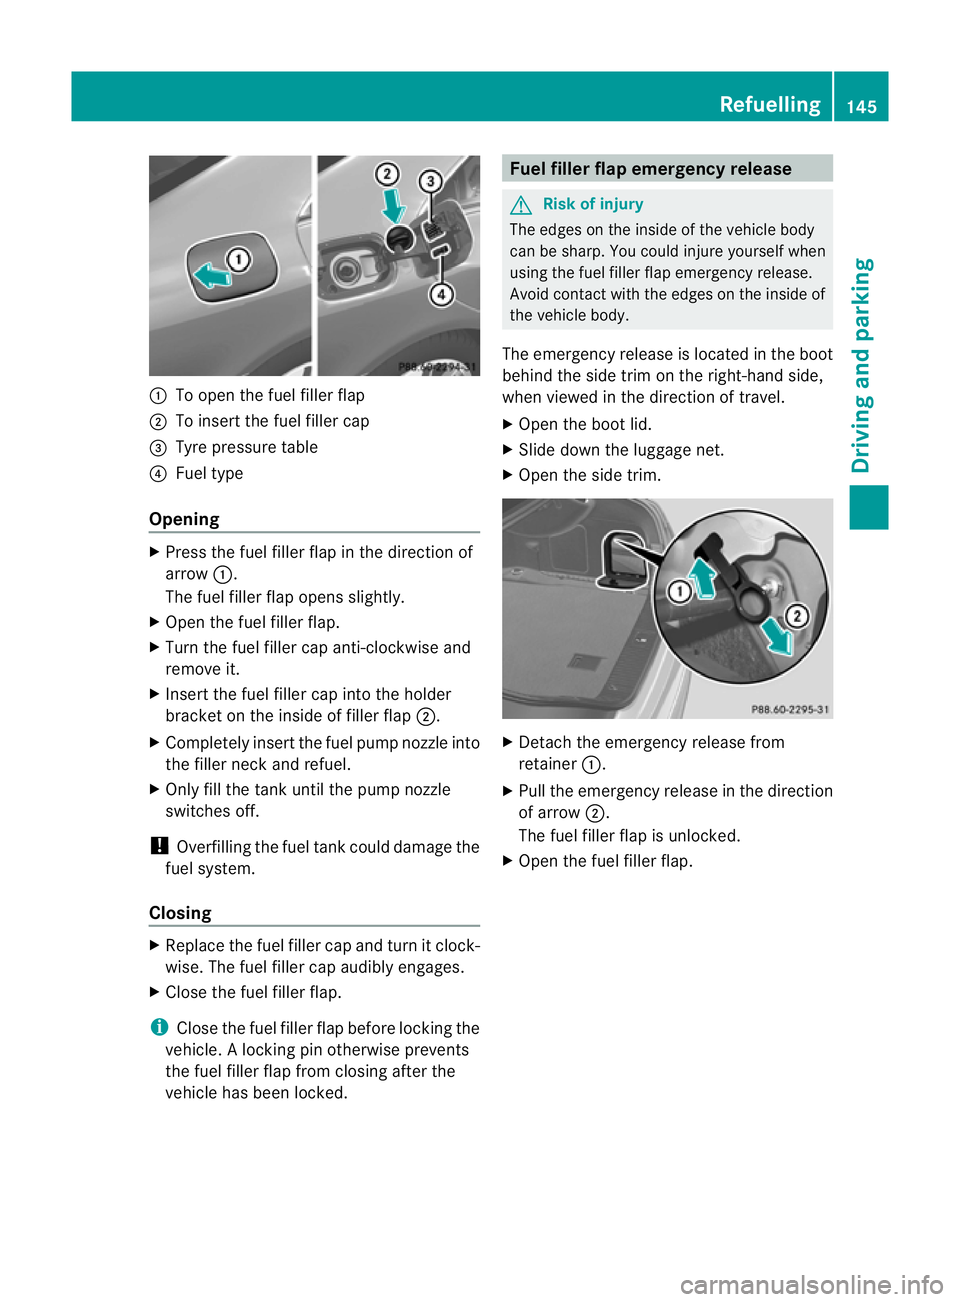
To open the fuel filler flap
; To insert the fuel filler cap
= Tyre pressure table
? Fuel type
Opening X
Press the fuel filler flap in the direction of
arrow :.
The fuel filler flap opens slightly.
X Open the fuel filler flap.
X Turn the fuel filler cap anti-clockwise and
remove it.
X Insert the fuel filler cap into the holder
bracket on the inside of filler flap ;.
X Completely insert the fuel pump nozzle into
the filler neck and refuel.
X Only fill the tank until the pump nozzle
switches off.
! Overfilling the fuel tank could damage the
fuel system.
Closing X
Replace the fuel filler cap and turn it clock-
wise. The fuel filler cap audibly engages.
X Close the fuel filler flap.
i Close the fuel filler flap before locking the
vehicle. Alocking pin otherwise prevents
the fuel filler flap from closing after the
vehicle has been locked. Fuel filler flap emergency release
G
Risk of injury
The edges on the inside of the vehicle body
can be sharp. You could injure yourself when
using the fuel filler flap emergency release.
Avoid contact with the edges on the inside of
the vehicle body.
The emergency release is located in the boot
behind the side trim on the right-hand side,
when viewed in the direction of travel.
X Open the boot lid.
X Slide down the luggage net.
X Open the side trim. X
Detach the emergency release from
retainer :.
X Pull the emergency release in the direction
of arrow ;.
The fuel filler flap is unlocked.
X Open the fuel filler flap. Refuelling
145Driving and parking Z
Page 275 of 337
High-pressure cleaning equipment
G
Risk of accident
Do not use high-pressure cleaners with circu-
lar-jet nozzles (dirt grinders) to clea nyour
vehicle, in particular the tyres. You could oth-
erwise damage the tyres and cause an acci-
dent.
! Always maintain a distance of at least
30 cm between the vehicle and the high-
pressure cleaner nozzle. Information about
the correc tdistance is available fro mthe
equipment manufacturer.
Move the high-pressure cleaner nozzle
around when cleaning your vehicle.
Do not aim directly at any of the following:
R tyres
R door gaps, roof gaps, joints etc.
R electrical components
R battery
R connectors
R lights
R seals
R trim elements
R ventilation slots
Damaged seals or electrical components
can lead to leaks or failures.
Cleaning the wheels !
Do not use acidic wheel cleaning products
to remove brake dust. This could damage
wheel bolts and brake components.
! Do not park up the vehicle for an extended
period straight after cleaning it, particularly
after having cleaned the wheels with wheel
cleaner. Wheel cleaners could cause
increased corrosion of the brake discs and
brake pads/linings. For this reason, you
should drive for a few minutes after clean-
ing. Braking heats the brake discs and
brake pads, thus drying them. The vehicle
can then be parked up. Cleaning the paintwork Scratches, corrosive deposits, areas affected
by corrosion and damage caused by inade-
quate care cannot always be completely
repaired. In such cases, visit a qualified spe-
cialist workshop, e.g. a Mercedes-Benz
Service Centre.
X Remove impurities immediately, where
possible, whilst avoiding rubbing too hard.
X Soak insect remains with insect remover
and rinse off the treated areas afterwards.
X Soak bird droppings with water and rinse
off the treated areas afterwards.
X Remove coolant, brake fluid, tree resin,
oils, fuels and greases by rubbing gently
with a cloth soaked in petroleum ether or
lighter fluid.
X Use tar remover to remove tar stains.
X Use silicone remover to remove wax.
! Do not affix:
R stickers
R films
R magnetic plates or similar items
to painted surfaces. You could otherwise
damage the paintwork.
Care and treatment of matt paintwork If your vehicle has a clear matt finish, observe
the following instructions in order to avoid
damage to the paintwork due to incorrect
care.
These notes also apply to light alloy wheels
with a clear matt finish.
! Never polish the vehicle or the light alloy
wheels. Polishing makes the paintwork
shiny.
! Never use paint cleaner, buffing or pol-
ishing products, or gloss preserver, e.g.
wax. These products are only suitable for
high-gloss surfaces. Their use on vehicles
with matt finish leads to considerable sur-
face damage (shiny, spotted areas). 272
CareMaintenance and care
Page 287 of 337
X
Correct the tyre pressure if it is still at least
130 kPa (1.3 bar/20 psi) (for the values,
see the fuel fille rflap).
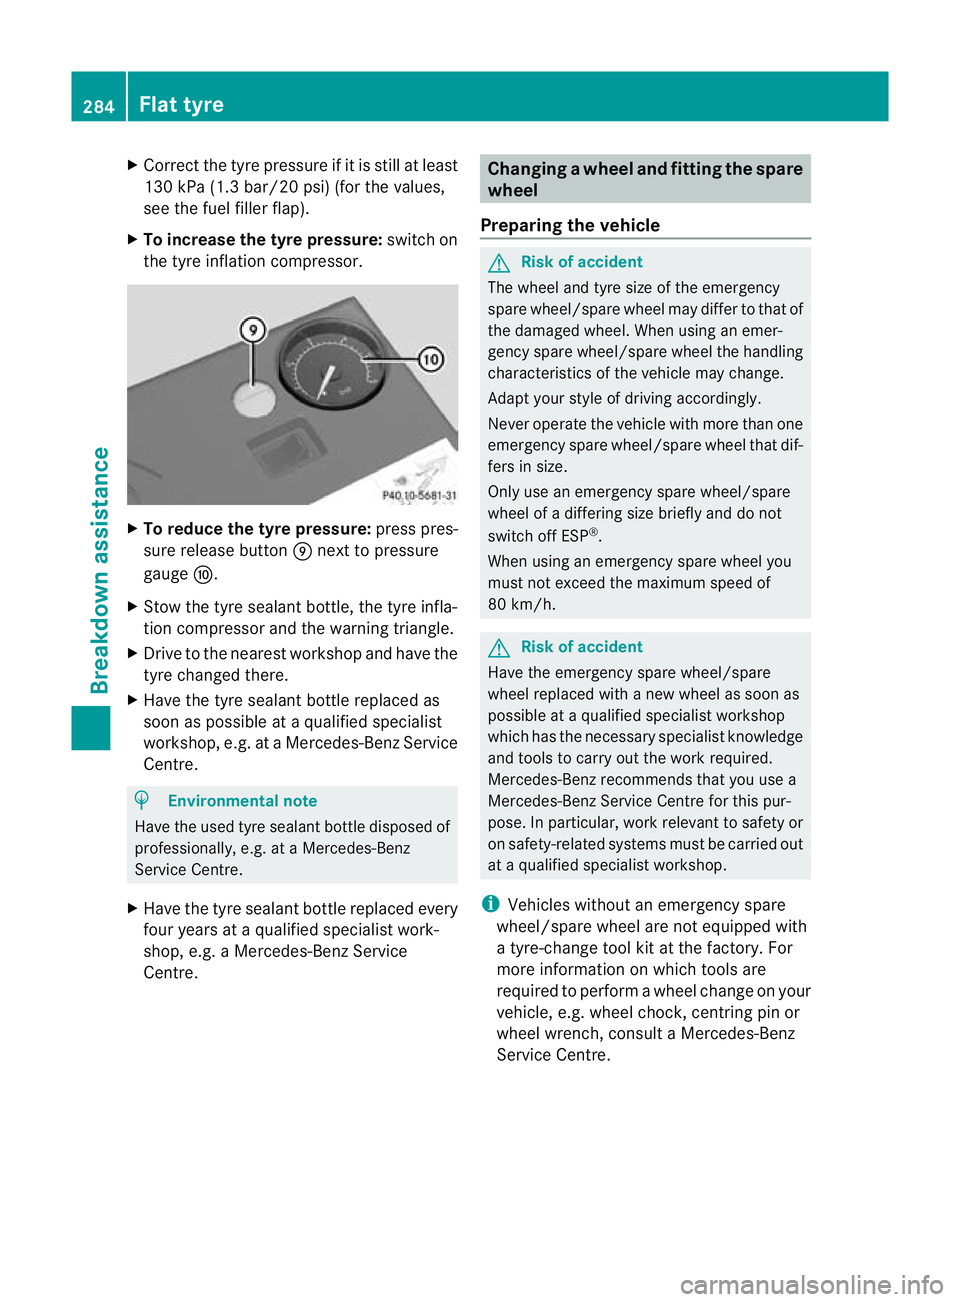
X To increase the tyre pressure: switch on
the tyre inflation compressor. X
To reduce the tyre pressure: press pres-
sure release button Enext to pressure
gauge F.
X Stow the tyre sealant bottle, the tyre infla-
tion compressor and the warning triangle.
X Drive to the nearest workshop and have the
tyre changed there.
X Have the tyre sealant bottle replaced as
soon as possible at a qualified specialist
workshop, e.g. at a Mercedes-Ben zService
Centre. H
Environmental note
Have the used tyre sealant bottle disposed of
professionally, e.g. at aMercedes-Benz
Service Centre.
X Have the tyre sealant bottle replaced every
four years at a qualified specialist work-
shop, e.g. a Mercedes-Benz Service
Centre. Changing
awheel and fitting the spare
wheel
Preparing the vehicle G
Risk of accident
The wheel and tyre size of the emergency
spare wheel/spare wheel may diffe rto that of
the damaged wheel. When using an emer-
gency spare wheel/spare wheel the handling
characteristics of the vehicle may change.
Adapt your style of driving accordingly.
Never operate the vehicle with more than one
emergency spare wheel/spare wheel that dif-
fers in size.
Only use an emergency spare wheel/spare
wheel of a differing size briefly and do not
switch off ESP ®
.
When using an emergency spare wheel you
must not exceed the maximum speed of
80 km/h. G
Risk of accident
Have the emergency spare wheel/spare
wheel replaced with a new wheel as soon as
possible at a qualified specialist workshop
which has the necessary specialist knowledge
and tools to carry out the work required.
Mercedes-Benz recommends that you use a
Mercedes-Benz Service Centre for this pur-
pose. In particular, work relevant to safety or
on safety-related systems must be carried out
at a qualified specialist workshop.
i Vehicles without an emergency spare
wheel/spare wheel are not equipped with
a tyre-change tool kit at the factory. For
more information on which tools are
required to perform a wheel change on your
vehicle, e.g. wheel chock, centring pin or
wheel wrench, consult a Mercedes-Benz
Service Centre. 284
Flat tyreBreakdown assistance
Page 308 of 337
achieving an increased driving force (cut-
ting action). Tyre pressure
Tyre pressure specifications
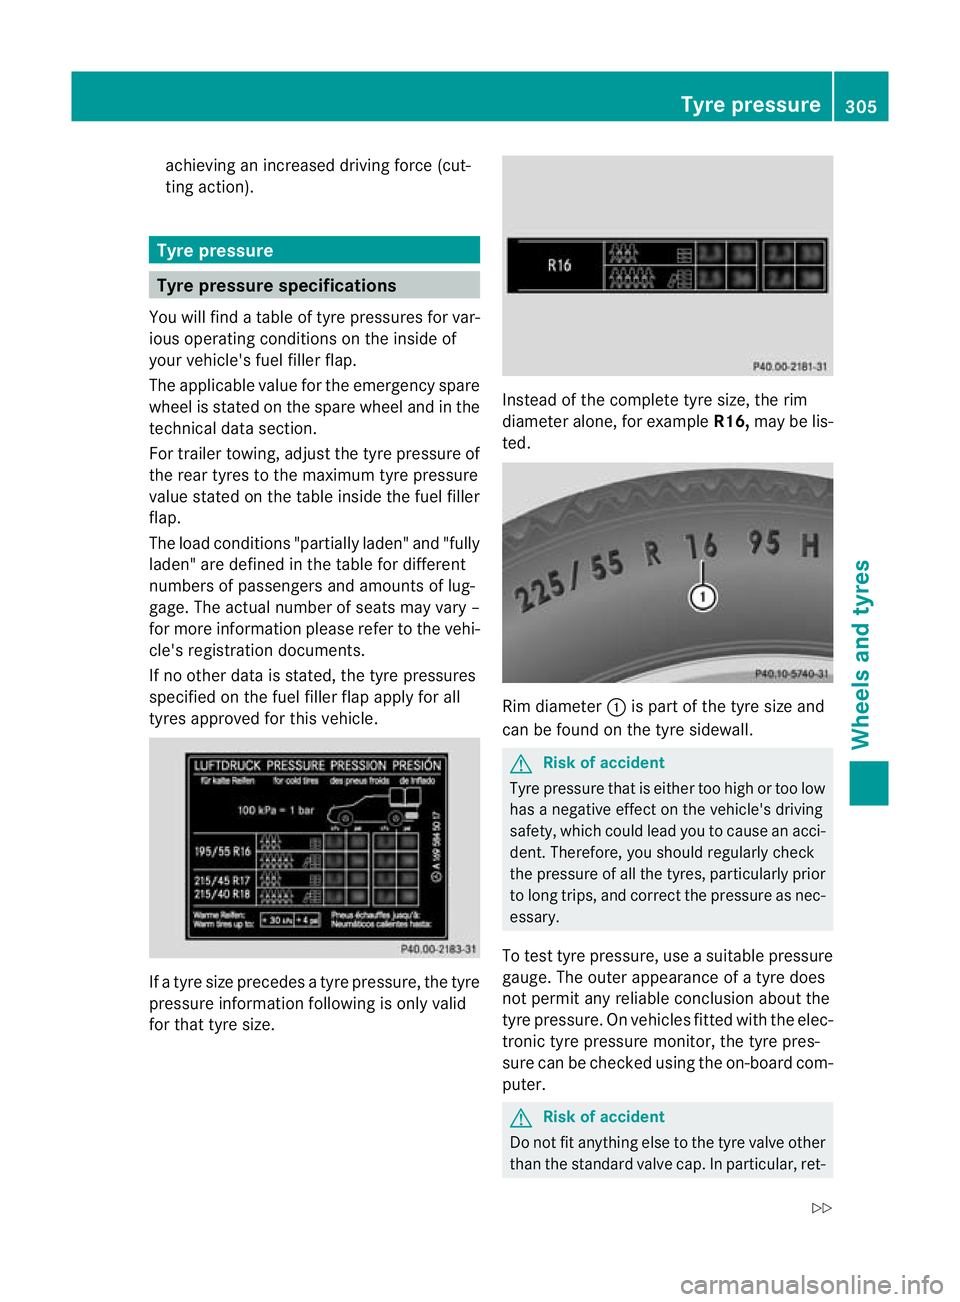
You will find a table of tyre pressures for var-
ious operating conditions on the inside of
your vehicle's fuel fille rflap.
The applicable value for the emergency spare
wheel is stated on the spare wheel and in the
technical data section.
For trailer towing, adjust the tyre pressure of
the rear tyres to the maximum tyre pressure
value stated on the table inside the fuel filler
flap.
The load conditions "partially laden" and "fully
laden" are defined in the table for different
numbers of passengers and amounts of lug-
gage. The actual number of seats may vary –
for more information please refer to the vehi-
cle's registration documents.
If no other data is stated, the tyre pressures
specified on the fuel filler flap apply for all
tyres approved for this vehicle. If a tyre size precedes a tyre pressure, the tyre
pressure information followin gis only valid
for that tyre size. Instead of the complete tyre size, the rim
diameter alone, for example
R16,may be lis-
ted. Rim diameter
:is part of the tyre size and
can be found on the tyre sidewall. G
Risk of accident
Tyre pressure that is either too high or too low
has a negative effect on the vehicle's driving
safety, which could lead you to cause an acci-
dent. Therefore, you should regularly check
the pressure of all the tyres, particularly prior
to long trips, and correct the pressure as nec-
essary.
To test tyre pressure, use a suitable pressure
gauge.T he outer appearance of a tyre does
not permit any reliable conclusion about the
tyre pressure. On vehicles fitted with the elec-
tronic tyre pressure monitor, the tyre pres-
sure can be checked using the on-board com-
puter. G
Risk of accident
Do not fit anything else to the tyre valve other
than the standard valve cap. In particular, ret- Tyre pressure
305Wheels and tyres
Z
Page 309 of 337
rofitted tyre pressure monitors which are
screwed on to the valve may overload it and
cause it to fail .Due to their design, the valve
is kept open continuously, which may lead to
air loss. G
Ris
kofa ccident
Should the tyre pressure drop repeatedly:
R check the tyre for foreign bodies.
R check whether the wheel is losing air or the
valve is leaking.
R make sure that only a valve cap approved
by Mercedes-Benz is fitted on the tyre
valve.
Tyre pressures that are to olow have a nega-
tive effect on vehicle safety, which could lead
you to cause an accident.
If possible, only correc ttyre pressures when
the tyres are cold. The tyres are cold when
the vehicle has been parked fo ratleast three
hours or has been driven less than 1.5 km.
Depending on the ambient temperature, the
speed you are driving at and the load on the
tyres, the tyre temperature and thus the tyre
pressure may change by approximately
10 kPa (0.1 bar, 1.5 psi) per 10 †. Take this
into accoun twhen checking the pressure of
warm tyres and only correct it if it is too low
for the current operating conditions.
Driving with tyre pressure that is too high or
too low can:
R shorten the service life of the tyres
R cause increased tyre damage
R have a negative effect on handling charac-
teristics and thus the driving safety (e.g. by
causing aquaplaning)
i The tyre pressure values given for low
loads are minimum values which offer you
good ride comfort characteristics.
However, you can also use the values given
for higher loads. These are permissible and
will not adversely affect the running of the
vehicle. H
Environmental note
Check the tyre pressure regularly, at least
every 14 days. Tyre pressure loss warning system
Important safety notes While the vehicle is in motion, the tyre pres-
sure loss warning system monitors the set
tyre pressure using the rotational speed of
the wheels. This enables the system to detect
significant pressure loss in a tyre. If the speed
of rotation of a wheel changes as a result of
a loss of pressure, a corresponding warning
message will appearint
he multifunction dis-
play. G
Risk of accident
The tyre pressure loss warning system does
not warn you of an incorrectly set tyre pres-
sure. The table on the inside of the fuel filler
flap will help you decide whether the tyre
pressures should be corrected.
The tyre pressure loss warning system does
not replace the need to regularly check your
vehicle's tyre pressures, since an even loss of
pressure on several tyres at the same time
cannot be detected by the tyre pressure loss
warning system.
The tyre pressure monitor is not able to warn
you of a sudden loss of pressure, e.g. if the
tyre is penetrated by a foreign object.
In the event of a sudden loss of pressure, bring
the vehicle to a halt by braking carefully. Do
not make any sudden steering movements
when doing so.
The function of the tyre pressure loss warning
system is limited or delayed if:
R snow chains are fitted to your vehicle's
tyres.
R road conditions are wintry.
R you are driving on sand or gravel. 306
Tyre pressureWheels and tyres
Page 310 of 337
R
you adop tavery sporty driving style (cor-
nering at high speeds or driving with high
rates of acceleration).
R you are driving with a heavy load (in the
vehicle or on the roof).
Restarting the tyre pressure loss warn-
ing system Restart the tyre pressure loss warning system
if you have:
R changed the tyre pressure
R changed the wheels or tyres
R fitted new wheels or tyres
X Before restarting, consult the table of tyre
pressures on the inside of the fuel filler flap
to ensure that the tyre pressure in all four
tyres is set correctly for the respective
operating conditions.
X Observe the notes in the section on tyre
pressures (Y page 305). G
Risk of accident
The tyre pressure loss warning system can
only give reliable warnings if you have set the
correct tyre pressure.
If an incorrect tyre pressure is set, these
incorrect values will be monitored.
At yre with insufficien tpressure results in
vehicle instability when driving, thus increas-
ing the risk of an accident.
X Make sure that the key is in posi-
tion 2(Ypage 129) in the ignition lock.
X Press =or; on the steering wheel
to select the Serv. menu.
X Press 9or: to select Tyre pres‐ sure .
X Press the abutton.
The Run Flat Indicator active Restart with OK message appears in the
multifunction display. If you wish to confirm the restart:
X
Press the abutton.
The Tyre press. now OK? message
appears in the multifunction display.
X Press 9or: to select Yes .
X Press the abutton.
The Run Flat Indicator restarted message appears in the multifunction dis-
play.
After a teach-in period, the tyre pressure
loss warning system will monitor the set
tyre pressures of all four tyres.
If you wish to cancel the restart:
X Press the %button.
or
X If the Tyre press. now OK? message
appears, press 9or: to select
Cancel .
X Press the abutton.
The tyre pressure values stored at the last
restart will continue to be monitored. Tyre pressure monitor
Important safety notes If a tyre pressure monitor system is fitted, the
vehicle's wheels have sensors fitted that
monitor the tyre pressures in all four tyres.
The tyre pressure monitor warns you if the
pressure drops in one or more of the tyres.
The tyre pressure monitor only functions if
the correct wheel electronics units are fitted
to all wheels.
G
Risk of accident
The tyre pressure monitor does not warn you
of an incorrectly set tyre pressure. The table
on the inside of the fuel filler flap will help you
decide whethe rthe tyre pressures should be
corrected.
The tyre pressure monitor is not able to warn
you of a sudden loss of pressure, e.g. if the
tyre is penetrated by a foreign object. In the
event of a sudden loss of pressure, bring the Tyre pressure
307Wheels and tyres
Z