oil temperature MERCEDES-BENZ CLS COUPE 2011 Owners Manual
[x] Cancel search | Manufacturer: MERCEDES-BENZ, Model Year: 2011, Model line: CLS COUPE, Model: MERCEDES-BENZ CLS COUPE 2011Pages: 337, PDF Size: 7.37 MB
Page 7 of 337
1, 2, 3 ...
12 Vsocket ........................................ 258
4ETS see ETS/4ETS A
ABS (Anti-lock Braking System) Display message ............................ 219
Function/notes ................................ 57
Warning lamp ................................. 241
Active Blin dSpot Assist
Activating/deactivating (on-
board computer) ............................ 204
Display message ............................ 229
Function/notes ............................. 186
Active Driving Assistance package .186
Active Lane Keeping Assist Activating/deactivating (on-
board computer) ............................ 205
Display message ............................ 228
Function/informatio n.................... 189
Active multicontour seat ....................88
Active Park Assist Display message ............................ 229
Active Parking Assist
Function/notes ............................. 173
Active Service Syste mPLUS
see ASSYS TPLUS service interval
display
ADAPTIVE BRAKE .................................61
Adaptive brake lamps .........................58
Adaptive Highbeam Assist Activating/deactivating .................100
Adaptive Main-Beam Assist
Display message ............................ 223
Switching on/off (on-board com-
puter) ............................................. 208
Additives
Engine oil ....................................... 321
Airbag
Important safety guidelines .............36
Airbags
Activation ......................................... 35
Front airbag (driver, front
passenger )....................................... 38
Kneebag .......................................... .38Pelvis airbag
.................................... 39
Sidebag ............................................ 38
Windowba g...................................... 39
Airc onditioning
3-zone THERMOTRONIC luxury
automatic air conditioning .............112
Activating/deactivating .................113
Activating/deactivating air-recir-
culation mode ................................ 117
Auxiliary heating/ventilation .......... 119
Controlling automatically ...............114
Cooling with aird ehumidification..114
Demisting the windscreen .............116
Rea rcontrol panel ......................... 113
Setting the aird istribution.............115
Setting the airflow .........................116
Setting the airv ents...................... 124
Setting the temperature ................115
Setting the temperature (rear
compartment) ................................ 115
Switching the residual hea tfunc-
tion on/off ..................................... 118
THERMATIC 2-zone automatic cli-
mate control .................................. 111
Air-conditioning system
see Climate control
Air dehumidification
Activating/deactivating with cool-
ing................................................. 114
Aird istribution
Settin g........................................... 115
Airf ilter (white display message) ....225
Airflow Setting ........................................... 116
AIRF LOW ........................................... 114
AIRMATIC Display message ............................ 226
Function/notes ............................. 167
Suspensio ntunin g......................... 168
Vehicle leve l.................................. 167
Air pressure
see Tyre pressure
Air-recirculation mode
Activating/deactivating .................117
Airv ents ............................................ .124
Glove compartment .......................124
Important safety information .........123
Rea r............................................... 1244
Index
Page 12 of 337
EBD (Electronic Brake-force Distri-
bution) Display message ............................ 220
Function/notes ................................ 61
ECO start/stop function
General information .......................131
Switching on/off (AMG vehicles) ...133
Switching on/off (except AMG
vehicles) ........................................ 133
Electrical fuses
see Fuses
Electronic Brake-force Distribution
see EBD
Electronic Stability Program
see ESP ®
Electronic Traction System see ETS/4ETS
Emergency key element
Function/notes ................................ 69
Emergency locking
Vehicle ............................................. 75
Emergency release
Fuel filler fla p................................. 145
Emergency running mode
Automatic transmission .................142
Emergency spare wheel
Inflating the collapsible spare
wheel ............................................. 288
Notes/data .................................... 313
Storage location ............................ 280
Stowing .......................................... 280
Emergency unlocking
Boot ................................................. 77
Vehicle ............................................. 75
Engine
Running irregularl y......................... 134
Starting problems ..........................134
Starting the engine with the key ....130
Starting with KEYLESS GO .............130
Stopping ........................................ 148
Warning lamp (engine diagnos-
tics) ............................................... 244
Engine electronics .............................316
Malfunction ................................... .134
Engine number .................................. 319Engine oil
Additives ........................................ 321
Checking the oil level ..................... 267
Display message ............................ 225
Filling capacity ............................... 321
Notes about oil grades ................... 320
Temperature (on-board computer) .212
Topping up ..................................... 268
Viscosity ........................................ 321
Environmental protection
Note ................................................ .19
Returning an end-of-life vehicle .......19
Error messages
see Display messages
ESP ®
(Electronic Stability Pro-
gram) Activating/deactivating (AMG
vehicles) .......................................... 60
Activating/deactivating (except
AMG vehicles) .................................. 59
Activating/deactivating (on-
board computer) ............................ 204
ETS/4ETS ........................................ 59
Important safety guidelines .............58
Warning lamp ................................. 242
ETS/4ETS (Electronic Traction Sys-
tem) ...................................................... 59
Exhaus ttail pipe (cleaning instruc-
tions) .................................................. 274
Exterior mirrors Adjusting ......................................... 93
Anti-dazzle mode (automatic) ..........94
Folding in/ou t(automatically) .........93
Folding in/ou t(electrically) .............93
Folding in whe nlocking (on-board
computer) ...................................... 211
Out of position ................................. 94
Parking position ............................... 94
Resetting ......................................... 93
Storing settings (memory func-
tion) ................................................. 95 F
Fatigue Assist see ATTENTION ASSIST
Fire extinguisher ............................... 278
First-aid kit ......................................... 278 Index
9
Page 16 of 337
NECK-PRO luxury head restraints
Operatio n......................................... 41
Reset ting after being triggered ........41
Night View Assist Plus
Activating/deactivating .................181
Cleaning ......................................... 274
Function/notes ............................. 180
Malfunction ................................... .183
Problem ......................................... 183
Notes on running in anew vehicle ..128 O
Occupant safety Childre ninthe vehicle ..................... 46
Important safety guidelines .............34
Odometer ........................................... 198
Oil see Engine oil
On-board computer
AMG menu ..................................... 212
Assistance menu ........................... 203
Audi omenu ................................... 200
Convenience submenu ..................211
Display messages ..........................215
Factory settings ............................. 212
Heating submenu ........................... 210
Important safety notes ..................194
Instrument cluster submenu ..........205
Ligh tsubmenu ............................... 207
Menu overview .............................. 197
Message memory .......................... 215
Navigation menu ............................ 199
Operating the TV ............................ 201
Operating vide oDVD ..................... 201
Operation ....................................... 195
Service menu ................................. 205
Settings menu ............................... 205
Standard display submenu ............198
Telephone menu ............................ 201
Time/Date submenu .....................206
Trip menu ...................................... 198
Vehicle submenu ........................... 209
Operating system
see On-board computer
Outside temperature
Display ........................................... 195Overhead control panel
Overview .......................................... 31
Override feature
Rea rside windows ........................... 56 P
Pain tcode .......................................... 318
Paintwork (cleaning instructions) ...272
Parking ............................................... 147
Parking aid Active Parking Assist .....................173
Display message ............................ 229
PARKTRONI C................................. 170
Reversing camera ..........................176
Parking brake .................................... 148
Display message ............................ 220
Parking lamp (display message) ......222
Parking position Exterior mirror on the front-
passenger side ................................. 94
PARKTRONIC
Activating/deactivating .................172
Function/notes ............................. 170
Malfunction ................................... .173
Problem ......................................... 173
Sensor range ................................. 170
Warning displa y............................. 171
PASSENGE RAIRBAG OFF warning
lamp ...................................................... 48
Permanent display (on-board com-
puter) .................................................. 206
Permanent Speedtronic ....................164
Plastic trim (cleaning instructions) .275
Power windows see Side windows
Pre-emptive occupant safety sys-
tem
see PRE-SAFE ®
PRE-SAFE ®
Brake (vehicles with
DISTRONIC PLUS) Activating/deactivating (on-
board computer) ............................ 204
Display message ............................ 217
Function/notes ................................ 61
PRE-SAFE ®
Brake (vehicles with
DISTRONIC PLUS) Warning lamp ................................. 246 Index
13
Page 19 of 337
Starting the engine
Important safety notes ..................130
Station
see Radio
Steering (display message) ..............235
Steering wheel Adjusting (electrically). ....................91
Adjusting (manually). .......................91
Buttons (on-board computer) ......... 195
Important safety instructions ...........90
Memory function (storing set-
tings) ................................................ 91
Steering wheel heating ....................91
Storing settings (memory func-
tion) ................................................. 95
Steering wheel gearshift paddles ....139
Steering wheel heating Malfunction indicator lamp ..............92
Stowage compartments
Armrest (under) ............................. 249
Centre console .............................. 249
Centre console (rea rcompart-
ment). ............................................ 250
Cuph older..................................... 255
Glove compartment .......................248
Rea r............................................... 250
Under driver's seat/front-
passenger sea t.............................. 250
Stowage space
Important safety information .........248
Stowage well
Boot floo r(underneath) ................. 254
Submenu (on-board computer)
Convenience .................................. 211
Factory setting ............................... 212
Heating .......................................... 210
Instrument cluster .........................205
Lights ............................................ .207
Standard displa y............................ 198
Time/Date ..................................... 206
Vehicle .......................................... .209
Summer opening
see Convenience opening feature
Summer tyres .................................... 303
Sun visor ............................................ 256
Supplemental Restraint System see SRS Surround lighting (on-board com-
puter)
................................................. .208
Suspension tuning ....................168, 169
Switching off the alarm (ATA) ............63 T
Tail lamp (display message) .............222
Technical data CLS 250 CDI BlueEFFICIENCY .......324
CLS 350 BlueEFFICIENCY ..............323
CLS 350 CDI 4MATIC BlueEFFI-
CIENC Y.......................................... 325
CLS 350 CDI BlueEFFICIENCY .......325
CLS 500 4MATIC BlueEFFI-
CIENC Y.......................................... 323
CLS 500 BlueEFFICIENCY ..............323
CLS 63 AMG .................................. 324
Notes ............................................. 316
Tyres/wheels ................................. 310
Telephone
Accepting acall............................. 202
Menu (on-board computer) ............201
Number from the phone book ....... .202
Redialling ....................................... 203
Rejecting/ending acall................. 202
Telephone compartment ..................249
Temperature Coolant .......................................... 194
Coolant (on-board computer) ......... 212
Engine oil (on-board computer) ...... 212
Outside temperature ..................... .195
Setting ........................................... 115
TEMPOMAT
Function/notes ............................. 152
Through-loading feature ...................251
Tilt/sliding sunroof see Sliding sunroof
Time (on-board computer) ................206
Timer (on-board computer) ..............212
TIREFIT kit .......................................... 281
Top Tether ............................................ 50
Total distance recorder ....................198
Tow-away protection ..........................64
Towing Important safety notes ..................29516
Index
Page 132 of 337
the vehicle could skid. Thi
scould cause you
to lose control of your vehicle and cause an
accident.
! Warm up the engine quickly. Do not use
the engine's full performance until it has
reached operating temperature.
Only set the automatic transmission to the
respective drive positions when the vehicle
is stationary.
Where possible, avoid spinning the drive
wheels when pulling away on slippery
roads. Otherwise, you could damage the
drive train.
! AMG vehicles: at low engine oil tempera-
tures (below +20 †), the maximum engine
speed is restricted in order to protect the
engine. To protect the engine and maintain
smooth engine operation, avoid driving at
full throttle when the engine is cold. Key positions
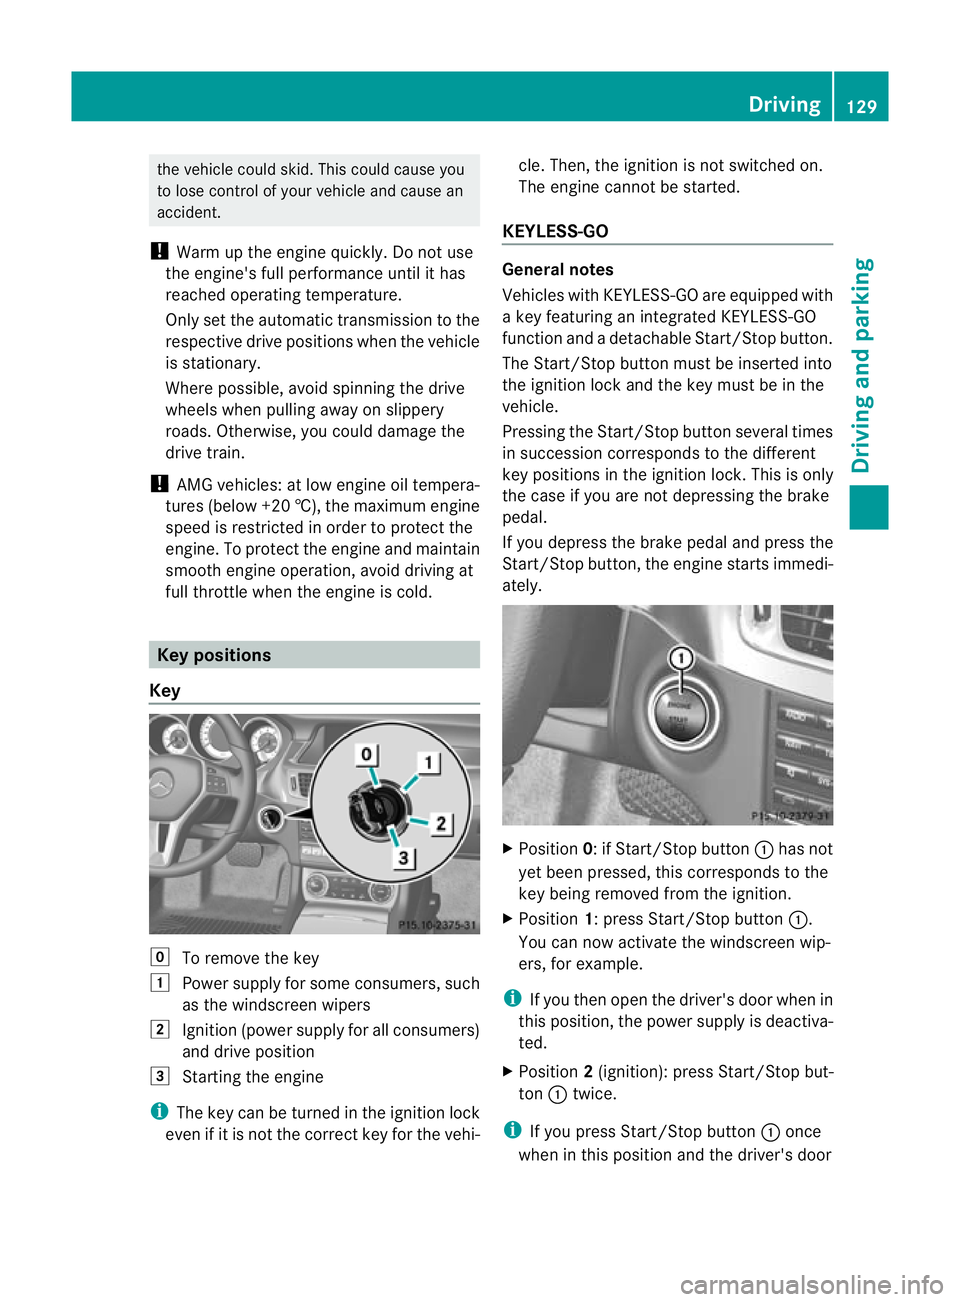
Key g
To remove the key
1 Power supply for some consumers, such
as the windscreen wipers
2 Ignition (power supply for all consumers)
and drive position
3 Starting the engine
i The key can be turned in the ignition lock
even if it is not the correc tkey for the vehi- cle. Then, the ignition is not switched on.
The engine cannot be started.
KEYLESS-GO General notes
Vehicles with KEYLESS-GO are equipped with
a key featuring an integrated KEYLESS-GO
function and a detachable Start/Stop button.
The Start/Stop button must be inserted into
the ignition lock and the key must be in the
vehicle.
Pressing the Start/Stop button several times
in succession corresponds to the different
key positions in the ignition lock. This is only
the case if you are not depressing the brake
pedal.
If you depress the brake pedal and press the
Start/Stop button, the engine starts immedi-
ately.
X
Position 0: if Start/Stop button :has not
yet been pressed, this corresponds to the
key being removed from the ignition.
X Position 1: press Start/Stop button :.
You can now activate the windscreen wip-
ers, for example.
i If you then open the driver's door when in
this position, the power supply is deactiva-
ted.
X Position 2(ignition): press Start/Stop but-
ton :twice.
i If you press Start/Stop button :once
when in this position and the driver's door Driving
129Driving and parking Z
Page 147 of 337
under 50 ppm
.Otherwise, the emission
control syste mcould be damaged.
! Vehicles without adiesel particle fil-
ter: the engine oil should be changed more
frequently in countries in which diesel with
a higher sulphur conten tis available. More
information about intervals for changing
the engine oil can be obtained from any
Mercedes-Benz Service Centre.
! Using fuel that does not conform to Euro-
pean standard EN 590 or German standard
DIN 51628 can lead to increased wear,
engine damage and damage to the exhaust
system.
Do not use the following:
R marine diesel
R heating oil
R bio-diesel
R vegetable oil
R petrol
R paraffin
R kerosene
Do not mix these fuels with diesel fuels and
do not use any special additives. Other-
wise, this can lead to damage to the engine.
This excludes flow improver, see "Low out-
side temperatures".
! Use a filter when adding fuel from a fuel
can. Otherwise, the fuel lines and/or the
diesel injection system could be blocked by
particles from the fuel can.
For further information on "Fuel", see
(Y page 319).
Low outside temperatures Diesel fuel with improved cold flow qualities
is available during the winter months. In
Europe, various climate-dependent low-tem-
perature classes are defined in EN 590. Refu-
elling with diesel fuel which complies with the
climatic specifications of standard EN 590
can help to prevent operating problems. At
exceptionally low temperatures, it is possible that the flow properties of the fuel may be
inadequate. This also applies to fuel that has
not been adapted to suit the climatic condi-
tions, e.g. diesel fuel from warmer regions.
i
Further information about country-spe-
cific fuel properties can be obtained from
oil companies, e.g. at filling stations.
Flow improver Flow improvers can be added to improve the
cold resistance of diesel fuel. The effective-
ness of a flow improver is not guaranteed with
every fuel.
Correct dosage and thorough mixing are deci-
sive factors in ensuring improvement in low-
temperature resistance. Under certain cir-
cumstances, an excessive dosage may
actually decrease low-temperature resist-
ance and should therefore be avoided.F ollow
the manufacturer's dosing instructions.
Mix the additive with the diesel in good time,
before the flow properties of the diesel
become inadequate. Malfunctions can other-
wise only be rectified by heating the entire
fuel system, e.g. by parking the vehicle in a
heated garage.
Observe the information provided by the man-
ufacturer when using a flow improver. Only
use flow improvers that have been tested and
approved by Mercedes-Benz. You can obtain
further information from any Mercedes-Benz
Service Centre. Refuelling
Fuel filler flap The fuel filler flap is unlocked or locked auto-
matically when you open or close the vehicle
with the key or using KEYLESS-GO.
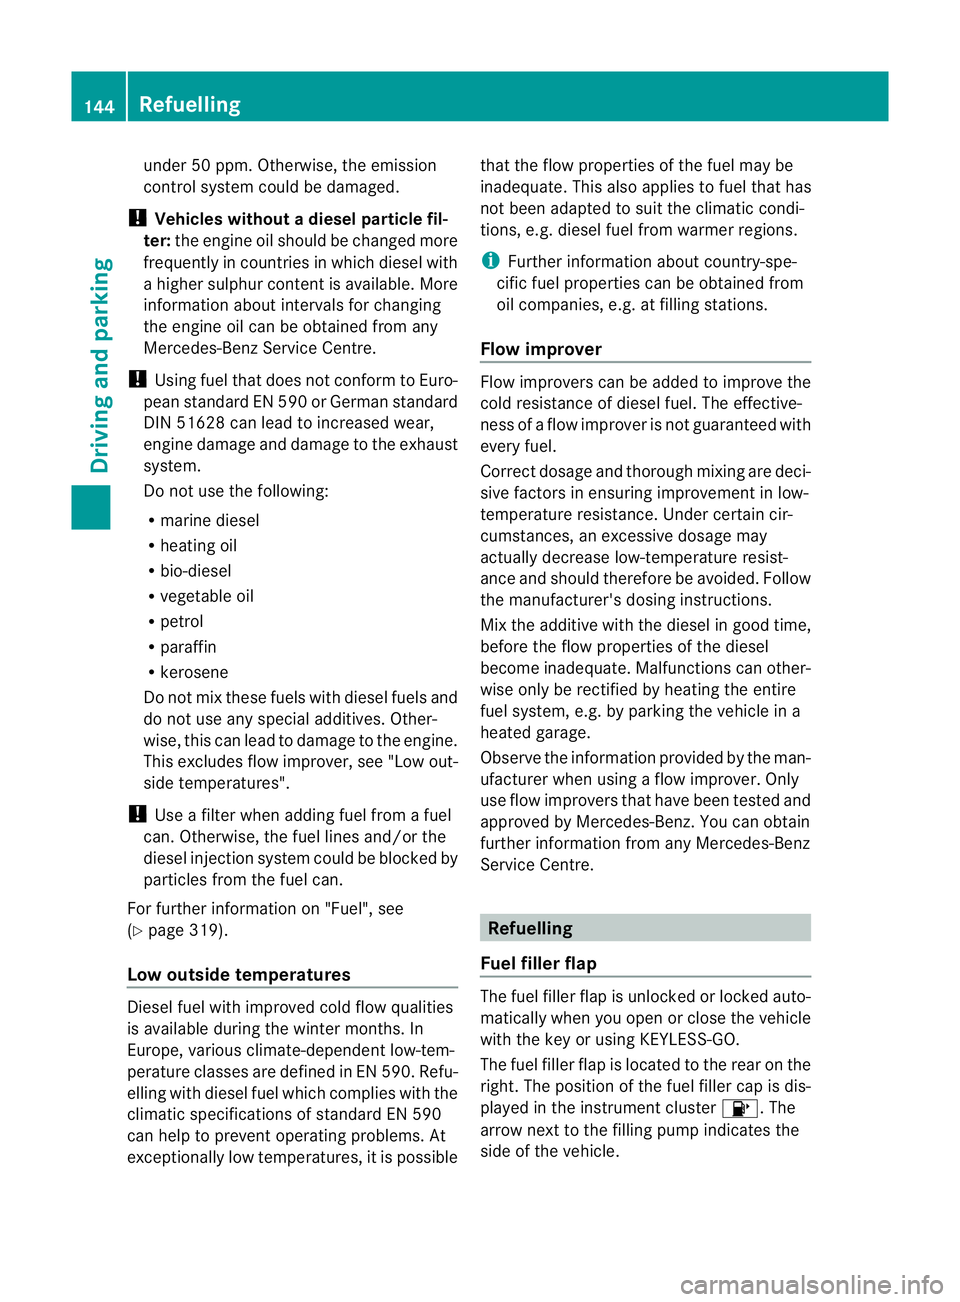
The fuel filler flap is located to the rear on the
right. The position of the fuel filler cap is dis-
played in the instrument cluster
8.The
arrow next to the filling pump indicates the
side of the vehicle. 144
RefuellingDriving and parking
Page 169 of 337
The braking effect of the HOLD function is
cancelled and the vehicle could roll away if:
R the HOLD function is deactivated by
depressing the accelerator pedal or the
brake pedal.
R there is a malfunction in the system or an
interruption in the power supply, e.g. bat-
tery failure.
R the electrical system in the engine com-
partment, the battery or the fuses are tam-
pered with.
R the battery is disconnected.
If you leave the vehicle or park it, deactivate
the HOLD function and secure the vehicle
against rolling away.
When the HOLD function is activated, the
transmission is shifted automatically to posi-
tion Pif:
R the driver's door is open and the driver's
seat belt is unfastened.
R the engine is switched off, unless it is auto-
matically switched off by the ECO start/
stop function.
R the bonnet is opened.
R a system fault occurs.
R the power supply is not sufficient. RACE START
Important safety notes i
RACE START is only available in AMG vehi-
cles.
RACE START enables optimal acceleration
from a standing start with suitable high-grip
road surface conditions. G
Risk of accident
RACE START is only available when SPORT
handling mode is activated. SPORT handling
mode will only be able to stabilise the vehicle
to a limited degree if the vehicle starts to skid
or a wheel starts to spin. The vehicle is there-
fore harder to control at the threshold range. You could lose control of the vehicle and
cause an accident.
RACE START should only be used on closed
off circuits .Always adapt your driving style to
suit the prevailing road and weathe rcondi-
tions.
Conditions for activation RACE START can be activated when:
R
the doors are closed.
R the engine is running and it has reached an
operating temperature of approximately
80 †. This is the case when the engine oil
temperature in the multifunction display
stops flashing.
R SPORT handling mode is activated
(Y page 60)
R the steering wheel is in the straight-ahead
position.
R the vehicle is stationary and the brake
pedal is depressed (left foot).
R the transmission is in position D.
Activating RACE START X
Depress the brake pedal with your left foot,
and keep it depressed.
X Turn the drive program selector switch
clockwise (Y page 138), until the RSlamp
lights up.
The RACE START Confirm: Paddle UP Cancel: Paddle DOWN message appears
in the multifunction display.
i If the conditions for activation are no lon-
ger fulfilled, RACE START is cancelled. The
RACE START cancelled message appears
in the multifunction display. 166
Driving systemsDriving and parking
Page 215 of 337
X
Press the =or; button on the steer-
ing wheel to select the Settings menu.
X Press the :or9 button to select the
Convenience submenu.
X Press the abutton to confirm.
X Press the :or9 button to select the
Auto. fold in function.
When the Auto. fold in function is acti-
vated, the vehicle's exterior mirror is dis-
played in red in the multifunction display.
X Press the abutton to save the setting.
Resetting to factor ysettings For safety reasons, no
tall functions are reset:
the Limit Speed (winter tyres) function
in permanent SPEEDTRONIC can only be set
in the Vehicle submenu. If you want to reset
the Daytime driving lights in the
Light submenu, you must tur
nthe key in the igni-
tion lock to position 1.
X Press the =or; button on the steer-
ing wheel to select the Settings menu.
X Press the :or9 button to select the
Factory setting submenu.
X Press the abutton to confirm.
The Reset all settings? message
appears.
X Press the :or9 button to select
No or
Yes .
X Press the abutton to confirm the selec-
tion.
If you select Yes , the multifunction display
shows a confirmation message. AMG menu in AMG vehicles
AMG displays X
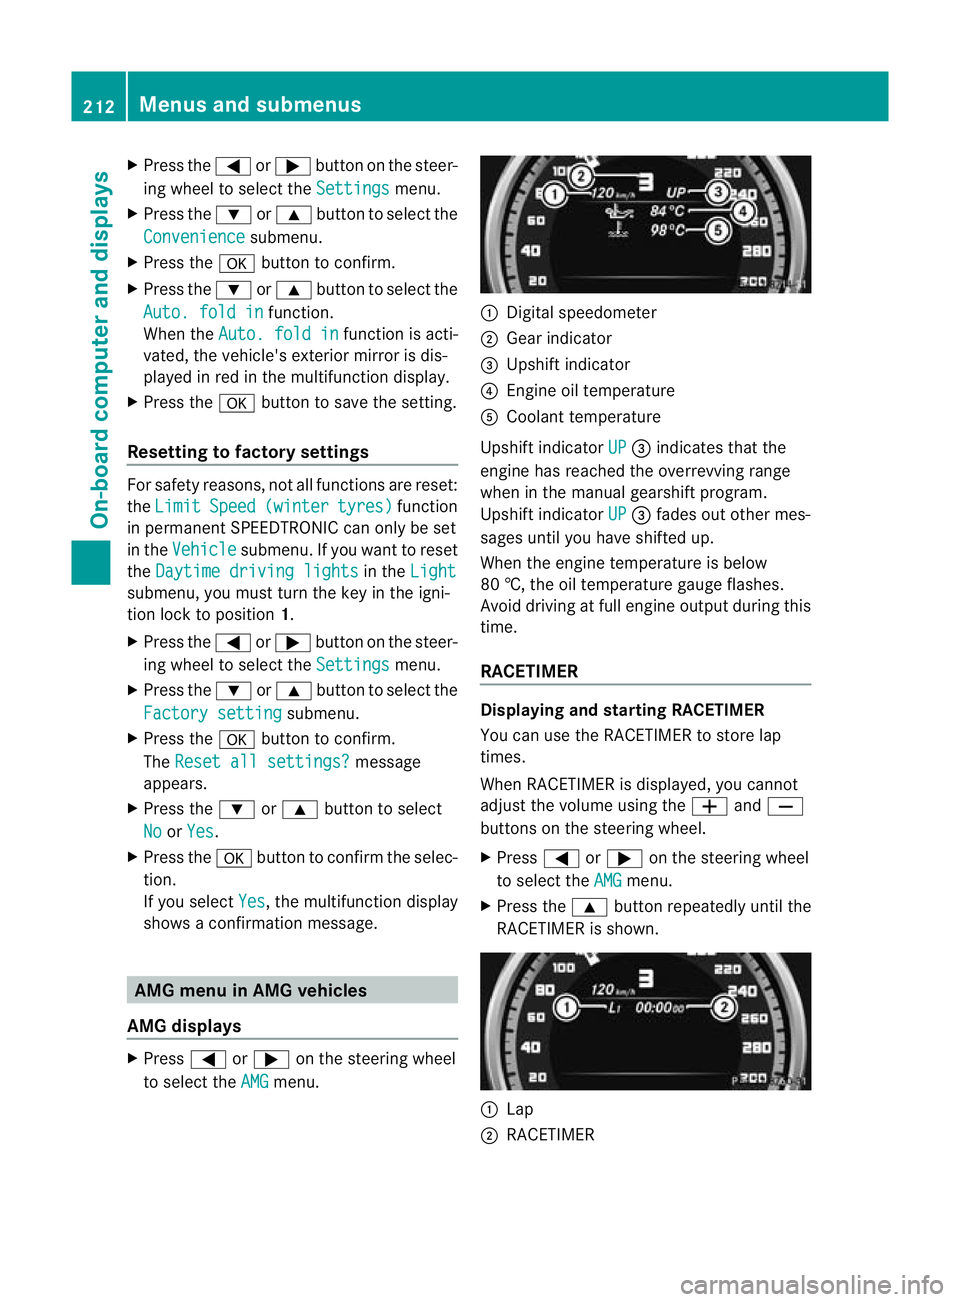
Press =or; on the steering wheel
to select the AMG menu. :
Digital speedometer
; Gear indicator
= Upshift indicator
? Engine oil temperature
A Coolant temperature
Upshift indicator UP =
indicates that the
engine has reached the overrevving range
when in the manual gearshift program.
Upshift indicator UP =
fades out other mes-
sages until you have shifted up.
When the engine temperature is below
80 †, the oil temperature gauge flashes.
Avoid driving at full engine output during this
time.
RACETIMER Displaying and starting RACETIMER
You can use the RACETIMER to store lap
times.
When RACETIMER is displayed, you cannot
adjust the volume using the
WandX
buttons on the steering wheel.
X Press =or; on the steering wheel
to select the AMG menu.
X Press the 9button repeatedly until the
RACETIMER is shown. :
Lap
; RACETIMER 212
Menus and submenusOn-board computer and displays
Page 270 of 337
X
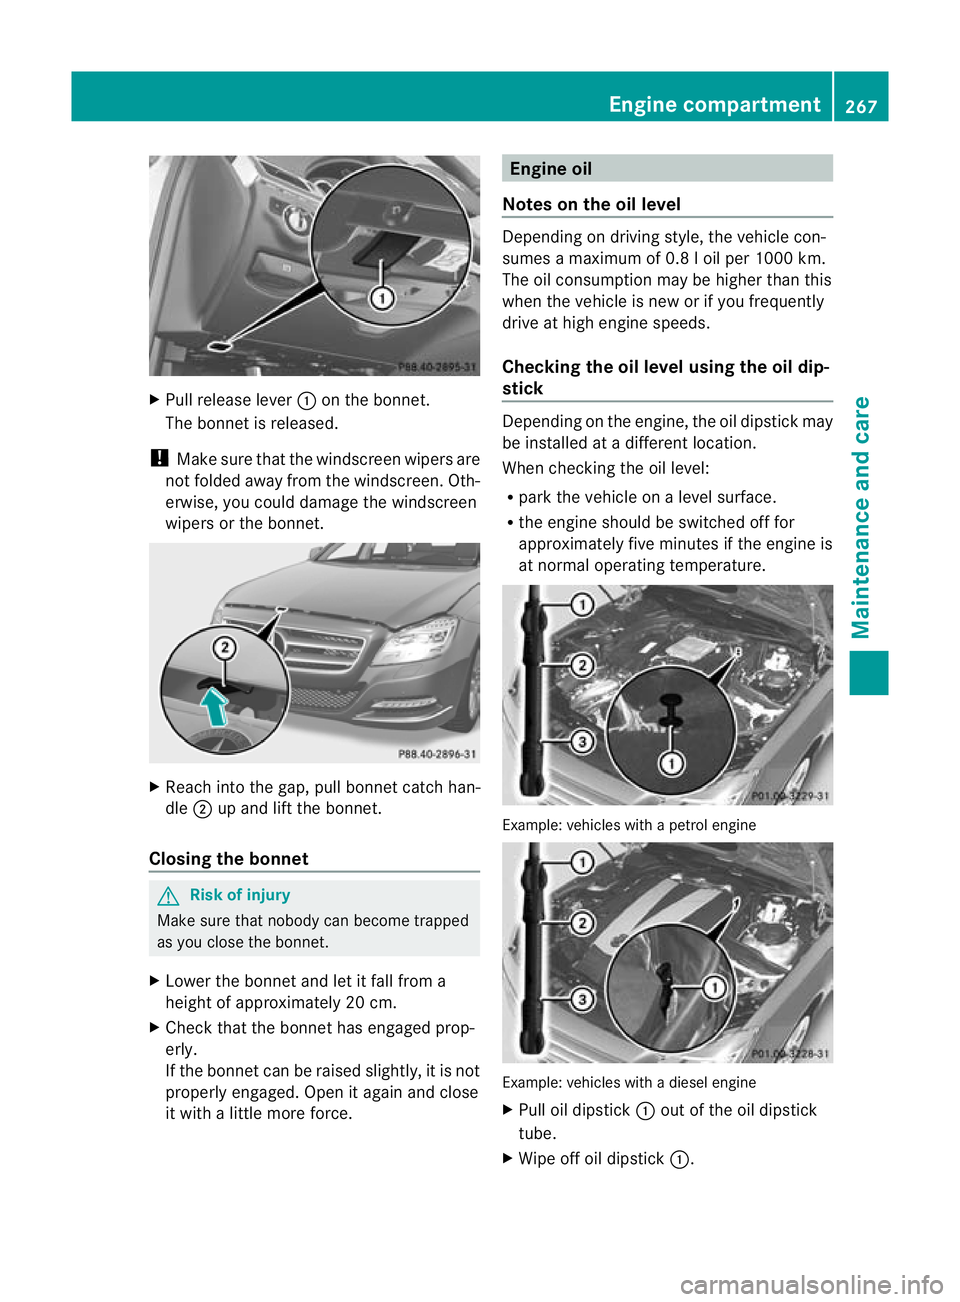
Pull release lever :on the bonnet.
The bonnet is released.
! Make sure that the windscreen wipers are
not folded away from the windscreen .Oth-
erwise, you could damage the windscreen
wipers or the bonnet. X
Reach into the gap, pull bonnet catch han-
dle ;up and lift the bonnet.
Closing the bonnet G
Risk of injury
Make sure tha tnobody can become trapped
as you close the bonnet.
X Lower the bonnet and let it fall from a
height of approximately 20 cm.
X Check that the bonnet has engaged prop-
erly.
If the bonnet can be raised slightly, it is not
properly engaged. Open it again and close
it with a little more force. Engine oil
Notes on the oil level Depending on driving style, the vehicle con-
sumes a maximum of 0.8 l oil per 1000 km.
The oil consumption may be higher than this
when the vehicle is new or if you frequently
drive at high engine speeds.
Checking the oil level using the oil dip-
stick
Depending on the engine, the oil dipstick may
be installed at a different location.
When checking the oil level:
R
park the vehicle on a level surface.
R the engine should be switched off for
approximately five minutes if the engine is
at normal operating temperature. Example: vehicles with a petrol engine
Example: vehicles with a diesel engine
X
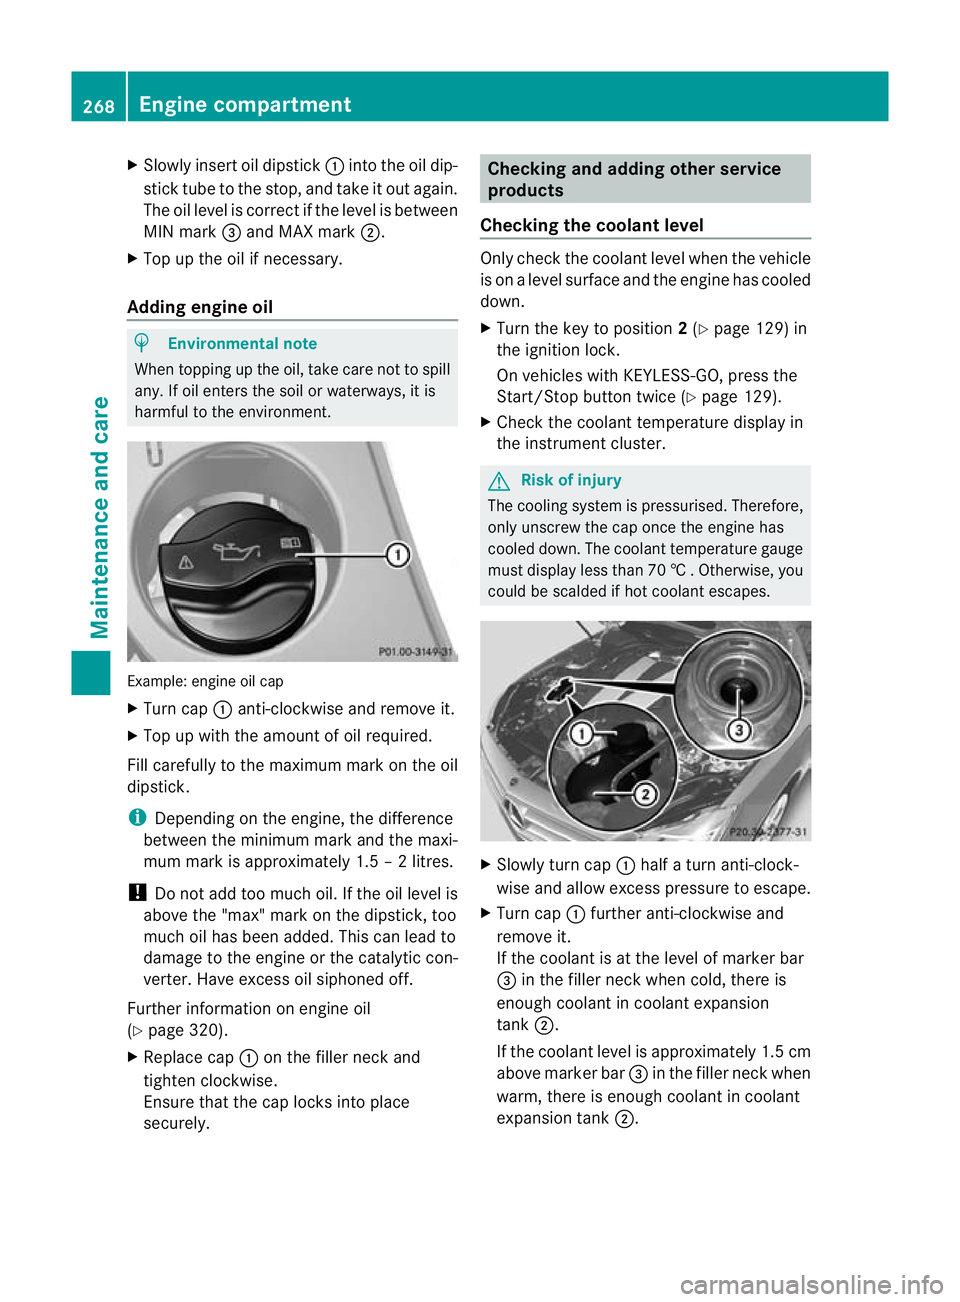
Pull oil dipstick :out of the oil dipstick
tube.
X Wipe off oil dipstick :. Engine compartment
267Maintenance and care Z
Page 271 of 337
X
Slowly insert oil dipstick :into the oil dip-
stick tube to the stop ,and take it ou tagain.
The oil level is correc tifthe level is between
MIN mark =and MAX mark ;.
X Top up the oil if necessary.
Adding engine oil H
Environmental note
When topping up the oil, take care not to spill
any. If oil enters the soil or waterways, it is
harmful to the environment. Example: engine oil cap
X
Turn cap :anti-clockwise and remove it.
X Top up with the amount of oil required.
Fill carefully to the maximum mark on the oil
dipstick.
i Depending on the engine, the difference
between the minimum mark and the maxi-
mum mark is approximately 1.5 – 2 litres.
! Do not add too much oil. If the oil level is
above the "max" mark on the dipstick, too
much oil has been added. This can lead to
damage to the engine or the catalytic con-
verter. Have excess oil siphoned off.
Further information on engine oil
(Y page 320).
X Replace cap :on the filler neck and
tighten clockwise.
Ensure that the cap locks into place
securely. Checking and adding other service
products
Checking the coolant level Only check the coolant level when the vehicle
is on a level surface and the engine has cooled
down.
X
Turn the key to position 2(Y page 129) in
the ignition lock.
On vehicles with KEYLESS-GO, press the
Start/Stop button twice (Y page 129).
X Check the coolant temperature display in
the instrument cluster. G
Risk of injury
The cooling system is pressurised. Therefore,
only unscrew the cap once the engine has
cooled down. The coolant temperature gauge
must display less than 70 †.Otherwise, you
could be scalded if hot coolant escapes. X
Slowly tur ncap : half a turn anti-clock-
wise and allow excess pressure to escape.
X Turn cap :further anti-clockwise and
remove it.
If the coolant is at the level of marker bar
= in the fille rneck when cold, there is
enough coolant in coolant expansion
tank ;.
If the coolant level is approximately 1.5 cm
above marker bar =in the filler neckw hen
warm, there is enough coolant in coolant
expansion tank ;.268
Engine compartmentMaintenance and care