radio MERCEDES-BENZ CLS COUPE 2014 Owner's Manual
[x] Cancel search | Manufacturer: MERCEDES-BENZ, Model Year: 2014, Model line: CLS COUPE, Model: MERCEDES-BENZ CLS COUPE 2014Pages: 417, PDF Size: 14.15 MB
Page 328 of 417
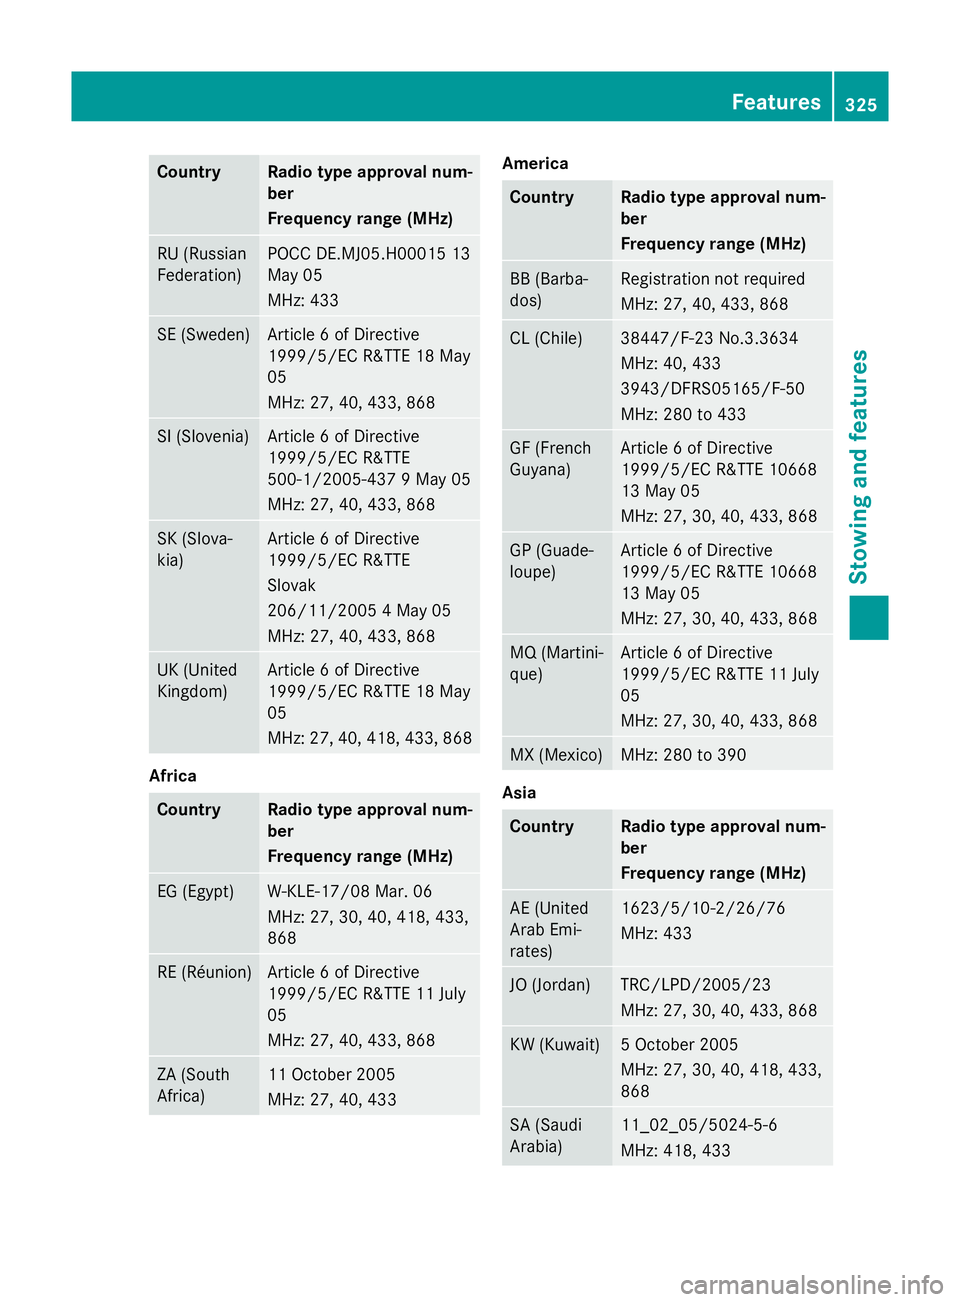
Country Radio type approval num-
ber
Frequency range (MHz)
RU (Russian
Federation) POCC DE.MJ05.H00015 13
May 05
MHz: 433
SE (Sweden) Article 6 of Directive
1999/5/EC R&TTE 18 May
05
MHz: 27, 40, 433, 868
SI (Slovenia) Article 6 of Directive
1999/5/EC R&TTE
500-1/2005-437 9 May 05
MHz: 27, 40, 433, 868
SK (Slova-
kia) Article 6 of Directive
1999/5/EC R&TTE
Slovak
206/11/2005 4 May 05
MHz: 27, 40, 433, 868
UK (United
Kingdom) Article 6 of Directive
1999/5/EC R&TTE 18 May
05
MHz: 27, 40, 418, 433, 868
Africa
Country Radio type approval num-
ber
Frequency range (MHz)
EG (Egypt) W-KLE-17/08 Mar. 06
MHz: 27, 30, 40, 418, 433,
868
RE (Réunion) Article 6 of Directive
1999/5/EC R&TTE 11 July
05
MHz: 27, 40, 433, 868
ZA (South
Africa) 11 October 2005
MHz: 27, 40, 433 America
Country Radio type approval num-
ber
Frequency range (MHz)
BB (Barba-
dos) Registration not required
MHz: 27, 40, 433, 868
CL (Chile) 38447/F-23 No.3.3634
MHz: 40, 433
3943/DFRS05165/F-50
MHz: 280 to 433
GF (French
Guyana) Article 6 of Directive
1999/5/EC R&TTE 10668
13 May 05
MHz: 27, 30, 40, 433, 868
GP (Guade-
loupe) Article 6 of Directive
1999/5/EC R&TTE 10668
13 May 05
MHz: 27, 30, 40, 433, 868
MQ (Martini-
que) Article 6 of Directive
1999/5/EC R&TTE 11 July
05
MHz: 27, 30, 40, 433, 868
MX (Mexico) MHz: 280 to 390
Asia
Country Radio type approval num-
ber
Frequency range (MHz)
AE (United
Arab Emi-
rates) 1623/5/10-2/26/76
MHz: 433
JO (Jordan) TRC/LPD/2005/23
MHz: 27, 30, 40, 433, 868
KW (Kuwait) 5 October 2005
MHz: 27, 30, 40, 418, 433,
868
SA (Saudi
Arabia) 11_02_05/5024-5-6
MHz: 418, 433 Features
325Stowing and features Z
Page 329 of 417
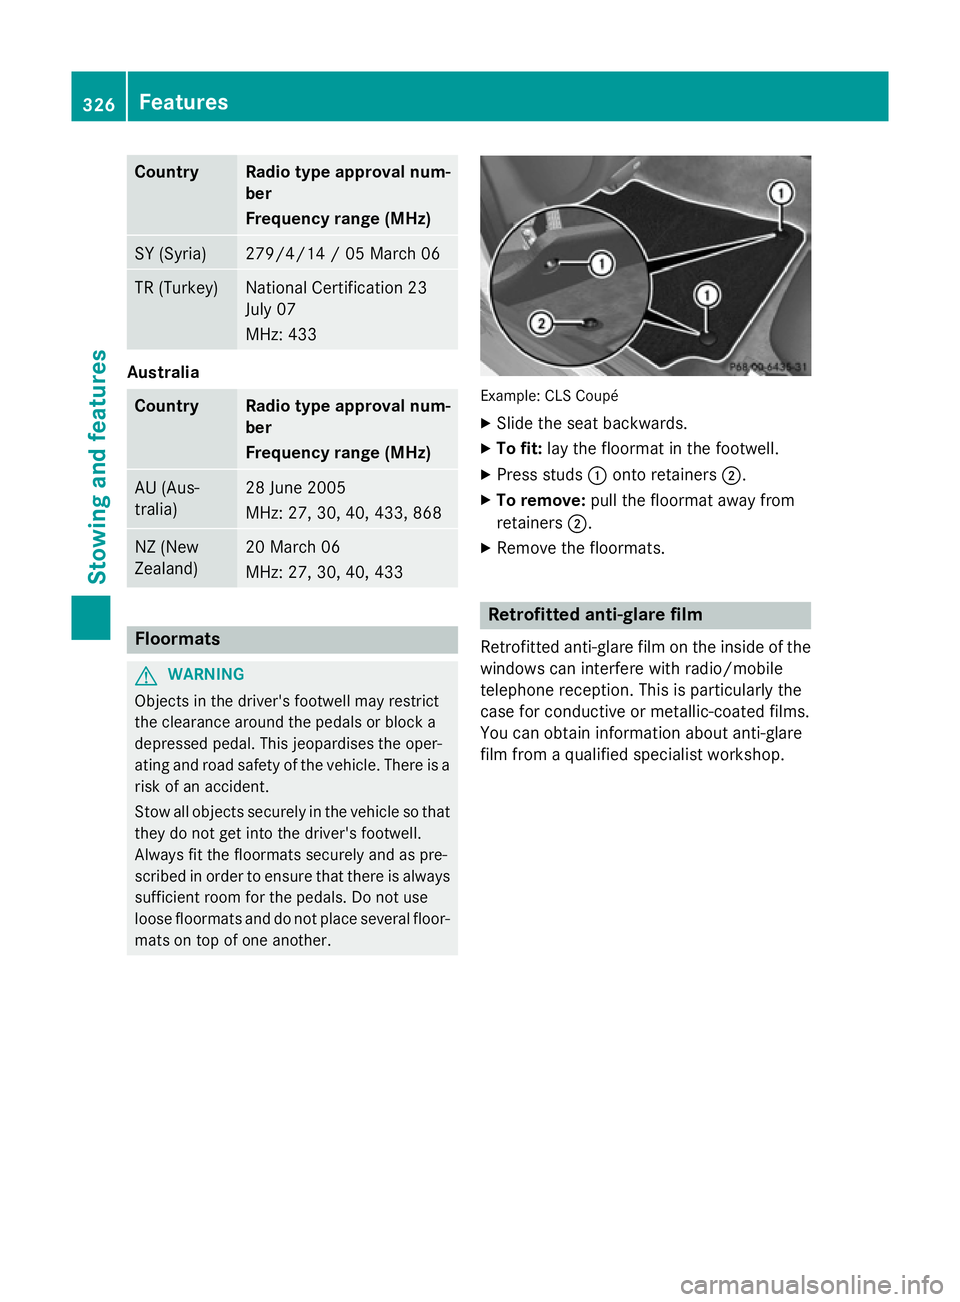
Country Radio type approval num-
ber
Frequency range (MHz)
SY (Syria) 279/4/14 / 05 March 06
TR (Turkey) National Certification 23
July 07
MHz: 433
Australia
Country Radio type approval num-
ber
Frequency range (MHz)
AU (Aus-
tralia) 28 June 2005
MHz: 27, 30, 40, 433, 868
NZ (New
Zealand) 20 March 06
MHz: 27, 30, 40, 433
Floormats
G
WARNING
Objects in the driver's footwell may restrict
the clearance around the pedals or block a
depressed pedal. This jeopardises the oper-
ating and road safety of the vehicle. There is a risk of an accident.
Stow all objects securely in the vehicle so that
they do not get into the driver's footwell.
Always fit the floormats securely and as pre-
scribed in order to ensure that there is always sufficient room for the pedals. Do not use
loose floormats and do not place several floor- mats on top of one another. Example: CLS Coupé
X Slide the seat backwards.
X To fit: lay the floormat in the footwell.
X Press studs :onto retainers ;.
X To remove: pull the floormat away from
retainers ;.
X Remove the floormats. Retrofitted anti-glare film
Retrofitted anti-glare film on the inside of the
windows can interfere with radio/mobile
telephone reception. This is particularly the
case for conductive or metallic-coated films.
You can obtain information about anti-glare
film from a qualified specialist workshop. 326
FeaturesStowing and features
Page 374 of 417
the notes on the recommended tyre pressure
(Y page 367).
The tyre pressure monitor is not able to warn you of a sudden loss of pressure, e.g. if the
tyre is punctured by a foreign object. In the
event of a sudden loss of pressure, bring the
vehicle to a halt by braking carefully. Avoid
abrupt steering manoeuvres.
The tyre pressure monitor has a yellow warn-
ing lamp in the instrument cluster for indicat-
ing a pressure loss or malfunction. Depending on how the warning lamp flashes or lights up,
a tyre pressure that is too low or a malfunc-
tion in the tyre pressure monitor is indicated:
R if the warning lamp is lit continuously, the
tyre pressure on one or more tyres is sig-
nificantly too low. The tyre pressure moni-
tor is not malfunctioning.
R if the warning lamp flashes for around a
minute and then remains lit constantly, the
tyre pressure monitor is malfunctioning.
i In addition to the warning lamp, a mes-
sage appears in the multifunction display.
Further information can be found at
(Y page 280).
If the tyre pressure monitor is malfunctioning,
it may take more than ten minutes for the tyre pressure warning lamp to inform you of the
malfunction by flashing for approximately one
minute and then remaining lit. When the fault
has been rectified, the tyre pressure warning lamp goes out after you have driven for a few
minutes.
The tyre pressure values indicated by the on- board computer may differ from those meas-
ured at a filling station using a pressure
gauge. The tyre pressures shown by the on-
board computer refer to those measured at
sea level. At high altitudes, the tyre pressure
values indicated by a pressure gauge are
higher than those shown by the on-board
computer. In this case, do not reduce the tyre
pressures.
The operation of the tyre pressure monitor
can be affected by interference from radio transmitting equipment (e.g. radio head-
phones, two-way radios) that may be being
operated in or near the vehicle.
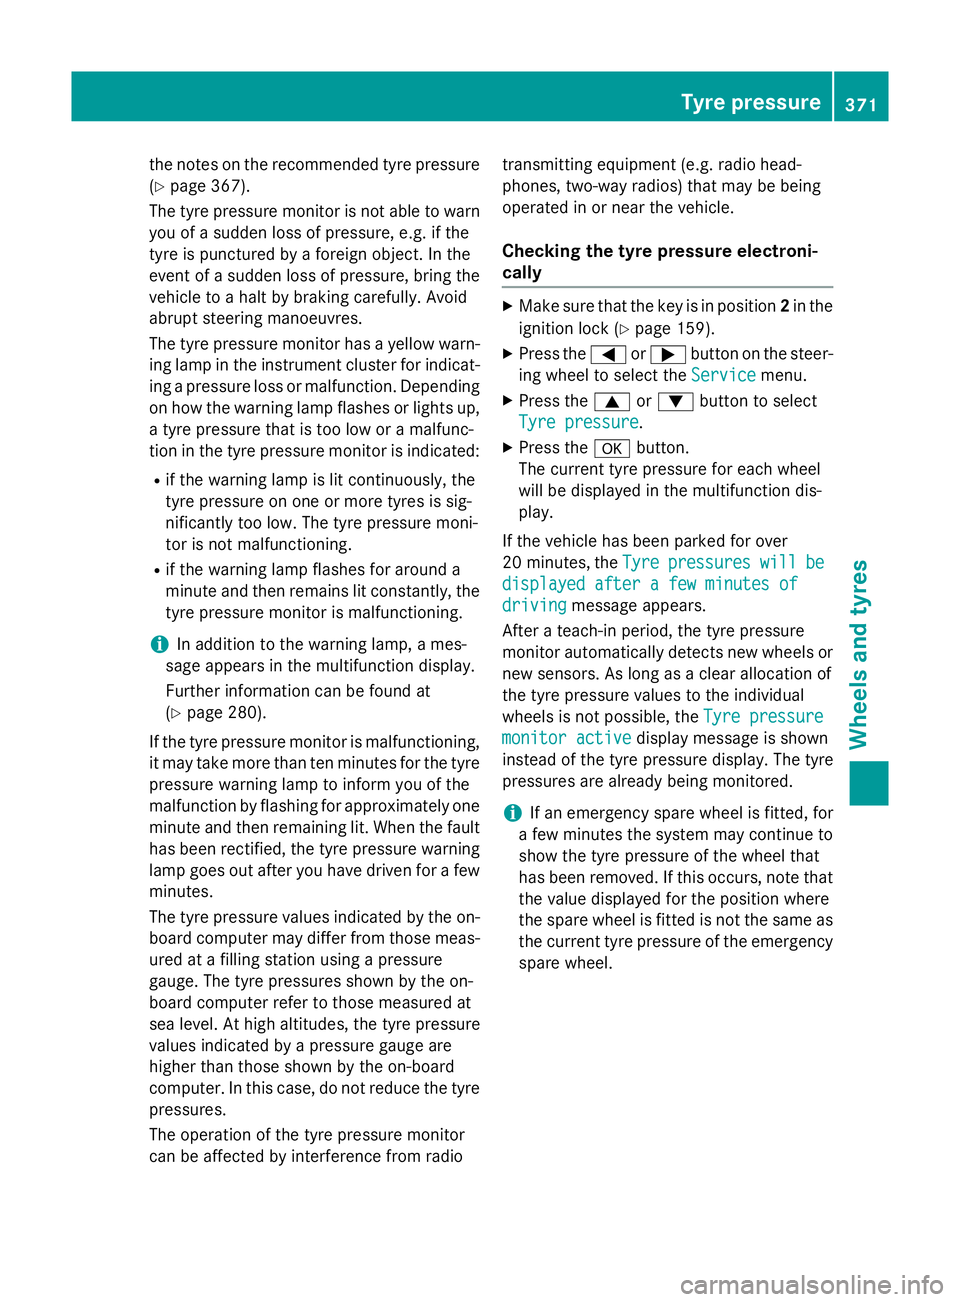
Checking the tyre pressure electroni-
cally X
Make sure that the key is in position 2in the
ignition lock (Y page 159).
X Press the =or; button on the steer-
ing wheel to select the Service
Service menu.
X Press the 9or: button to select
Tyre pressure Tyre pressure.
X Press the abutton.
The current tyre pressure for each wheel
will be displayed in the multifunction dis-
play.
If the vehicle has been parked for over
20 minutes, the Tyre Tyrepressures
pressures will
willbe
be
displayed after a few minutes of
displayed after a few minutes of
driving driving message appears.
After a teach-in period, the tyre pressure
monitor automatically detects new wheels or new sensors. As long as a clear allocation of
the tyre pressure values to the individual
wheels is not possible, the Tyre pressure Tyre pressure
monitor active monitor active display message is shown
instead of the tyre pressure display. The tyre
pressures are already being monitored.
i If an emergency spare wheel is fitted, for
a few minutes the system may continue to
show the tyre pressure of the wheel that
has been removed. If this occurs, note that the value displayed for the position where
the spare wheel is fitted is not the same asthe current tyre pressure of the emergencyspare wheel. Tyre pressure
371Wheels and tyres Z
Page 376 of 417
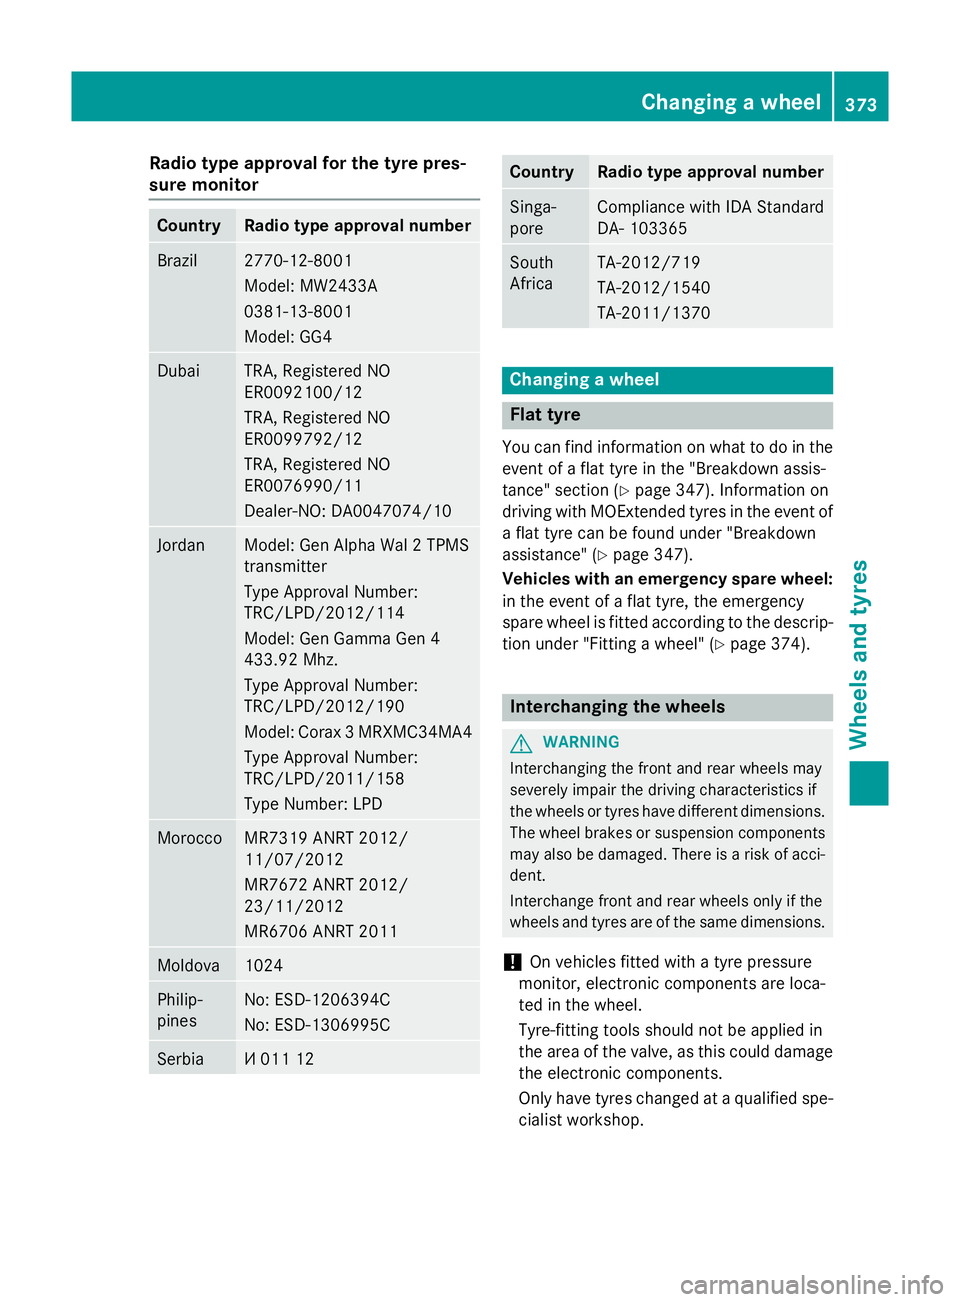
Radio type approval for the tyre pres-
sure monitor Country Radio type approval number
Brazil 2770-12-8001
Model: MW2433A
0381-13-8001
Model: GG4
Dubai TRA, Registered NO
ER0092100/12
TRA, Registered NO
ER0099792/12
TRA, Registered NO
ER0076990/11
Dealer-NO: DA0047074/10
Jordan Model: Gen Alpha Wal 2 TPMS
transmitter
Type Approval Number:
TRC/LPD/2012/114
Model: Gen Gamma Gen 4
433.92 Mhz.
Type Approval Number:
TRC/LPD/2012/190
Model: Corax 3 MRXMC34MA4
Type Approval Number:
TRC/LPD/2011/158
Type Number: LPD Morocco MR7319 ANRT 2012/
11/07/2012
MR7672 ANRT 2012/
23/11/2012
MR6706 ANRT 2011
Moldova 1024
Philip-
pines No: ESD-1206394C
No: ESD-1306995C
Serbia И 011 12 Country Radio type approval number
Singa-
pore Compliance with IDA Standard
DA- 103365
South
Africa TA-2012/719
TA-2012/1540
TA-2011/1370
Changing a wheel
Flat tyre
You can find information on what to do in the event of a flat tyre in the "Breakdown assis-
tance" section (Y page 347). Information on
driving with MOExtended tyres in the event of a flat tyre can be found under "Breakdown
assistance" (Y page 347).
Vehicles with an emergency spare wheel: in the event of a flat tyre, the emergency
spare wheel is fitted according to the descrip-
tion under "Fitting a wheel" (Y page 374). Interchanging the wheels
G
WARNING
Interchanging the front and rear wheels may
severely impair the driving characteristics if
the wheels or tyres have different dimensions. The wheel brakes or suspension components may also be damaged. There is a risk of acci-
dent.
Interchange front and rear wheels only if the
wheels and tyres are of the same dimensions.
! On vehicles fitted with a tyre pressure
monitor, electronic components are loca-
ted in the wheel.
Tyre-fitting tools should not be applied in
the area of the valve, as this could damage
the electronic components.
Only have tyres changed at a qualified spe- cialist workshop. Changing a wheel
373Wheels and tyres Z
Page 399 of 417
Useful information
i This Owner's Manual describes all mod-
els, series and optional equipment for your
vehicle that were available at the time of
going to press. National variations are pos- sible. Note that your vehicle may not be
equipped with all of the functions descri-
bed. This is also the case for systems and
functions relevant to safety.
i Read the information on qualified special-
ist workshops: (Y page 26). Information on technical data
You can find current technical data on the
Internet on our Mercedes ‑Benz homepage.
i The technical data was determined in
accordance with EU Directives. All data
applies to the vehicle's standard equip-
ment. The data may therefore differ for
vehicles with optional equipment. You can
obtain further information from a
Mercedes-Benz Service Centre. Vehicle electronics
Tampering with the engine electron-
ics
! Only have work carried out on the engine
electronics and its associated parts, such
as control units, sensors, actuating com-
ponents and connector leads, at a qualified specialist workshop. Vehicle components
may otherwise wear more quickly and the
vehicle's operating permit may be invalida- ted. Retrofitting two-way radios and
mobile phones (RF transmitters)
G
WARNING
If RF transmitters are tampered with or not
properly retrofitted, the electromagnetic radi- ation they emit can interfere with the vehicle
electronics. This may jeopardise the opera-
tional safety of the vehicle. There is a risk of an
accident.
You should have all work on electrical and
electronic components carried out at a quali-
fied specialist workshop. G
WARNING
If you use the RF transmitter in the vehicle in
an improper way, its electromagnetic radia-
tion can disrupt vehicle electronics, e.g. if:
R the RF transmitter is not connected to an
exterior aerial
R the exterior aerial is fitted incorrectly or is
not a low-reflection aerial
This can jeopardise the operating safety of the vehicle. There is a risk of an accident.
Have the low-reflection exterior aerial fitted at
a qualified specialist workshop. When oper-
ating in the vehicle, always connect the RF
transmitter to the low-reflection exterior aer-
ial.
! The operating permit may be invalidated if
the instructions for installation and use of
RF transmitters are not observed.
In particular, the following conditions must be complied with:
R only approved wavebands may be used.
R observe the maximum permissible out-
put in these wavebands.
R only approved aerial positions may be
used.
Excessive levels of electromagnetic radiation
may cause damage to your health and to the
health of others. The use of an exterior aerial
takes into consideration the scientific discus- 396
Vehicle electronicsTechnical data
Page 400 of 417
sion surrounding the possible health risk
posed by electromagnetic fields.
Observe the notes on operating mobile
phones (Y page 319).
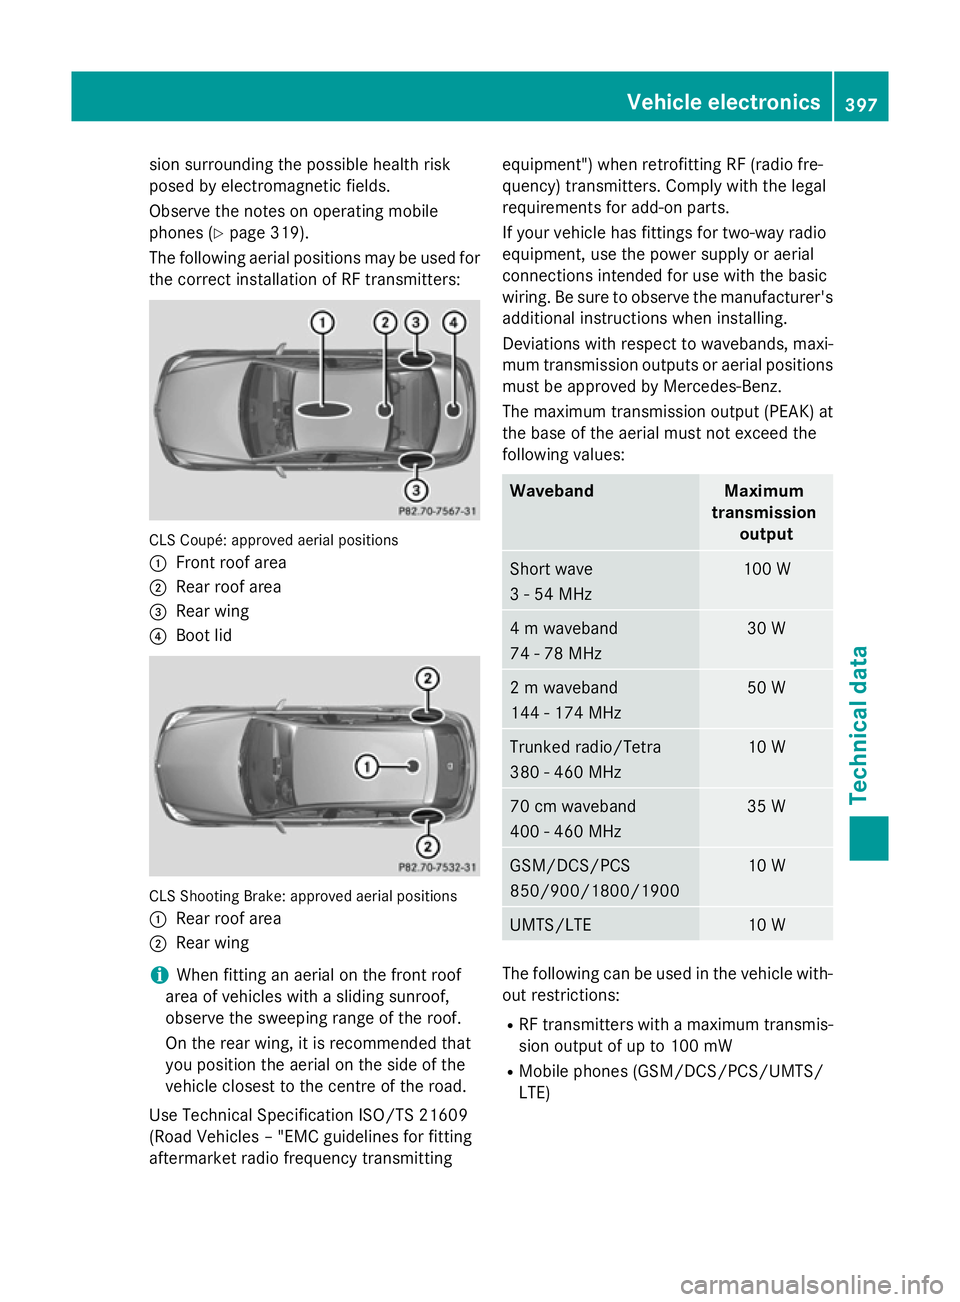
The following aerial positions may be used for the correct installation of RF transmitters: CLS Coupé: approved aerial positions
:
Front roof area
; Rear roof area
= Rear wing
? Boot lid CLS Shooting Brake: approved aerial positions
:
Rear roof area
; Rear wing
i When fitting an aerial on the front roof
area of vehicles with a sliding sunroof,
observe the sweeping range of the roof.
On the rear wing, it is recommended that
you position the aerial on the side of the
vehicle closest to the centre of the road.
Use Technical Specification ISO/TS 21609
(Road Vehicles – "EMC guidelines for fitting
aftermarket radio frequency transmitting equipment") when retrofitting RF (radio fre-
quency) transmitters. Comply with the legal
requirements for add-on parts.
If your vehicle has fittings for two-way radio
equipment, use the power supply or aerial
connections intended for use with the basic
wiring. Be sure to observe the manufacturer's
additional instructions when installing.
Deviations with respect to wavebands, maxi-
mum transmission outputs or aerial positions must be approved by Mercedes-Benz.
The maximum transmission output (PEAK) at
the base of the aerial must not exceed the
following values: Waveband Maximum
transmission output Short wave
3 - 54 MHz 100 W
4 m waveband
74 - 78 MHz 30 W
2 m waveband
144 - 174 MHz 50 W
Trunked radio/Tetra
380 - 460 MHz 10 W
70 cm waveband
400 - 460 MHz 35 W
GSM/DCS/PCS
850/900/1800/1900 10 W
UMTS/LTE 10 W
The following can be used in the vehicle with-
out restrictions:
R RF transmitters with a maximum transmis-
sion output of up to 100 mW
R Mobile phones (GSM/DCS/PCS/UMTS/
LTE) Vehicle electronics
397Technical data Z
Page 401 of 417
There are no restrictions when positioning the
aerial on the outside of the vehicle for the fol-
lowing wavebands:
R Trunked radio/Tetra
R 70 cm waveband
R GSM/DCS/PCS
R UMTS/LTE Identification plates
Vehicle identification plate with vehi-
cle identification number (VIN)
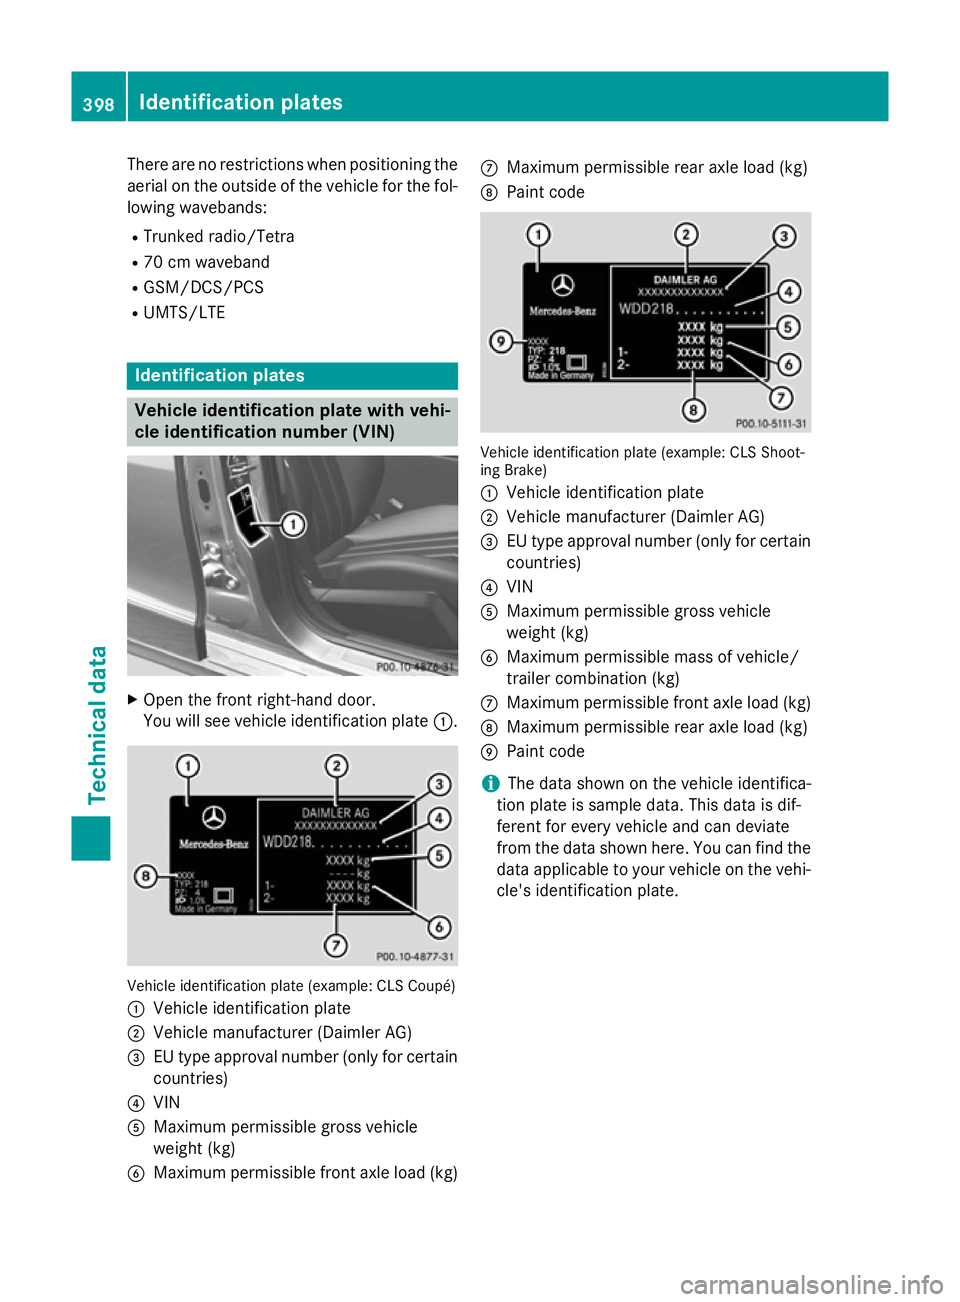
X
Open the front right-hand door.
You will see vehicle identification plate :.Vehicle identification plate (example: CLS Coupé)
: Vehicle identification plate
; Vehicle manufacturer (Daimler AG)
= EU type approval number (only for certain
countries)
? VIN
A Maximum permissible gross vehicle
weight (kg)
B Maximum permissible front axle load (kg) C
Maximum permissible rear axle load (kg)
D Paint code Vehicle identification plate (example: CLS Shoot-
ing Brake)
: Vehicle identification plate
; Vehicle manufacturer (Daimler AG)
= EU type approval number (only for certain
countries)
? VIN
A Maximum permissible gross vehicle
weight (kg)
B Maximum permissible mass of vehicle/
trailer combination (kg)
C Maximum permissible front axle load (kg)
D Maximum permissible rear axle load (kg)
E Paint code
i The data shown on the vehicle identifica-
tion plate is sample data. This data is dif-
ferent for every vehicle and can deviate
from the data shown here. You can find the
data applicable to your vehicle on the vehi- cle's identification plate. 398
Identification platesTechnical data