service MERCEDES-BENZ CLS COUPE 2014 Service Manual
[x] Cancel search | Manufacturer: MERCEDES-BENZ, Model Year: 2014, Model line: CLS COUPE, Model: MERCEDES-BENZ CLS COUPE 2014Pages: 417, PDF Size: 14.15 MB
Page 373 of 417
for the respective operating conditions.
The recommended tyre pressures can be
found in the tyre pressure table on the fuel
filler flap.
The tyre pressure loss warning system can only give reliable warnings if you have set
the correct tyre pressure. If an incorrect
tyre pressure is set, these incorrect values
will be monitored.
X Observe the notes in the section on tyre
pressures (Y page 367).
X Make sure that the key is in position 2in the
ignition lock (Y page 159).
X Press the =or; button on the steer-
ing wheel to select the Serv.
Serv. menu.
X Press the 9or: button on the steer-
ing wheel to select the Tyre pressure
Tyre pressure
menu.
X Press the abutton.
The Run Flat Indicator active
Run Flat Indicator active
Restart Restart with
withOK
OKmessage appears in the
multifunction display.
If you wish to confirm the restart: X Press the abutton.
The Tyre press. now OK?
Tyre press. now OK? message
appears in the multifunction display.
X Press the 9or: button to select
Yes
Yes.
X Press the abutton.
The Run Flat Indicator restarted
Run Flat Indicator restarted
message appears in the multifunction dis-
play.
After a teach-in period, the tyre pressure
loss warning system will monitor the set
tyre pressures of all four tyres.
If you wish to cancel the restart:
X Press the %button.
or
X When the Tyre
Tyre press. press. now
nowOK?
OK?message
appears, press the 9or: button to
select Cancel
Cancel .
X Press the abutton.
The tyre pressure values stored at the last
restart will continue to be monitored. Tyre pressure monitor
General notes If a tyre pressure monitor system is fitted, the
vehicle's wheels have sensors fitted that
monitor the tyre pressures in all four tyres.
The tyre pressure monitor warns you if the
pressure drops in one or more of the tyres.
The tyre pressure monitor only functions if
the corresponding sensors are fitted to all
wheels.
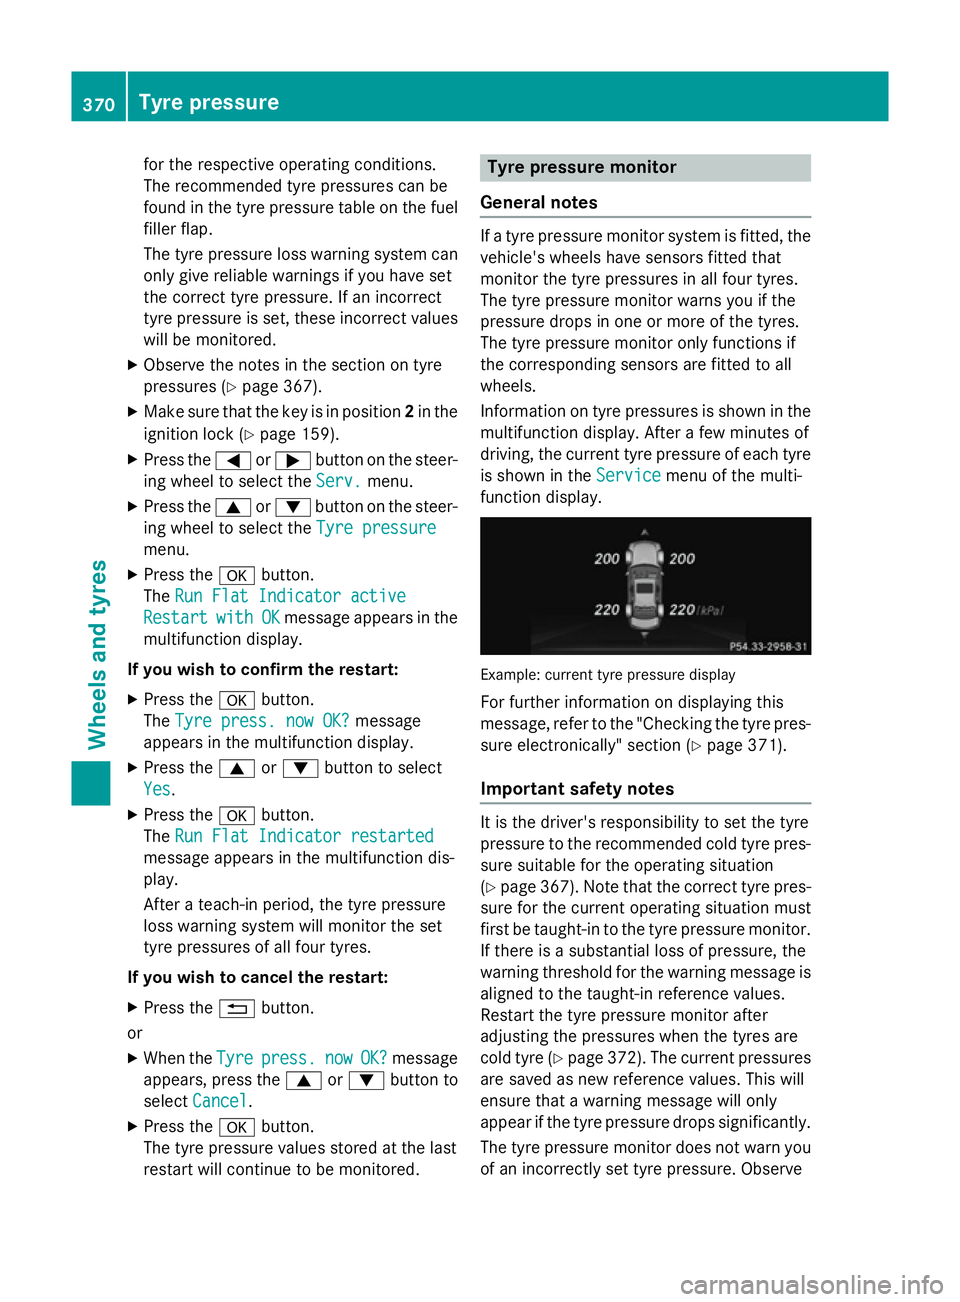
Information on tyre pressures is shown in the multifunction display. After a few minutes of
driving, the current tyre pressure of each tyre
is shown in the Service Servicemenu of the multi-
function display. Example: current tyre pressure display
For further information on displaying this
message, refer to the "Checking the tyre pres-
sure electronically" section (Y page 371).
Important safety notes It is the driver's responsibility to set the tyre
pressure to the recommended cold tyre pres-
sure suitable for the operating situation
(Y page 367). Note that the correct tyre pres-
sure for the current operating situation must
first be taught-in to the tyre pressure monitor. If there is a substantial loss of pressure, the
warning threshold for the warning message isaligned to the taught-in reference values.
Restart the tyre pressure monitor after
adjusting the pressures when the tyres are
cold tyre (Y page 372). The current pressures
are saved as new reference values. This will
ensure that a warning message will only
appear if the tyre pressure drops significantly.
The tyre pressure monitor does not warn you
of an incorrectly set tyre pressure. Observe 370
Tyre pressureWheels and tyres
Page 374 of 417
the notes on the recommended tyre pressure
(Y page 367).
The tyre pressure monitor is not able to warn you of a sudden loss of pressure, e.g. if the
tyre is punctured by a foreign object. In the
event of a sudden loss of pressure, bring the
vehicle to a halt by braking carefully. Avoid
abrupt steering manoeuvres.
The tyre pressure monitor has a yellow warn-
ing lamp in the instrument cluster for indicat-
ing a pressure loss or malfunction. Depending on how the warning lamp flashes or lights up,
a tyre pressure that is too low or a malfunc-
tion in the tyre pressure monitor is indicated:
R if the warning lamp is lit continuously, the
tyre pressure on one or more tyres is sig-
nificantly too low. The tyre pressure moni-
tor is not malfunctioning.
R if the warning lamp flashes for around a
minute and then remains lit constantly, the
tyre pressure monitor is malfunctioning.
i In addition to the warning lamp, a mes-
sage appears in the multifunction display.
Further information can be found at
(Y page 280).
If the tyre pressure monitor is malfunctioning,
it may take more than ten minutes for the tyre pressure warning lamp to inform you of the
malfunction by flashing for approximately one
minute and then remaining lit. When the fault
has been rectified, the tyre pressure warning lamp goes out after you have driven for a few
minutes.
The tyre pressure values indicated by the on- board computer may differ from those meas-
ured at a filling station using a pressure
gauge. The tyre pressures shown by the on-
board computer refer to those measured at
sea level. At high altitudes, the tyre pressure
values indicated by a pressure gauge are
higher than those shown by the on-board
computer. In this case, do not reduce the tyre
pressures.
The operation of the tyre pressure monitor
can be affected by interference from radio transmitting equipment (e.g. radio head-
phones, two-way radios) that may be being
operated in or near the vehicle.
Checking the tyre pressure electroni-
cally X
Make sure that the key is in position 2in the
ignition lock (Y page 159).
X Press the =or; button on the steer-
ing wheel to select the Service
Service menu.
X Press the 9or: button to select
Tyre pressure Tyre pressure.
X Press the abutton.
The current tyre pressure for each wheel
will be displayed in the multifunction dis-
play.
If the vehicle has been parked for over
20 minutes, the Tyre Tyrepressures
pressures will
willbe
be
displayed after a few minutes of
displayed after a few minutes of
driving driving message appears.
After a teach-in period, the tyre pressure
monitor automatically detects new wheels or new sensors. As long as a clear allocation of
the tyre pressure values to the individual
wheels is not possible, the Tyre pressure Tyre pressure
monitor active monitor active display message is shown
instead of the tyre pressure display. The tyre
pressures are already being monitored.
i If an emergency spare wheel is fitted, for
a few minutes the system may continue to
show the tyre pressure of the wheel that
has been removed. If this occurs, note that the value displayed for the position where
the spare wheel is fitted is not the same asthe current tyre pressure of the emergencyspare wheel. Tyre pressure
371Wheels and tyres Z
Page 375 of 417
Warning messages of the tyre pressure
monitor If the tyre pressure monitor detects a pres-
sure loss in one or more tyres, a warning mes-
sage is shown in the multifunction display and the yellow tyre pressure monitor warning
lamp comes on.
R If the Please correct tyre pressure
Please correct tyre pressure
message appears in the multifunction dis-
play, the tyre pressure in at least one tyre is too low and must be corrected at the next
opportunity.
R If the Check tyre(s) Check tyre(s) message appears in
the multifunction display, the tyre pressure
in one or more tyres has dropped signifi-
cantly and the tyres must be checked.
R If the Warning tyre defect
Warning tyre defect message
appears in the multifunction display, the
tyre pressure in one or more tyres has drop-
ped suddenly and the tyres must be
checked.
Observe the instructions and safety notes in
the display messages in the "Tyres" section
(Y page 280).
i If the wheel positions on the vehicle are
interchanged, the tyre pressures may be
displayed for the wrong positions for a
short time. After a few minutes of driving,
this is rectified and the tyre pressures are
displayed for the correct positions.
Restarting the tyre pressure monitor When you restart the tyre pressure monitor,
all existing warning messages are deleted and
the warning lamps go out. The monitor uses
the currently set tyre pressures as the refer-
ence values for monitoring. In most cases, the tyre pressure monitor will automatically
detect the new reference values after you
have changed the tyre pressure. However,
you can also define reference values man-
ually as described here. The tyre pressure
monitor then monitors the new tyre pressure
values. X
Using the table on the inside of the fuel filler
flap, ensure that the tyre pressure is set
correctly in all four tyres for the current
operating conditions.
Also observe the notes in the section on
tyre pressures (Y page 367).
X Make sure that the key is in position 2in the
ignition lock.
X Press the =or; button on the steer-
ing wheel to select the Service Servicemenu.
X Press the 9or: button to select
Tyre pressure
Tyre pressure.
X Press the abutton.
The multifunction display shows the cur-
rent tyre pressure for the individual tyres or
the Tyre pressures will be dis‐ Tyre pressures will be dis‐
played
played after
aftera
afew
few minutes
minutes of
ofdriv‐
driv‐
ing
ing message.
X Press the :button.
The Use current pressures as new Use current pressures as new
reference values reference values message appears in
the multifunction display.
If you wish to confirm the restart: X Press the abutton.
The Tyre press. monitor restarted
Tyre press. monitor restarted
message appears in the multifunction dis-
play.
After you have driven for a few minutes, the system checks whether the current tyre
pressures are within the specified range.
The new tyre pressures are then accepted
as reference values and monitored.
If you wish to cancel the restart:
X Press the %button.
The tyre pressure values stored at the last
restart will continue to be monitored. 372
Tyre pressureWheels and tyres
Page 395 of 417
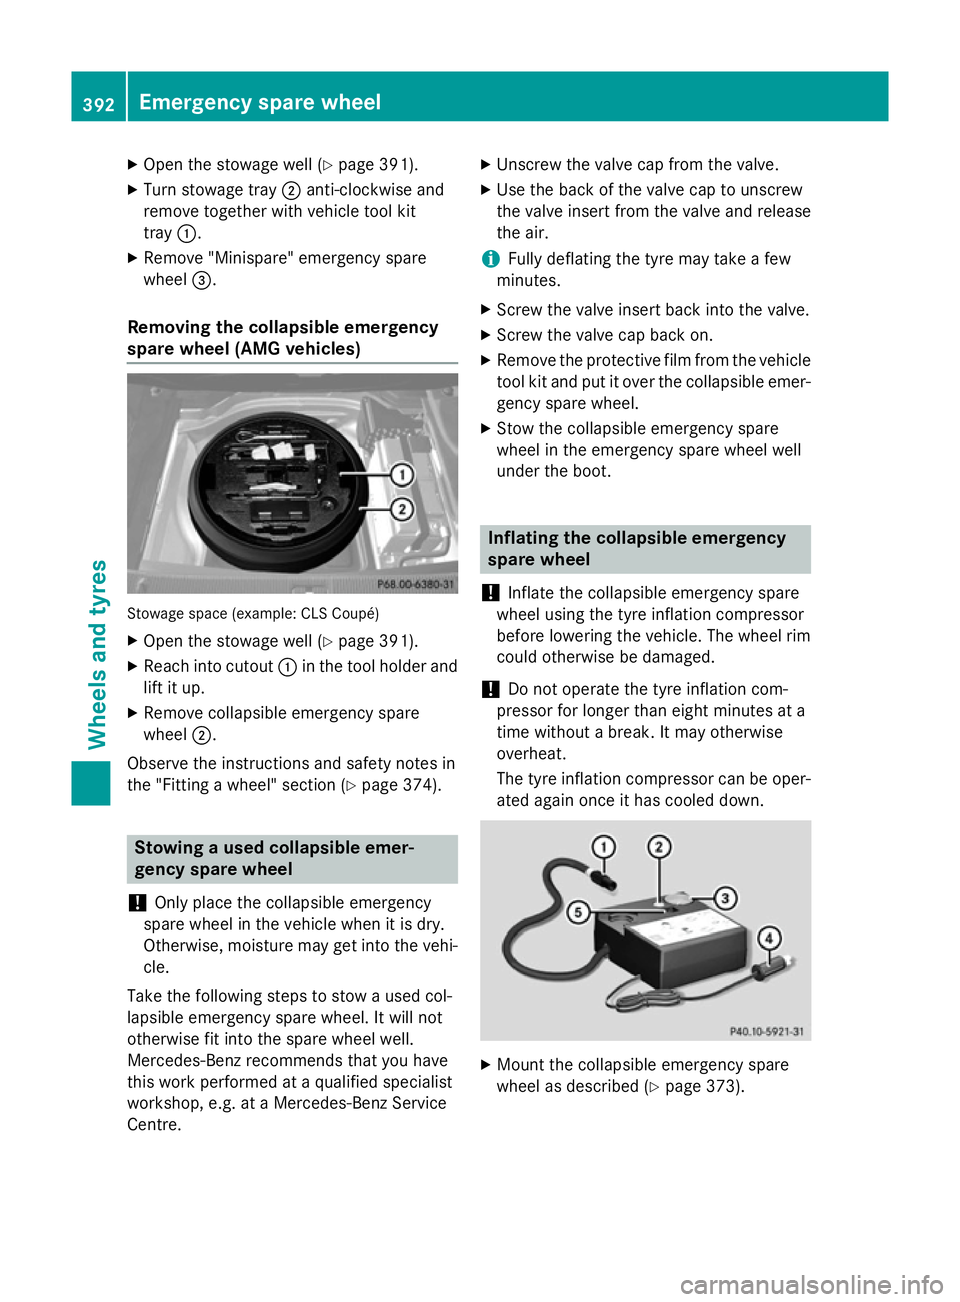
X
Open the stowage well (Y page 391).
X Turn stowage tray ;anti-clockwise and
remove together with vehicle tool kit
tray :.
X Remove "Minispare" emergency spare
wheel =.
Removing the collapsible emergency
spare wheel (AMG vehicles) Stowage space (example: CLS Coupé)
X Open the stowage well (Y page 391).
X Reach into cutout :in the tool holder and
lift it up.
X Remove collapsible emergency spare
wheel ;.
Observe the instructions and safety notes in
the "Fitting a wheel" section (Y page 374).Stowing a used collapsible emer-
gency spare wheel
! Only place the collapsible emergency
spare wheel in the vehicle when it is dry.
Otherwise, moisture may get into the vehi-
cle.
Take the following steps to stow a used col-
lapsible emergency spare wheel. It will not
otherwise fit into the spare wheel well.
Mercedes-Benz recommends that you have
this work performed at a qualified specialist
workshop, e.g. at a Mercedes-Benz Service
Centre. X
Unscrew the valve cap from the valve.
X Use the back of the valve cap to unscrew
the valve insert from the valve and release
the air.
i Fully deflating the tyre may take a few
minutes.
X Screw the valve insert back into the valve.
X Screw the valve cap back on.
X Remove the protective film from the vehicle
tool kit and put it over the collapsible emer-
gency spare wheel.
X Stow the collapsible emergency spare
wheel in the emergency spare wheel well
under the boot. Inflating the collapsible emergency
spare wheel
! Inflate the collapsible emergency spare
wheel using the tyre inflation compressor
before lowering the vehicle. The wheel rim
could otherwise be damaged.
! Do not operate the tyre inflation com-
pressor for longer than eight minutes at a
time without a break. It may otherwise
overheat.
The tyre inflation compressor can be oper-
ated again once it has cooled down. X
Mount the collapsible emergency spare
wheel as described (Y page 373).392
Emergency spare wheelWheels and tyres
Page 398 of 417
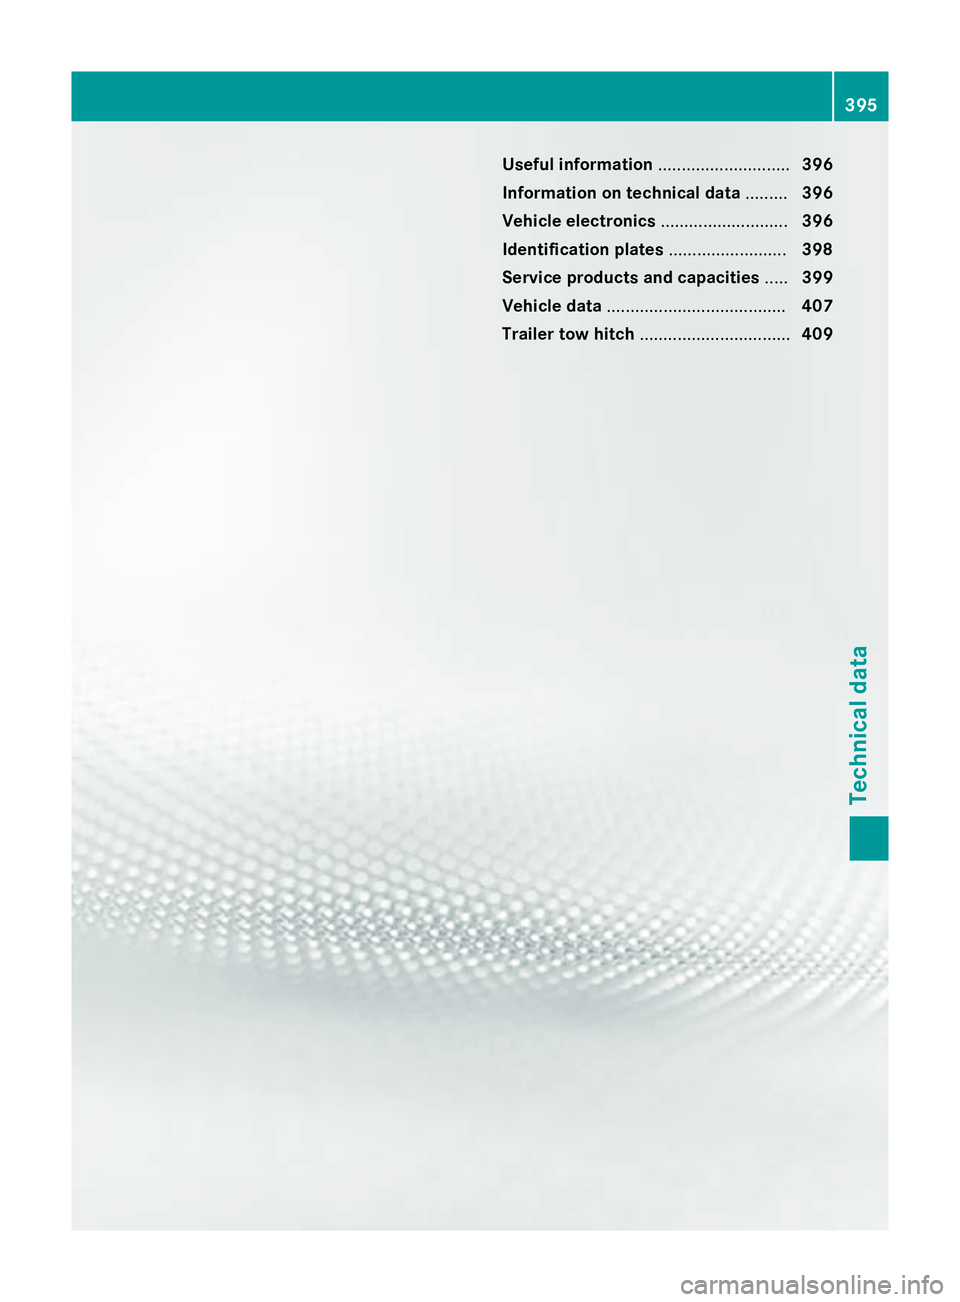
Useful information
............................396
Information on technical data .........396
Vehicle electronics ...........................396
Identification plates .........................398
Service products and capacities .....399
Vehicle data ...................................... 407
Trailer tow hitch ................................ 409 395Technical data
Page 399 of 417
Useful information
i This Owner's Manual describes all mod-
els, series and optional equipment for your
vehicle that were available at the time of
going to press. National variations are pos- sible. Note that your vehicle may not be
equipped with all of the functions descri-
bed. This is also the case for systems and
functions relevant to safety.
i Read the information on qualified special-
ist workshops: (Y page 26). Information on technical data
You can find current technical data on the
Internet on our Mercedes ‑Benz homepage.
i The technical data was determined in
accordance with EU Directives. All data
applies to the vehicle's standard equip-
ment. The data may therefore differ for
vehicles with optional equipment. You can
obtain further information from a
Mercedes-Benz Service Centre. Vehicle electronics
Tampering with the engine electron-
ics
! Only have work carried out on the engine
electronics and its associated parts, such
as control units, sensors, actuating com-
ponents and connector leads, at a qualified specialist workshop. Vehicle components
may otherwise wear more quickly and the
vehicle's operating permit may be invalida- ted. Retrofitting two-way radios and
mobile phones (RF transmitters)
G
WARNING
If RF transmitters are tampered with or not
properly retrofitted, the electromagnetic radi- ation they emit can interfere with the vehicle
electronics. This may jeopardise the opera-
tional safety of the vehicle. There is a risk of an
accident.
You should have all work on electrical and
electronic components carried out at a quali-
fied specialist workshop. G
WARNING
If you use the RF transmitter in the vehicle in
an improper way, its electromagnetic radia-
tion can disrupt vehicle electronics, e.g. if:
R the RF transmitter is not connected to an
exterior aerial
R the exterior aerial is fitted incorrectly or is
not a low-reflection aerial
This can jeopardise the operating safety of the vehicle. There is a risk of an accident.
Have the low-reflection exterior aerial fitted at
a qualified specialist workshop. When oper-
ating in the vehicle, always connect the RF
transmitter to the low-reflection exterior aer-
ial.
! The operating permit may be invalidated if
the instructions for installation and use of
RF transmitters are not observed.
In particular, the following conditions must be complied with:
R only approved wavebands may be used.
R observe the maximum permissible out-
put in these wavebands.
R only approved aerial positions may be
used.
Excessive levels of electromagnetic radiation
may cause damage to your health and to the
health of others. The use of an exterior aerial
takes into consideration the scientific discus- 396
Vehicle electronicsTechnical data
Page 402 of 417
VIN
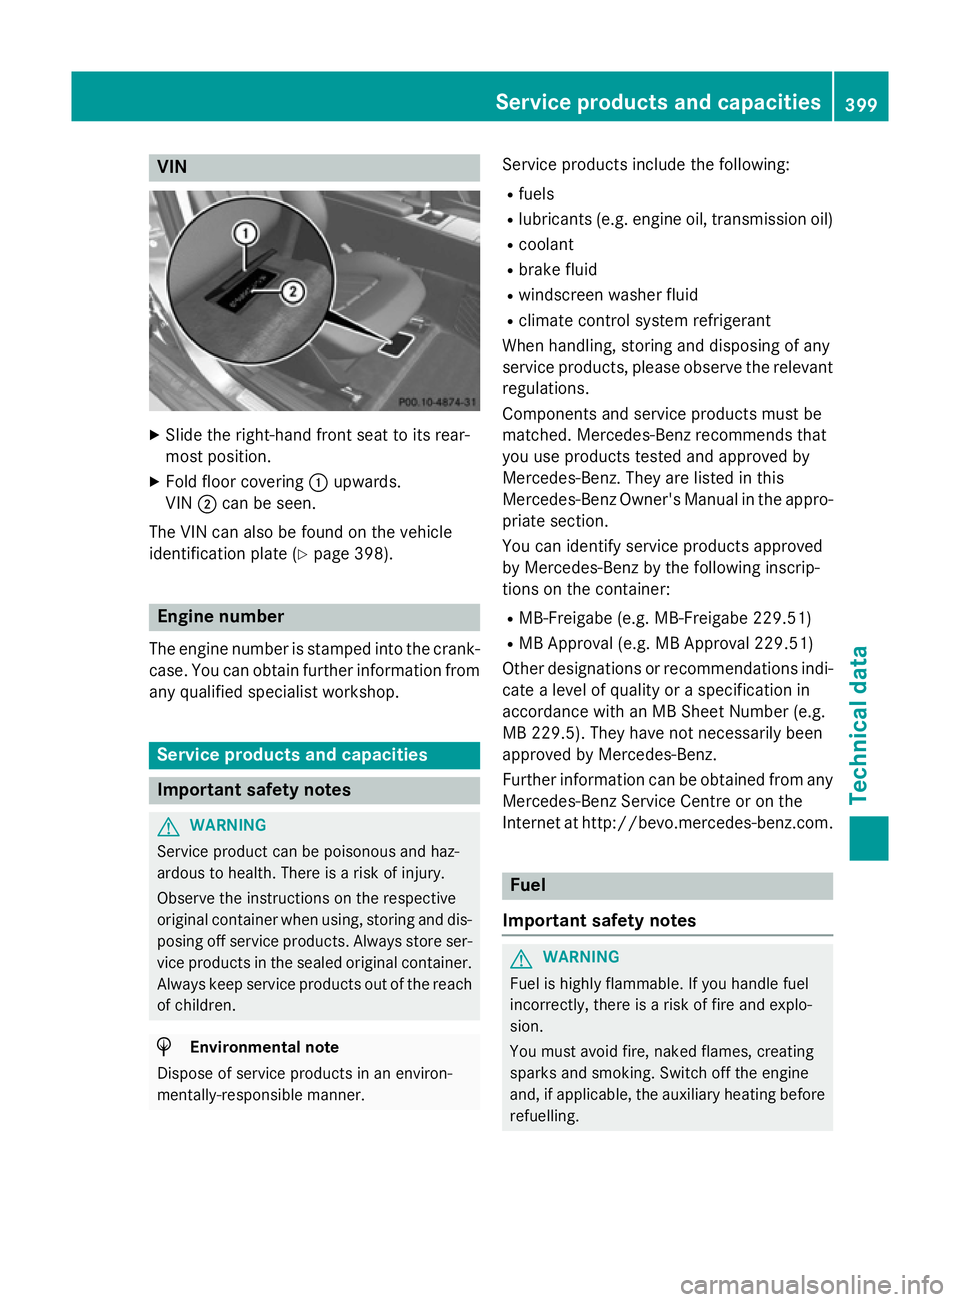
X
Slide the right-hand front seat to its rear-
most position.
X Fold floor covering :upwards.
VIN ;can be seen.
The VIN can also be found on the vehicle
identification plate (Y page 398).Engine number
The engine number is stamped into the crank- case. You can obtain further information from
any qualified specialist workshop. Service products and capacities
Important safety notes
G
WARNING
Service product can be poisonous and haz-
ardous to health. There is a risk of injury.
Observe the instructions on the respective
original container when using, storing and dis- posing off service products. Always store ser-
vice products in the sealed original container. Always keep service products out of the reach
of children. H
Environmental note
Dispose of service products in an environ-
mentally-responsible manner. Service products include the following:
R fuels
R lubricants (e.g. engine oil, transmission oil)
R coolant
R brake fluid
R windscreen washer fluid
R climate control system refrigerant
When handling, storing and disposing of any
service products, please observe the relevant regulations.
Components and service products must be
matched. Mercedes-Benz recommends that
you use products tested and approved by
Mercedes-Benz. They are listed in this
Mercedes-Benz Owner's Manual in the appro-
priate section.
You can identify service products approved
by Mercedes-Benz by the following inscrip-
tions on the container:
R MB-Freigabe (e.g. MB-Freigabe 229.51)
R MB Approval (e.g. MB Approval 229.51)
Other designations or recommendations indi- cate a level of quality or a specification in
accordance with an MB Sheet Number (e.g.
MB 229.5). They have not necessarily been
approved by Mercedes-Benz.
Further information can be obtained from any
Mercedes-Benz Service Centre or on the
Internet at http://bevo.mercedes-benz.com. Fuel
Important safety notes G
WARNING
Fuel is highly flammable. If you handle fuel
incorrectly, there is a risk of fire and explo-
sion.
You must avoid fire, naked flames, creating
sparks and smoking. Switch off the engine
and, if applicable, the auxiliary heating before refuelling. Service products and capacities
399Technical data Z
Page 403 of 417
G
WARNING
Fuels are poisonous and hazardous to health. There is a danger of injury.
Do not swallow fuel or let it come into contact
with skin, eyes or clothing. Do not inhale fuel
vapours. Keep fuels out of the reach of chil-
dren.
If you or others come into contact with fuel,
observe the following:
R Wash the fuel off any affected areas of skin
with water and soap immediately.
R If you get fuel in your eyes, rinse them thor-
oughly with clean water immediately. Seek immediate medical attention.
R If fuel is swallowed, seek immediate medi-
cal attention. Do not induce vomiting.
R Change any clothing that has come into
contact with fuel immediately.
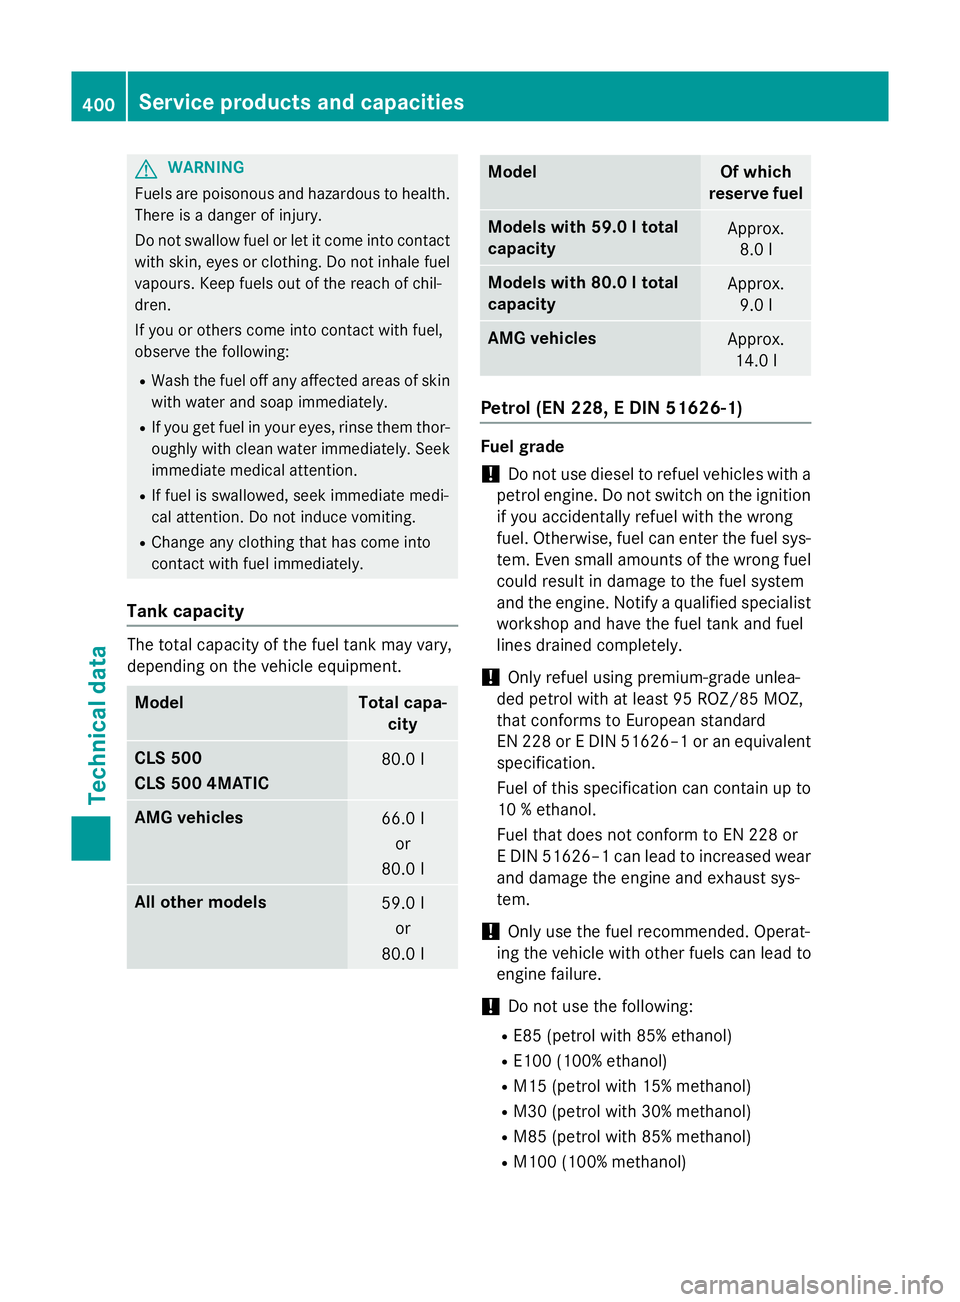
Tank capacity The total capacity of the fuel tank may vary,
depending on the vehicle equipment. Model Total capa-
city CLS 500
CLS 500 4MATIC
80.0 l
AMG vehicles
66.0 l
or
80.0 l All other models
59.0 l
or
80.0 l Model Of which
reserve fuel Models with 59.0 l total
capacity Approx.
8.0 l Models with 80.0 l total
capacity Approx.
9.0 l AMG vehicles
Approx.
14.0 l Petrol (EN 228, E DIN 51626-1)
Fuel grade
!
Do not use diesel to refuel vehicles with a
petrol engine. Do not switch on the ignition if you accidentally refuel with the wrong
fuel. Otherwise, fuel can enter the fuel sys-
tem. Even small amounts of the wrong fuel could result in damage to the fuel system
and the engine. Notify a qualified specialist
workshop and have the fuel tank and fuel
lines drained completely.
! Only refuel using premium-grade unlea-
ded petrol with at least 95 ROZ/85 MOZ,
that conforms to European standard
EN 228 or E DIN 51626–1 or an equivalent specification.
Fuel of this specification can contain up to
10 %ethanol.
Fuel that does not conform to EN 228 or
E DIN 51626–1 can lead to increased wear
and damage the engine and exhaust sys-
tem.
! Only use the fuel recommended. Operat-
ing the vehicle with other fuels can lead to
engine failure.
! Do not use the following:
R E85 (petrol with 85% ethanol)
R E100 (100% ethanol)
R M15 (petrol with 15% methanol)
R M30 (petrol with 30% methanol)
R M85 (petrol with 85% methanol)
R M100 (100% methanol) 400
Service products and capacitiesTechnical data
Page 404 of 417
R
Petrol with additives containing metal
R Diesel
Do not mix such fuels with the fuel recom-
mended for your vehicle. Do not use addi-
tives. This can otherwise lead to engine
damage. This does not include cleaning
additives for the removal and prevention of residue build-up. Petrol must only be mixed
with additives recommended by Mercedes- Benz; see "Additives". You can obtain fur-
ther information from any Mercedes-Benz
Service Centre.
Usually you will find information about the
fuel grade on the pump. If you cannot find the
label on the petrol pump, ask the filling sta-
tion staff.
i E10 fuel contains up to 10% bioethanol.
Your vehicle is suitable for use with E10
fuel. You may refuel your vehicle using E10 fuel.
As a temporary measure, if the recommended fuel is not available, you may also use unlea-
ded petrol with an octane rating of 91 RON/
82 MON. This may reduce engine perform-
ance and increase fuel consumption. Avoid
driving at full throttle and sudden accelera-
tion. Never refuel using fuel with a lower
RON/MON.
i In some countries, the available petrol
may not be sufficiently low in sulphur. This
fuel can temporarily produce unpleasant
odours, especially on short journeys. As
soon as sulphur-free fuel (sulphur content
<1 0 ppm) is used for refuelling, the odours
are reduced.
Information on refuelling (Y page 178).
AMG vehicles ! Only refuel using super unleaded petrol
with at least 98 RON/88 MON that con-
forms to European standard EN 228 or an
equivalent specification.
You can otherwise impair engine output or
damage the engine. !
Premium-grade unleaded petrol with an
octane rating of 95 RON/85 MON may be
used as a temporary measure if the recom-
mended fuel is not available. This may
reduce engine performance and increase
fuel consumption. As much as possible,
avoid driving at full throttle.
! Regular unleaded petrol with an octane
rating of 91 RON/82.5 MON may also be
used as a temporary measure if the recom-
mended fuel is not available.
Doing so results in noticeably higher fuel
consumption, and the engine power output is noticeably reduced. Avoid driving at full
throttle.
If only regular unleaded petrol with an
octane rating of 91 RON/82.5 MON or
lower is available, you must have the vehi-
cle adapted to this fuel at a qualified spe-
cialist workshop.
i E10 fuel contains up to 10% bioethanol.
Your vehicle is suitable for use with E10
fuel. You may refuel your vehicle using E10 fuel.
CLS 350
! Only refuel using unleaded, sulphur-free
unleaded petrol with at least 95 RON/
85 MON that conforms to European stand- ard EN 228 or an equivalent specification.
You could otherwise impair engine output
or damage the emission control system.
i In some countries, the available petrol
may not be sufficiently low in sulphur. This
fuel can temporarily produce unpleasant
odours, especially on short journeys. As
soon as sulphur-free unleaded fuel (sulphur
content <10 ppm) is used for refuelling, the
odours are reduced.
Additives ! Operating the engine with fuel additives
added later can lead to engine failure. Do
not mix fuel additives with fuel. This does
not include additives for the removal and
prevention of residue build-up. Petrol must Service products and capacities
401Technical data Z
Page 405 of 417
only be mixed with additives recommended
by Mercedes-Benz. Observe the instruc-
tions for use in the product description.
More information about recommended
additives can be obtained from any
Mercedes-Benz Service Centre.
Mercedes-Benz recommends that you use
fuel brands that have additives.
The quality of the fuel available in some coun- tries may not be sufficient. Residue could
build up in the injection system as a result. In
this case, in consultation with a Mercedes-
Benz Service Centre, the petrol may be mixed with the cleaning additive recommended by
Mercedes-Benz. Always observe the notes
and mixing ratios specified on the container.
Diesel (EN 590) Fuel grade
G
WARNING
If you mix diesel fuel with petrol, the flash
point of this fuel mixture is lower than that of pure diesel fuel. When the engine is running,
components in the exhaust system may over-
heat unnoticed. There is a risk of fire.
Never refuel with petrol. Never add petrol to
diesel fuel.
! When refuelling, only use diesel fuel that
conforms to the European standard EN 590
or is of equivalent quality. Fuel that does
not conform to EN 590 can lead to
increased wear as well as damage to the
engine and exhaust system.
! Do not use the following:
R marine diesel
R heating oil
R bio-diesel
R vegetable oil
R petrol
R paraffin
R kerosene Do not mix such fuels with diesel fuel and
do not use any special additives. This can
otherwise lead to engine damage.
! Vehicles with diesel particle filters:
in
countries outside the EU, only use low sul-
phur Euro diesel with a sulphur content of
under 50 ppm. Otherwise, the emission
control system could be damaged.
! Vehicles without a diesel particle fil-
ter: in countries where only diesel fuel with
a high sulphur content is available, you will need to carry out your vehicle's oil change
at shorter intervals. More information
about the interval for oil change can be
obtained from any qualified specialist
workshop.
Usually you will find information about the
fuel grade on the pump. If you cannot find the
label on the petrol pump, ask the filling sta-
tion staff.
Information on refuelling (Y page 178).
Low outside temperatures
In winter months, diesel fuel with an improved cold flow quality is available. In Europe, the
EN 590 standard defines various climate-
dependent temperature categories. Malfunc- tions can be avoided by refuelling with diesel
fuel that corresponds to the climatic specifi-
cations outlined in EN 590. At unusually low
outside temperatures, it is possible that the
flow characteristics of the diesel fuel could be
insufficient. Accordingly, diesel fuel from
warmer areas may not be suitable for opera-
tion in colder climatic conditions.
i Further information on country-specific
fuel properties and fuel types with low-tem-
perature resistance can be obtained from
oil companies, e.g. at filling stations.
Fuel consumption information H
Environmental note
CO 2(carbon dioxide) is the gas which scien-
tists believe to be principally responsible for 402
Service products and capacitiesTechnical data