emergency towing MERCEDES-BENZ CLS COUPE 2014 Owners Manual
[x] Cancel search | Manufacturer: MERCEDES-BENZ, Model Year: 2014, Model line: CLS COUPE, Model: MERCEDES-BENZ CLS COUPE 2014Pages: 417, PDF Size: 14.15 MB
Page 8 of 417
Switching the function on/off
(ATA) ................................................ 78
Alarm system
see ATA (Anti-Theft Alarm system)
Ambient lighting
Setting the brightness (on-board
computer) ...................................... 253
Setting the colour (on-board com-
puter) ............................................. 254
AMG RIDE CONTROL sports sus-
pension ............................................... 204
Anti-glare film .................................... 326
Anti-lock braking system
see ABS (Anti-lock Braking System)
Anti-Theft Alarm system
see ATA (Anti-Theft Alarm system)
Aquaplaning ....................................... 185
Ashtray ............................................... 315
Assistance display (on-board com-
puter) .................................................. 249
Assistance menu (on-board com-
puter) .................................................. 249
ASSYST PLUS
Displaying a service message ........ 333
Hiding a service message .............. 333
Notes ............................................. 332
Resetting the service interval dis-
play ................................................ 333
Service message ............................ 332
Special service requirements ......... 333
ATA (Anti-Theft Alarm system)
Activating/deactivating ................... 78
Function ........................................... 78
Interior motion sensor ..................... 79
Switching off the alarm .................... 78
Tow-away protectio n ........................79
ATTENTION ASSIST
Activating/deactivating ................. 250
Display message ............................ 274
Function/notes ............................ .218
Authorised workshop
see Qualified specialist workshop
AUTO lights
Display message ............................ 269
see Lights
Automatic engine start (ECO start/
stop function) ................................... .164 Automatic engine switch-off (ECO
start/stop function)
.......................... 163
Automatic headlamp mode .............. 123
Automatic transmission
Accelerator pedal position ............. 171
Automatic drive program .............. .173
Changing gear ............................... 171
DIRECT SELECT lever ..................... 168
Display message ............................ 282
Drive program displa y.................... 169
Driving tips .................................... 171
Emergency running mod e.............. 177
Engaging drive position .................. 170
Engaging neutral ............................ 170
Engaging park position (AMG vehi- cles) ............................................... 168
Engaging reverse gear ................... 169
Engaging the park position ............ 169
Kickdown ....................................... 171
Manual drive progra m.................... 174
Manual drive program (AMG vehi-
cles) ............................................... 175
Manual drive program (vehicles
with Sports package AMG) ............ 175
Overview ........................................ 167
Problem (fault) ............................... 177
Program selector button ................ 171
Pulling away ................................... 162
Selector lever ................................ 168
Starting the engine ........................ 161
Steering wheel gearshift paddle s... 173
Trailer towing ................................. 171
Transmission position display ........ 168
Transmission position display
(DIRECT SELECT lever) ................... 169
Transmission positions .................. 170
Automatic transmission emer-
gency running mode ......................... 177
Auxiliary heating
Activating/deactivating ................. 150
Activating/deactivating (on the
centre console ).............................. 151
Display message ............................ 284
Important safety notes .................. 150
Problem (display message) ............ 154
Remote control .............................. 151
Setting ........................................... 256
Setting the departure time ............. 152 Index
5
Page 9 of 417
Auxiliary ventilation
Activating/deactivating ................ .150
Activating/deactivating (on the
centre console ).............................. 151
Problem (display message) ............ 154
Remote control .............................. 151
Axle load, permissible (trailer tow-
ing) ...................................................... 410 B
Ball coupling Folding in ....................................... 236
Folding out ..................................... 234
BAS (Brake Assist System) ................. 70
BAS PLUS (Brake Assist System
PLUS) .................................................... 71
Battery (key)
Checking .......................................... 85
Important safety notes .................... 85
Replacing ......................................... 86
Battery (vehicle)
Charging ........................................ 353
Display message ............................ 271
Important safety notes .................. 351
Jump starting ................................. 355
Belt
see Seat belts
Belt tensioner
Activation ......................................... 51
Blind Spot Assist
Activating/deactivating ................. 250
Display message ............................ 276
Notes/function .............................. 223
Trailer towing ................................. 225
see Active Blind Spot Assist
BlueTEC (AdBlue®) ............................ 403
Bluetooth® SAP V3 telephone
module
see Separate operating instructions
Bonnet
Closing ........................................... 329
Display message ............................ 283
Important safety notes .................. 328
Opening ......................................... 328
Boot
Emergency release .......................... 95
Important safety notes .................... 91 Opening/closing (automatically
from inside) ...................................... 94
Opening/closing (automatically
from outside) ................................... 92
Opening/closing (manually from
outside) ............................................ 92
Boot lid
Display message ............................ 283
Opening dimensions ...................... 407
Boot load (maximum) ........................ 407
Bottle holders .................................... 314
Box (boot) ........................................... 308
Brake Assist
see BAS (Brake Assist System)
Brake fluid
Display message ............................ 264
Notes ............................................. 405
Brake lamps
Adaptive ........................................... 72
Display message ............................ 268
Brakes
ABS .................................................. 70
BAS .................................................. 70
BAS PLUS ........................................ 71
Brake fluid (notes) ......................... 405
Display message ............................ 262
Driving tips .................................... 183
High-performance brake system .... 184
HOLD function ............................... 200
Important safety notes .................. 183
Parking brake ................................ 181
Warning lamp ................................. 288
Breakdown
see Flat tyre
see Towing away
Bulbs
see Replacing bulbs C
Calling up a fault see Display messages
Car
see Vehicle
Car key
see Key
Car wash (care) ................................. 3346
Index
Page 13 of 417
Brakes ........................................... 183
Downhill gradient ........................... 183
Driving abroad ............................... 122
Driving in winter ............................. 185
Driving on flooded roads ................ 185
Driving on wet roads ...................... 185
General .......................................... 182
Icy road surfaces ........................... 185
Limited braking efficiency on sal-
ted roads ....................................... 184
New brake pads/linings ................ 184
Running-in tips ............................... 158
Snow chains .................................. 367
Symmetrical dipped bea m............. 122
Towing a trailer .............................. 233
Wet road surface ........................... 184
DVD audio
Operating (on-board computer) ..... 246
DVD video
Operating (on-board computer) ..... 247 E
EASY-ENTRY feature Activating/deactivating ................. 257
Function/note s............................. 115
EASY-EXIT feature
Crash-responsive ........................... 116
Function/note s............................. 115
Switching on/of f........................... 257
EASY-PACK convenience box ........... 308
EASY-PACK load-securing kit
Components and storage .............. 310
Inserting the brackets into the
loading rai l..................................... 310
EASY-PACK luggage compartment
management system ........................ 310
EBD (electronic brake force distri-
bution)
Display message ............................ 264
Function/note s................................ 76
ECO display
Function/note s............................. 182
On-board computer ....................... 244
ECO start/stop function
Automatic engine switch-off .......... 163
Deactivating/activating ................. 164
General information ....................... 163 Important safety notes .................. 163
Introduction ................................... 163
Electrical fuses
see Fuses
Electromagnetic compatibility
Declaration of conformity ................ 25
Electronic Stability Program
see ESP® (Electronic Stability Program)
Emergency
Automatic measures after an acci-
dent ................................................. 55
Emergency key
Unlocking the driver's door .............. 90
Emergency key element
Function/note s................................ 84
Inserting .......................................... 85
Locking vehicle ................................ 90
Removing ......................................... 85
Emergency release
Driver's door .................................... 90
Fuel filler fla p................................. 179
Emergency spare wheel
General notes ................................ 391
Important safety notes .................. 390
Inflating the collapsible spare
wheel ............................................. 392
Removing ....................................... 391
Storage location ............................ 391
Stowing .......................................... 392
Technical data ............................... 394
Emergency unlocking
Tailgate ............................................ 95
Vehicle ............................................. 90
Engine
Display message ............................ 270
ECO start/stop function ................ 163
Engine number ............................... 399
Jump-starting ................................. 355
Running irregularly ......................... 166
Starting problems .......................... 166
Starting the engine with the key .... 161
Starting with KEYLESS GO ............. 162
Stopping ........................................ 181
Tow-starting (vehicle) ..................... 360
Warning lamp (engine diagnos-
tics) ............................................... 295
Engine electronics
Notes ............................................. 396 10
Index
Page 23 of 417
Deactivating ....................................
.79
Function ........................................... 79
Tow-starting
Emergency engine starting ............ 360
Important safety notes .................. 357
Towing
Important safety notes .................. 357
With the rear axle raised ................ 359
Towing a trailer
Active Blind Spot Assist ................ .229
Active Lane Keeping Assist ............ 232
Active Parking Assist ..................... 213
Axle load, permissible .................... 410
Bulb failure indicator for LED
lamps ............................................. 237
ESP® (Electronic Stability Pro-
gram) ............................................... 75
Towing away
Fitting the towing eye .................... 358
Removing the towing eye .............. .359
With both axles on the ground ....... 359
Trailer
Display message ............................ 284
Trailer coupling
see Towing a trailer
Trailer towing
7-pin connector ............................ .237
Blind Spot Assist ............................ 225
Cleaning the trailer tow hitch ......... 338
Coupling up a trailer ..................... .235
Decoupling a trailer ....................... 235
Driving tips ................................... .233
Folding in the ball coupling ............ 236
Folding out the ball coupling .......... 234
Important safety notes .................. 232
Lights display message .................. 267
Mounting dimensions .................... 409
Parktronic ...................................... 209
Power supply ................................. 236
Trailer loads ................................... 410
Transmission
see Automatic transmission
Transmission position display ......... 169
Transmission position display
(DIRECT SELECT lever) ......................169
Transporting the vehicle .................. 359
Trim pieces (cleaning instruc-
tions) ................................................. .340 Trip computer (on-board com-
puter)
................................................. .243
Trip meter
Calling up ....................................... 243
Resetting (on-board computer) ...... 244
Turn signals
Switching on/off ........................... 125
TV
Operating (on-board computer) ..... 247
see Separate operating instructions
Two-way radio
Frequencies ................................... 396
Installation ..................................... 396
Transmission output (maximum) .... 396
Type identification plate
see Vehicle identification plate
Tyre pressure
Calling up (on-board computer) ..... 370
Display message ............................ 280
Important safety notes .................. 370
Not reached (TIREFIT) .................... 350
Reached (TIREFIT) .......................... 350
Recommended ............................... 367
Tyre pressure loss warning
General notes ................................ 369
Important safety notes .................. 369
Restarting ...................................... 369
Tyre pressure monitor
Checking the tyre pressure elec-
tronically ........................................ 371
Function/notes ............................ .370
General notes ................................ 370
Important safety notes .................. 370
Radio type approval for the tyre
pressure monitor ........................... 373
Restarting ...................................... 372
Warning lamp ................................. 298
Warning message .......................... 372
Tyres
Changing a wheel .......................... 373
Checking ........................................ 365
Direction of rotatio n...................... 374
Display message ............................ 280
Important safety notes .................. 364
MOExtended tyre s......................... 366
Replacing ....................................... 373
Service life ..................................... 365
Storing ........................................... 374 20
Index
Page 24 of 417
Tyre size (data) .............................. 378
Tyre tread ...................................... 365
Wheel and tyre combinations ........ 380
see Flat tyre U
Unlocking Emergency unlocking ....................... 90
From inside the vehicle (central
unlocking button )............................. 89 V
Vanity mirror (in sun visor) .............. 315
Variable SPEEDTRONIC
see SPEEDTRONIC
Vehicle
Correct use ...................................... 26
Data acquisition ............................... 27
Display message ............................ 282
Electronics ..................................... 396
Equipment ....................................... 24
Implied warranty .............................. 27
Individual settings .......................... 251
Leaving parked up ......................... 182
Locking (in an emergency) ............... 90
Locking (key) ................................... 83
Lowering ........................................ 378
Pulling away ................................... 162
Raising ........................................... 375
Registration ..................................... 26
Securing from rolling away ............ 375
Towing away .................................. 357
Transporting .................................. 359
Unlocking (in an emergency) ........... 90
Unlocking (key) ................................ 83
Vehicle data ................................... 407
Vehicle data ....................................... 407
Vehicle dimensions ........................... 407
Vehicle emergency locking ................ 90
Vehicle identification number
see VIN
Vehicle identification plate .............. 398
Vehicle level
AIRMATIC ...................................... 202
Vehicle level (display message) ....... 274Vehicle maintenance
see ASSYST PLUS
Vehicle tool kit .................................. 345
Vehicle weights ................................. 407
Video
Operating the DVD ......................... 247
VIN ...................................................... 398 W
Warning and indicator lamps ABS ................................................ 289
Brakes ........................................... 288
Distance warning signal ................. 297
ESP® ............................................. 291
ESP® OFF ...................................... 292
LIM (cruise control) ........................ 186
LIM (DISTRONIC PLUS) .................. 193
LIM (variable SPEEDTRONIC) ......... 189
Overview .......................................... 34
PASSENGER AIR BAG OFF ............... 43
Reserve fue l................................... 295
Seat belt ........................................ 287
Tyre pressure monitor ................... 298
Warning triangle ................................ 344
Washer fluid
Display message ............................ 285
Wheel and tyre combinations
see Tyres
Wheel bolt tightening torque ........... 378
Wheel chock ...................................... 375
Wheels
Changing a whee l.......................... 373
Changing/replacing ....................... 373
Checking ........................................ 365
Cleaning ......................................... 336
Cleaning (warning) ......................... 374
Emergency spare wheel ................. 390
Fitting a new wheel ........................ 377
Fitting a wheel ............................... 374
Important safety notes .................. 364
Removing a whee l.......................... 377
Storing ........................................... 374
Tightening torque ........................... 378
Wheel size/tyre size ...................... 378
Windowbag
Operation ......................................... 50 Index
21
Page 304 of 417
thrown around and hit vehicle occupants.
There is a risk of injury, particularly in the
event of sudden braking or a sudden change
in direction.
R Always stow objects so that they cannot be
thrown around in such situations.
R Always make sure that objects do not pro-
trude from stowage spaces, luggage nets or
stowage nets.
R Close the lockable stowage spaces while
driving.
R Always stow and secure heavy, hard, poin-
ted, sharp-edged, fragile or bulky objects in
the boot/luggage compartment.
Observe the loading guidelines (Y page 300).
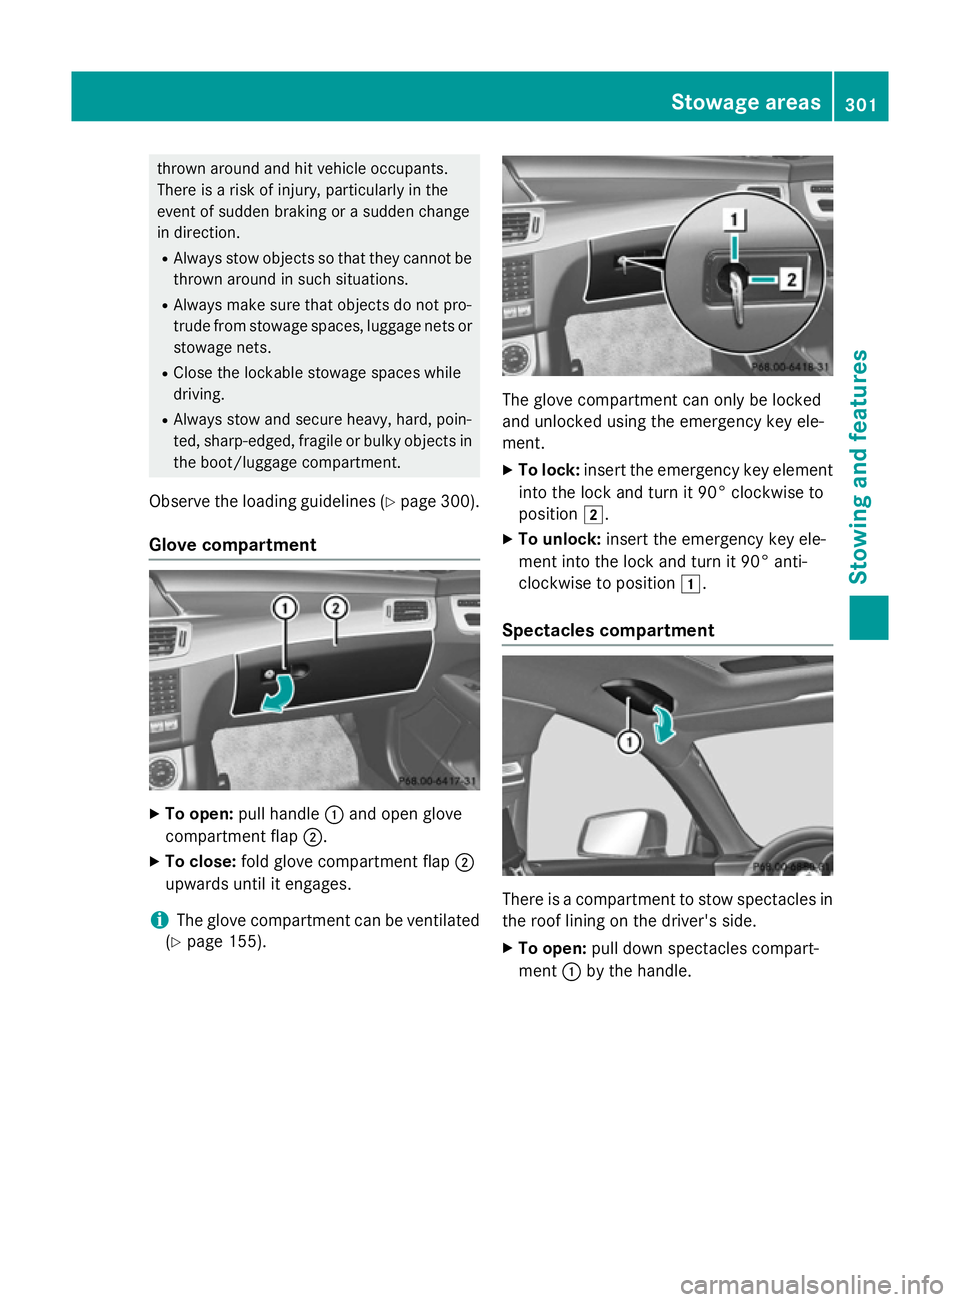
Glove compartment X
To open: pull handle :and open glove
compartment flap ;.
X To close: fold glove compartment flap ;
upwards until it engages.
i The glove compartment can be ventilated
(Y page 155). The glove compartment can only be locked
and unlocked using the emergency key ele-
ment.
X To lock: insert the emergency key element
into the lock and turn it 90° clockwise to
position 2.
X To unlock: insert the emergency key ele-
ment into the lock and turn it 90° anti-
clockwise to position 1.
Spectacles compartment There is a compartment to stow spectacles in
the roof lining on the driver's side.
X To open: pull down spectacles compart-
ment :by the handle. Sto
wage areas
301Stowing and features Z
Page 320 of 417
Cigarette lighter
G
WARNING
You can burn yourself if you touch the hot
heating element or the socket of the cigarette lighter.
In addition, flammable materials can ignite if:
R the hot cigarette lighter falls
R a child holds the hot cigarette lighter to
objects, for example
There is a risk of fire and injury.
Always hold the cigarette lighter by the knob.
Always make sure that the cigarette lighter is
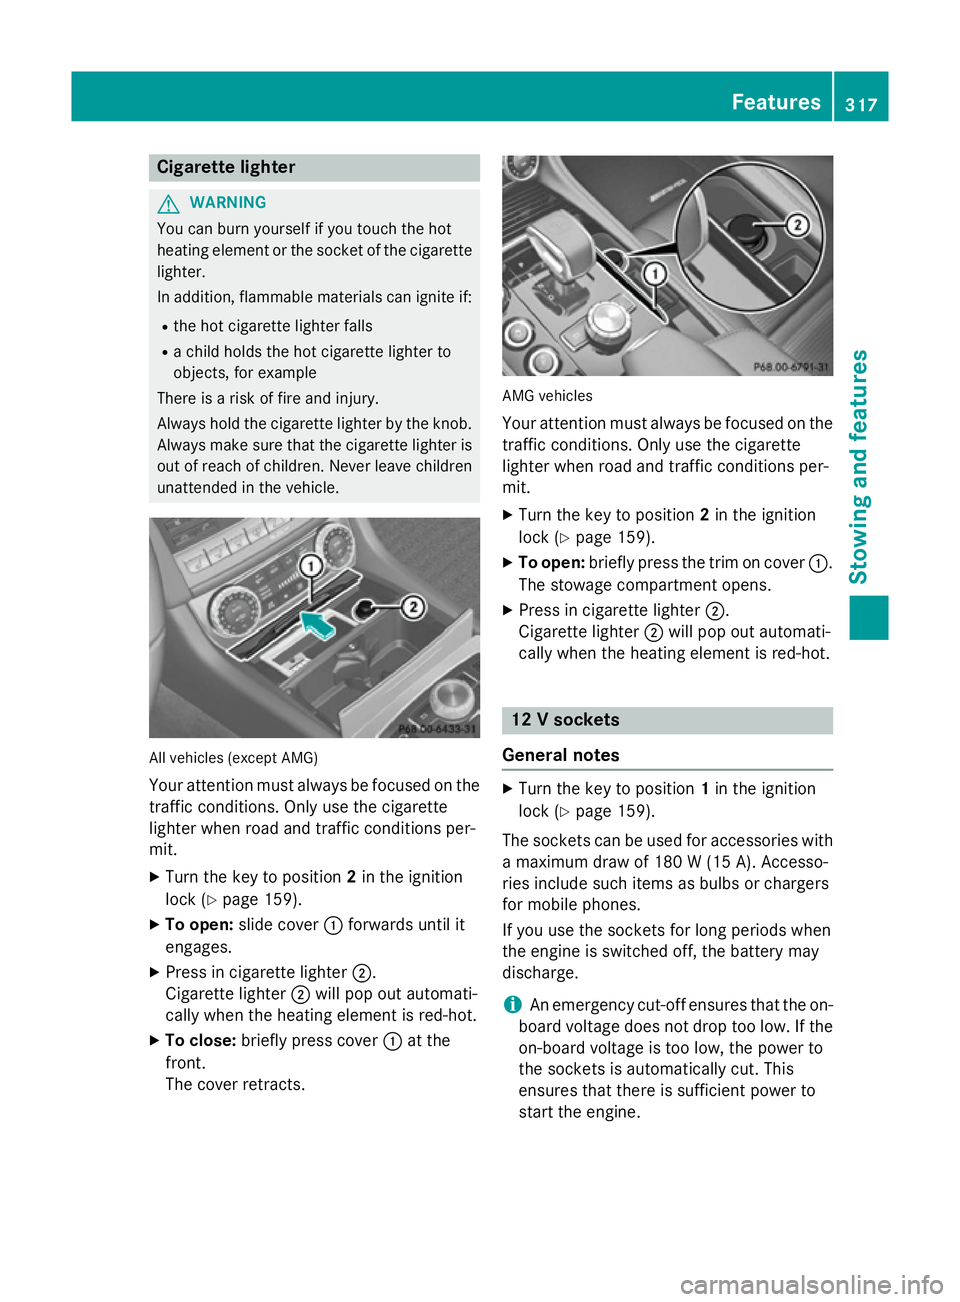
out of reach of children. Never leave children unattended in the vehicle. All vehicles (except AMG)
Your attention must always be focused on the
traffic conditions. Only use the cigarette
lighter when road and traffic conditions per-
mit.
X Turn the key to position 2in the ignition
lock (Y page 159).
X To open: slide cover :forwards until it
engages.
X Press in cigarette lighter ;.
Cigarette lighter ;will pop out automati-
cally when the heating element is red-hot.
X To close: briefly press cover :at the
front.
The cover retracts. AMG vehicles
Your attention must always be focused on the
traffic conditions. Only use the cigarette
lighter when road and traffic conditions per-
mit.
X Turn the key to position 2in the ignition
lock (Y page 159).
X To open: briefly press the trim on cover :.
The stowage compartment opens.
X Press in cigarette lighter ;.
Cigarette lighter ;will pop out automati-
cally when the heating element is red-hot. 12 V sockets
General notes X
Turn the key to position 1in the ignition
lock (Y page 159).
The sockets can be used for accessories with a maximum draw of 180 W (15A). Accesso-
ries include such items as bulbs or chargers
for mobile phones.
If you use the sockets for long periods when
the engine is switched off, the battery may
discharge.
i An emergency cut-off ensures that the on-
board voltage does not drop too low. If the
on-board voltage is too low, the power to
the sockets is automatically cut. This
ensures that there is sufficient power to
start the engine. Features
317Stowing and fea tures Z
Page 349 of 417
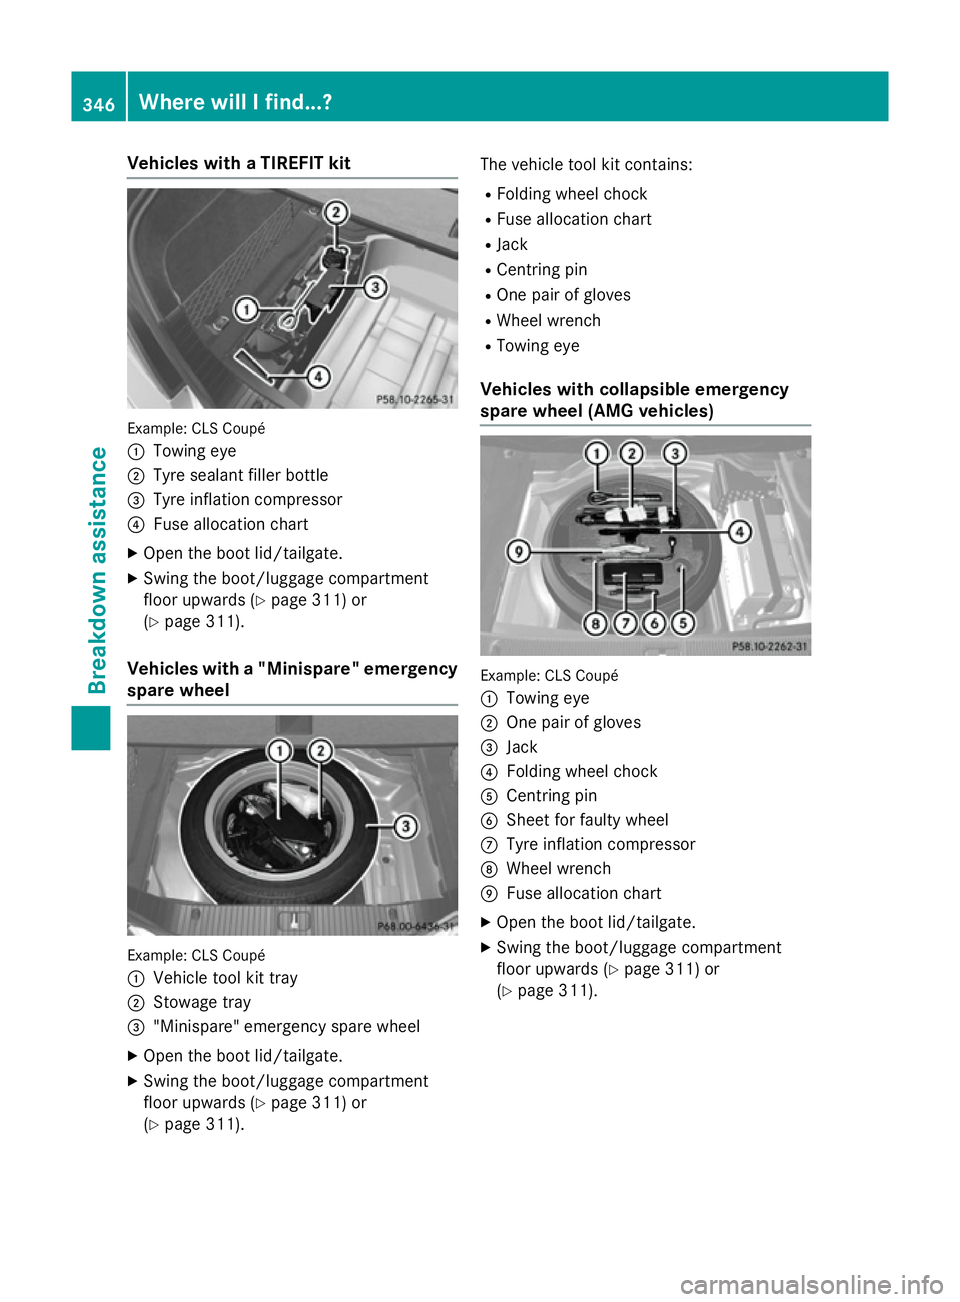
Vehicles with a TIREFIT kit
Example: CLS Coupé
:
Towing eye
; Tyre sealant filler bottle
= Tyre inflation compressor
? Fuse allocation chart
X Open the boot lid/tailgate.
X Swing the boot/luggage compartment
floor upwards (Y page 311) or
(Y page 311).
Vehicles with a "Minispare" emergency
spare wheel Example: CLS Coupé
:
Vehicle tool kit tray
; Stowage tray
= "Minispare" emergency spare wheel
X Open the boot lid/tailgate.
X Swing the boot/luggage compartment
floor upwards (Y page 311) or
(Y page 311). The vehicle tool kit contains:
R Folding wheel chock
R Fuse allocation chart
R Jack
R Centring pin
R One pair of gloves
R Wheel wrench
R Towing eye
Vehicles with collapsible emergency
spare wheel (AMG vehicles) Example: CLS Coupé
:
Towing eye
; One pair of gloves
= Jack
? Folding wheel chock
A Centring pin
B Sheet for faulty wheel
C Tyre inflation compressor
D Wheel wrench
E Fuse allocation chart
X Open the boot lid/tailgate.
X Swing the boot/luggage compartment
floor upwards (Y page 311) or
(Y page 311). 346
Where will I find...?Breakdo
wn assis tance
Page 363 of 417
The towing eye can be used to pull the vehicle
onto a trailer or transporter for transporta-
tion.
The towing eyes or trailer tow hitch can be
used to pull the vehicle onto a trailer or trans-
porter if you wish to transport it.
X Turn the key to position 2in the ignition
lock.
X Shift the automatic transmission to posi-
tion N.
As soon as the vehicle is loaded:
X Prevent the vehicle from rolling away by
applying the parking brake.
X Shift the automatic transmission to posi-
tion P.
X Turn the key in the ignition lock to position
0 and remove the key from the ignition
lock.
X Secure the vehicle. Notes for 4MATIC vehicles
! Vehicles with 4MATIC must not be towed
with the front or rear axle raised; otherwise,
the transmission may be damaged.
If the vehicle has transmission damage or
damage to the front or rear axle, have it trans- ported on a transporter or trailer.
In the event of damage to the electrical
system
If the battery is defective, the automatic
transmission will be locked in position P. To
shift the automatic transmission to position
N, you must provide power to the vehicle's
electrical system in the same way as when
jump-starting (Y page 355).
Have the vehicle transported on a transporter
or trailer. Tow-starting (emergency engine
starting)
! Vehicles with automatic transmission
must not be tow-started. The transmission
may otherwise be damaged.
i You can find information on "Jump-start-
ing" under (Y page 355). Electrical fuses
Important safety notes
G
WARNING
If you manipulate, bridge or replace a faulty
fuse with a fuse of a higher amperage, the
electric cables could be overloaded. This may result in a fire. There is a risk of an accident
and injury.
Always replace faulty fuses with specified new fuses of the correct amperage.
! Only use fuses that have been approved
for Mercedes-Benz vehicles and which
have the correct fuse rating for the system concerned. Otherwise, components or sys-
tems could be damaged.
The fuses in your vehicle serve to disconnect
faulty circuits. If a fuse blows, all the compo- nents on the circuit and their functions will
fail.
Blown fuses must be replaced with fuses of
the same rating, which you can recognise by
the colour and fuse rating. The fuse ratings
are listed in the fuse allocation chart.
If the newly inserted fuse also blows, have the
cause traced and rectified at a qualified spe-
cialist workshop, e.g. a Mercedes-Benz Ser-
vice Centre. Before replacing a fuse
Observe the important safety notes
(Y page 360) 360
Electrical fusesBreakdown assistance
Page 395 of 417
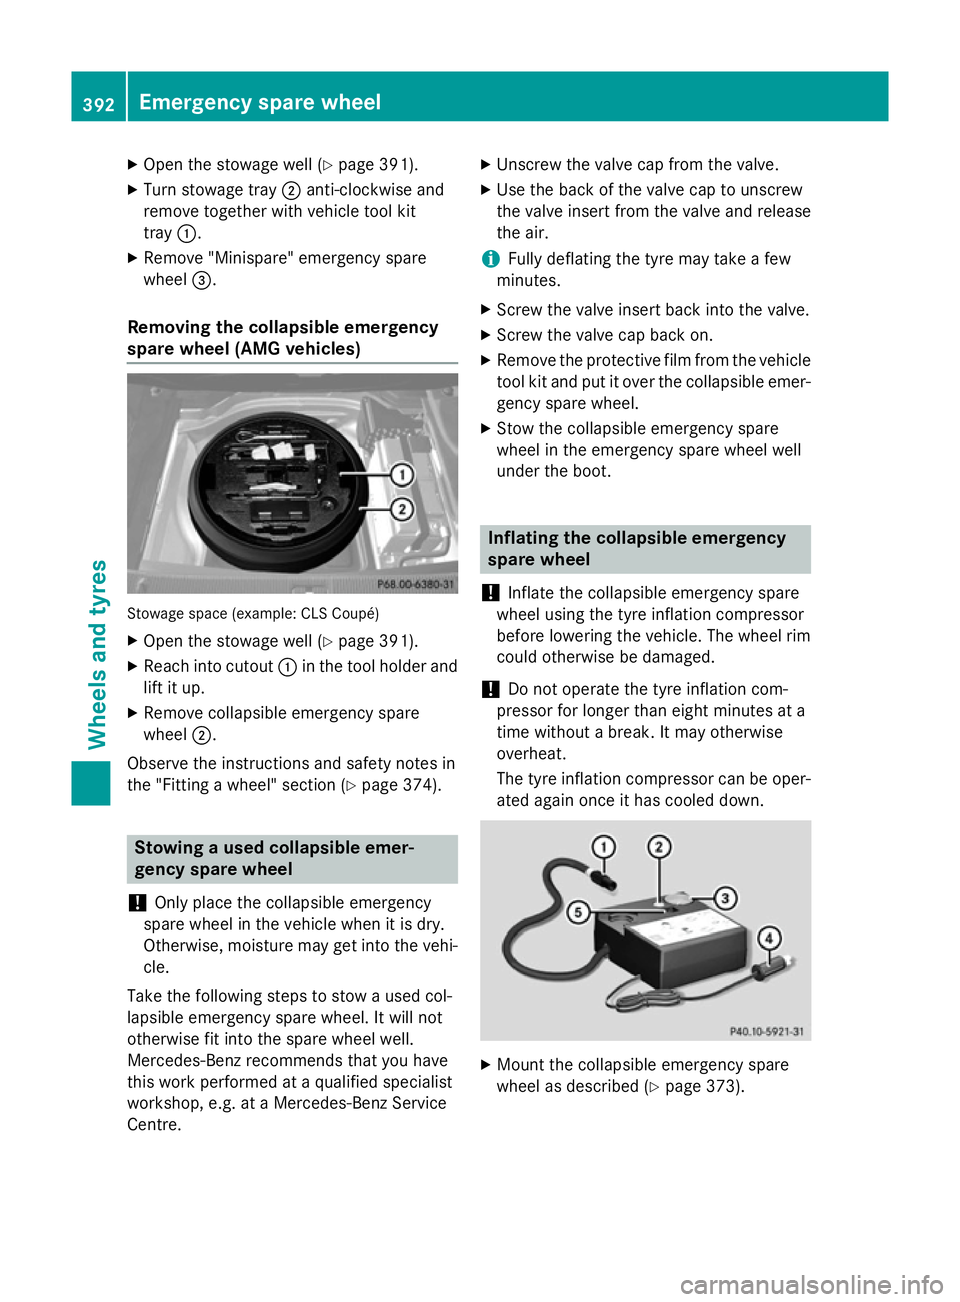
X
Open the stowage well (Y page 391).
X Turn stowage tray ;anti-clockwise and
remove together with vehicle tool kit
tray :.
X Remove "Minispare" emergency spare
wheel =.
Removing the collapsible emergency
spare wheel (AMG vehicles) Stowage space (example: CLS Coupé)
X Open the stowage well (Y page 391).
X Reach into cutout :in the tool holder and
lift it up.
X Remove collapsible emergency spare
wheel ;.
Observe the instructions and safety notes in
the "Fitting a wheel" section (Y page 374).Stowing a used collapsible emer-
gency spare wheel
! Only place the collapsible emergency
spare wheel in the vehicle when it is dry.
Otherwise, moisture may get into the vehi-
cle.
Take the following steps to stow a used col-
lapsible emergency spare wheel. It will not
otherwise fit into the spare wheel well.
Mercedes-Benz recommends that you have
this work performed at a qualified specialist
workshop, e.g. at a Mercedes-Benz Service
Centre. X
Unscrew the valve cap from the valve.
X Use the back of the valve cap to unscrew
the valve insert from the valve and release
the air.
i Fully deflating the tyre may take a few
minutes.
X Screw the valve insert back into the valve.
X Screw the valve cap back on.
X Remove the protective film from the vehicle
tool kit and put it over the collapsible emer-
gency spare wheel.
X Stow the collapsible emergency spare
wheel in the emergency spare wheel well
under the boot. Inflating the collapsible emergency
spare wheel
! Inflate the collapsible emergency spare
wheel using the tyre inflation compressor
before lowering the vehicle. The wheel rim
could otherwise be damaged.
! Do not operate the tyre inflation com-
pressor for longer than eight minutes at a
time without a break. It may otherwise
overheat.
The tyre inflation compressor can be oper-
ated again once it has cooled down. X
Mount the collapsible emergency spare
wheel as described (Y page 373).392
Emergency spare wheelWheels and tyres