flat tire MERCEDES-BENZ CLS COUPE 2018 Owners Manual
[x] Cancel search | Manufacturer: MERCEDES-BENZ, Model Year: 2018, Model line: CLS COUPE, Model: MERCEDES-BENZ CLS COUPE 2018Pages: 589, PDF Size: 10.95 MB
Page 22 of 589
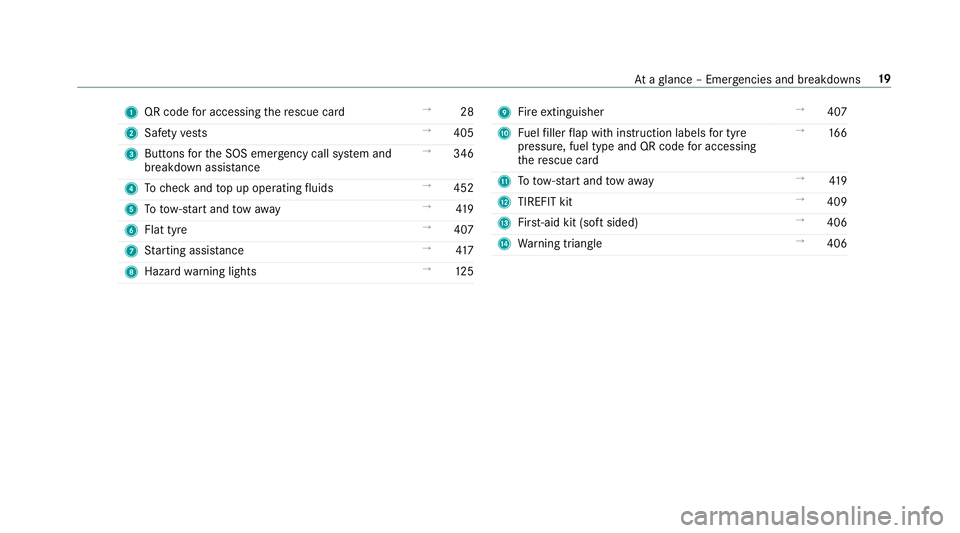
1
QR code for accessing there scue card →
28
2 Safetyve sts →
405
3 Buttons forth e SOS emer gency call sy stem and
breakdown assis tance →
346
4 Tocheck and top up operating fluids →
452
5 Totow- start and tow aw ay →
419
6 Flat tyre →
407
7 Starting assis tance →
417
8 Haza rdwa rning lights →
12 5 9
Fire extinguisher →
407
A Fuelfiller flap with instruction labels for tyre
pressu re, fuel type and QR code for accessing
th ere scue card →
16 6
B Totow- start and tow aw ay →
419
C TIREFIT kit →
409
D First-aid kit (so ftsided) →
406
E Warning triangle →
406 At
aglance – Emer gencies and breakdowns 19
Page 410 of 589
Re
moving the fire extinguisher &
WARNING Risk of accident due toan
incor rectly secu redfire extinguisher in
th e driver's foot we ll
A fire extinguisher in the driver's foot we ll
may impede pedal tra vel or block a
depressed pedal.
This jeopardises the operating and road
saf ety of theve hicle.
Moreo ver,th efire extinguisher can be flung
around in the driver's foot we ll and injure the
driver or other vehicle occupants. #
Alw aysst ore and secure thefire extin‐
guisher in the brac ket du ring the jour‐
ne y. #
Do not remo vethefire extinguisher
while driving. #
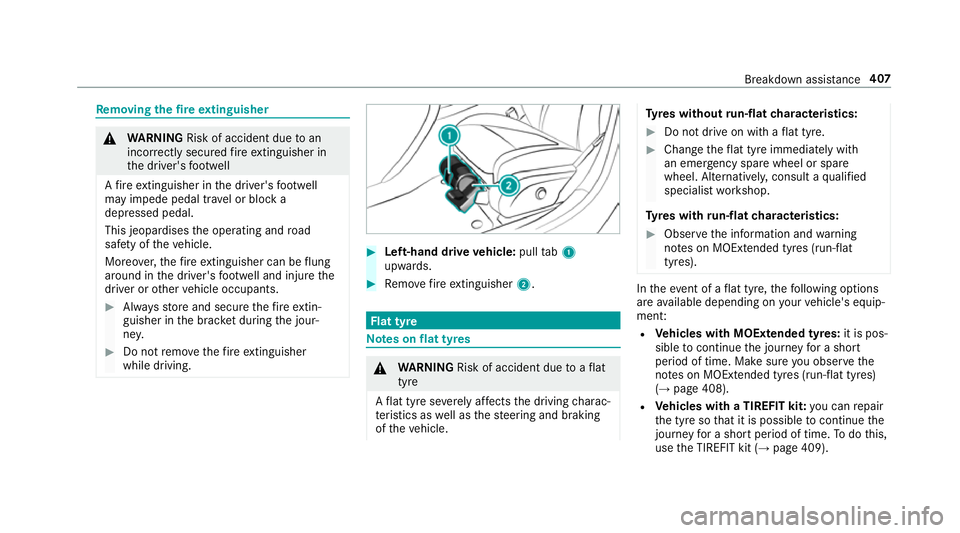
Left-hand drive vehicle: pulltab1
upwards. #
Remo vefire extinguisher 2. Flat tyre
Note
s onflat tyres &
WARNING Risk of accident due toaflat
tyre
A flat tyre se verely affects the driving charac‐
te rist ics as well as thesteering and braking
of theve hicle. Ty
res without run-flat characteristics: #
Do not drive on with a flat tyre. #
Chan getheflat tyre immediately with
an emer gency spa rewheel or spare
wheel. Alternativel y,consult a qualified
specialist workshop.
Ty res with run-flat characteristics: #
Obse rveth e information and warning
no tes on MOExtended tyres (run-flat
tyres). In
theeve nt of a flat tyre, thefo llowing options
are available depending on your vehicle's equip‐
ment:
R Vehicles with MOExtended tyres: it is pos‐
sible tocontinue the journey for a short
period of time. Make sure you obse rvethe
no tes on MOExtended tyres (run-flat tyres)
(→ page 408).
R Vehicles with a TIREFIT kit: you can repair
th e tyre so that it is possible tocontinue the
jou rney for a short period of time. Todo this,
use the TIREFIT kit (→ page 409). Breakdown assis
tance 407
Page 412 of 589
Driving distance possible in limp-home mode
af
te r the pressure loss warning: Load condition Driving distance pos‐
sible in limp-homemode
Pa rtially laden 80 km
Fu lly laden 30 kmR
The driving dis tance possible in li mp-home
mode may vary depending on the driving
st yle.
R Maximum permissible speed 80 km/h.
If a tyre has gone flat and cannot be replaced
with an MOEx tended tyre, you can use a stand‐
ard tyre as a temp orary measure. TIREFIT kit
storage location Mercedes-AMG
vehicles: observeth e no tes in
th e Supplement. Otherwise, you may failto rec‐
ognise dangers.
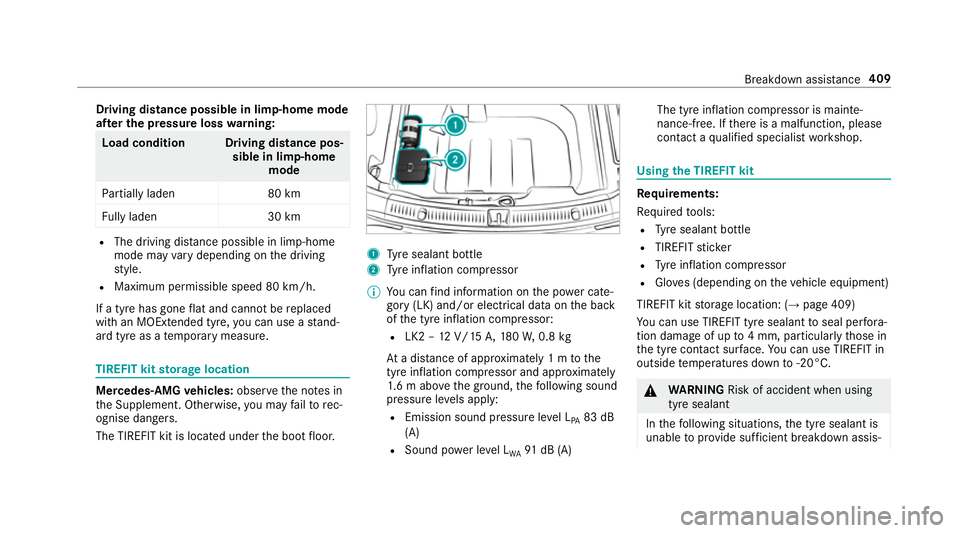
The TIREFIT kit is loca ted under the boot floor. 1
Tyre sealant bottle
2 Tyre inflation compressor
% You can find information on the po wer cate‐
gory (LK) and/or electrical data on the back
of the tyre inflation compressor:
R LK2 – 12V/15 A,180W, 0.8 kg
At a dis tance of appr oximately 1 m tothe
tyre inflation compressor and appr oximately
1. 6 m abo vethe ground, thefo llowing sound
pressure le vels apply:
R Emission sound pressure le vel L
PA 83 dB
(A)
R Sound po wer le vel L
WA 91
dB (A) The tyre inflation compressor is mainte‐
nance-free. If
there is a malfunction, please
conta ct aqualified specialist workshop. Using
the TIREFIT kit Re
quirements:
Re quired tools:
R Tyre sealant bottle
R TIREFIT sticker
R Tyre inflation compressor
R Gloves (depending on theve hicle equipment)
TIREFIT kit storage location: (→ page 409)
Yo u can use TIREFIT tyre sealant toseal per fora‐
tion dama geof up to4 mm, particularly those in
th e tyre conta ct surface. You can use TIREFIT in
outside temp eratures down to-20°C. &
WARNING Risk of accident when using
tyre sealant
In thefo llowing situations, the tyre sealant is
unable toprov ide suf ficient breakdown assis‐ Breakdown assis
tance 409
Page 413 of 589

ta
nce, as it is unable toseal the tyre prop‐
er ly:
R there are cuts or punctures in the tyre
lar gerth an those pr eviously mentioned.
R the wheel rim is dama ged.
R you ha vedriven at very low tyre pres‐
sures or on a flat tyre. #
Do not drive on. #
Consult a qualified specialist workshop. &
WARNING Risk of inju ryand poisoning
from tyre sealant
Ty re sealant is hazardous tohealth and cau‐
ses ir rita tion. Do not allow it tocome into
contact wi thyour skin, eyes or clo thing, and
do not swallow it. Do not inhale any vapours.
Ke ep the tyre sealant away from children.
Obser vethefo llowing if you come into con‐
ta ct wi th the tyre sealant: #
Rinse off the tyre sealant from your skin
using water immediatel y. #
If tyre sealant gets into your eyes, thor‐
oughly rinse them using clean water
immediatel y. #
If tyre sealant has been swallowe d,
th oroughly rinse out your mouth imme‐
diately and drink plenty of water.Do not
induce vomiting and seek medical
attention immediately. #
Change out of clo thing which has come
into con tact wi thtyre sealant immedi‐
ately. #
If an alle rgic reaction occurs, seek med‐
ical attention immediatel y. *
NO
TEOverheating due tothe tyre infla‐
tion compressor running too long #
Do not runth e tyre inflation compres‐
sor for longer than ten minu tes without
inter ruption. Comply with
the manufacturer's saf ety no tes on
th est icke r on the tyre inflation compressor. Ha
ve the tyre sealant bottle replaced in a quali‐
fi ed specialist workshop every five years. #
Do not remo veany fore ign objects which
ha ve entered the tyre. #
Affix pa rt1 ofthe TIREFIT sticke rto the
instrument clus ter within the driver's field of
vision. #
Affix pa rt2 ofthe TIREFIT sticke r near the
va lve on the wheel with the defective tyre. 41 0
Breakdown assis tance
Page 415 of 589

#
Drive forw ards or reve rseve ry slowly for
appr oximately 10m. #
Pump up the tyre again.
Af ter a maximum of ten minu testh e tyre
pressure must be at least 200 kPa (2.0 bar/
29 psi). &
WARNING Risk of accident due tothe
specified tyre pressure not being ach‐
ie ved
If th e specified tyre pressure is not achie ved
af te rth e specified time, the tyre is too badly
damaged. The tyre sealant cannot repair the
tyre in this ins tance.
Dama ged tyres and a tyre pressure that is
to o low can significantly impair braking and
handling characteristics. #
Do not drive on. #
Consult a qualified specialist workshop. If, af
terte n minutes, a tyre pressure of
200 kPa (2.0 bar/29 psi) has been achie ved: #
Switch off the tyre inflation compressor. #
Unscr ew thefilling hose from theva lve of the
defective tyre. &
WARNING Risk of accident from driving
wi th sealed tyres
A tyre temp orarily sealed with tyre sealant
impairs driving characteristics and is not
suitable for higher speeds. #
Adapt your driving style according lyand
drive carefull y. #
Do not exceed the maximum speed
limit with a tyre that has been repaired
using tyre sealant. #
Obser vethe maximum permissible speed for
a tyre sealed with tyre sealant 80 km/h. #
Affix th e upper section of the TIREFIT sticker
to the instrument clus ter in a location where
it will be easi lyseen bythe driver.
* NO
TEStaining from leaking tyre sealant Af
ter use, excess tyre sealant may leak out
from thefilling hose. #
Therefore, place thefilling hose in the
plastic bag that con tained the TIREFIT
kit. +
ENVIRONMEN
TALNO TEEnvironmental
pollution caused byenvironmen tally ir re‐
sponsible disposal Ty
re sealant contains polluta nts. #
Have the tyre sealant bottle disposed of
professionall y,e.g. at a Mercedes-Benz
Service Centre. #
Stow th e tyre sealant bottle, the tyre inflation
compressor and thewa rning triangle. #
Pull away immediatel y. #
Stop driving af ter appro ximately ten minu tes
and check the tyre pressure using the tyre
inflation compressor.
The tyre pressure must now be at least
13 0 kPa (1.3 bar/19 psi). 412
Breakdown assis tance
Page 442 of 589
R
Obser vethe maximum permissible speed for
th e M+S tyres fitted.
If th is is below theve hicle's maximum speed,
th is must be indicated in an appropriate label
in the driver's field of vision.
R Run in new tyres at moderate speeds forthe
fi rs t10 0 km.
R Replace the tyres af ter six years at the latest,
re ga rdless of wear.
R When replacing with tyres that do not
fe ature run-flat characteristics: vehicles
with MOExtended tyres are not equipped
with a TIREFIT kit at thefa ctor y.Equip the
ve hicle with a TIREFIT kit af terre placing with
tyres that do not feature run-flat characteris‐
tics, e.g. winter tyres.
Fo r more information on wheels and tyres, con‐
tac t a qualified specialist workshop.
Be sure toalso obse rveth efo llowing fur ther
re lated subjects:
R Notes on tyre pressure (→ page 429)
R Tyre pressure table (→ page 430) R
Notes on the emer gency spa rewheel
(→ page 446) Note
s on inter changing wheels &
WARNING Risk of inju rythro ugh dif fer‐
ent wheel sizes
Inter changing the front and rear wheels if the
wheels or tyres ha vediffere nt dimensions
may se verely impair the driving characteris‐
tics.
The disk brakes or wheel suspension compo‐
nents may also be damaged. #
Rotate front and rear wheels on lyifthe
wheels and tyres are of the same
dimensions. Inter
changing the front and rear wheels if the
wheels or tyres ha vediffere nt dimensions can
re nder thege neral operating pe rmit in valid. The
wear pat tern s on the front and rear wheels
dif fer:
R Front wheels wear more on the shoulder of
th e tyre
R Rear wheels wear more in the cent reofthe
tyre
On vehicles with the same front and rear wheel
size, you can inter change the wheels every
5,000 to10,000 km, depending on thewe ar.
Ensure the direction of rotation is maintained for
th e wheels.
It is imperative toobser vethe instructions and
saf ety no tes on "Wheel change" when doing so. Note
s onstoring wheels R
Afterre moving wheels, store them in a cool,
dry and preferably dark place.
R Protect the tyres from conta ct withoil,
grease or fuel. Wheels and tyres
439
Page 561 of 589

Flat
towing
see Tow- bar sy stem
Flat tyre ....................................................4 07
MOExtended tyres ...............................4 08
No tes ................................................... 407
TIREFIT kit ...........................................4 09
Wheel change ...................................... 440
Floor mats ................................................ 121
Fo g light (extended range) ......................1 26
Fo il co vering ............................................. 181
Fr ag rance
see Fragrance sy stem
Fr ag rance sy stem .................................... 141
Inserting/removing theflacon ............ .141
Setting ................................................. 14 0
Fr ee software ............................................ .31
Fr equencies
Tw o-w ayradio .....................................4 49
Fr equency band
Dialling (on-board computer) .............. .262
Fr ont airbag (driver, front passenger) .....39 Fr
ont passenger seat
Ad justing from the driver's seat ............ 95
Fu el .......................................................... .455
Ad ditives .............................................4 55
Diesel ................................................. .455
E10 ...................................................... 454
Fu elreser ve ........................................ 456
Low outside temp eratures ...................4 55
Pe trol ................................................... 454
Quality (diesel) .................................... 455
Quality (p etro l) .................................... 454
Re fuelling ............................................ 16 6
Sulphur content ................................... 454
Ta nk content ....................................... 456
Fu el consum ption
On-board computer ............................ .259
Fu nction seat
see Door cont rol panel
Fu ses ........................................................ 424
Before replacing a fuse ........................ 424
Fu se assignment diagram .................... 424
Fu se box in the boot ............................4 26
Fu se box in the engine compartment .. 425 Fu
se box in the front passenger foot‐
we ll ...................................................... 426
Fu se box on the dashboard ................. 426
No tes ................................................... 424 G
Garage door opener Cleari ngthe memory ........................... 176
Opening or closing the door ................1 75
Programming buttons .......................... 173
Ra dio equipment appr oval numbers .... .176
Re solving problems ............................. 175
Synchronising thero lling code ............ .174
Gearshift recommendation ....................16 4
Genera l operating permit number
(EU) .......................................................... .450
Genuine parts ............................................ 22
Glide mode ............................................... 16 4
Glo vebox
Air vent ................................................ 14 8
Locking/unlocking .............................. 107558
Index
Page 580 of 589
Tr
ailer operation
Ac tive Blind Spot Assi st....................... 241
Ac tive Lane Keeping Assist .................. 24 3
Bicycle rack ......................................... 250
Coupling up/uncoupling a trailer ......... 24 8
Extending/r etra cting the ball neck ...... 24 6
No tes ................................................... 24 6
Soc ket ................................................. 24 8
Tr ailer stabilisation
Fu nction/no tes ................................... 186
Tr ansfer redve hicle data
Android Auto ....................................... 345
Apple CarPl ay™ ................................... 345
Tr ansmission (problem) ..........................16 5
Tr ansmission position display ................161
Tr anspo rting
Ve hicle ................................................ 422
Tr im element (Care) ................................ 402
Tr ip
Menu (on-board computer) .................. 259
Tr ip computer
Displaying ............................................ 259
Re setting ............................................. 260 Tr
ip distance ............................................ 259
Displaying ............................................ 259
Re setting ............................................. 260
Tr ip me ter
see Trip dis tance
Tu rn signal indicator
see Turn signal lights
Tu rn signal lights .....................................1 24
Switching on/off ................................. 124
TV .............................................................. 275
Ac tivating ............................................ 377
Ad justing the brightness ..................... 383
Calling up the menu (CI+ module) .......3 83
Displ ays in theTV control menu .......... 379
Fu nction/no tes (audio language,
subtitles) ............................................. 381
Information .......................................... 375
Overview ............................................. 378
Picture settings ................................... 383
Picture settings overview .................... 382
Setting subtitles .................................. 382
Setting the audio language .................. 381
Showing telete xt ................................. .382
Showing/hiding full screen ................. 379Te
lete xt overview ................................. 382
Vo ice commands (LINGU ATRO NIC) .....2 75
TV channel
Ac tivating/deactivating channel fix ..... 380
Channel fix .......................................... 380
Channel li stove rview .......................... 380
EPG (elect ronic programme guide) ...... 380
Overview of favo urites ........................ .380
Quick sa ve........................................... 381
Selecting from thech annel list ............ 379
Selecting from the control menu ......... 379
Selecting from thefa vo urites .............. 379
Selecting in the bac kground ................ 379
St oring .................................................3 81
Tw o phone mode
see Second telephone
Tw o-w ayradios
Fr equencies ......................................... 449
No tes on ins tallation .......................... .448
Tr ansmission output (maximum) ........ .449
Ty re inflation compressor
see TIREFIT kit Index
577
Page 581 of 589
Ty
re pressure ........................................... 430
Checking (ty repressure monitoring
sy stem) ................................................ 431
No tes .................................................. 429
Re starting the tyre pressure loss
wa rning sy stem ................................... 435
Re starting the tyre pressure monitor‐
ing sy stem ...........................................4 32
TIREFIT kit .......................................... .409
Ty re pressure loss warning sy stem
(function) ............................................. 435
Ty re pressure monitoring sy stem
(function) ............................................. 431
Ty re pressure table .............................. 430
Ty re pressure loss warning sy stem
Fu nction .............................................. 435
Re starting ............................................ 435
Ty re pressure moni toring sy stem
Checking the tyre pressure .................. 431
Checking the tyre temp erature ............ 431
Fu nction .............................................. 431
Re starting ............................................ 432
Te ch nical da ta..................................... 433
Ty re pressure table ................................. 430 Ty
re temp erature
Checking (tyre pressure monitoring
sy stem) ................................................ 431
Ty re pressure monitoring sy stem
(function) ............................................. 431
Ty re tread ................................................. 428
Ty re-change tool kit
Overview ............................................ .440
Ty res
Changing hub caps .............................. 441
Checking ............................................ .428
Che cking the tyre pressure (tyre
pressure monitoring sy stem) ............... 431
Fitting .................................................. 444
Flat tyre ............................................... 407
Inter changing ...................................... 439
MOExtended tyres .............................. .408
Noise ................................................... 428
No tes on fitting ................................... 436
Re moving ............................................ 444
Re placing .................................... 436, 440
Re starting the tyre pressure loss
wa rning sy stem ................................... 435
Re starting the tyre pressure monitor‐
ing sy stem ...........................................4 32Selection ............................................. 436
Snow
chains ........................................ 428
St oring ................................................ 439
TIREFIT kit ...........................................4 09
Ty re pressure (N otes) .......................... 429
Ty re pressure loss warning sy stem
(function) ............................................. 435
Ty re pressure monitoring sy stem
(function) ............................................. 431
Ty re pressure table .............................. 430
Un usual handling characteristics ........ 428 U
Un its of measurement
Setting ................................................ .295
Un locking setting ...................................... 68
USB devices Connecting .......................................... 363
USB port .................................................. .119
User profile .............................................. 296
Creating ...............................................2 97
Importing/exporting ............................ 297
Options ................................................ 298
Setting ................................................. 296 578
Index
Page 584 of 589
PA
SSENGER AIR BAG ............................ 43
Wa rranty .................................................... 28
Wa sher fluid
see Windsc reen washer fluid
Wa shing byhand (care) .......................... 396
Wa ter tank
see Air-water duct
We ather information ............................... 327
We b br owser
Calling up a web page .........................3 56
Calling up options ................................ 357
Calling up the settings .........................3 57
Del eting a bookmark .......................... .357
Del eting br owser data .........................3 57
Ending ................................................ .358
Managing bookma rks .......................... 357
Overview ............................................. 357
Showing/hiding the menu ...................3 56
We bsite
Calling up ............................................ 356
Showing/hiding thewe b br ows er
menu ................................................... 356 Wheel
change
Fitting a new wheel ............................ .444
Lo we ring theve hicle ........................... 445
Preparation ......................................... 440
Ra ising theve hicle .............................. 442
Re moving a wheel .............................. .444
Re moving/fitting hub caps .................. 441
Wheel change
see Emer gency spa rewheel
Wheel rotation ........................................ .439
Wheels Care .................................................... 400
Changing hub caps .............................. 441
Checking ............................................ .428
Che cking the tyre pressure (tyre
pressure monitoring sy stem) ............... 431
Fitting .................................................. 444
Flat tyre ............................................... 407
Inter changing ...................................... 439
MOExtended tyres .............................. .408
Noise ................................................... 428
No tes on fitting ................................... 436
Re moving ............................................ 444
Re placing .................................... 436, 440Re
starting the tyre pressure loss
wa rning sy stem ................................... 435
Re starting the tyre pressure monitor‐
ing sy stem ...........................................4 32
Selection ............................................. 436
Snow chains ........................................ 428
St oring ................................................ 439
TIREFIT kit ...........................................4 09
Ty re pressure (N otes) .......................... 429
Ty re pressure loss warning sy stem
(function) ............................................. 435
Ty re pressure monitoring sy stem
(function) ............................................. 431
Ty re pressure table .............................. 430
Un usual handling characteristics ........ 428
Wi -Fi .......................................................... 291
Overview .............................................. 291
Setting ................................................ .292
Setting up a hotspot ............................ 293
Setting up an Internet connection ....... 352
Wi ndow airbag ...........................................39
Wi ndo ws
see Side windo ws
Wi ndo ws(Care) ...................................... .400 Index
581