tow MERCEDES-BENZ CLS COUPE 2020 Owners Manual
[x] Cancel search | Manufacturer: MERCEDES-BENZ, Model Year: 2020, Model line: CLS COUPE, Model: MERCEDES-BENZ CLS COUPE 2020Pages: 469, PDF Size: 8.47 MB
Page 5 of 469
Symbols
........................................................ 5At
agl ance .................................................... 6
Cockpit ........................................................... 6
Indica tor and warning lamps ........................ .10
Overhead contro l panel ................................ 12
Door control panel and seat adjustment ....... 14
Emergencies and breakdowns ...................... 16Digital Owner's Manual
.............................18
Calling up the Digital Owner's Manual ..........18 Genera
l notes............................................. 20
Pr otection of the environment ......................20
Ta ke -ba ckof end-of-life vehicles ...................20
Mercedes-Benz GenuineParts ....................... 21
Owner's Manual ...........................................22
Operating saf ety .......................................... .22
Declaration of conformity ............................. 24
Diagno stics connection ................................ 28
Qualified specialist workshop ....................... 29
Ve hicle registration ....................................... 30
Cor rect use of theve hicle ............................30 Information on
the REA CHregulation ........... 30
No tesfo r persons with electronic medi‐
cal aids ......................................................... 30
Implied warranty .......................................... .31
QR code forre scue card ...............................31
Data storage .................................................31
Copyright ...................................................... 35 Occupant saf
ety......................................... 36
Re stra int sy stem ...........................................36
Seat belts ..................................................... 38
Airbags ......................................................... 42
PRE-SAFE ®
sy stem ....................................... 49
Safely transporting children in theve hi‐
cle ................................................................. 51
No tes on pets in theve hicle .........................70 Opening and closing
.................................. 71
Ke y ................................................................ 71
Doo rs............................................................ 74
Boot .............................................................. 78
Side windo ws............................................... 83
Sliding sunroof .............................................. 87
Ro ller sunblinds ............................................ 89 Anti-
theft pr otection .....................................90 Seats and
stowing ..................................... 93
No tes on the cor rect driver's seat posi‐
tion ............................................................... 93
Seats ............................................................ 94
St eering wheel ............................................ 102
Easy entry and exitfeature ........................ .104
Memory function ........................................ 105
St ow age areas ............................................ 106
Soc kets ....................................................... 11 5
Wi reless charging of the mobile phone
and connection with theex terior aerial .......1 16
Fitting/removing thefloor mats .................. 11 8 Light and sight
......................................... 12 0
Exterior lighting .......................................... 12 0
Interior lighting ........................................... 12 9
Wi ndsc reen wipers and windscreen
wa sher sy stem ............................................ 13 0
Mir rors ........................................................ 13 2
Area pe rmeable toradio waves on the
windscreen ................................................ .135
Infrared-reflective windscreen function ...... 13 62
Contents
Page 6 of 469
Climate control
......................................... 137
Overview of climate contro l systems ..........1 37
Operating the climate control sy stem ......... 13 8 Driving and pa
rking ................................. 14 8
Driving ........................................................ 14 8
DY NA MIC SELECT switch ........................... 15 9
Au tomatic transmission .............................. 161
Fu nction of the 4MATIC .............................. 16 6
Re fuelling .................................................... 16 6
Pa rking ...................................................... .172
Driving and driving sa fety sy stems .............. 178
Tr ailer hit ch................................................ 234
Bicycle rack function .................................. 239
Ve hicle towing instructions ........................ .241 Instrument display and on-board
compu
ter.................................................. 243
No tes on the instrument display and on-
board computer .......................................... 24 3
Instrument display overview ...................... .244
Overview of the buttons on thesteering
wheel ..........................................................2 45
Operating the on-board computer .............. 24 5Overview of displa
yson the multifunc‐
tion display .................................................2 47
Head-up display .......................................... 247 MBUX multimedia sy
stem ...................... 250
Overview and operation .............................. 250
Sy stem settings .......................................... 258
Na vigation .................................................. 262
Te lephone .................................................. .268
Mercedes me and apps ............................... 271
Mercedes-Benz emer gency call sy stem ...... 280
Ra dio, media & TV...................................... 284
Sound settings ........................................... 290 Main
tenance and care ............................. 292
ASS YST PLUS service inter val display ........ 292
Engine compartment .................................. 293
Cleaning and care ...................................... .299 Breakdown assi
stance ............................ 306
Emergency ................................................. .306
Flat tyre ...................................................... 308
Battery (vehicle) .......................................... 314To
w- starting or towing away ....................... 319
Electrical fuses ........................................... 324 Wheels and tyres
..................................... 327
No tes on noise or unusual handling char‐
acteristics .................................................. .327
No tes on regular lyinspecting wheels and
tyres .......................................................... .327
No tes on snow chains ................................ 327
Ty re pressure .............................................. 328
Wheel change ............................................ .332
Emergency spa rewheel .............................. 342 Te
ch nical data .......................................... 343
No tes on tech nical da ta.............................. 343
On-board electronics .................................. 343
Ra dio operating permits forve hicle com‐
ponents ...................................................... 345
Ve hicle identification plate, VIN and
engine number overview ............................ 345
Operating fluids .......................................... 347
Ve hicle data ................................................ 356
Tr ailer hit ch................................................. 357 Contents
3
Page 10 of 469
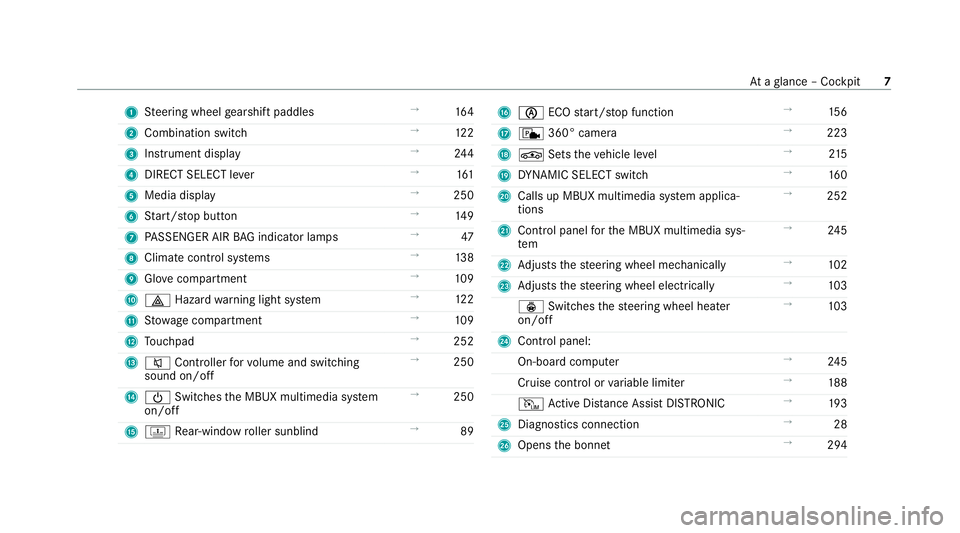
1
Steering wheel gearshift paddles →
16 4
2 Combination swit ch →
12 2
3 Instrument display →
24 4
4 DIRECT SELECT le ver →
161
5 Media display →
250
6 Start/ stop button →
14 9
7 PASSENGER AIR BAG indicator lamps →
47
8 Climate cont rol sy stems →
13 8
9 Glovecompa rtment →
109
A £ Hazardwa rning light sy stem →
12 2
B Stow age compartment →
109
C Touchpad →
252
D 8 Controller forvo lume and switching
sound on/off →
250
E Ü Switches the MBUX multimedia sy stem
on/off →
250
F D Rear-window roller sunblind →
89 G
è ECOstart/ stop function →
15 6
H c 360° camera →
223
I É Setstheve hicle le vel →
215
J DYNA MIC SELECT switch →
16 0
K Calls up MBUX multimedia sy stem applica‐
tions →
252
L Control panel forth e MBUX multimedia sys‐
tem →
24 5
M Adjusts thesteering wheel mechanically →
102
N Adjusts thesteering wheel electrically →
103
ý Switches thesteering wheel heater
on/off →
103
O Control panel:
On-board co mputer →
24 5
Cruise cont rol or variable limiter →
188
I Active Dis tance Assi stDISTRONIC →
19 3
P Diagno stics connection →
28
Q Opens the bonn et →
294 At
aglance – Cockpit 7
Page 20 of 469
1
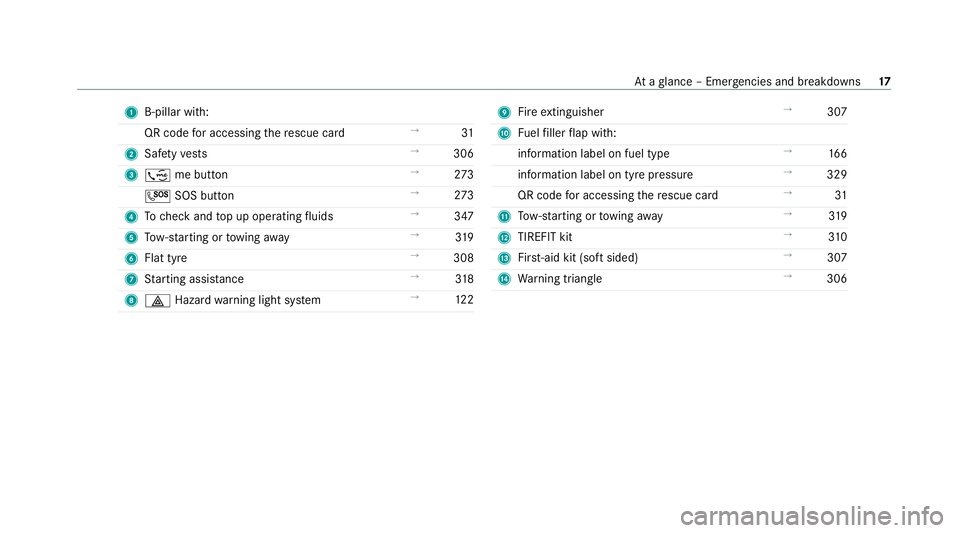
B-pillar wi th:
QR code for accessing there scue card →
31
2 Safetyve sts →
306
3 ; me button →
273
G SOS button →
273
4 Tocheck and top up operating fluids →
347
5 Tow- starting or towing away →
319
6 Flat tyre →
308
7 Starting assis tance →
318
8 £ Hazardwa rning light sy stem →
12 2 9
Fire extinguisher →
307
A Fuelfiller flap with:
information label on fuel type →
16 6
information label on tyre pressure →
329
QR code for accessing there scue card →
31
B Tow- starting or towing away →
319
C TIREFIT kit →
310
D First-aid kit (so ftsided) →
307
E Warning triangle →
306 At
aglance – Emer gencies and breakdowns 17
Page 21 of 469
Calling up
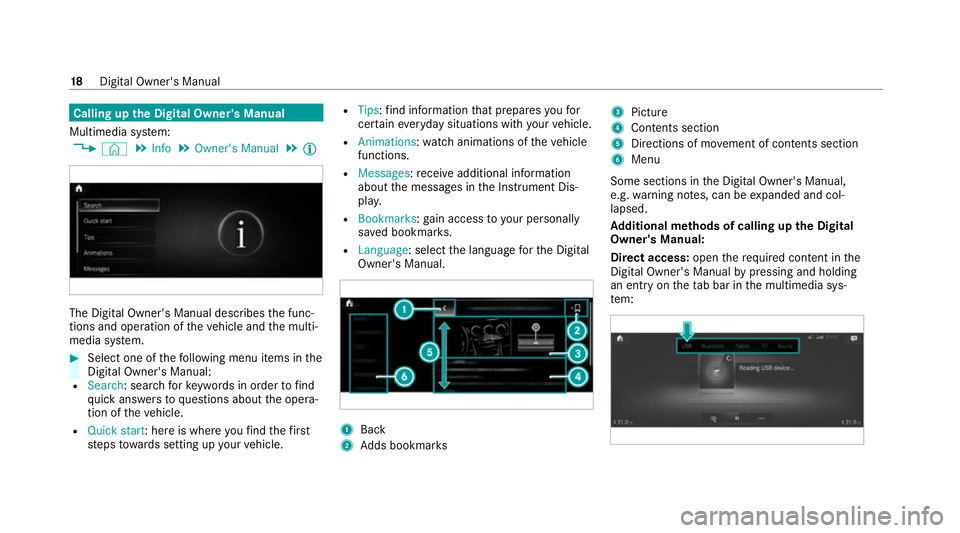
the Digital Owner's Manual
Multimedia sy stem:
4 © 5
Info 5
Owner's Manual 5
Õ The Digital Owner's Manual describes
the func‐
tions and operation of theve hicle and the multi‐
media sy stem. #
Select one of thefo llowing menu items in the
Digital Owner's Manual:
R Search: sea rchfo rke ywords in order tofind
qu ick answers toquestions about the opera‐
tion of theve hicle.
R Quick start: here is where youfind thefirst
st eps towa rds setting up your vehicle. R
Tips: find information that prepares youfor
cer tain eve ryday situations with your vehicle.
R Animations: watch animations of theve hicle
functions.
R Messages: recei veadditional information
about the messages in the Instrument Dis‐
pla y.
R Bookmarks: gain access to your personally
sa ve d bookmar ks.
R Language: select the language forth e Digital
Owner's Manual. 1
Back
2 Adds bookmar ks 3
Picture
4 Contents section
5 Directions of mo vement of contents section
6 Menu
Some sections in the Digital Owner's Manual,
e.g. warning no tes, can be expanded and col‐
lapsed.
Ad ditional methods of calling up the Digital
Owner's Manual:
Di rect access: openthere qu ired con tent in the
Digital Owner's Manual bypressing and holding
an ent ryon theta b bar in the multimedia sys‐
te m: 18
Digital Owner's Manual
Page 32 of 469
&
WARNING Risk of accident due to
objects in the driver's foot we ll
Objects in the driver's foot we ll may impede
pedal tr avel or block a depressed pedal.
This jeopardises the operating and road
saf ety of theve hicle. #
Stow all objects in theve hicle securely
so that they cannot getinto the driver's
fo ot we ll. #
Alw aysfit th efloor mats securely and
as prescribed in order toensure that
th ere is alw ays suf ficient room forthe
pedals. #
Do not use loose floor mats and do not
place floor mats on top of one ano ther. *
NO
TEBattery discharging from using
devices connected tothe diagnostics
connection Using devices at
the diagnostics connection
drains the batter y. #
Check thech arge leve l of the batter y. #
Ifth ech arge leve l is lo w,charge the
batter y,e.g. bydriving a considerable
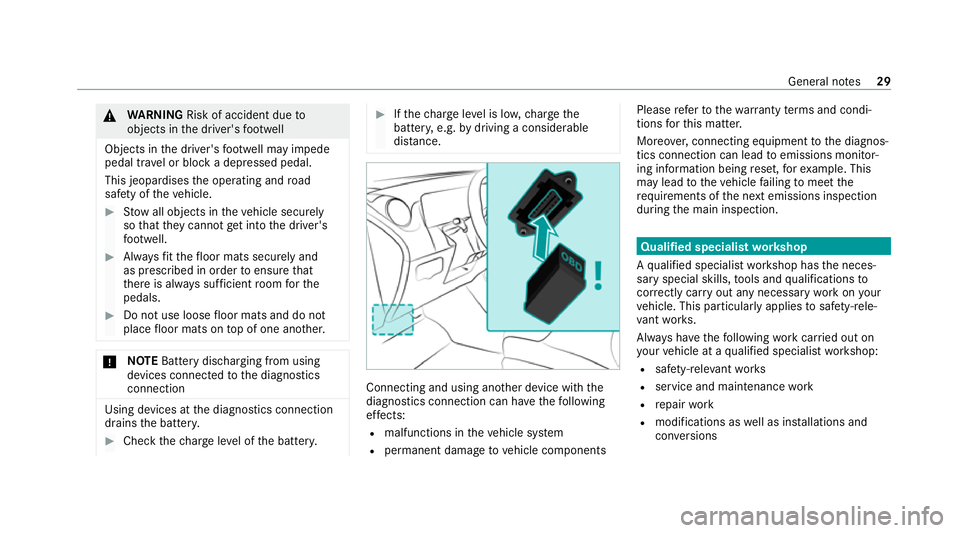
dis tance. Connecting and using ano
ther device with the
diagnostics connection can ha vethefo llowing
ef fects:
R malfunctions in theve hicle sy stem
R permanent damage tovehicle components Please
referto thewa rranty term s and condi‐
tions forth is matter.
Moreo ver,connecting equipment tothe diagnos‐
tics connection can lead toemissions monitor‐
ing information being reset, forex ample. This
may lead totheve hicle failing tomeet the
re qu irements of the next emissions inspection
during the main inspection. Qualified specialist
workshop
A qu alified specialist workshop has the neces‐
sary special skills, tools and qualifications to
cor rectly car ryout any necessary workon your
ve hicle. This particular lyapplies tosaf ety-re le‐
va nt wo rks.
Alw ays ha vethefo llowing workcar ried out on
yo ur vehicle at a qualified specialist workshop:
R safety-re leva nt wo rks
R service and maintenance work
R repair work
R modifications as well as ins tallations and
con versions General no
tes29
Page 41 of 469
indicator lamp is off. If
the front passenger seat
is occupied, make sure, bo thbefore and during
th e journe y,that thest atus of the front
passenger airbag is cor rect (/ page 47). &
WARNING Risk of bu rns from hot airbag
components
The airbag parts are hot af ter an airbag has
been depl oyed. #
Do not touch the airbag parts. #
Have a deplo yed airbag replaced at a
qu alified specialist workshop as soon
as possible. Mercedes-Benz
recommends that you ha vethe
ve hicle towe dto aqu alified specialist workshop
af te r an accident. Take this into account, partic‐
ularly if a seat belt tensioner is trig gered or an
airbag deplo yed.
If th e seat belt tensioners are trig gered or an air‐
bag is deplo yed, you will hear a bang, and a
small amount of powder may also be released:
R The bang will not generally af fect your hear‐
ing. R
Ingeneral, the powder released is not haz‐
ardous tohealth but may cause short-term
breathing dif ficulties topersons suf fering
from as thma or other pulmonary conditions.
Pr ov ided it is safe todo so, lea vetheve hicle
immediately or open the window in order to
pr eve nt brea thing dif ficulties. Seat belts
Pr
otection pr ovided bythe seat belt Alw
aysfast enyour seat belt co rrectly before
st arting a journe y.A seat belt can only pr ovide
th e best le vel of pr otection if it is worncor rectly. &
WARNING Risk of inju ryor death due to
incor rectly fastened seat belt
If th e seat belt is not worncor rectly, it can‐
not per form its intended pr otective function.
In addition, an incor rectly fastened seat belt
can also cause injuries, forex ample, in the
ev ent of an accident or when braking or
ch anging direction sudden ly. #
Alwa ys ensure that all vehicle occu‐
pants ha vetheir seat belts fastened
cor rectly and are sitting prope rly. Alw
ays obser vethe instructions about the cor‐
re ct driver's seat position and adjusting the seat
(/ page 93).
In order forth e cor rectly wornseat belt topro‐
vide the intended le vel of pr otection, each vehi‐
cle occupant must obser vethefo llowing infor‐
mation:
R The seat belt must not be twis ted and must
fi t tightly and snu gly across the body.
R The seat belt must be routed across the
centre of the shoulder and as low down
across the hips as possible.
R The shoulder section of the seat belt should
not touch your ne cknor be routed under
yo ur arm or behind your bac k.
R Avoid wearing bulky clo thing, e.g. a winter
coat.
R Push the lap belt down as far as possible
across your hips and pull tight with the shoul‐ 38
Occupant saf ety
Page 43 of 469
seat belt
tensioner, seat belt anchorage
and seat belt retractor. #
Makesure that the seat belts are
undamaged, not wornand clean. #
Alw ays ha vethe seat belts checked
immediately af ter an accident at a
qu alified specialist workshop. Mercedes-Benz
recommends that you use seat
belts which ha vebeen appr ovedfo ryo ur vehicle
by Mercedes-Benz. &
WARNING Risk of inju ryor death from
deplo yedpy rotech nic seat belt tension‐
ers
Py rotech nic seat belt tensioners that ha ve
been deplo yed are no longer operational and
are unable toper form their intended pr otec‐
tive function. #
Therefore, ha vedeplo yedpy rotech nic
seat belt tensioners immedia tely
re placed at a qualified specialist work‐
shop. Mercedes-Benz
recommends that you ha vethe
ve hicle towe dto aqu alified specialist workshop
af te r an accident.
* NO
TEDama gecaused bytrapping the
seat belt If an unused seat belt is not fully
retracted, it
may become trapped in the door or in the
seat mechanism. #
Alw ays ensure that an unused seat belt
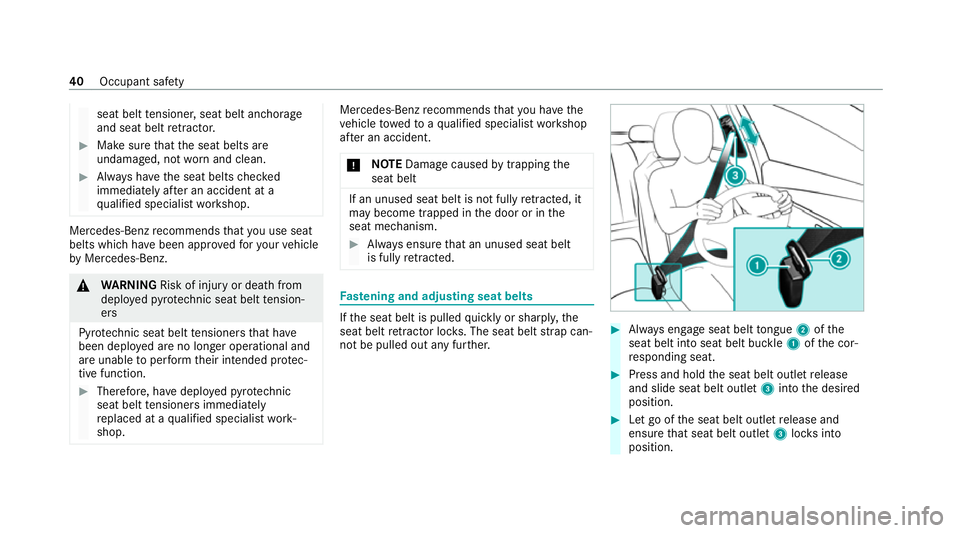
is fully retracted. Fa
stening and adju sting seat belts If
th e seat belt is pulled quickly or sharpl y,the
seat belt retractor lo cks. The seat belt stra p can‐
not be pulled out any fur ther. #
Alw ays engage seat belt tongue 2ofthe
seat belt into seat belt buckle 1ofthe cor‐
re sponding seat. #
Press and hold the seat belt outlet release
and slide seat belt outlet 3into the desired
position. #
Let go of the seat belt outlet release and
ensure that seat belt outlet 3locksinto
position. 40
Occupant saf ety
Page 46 of 469
Information on au
tomatic front passen ger
airbag shutoff
The front passenger airbag can only be deplo yed
in an accident if thePA SSENGER AIR BAG OFF
indicator lamp is off. If the front passenger seat
is occupied, make sure, bo thbefore and during
th e journe y,that thest atus of the front
passenger airbag is cor rect (/ page 47).
* NO
TEImpo rtant points toremember if
th e front passenger seat is unoccupied In an accident,
the components of the
re stra int sy stem may deploy unnecessarily
on the front passenger side if:
R There are heavy objects on the front
passenger seat.
R The seat belt tongue is engaged in the
seat belt buckle of the front passenger
seat and the front passenger seat is
unoccupied. #
Stow objects in a suitable place. #
Only one person should use each seat
belt at any one time. Depending on
the de tected accident situation,
th e window airbag on the front passenger side
may deplo y.The airbag is deplo yedre ga rdless of
whe ther the front passenger seat is occupied. Pr
otective capacity of the airbags Depending on
the accident situation, an airbag
may supplement the pr otection of fere dby a cor‐
re ctly fastened seat belt. &
WARNING Risk of inju ryor death due to
an incor rect seat position
If yo u deviate from the cor rect seat position,
th e airbag cann otper form its intended pro‐
te ctive function.
Each vehicle occupant must make sure of the
fo llowing:
R Fasten seat belts cor rectl y.Pregnant
wo men must take particular care to
ensure that the lap belt ne ver lies across
th e abdomen. R
Adopt the cor rect seat position and keep
as faraw ay as possible from the airbags.
R Obser vethefo llowing information. #
Alw ays make sure that there are no
objects between the airbag and vehicle
occupant. To
avo idtherisks resulting from the deployment
of an airbag, each vehicle occupant must
obser vethefo llowing information in particular:
R Before starting your journe y,adjust your seat
co rrectly; the driver's seat and front
passenger seat should be mo ved as far back
as possible.
When doing so, alw ays obser vethe informa‐
tion on the cor rect driver's seat position
(/ page 93).
R Only hold thesteering wheel bythesteering
wheel rim. This allows the airbag tobe fully
deplo yed.
R Alw ays lean against the seat backrest when
th eve hicle is in motion. Do not lean forw ards
or against the door or side windo w.You may Occupant saf
ety43
Page 47 of 469
ot
herwise be in the deployment area of the
airbags.
R The occupants must alw ayske ep their feet
on thefloor. Do not put your feet on the
cockpit, forex ample. Your feet may other‐
wise be in the deployment area of the airbag.
R Ifch ildren are tra velling in theve hicle,
obser vethe additional no tes (/ page 52).
R Alw aysstow and secure objects cor rectl y.
Objects in theve hicle interior may pr event an
airbag from functioning cor rectly. Each vehicle
occupant must alw ays make sure of thefo llow‐
ing in particular:
R There are no people, animals or objects
between theve hicle occupants and an air‐
bag.
R There are no objects between the seat, door
and door pillar (B-pillar).
R There are no hard objects, e.g. coat hangers,
hanging on the grab handles or coat hooks.
R There are no accessory parts, such as mobile
navigation devices, mobile phones or cup
holders, within the deployment area of an air‐ bag, e.g. on
the cockpit, on the door, on the
side window or on the side trim.
In addition, no connecting cables, tensioning
st ra ps or retaining stra ps must be routed or
attached totheve hicle within the deploy‐
ment area of an airbag. Alw ays comply with
th e accessory manufacturer's ins tallation
instructions and, in particular, the no tes on
suitable places for ins tallation.
R There are no heavy, sharp-edged or fragile
objects in the poc kets of your clo thing. Store
such objects in a suitable place. Limited pr
otection pr ovided byairbags &
WARNING Risk of inju rydue tomodifi‐
cations tothe co ver of an airbag
If yo u modify the co ver of an airbag or af fix
objects such as sticke rs to it,the airbag may
no longer function cor rectl y. #
Never modify the co ver of an airbag and
do not af fix objects toit. The ins
tallation location of an airbag is identified
by the AIRB AGsymbol (/ page 42). &
WARNING Risk of inju ryor death due to
th e use of unsuitable seat co vers
Due tounsuitable seat co vers,th e airbags
cann otprotect vehicle occupants as inten‐
ded.
In addition, the operation of the automatic
front passenger airbag shutoff could be
re stricted. #
You should on lyuse seat co vers that
ha ve been appr oved forth e cor respond‐
ing seats byMercedes-Benz. &
WARNING Risk of inju rydue tomalfunc‐
tioning sensors in the door
The function of the airbags can be impaired
due tomodifications or incor rect wo rkper‐
fo rm ed on the doors or door trim, or if the
doors are damaged. #
Never modify the doors or parts of the
doors. 44
Occupant saf ety