brake light MERCEDES-BENZ CLS SHOOTING BRAKE 2012 Owner's Manual
[x] Cancel search | Manufacturer: MERCEDES-BENZ, Model Year: 2012, Model line: CLS SHOOTING BRAKE, Model: MERCEDES-BENZ CLS SHOOTING BRAKE 2012Pages: 405, PDF Size: 10.21 MB
Page 172 of 405
i
This also applies if you have activated
cruise control, SPEEDTRONIC or DIS-
TRONIC PLUS.
This will use the braking effect of the engine,
so less braking will be required to prevent the
vehicle from gaining speed. This relieves the
load on the brake system and prevents the
brakes from overheating and wearing too
quickly.
Heavy and light loads G
WARNING
The braking system can overheat if you leave
your foot on the brake pedal while driving.
This increases the braking distance and could
even cause the braking system to fail. There
is a risk of an accident.
Never use the brake pedal as a footrest. Do
not simultaneously depress both the brake
pedal and the accelerator pedal while driving.
! Depressing the brake pedal constantly
results in excessive and premature wear to
the brake pads.
If the brakes have been subjected to a heavy
load, do not stop the vehicle immediately, but
drive on for a short while. This allows the air-
flow to cool the brakes more quickly.
If the brakes have been used only moderately,
you should occasionally test their effective-
ness. To do this, brake more firmly from a
higher speed. This improves the grip of the
brakes.
Wet road surfaces If you have driven for a long time in heavy rain
without braking, there may be a delayed reac-
tion from the brakes when braking for the first
time. This may also occur after the vehicle has
been washed or driven through deep water.
You have to depress the brake pedal more
firmly. Maintain a greater distance from the
vehicle in front.
After driving on a wet road or having the vehi-
cle washed, brake firmly while paying atten- tion to the traffic conditions. This will warm
up the brake discs, thereby drying them more
quickly and protecting them against corro-
sion.
Limited braking performance on salt-
treated roads If you drive on salted roads, a layer of salt
residue may form on the brake discs and
brake pads. This can result in a significantly
longer braking distance.
R
Brake occasionally to remove any possible
salt residue. Make sure that you do not
endanger other road users when doing so.
R Carefully depress the brake pedal and the
beginning and end of a journey.
R Maintain a greater distanc eto the vehicle
ahead.
New brake pads/linings New and replaced brake pads and discs only
reach their optimum braking effect after sev-
eral hundred kilometres of driving. Compen-
sate for this by applying greater force to the
brake pedal.
For safety reasons, Mercedes-Benz recom-
mends that you only have brake pads/linings
fitted to your vehicle which have been
approved for Mercedes-Benz vehicles or
which correspond to an equivalent quality
standard. Brake pads/linings which have not
been approved for Mercedes-Benz vehicles or
which are not of an equivalent quality could
affect your vehicle's operating safety.
AMG high-performance and ceramic
brakes
AMG brake systems are designed for heavy
loads. This may lead to noise when braking.
This is dependent on:
R
speed
R braking force
R environmental conditions, such as temper-
ature and humidity Driving tips
169Driving and parking Z
Page 175 of 405
Cruise control lever
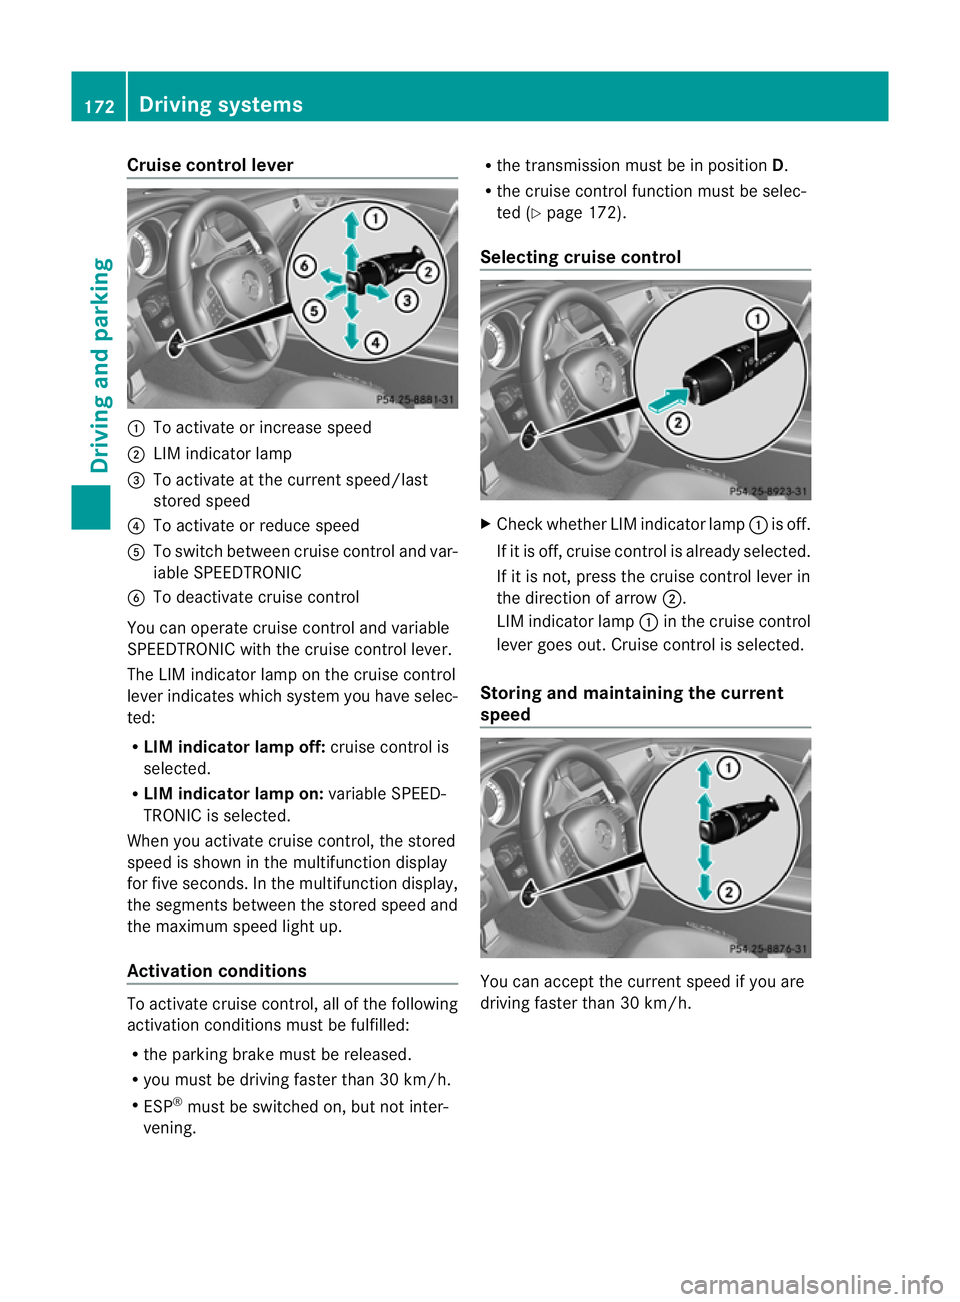
:
To activate or increase speed
; LIM indicator lamp
= To activate at the curren tspeed/last
stored speed
? To activate or reduce speed
A To switch between cruise control and var-
iable SPEEDTRONIC
B To deactivate cruise control
You can operate cruise control and variable
SPEEDTRONIC with the cruise control lever.
The LIM indicator lamp on the cruise control
lever indicates which system you have selec-
ted:
R LIM indicator lamp off: cruise control is
selected.
R LIM indicator lamp on: variable SPEED-
TRONIC is selected.
When you activate cruise control, the stored
speed is shown in the multifunction display
for five seconds. In the multifunction display,
the segments between the stored speed and
the maximum speed light up.
Activation conditions To activate cruise control, all of the following
activation conditions must be fulfilled:
R
the parking brake must be released.
R you must be driving faster than 30 km/h.
R ESP ®
must be switched on, but not inter-
vening. R
the transmission must be in position D.
R the cruise control function must be selec-
ted (Y page 172).
Selecting cruise control X
Check whether LIM indicator lamp :is off.
If it is off, cruise control is already selected.
If it is not, press the cruise control lever in
the direction of arrow ;.
LIM indicator lamp :in the cruise control
lever goes out. Cruise control is selected.
Storing and maintaining the current
speed You can accept the curren
tspeed if you are
driving faster than 30 km/h. 172
Driving systemsDriving and parking
Page 177 of 405
Deactivating cruise control
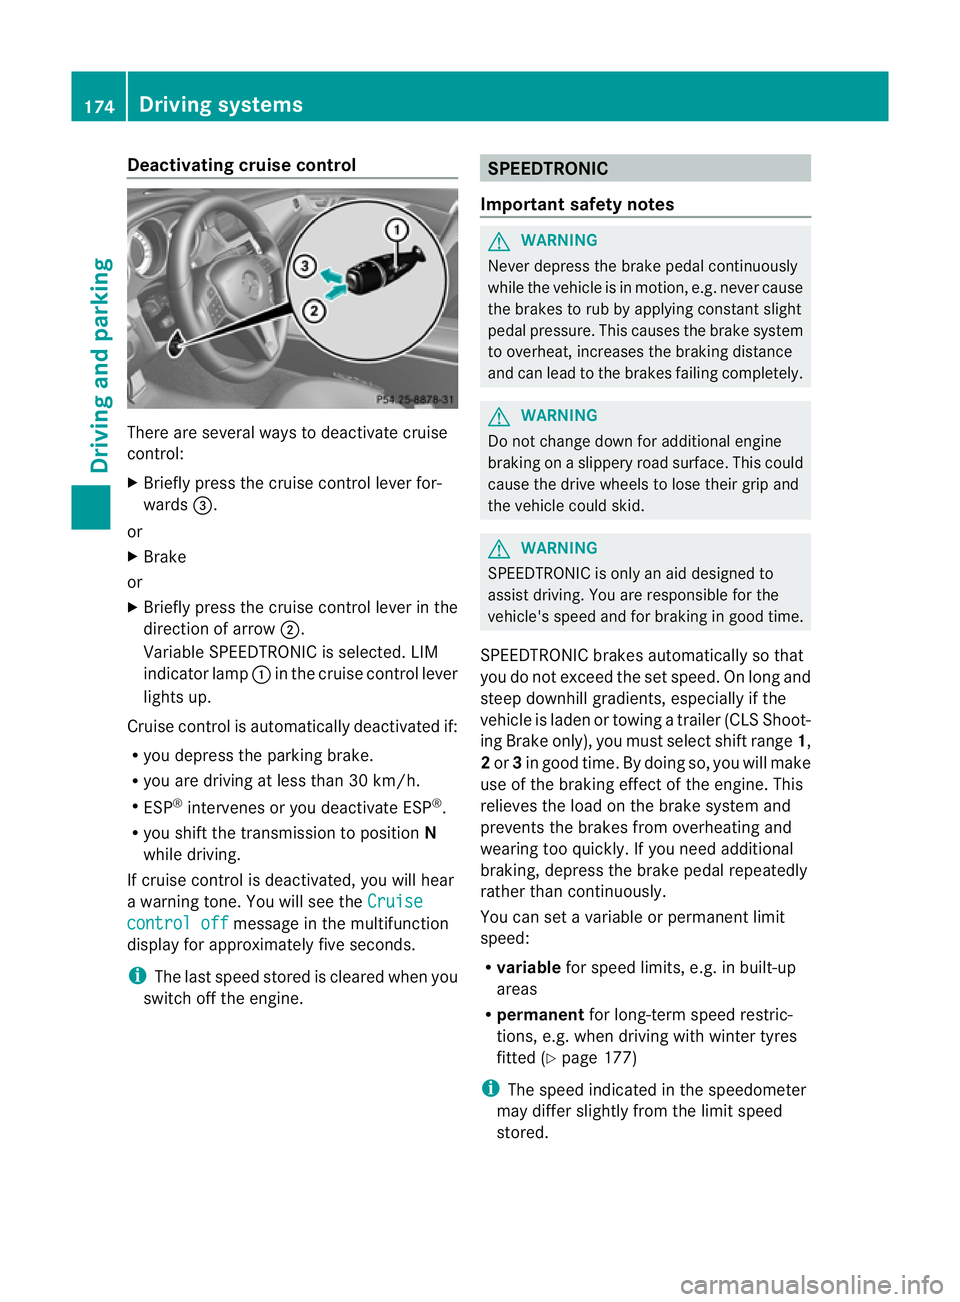
There are several ways to deactivate cruise
control:
X
Briefly press the cruise control lever for-
wards =.
or
X Brake
or
X Briefly press the cruise control lever in the
direction of arrow ;.
Variable SPEEDTRONIC is selected. LIM
indicator lamp :in the cruise contro llever
lights up.
Cruise control is automatically deactivated if:
R you depress the parking brake.
R you are driving at less than 30 km/h.
R ESP ®
intervenes or you deactivate ESP ®
.
R you shift the transmission to position N
while driving.
If cruise control is deactivated, you will hear
a warning tone. You will see the Cruisecontrol off message in the multifunction
display for approximately five seconds.
i The last speed stored is cleared when you
switch off the engine. SPEEDTRONIC
Important safety notes G
WARNING
Never depress the brake pedal continuously
while the vehicle is in motion, e.g. never cause
the brakes to rub by applying constan tslight
pedal pressure. This causes the brake system
to overheat, increases the braking distance
and can lead to the brakes failing completely. G
WARNING
Do not change down for additional engine
braking on a slippery road surface. This could
cause the drive wheels to lose their grip and
the vehicle could skid. G
WARNING
SPEEDTRONIC is only an aid designed to
assist driving. You are responsible for the
vehicle's speed and for braking in good time.
SPEEDTRONIC brakes automatically so that
you do not exceed the set speed. On long and
steep downhill gradients, especially if the
vehicle is laden or towin gatrailer (CLS Shoot-
ing Brake only), you must select shift range 1,
2 or 3in good time. By doing so, you will make
use of the braking effect of the engine .This
relieves the load on the brake system and
prevents the brakes from overheating and
wearing too quickly. If you need additional
braking, depress the brake pedal repeatedly
rather than continuously.
You can set a variable or permanent limit
speed:
R variable for speed limits, e.g. in built-up
areas
R permanent for long-term speed restric-
tions, e.g. when driving with winter tyres
fitted (Y page 177)
i The speed indicated in the speedometer
may differ slightly from the limit speed
stored. 174
Driving systemsDriving and parking
Page 181 of 405
Otherwise, you may fail to recognise dangers
in time, cause an accident and injure yourself
and others. G
WARNING
DISTRONIC PLUS brakes your vehicle up to a
maximum of 4 m/s 2
depending on its speed.
This corresponds to approximately 40% of
your vehicle's maximum braking power. You
must also apply the brakes yourselfift his
braking power is not sufficient.
If DISTRONIC PLUS detects a risk of collision
with avehicle in front, an intermittent warning
tone sounds. In addition, the ·distance
warning lamp in the instrument cluster lights
up. Brake to avoid a collision.
General notes DISTRONIC PLUS regulates the speed and
automatically helps you maintain the dis-
tance to the vehicle detected in front. DIS-
TRONIC PLUS brakes automatically so that
the set speed is not exceeded.
On long and steep downhill gradients, espe-
cially if the vehicle is laden or towing a trailer
(CLS Shooting Brake only), you must select
shift range
1,2or 3in good time. By doing
so, you will make use of the braking effec tof
the engine .This relieves the load on the brake
system and prevents the brakes from over-
heating and wearing too quickly.
If DISTRONIC PLUS detects a slower-moving
vehicle in front, your vehicle is braked in order
to maintain the preset distance to the vehicle
in front.
If you want DISTRONIC PLUS to assist you,
the radar sensor system must be activated
(Y page 243) and operational.
The radar sensor system is switched off auto-
matically in the vicinity of radio telescope
facilities (Y page 398).
If there is no vehicle in front, DISTRONIC
PLUS operates in the same way as cruise
control in the speed range between
30 km/h and 200 km/h. If avehicle is driving in front of you, DISTRONIC operates in the
speed range between 0km/h and
200 km/h.
Do not use DISTRONIC PLUS on roads with
steep gradients.
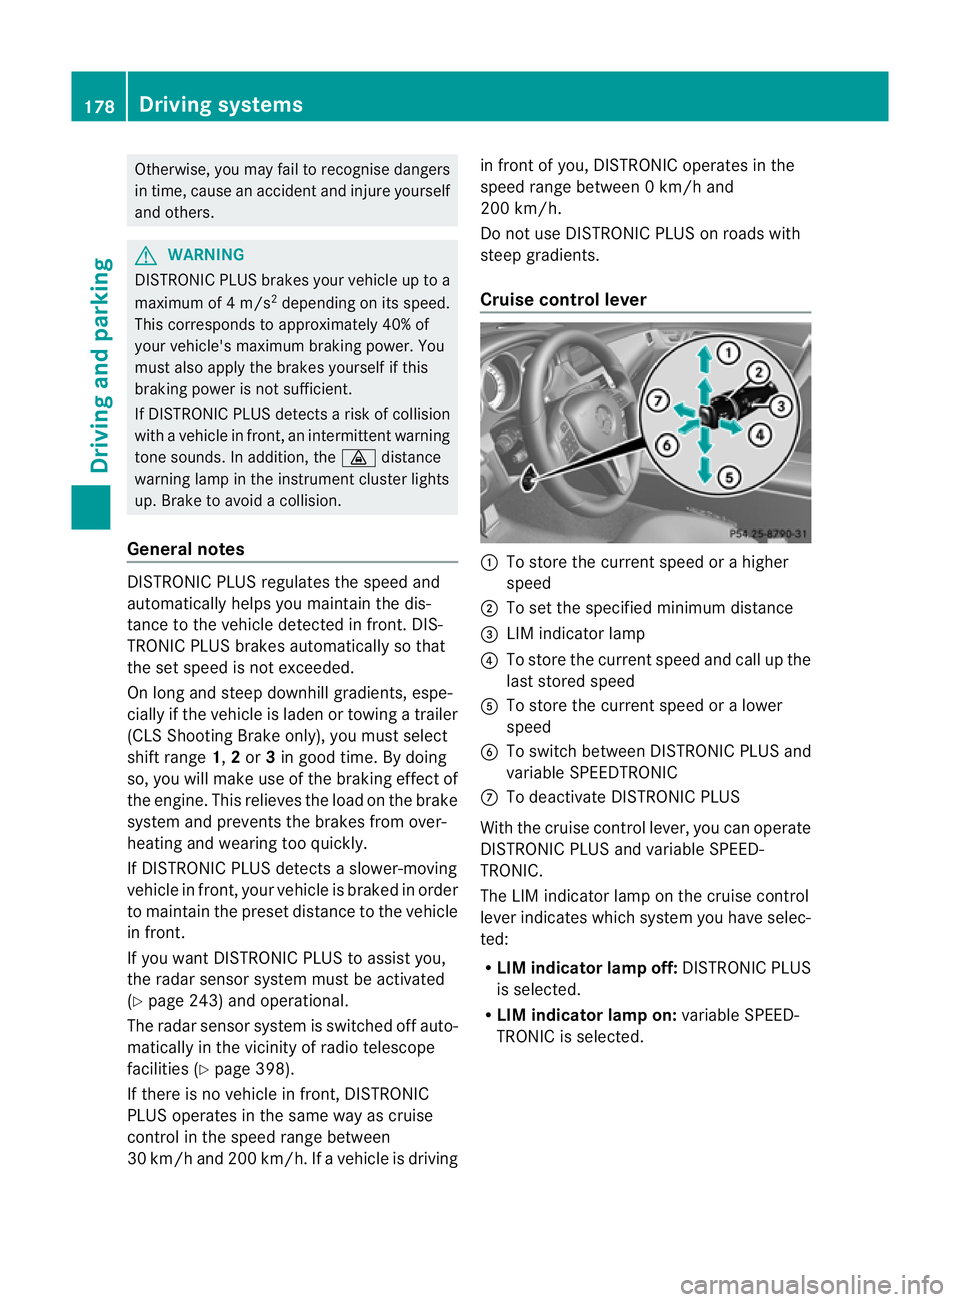
Cruise control lever :
To store the current spee dorahigher
speed
; To set the specified minimum distance
= LIM indicator lamp
? To store the current speed and call up the
last stored speed
A To store the current speed or a lower
speed
B To switch between DISTRONIC PLUS and
variable SPEEDTRONIC
C To deactivate DISTRONIC PLUS
With the cruise control lever, you can operate
DISTRONIC PLUS and variable SPEED-
TRONIC.
The LIM indicator lamp on the cruise control
lever indicates which system you have selec-
ted:
R LIM indicator lamp off: DISTRONIC PLUS
is selected.
R LIM indicator lamp on: variable SPEED-
TRONIC is selected. 178
Driving systemsDriving and parking
Page 186 of 405
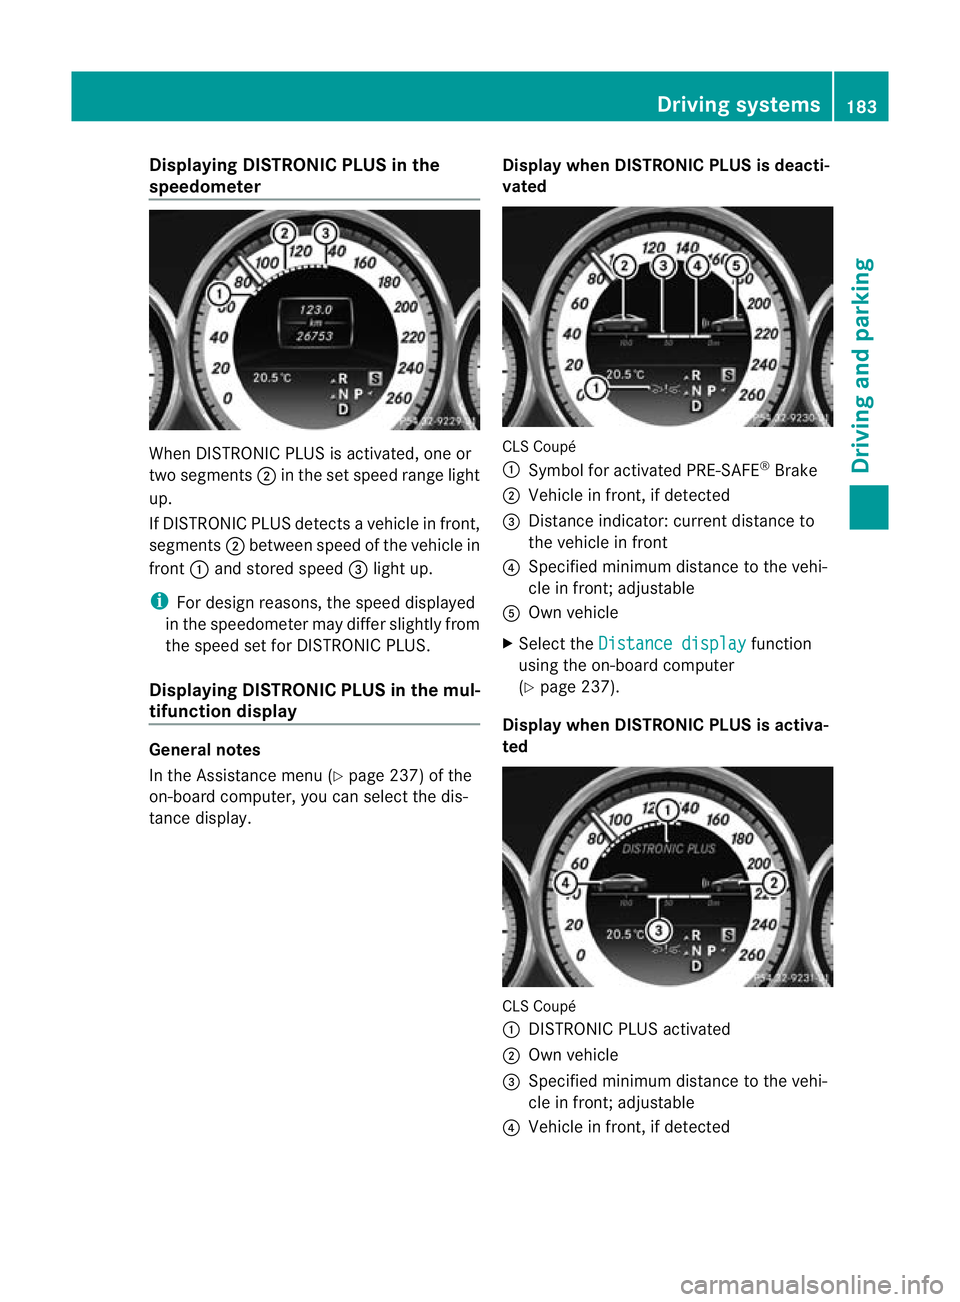
Displaying DISTRONIC PLUS in the
speedometer
When DISTRONIC PLUS is activated, one or
two segments ;in the set speed range light
up.
If DISTRONIC PLUS detects avehicle in front,
segments ;between speed of the vehicle in
front :and stored speed =light up.
i For design reasons, the speed displayed
in the speedometer may differ slightly from
the speed set for DISTRONIC PLUS.
Displaying DISTRONIC PLUS in the mul-
tifunction display General notes
In the Assistance menu (Y
page 237) of the
on-board computer, you can select the dis-
tance display. Display when DISTRONIC PLUS is deacti-
vated CLS Coupé
:
Symbol for activated PRE-SAFE ®
Brake
; Vehicle in front, if detected
= Distance indicator: current distance to
the vehicle in front
? Specified minimum distance to the vehi-
cle in front; adjustable
A Own vehicle
X Select the Distance display function
using the on-board computer
(Y page 237).
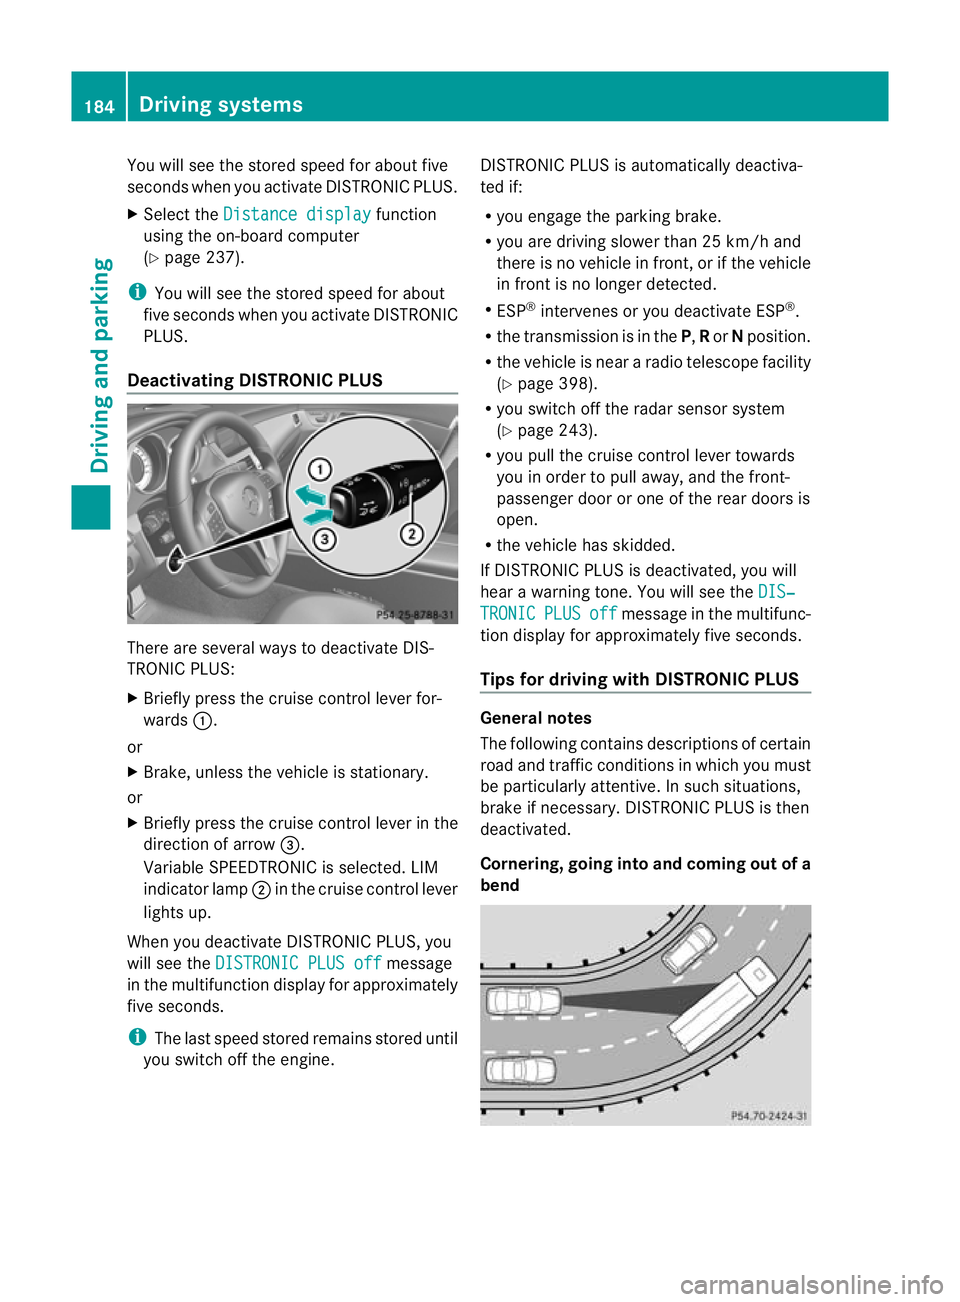
Display when DISTRONIC PLUS is activa-
ted CLS Coupé
:
DISTRONIC PLUS activated
; Own vehicle
= Specified minimum distance to the vehi-
cle in front; adjustable
? Vehicle in front, if detected Driving systems
183Driving and parking Z
Page 187 of 405
You will see the stored speed for about five
seconds when you activate DISTRONIC PLUS.
X Selec tthe Distance display function
using the on-board computer
(Y page 237).
i You will see the stored speed for about
five seconds when you activate DISTRONIC
PLUS.
Deactivating DISTRONIC PLUS There are several ways to deactivate DIS-
TRONIC PLUS:
X Briefly press the cruise control lever for-
wards :.
or
X Brake, unless the vehicle is stationary.
or
X Briefly press the cruise control lever in the
direction of arrow =.
Variable SPEEDTRONIC is selected. LIM
indicator lamp ;in the cruise control lever
lights up.
When you deactivate DISTRONIC PLUS, you
will see the DISTRONIC PLUS off message
in the multifunction display for approximately
five seconds.
i The last speed stored remains stored until
you switch off the engine. DISTRONIC PLUS is automatically deactiva-
ted if:
R
you engage the parking brake.
R you are driving slower than 25 km/h and
there is no vehicle in front, or if the vehicle
in front is no longer detected.
R ESP ®
intervenes or you deactivate ESP ®
.
R the transmission is in the P,Ror Nposition.
R the vehicle is near a radio telescope facility
(Y page 398).
R you switch off the radar sensor system
(Y page 243).
R you pull the cruise control lever towards
you in order to pull away, and the front-
passenger door or one of the rear doors is
open.
R the vehicle has skidded.
If DISTRONIC PLUS is deactivated, you will
hear a warning tone. You will see the DIS‐ TRONIC PLUS off message in the multifunc-
tion display for approximately five seconds.
Tips for driving with DISTRONIC PLUS General notes
The following contains descriptions of certain
road and traffic conditions in which you must
be particularly attentive. In such situations,
brake if necessary. DISTRONIC PLUS is then
deactivated.
Cornering, going into and coming out of a
bend184
Driving systemsDriving and parking
Page 188 of 405
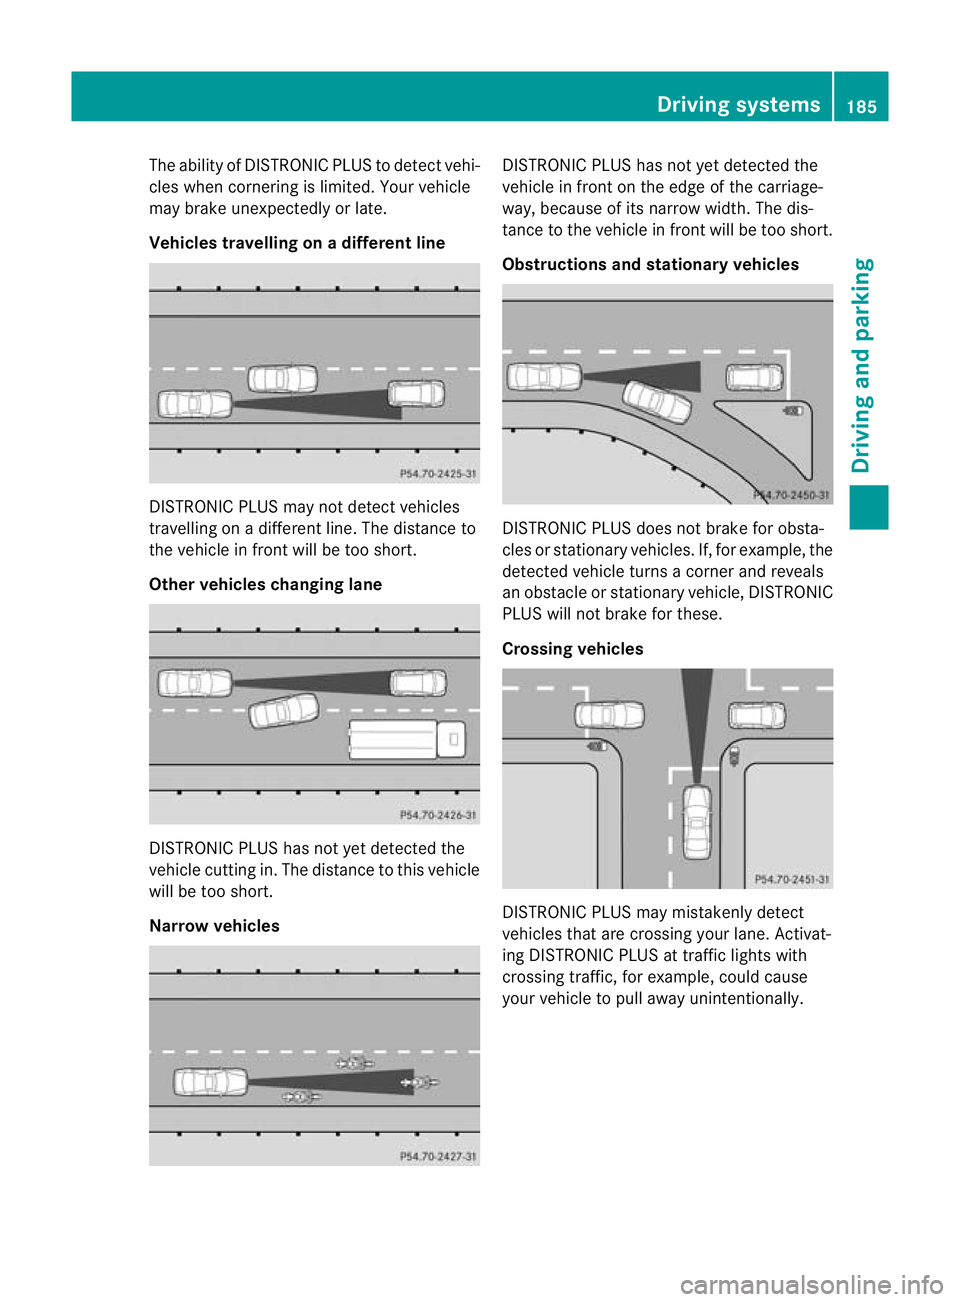
The ability of DISTRONIC PLUS to detect vehi-
cles when cornering is limited. Your vehicle
may brake unexpectedly or late.
Vehicles travelling on adifferent line DISTRONIC PLUS may not detect vehicles
travelling on a different line. The distance to
the vehicle in fron twill be too short.
Other vehicles changing lane DISTRONIC PLUS has not yet detected the
vehicle cutting in. The distance to this vehicle
will be too short.
Narrow vehicles DISTRONIC PLUS has not yet detected the
vehicle in front on the edge of the carriage-
way, because of its narrow width
.The dis-
tance to the vehicle in front will be too short.
Obstructions and stationary vehicles DISTRONIC PLUS does not brake for obsta-
cles or stationary vehicles. If, for example, the
detected vehicle turns a corner and reveals
an obstacle or stationary vehicle, DISTRONIC
PLUS will not brake for these.
Crossing vehicles
DISTRONIC PLUS may mistakenly detect
vehicles that are crossing your lane. Activat-
ing DISTRONIC PLUS at traffic lights with
crossing traffic, for example, could cause
your vehicle to pull away unintentionally. Driving systems
185Driving and parking Z
Page 190 of 405
R
you depress the brake pedal again with a
certain amount of pressur euntil ë dis-
appears from the multifunctio ndisplay.
R you activate DISTRONIC PLUS.
When the HOLD function is activated, the
transmission is shifted automatically to posi-
tion Pif:
R the driver's door is open and the driver's
seat belt is unfastened.
R the engine is switched off, unless it is auto-
matically switched off by the ECO start/
stop function.
R the bonnet is opened.
R a system fault occurs.
R the power supply is not sufficient. RACE START
Important safety notes G
WARNING
RACE START is only available when SPORT
handling mode is activated. SPORT handling
mode will only be able to stabilise the vehicle
to a limited degree if the vehicle starts to skid
or a wheel starts to spin .The vehicle is there-
fore harder to control at the threshold range.
You could lose control of the vehicle and
cause an accident.
RACE START should only be used on closed
off circuits. Always adapt your driving style to
suit the prevailing road and weather condi-
tions.
i RACE START is only available in AMG vehi-
cles.
RACE START enables optimum acceleration
from a standing start. The precondition for
this is a suitable high-grip road surface. Activation conditions You can activate RACE START if:
R
the doors are closed.
R the engine is running and it has reached an
operating temperature of approximately
80 †. This is the case when the engine oil
temperature in the multifunction display
stops flashing.
R SPORT handling mode is activated
(Y page 68).
R the steering wheel is in the straight-ahead
position.
R the vehicle is stationary and the brake
pedal is depressed (left foot).
R the transmission is in position D.
Activating RACE START X
Depress the brake pedal with your left foot
and keep it depressed.
X Turn the drive program selector clockwise
(Y page 158) until the RSlamp lights up.
The Confirm RACE START: Cancel Pad‐
dle UP: Paddle DOWN message appears
in the multifunction display.
i If the activation conditions are no longer
fulfilled, RACE START is cancelled. The
RACE START cancelled message appears
in the multifunction display.
X To cancel: pull the left steering wheel shift
paddle (Y page 158).
or
X To confirm:p ull the right steering wheel
shif tpaddle (Y page 158).
The RACE START available Depress accelerator message appears in the mul-
tifunctio ndisplay.
i If you do not depress the accelerator
pedal fully within two seconds, RACE
START is cancelled. The RACE START not
possible See Owner's Manual message
appears in the multifunction display. Driving systems
187Driving and parking Z
Page 195 of 405
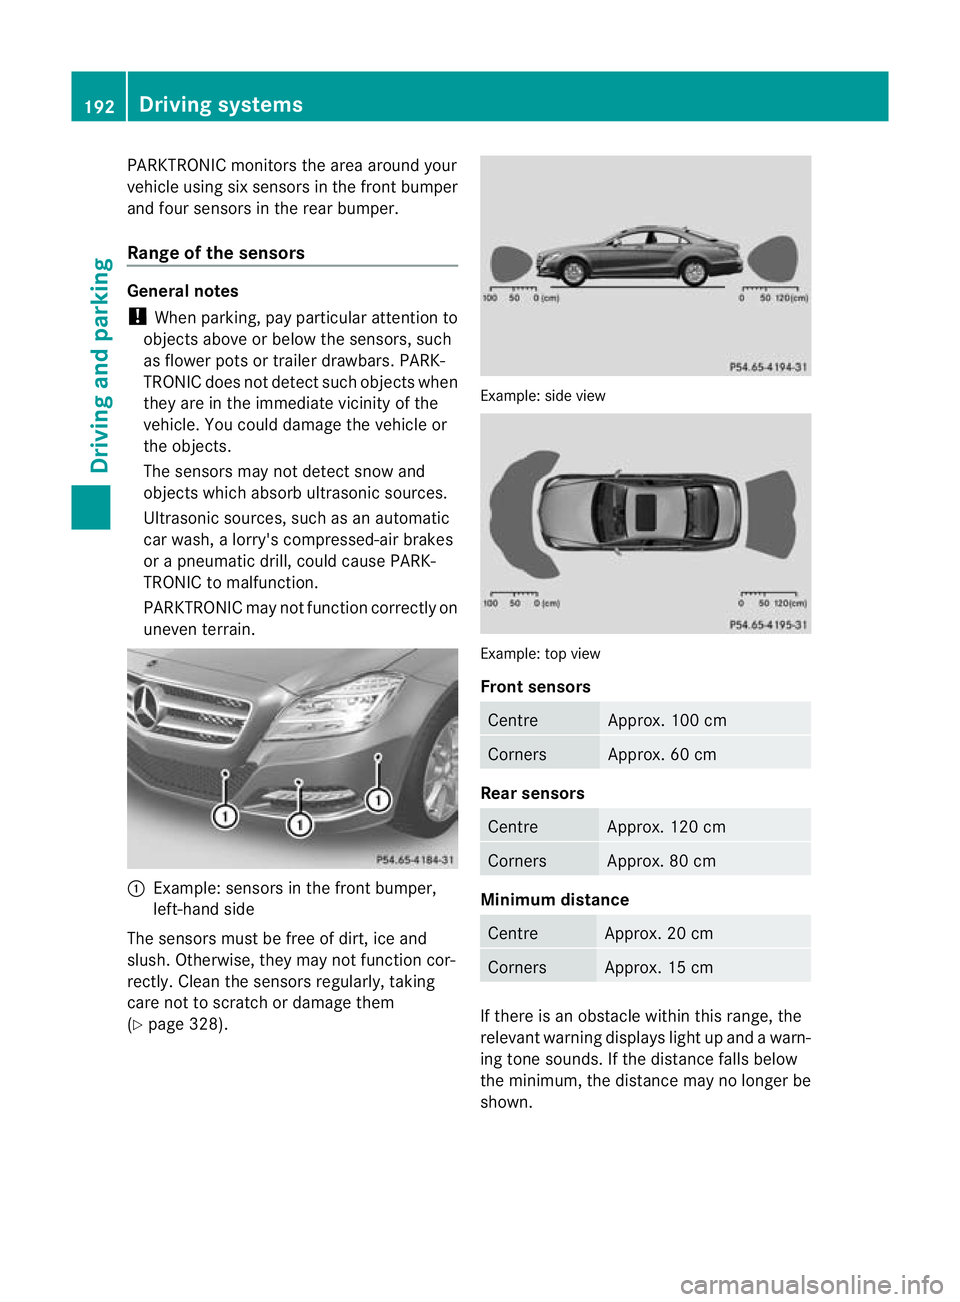
PARKTRONIC monitors the area around your
vehicle using six sensors in the frontb umper
and four sensors in the rear bumper.
Range of the sensors General notes
!
When parking, pay particular attention to
objects above or below the sensors, such
as flower pots or trailer drawbars. PARK-
TRONIC does no tdetec tsuch objects when
they are in the immediat evicinity of the
vehicle. You could damage the vehicle or
the objects.
The sensors may not detect snow and
objects which absorb ultrasonic sources.
Ultrasonic sources, such as an automatic
car wash, a lorry's compressed-air brakes
or a pneumatic drill, could cause PARK-
TRONIC to malfunction.
PARKTRONIC may not function correctly on
uneven terrain. :
Example: sensors in the front bumper,
left-hand side
The sensors must be free of dirt, ice and
slush. Otherwise, they may not function cor-
rectly. Clean the sensors regularly, taking
care not to scratch or damage them
(Y page 328). Example: side view
Example: top view
Front sensors
Centre Approx. 100 cm
Corners Approx. 60 cm
Rea
rsensors Centre Approx. 120 cm
Corners Approx. 80 cm
Minimum distance
Centre Approx. 20 cm
Corners Approx. 15 cm
If there is an obstacle within this range, the
relevant warning displays light up and a warn-
ing tone sounds. If th edistance falls below
the minimum, the distanc emay no longer be
shown. 192
Driving systemsDriving and parking
Page 200 of 405
i
In tight parking spaces, you will achieve
the best parking results by backing up as
far as possible. When doing so, also
observe the PARKTRONIC messages.
X Stop as soon as PARKTRONIC sounds the
continuous warning tone, if not before.
Manoeuvring may be required in tight park-
ing spaces.
The Park Assist active Select D Observe surroundings message appears in
the multifunction display.
X Shift the transmission to position Dwhile
the vehicle is stationary.
Active Parking Assist immediately steers in
the other direction.
The Park Assist active Accelerate and brake Observe surroundings mes-
sage appears in the multifunction display.
i You will achieve the best results by wait-
ing for the steering procedure to complete
before pulling away.
X Drive forwards and be ready to brake at all
times.
X Stop as soon as PARKTRONIC sounds the
continuous warning tone, if not before.
The Park Assist active Select R Observe surroundings message appears in
the multifunction display.
Further transmission shifts may be neces-
sary.
As soon as the parking procedure is com-
plete, the Park Assist switched off mes-
sage appears in the multifunction display.
PARKTRONIC continues to be available.
X Manoeuvre if necessary.
X Always observe the warning messages dis-
played by PARKTRONIC (Y page 193).
Cancelling Active Parking Assist You can cancel Active Parking Assist at any
time. X
Stop the movement of the multifunction
steering wheel or steer yourself.
Active Parking Assist will be cancelled at
once. The Park Assist cancelled mes-
sage appears in the multifunction display.
or
X Press the PARKTRONIC button on the
centre console (Y page 193).
PARKTRONIC is switched off and Active
Parking Assist is immediately cancelled.
The Park Assist cancelled message
appears in the multifunction display.
Active Parking Assist is cancelled automati-
cally if:
R the transmission is shifted too early.
R parking using Active Parking Assist is no
longer possible.
R you are driving faster than 10 km/h.
R a wheel spins and ESP ®
intervenes or fails.
The ä warning lamp lights up in the
instrument cluster.
Aw arning tone sounds. The parking symbol
disappears and the multifunction display
shows the Park Assist cancelled mes-
sage.
When Active Parking Assist is cancelled, you
must steer again yourself.
Towing atrailer For vehicles with a trailer tow hitch, the min-
imum length for parking spaces is slightly
increased.
If you have attached a trailer to your vehicle,
you should not use Active Parking Assist.
Once the electrical connectio
nis established
between your vehicle and the trailer, Active
Parking Assist is no longer available. PARK-
TRONIC is deactivated for the rear area. Driving systems
197Driving and parking Z