warning lights MERCEDES-BENZ CLS SHOOTING BRAKE 2012 Repair Manual
[x] Cancel search | Manufacturer: MERCEDES-BENZ, Model Year: 2012, Model line: CLS SHOOTING BRAKE, Model: MERCEDES-BENZ CLS SHOOTING BRAKE 2012Pages: 405, PDF Size: 10.21 MB
Page 288 of 405
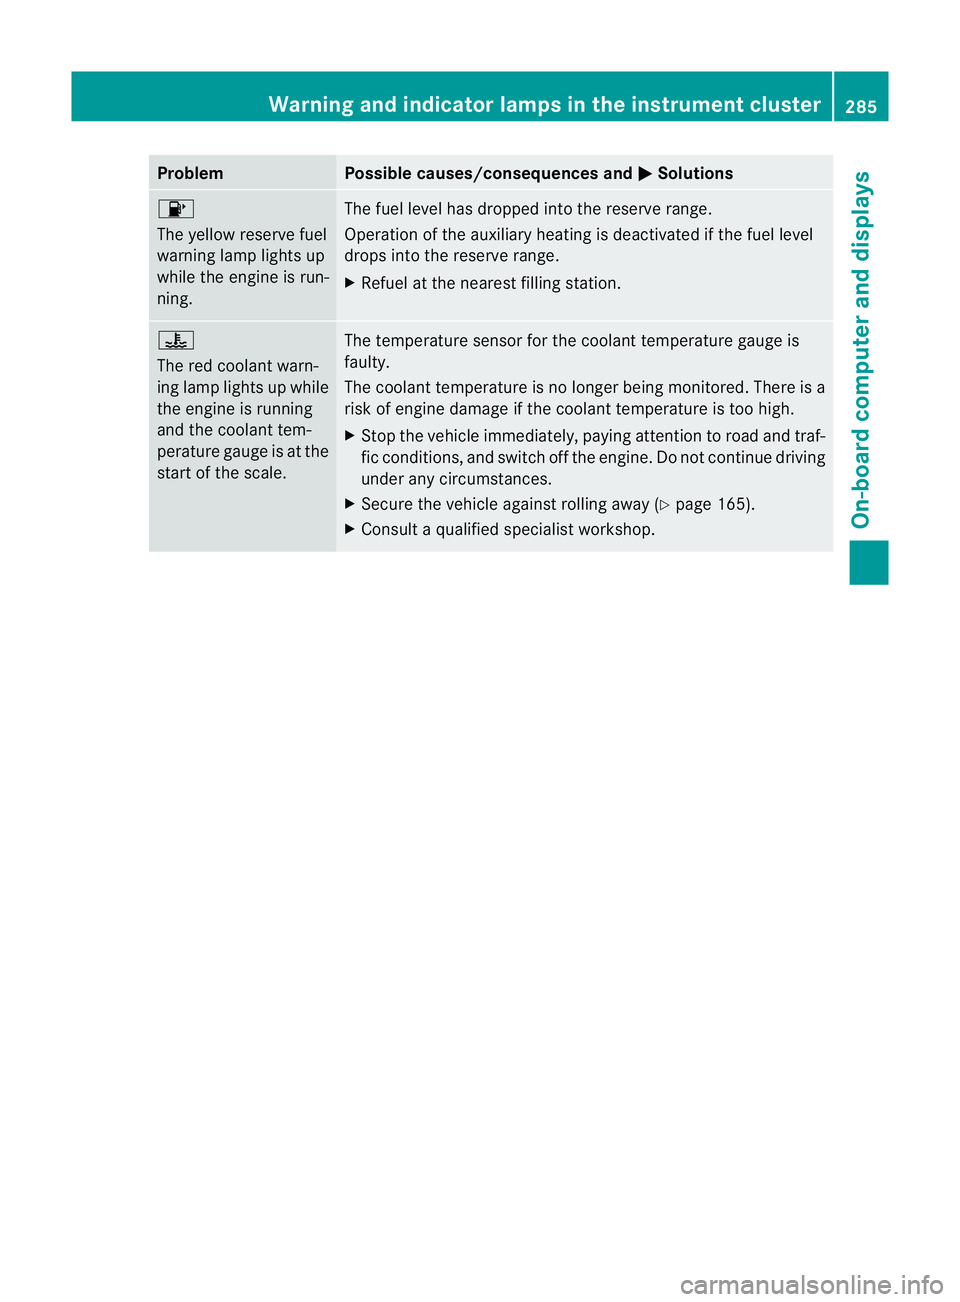
Problem Possible causes/consequences and
M Solutions
8
The yellow reserve fuel
warning lamp lights up
while the engine is run-
ning.
The fuel level has dropped into the reserve range.
Operation of the auxiliary heating is deactivated if the fuel level
drops into the reserve range.
X
Refuel at the nearest filling station. ?
The red coolant warn-
ing lamp lights up while
the engine is running
and the coolant tem-
perature gauge is at the
start of the scale.
The temperature sensor for the coolant temperature gauge is
faulty.
The coolant temperature is no longer being monitored. There is a
risk of engine damage if the coolant temperature is too high.
X
Stop the vehicle immediately, paying attention to road and traf-
fic conditions, and switch off the engine. Do not continue driving
under any circumstances.
X Secure the vehicle against rolling away (Y page 165).
X Consult a qualified specialist workshop. Warning and indicator lamps in the instrument cluster
285On-board computer and displays Z
Page 290 of 405
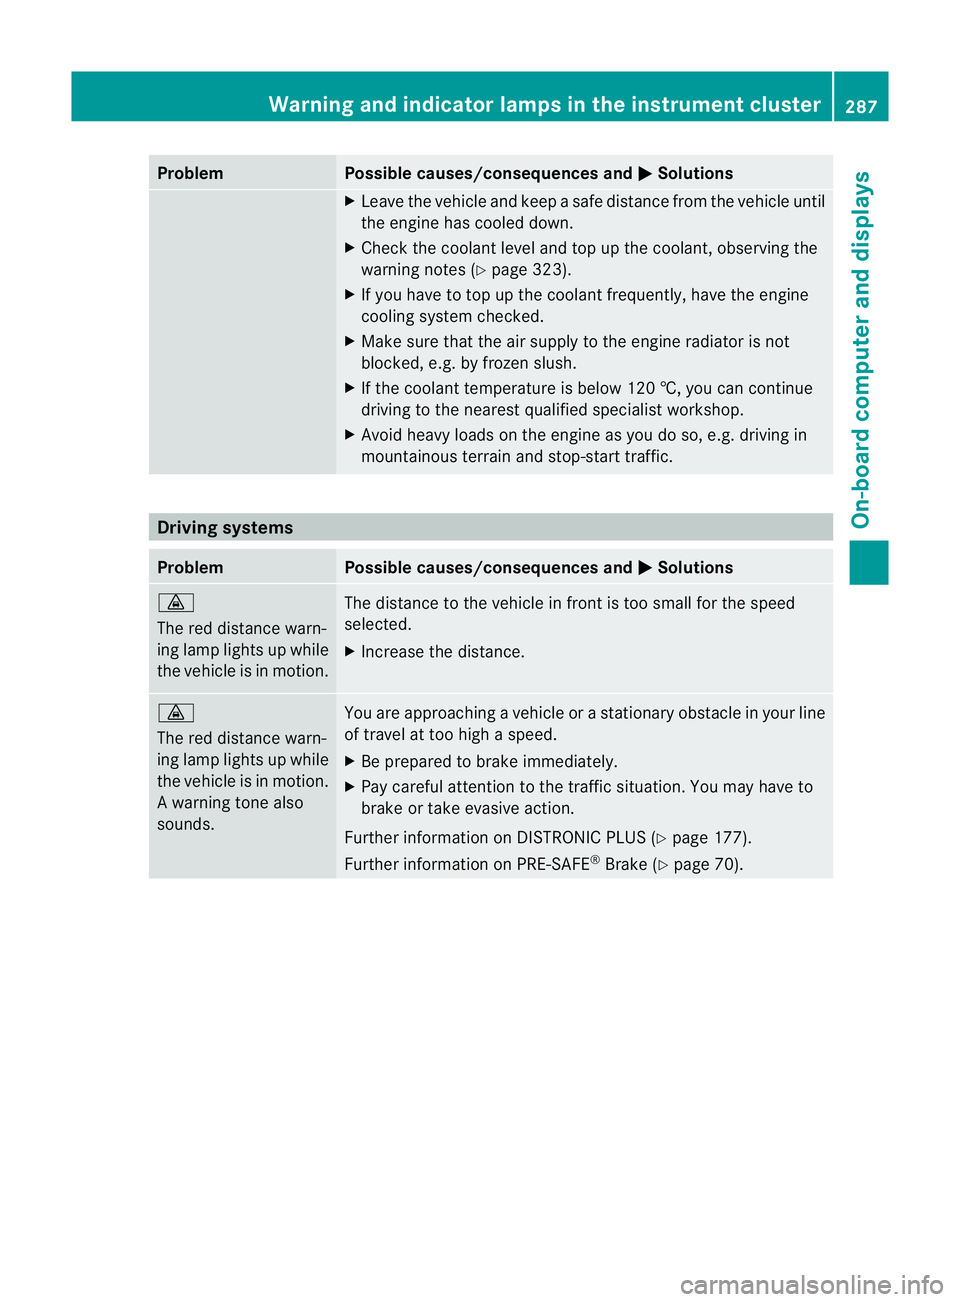
Problem Possible causes/consequences and
M Solutions
X
Leave the vehicle and keep a safe distance from the vehicle until
the engine has cooled down.
X Check the coolant level and top up the coolant, observing the
warning notes (Y page 323).
X If you have to top up the coolant frequently, have the engine
cooling system checked.
X Make sure that the air supply to the engine radiator is not
blocked, e.g. by frozen slush.
X If the coolant temperature is below 120 †, you can continue
driving to the nearest qualified specialist workshop.
X Avoid heavy loads on the engine as you do so, e.g. driving in
mountainous terrain and stop-start traffic. Driving systems
Problem Possible causes/consequences and
M Solutions
·
The red distance warn-
ing lamp lights up while
the vehicle is in motion.
The distance to the vehicle in front is too small for the speed
selected.
X Increase the distance. ·
The red distance warn-
ing lamp lights up while
the vehicle is in motion.
Aw
arning tone also
sounds. You are approaching a vehicle or a stationary obstacle in your line
of travel at too high a speed.
X
Be prepared to brake immediately.
X Pay careful attention to the traffic situation. You may have to
brake or take evasive action.
Further information on DISTRONIC PLUS (Y page 177).
Further information on PRE-SAFE ®
Brake (Y page 70). Warning and indicator lamps in the instrument cluster
287On-board computer and displays Z
Page 315 of 405
HomeLink
®
and/o rcompatible products is
available from:
R at a qualified specialised workshop
R the HomeLink ®
hotline
(0) 08000 466 354 65 (free of charge) or
+49 (0) 6838 907 277 (charges apply)
R on the Internet at:
http://www.homelink.com
Programming Programming buttons
G
WARNING
Only press the button on the integrated
garage door opener if there are no persons or
objects present within the sweep of the
garage door. Persons could otherwise be
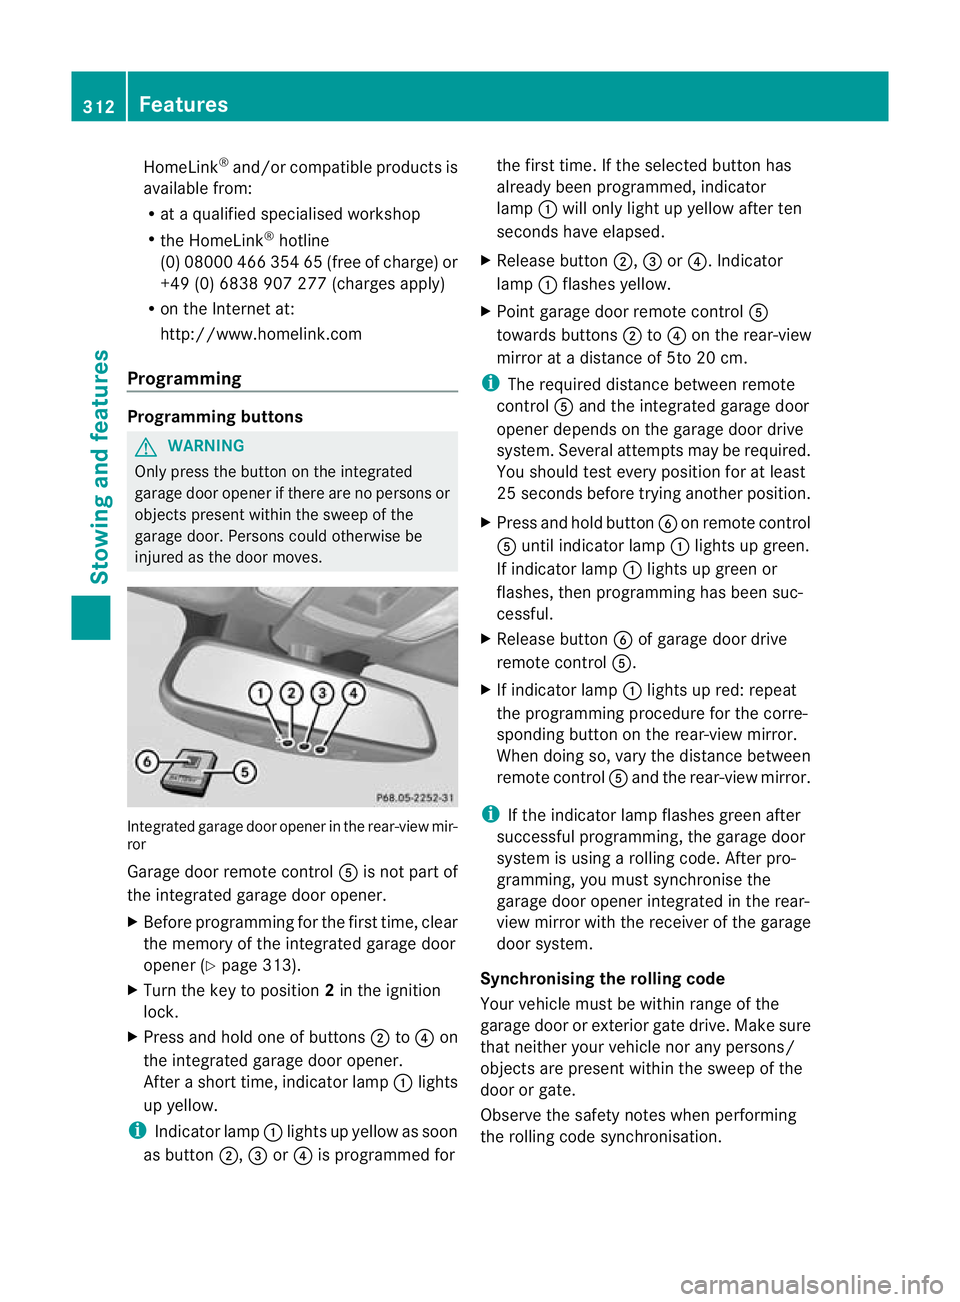
injured as the door moves. Integrated garage door opener in the rear-view mir-
ror
Garage door remote control
Ais not part of
the integrated garage door opener.
X Before programming for the first time, clear
the memory of the integrated garage door
opener (Y page 313).
X Turn the key to position 2in the ignition
lock.
X Press and hold one of buttons ;to? on
the integrated garage door opener.
After a short time, indicator lamp :lights
up yellow.
i Indicator lamp :lights up yellow as soon
as button ;,=or? is programmed for the first time. If the selected button has
already been programmed, indicator
lamp
:will only light up yellow after ten
seconds have elapsed.
X Release button ;,=or?. Indicator
lamp :flashes yellow.
X Point garage door remote control A
towards buttons ;to? on the rear-view
mirror at a distance of 5to 20 cm.
i The required distance between remote
control Aand the integrated garage door
opener depends on the garage door drive
system. Several attempt smay be required.
You should test every positio nfor at least
25 seconds before trying another position.
X Press and hold button Bon remote control
A until indicator lamp :lights up green.
If indicator lamp :lights up green or
flashes, then programming has been suc-
cessful.
X Release button Bof garage door drive
remote control A.
X If indicator lamp :lights up red: repeat
the programming procedure for the corre-
sponding button on the rear-view mirror.
When doing so, vary the distance between
remote control Aand the rear-view mirror.
i If the indicator lamp flashes green after
successful programming, the garage door
system is using a rolling code. After pro-
gramming, you must synchronise the
garage door opener integrated in the rear-
view mirror with the receiver of the garage
door system.
Synchronising the rolling code
Your vehicle must be within range of the
garage door or exterior gate drive. Make sure
that neither your vehicle nor any persons/
objects are present within the sweep of the
door or gate.
Observe the safety notes when performing
the rolling code synchronisation. 312
FeaturesStowing and features
Page 329 of 405
R
Vehicles with a key:
do not remove the key from the ignition
lock. Do not open the driver's door or
front-passenger door when the engine is
switched off. Otherwise, the automatic
transmission selects park position P
automatically and locks the wheels. You
can prevent this by shifting the auto-
matic transmission to Nbeforehand.
R Vehicles with KEYLESS-GO:
do not open the driver's door or front-
passenger door when the engine is
switched off. Otherwise, the automatic
transmission selects park position P
automatically and locks the wheels.
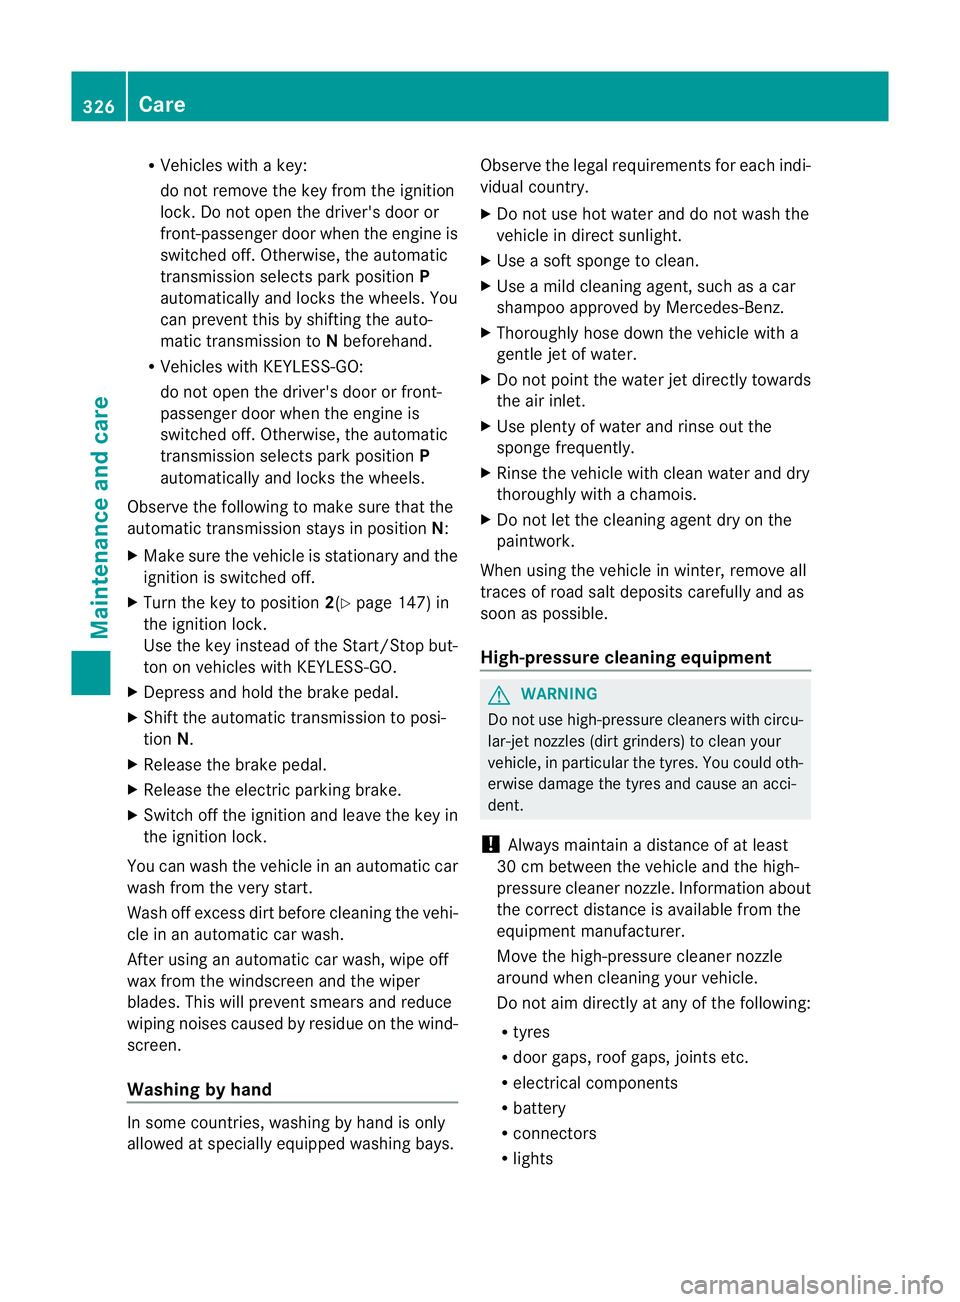
Observe the following to make sure that the
automatic transmission stays in position N:
X Make sure the vehicle is stationary and the
ignition is switched off.
X Turn the key to position 2(Ypage 147) in
the ignition lock.
Use the key instead of the Start/Stop but-
ton on vehicles with KEYLESS-GO.
X Depress and hold the brake pedal.
X Shift the automatic transmission to posi-
tion N.
X Release the brake pedal.
X Release the electric parking brake.
X Switch off the ignition and leave the key in
the ignition lock.
You can wash the vehicle in an automatic car
wash from the very start.
Wash off excess dirt before cleaning the vehi-
cle in an automatic car wash.
After using an automatic car wash, wipe off
wax from the windscreen and the wiper
blades. This will prevent smears and reduce
wiping noises caused by residueont he wind-
screen.
Washing by hand In some countries, washing by hand is only
allowed at specially equipped washing bays. Observe the legal requirements for each indi-
vidual country.
X
Do not use hot water and do not wash the
vehicle in direct sunlight.
X Use a soft sponge to clean.
X Use a mild cleaning agent, such as a car
shampoo approved by Mercedes-Benz.
X Thoroughly hose down the vehicle with a
gentle jet of water.
X Do not point the water jet directly towards
the air inlet.
X Use plenty of water and rinse out the
sponge frequently.
X Rinse the vehicle with clean water and dry
thoroughly with a chamois.
X Do not let the cleaning agent dry on the
paintwork.
When using the vehicle in winter, remove all
traces of road salt deposits carefully and as
soon as possible.
High-pressure cleaning equipment G
WARNING
Do not use high-pressure cleaners with circu-
lar-jet nozzles (dirt grinders) to clean your
vehicle, in particular the tyres. You could oth-
erwise damage the tyres and cause an acci-
dent.
! Always maintain a distance of at least
30 cm between the vehicle and the high-
pressure cleaner nozzle. Information about
the correct distance is available from the
equipment manufacturer.
Move the high-pressure cleaner nozzle
around when cleaning your vehicle.
Do not aim directly at any of the following:
R tyres
R door gaps, roof gaps, joints etc.
R electrical components
R battery
R connectors
R lights 326
CareMaintenance and care
Page 364 of 405
Warning messages of the tyre pressure
monitor If the tyre pressure monitor detects a signifi-
cant pressure loss on one or more tyres, a
warning message is show ninthe multifunc-
tion display. Awarning tone also sounds and
the tyre pressure warning lamp lights up in
the instrument cluster.
Each tyre that is affected by a significant loss
of pressure is highlighted in the pressure dis-
play.
X If the Please correct tyre pressure message appears in the multifunction dis-
play, check the tyre pressure on all four
wheels and correct it if necessary.
i If the wheel positions on the vehicle are
interchanged, the tyre pressures may be
displayed for the wrong positions for a
short time. This is rectified after a few
minutes of driving and the tyre pressures
are displayed for the correct positions.
Restarting the tyre pressure monitor When you restar
tthe tyre pressure monitor,
all existing warning messages are deleted and
the warning lamps go out. The monitor uses
the currently set tyre pressures as the refer-
ence values for monitoring. In most cases, the
tyre pressure monitor will automatically
detect the new referencev alues after you
have changed the tyre pressure .However,
you can also define reference values man-
ually as described here. The tyre pressure
monitor then monitors the new tyre pressure
values.
X Use the table on the inside of the fuel filler
flap to ensure that the tyre pressure is set
correctly in all four tyres for the current
operating conditions.
Also observe the notes in the section on
tyre pressures (Y page 357).
X Make sure that the key is in position 2in
the ignition lock. X
Press the =or; buttons on the
steering wheel to select the Serv. menu.
X Press the 9or: button to select
Tyre pressure .
X Press the abutton.
The multifunction display shows the cur-
rent tyre pressure for each tyre or the
Tyre pressures will be displayed after a few minutes of driving mes-
sage.
X Press the :button.
The multifunction display shows the Use current pressure values as new ref‐
erence values message.
If you wish to confirm the restart:
X Press the abutton.
The Tyre press. monitor restarted message appears in the multifunction dis-
play.
After you have driven for a few minutes, the
system checks whether the current tyre
pressures are within the specified range.
The new tyre pressures are then accepted
as reference values and monitored.
If you wish to cancel the restart:
X Press the %button.
The tyre pressure values stored at the last
restart will continue to be monitored.
Radio type approval for the tyre pres-
sure monitor In certain countries, a radio type approval for
the tyre pressure monitor may be required.
The radio type approval number for the tyre
pressure monitor can be found online at:
http://www.mercedes-benz.de/
betriebsanleitung.
Missing values were not available at the time
of going to print. Tyre pressure
361Wheels and tyres Z