air condition MERCEDES-BENZ CLS SHOOTING BRAKE 2012 Owners Manual
[x] Cancel search | Manufacturer: MERCEDES-BENZ, Model Year: 2012, Model line: CLS SHOOTING BRAKE, Model: MERCEDES-BENZ CLS SHOOTING BRAKE 2012Pages: 405, PDF Size: 10.21 MB
Page 7 of 405
1, 2, 3 ...
12 Vsocket
see Socket
4ETS
see ETS/4ETS (Electronic Trac-
tionS ystem)
4MATIC (permanent four-wheel
drive) .................................................. 191
4MATIC off-road system ...................191 A
ABS (Anti-lock Braking System) Display message ............................ 250
Function/notes ................................ 64
Important safety notes ....................64
Warning lamp ................................. 279
Activating/deactivating air-recir-
culation mode .................................... 137
Activating/deactivating cooling
with air dehumidification .................133
Active Blin dSpot Assist
Activating/deactivating (on-
board computer) ............................ 238
Display message ............................ 264
Function/notes ............................. 212
Towing atrailer .............................. 215
Active Driving Assistance package .212
Active Lane Keeping Assist Activating/deactivating (on-
board computer) ............................ 238
Display message ............................ 264
Function/notes ............................. 215
Towing atrailer .............................. 217
Active light function .........................119
Active multicontour seat ..................103
Active Park Assist Display message ............................ 265
Active Parking Assist
Important safety notes ..................194
Towing atrailer .............................. 197
Active Service System
see ASSYST PLUS
ADAPTIVE BRAKE ................................. 70
Adaptive brake lamps .........................66Adaptive Highbeam Assist
Display message ............................ 258
Function/notes ............................. 120
Adaptive Main-beam Assist
Switching on/off (on-board com-
puter) ............................................. 241
Additives (engine oil) ........................392
Airbags Front airbag (driver, front
passenger )....................................... 44
Important safety guidelines .............42
Kneebag .......................................... .44
Pelvis airbag .................................... 45
Sidebag ............................................ 45
Triggering ......................................... 41
Windowba g...................................... 46
Air-conditioning system
see Climate control
Airf ilter (white display message) ....261
AIRF LOW ........................................... 134
AIRMATIC Display message ............................ 261
Function/notes ............................. 188
Air pressure
see Tyre pressure
Airv ents
Glove compartmen t....................... 143
Important safety notes ..................142
Rea r............................................... 143
Setting ........................................... 142
Setting the centre air vents ...........143
Setting the side air vents ...............143
Alarm system
see ATA (Anti-Theft Alarm system)
Ambient lighting
Setting the brightness (on-board
computer) ...................................... 241
Setting the colou r(on-board com-
puter) ............................................ .241
AMG RIDE CONTROL sports sus-
pension ............................................... 190
Anti-glare film .................................... 317
Anti-loc kBraking System
see ABS (Anti-lock Braking System)
Anti-Theft Alarm system
see ATA (Anti-Theft Alarm system)
Aquaplaning ....................................... 1704
Index
Page 46 of 405
R
move the front-passenger seat as far back
as possible. This is especially important if
you have secured a child in a child restraint
system on the front-passenger seat.
R vehicle occupants –inparticular, children
–m ust no tlean their heads into the area of
the window in which the sidebag/window-
bag is deployed.
R rearward-facing child restraint systems
must not be fitted to the front-passenger
seat unless the front-passenger airbag has
been disabled. On the front-passenger
seat, the front-passenger airbag is disabled
if a child restraint system with a trans-
ponder for automatic child seat recognition
is fitted to the front-passenger seat in a
vehicle equipped with automatic child seat
recognition. The 4PASSENGER AIRBAG
OFF indicator lamp must be continuously
lit.
If the front-passenger seat of your vehicle
does not have automatic child seat recog-
nition, or your rearward-facing child
restraint system does not have a trans-
ponder for automatic child seat recogni-
tion, children must be secured in a child
restraint system on a suitable seat in the
rear. If you secure a forward-facing child
restraint system to the front-passenger
seat, you must move the front-passenger
seat as far back as possible.
R make sure there are no heavy or sharp-
edged objects in the pockets of clothing.
R do not lean forwards, e.g. over the cover of
the driver's/front-passenger front airbag,
particularly when the vehicle is in motion.
R do not put your feet on the dashboard.
R only hold the steering wheel on the outside.
This allows the airbag to be fully deployed.
You could be injured if the airbag is
deployed and you are holding the inside of
the steering wheel.
R do not lean on the doors from inside the
vehicle. R
make sure that there are no people, ani-
mals or objects between the vehicle occu-
pants and the area where the airbags are
deployed.
R do not place any objects between the seat
backrest and the door.
R do not hang any hard objects, e.g. coat
hangers, on the grab handles or coat hooks.
R do not attach accessories, e.g. cup holders,
to the doors.
It is not possible to rule out a risk of injury
being caused by an airbag, due to the high
speed at which the airbag must be deployed. G
WARNING
Airbag functionality can only be assured if the
following parts are not covered and no badges
or stickers are attached to them:
R padded steering wheel boss
R kneebag cover below the steering column
R front-passenger airbag cover
R outer side of fron tseat bolsters
R side trim next to the rear seat backrest
R roof frame cover between the fron tA-pillar
and the C-pillar in the rear compartment G
WARNING
Whe nana irbag deploys, a small amount of
powder is released .The powder may cause
short-term breathing difficulties to persons
suffering from asthma or other pulmonary
conditions.
In order to prevent potential breathing diffi-
culties, you should leave the vehicle as soon
as it is safe to do so. You can also open the
window to allow fresh air to enter the vehicle
interior. The powder does not constitute a
health hazard and does not indicate that there
is a fire in the vehicle. G
WARNING
The airbag parts are hot after the airbag has
been deployed. Do not touch them as you
could burn yourself. Occupant safety
43Safety
Z
Page 67 of 405
R
ESP ®
(Electronic StabilityProgram)
(Y page 66)
R EBD ( Electronic Brake force Distribution)
(Y page 69)
R ADAPTIVE BRAKE (Y page 70)
R PRE-SAFE ®
Brake (Y page 70) Important safety notes
If you fail to adap tyour driving style or if you
are inattentive, the driving safety systems can
neither reduce the risk of accident nor over-
ride the laws of physics. Driving safety sys-
tems are merely aids designed to assist driv-
ing. You are responsible for the distance to
the vehicle in front, for vehicle speed and for
braking in good time. Always adapt your driv-
ing style to suit the prevailing road, weather
and traffic conditions and maintain a safe dis-
tance from the vehicle in front. Drive care-
fully.
i The driving safety systems described only
work as effectively as possible when there
is adequate contact between the tyres and
the road surface. Please pay special atten-
tion to the notes on tyres, recommended
minimum tyre tread depths, etc.
(Y page 354).
In wintry driving conditions, always use
winter tyres (M+S tyres) and, if necessary,
snow chains. Only in this way will the driv-
ing safety systems described in this section
work as effectively as possible. ABS (Anti-lock Braking System)
Important safety notes i
Observe the "Important safety notes" sec-
tion (Y page 64). G
WARNING
If ABS is faulty, the wheels could lock when
braking. The steerability and braking charac-
teristics may be severely impaired. Addition-
ally, further driving safety systems are deac- tivated. There is an increased danger of skid-
ding and accidents.
Drive on carefully. Have ABS checked imme-
diately at a qualified specialist workshop.
When ABS is malfunctioning, other systems,
including driving safety systems, will also
become inoperative. Observe the information
on the ABS warning lamp (Y page 279) and
display messages which may be shown in the
instrument cluster (Y page 250).
ABS regulates brake pressure in such a way
that the wheels do not lock when you brake.
This allows you to continue steering the vehi-
cle when braking.
ABS works from a speed of about 8 km/h
upwards, regardless of road-surface condi-
tions. ABS works on slippery surfaces, even
when you only brake gently.
The yellow !ABS warning lamp in the
instrument cluster lights up when the ignition
is switched on. It goes out when the engine is
running.
Brakes X
If ABS intervenes: continue to depress the
brake pedal with force until the braking sit-
uation is over.
X To make a full brake application:
depress the brake pedal with full force.
If ABS intervenes when braking, you will feel
a pulsing in the brake pedal.
The pulsating brake pedal can be an indica-
tion of hazardous road conditions and func-
tions as a reminder to take extra care while
driving. BAS (Brake Assist System)
i Observe the "Important safety notes" sec-
tion (Y page 64). 64
Driving safety systemsSafety
Page 74 of 405
If you approach an obstacle and PRE-SAFE
®
Brake detects a risk of a collision, the system
will alert you both visually and acoustically. If
you do not brake or take evasive action, the
system will warn you by automatically braking
the vehicle gently. If there is an increased risk
of collision, preventative passenger protec-
tion measures (PRE-SAFE ®
) are activated
(Y page 48). If, at speeds over 30 km/h, a risk
of collision remains and you do not brake,
take evasive action or significantly acceler-
ate, automatic braking may be performed up
to a level of automatic emergency braking.
Automatic emergency braking is not per-
formed until immediately prior to an accident
that can no longer be avoided. G
WARNING
PRE-SAFE ®
Brake will initially brake yourv ehi-
cle by a partial application of the brakes if a
danger of collision is detected. There may be
a collision unless you also brake. Automatic
emergency braking cannot prevent a colli-
sion. There is a risk of an accident.
Always apply the brakes yourself and try to
take evasive action. G
WARNING
PRE-SAFE ®
Brake cannot always clearly iden-
tify objects and complex traffic conditions.
In these cases, PRE-SAFE ®
Brake may:
R give an unnecessary warning and then
brake the vehicle
R neither give a warning nor intervene
There is a risk of an accident.
Always pay particular attention to the traffic
situation and be ready to brake, especially if
PRE-SAFE ®
Brake warns you. Terminate the
intervention in a non-critical driving situation.
In particular, the detection of obstacles can
be impaired if there is:
R dirt on the sensors or anything else cover-
ing the sensors
R snow or heavy rain
R interference by other radar sources R
the possibility of strong radar reflections,
for example, in multi-storey car parks
R a narrow vehicle travelling in front, e.g. a
motorcycle
R a vehicle travelling in front on a different
line G
WARNING
PRE-SAFE ®
Brake does not react:
R to people or animals
R to oncoming vehicles
R to crossing traffic
R when cornering
As a result, PRE-SAFE ®
Brake may neither
give warnings nor intervene in all critical sit-
uations. There is a risk of an accident.
Always pay careful attention to the traffic sit-
uation and be ready to brake.
In order to maintain the appropriate distance
to the vehicle in fron tand thus prevent a col-
lision, you must apply the brakes yourself.
X To activate/deactivate: activate or deac-
tivate PRE-SAFE ®
Brake in the on-board
computer (Y page 237).
When PRE-SAFE ®
Brake is activated, the
Ä symbol appears in multifunctio ndis-
play, as long as the HOL Dfunction is deac-
tivated (Y page 186). On vehicles with the
Active Parking Assist driving system, the
Ä symbol is displayed when position P
is engaged or you are driving faste rthan
35 km/h.
For PRE-SAFE ®
Brake to assist you when driv-
ing, the radar sensor system must be
switched on (Y page 243) and be opera-
tional.
The radar sensor system is switched off auto-
matically in the vicinity of radio telescope
facilities in the following vehicles:
R vehicles with COMAND Online and naviga-
tion
R vehicles with Audio 20 and Becker ®
MAP
PILOT Driving safety systems
71Safety Z
Page 101 of 405
Useful information
i This Owner's Manual describes all mod-
els, series and optional equipment for your
vehicle that were available at the time of
going to press. National variations are pos-
sible. Note that your vehicle may not be
equipped with all of the functions descri-
bed. This is also the case for systems and
functions relevant to safety.
i Read the information on qualified special-
ist workshops: (Y page 24). Correct driver's seat position
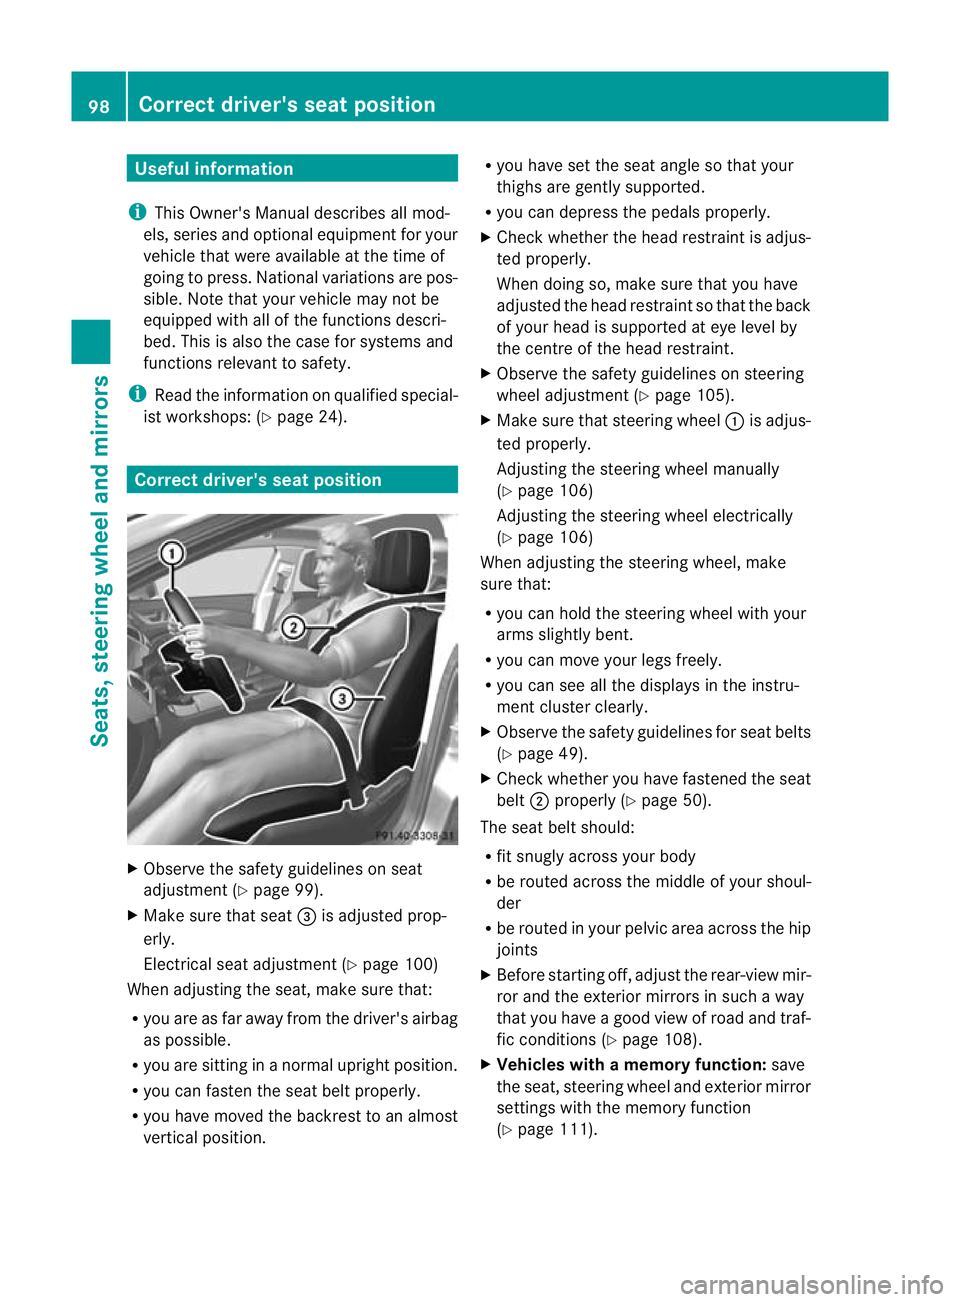
X
Observe the safety guidelines on seat
adjustment (Y page 99).
X Make sure that seat =is adjusted prop-
erly.
Electrical seat adjustment (Y page 100)
When adjusting the seat, make sure that:
R you are as far away from the driver's airbag
as possible.
R you are sitting in a normal upright position.
R you can faste nthe seat belt properly.
R you have moved the backrest to an almost
vertical position. R
you have set the seat angle so that your
thighs are gently supported.
R you can depress the pedals properly.
X Check whether the head restraint is adjus-
ted properly.
When doing so, make sure that you have
adjusted the head restraint so that the back
of your head is supported at eye level by
the centre of the head restraint.
X Observe the safety guidelines on steering
wheel adjustment (Y page 105).
X Make sure that steering wheel :is adjus-
ted properly.
Adjusting the steering wheel manually
(Y page 106)
Adjusting the steering wheel electrically
(Y page 106)
When adjusting the steering wheel, make
sure that:
R you can hold the steering wheel with your
arms slightly bent.
R you can move your legs freely.
R you can see all the displays in the instru-
ment cluster clearly.
X Observe the safety guidelines for seat belts
(Y page 49).
X Check whether you have fastened the seat
belt ;properly (Y page 50).
The seat belt should:
R fit snugly across your body
R be routed across the middle of your shoul-
der
R be routed in your pelvic area across the hip
joints
X Before starting off, adjust the rear-view mir-
ror and the exterior mirrors in such a way
that you have a good view of road and traf-
fic conditions (Y page 108).
X Vehicles with a memory function: save
the seat, steering wheel and exterior mirror
settings with the memory function
(Y page 111). 98
Correct driver's seat positionSeats, steering wheel and mirrors
Page 102 of 405

Seats
Important safety notes
G
WARNING
The seats can still be adjusted when there is
no key in the ignition lock. For this reason,
children should never be left unsupervised in
the vehicle. They could adjust the seats and
become trapped. G
WARNING
Only adjust the driver's seat when the vehicle
is stationary. You will otherwise be distracted
from the road and traffic conditions and you
could lose control of the vehicle as a result of
the seat moving. This could cause an acci-
dent. G
WARNING
If you adjust the seat height carelessly, you or
others could be trapped and thereby injured.
Children in particular could unintentionally
press the buttons to electrically adjust the
seats and become trapped.
Take care that:
R while moving the seats, your hands do not
get under the lever assembly of the seat
adjustment system.
R children in the vehicle do not slide their
hands under the levers. G
WARNING
Make sure that nobody can become trapped
when adjusting the seats.
Observe the notes on airbags.
Secure children as recommended; see the
"Children in the vehicle" section. G
WARNING
Make sure that the back of your head is sup-
ported at eye level by the central area of the
head restraint .Ifyour head is not supported
correctly by the head restraint, you could suf-
fer a severe neck injury in the event of an accident
.Never drive if the head restraints are
not engaged and set correctly. G
WARNING
As eat belt can only offer its intended degree
of protection when the backrest is almost ver-
tical and the occupant is sitting upright. Avoid
seat positions that do not allow the seat belt
to be routed correctly. Adjust the backrest so
that it is as upright as possible. Never travel
with the backrest reclined too far backwards.
You could otherwise be seriously or even
fatally injured in the event of an accident or
sudden braking.
! To avoid damage to the seats and the seat
heating, observe the following information:
R do not spill any liquids on the seats. If
liquid is spilled on the seats, dry them as
soon as possible.
R if the seat covers are damp or wet, do not
switch on the seat heating. The seat
heating should also not be used to dry
the seats.
R clean the seat covers as recommended;
see the "Interior care" section.
R do not transport heavy loads on the
seats. Do not place sharp objects on the
seat cushions, e.g. knives, nails or tools.
The seats should only be occupied by
passengers, if possible.
R when the seat heating is in operation, do
not cover the seats with insulating mate-
rials, e.g. blankets, coats, bags, seat cov-
ers, child seats or booster seats.
! To avoid damage to the seats and the seat
heating, observe the following information:
R do not spill any liquids on the seats. If
liquid is spilled on the seats, dry them as
soon as possible.
R if the seat covers are damp or wet, do not
switch on the seat heating. The seat
heating should also not be used to dry
the seats. Seats
99Seats, steering wheel and mirrors Z
Page 123 of 405
Active:
if you are driving at aspeed above
110 km/ hand do not make any large steering
movements for at least 1000 m or if you are
driving at a spee dabove 130 km/h.
Not active: if you are driving at speeds below
80 km/h following activation.
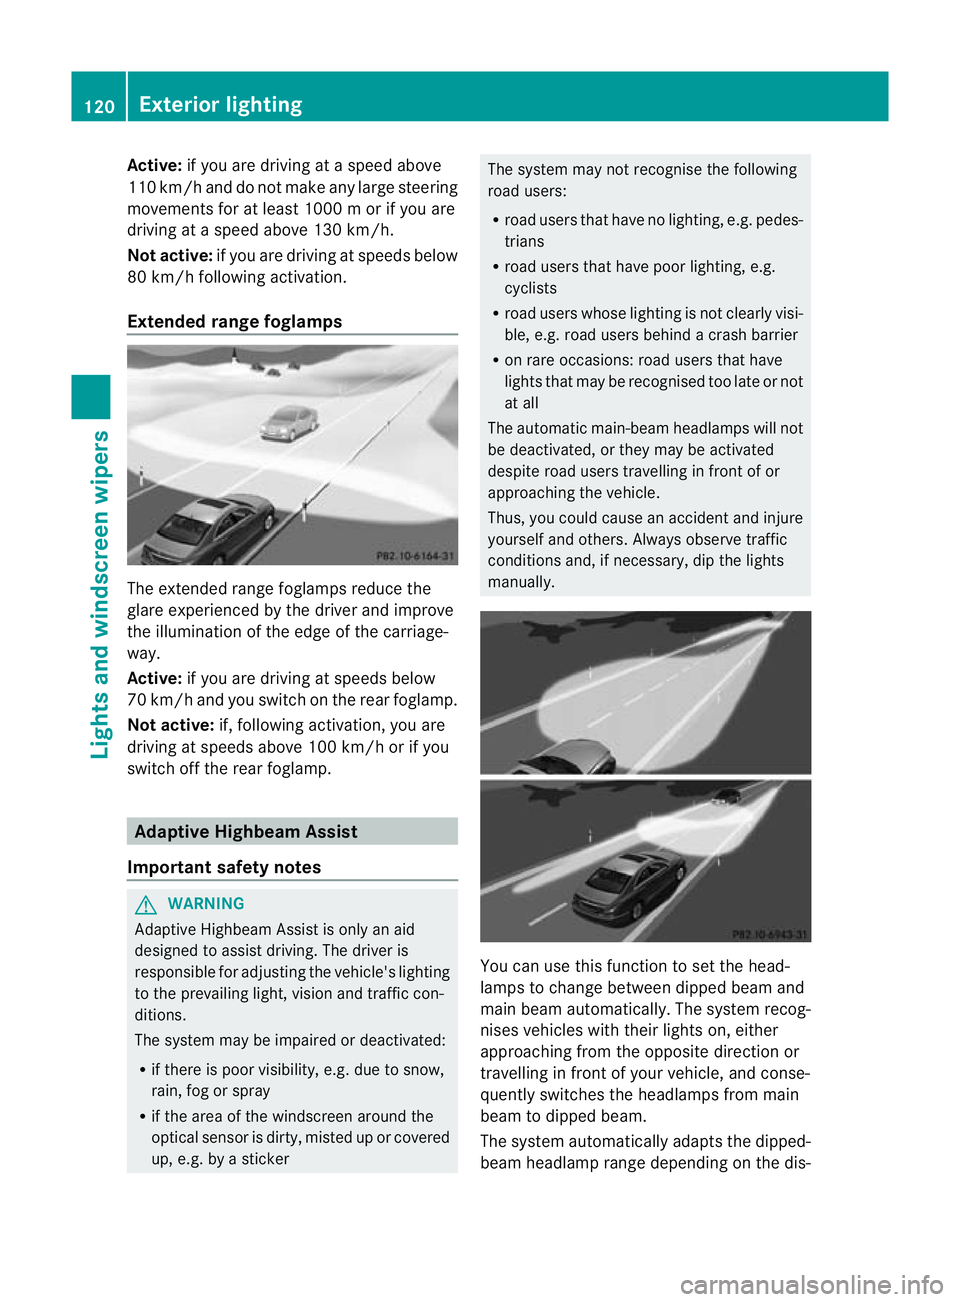
Extended range foglamps The extended range foglamps reduce the
glare experienced by the driver and improve
the illumination of the edge of the carriage-
way.
Active:
if you are driving at speeds below
70 km/ hand you switch on the rea rfoglamp.
Not active: if, following activation, you are
driving at speeds above 100 km/h or if you
switch off the rear foglamp. Adaptive Highbeam Assist
Important safety notes G
WARNING
Adaptive Highbeam Assist is only an aid
designed to assist driving. The driver is
responsible for adjusting the vehicle's lighting
to the prevailing light, vision and traffic con-
ditions.
The system may be impaired or deactivated:
R if there is poor visibility, e.g. due to snow,
rain, fog or spray
R if the area of the windscreen around the
optical sensor is dirty, misted up or covered
up, e.g. by a sticker The system may not recognise the following
road users:
R road users that have no lighting, e.g. pedes-
trians
R road users that have poor lighting, e.g.
cyclists
R road users whose lighting is not clearly visi-
ble, e.g. road users behind a crash barrier
R on rare occasions: road users that have
lights that may be recognised too late or not
at all
The automatic main-beam headlamps will not
be deactivated, or they may be activated
despite road users travelling in front of or
approaching the vehicle.
Thus, you could cause an accident and injure
yourself and others. Always observe traffic
conditions and, if necessary, dip the lights
manually. You can use this function to set the head-
lamps to change between dipped beam and
main beam automatically. The system recog-
nises vehicles with their lights on, either
approaching from the opposite direction or
travelling in front of your vehicle, and conse-
quently switches the headlamps from main
beam to dipped beam.
The system automatically adapts the dipped-
beam headlamp range depending on the dis-120
Exterior lightingLights and windscreen wipers
Page 133 of 405
Useful information
i This Owner's Manual describes all mod-
els, series and optional equipment for your
vehicle that were available at the time of
going to press. National variations are pos-
sible. Note that your vehicle may not be
equipped with all of the functions descri-
bed. This is also the case for systems and
functions relevant to safety.
i Read the information on qualified special-
ist workshops: (Y page 24). Overview of climate control systems
Important safety notes
G
WARNING
Observe the settings recommended on the
following pages. The windows could other-
wise mist up. This may preven tyou from
observing the traffic conditions, thereby caus-
ing an accident.
Climate control regulates the temperature
and the humidity in the vehicle interior and
filters undesirable substances out of the air.
Climate control is only operational when the
engine is running. The system only works
optimally if the side windows and the roof are
closed.
The residual heat function can only be acti-
vated or deactivated with the ignition
switched off (Y page 138).
i Ventilate the vehicle for a brief period
during warm weather, e.g. using the con-
venience opening feature (Y page 90). This
will speed up the cooling process and the
desired vehicle interior temperature will be
reached more quickly.
i The integrated filter can filter out most
particles of dust and completely filters out
pollen. Aclogged filter reduces the amount
of air supplied to the vehicle interior .For
this reason, you should always observe the interval for replacing the filter, which is
specified in the Service Booklet
.As it
depends on environmental conditions, e.g.
heavy air pollution, the interval may be
shorter than stated in the Service Booklet. 130
Overview of climate control systemsClimate control
Page 136 of 405
Information abou
tusing
THERMOTRONIC automatic climate
control
The following contains instructions and rec-
ommendations to enable you to get the most
out of your THERMOTRONIC automatic cli-
mate control.
R Activate climate control using the Ãand
¿ buttons. The indicato rlamps above
the à and¿ buttons light up.
R In automatic mode, you can also use the
ñ button to set a climate mode
(FOCUS/MEDIUM/DIFFUSE). The
MEDIUM level is recommended.
R Set the temperature to 22 †.
R Only use the demisting function briefly until
the windscree nis clear again.
R Only use the air-recirculation mode briefly,
e.g. if there are unpleasant outside odours
or when in a tunnel. The windows could
otherwise mist up as no fresh air is drawn
into the vehicle in air-recirculation mode.
R Use the ZONE function to adopt the tem-
perature settings on the driver's side for
the front-passenger side and the rear com-
partment as well.T he indicator lamp above
the á button goes out.
R Use the residual heat function if you want
to heat or ventilate the vehicle interior
when the ignition is switched off. The resid-
ual heat function can only be activated or
deactivated with the ignition switched off. Operating the climate control system
Switching climate control on/off
Points to observe before use i
If climate control is switched off, the air
supply and air circulation are also switched
off. Only use this setting for a brief period.
The windows could otherwise mist up.
i Switch on climate control primarily using
the à button (Y page 134). Switching on/off X
Turn the key to position 2in the ignition
lock.
X To switch on: press theÃbutton on
the climate control operating panel.
The indicator lamp in the Ãbutton lights
up. Airflow and air distribution are set to
automatic mode.
or
X Press the ^button.
The indicator lamp in the ^button goes
out. The previous settings are reactivated.
X To switch off: press the^button.
The indicator lamp in the ^button lights
up. Activating/deactivating the cooling
with air dehumidification function
Points to observe before use G
WARNING
If the "cooling with air dehumidification" func-
tion is deactivated, the air inside the vehicle
will not be cooled (during warm weather) or
dehumidified. The windows could mist up
more quickly. This may prevent you from
observing the traffic conditions, thereby caus-
ing an accident.
The cooling with air dehumidification function
is only available when the engine is running.
The air inside the vehicle is cooled and dehu-
midified according to the temperature selec-
ted.
Condensation may drip from the underside of
the vehicle when cooling mode is active. This
is normal and not a sign that there is a mal-
function.
i The cooling with air dehumidification
function uses refrigerant R134a. This
refrigerant does not contain chlorofluoro-
carbons, and therefore does not damage
the ozone layer. Operating the climate control system
133Climate control Z
Page 140 of 405
Rear window heating
Switching on/off G
WARNING
Clea rall windows of ice or snow before setting
off .O therwise, impaired visibility could
endanger you and others.
The rea rwindow heating has ahigh current
draw. You should therefore switch it off as
soon as the window is clear .Itotherwise
switches off automatically after several
minutes.
If the battery voltage is too low, the rea rwin-
dow heating may switch off.
X Turn the key to position 2in the ignition
lock.
X Press the ¤button.
The indicator lamp in the ¤button lights
up or goes out.
Problems with the rea rwindow heating The rear window heating has switched off
prematurely or cannot be activated.
X Switch off any consumers that are not
required, e.g. reading lamps or interior
lighting.
When the battery is sufficiently charged,
the rear window heating is activated again
automatically. Activating/deactivating air-recircula-
tion mode G
WARNING
Only switch over to air-recirculatio nmode
briefly at low outside temperatures. Other-
wise, the windows could mist up, thus impair-
ing visibility and endangering yourself and
others. This may prevent you from observing
the traffic conditions, thereby causing an
accident. You can deactivate the flow of fresh air if
unpleasant odours are entering the vehicle
from outside. The air already inside the vehi-
cle will then be recirculated.
The operation of air-recirculation mode is the
same for all control panels.
X
Turn the key to position 2in the ignition
lock.
X To activate: press thegbutton.
The indicator lamp in the gbutton lights
up.
i In the event of high pollution levels 1
or at
high outside temperatures, air-recircula-
tion mode is automatically activated. When
air-recirculation mode is activated auto-
matically, the indicator lamp above the
g button does not light up.
Outside air is added after approximately
30 minutes.
X To deactivate: press thegbutton.
The indicator lamp in the gbutton goes
out.
i Air-recirculation mode deactivates auto-
matically:
R after approximately five minutes at out-
side temperatures below approximately
5 †
R after approximately five minutes if cool-
ing with air dehumidification is deactiva-
ted
R after approximately 30 minutes at out-
side temperatures above approximately
5† with the "cooling with air dehumidi-
fication" function switche don. Convenience opening/closing using
the air-recirculation button
G
WARNING
Make sure tha tnobody can become trapped
between the side window and the door frame
as the side windows are opened and closed.
Make sure that all object sand body parts are
1 THERMOTRONIC automatic climate control only. Operating the climate control system
137Climate control
Z