high beam MERCEDES-BENZ CLS SHOOTING BRAKE 2012 Owners Manual
[x] Cancel search | Manufacturer: MERCEDES-BENZ, Model Year: 2012, Model line: CLS SHOOTING BRAKE, Model: MERCEDES-BENZ CLS SHOOTING BRAKE 2012Pages: 405, PDF Size: 10.21 MB
Page 7 of 405
1, 2, 3 ...
12 Vsocket
see Socket
4ETS
see ETS/4ETS (Electronic Trac-
tionS ystem)
4MATIC (permanent four-wheel
drive) .................................................. 191
4MATIC off-road system ...................191 A
ABS (Anti-lock Braking System) Display message ............................ 250
Function/notes ................................ 64
Important safety notes ....................64
Warning lamp ................................. 279
Activating/deactivating air-recir-
culation mode .................................... 137
Activating/deactivating cooling
with air dehumidification .................133
Active Blin dSpot Assist
Activating/deactivating (on-
board computer) ............................ 238
Display message ............................ 264
Function/notes ............................. 212
Towing atrailer .............................. 215
Active Driving Assistance package .212
Active Lane Keeping Assist Activating/deactivating (on-
board computer) ............................ 238
Display message ............................ 264
Function/notes ............................. 215
Towing atrailer .............................. 217
Active light function .........................119
Active multicontour seat ..................103
Active Park Assist Display message ............................ 265
Active Parking Assist
Important safety notes ..................194
Towing atrailer .............................. 197
Active Service System
see ASSYST PLUS
ADAPTIVE BRAKE ................................. 70
Adaptive brake lamps .........................66Adaptive Highbeam Assist
Display message ............................ 258
Function/notes ............................. 120
Adaptive Main-beam Assist
Switching on/off (on-board com-
puter) ............................................. 241
Additives (engine oil) ........................392
Airbags Front airbag (driver, front
passenger )....................................... 44
Important safety guidelines .............42
Kneebag .......................................... .44
Pelvis airbag .................................... 45
Sidebag ............................................ 45
Triggering ......................................... 41
Windowba g...................................... 46
Air-conditioning system
see Climate control
Airf ilter (white display message) ....261
AIRF LOW ........................................... 134
AIRMATIC Display message ............................ 261
Function/notes ............................. 188
Air pressure
see Tyre pressure
Airv ents
Glove compartmen t....................... 143
Important safety notes ..................142
Rea r............................................... 143
Setting ........................................... 142
Setting the centre air vents ...........143
Setting the side air vents ...............143
Alarm system
see ATA (Anti-Theft Alarm system)
Ambient lighting
Setting the brightness (on-board
computer) ...................................... 241
Setting the colou r(on-board com-
puter) ............................................ .241
AMG RIDE CONTROL sports sus-
pension ............................................... 190
Anti-glare film .................................... 317
Anti-loc kBraking System
see ABS (Anti-lock Braking System)
Anti-Theft Alarm system
see ATA (Anti-Theft Alarm system)
Aquaplaning ....................................... 1704
Index
Page 16 of 405
Important safety notes
....................76
Loss ................................................. 81
Modifying the programming .............78
Positions (ignition lock) .................147
Problem (malfunction) .....................81
Starting the engine ........................149
KEYLESS-GO
Convenience closing ........................91
Display message ............................ 275
Locking ............................................ 77
Start/Stop button .......................... 147
Starting the engine ........................149
Unlocking ......................................... 77
Keyp ositions
Key ................................................ 147
KEYLESS GO .................................. 147
Kickdown
Driving tips .................................... 157
Manual drive program ....................160
Kneebag ............................................... 44L
Lamps see Warning and indicator lamps
Lane detection (automatic)
see Lane Keeping Assist
Lane Keeping Assist
Activating/deactivating .................238
Display message ............................ 264
Function/informatio n.................... 210
Lane package ..................................... 208
Lap time (RACETIMER) ......................246
Lashing eyelets ................................. 295
Licence plate lamp (display mes-
sage) ................................................... 257
Lighting see Lights
Lights
Activating/deactivating the Intel-
ligent Ligh tSystem ........................ 240
Activating/deactivating the inte-
rior lighting delayed switch-off .......242
Active light function .......................119
Automatic headlamp mode ............115
Cornering light function .................119
Dipped-bea mheadlamps ............... 115
Driving abroad ............................... 114Foglamps (extended range)
...........120
Hazard warning lamps ...................118
Headlamp flasher ........................... 118
Ligh tswitc h................................... 114
Main-beam headlamps ................... 117
Motorway mode ............................. 119
Parking lamps ................................ 117
Rea rfoglamp ................................. 116
Setting brightness for display/
switches (on-board computer) .......240
Setting the ambient lighting
brightness (on-board computer) ....241
Setting the ambient lighting col-
our (on-board computer) ................ 241
Side lamps ..................................... 116
Switching Adaptive Highbeam
Assist on/off ................................. 241
Switching the daytime driving
lights on/off (on-board computer) .240
Switching the exterio rlighting
delayed switch-off on/off (on-
board computer )............................ 242
Switching the surround lighting
on/off (on-board computer) ..........242
Turn signals ................................... 117
see Changing bulbs
see Interior lighting
Light sensor (display message) .......258
LIM indicator lamp Cruise control ................................ 172
DISTRONI CPLUS ........................... 178
Variabl eSPEEDTRONIC .................175
Limiting the speed
see SPEEDTRONIC
Loading guidelines ............................290
Locking see Centra llocking
Locking (doors)
Automatic ........................................ 84
Emergency locking ........................... 84
From inside (central locking but-
ton) .................................................. 83
Locking centrally
see Centra llocking
Locking verification signal (on-
board computer) ............................... 243
Luggage compartment cover ...........297 Index
13
Page 17 of 405
Luggage compartment enlarge-
ment
................................................... 294
Luggage compartment floor opening/closing ............................ 302
stowage well, unde r....................... 302
Luggage cover
Removing and fitting ......................298
Luggage holde r(EASY-PACK load-
securing kit) ...................................... .300
Lumbar support Adjusting ....................................... 104
Adjusting the 4-way lumba rsup-
por t................................................ 104
Luxu ry head restraint .......................101 M
M+S tyres ........................................... 356
Main-beam headlamps Display message ............................ 257
Switching Adaptive Highbeam
Assist on/off ................................. 121
Switching on/off ........................... 117
Massage function (PULSE) ...............103
Matt finish (cleaning instructions) ..327
Memory card (audio) .........................234
Memory function ............................... 111
Mercedes-Benz Service Centre see Qualified specialist workshop
Message memory (on-board com-
puter) ................................................. .249
Messages see Display messages
Mirror
see Vanity mirror (in sun visor)
Mirrors
see Exterior mirrors
see Rear-view mirror
Mobile phone
Frequencies ................................... 383
Installatio n..................................... 383
Menu (on-board computer) ............235
Notes/placing in the bracket ......... 309
Sliding adapter ............................... 311
Transmission output (maximum) .... 383
Modifying the programming (key) .....78
MOExtended tyres .............................337
Motorway mode ................................ 119MP3
Operating ...................................... .234
see Separate operating instructions
Multifunction display
Function/notes ............................. 229
Permanent displa y......................... 239
Multifunction steering wheel
Operating the on-board computer .228
Overview .......................................... 33 N
Navigation Menu (on-board computer) ............232
NECK-PRO head restraints
Operation ........................................ .46
Resetting after being triggered ........47
NECK-PRO luxury head restraints
Operation ........................................ .46
Resetting after being triggered ........48
Night View Assist Plus
Activating/deactivating .................206
Cleaning ......................................... 330
Function/notes ............................. 205
Problem (fault) ............................... 208
Notes on running in anew vehicle ..146 O
Occupant safety Childre ninthe vehicle ..................... 53
Important safety notes ....................40
Odometer
see Total distance recorder
see Trip meter
Oil
see Engine oil
On-board computer
AMG menu ..................................... 246
Assistance menu ........................... 236
Audi omenu ................................... 233
Convenience submenu ..................244
Displaying a service message ........324
Display messages ..........................249
DISTRONI CPLUS ........................... 183
Factory setting submenu ...............245
Heating submenu ........................... 243
Important safety notes ..................22614
Index
Page 121 of 405
X
To switch on the main-beam head-
lamps: turn the key in the ignition lock to
position 2or start the engine.
X Turn the light switch to LorÃ.
X Press the combinatio nswitc hbeyond the
pressure point in the direction of
arrow :.
In the Ãposition, the main-beam head-
lamps are only switched on when it is dark
and the engine is running.
The blue Kindicator lamp in the instru-
ment cluster lights up when the main-beam
headlamps are switched on.
X To switch off the main-beam head-
lamps: move the combination switch back
to its normal position.
The blue Kindicator lamp in the instru-
ment cluster goes out.
i Vehicles with Adaptive Highbeam Assist:
when Adaptive Highbeam Assist is active,
it controls activation of the main-beam
headlamps (Y page 120).
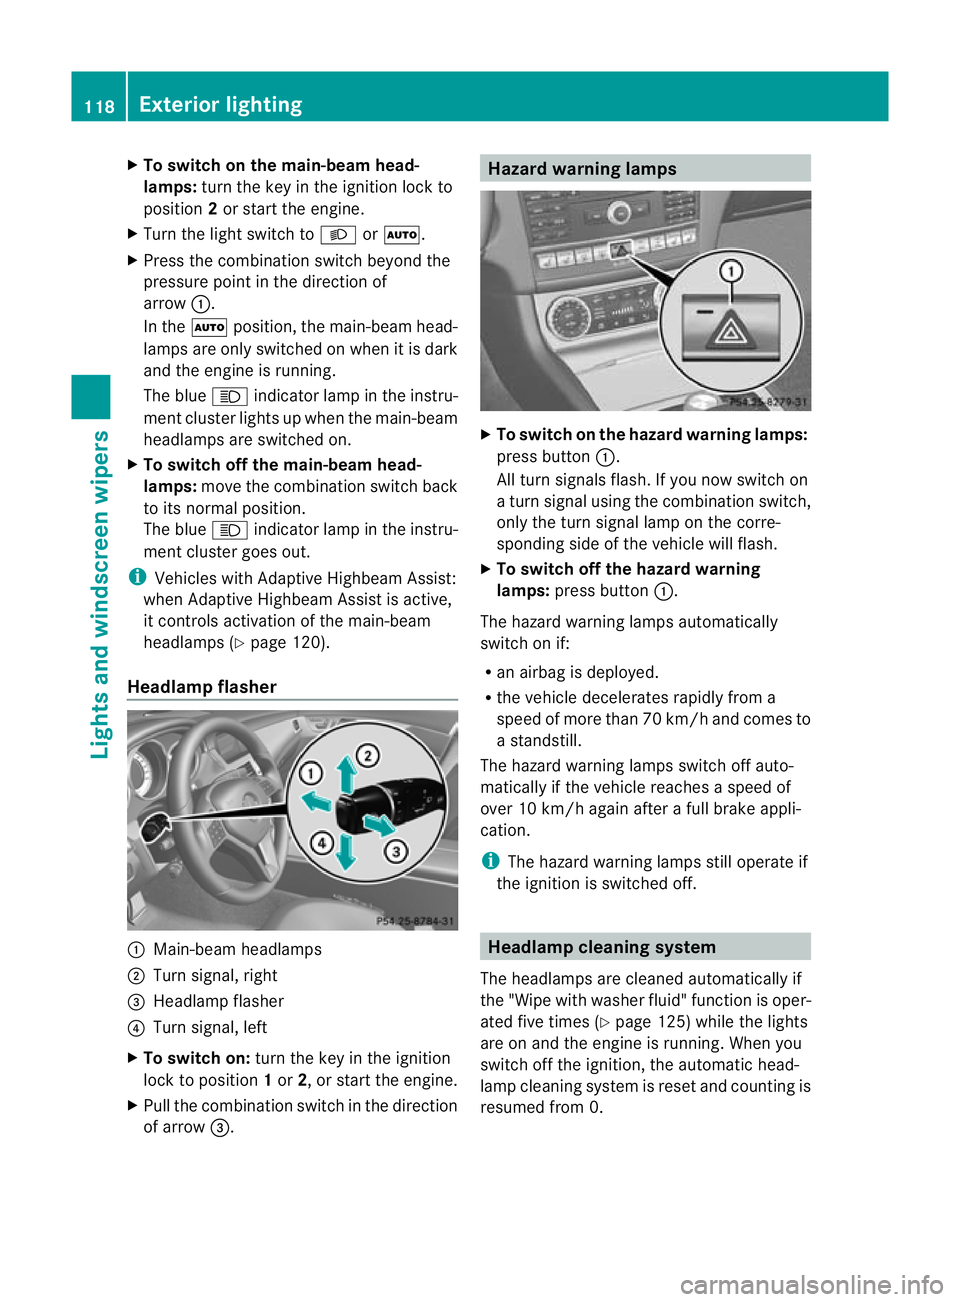
Headlamp flasher :
Main-beam headlamps
; Turn signal, right
= Headlamp flasher
? Turn signal, left
X To switch on: turn the key in the ignition
lock to position 1or 2, or start the engine.
X Pull the combination switch in the direction
of arrow =. Hazard warning lamps
X
To switch on the hazard warning lamps:
press button :.
All turn signals flash. If you now switch on
a turn signal using the combination switch,
only the turn signal lamp on the corre-
sponding side of the vehicle will flash.
X To switch off the hazard warning
lamps: press button :.
The hazard warning lamps automatically
switch on if:
R an airbag is deployed.
R the vehicle decelerates rapidly from a
speed of more than 70 km/ha nd comes to
a standstill.
The hazard warning lamps switch off auto-
matically if the vehicle reaches a speed of
over 10 km/h again after a full brake appli-
cation.
i The hazard warning lamps still operate if
the ignition is switched off. Headlamp cleaning system
The headlamps are cleaned automatically if
the "Wipe with washe rfluid" function is oper-
ated five times (Y page 125) while the lights
are on and the engine is running. When you
switch off the ignition, the automatic head-
lamp cleaning system is reset and counting is
resumed from 0. 118
Exterior lightingLights and windscreen wipers
Page 123 of 405
Active:
if you are driving at aspeed above
110 km/ hand do not make any large steering
movements for at least 1000 m or if you are
driving at a spee dabove 130 km/h.
Not active: if you are driving at speeds below
80 km/h following activation.
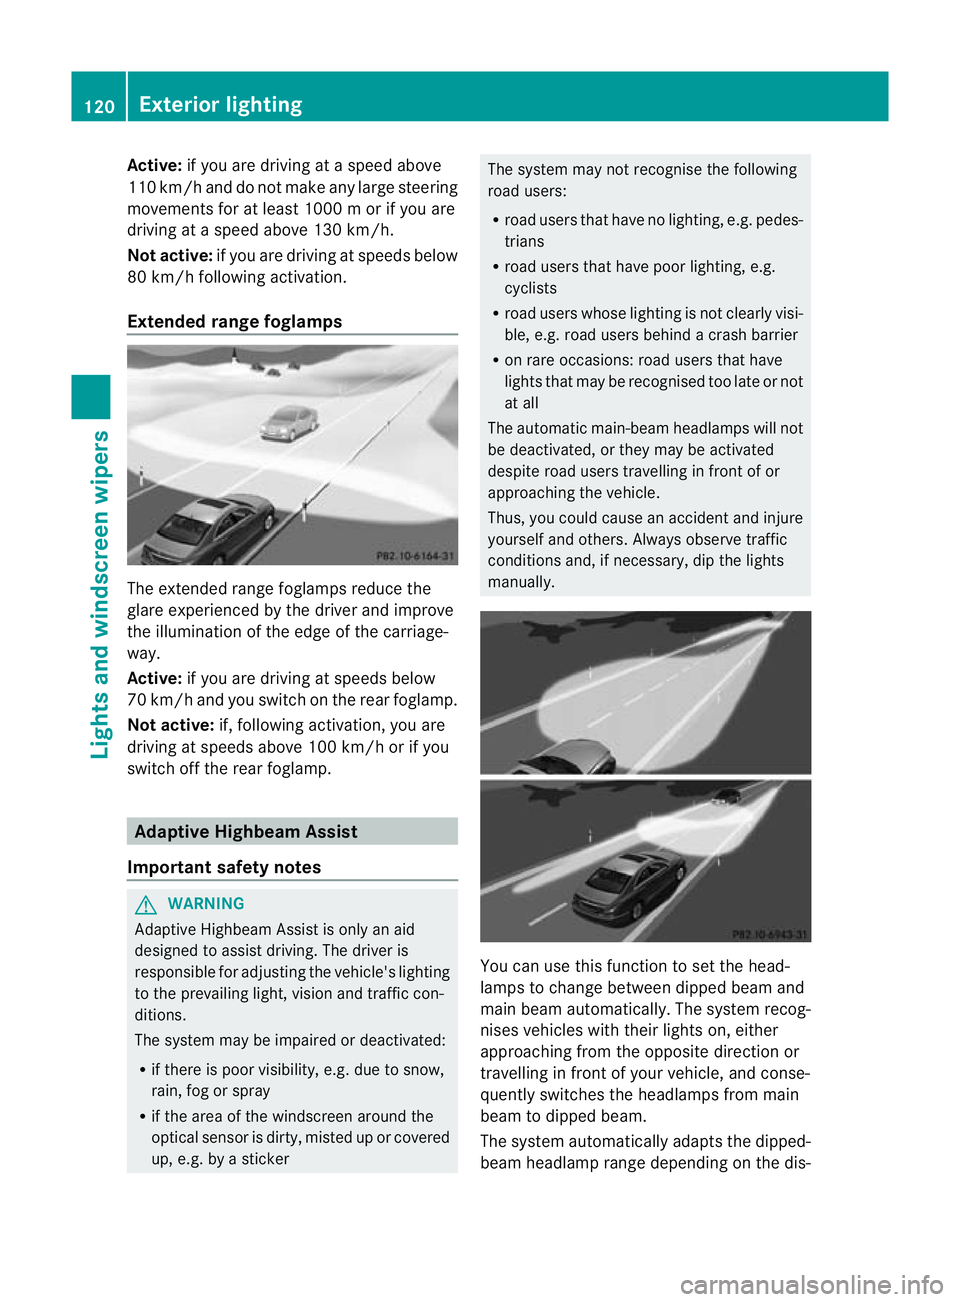
Extended range foglamps The extended range foglamps reduce the
glare experienced by the driver and improve
the illumination of the edge of the carriage-
way.
Active:
if you are driving at speeds below
70 km/ hand you switch on the rea rfoglamp.
Not active: if, following activation, you are
driving at speeds above 100 km/h or if you
switch off the rear foglamp. Adaptive Highbeam Assist
Important safety notes G
WARNING
Adaptive Highbeam Assist is only an aid
designed to assist driving. The driver is
responsible for adjusting the vehicle's lighting
to the prevailing light, vision and traffic con-
ditions.
The system may be impaired or deactivated:
R if there is poor visibility, e.g. due to snow,
rain, fog or spray
R if the area of the windscreen around the
optical sensor is dirty, misted up or covered
up, e.g. by a sticker The system may not recognise the following
road users:
R road users that have no lighting, e.g. pedes-
trians
R road users that have poor lighting, e.g.
cyclists
R road users whose lighting is not clearly visi-
ble, e.g. road users behind a crash barrier
R on rare occasions: road users that have
lights that may be recognised too late or not
at all
The automatic main-beam headlamps will not
be deactivated, or they may be activated
despite road users travelling in front of or
approaching the vehicle.
Thus, you could cause an accident and injure
yourself and others. Always observe traffic
conditions and, if necessary, dip the lights
manually. You can use this function to set the head-
lamps to change between dipped beam and
main beam automatically. The system recog-
nises vehicles with their lights on, either
approaching from the opposite direction or
travelling in front of your vehicle, and conse-
quently switches the headlamps from main
beam to dipped beam.
The system automatically adapts the dipped-
beam headlamp range depending on the dis-120
Exterior lightingLights and windscreen wipers
Page 124 of 405
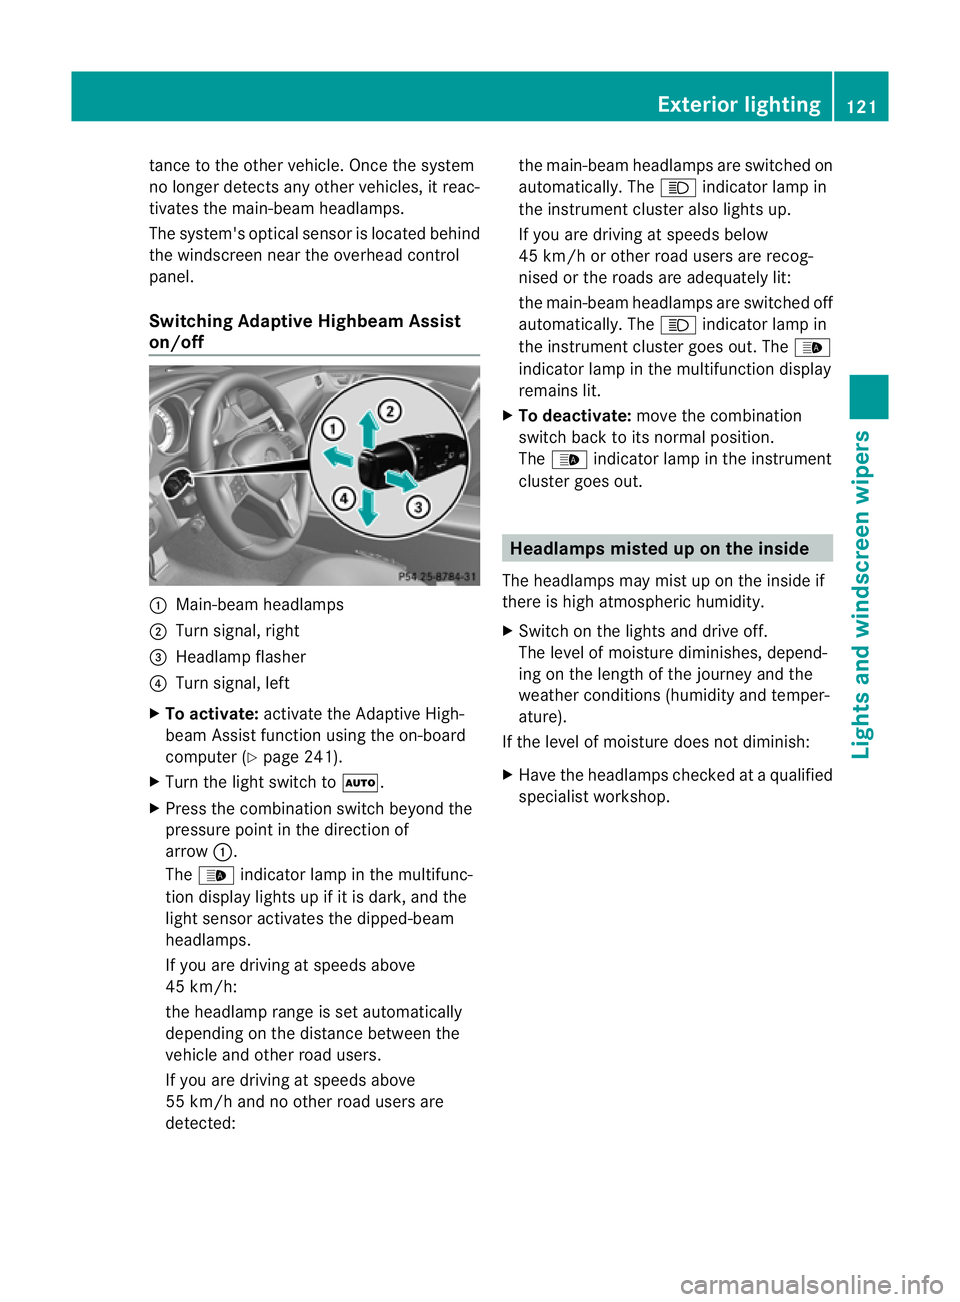
tance to the other vehicle. Once the system
no longe rdetects any other vehicles, it reac-
tivates the main-beam headlamps.
The system's optical sensor is located behind
the windscreen near the overhead control
panel.
Switching Adaptive Highbeam Assist
on/off :
Main-beam headlamps
; Turn signal, right
= Headlamp flasher
? Turn signal, left
X To activate: activate the Adaptive High-
beam Assist function using the on-board
computer (Y page 241).
X Turn the light switch to Ã.
X Press the combination switch beyond the
pressure point in the direction of
arrow :.
The _ indicator lamp in the multifunc-
tion display lights up if it is dark, and the
light sensor activates the dipped-beam
headlamps.
If you are driving at speeds above
45 km/h:
the headlamp range is set automatically
depending on the distance between the
vehicle and other road users.
If you are driving at speeds above
55 km/h and no other road users are
detected: the main-beam headlamps are switched on
automatically. The
Kindicator lamp in
the instrument cluster also lights up.
If you are driving at speeds below
45 km/h or other road users are recog-
nised or the roads are adequately lit:
the main-beam headlamps are switched off
automatically. The Kindicator lamp in
the instrument cluster goes out. The _
indicator lamp in the multifunction display
remains lit.
X To deactivate: move the combination
switch back to its normal position.
The _ indicator lamp in the instrument
cluster goes out. Headlamps misted up on the inside
The headlamps may mist up on the inside if
there is high atmospheric humidity.
X Switch on the lights and drive off.
The level of moisture diminishes, depend-
ing on the length of the journey and the
weather conditions (humidity and temper-
ature).
If the level of moisture does not diminish:
X Have the headlamps checked at a qualified
specialist workshop. Exterior lighting
121Lights and windscreen wipers Z
Page 208 of 405
Permanently showing detected traffic
signs in the multifunction display
X Display Speed Limit Assist using the on-
board computer (Y page 236).
At raffic sign indicating a speed limi torthe
end of a speed limit :appears in the mul-
tifunction display as soon as it is detected.
Traffic sign indicating a speed limit :is
generally displayed until:
R a traffic sign indicating the end of the
speed limit is detected.
R you make a turn.
R you leave or enter a town.
R the road type changes (e.g. motorway,
country road).
R you have travelled a certain minimum
distance without the traffic sign being
repeated or detected again.
i You can also activate Speed Limit Assist
using COMAND APS. The maximum per-
missible speed is then shown in the
COMAND display; see the COMAND APS
operating instructions. Night View Assist Plus
Important safety notes G
WARNING
Night View Assist Plus is only an aid designed
to assist driving and does not relieve you of
the responsibility to pay attention. Continue
to look through the windscreen instead of
relying on the Night View Assist Plus display.
You are responsible for safety and must drive
in accordance with traffic conditions. You
could otherwise endanger yourself and oth-
ers. The system may be impaired or may not func-
tion if:
R
there is poor visibility, e.g. due to snow,
rain, fog or spray.
R the windscreen is dirty, misted up or cov-
ered, for instance by a sticker, in the vicinity
of the camera.
R on bends, on uphill gradients or downhill
gradients. G
WARNING
Night View Assist Plus does not detect
objects in the immediate vicinity of the vehi-
cle. Look through the windscreen when
manoeuvring. Make sure that there are no
people or animals in the area in which you are
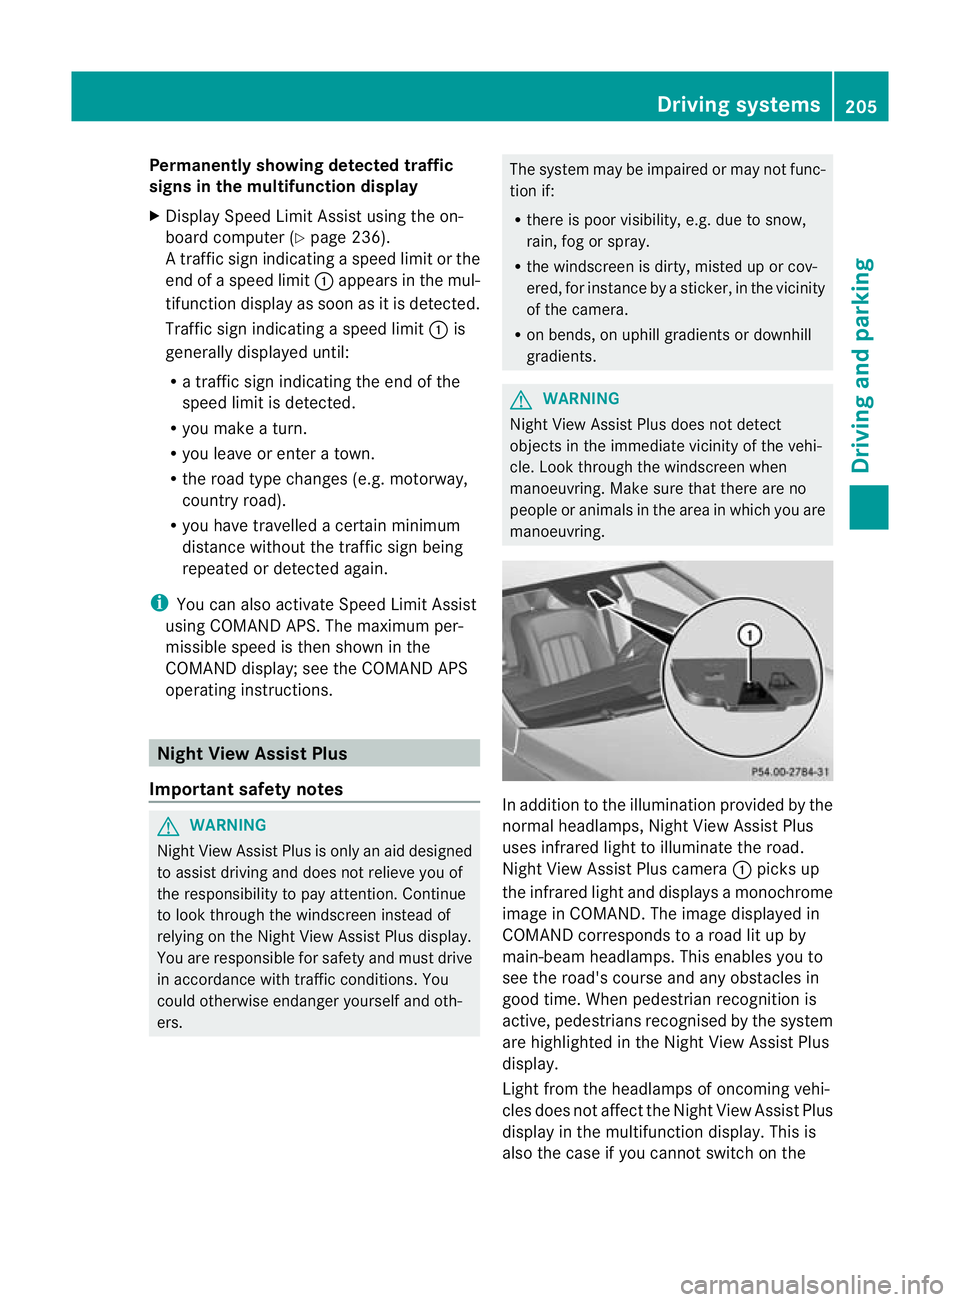
manoeuvring. In addition to the illumination provided by the
normal headlamps, Night View Assist Plus
uses infrared light to illuminate the road.
Night View Assist Plus camera
:picks up
the infrared light and displays a monochrome
image in COMAND. The image displayed in
COMAND corresponds to a road lit up by
main-beam headlamps. This enables you to
see the road's course and any obstacles in
good time. When pedestrian recognition is
active, pedestrians recognised by the system
are highlighted in the Night View Assist Plus
display.
Light from the headlamps of oncoming vehi-
cles does not affect the Night View Assist Plus
display in the multifunction display. This is
also the case if you cannot switch on the Driving systems
205Driving and parking Z
Page 233 of 405
?
Transmission position (Y page 155)
A Permanen tdisplay: outside temperature
or speed (Y page 239)
X To show the menu bar ;:press the
= or; button on the steerin gwheel.
Menu bar ;disappears after a few seconds.
Text field :shows the selected menu or
submenu as well as display messages.
The following messages can appearint he
multifunction display:
XjY Active Parking Assist
(Ypage 194)
¯ Cruise control (Y page 171)
È SPEEDTRONIC (Y page 174)
_ Adaptive Highbeam Assist
(Ypage 121)
À ATTENTION ASSIST
(Ypage 202)
¤ ECO start/stop function
(Ypage 150)
Ä Speed Limit Assist
(Ypage 204)
à Lane Keeping Assist
(Ypage 210)
à Active Lane Keeping Assist
(Ypage 215)
ë HOLD function (Y page 186)
Ä PRE-SAFE®
Brake (Y page 70)
120 km/h! Maximum permissible speed
exceeded (only for certain coun-
tries)
Menus and submenus
Menu overview
Press the =or; button on the steer-
ing wheel to call up the menu bar and select
a menu.
Operating the on-board computer
(Y page 228). Depending on the equipment fitted in the
vehicle, you can call up the following menus:
R
Trip menu (Y
page 230)
R Navi menu (navigation instructions)
(Y page 232)
R Audio menu (Y
page 233)
R Tel menu (telephone) (Y
page 235)
R Assist. menu (assistance) (Y
page 236)
R Serv. menu (Y
page 239)
R Settings menu (Y
page 239)
R AMG menu in AMG vehicles (Y
page 246)
The Audio ,
Navi and
Tel menus differ slightly
in vehicles with an audio system and in vehi-
cles with COMAND Online. The examples
given in this Owner's Manual apply to vehicles
equipped with COMAND Online. Trip menu
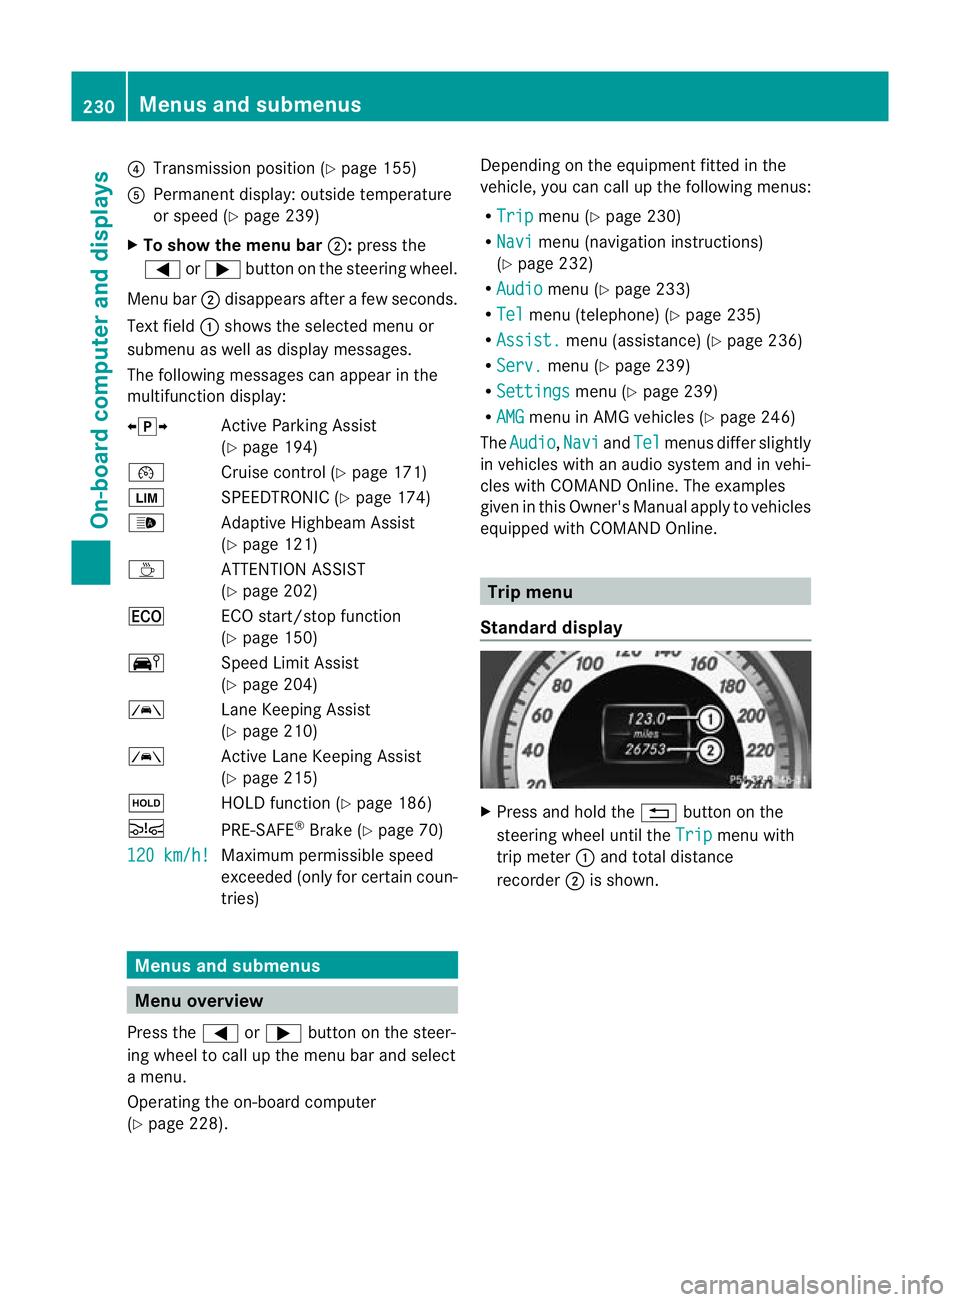
Standard display X
Press and hold the %button on the
steering wheel until the Trip menu with
trip meter :and total distance
recorder ;is shown. 230
Menus and submenusOn-board computer and displays
Page 244 of 405
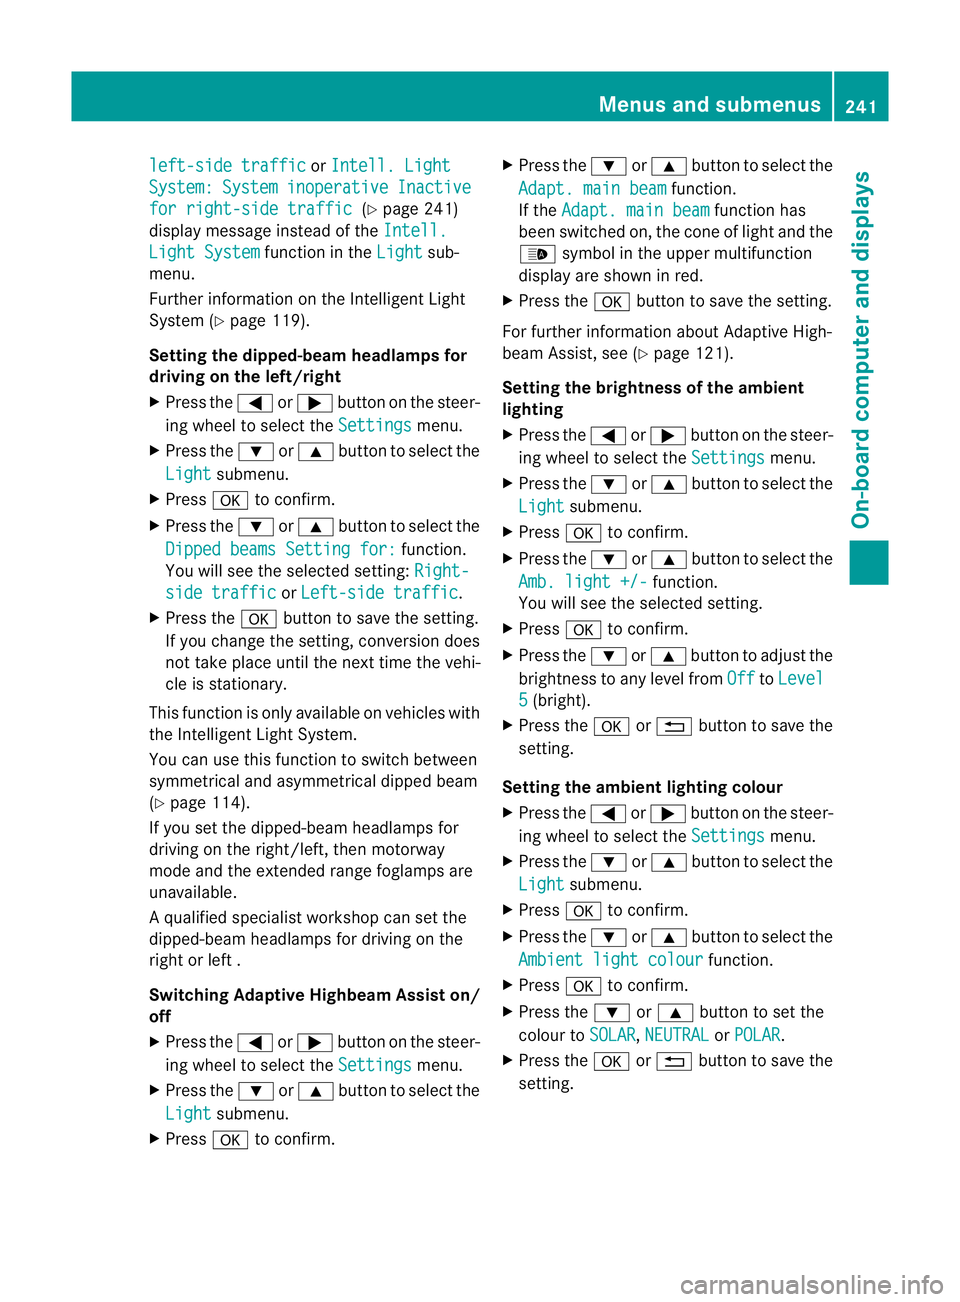
left-side traffic or
Intell. Light System: System inoperative Inactive
for right-side traffic (Y
page 241)
display message instead of the Intell.Light System function in the
Light sub-
menu.
Further information on the Intelligent Light
System (Y page 119).
Setting the dipped-beam headlamps for
driving on the left/right
X Press the =or; button on the steer-
ing wheel to select the Settings menu.
X Press the :or9 button to select the
Light submenu.
X Press ato confirm.
X Press the :or9 button to select the
Dipped beams Setting for: function.
You will see the selected setting: Right-side traffic or
Left-side traffic .
X Press the abutton to save the setting.
If you change the setting, conversion does
not take place until the next time the vehi-
cle is stationary.
This function is only available on vehicles with
the Intelligent Light System.
You can use this function to switch between
symmetrical and asymmetrical dipped beam
(Y page 114).
If you set the dipped-beam headlamps for
driving on the right/left, then motorway
mode and the extended range foglamps are
unavailable.
Aq ualified specialist workshop can set the
dipped-beam headlamps for driving on the
right or left .
Switching Adaptive Highbeam Assis ton/
off
X Press the =or; button on the steer-
ing wheel to select the Settings menu.
X Press the :or9 button to select the
Light submenu.
X Press ato confirm. X
Press the :or9 button to select the
Adapt. main beam function.
If the Adapt. main beam function has
been switched on, the cone of light and the
_ symbol in the upper multifunction
display are shown in red.
X Press the abutton to save the setting.
For further information about Adaptive High-
beam Assist, see (Y page 121).
Setting the brightness of the ambient
lighting
X Press the =or; button on the steer-
ing wheel to select the Settings menu.
X Press the :or9 button to select the
Light submenu.
X Press ato confirm.
X Press the :or9 button to select the
Amb. light +/- function.
You will see the selected setting.
X Press ato confirm.
X Press the :or9 button to adjust the
brightness to any level from Off to
Level 5 (bright).
X Press the aor% button to save the
setting.
Setting the ambient lighting colour
X Press the =or; button on the steer-
ing wheel to select the Settings menu.
X Press the :or9 button to select the
Light submenu.
X Press ato confirm.
X Press the :or9 button to select the
Ambient light colour function.
X Press ato confirm.
X Press the :or9 button to set the
colour to SOLAR ,
NEUTRAL or
POLAR .
X Press the aor% button to save the
setting. Menus and submenus
241On-board computer and displays Z
Page 260 of 405
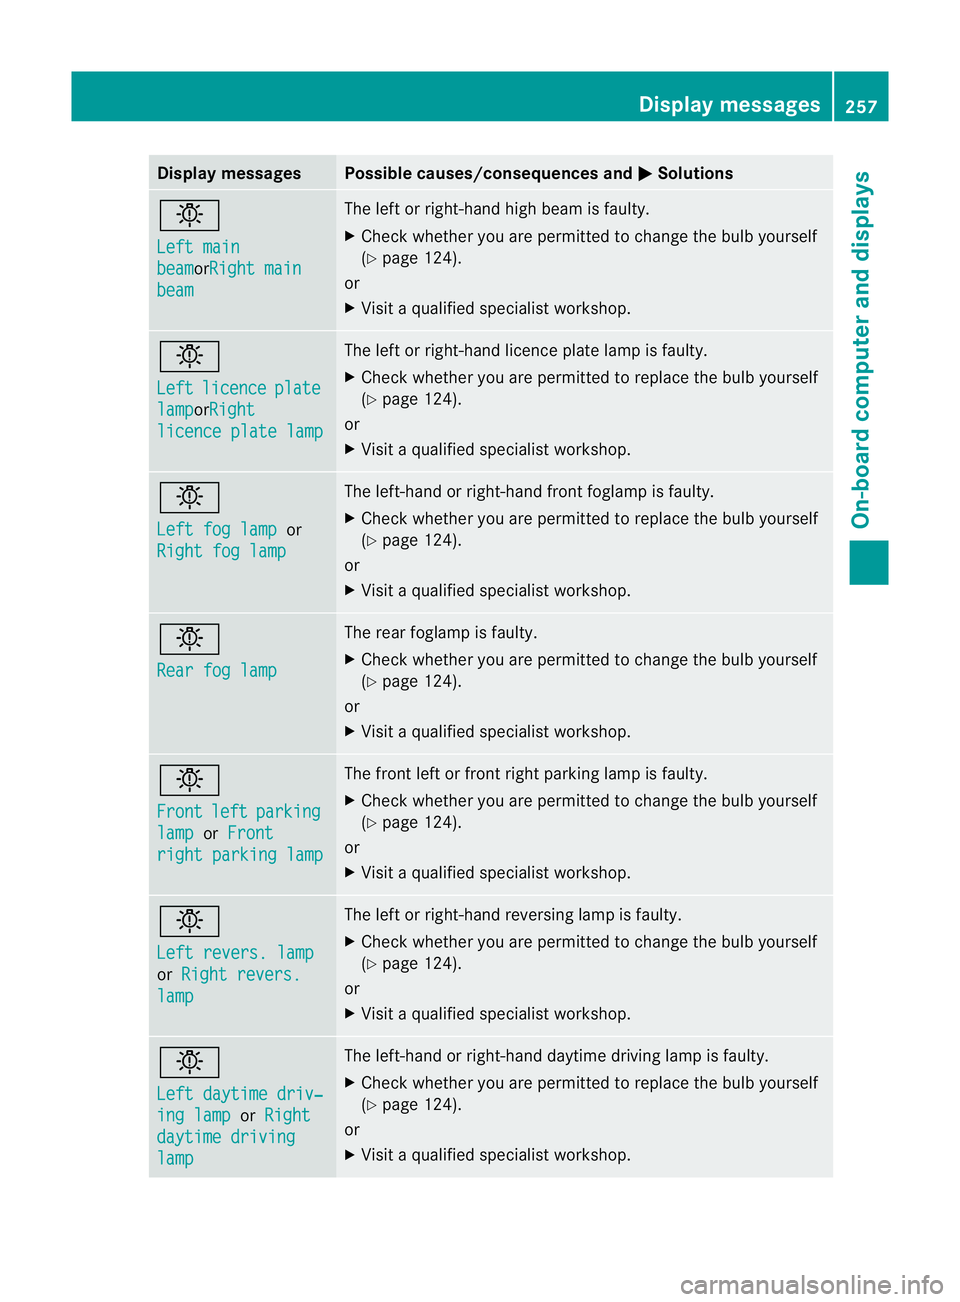
Display messages Possible causes/consequences and
M Solutions
b
Left main
beam orRight main
beam The lef
torright-hand high beam is faulty.
X Check whether you are permitted to change the bulb yourself
(Y page 124).
or
X Visit a qualified specialist workshop. b
Left
licence plate
lamp orRight
licence plate lamp The left or right-hand licence plate lamp is faulty.
X
Check whether you are permitted to replace the bulb yourself
(Y page 124).
or
X Visit a qualified specialist workshop. b
Left fog lamp
or
Right fog lamp The left-hand or right-hand front foglamp is faulty.
X Check whether you are permitted to replace the bulb yourself
(Y page 124).
or
X Visit a qualified specialist workshop. b
Rear fog lamp The rear foglamp is faulty.
X
Check whether you are permitted to change the bulb yourself
(Y page 124).
or
X Visit a qualified specialist workshop. b
Front
left parking
lamp or
Front right parking lamp The front left or front right parking lamp is faulty.
X
Check whether you are permitted to change the bulb yourself
(Y page 124).
or
X Visit a qualified specialist workshop. b
Left revers. lamp
or
Right revers. lamp The left or right-hand reversing lamp is faulty.
X
Check whether you are permitted to change the bulb yourself
(Y page 124).
or
X Visit a qualified specialist workshop. b
Left daytime driv‐
ing lamp or
Right daytime driving
lamp The left-hand or right-hand daytime driving lamp is faulty.
X Check whether you are permitted to replace the bulb yourself
(Y page 124).
or
X Visit a qualified specialist workshop. Display messages
257On-board computer and displays Z