recommended oil MERCEDES-BENZ CLS SHOOTING BRAKE 2012 Owners Manual
[x] Cancel search | Manufacturer: MERCEDES-BENZ, Model Year: 2012, Model line: CLS SHOOTING BRAKE, Model: MERCEDES-BENZ CLS SHOOTING BRAKE 2012Pages: 405, PDF Size: 10.21 MB
Page 22 of 405
Temperature
Coolant .......................................... 228
Coolant (on-board computer) ......... 246
Engine oil (on-board computer) ...... 246
Outside temperature ..................... .228
Setting (climate control) ................134
TEMPOMAT
Function/notes ............................. 171
Theft-deterrent system
ATA (Anti-Theft Alarm system) .........72
Immobiliser ...................................... 72
Through-loading feature ...................293
Timing (RACETIMER) .........................246
Tiredness Assist see ATTENTION ASSIST
TIREFIT kit .......................................... 338
Top Tether ............................................ 57
Total distance recorder ....................230
Tow-away protection ..........................73
Towing Important safety notes ..................346
With the rear axle raised ................348
Towing atrailer
Activ eBlind Spot Assist .................215
Active Lane Keeping Assist ............217
Active Parking Assist .....................197
Axle load, permissible ....................398
Bulb failure indicator for LED
lamps ............................................. 223
ESP ®
(Electroni cStability Pro-
gram) ............................................... 69
Towing away
Fitting the towing eye. ...................347
Removing the towing eye. ..............348
With both axles on the ground .......348
Tow-starting
Emergency engine starting ............349
Important safety notes ..................346
Trailer
Display message ............................ 274
Trailer coupling
see Towing atrailer
Trailer towing
7-pin connector ............................. 223
Blind Spot Assist ............................ 210
Cleaning the trailer tow hitch ......... 329
Coupling up atrailer ...................... 221Decoupling
atrailer ....................... 221
Driving tips .................................... 219
Folding in the ball coupling ............221
Folding out the ball coupling ..........220
Important safety notes ..................217
Lights displa ymessage .................. 255
Mounting dimensions ....................396
Parktroni c...................................... 193
Power supply ................................. 222
Shift range ..................................... 157
Trailer loads ................................... 398
Transmission
see Automatic transmission
Transmission position display .........155
Transmission position display
(DIRECT SELECTl ever)...................... 155
Transporting the vehicle ..................349
Trim pieces (cleaning instructions) .331
Trip computer (on-board com-
puter) ................................................. .231
Trip meter Calling up ....................................... 230
Resetting (on-board computer) ......232
Turn signal
see Turn signals
Turn signals
Switching on/off ........................... 117
TV
Operating (on-board computer) .....234
see Separate operating instructions
Two-way radio
Frequencies ................................... 383
Installatio n..................................... 383
Transmission output (maximum) .... 383
Type identification plate
see Vehicle identification plate
Tyre pressure
Calling up (on-board computer) .....360
Display message ............................ 268
Not reached (TIREFIT) ....................339
Reached (TIREFIT) ..........................339
Recommended ............................... 357
Tyre pressure loss warning
Important safety notes ..................358
Restarting ...................................... 359 Index
19
Page 330 of 405
R
seals
R trim elements
R ventilation slots
Damaged seals or electrical components
can lead to leaks or failures.
Cleaning the paintwork !
Do not affix:
R stickers
R films
R magnetic plates or similari tems
to painted surfaces .You could otherwise
damage the paintwork.
Scratches, corrosive deposits, areas affected
by corrosion and damage caused by inade-
quate care cannot always be completely
repaired. In such cases, visit a qualified spe-
cialist workshop.
X Remove impurities immediately, where
possible, whilst avoiding rubbing too hard.
X Soak insect remains with insect remover
and rinse off the treated areas afterwards.
X Soak bird droppings with water and rinse
off the treated areas afterwards.
X Remove coolant, brake fluid, tree resin,
oils, fuels and greases by rubbing gently
with a cloth soaked in petroleum ether or
lighter fluid.
X Use tar remover to remove tar stains.
X Use silicone remover to remove wax.
Care and treatment of matt paintwork !
Never polish the vehicle or the light alloy
wheels. Polishing makes the paintwork
shiny.
! The following may cause the paint to
become shiny and thus reduce the matt
effect:
R Vigorous rubbing with unsuitable mate-
rials.
R Frequent use of car washes.
R Washing the vehicle in direct sunlight. !
Never use paint cleaner, buffing or pol-
ishing products, or gloss preserver, e.g.
wax. These products are only suitable for
high-gloss surfaces. Their use on vehicles
with matt finish leads to considerable sur-
face damage (shiny, spotted areas).
Always have paintwork repairs performed
at a qualified specialist workshop, e.g. a
Mercedes-Benz Service Centre.
! Do not use wash programs with a hot wax
treatment under any circumstances.
Observe these notes if your vehicle has a
clear matt finish. This will help you to avoid
damage to the paintwork due to incorrect
treatment.
These notes also apply to light-alloy wheels
with a clear matt finish.
i The vehicle should preferably be washed
by hand using a soft sponge, car shampoo
and plenty of water.
i Use only insect remover and car shampoo
from the range of recommended and
approved Mercedes-Benz care products. Cleaning vehicle parts
Cleaning the wheels !
Do not use acidic wheel cleaning products
to remove brake dust. This could damage
wheel bolts and brake components.
! Do not park up the vehicle for an extended
period straight after cleaning it, particularly
after having cleaned the wheels with wheel
cleaner. Wheel cleaners could cause
increased corrosion of the brake discs and
brake pads/linings. For this reason, you
should drive for a few minutes after clean-
ing. Braking heats the brake discs and the
brake pads/linings, thus drying them. The
vehicle can then be parked up. Care
327Maintenance and care Z
Page 333 of 405
Interior care
Cleaning the display !
Forc leaning, do not use any of the fol-
lowing:
R alcohol-based thinner or petrol
R abrasive cleaning agents
R commercially-available household clean-
ing agents
These may damage the display surface. Do
not put pressure on the display surface
when cleaning. This could lead to irrepara-
ble damage to the display.
X Before cleaning the display, make sure that
it is switched off and has cooled down.
X Clean the display surface using a commer-
cially available microfibre cloth and TFT/
LCD display cleaner.
X Dry the display surface using a dry micro-
fibre cloth.
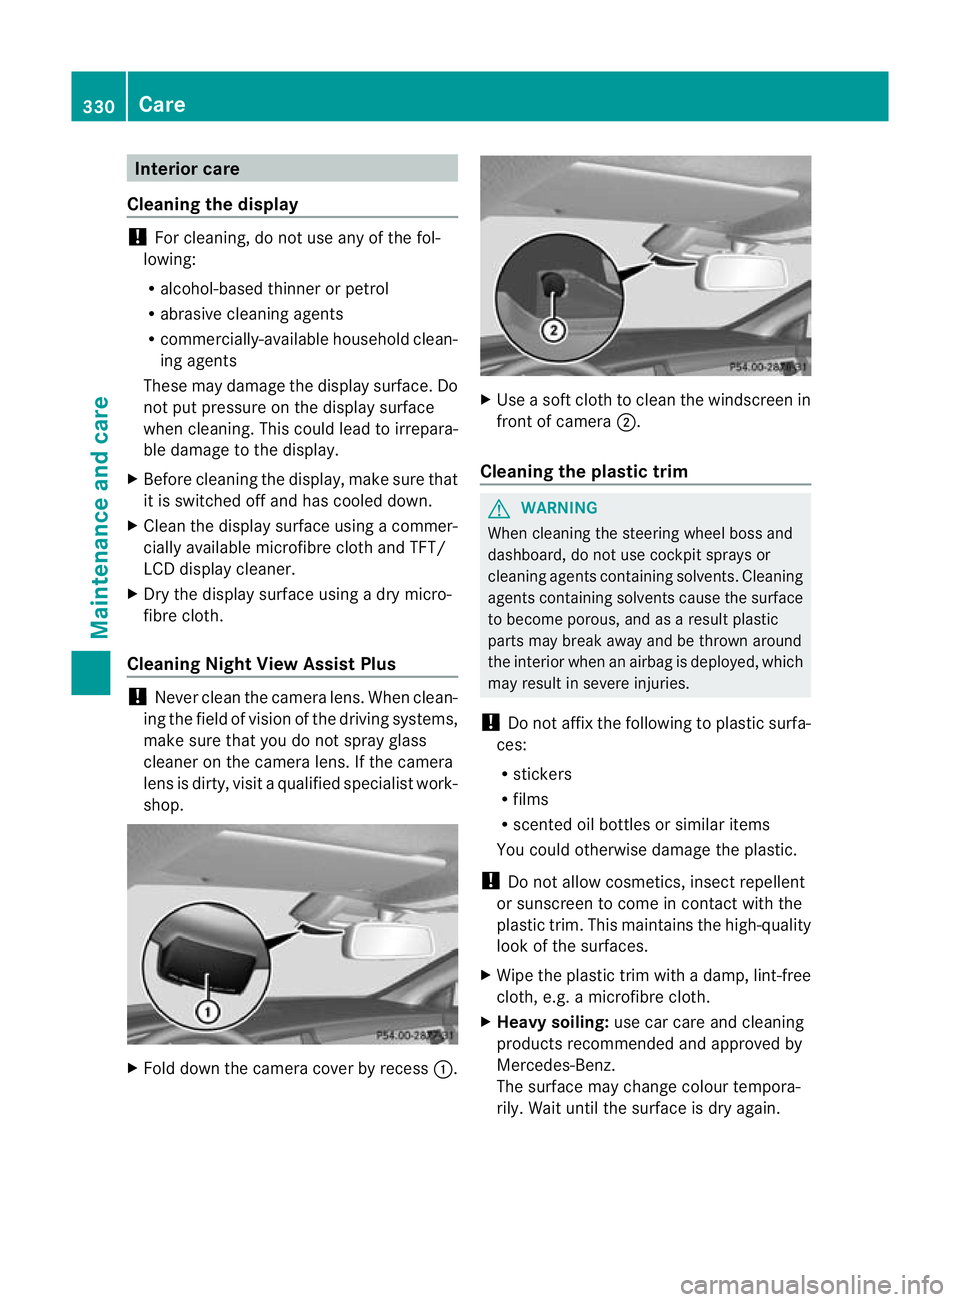
Cleaning Nigh tView Assist Plus !
Never clean the camera lens. When clean-
ing the field of vision of the driving systems,
make sure that you do not spray glass
cleaner on the camera lens. If the camera
lens is dirty, visit a qualified specialist work-
shop. X
Fold down the camera cover by recess :. X
Use a soft cloth to clean the windscreen in
front of camera ;.
Cleaning the plastic trim G
WARNING
When cleaning the steering wheel boss and
dashboard, do not use cockpit sprays or
cleaning agents containing solvents. Cleaning
agents containing solvents cause the surface
to become porous, and as aresult plastic
parts may break away and be thrown around
the interior when an airbag is deployed, which
may result in severe injuries.
! Do not affix the following to plastic surfa-
ces:
R stickers
R films
R scented oil bottles or similar items
You could otherwise damage the plastic.
! Do not allow cosmetics, insect repellent
or sunscreen to come in contact with the
plastic trim .This maintains the high-quality
look of the surfaces.
X Wipe the plastic trim with a damp, lint-free
cloth, e.g. a microfibre cloth.
X Heavy soiling: use car care and cleaning
products recommended and approved by
Mercedes-Benz.
The surface may change colour tempora-
rily. Wait until the surface is dry again. 330
CareMaintenance and care
Page 334 of 405
Cleaning the steering wheel and gear or
selector lever X
Thoroughly wipe with a damp cloth or use
leather care agents that have been recom-
mended and approved by Mercedes-Benz.
Cleaning wooden trim and trim ele-
ments !
Do no tuse solvent-based cleaning agents
such as tar remover, wheel cleaners, pol-
ishes or waxes. There is otherwise a risk of
damaging the surface.
X Wipe the wooden trim and trim elements
with a damp, lint-free cloth, e.g. a microfi-
bre cloth.
X Heavy soiling: use car care and cleaning
products recommended and approved by
Mercedes-Benz.
Cleaning the seat covers General notes
!
Do not use microfibre cloths to clean gen-
uine leather, artificial leather or
Alcantara® covers. If used often, these can
damage the cover.
i Note that regularc are is essential to
make sure that the appearance and com-
fort of the covers are retained over time.
Genuine leather seat covers
Leather is a natural product.
It displays the characteristics of a natural sur-
face, e.g.
R deviations in structure
R evidence of growth and injury
R sligh tdifferences in colour
These are features which are special to
leathe rand do not indicate faults in the mate-
rial. !
To retain the natural appearance of the
leather, observe the following cleaning
instructions:
R Clea ngenuine leather covers carefully
with a damp cloth and then wipe the cov-
ers down with a dry cloth.
R Make sure that the leather does not
become soaked. It may otherwise
become rough and cracked.
R Only use leather care agents that have
been tested and approved by Mercedes-
Benz. You can obtain these from a quali-
fied specialist workshop.
Seat covers made from other materials
! Observe the following when cleaning:
R Clean artificial leather covers with a cloth
moistened with a solution containing
1% detergen t(e.g. washing-up liquid).
R Clean cloth covers with a microfibre
cloth moistened with a solution contain-
ing 1% detergen t(e.g. washing-up liquid).
Rub carefully, and always wipe entire
seat sections to avoid leaving visible
lines. Leave the seat to dry afterwards.
Cleaning results depend on the type of
dirt and how long it has been there.
R Clean Alcantara® covers with a damp
cloth. Make sure that you wipe entire
seat sections to avoid leaving visible
lines.
Cleaning the seat belts !
Do not clean the seat belts using chemical
cleaning agents .Do not dry the seat belts
at temperatures above 80 † or in direct
sunlight.
X Use clean, lukewarm water and soap solu-
tion. Care
331Maintenance and care Z
Page 392 of 405
<10p
pm) is used for refuelling, the odours
are reduced.
Additives
! Operating the engine with fuel additives
can cause wear in the fuel high-pressure
pump and contaminate the entire fuel sys-
tem. The repair costs are high. This does
not include additives for the removal and
prevention of residue build-up. Petrol must
only be mixed with additives recommended
by Mercedes-Benz .More information about
recommended additives can be obtained
from any Mercedes-Benz Service Centre.
One of the major problems with low-grade
fuel is the creation of carbon deposits during
the process of burning fuel. Mercedes-Benz
recommends that you use fuel brands that
have additives.
If you use fuels without these additives for a
longer period of time, there may be a build-up
of carbon deposits. These will form especially
on the inlet valves and in the combustion
chamber.
This could lead to engine running problems,
e.g.:
R longer engine warm-up phase
R uneven idle
R engine noise
R misfiring
R loss of power
In areas where petrol with the required addi-
tives is not available, carbon deposits can
build up. In this case, Mercedes-Benz recom-
mends the use of additives that have been
approved for Mercedes-Benz vehicles; see
http://bevo.mercedes-benz.com.
The quality of the fuel available in some coun-
tries may not be sufficient .Residue could
build up as a result. In such cases, and in
consultation with a Mercedes-Benz Service
Centre, the petrol may be mixed with the
additive recommended by Mercedes-Benz
(part no. A000989254510). You must
observe the notes and mixing ratios specified
on the container. Consult a Mercedes-Benz Service Centre to
view a list of approved products. Observe the
instructions for use in the product descrip-
tion.
Do not mix other fuel additives with fuel. This
causes unnecessary costs and could damage
the engine.
Diesel (EN 590)
Fuel grade
G
WARNING
If you mix diesel fuel with petrol, the flash
point of this fuel mixture is lower than that of
pure diesel fuel. When the engine is running,
components in the exhaust system may over-
heat unnoticed. There is arisk of fire.
Never refuel with petrol. Never add petrol to
diesel fuel.
! When refuelling, only use diesel fuel that
conforms to the European standard EN 590
or is of equivalen tquality. Fuel that does
not conform to EN 590 can lead to
increased wear as well as damage to the
engine and exhaust system.
! Do no tuse the following:
R marine diesel
R heating oil
R bio-diesel
R vegetable oil
R petrol
R paraffin
R kerosene
Do not mix such fuels with diesel fuel and
do not use any special additives. This can
otherwise lead to engine damage.T his
does not include flow improver additives.
For further information, see "Flow improv-
ers".
! Vehicles with adiesel particle filter: in
countries outside the EU, only refuel with
low-sulphur Euro diesel with a sulphur con- Service products and capacities
389Technical data Z
Page 393 of 405
tent under 50 pp
m; otherwisethe emission
control syste mcould be damaged.
! Vehicles without adiesel particle fil-
ter: in countries where only diesel fuel with
a high sulphur conten tis available, you will
need to carry out your vehicle's oil change
at shorter intervals. More information
aboutt he interval for oil change can be
obtained from any qualified specialist
workshop.
Usually you will find information about the
fuel grade on the pump. If you cannot find the
label on the petrol pump, ask the filling sta-
tion staff.
Information on refuelling (Y page 162).
Low outside temperatures
In winter months, diesel fuel with an improved
cold flow quality is available. In Europe, the
EN 590 standard defines various climate-
dependent temperature categories. Malfunc-
tions can be avoided by refuelling with diesel
fuel that corresponds to the climatic specifi-
cations outlined in EN 590. At unusually low
outside temperatures, it is possible that the
flow characteristics of the diesel fuel could be
insufficient .Accordingly, diesel fuel from
warmer areas may not be suitable for opera-
tion in colder climati cconditions.
i Further information on country-specific
fuel properties can be obtained from oil
companies, e.g. at filling stations.
Flow improvers
To improve the low-temperature resistance of
diesel fuel, a flow improver can be attached.
The effectiveness of a flow improver is not
guaranteed for every fuel.
Only use flow improvers tested and approved
by Mercedes-Benz. During use, please
observe the information on operation.
Correct dosage and sufficient mixing are deci-
sive in improving low-temperature resistance
with the flow improver. Overdosage can
potentially even decrease low-temperature
resistance and must therefore be avoided. Follow the manufacturer's guidelines on dos-
age.
Mix the additive into the diesel in good time,
before the flow characteristics of the diesel
become insufficient. Otherwise, malfunctions
can arise through heating the fuel system,
e.g. through parking in a heated garage.
More information about recommended flow
improvers can be obtained from any qualified
specialist workshop.
Fuel consumption information
H
Environmental note
CO 2(carbon dioxide) is the gas which scien-
tists believe to be principally responsible for
global warming (the greenhouse effect). Your
vehicle's CO 2emissions are directly related to
fuel consumption and therefore depend on:
R efficient use of the fuel by the engine
R driving style
R other non-technical factors, such as envi-
ronmental influences or road conditions
You can minimise your vehicle's CO 2emis-
sions by driving carefully and having it serv-
iced regularly.
The vehicle will use more fuel than usual in
the following situations:
R at very low outside temperatures
R in urban traffic
R on short journeys
R in mountainous terrain
R when towing a trailer
i Only for certain countries: you can find
the current consumption and emission val-
ues of your vehicle in the COC documents
(EU CERTIFICATE OF CONFORMITY). These
documents are delivered with your vehicle.
The consumption figures were in each case
based on the currently applicable version:
R for vehicles that comply with standards
up to and including the EURO 4standard, 390
Service products and capacitiesTechnical data
Page 395 of 405
Model Replacement
amount CLS 250 CDI Blue-
EFFICIENCY
CLS 350 BlueEFFI-
CIENCY 6.5 l
CLS 350 CDI Blue-
EFFICIENCY
CLS 350 CDI
4MATIC BlueEFFI-
CIENCY
CLS 500 BlueEFFI-
CIENCY
CLS 500 4MATIC
BlueEFFICIENCY 8.0 l
CLS 63 AMG
With external oil
cooler: 8.5 l Additives
!
Do not use any additives with the engine
oil.T his could damage the engine.
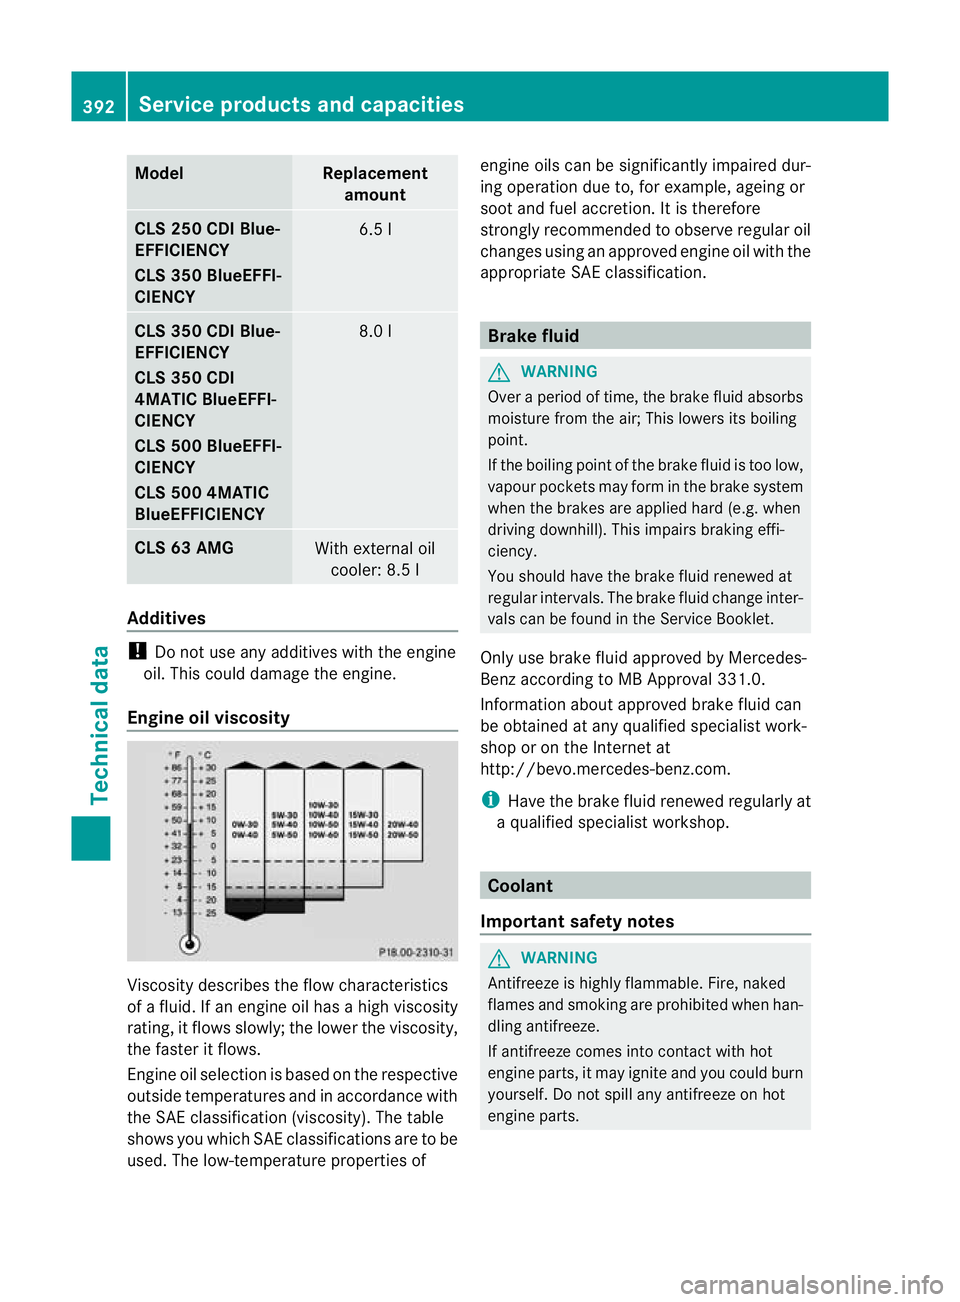
Engine oil viscosity Viscosity describes the flow characteristics
of a fluid. If an engine oil has a high viscosity
rating, it flows slowly; the lower the viscosity,
the faster it flows.
Engine oil selection is based on the respective
outside temperatures and in accordance with
the SAE classification (viscosity). The table
shows you which SAE classifications are to be
used. The low-temperature properties of engine oils can be significantly impaired dur-
ing operation due to, for example, ageing or
soot and fuel accretion. It is therefore
strongly recommended to observe regular oil
changes using an approved engine oil with the
appropriate SAE classification.
Brake fluid
G
WARNING
Over a period of time, the brake fluid absorbs
moisture from the air; This lowers its boiling
point.
If the boiling point of the brake fluid is too low,
vapour pockets may form in the brake system
when the brakes are applied hard (e.g. when
driving downhill). This impairs braking effi-
ciency.
You should have the brake fluid renewed at
regular intervals. The brake fluid change inter-
vals can be found in the Service Booklet.
Only use brake fluid approved by Mercedes-
Benz according to MB Approval 331.0.
Information about approved brake fluid can
be obtained at any qualified specialist work-
shop or on the Internet at
http://bevo.mercedes-benz.com.
i Have the brake fluid renewed regularly at
a qualified specialist workshop. Coolant
Important safety notes G
WARNING
Antifreeze is highly flammable. Fire, naked
flames and smoking are prohibited when han-
dling antifreeze.
If antifreeze comes into contact with hot
engine parts, it may ignite and you could burn
yourself. Do not spill any antifreeze on hot
engine parts. 392
Service products and capacitiesTechnical data