trunk release MERCEDES-BENZ CLS550 2010 W219 Owner's Manual
[x] Cancel search | Manufacturer: MERCEDES-BENZ, Model Year: 2010, Model line: CLS550, Model: MERCEDES-BENZ CLS550 2010 W219Pages: 308, PDF Size: 5.82 MB
Page 9 of 308
Direction of rotation (tires)
..............197
Displays
Digital speedometer ......................113
Distronic
........................................ 131
Maintenance service indicator .......214
Messages in the multifunction
display ........................................... 228
Multifunction display .....................111
Outside temperature .............113, 120
Symbol messages .......................... 238
Text messages ............................... 229
Trip computer ................................ 124
Vehicle status message memory ...117
Vehicle system settings ................. 118
Distronic ............................................ 129
Cleaning system sensor cover ....... 219
Control system .............................. 117
Distance warning function .............137
Distance warning lamp .......... 131, 256
Driving with .................................... 135
Menu ............................................. 132
Messages in the multifunction
display ........................................... 233
Resume function ............................ 134
Sensor cover .................................. 219
Door control panel .............................. 32
Door handles ........................................ 32
Doors
Child safety locks ............................ 56
Locking/unlocking (KEYLESS-GO) ...67
Locking/unlocking (SmartKey) ........ 66
Messages in the multifunction
display ........................................... 241
Opening from inside ......................... 70
Remote door unlock (Tele Aid) ....... 168
Unlocking (Mechanical key) ........... 261
DOT (Department of
Transportation) .................................. 206
Drinking and driving .........................210
Driving
Abroad ........................................... 213
Hydroplaning ................................. 212
Instructions ............................. 97, 210
In winter ........................................ 209
Problems ......................................... 99
Safety systems ................................ 57
Systems ......................................... 127Through standing water
.................213
With Distronic ................................ 135
Driving and parking
Safety notes ..................................... 96
Driving off .................................... 98, 212
Driving safety systems ....................... 57
ABS .................................................. 58
Adaptive Brake ................................ 59
BAS .................................................. 59
EBP .................................................. 59
ESP ®
................................................ 59
ETS .................................................. 60
Driving systems
AIRMATIC DC (Dual Control) .......... 137
Cruise control ................................ 127
Distronic ........................................ 129
Parktronic system ..........................139
Driving tips, automatic
transmission ...................................... 104 E
Easy-entry/exit feature .............. 83, 124
EBP (Electronic Brake
Proportioning) ......................................
59
Electrical system
Improper work on or
modifications ................................... 21
Power outlets ................................. 163
Electrical system (Technical data)
see Vehicle specification
Electronic Stability Program
see ESP ®
Emergency, in case of
First aid kit ..................................... 224
Flat tire .......................................... 271
Hazard warning flasher ....................90
Roadside Assistance ................ 20, 166
Towing the vehicle .........................281
Emergency calls
Tele Aid .......................................... 165
Emergency operations
Remote door unlock (Tele Aid) ....... 168
Trunk lid, emergency release ...........74
Emergency Tensioning Device
see ETD Index
7 219_AKB; 4; 54, en-US
d2ureepe,
Version: 2.11.8.1 2009-05-11T16:21:02+02:00 - Seite 7
Page 19 of 308
Treadwear
...................................... 199
Treadwear indicators .............198, 208
Vehicle maximum load on ..............208
Wear pattern .................................. 200
Winter tires ............................ 208, 291
Tire speed rating .......................203, 207
Top tether see Children in the vehicle
Total load limit ................................... 207
Towing
Towing eye bolt .............................. 282
Vehicle ........................................... 281
Towing eye bolt ................................. 282
Traction ...................................... 199, 207
Transmission see Automatic transmission
Transmission fluid level .................... 180
Transmission gear selector lever see Gear selector lever
Transmission positions ....................103
Traveling abroad ............................... 213
Tread (tires) ....................................... 207
Tread depth (tires) ....................198, 208
Treadwear .......................................... 199
Treadwear indicators (tires) .... 198, 208
Trip computer menu .........................124
Trip odometer, resetting ................... 110
Trunk
Closing ............................................. 72
Fuse box ........................................ 285
Messages in the multifunction
display ........................................... 241
Opening ........................................... 72
Opening/closing system .................. 73
Tie-down hooks .............................. 157
Trunk lid emergency release ............ 74
Unlocking manually .......................262
Valet locking .................................... 75
Turning off the engine ......................101
Turn signals ......................................... 89
Cleaning lenses ............................. 219
Indicator lamps ................................ 28
Messages in the multifunction
display ........................................... 250
Replacing bulbs ............................. 267 U
Uniform Tire Quality Grading
Standards .................................. 199, 208
Units Selecting speedometer display
mode ............................................. 120
Unleaded gasoline, premium ........... 299
Unlocking the vehicle
KEYLESS-GO
.................................... 67
Manually ........................................ 261
SmartKey ......................................... 66
Upholstery, cleaning .........................221
Useful features .................................. 160 V
Valet locking ........................................ 75
Vehicle
Battery ........................................... 278
Care ............................................... 215
Control system .............................. 110
Identification Number (VIN) ........... 288
Locking/unlocking
........................... 66
Lowering (wheel change) ...............276
Modifications and alterations,
Operating safety .............................. 21
Towing ........................................... 281
Unlocking/locking manually .......... 261
Vehicle dimensions
see Vehicle specification
Vehicle Identification Number
(VIN) ................................................... 288
Vehicle jack see Jack
Vehicle level control
see AIRMATIC DC (Dual Control)
Vehicle lighting .................................... 86
Vehicle loading
Instructions .................................... 154
Load limit ....................................... 194
Roof rack ....................................... 155
Ski bag ........................................... 155
Terminology ................................... 205
Vehicle maximum load on the tire ... 208
Vehicle specification
CLS 550 ......................................... 290
CLS 63 AMG .................................. 290 Index
17 219_AKB; 4; 54, en-US
d2ureepe,
Version: 2.11.8.1 2009-05-11T16:21:02+02:00 - Seite 17
Page 64 of 308
X
With the engine running, press ESP ®
switch : until the ESP ®
warning lamp
d in the instrument cluster comes on.
The ESP ®
is switched off. G
Warning!
When the ESP ®
warning lamp d is
illuminated continuously, the ESP ®
is
switched off or is not operational due to a
malfunction. Vehicle stability in standard
driving maneuvers is reduced.
Adapt
your speed and driving to the prevailing
road conditions and to the non-operating
status of the ESP ®
.
! Avoid spinning of a drive wheel for an
extended period with the ESP ®
switched
off. This may cause serious damage to the
drivetrain which is not covered by the
Mercedes-Benz Limited Warranty.
Switching on the ESP ®X
Press ESP ®
switch : until the ESP ®
warning lamp d in the instrument
cluster goes out.
You are now again in normal driving mode
with the ESP ®
switched on. Anti-theft systems
Immobilizer
The immobilizer prevents unauthorized
persons from starting your vehicle.
When leaving the vehicle, always take the
SmartKey with you and lock the vehicle. The
engine can be started by anyone with a valid
SmartKey that is left inside the vehicle.
Activating X
With SmartKey: Remove the SmartKey
from the starter switch.
X With KEYLESS-GO:
Turn off the engine and
open the driver’s door. Deactivating X
Switch on the ignition.
i Starting the engine will also deactivate
the immobilizer.
In the event that the engine cannot be
started (yet the vehicle’s battery is
charged), the system is not operational.
Contact an authorized Mercedes-Benz
Center
or call 1-800-FOR-MERCedes (in the
USA) or 1-800-387-0100 (in Canada). Anti-theft alarm system
Once the alarm system has been armed, a
visual and audible alarm is triggered when
someone opens
R a door
R the trunk
R the hood
The alarm will stay on even if the activating
element, a door, for example, is closed
immediately.
The
alarm system will also be triggered when
R the vehicle is opened with the mechanical
key
R a door is opened from the inside
R the trunk is opened with the emergency
release button
To cancel the alarm after it has been
triggered, see “Canceling the alarm”
(Y page 63). 62
Anti-theft systems
Safety and security
219_AKB; 4; 54, en-US
d2ureepe,
Version: 2.11.8.1 2009-05-11T16:21:02+02:00 - Seite 62
Page 74 of 308
You can open the trunk when the vehicle is
stationary.
A minimum height clearance of 5.9 ft (1.80 m)
is required to open the trunk lid.
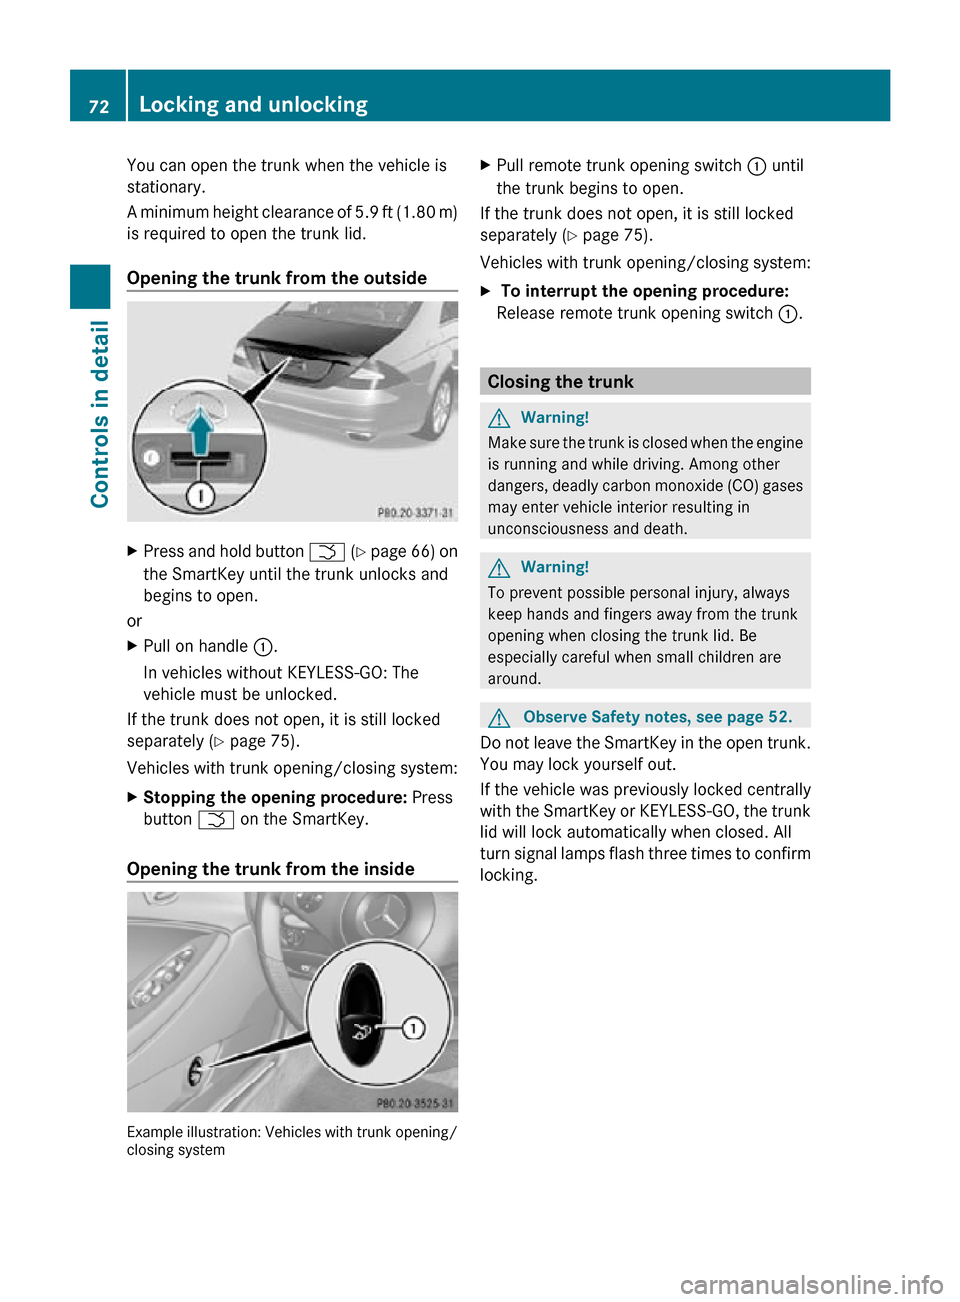
Opening the trunk from the outside
X
Press and hold button F (Y page 66) on
the SmartKey until the trunk unlocks and
begins to open.
or
X Pull on handle :.
In vehicles without KEYLESS-GO: The
vehicle must be unlocked.
If the trunk does not open, it is still locked
separately ( Y page 75).
Vehicles with trunk opening/closing system:
X Stopping the opening procedure: Press
button F on the SmartKey.
Opening the trunk from the inside Example illustration: Vehicles with trunk opening/
closing system X
Pull remote trunk opening switch : until
the trunk begins to open.
If the trunk does not open, it is still locked
separately ( Y page 75).
Vehicles with trunk opening/closing system:
X To interrupt the opening procedure:
Release remote trunk opening switch :. Closing the trunk
G
Warning!
Make sure the trunk is closed when the engine
is running and while driving. Among other
dangers, deadly carbon monoxide (CO) gases
may enter vehicle interior resulting in
unconsciousness and death. G
Warning!
To prevent possible personal injury, always
keep hands and fingers away from the trunk
opening when closing the trunk lid. Be
especially careful when small children are
around. G
Observe Safety notes, see page 52.
Do not leave the SmartKey in the open trunk.
You may lock yourself out.
If the vehicle was previously locked centrally
with the SmartKey or KEYLESS-GO, the trunk
lid will lock automatically when closed. All
turn signal lamps flash three times to confirm
locking. 72
Locking and unlockingControls in detail
219_AKB; 4; 54, en-US
d2ureepe,
Version: 2.11.8.1 2009-05-11T16:21:02+02:00 - Seite 72
Page 75 of 308
Closing the trunk from the outside
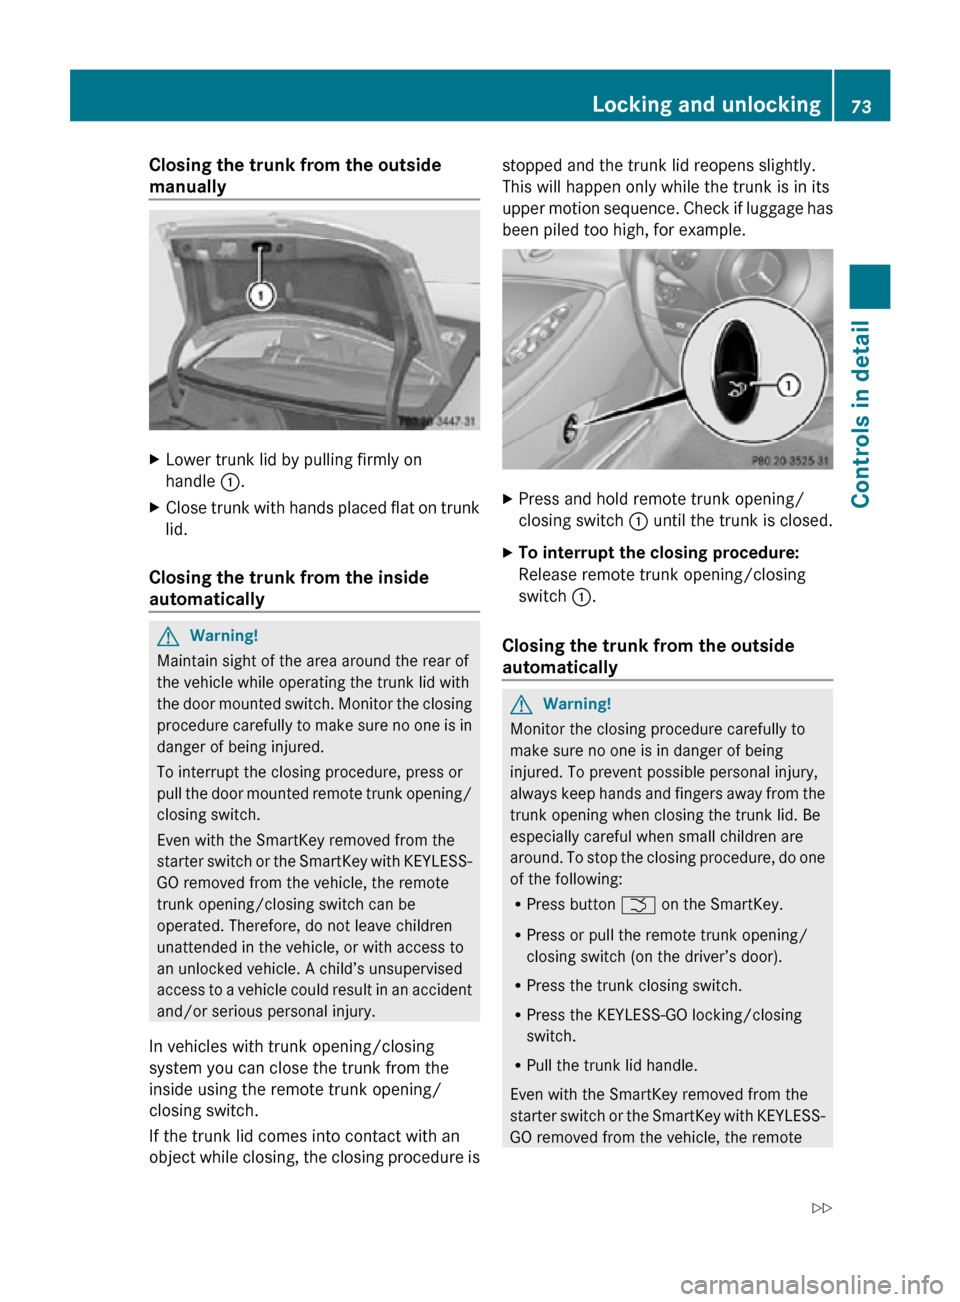
manually
X
Lower trunk lid by pulling firmly on
handle :.
X Close trunk with hands placed flat on trunk
lid.
Closing the trunk from the inside
automatically G
Warning!
Maintain sight of the area around the rear of
the vehicle while operating the trunk lid with
the door mounted switch. Monitor the closing
procedure carefully to make sure no one is in
danger of being injured.
To interrupt the closing procedure, press or
pull the door mounted remote trunk opening/
closing switch.
Even with the SmartKey removed from the
starter switch or the SmartKey with KEYLESS-
GO removed from the vehicle, the remote
trunk opening/closing switch can be
operated. Therefore, do not leave children
unattended in the vehicle, or with access to
an unlocked vehicle. A child’s unsupervised
access to a vehicle could result in an accident
and/or serious personal injury.
In vehicles with trunk opening/closing
system you can close the trunk from the
inside using the remote trunk opening/
closing switch.
If the trunk lid comes into contact with an
object while closing, the closing procedure is stopped and the trunk lid reopens slightly.
This will happen only while the trunk is in its
upper motion sequence. Check if luggage has
been piled too high, for example.
X
Press and hold remote trunk opening/
closing switch : until the trunk is closed.
X To interrupt the closing procedure:
Release remote trunk opening/closing
switch :.
Closing the trunk from the outside
automatically G
Warning!
Monitor the closing procedure carefully to
make sure no one is in danger of being
injured. To prevent possible personal injury,
always keep hands and fingers away from the
trunk opening when closing the trunk lid. Be
especially careful when small children are
around. To stop the closing procedure, do one
of the following:
R Press button F on the SmartKey.
R Press or pull the remote trunk opening/
closing switch (on the driver’s door).
R Press the trunk closing switch.
R Press the KEYLESS-GO locking/closing
switch.
R Pull the trunk lid handle.
Even with the SmartKey removed from the
starter switch or the SmartKey with KEYLESS-
GO removed from the vehicle, the remote Locking and unlocking
73Controls in detail
219_AKB; 4; 54, en-US
d2ureepe, Version: 2.11.8.1 2009-05-11T16:21:02+02:00 - Seite 73 Z
Page 76 of 308
trunk opening/closing switch can be
operated. Therefore, do not leave children
unattended in the vehicle, or with access to
an unlocked vehicle. A child’s unsupervised
access to a vehicle could result in an accident
and/or serious personal injury.
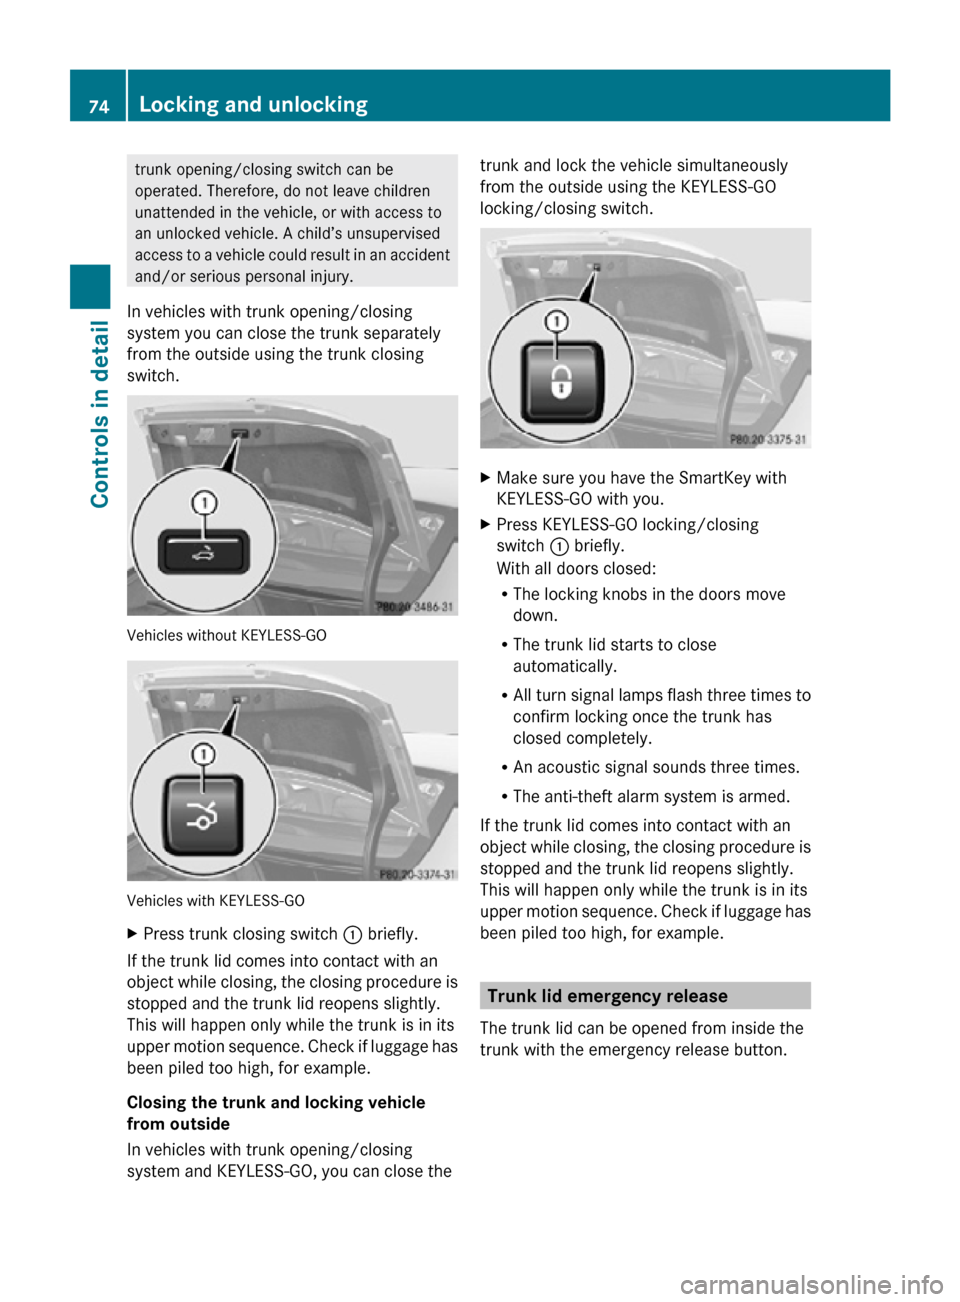
In vehicles with trunk opening/closing
system you can close the trunk separately
from the outside using the trunk closing
switch. Vehicles without KEYLESS-GO
Vehicles with KEYLESS-GO
X
Press trunk closing switch : briefly.
If the trunk lid comes into contact with an
object while closing, the closing procedure is
stopped and the trunk lid reopens slightly.
This will happen only while the trunk is in its
upper motion sequence. Check if luggage has
been piled too high, for example.
Closing the trunk and locking vehicle
from outside
In vehicles with trunk opening/closing
system and KEYLESS-GO, you can close the trunk and lock the vehicle simultaneously
from the outside using the KEYLESS-GO
locking/closing switch.
X
Make sure you have the SmartKey with
KEYLESS-GO with you.
X Press KEYLESS-GO locking/closing
switch : briefly.
With all doors closed:
R
The locking knobs in the doors move
down.
R The trunk lid starts to close
automatically.
R All turn signal lamps flash three times to
confirm locking once the trunk has
closed completely.
R An acoustic signal sounds three times.
R The anti-theft alarm system is armed.
If the trunk lid comes into contact with an
object while closing, the closing procedure is
stopped and the trunk lid reopens slightly.
This will happen only while the trunk is in its
upper motion sequence. Check if luggage has
been piled too high, for example. Trunk lid emergency release
The trunk lid can be opened from inside the
trunk with the emergency release button. 74
Locking and unlockingControls in detail
219_AKB; 4; 54, en-US
d2ureepe,
Version: 2.11.8.1 2009-05-11T16:21:02+02:00 - Seite 74
Page 77 of 308
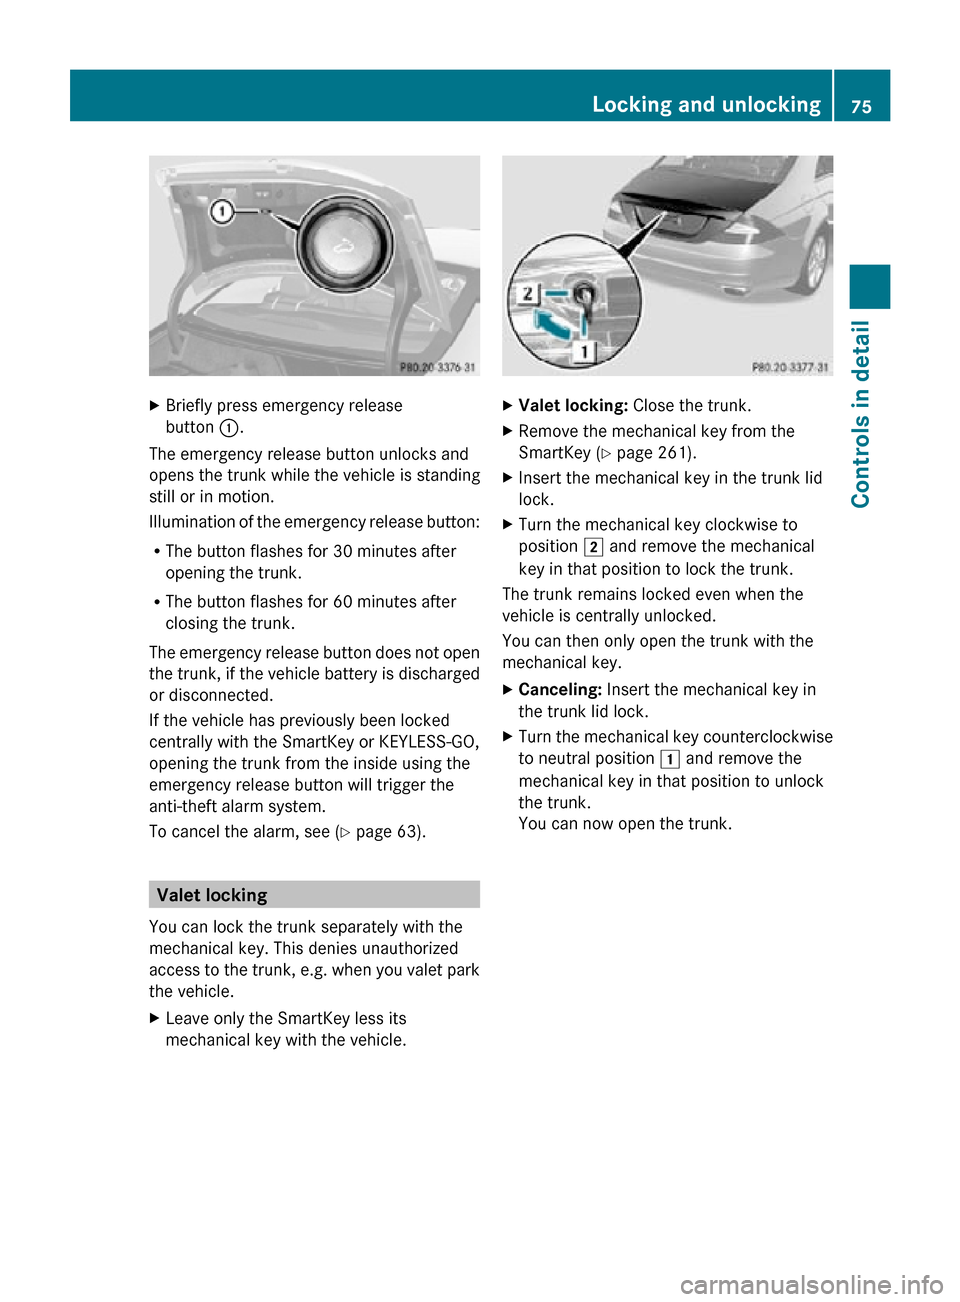
X
Briefly press emergency release
button :.
The emergency release button unlocks and
opens the trunk while the vehicle is standing
still or in motion.
Illumination of the emergency release button:
R The button flashes for 30 minutes after
opening the trunk.
R The button flashes for 60 minutes after
closing the trunk.
The emergency release button does not open
the trunk, if the vehicle battery is discharged
or disconnected.
If the vehicle has previously been locked
centrally with the SmartKey or KEYLESS-GO,
opening the trunk from the inside using the
emergency release button will trigger the
anti-theft alarm system.
To cancel the alarm, see ( Y page 63).Valet locking
You can lock the trunk separately with the
mechanical key. This denies unauthorized
access to the trunk, e.g. when you valet park
the vehicle.
X Leave only the SmartKey less its
mechanical key with the vehicle. X
Valet locking: Close the trunk.
X Remove the mechanical key from the
SmartKey (Y page 261).
X Insert the mechanical key in the trunk lid
lock.
X Turn the mechanical key clockwise to
position 2 and remove the mechanical
key in that position to lock the trunk.
The trunk remains locked even when the
vehicle is centrally unlocked.
You can then only open the trunk with the
mechanical key.
X Canceling: Insert the mechanical key in
the trunk lid lock.
X Turn the mechanical key counterclockwise
to neutral position 1 and remove the
mechanical key in that position to unlock
the trunk.
You can now open the trunk. Locking and unlocking
75Controls in detail
219_AKB; 4; 54, en-US
d2ureepe, Version: 2.11.8.1 2009-05-11T16:21:02+02:00 - Seite 75 Z
Page 160 of 308
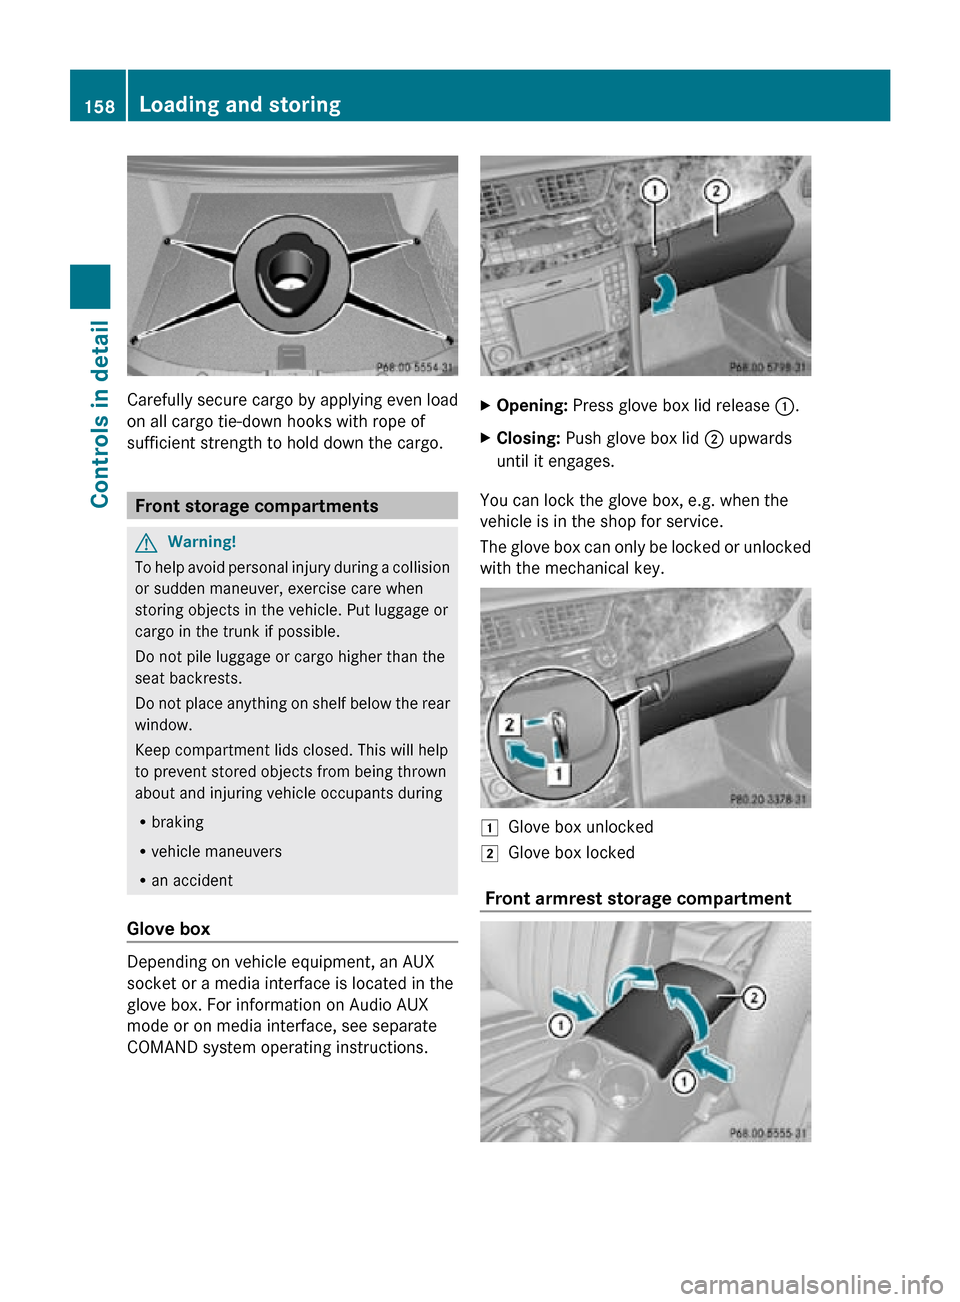
Carefully secure cargo by applying even load
on all cargo tie-down hooks with rope of
sufficient strength to hold down the cargo.
Front storage compartments
G
Warning!
To help avoid personal injury during a collision
or sudden maneuver, exercise care when
storing objects in the vehicle. Put luggage or
cargo in the trunk if possible.
Do not pile luggage or cargo higher than the
seat backrests.
Do not place anything on shelf below the rear
window.
Keep compartment lids closed. This will help
to prevent stored objects from being thrown
about and injuring vehicle occupants during
R braking
R vehicle maneuvers
R an accident
Glove box Depending on vehicle equipment, an AUX
socket or a media interface is located in the
glove box. For information on Audio AUX
mode or on media interface, see separate
COMAND system operating instructions. X
Opening: Press glove box lid release :.
X Closing: Push glove box lid ; upwards
until it engages.
You can lock the glove box, e.g. when the
vehicle is in the shop for service.
The glove box can only be locked or unlocked
with the mechanical key. 1
Glove box unlocked
2 Glove box locked
Front armrest storage compartment 158
Loading and storingControls in detail
219_AKB; 4; 54, en-US
d2ureepe,
Version: 2.11.8.1 2009-05-11T16:21:02+02:00 - Seite 158
Page 265 of 308
X
Insert mechanical key ; into the driver’s
door lock.
X Turn mechanical key ; clockwise to
position 1.
The driver’s door is locked.
X Turn mechanical key ; back and remove
it from the driver’s door lock.
i This procedure does not arm the anti-
theft alarm system, nor does it lock the fuel
filler flap. Manually unlocking the gear selector
lever
If the vehicle’s electrical system is
malfunctioning, the gear selector lever could
remain locked in park position P. In this case
the gear selector lever can be unlocked
manually, e.g. to tow the vehicle.
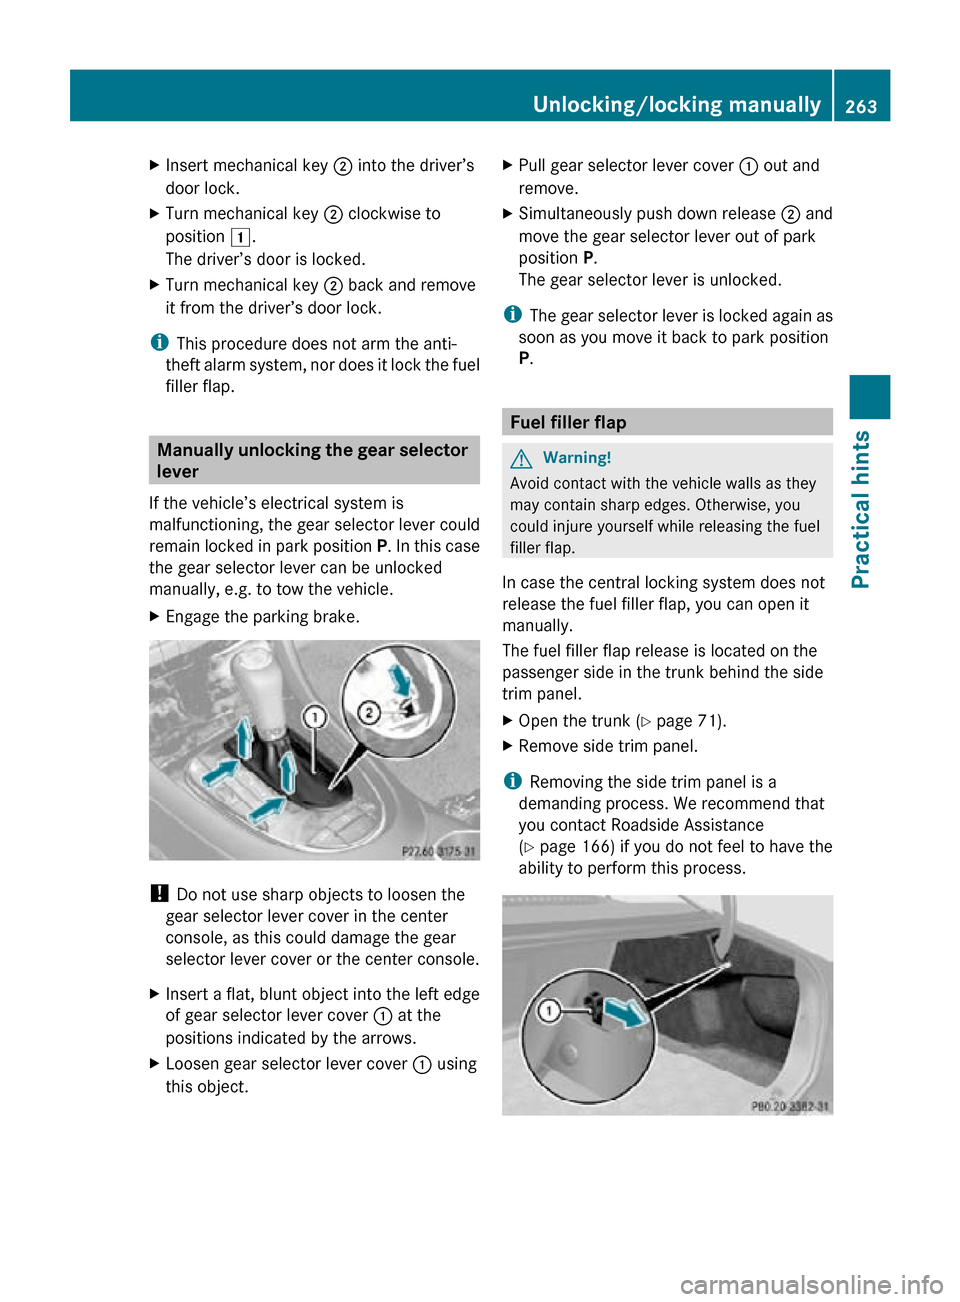
X Engage the parking brake. !
Do not use sharp objects to loosen the
gear selector lever cover in the center
console, as this could damage the gear
selector lever cover or the center console.
X Insert a flat, blunt object into the left edge
of gear selector lever cover : at the
positions indicated by the arrows.
X Loosen gear selector lever cover : using
this object. X
Pull gear selector lever cover : out and
remove.
X Simultaneously push down release ; and
move the gear selector lever out of park
position P.
The gear selector lever is unlocked.
i The gear selector lever is locked again as
soon as you move it back to park position
P. Fuel filler flap
G
Warning!
Avoid contact with the vehicle walls as they
may contain sharp edges. Otherwise, you
could injure yourself while releasing the fuel
filler flap.
In case the central locking system does not
release the fuel filler flap, you can open it
manually.
The fuel filler flap release is located on the
passenger side in the trunk behind the side
trim panel.
X Open the trunk (Y page 71).
X Remove side trim panel.
i Removing the side trim panel is a
demanding process. We recommend that
you contact Roadside Assistance
(Y page 166) if you do not feel to have the
ability to perform this process. Unlocking/locking manually
263Practical hints
219_AKB; 4; 54, en-US
d2ureepe, Version: 2.11.8.1 2009-05-11T16:21:02+02:00 - Seite 263 Z
Page 266 of 308
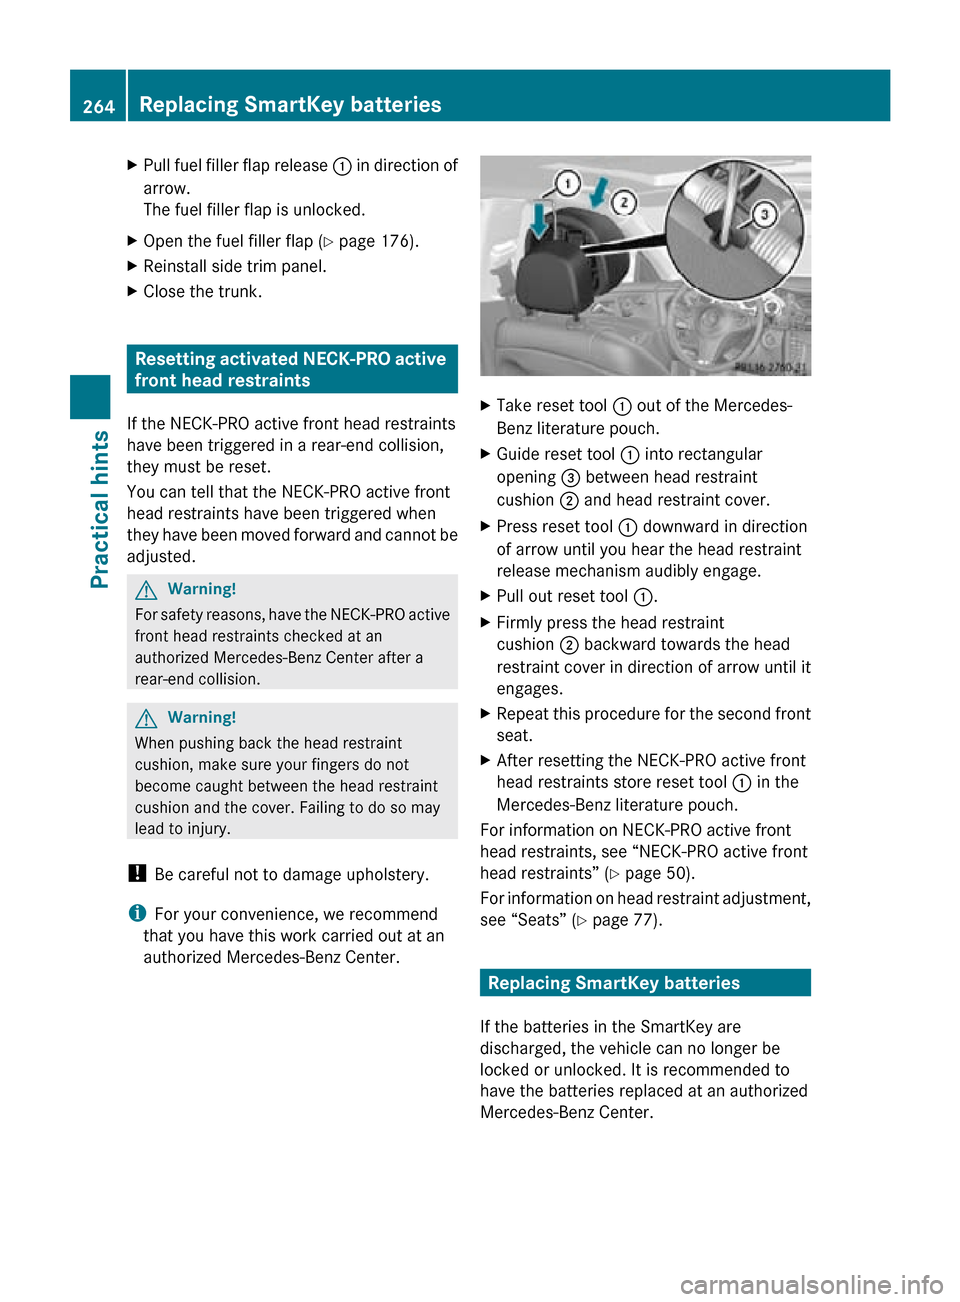
X
Pull fuel filler flap release : in direction of
arrow.
The fuel filler flap is unlocked.
X Open the fuel filler flap ( Y page 176).
X Reinstall side trim panel.
X Close the trunk. Resetting activated NECK-PRO active
front head restraints
If the NECK-PRO active front head restraints
have been triggered in a rear-end collision,
they must be reset.
You can tell that the NECK-PRO active front
head restraints have been triggered when
they have been moved forward and cannot be
adjusted. G
Warning!
For safety reasons, have the NECK-PRO active
front head restraints checked at an
authorized Mercedes-Benz Center after a
rear-end collision. G
Warning!
When pushing back the head restraint
cushion, make sure your fingers do not
become caught between the head restraint
cushion and the cover. Failing to do so may
lead to injury.
! Be careful not to damage upholstery.
i For your convenience, we recommend
that you have this work carried out at an
authorized Mercedes-Benz Center. X
Take reset tool : out of the Mercedes-
Benz literature pouch.
X Guide reset tool : into rectangular
opening = between head restraint
cushion ; and head restraint cover.
X Press reset tool : downward in direction
of arrow until you hear the head restraint
release mechanism audibly engage.
X Pull out reset tool :.
X Firmly press the head restraint
cushion ; backward towards the head
restraint cover in direction of arrow until it
engages.
X Repeat this procedure for the second front
seat.
X After resetting the NECK-PRO active front
head restraints store reset tool : in the
Mercedes-Benz literature pouch.
For information on NECK-PRO active front
head restraints, see “NECK-PRO active front
head restraints” ( Y page 50).
For information on head restraint adjustment,
see “Seats” ( Y page 77). Replacing SmartKey batteries
If the batteries in the SmartKey are
discharged, the vehicle can no longer be
locked or unlocked. It is recommended to
have the batteries replaced at an authorized
Mercedes-Benz Center. 264
Replacing SmartKey batteriesPractical hints
219_AKB; 4; 54, en-US
d2ureepe,
Version: 2.11.8.1 2009-05-11T16:21:02+02:00 - Seite 264