ECU MERCEDES-BENZ E-Class 2012 W212 Comand Manual
[x] Cancel search | Manufacturer: MERCEDES-BENZ, Model Year: 2012, Model line: E-Class, Model: MERCEDES-BENZ E-Class 2012 W212Pages: 234, PDF Size: 6.74 MB
Page 119 of 234
mobil
ephone (Ypag e119). IfCOMAND
does notfind yourmobile phone, external
authorization (Ypage 118)maybe
necessary.
i Ifyou callupthe telephone listagain, the
unauthorized devicesareremoved fromthe
list. Inthis case, startanew search to
update theBluetooth ®
telephone list.
Authoriz ing(registering) amobile
ph one Opt
ion1:usin gth epa sskey (access code)
X In theBluet ooth®
te lepho neslist,selec tthe
not yetauthorized mobilephonebyturning
cVd theCOMAND controller.
X Select thelistsymbol tothe right ofthe
entr yby sliding VYtheCOMAND
cont roller andpress Wtoconfirm .
X Select Authorize and
press Wtoconfirm .
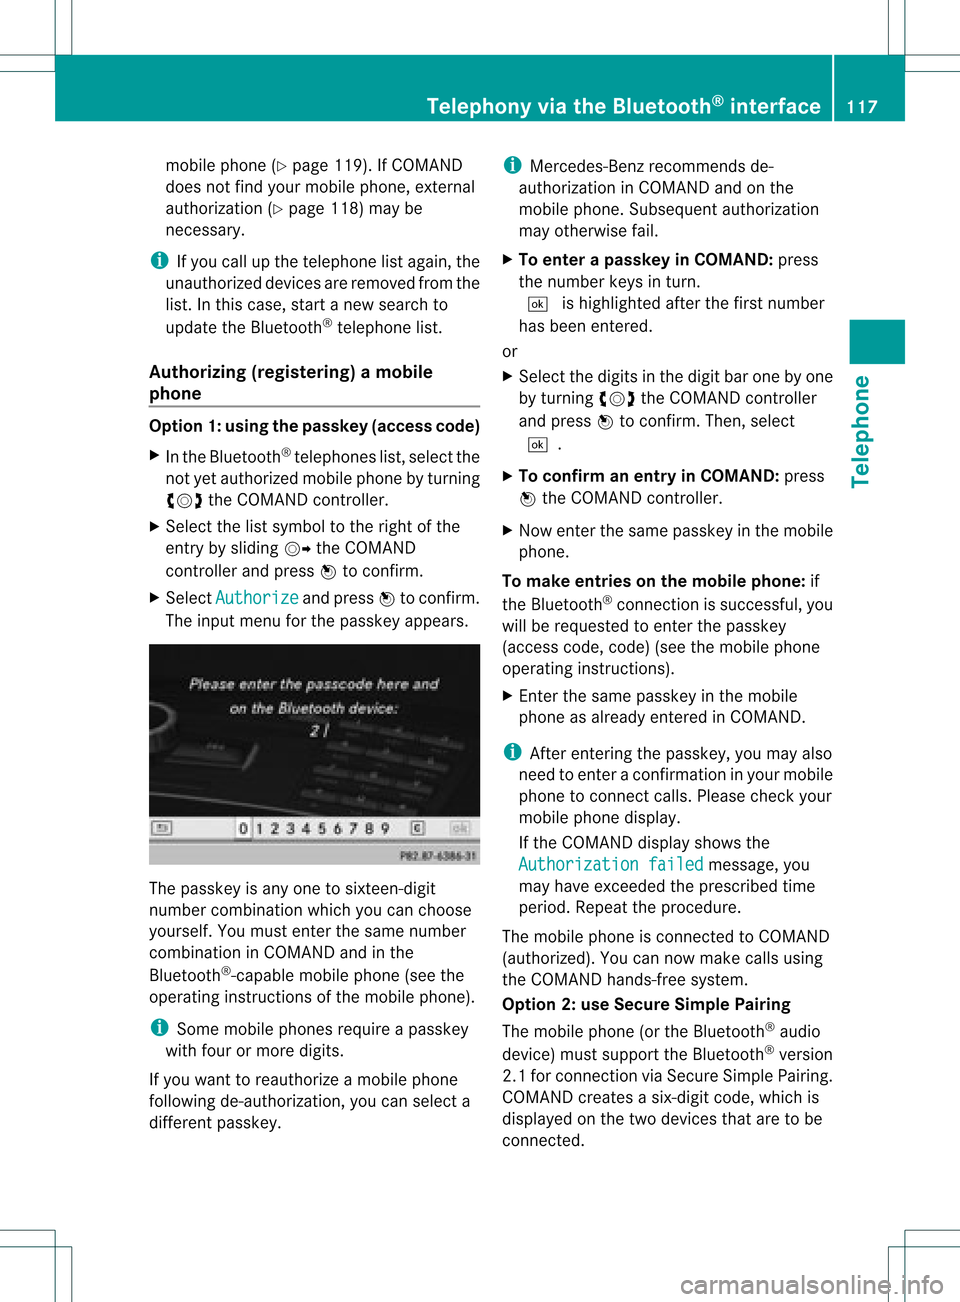
The input menu forthe passkey appears. The
passkey isany one tosixteen- digit
number combination whichyoucan choose
yourself. Youmust enter thesame number
combination inCOMAND andinthe
Bluetooth ®
-capable mobilephone(seethe
operating instructionsofthe mobile phone).
i Some mobile phones requireapasskey
with fourormore digits.
If you want toreauthorize amobile phone
following <0004000500250001001500140008000F00120009001C000100140009000F000E
0032V youcan select a
different passkey. i
Mercedes-Ben zrecomm endsde-
authoriz ationinCOMAND andonthe
mobile phone. Subsequent authorization
may other wisefail.
X To enter apassk eyinCOMAND: press
the number keysinturn .
¬ ishighlighted afterthefirst number
has been entered.
or
X Select thedigits inthe digit barone byone
by turn ingcVd theCOMAND controller
and press Wtocon firm. Then, select
¬.
X To confirm anentry inCOMAND: press
W the COMAND controller.
X Now enterthe same passkey inthe mobile
phone.
To mak eentries onthe mobile phone:if
the Bluetoot h®
con nection issuccess ful,you
will berequested toent erthe passkey
(access code,code) (seethemobile phone
operatin ginst ruct ions).
X En ter the same passkey inthe mobile
phone asalready entered inCOMAND .
i Afterent ering thepasskey, youmay also
need toent eracon firmat ioninyour mobile
phone tocon nectcalls. Pleas ech eck your
mob ilephon edispl ay.
If th eCOMA NDdispl aysho wsthe
Aut horizationfai led mes
sage, you
may have excee ded thepres cribed time
peri od.Repeat thepro ced ure.
The mob ilephon eis co nn ect edtoCOMA ND
(auth orized). Youcannowm ake calls using
th eCOMA NDhands-free syst em.
Opt ion 2:use Secur eSim plePairing
The mob ilephon e(or theBlue toot h®
audio
devi ce)must suppo rttheBlue tooth®
ver sion
2. 1f or conn ection viaSecure SimplePairing.
COMAND createsasix-digit code,which is
display edon the two devices thataretobe
conn ected. Telephony
viathe Bluetooth ®
interfa ce117Telephone Z
Page 120 of 234
X
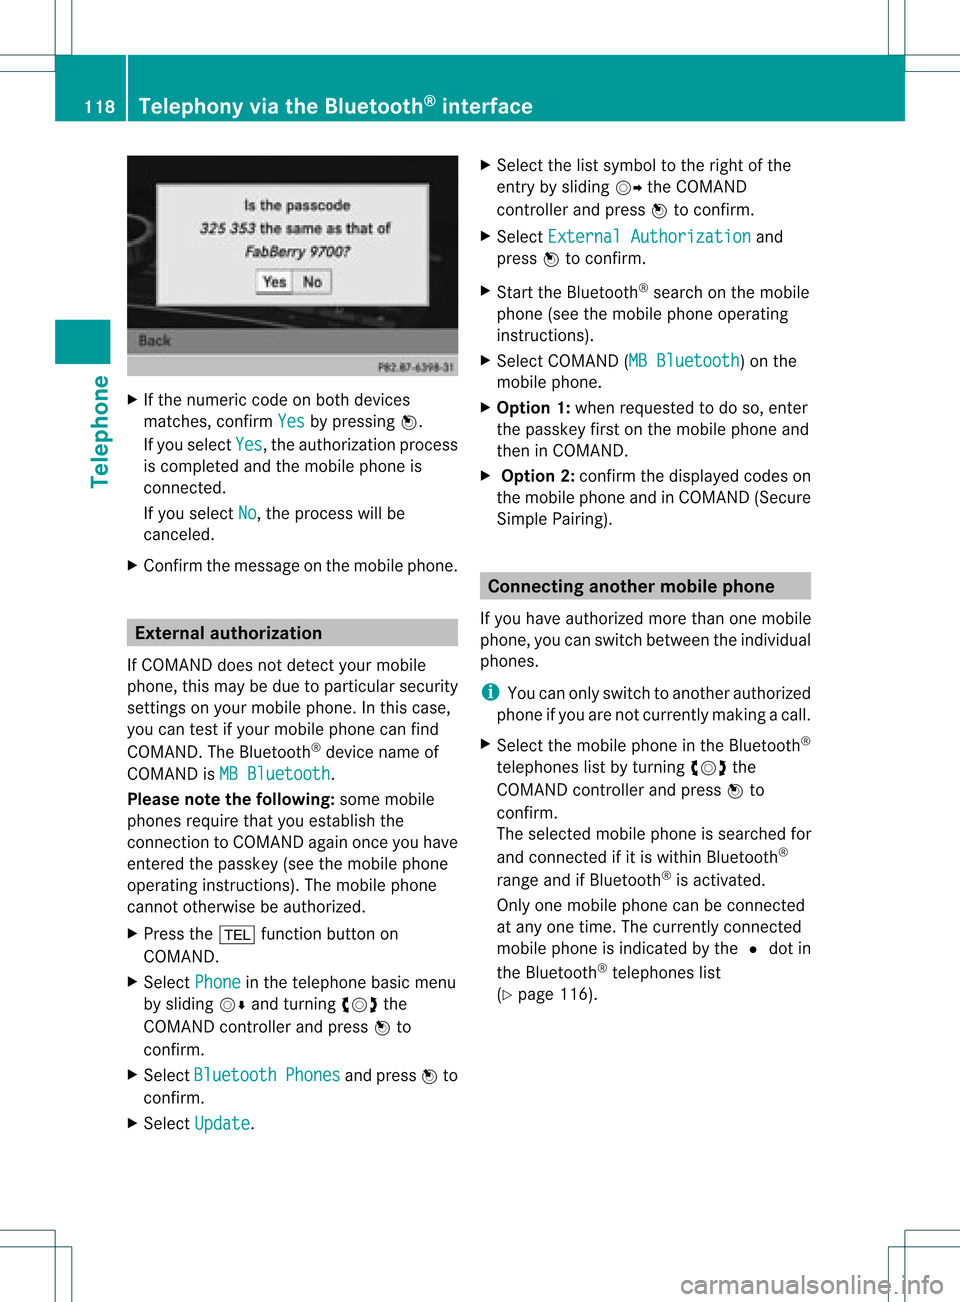
Ifthe numeric codeonboth devices
matches, confirmYes by
pressi ngW.
If you select Yes ,
the authori zationprocess
is completed andthemobil ephone is
connect ed.
If you select No ,
the process willbe
canceled.
X Confirm themessag eon the mobil ephone. External
authorization
If COMAND doesnotdetect yourmobile
phone, thismay bedue toparticular security
sett ings onyour mobile phone. Inthis case,
you can test ifyour mobile phonecanfind
COMAND. TheBluetooth ®
device nameof
COMAND isMB Bluetooth .
Please notethefollowi ng:some mobile
phones requirethatyouestablish the
conn ection toCOMAND againonceyouhave
enter edthe passkey (seethemobile phone
operating instructions). Themobile phone
cann ototherwise beauthorized.
X Press the% functionbutton on
COMAND.
X Select Phone in
the telephone basicmenu
by sliding VÆandturnin gcVd the
COMAND controller andpress Wto
conf irm.
X Select Bluetooth Phones and
press Wto
conf irm.
X Select Update .X
Select thelistsymbol tothe right ofthe
entr yby sliding VYtheCOMAND
cont roller andpress Wtoconf irm.
X Select External Authorizatio n and
press Wtoconf irm.
X Start theBluetooth ®
search onthe mobile
phone (seethemobile phoneoperating
instr uctions).
X Select COMAND (MBBluetooth )
on the
mobile phone.
X Option 1:when requested todo so, enter
the passkey firstonthe mobile phoneand
then inCOMAND.
X Option 2:conf irmthedisplay edcodes on
the mobile phoneandinCOMAND (Secure
Simple Pairing). Connec
tinganother mobilephone
If you have authorized morethanonemobile
phone, youcan switch between theindividual
phones.
i You canonly switch toanother authorized
phone ifyou arenot current lymaking acall.
X Select themobile phoneinthe Bluetooth ®
telephones listbyturnin gcVd the
COMAND controller andpress Wto
conf irm.
The selected mobilephoneissearched for
and conn ected ifit is within Bluetooth ®
range andifBluetooth ®
is activated.
Only onemobile phonecanbeconn ected
at any one time. Thecurrent lyconn ected
mobile phoneisindicated bythe #dot in
the Bluetooth ®
telephones list
(Y page 116). 118
Telephony viathe Bluetooth ®
interfa ceTelephone
Page 147 of 234

Note
son HD Radi o™
i Thefu nctio nsofHD Radio™ include:
R digital transmi ssion inthe same
wa veb and sas ana log AM/FM .The
analog AM/FMstations remaininthe
same position whenselecting astati on.
R the ability tobro adcas tseveral program
str eams overasingle FMfrequenc y(e.g.
HD 1,HD 2etc .).
R int erferen ce-free, clear recept ion.
R FM: sound inCD quality; AM:sound as
on analog FMstat ions.
R tex t-based information (e.g.artist ,trac k
name) inthe display.
For furth erinfor mation onHD Radio™, visit
htt p://ww w.hdradio.com.
You candeactivat eHD Radio™ forthe
select edfrequenc yin the radio submenu. X
Select Radio in
the radio display bysliding
VÆ theCOMAND controller andpress W
to con firm.
X Select HDRadio and
press Wtocon firm.
HD Radio™ isdeactivat edifthe ªchec k
box isempty.
You hear theanalog program ofthis
frequenc y.
As soon asyou change toanoth erHD Radio
frequenc y,the HDRadio™ isreact ivated. Switching
wavebands
Opt ion 1 You
canswitch theradio between theFM, AM
and WBwaveband.
X Press the$ function button repeatedly
until thedesired waveband isselect ed.
i Repeatedly pressingthisfunc tion button
switch esbetween theFM, AMand WB
wavebands inthat order andthen calls up
SatRadio mode.Pressin gthe button again
takes youback toFM radio mode.
Opt ion 2 X
Select FM ,
AM or
WB in
the radio display by
sliding VÆandturningcVd theCOMAND
con troller andpress Wtocon firm.
Waveband submenuisopened. 1
Waveband submenu
The #dot shows thecurren tlyselect ed
waveband.
X Select awaveband andpress Wtocon firm.
You willhear thelast stationplayed onthe
select edwaveband. Rad
iomod e
145Audio
Page 149 of 234
Stati
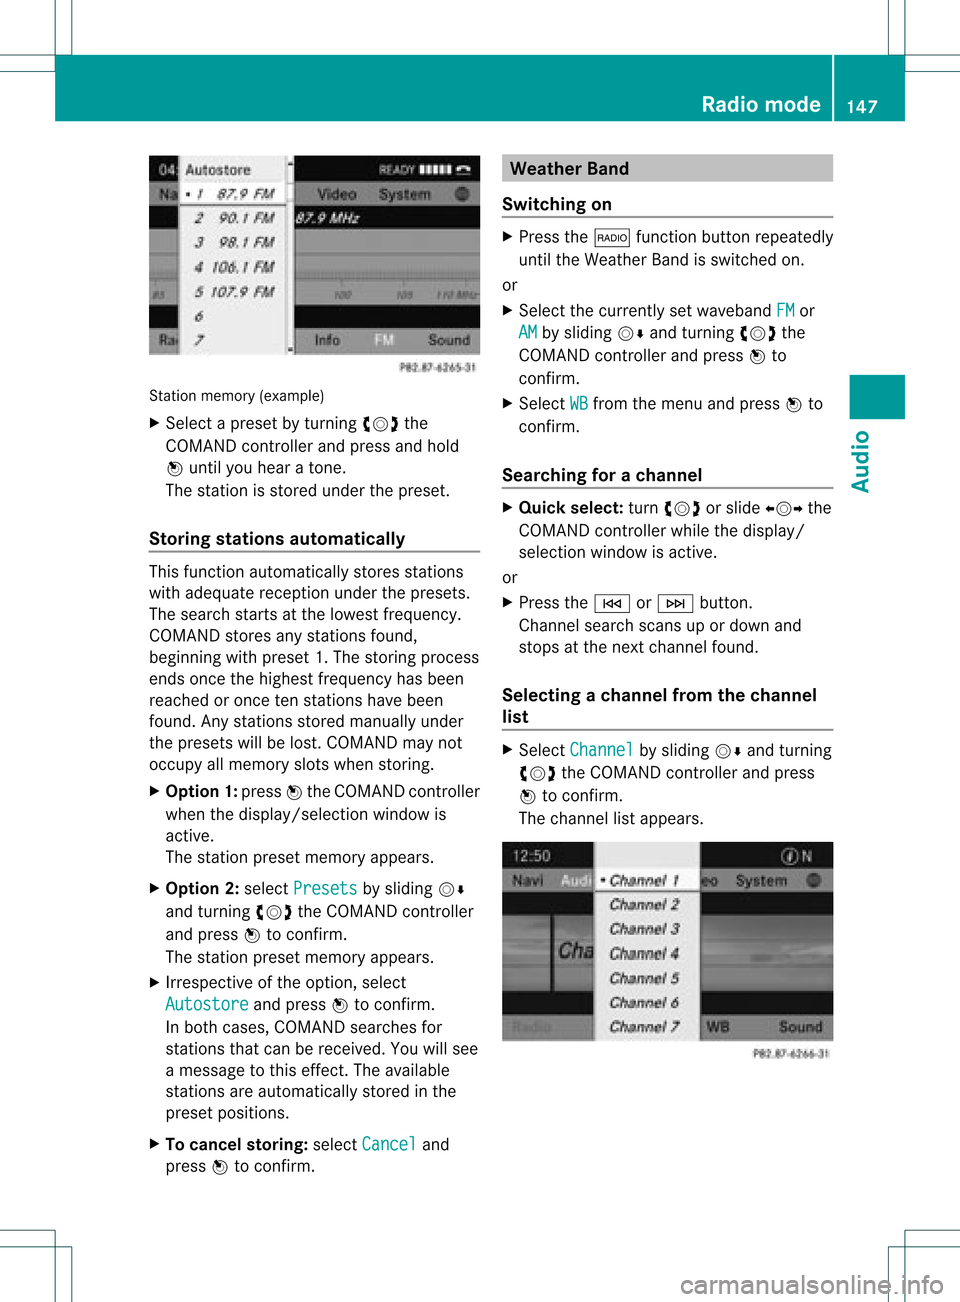
onmemo ry(exa mple)
X Sel ect apre set byturni ngcVd the
CO MAND controllera nd pre ssand hold
W unti lyo uhea rato ne.
Th esta tionisstored underthepreset.
Storing stations automatically This
function automaticall ystores stations
with adequ atereception underthepresets.
The search startsatthe lowest frequency.
COMAND storesanystations found,
beginning withpreset 1.The storing process
ends once thehighest frequency hasbeen
reached oronce tenstations havebeen
found. Anystations storedmanuall yunder
the presets willbelost. COMAND maynot
occupy allmemory slotswhen storing.
X Option 1:press Wthe COMAND controller
when thedispla y/selection windowis
active.
The station presetmemory appears.
X Option 2:select Presets by
sliding VÆ
and turning cVdtheCOMAND controller
and press Wtoconfirm.
The station presetmemory appears.
X Irrespective ofthe option, select
Autostore and
press Wtoconfirm.
In both cases, COMAND searchesfor
stations thatcanbereceived. Youwillsee
a message tothis effect. Theavail able
stations areautomaticall ystored inthe
preset positions.
X To cance lstoring: selectCancel and
press Wtoconfirm. Weather
Band
Switching on X
Press the$ function buttonrepeatedly
until theWeather Bandisswitched on.
or
X Select thecurrently setwaveba ndFM or
AM by
sliding VÆandturning cVdthe
COMAND controller andpress Wto
confirm.
X Select WB from
themenu andpress Wto
confirm.
Searching forachanne l X
Quic kselect: turncVd orslide XVY the
COMA NDcontroller while thed isplay/
selec tionwindow isact ive.
or
X Press theE orF button.
Chann elsearc hscan sup ordown and
st ops atthe nextchan nelfoun d.
Selecting achanne lfrom thechann el
lis t X
Select Channe l by
sliding VÆandturning
cVd theCOMAND controllerand press
W toconfirm.
The channel lista ppears. Ra
dio mod e
147Audio
Page 154 of 234
X
Sel ect acha nnel byturni ngcVd the
CO MAND controllera nd pre ssW to
confi rm.
Opti on2
X Sel ect ChannelLis twit hArt ist, Tit
le and
pressW toconfi rm.
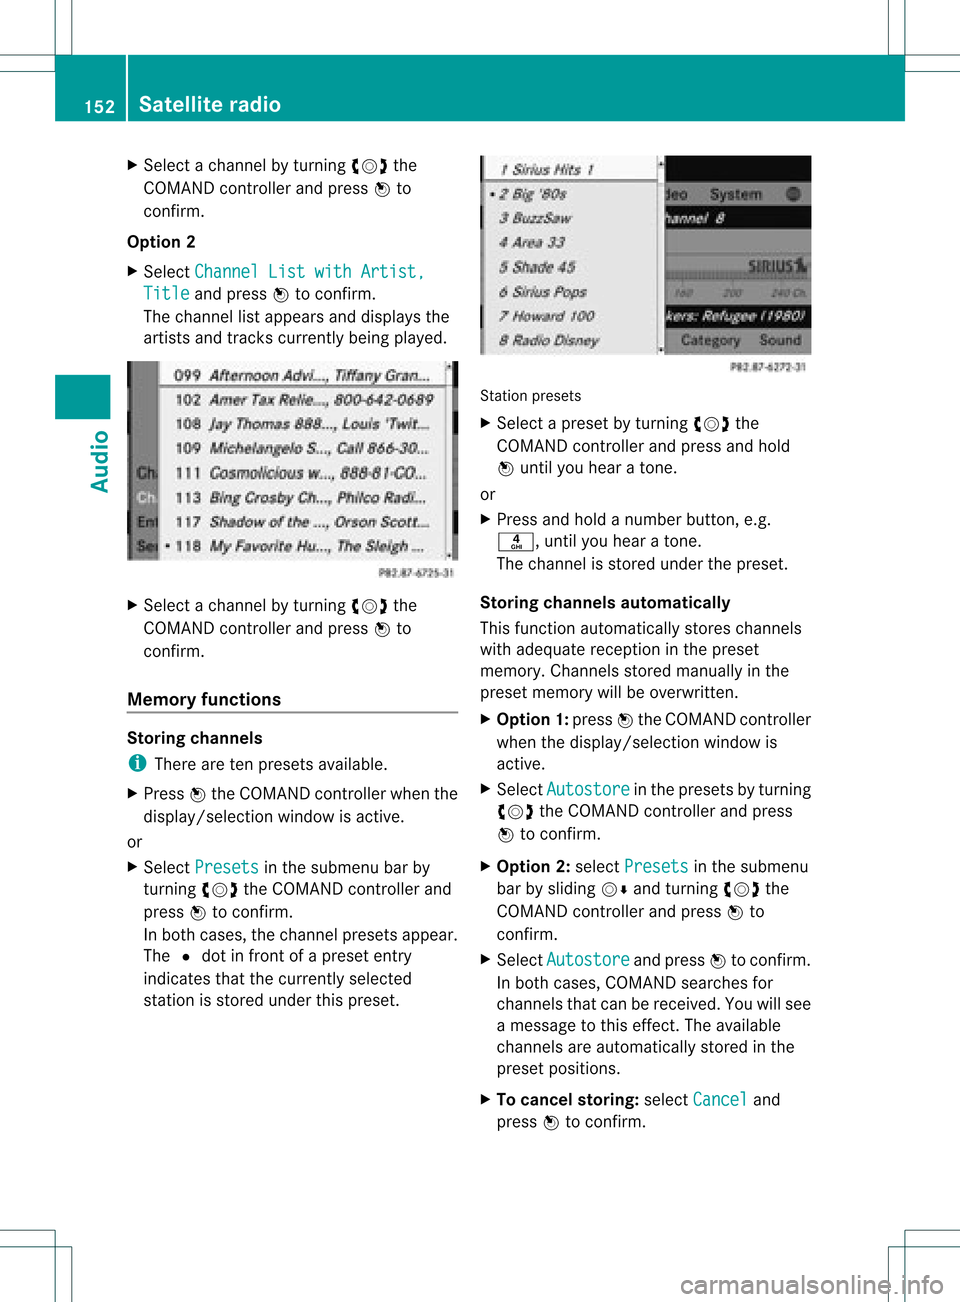
The channel list appe arsand displ aysthe
ar tis ts and trackscur rentl ybe ing play ed . X
Sel ect acha nnel byturning cVd the
CO MAND controller and pressW to
confi rm.
Memo ryfun ctions Sto
ringch ann els
i Thereareten presets availabl e.
X Pre ssW the COMAND controller wh en the
di spl ay/se lectio nwindow isact ive.
or
X Selec tPres ets in
the submen ubar by
tur nin gcVd theCOMA NDcontroller and
press Wtocon firm .
In bot hcases ,the chan nelprese tsappear.
The Rdot infro ntofaprese tent ry
indic ates thatthecurr entlyselec ted
st ation isstored under thisprese t. St
ation presets
X Selec tapreset byturn ingcVd the
COMAND controller and press andhold
W until youhear aton e.
or
X Press andhold anumber button,e.g.
n, untilyouhear aton e.
The chann elisstor edunder thepreset .
Stor ingchannels automat ically
This function automatic allystoreschann els
with adequate receptioninthe preset
memor y.Channels storedmanually inthe
preset memor ywill beoverwrit ten.
X Opt ion1:press Wthe COMAND controller
when thedisplay/select ionwindow is
activ e.
X Select Autost ore in
the preset sby turn ing
cVd theCOMAND controller and press
W tocon firm.
X Opt ion 2:select Preset s in
the submenu
bar bysliding VÆandturningcVd the
COMAND controller and press Wto
con firm.
X Select Autost ore and
press Wtocon firm.
In both cases, COMAND searchesfor
chann elsthat canbereceiv ed.You willsee
a message tothis effec t.The available
chann elsare automatic allystoredinthe
preset position s.
X To cancel storing: select Cancel and
press Wtocon firm. 152
Sat
ellite radioAudio
Page 156 of 234
Aud
ioCD/DVD andMP3 mode Imp
ortant safety notes G
WAR
NING
COMA NDisclas sified asaClass 1laser
prod uct.You must notopen thecasing. Ifyou
open thecasing, orifthe casing isfaulty or
damaged, thereisarisk ofexposure to
invisible laserradiation. Thismay damage
your eyes, orthose ofothers.
COMAND doesnotcont ainany parts thatcan
be serviced bythe user. Forsafety reasons,
all mainten ancework must becarried outby
quali fiedaftersales technicians. G
WARNING
Only when thevehicle isstation aryshould
you:
R load adisc
R eject adisc
There isarisk ofbeing distract edfrom the
road andtraffic conditionsifthis isdone while
the vehicle isin motion. <001E000E00130005001200140009000E000700210005000A0005000300140009
000E0007H
CDs/DVDs
Notes If
the CD/D VDhas aprinted side,thismust
face upwards whentheCD/D VDisinsert ed.
If neither sideisprinted, theside tobe playe d
should facedownwards. Thesystem maynot
be able toplay CDs/D VDswith copy
protect ion.
i Ifamedium contains other filesin
addition tomusic files,theloading time
before thefirst track startsto play may be
longer.
Inserting discsintotheDVD changer The
DVD changer hasafixed magazine with
six trays. X
To insert aCD/DVD intoth ema gaz ine
tr ay :pre sstheV load/ejec tb utt on.
Am enu shows thecurren tload status of
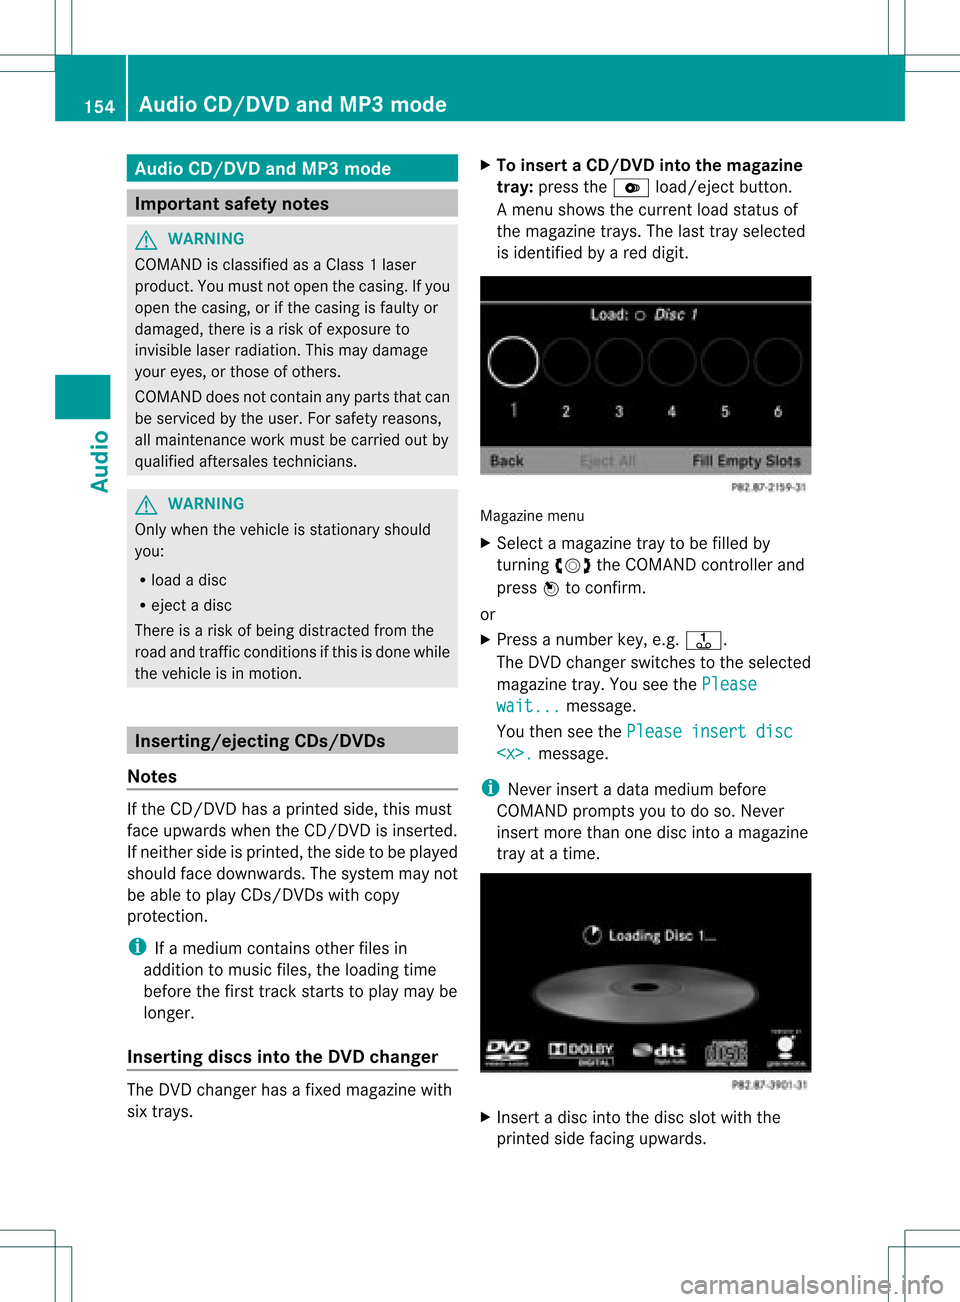
the magazine trays.Thelasttray selected
is identified byared digit. Magazine
menu
X Select amagazine traytobe filled by
turnin gcVd theCOMAND controller and
press Wtoconf irm.
or
X Press anumber key,e.g.j.
The DVD changer switches tothe selected
magazine tray.YouseethePlease wait... message.
You then seethePlease insertdisc
i Never insertadata medium before
COMAND promptsyoutodo so. Never
insert morethanonedisc intoamagazine
tray atatime. X
Insert adisc intothedisc slotwith the
printed sidefacing upwards. 154
Audio
CD/DVD andMP3 modeAudio
Page 157 of 234
The
DVD changer loadsthedisc intothe
selected magazine tray.TheLoading disc
appears.
i Itmay take some timeforthe disc tobe
loaded, depending onthe type ofdisc. Ifno
disc isinsert edfor approximately 20
seconds, thedisplay returnstothe
magazine menu.
The DVD changer playsthedisc if:
R ithas been insert edcorrec tly.
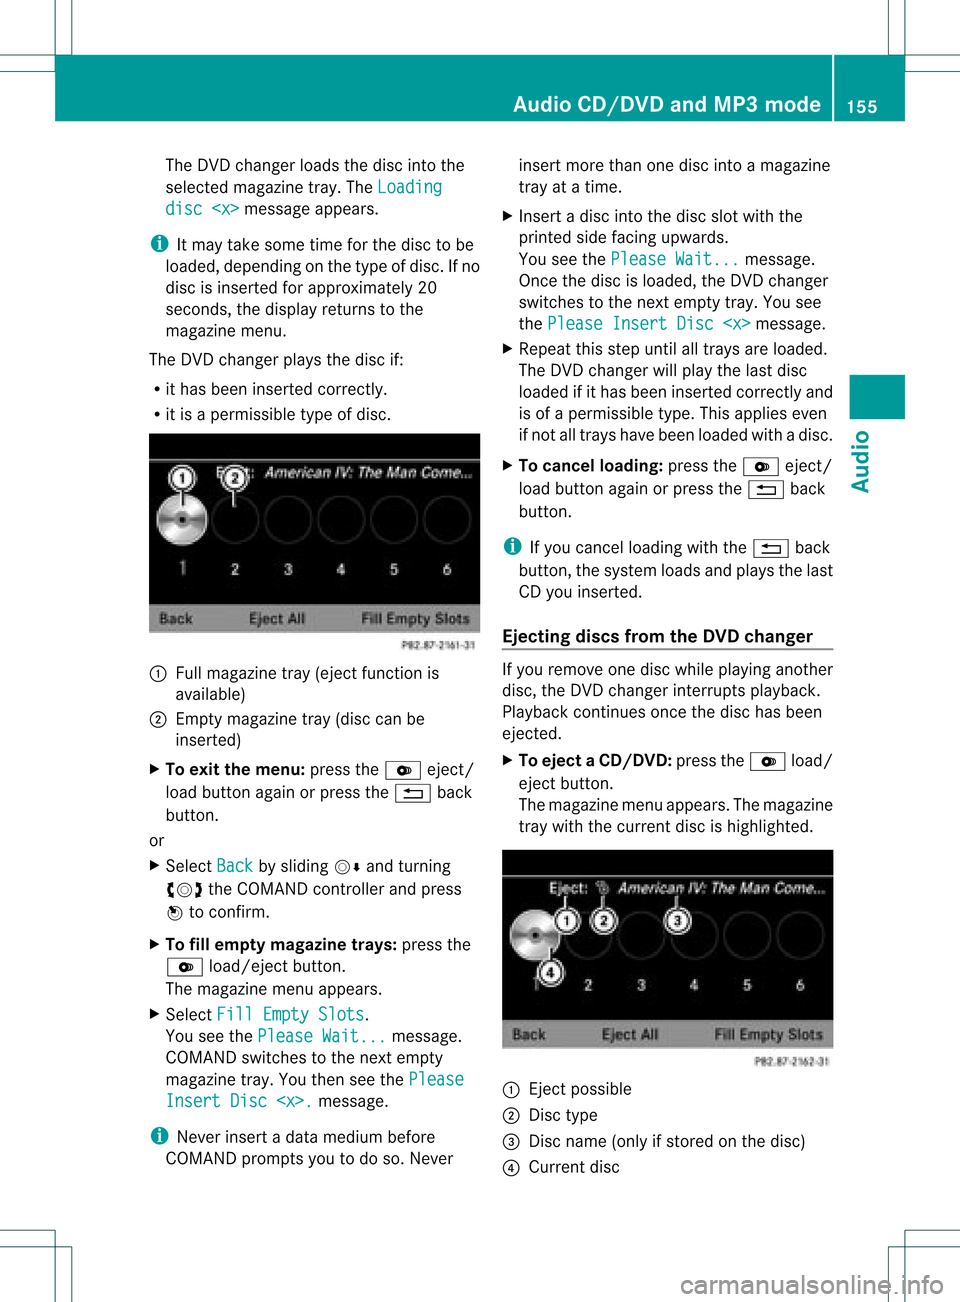
R itis apermissible typeofdisc. :
Full magazine tray(eject functionis
availa ble)
; Empt ymagazine tray(disc canbe
insert ed)
X To exit themenu: presstheV eject/
load button againorpress the% back
button .
or
X Select Back by
sliding VÆandturnin g
cVd theCOMAND controller andpress
W toconf irm.
X To fill empt ymagaz inetrays: press the
V load/eject button.
The magazine menuappears.
X Select FillEmpty Slots .
You seethePlease Wait... message.
COMAND switchestothe next empty
magazine tray.Youthen seethePlease Insert
Disc
i Never insertadata medium before
COMAND promptsyoutodo so. Never insert
morethanonedisc intoamagazine
tray atatime.
X Insert adisc intothedisc slotwith the
printed sidefacing upwards.
You seethePlease Wait... message.
Once thedisc isloaded, theDVD changer
switches tothe next empty tray.Yousee
the Please InsertDisc
X Repeat thisstep until alltrays areloaded.
The DVD changer willplay thelast disc
loaded ifit has been insert edcorrec tlyand
is of apermissible type.Thisapplies even
if not alltrays havebeen loaded withadisc.
X To cancel loading: presstheV eject/
load button againorpress the% back
button .
i Ifyou cancel loading withthe% back
button ,the system loadsandplays thelast
CD you insert ed.
Ejecting discsfromtheDVD changer If
you remove onedisc while playinganother
disc, theDVD changer interruptsplayb ack.
Playba ckcont inues oncethedisc hasbeen
eject ed.
X To eject aCD/DVD: presstheV load/
ej ec tbut ton.
The mag azine men uappea rs.T he magazine
tray with thecurrent discishighlighted. :
Ejec tpossible
; Disc type
= Disc name (onlyifstored onthe disc)
? Current disc Audio
CD/DVD andMP3 mode
155Audio Z
Page 158 of 234
X
Sel ect amag azine tray conta ining adi sc by
turni ngcVd theCOMAND controllerand
pre ssW toconfi rm.
or
X Pre ssanumb erkey ,e.g. j.
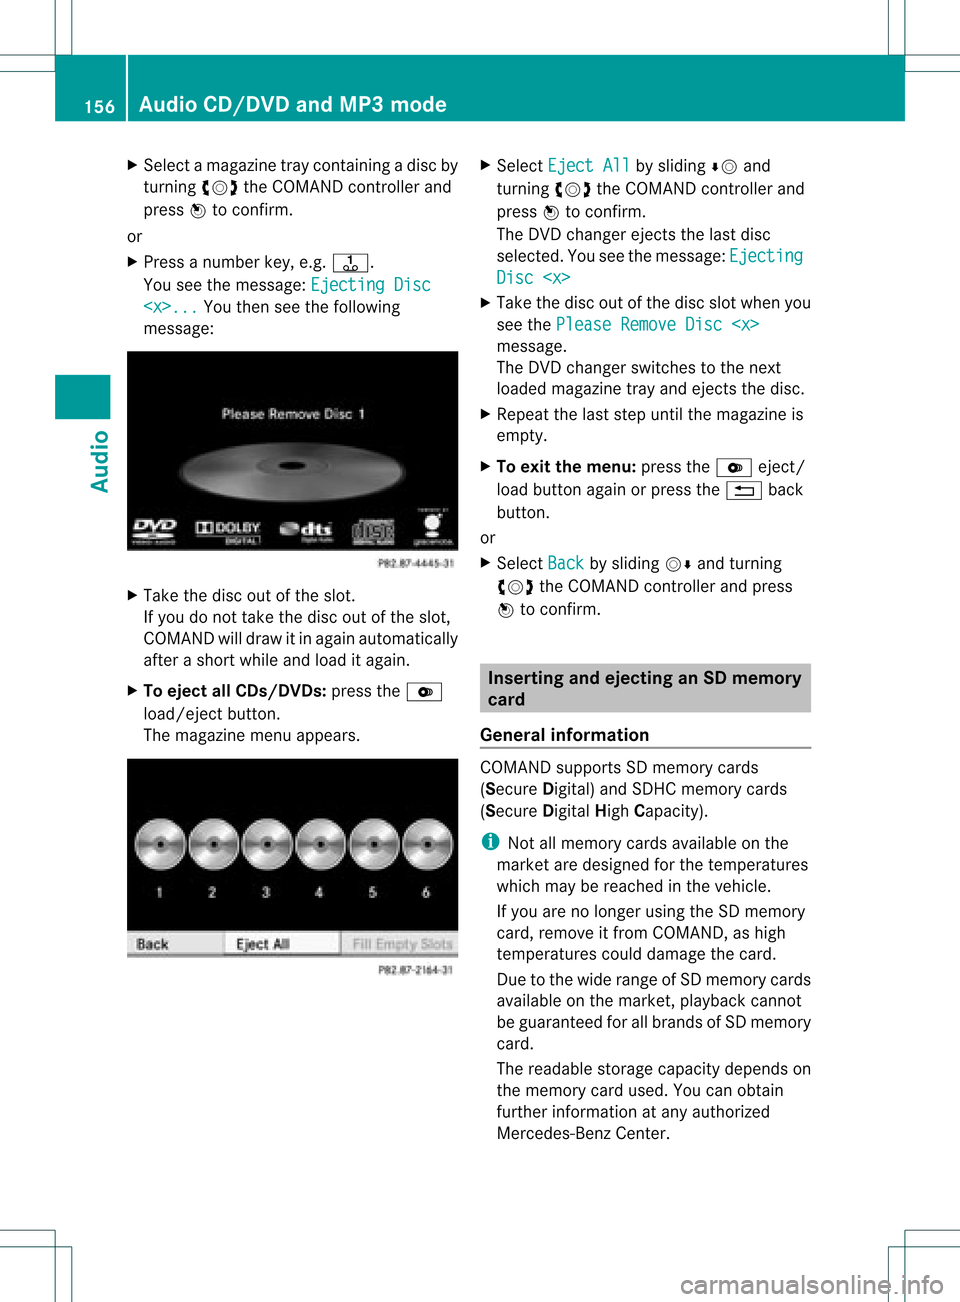
Yo usee themes sage: Eje ctingDisc
... Yo
uthen seethefollowi ng
mes sage: X
Ta ke the disc outo fthe slot.
If you donot take thedisc outofthe slot,
COMAND willdraw itin again automatically
after ashort while andload itagain.
X To eject allCDs/ DVDs: presstheV
load/eject button.
The magazine menuappears. X
Select Eject All by
sliding ÆVand
turning cVdtheCOMAND controller and
press Wtoconfirm .
The DVD changer ejectsthe last disc
selected. Youseethemessage: Ejecting Disc
Take thedisc outofthe disc slotwhen you
see thePlease RemoveDisc
The DVD changer switches tothe next
loaded magazine trayandeject sthe disc.
X Repea tthe last step until themagazine is
empty.
X To exit themenu: presstheV eject/
load button againorpress the% back
button.
or
X Select Back by
sliding VÆandturning
cVd theCOMAND controller andpress
W toconfirm . Inserting
andejecting anSD memory
card
General informat ion COMAND
supportsSDmemory cards
(Secure Digital)andSDH Cmemory cards
(Secure DigitalHighCapacity).
i Not allmemory cardsavailableonthe
market aredesigned forthe temperatures
which maybereached inthe vehicle.
If you arenolonger usingtheSDmemory
card, remove itfrom COMAND, ashigh
temperatures coulddamage thecard.
Due tothe wide range ofSD memory cards
availa bleonthe market, playback cannot
be guaranteed forallbrands ofSD memory
card.
The readabl estorage capacity depends on
the memory cardused. Youcanobtain
further information atany authorized
Mercedes-Ben zCent er. 156
Audio
CD/DVD andMP3 modeAudio
Page 161 of 234
In
audio DVD modeonly X
To pause playba ck:swit chon audio DVD
mod e(Y page 157).
X Se lec tË byslidi ngVÆ andturnin g
cVd theCOMA NDcontrol ler and press
W toconfirm .
The Ë displaychang estoÌ.
X To cont inuepla yba ck:sele ctÌ and
pre ssW toconfirm .
Playbac kcont inues fromthepoint where it
was inter rupted. TheÌ display changes
to Ë. Stop
function
This funct ionisonly availa bleinaudio DVD
mode.
X Switch onaudio DVDmode (Ypage 157).
X To interr uptplayback: selectÉby
sliding VÆandturnin gcVd theCOMAND
cont roller andpress Wtoconf irm.
The Ë display changes toÌ. É
remains highlighted.
X To continue playback: selectÌand
press Wtoconf irm.
Playba ckcont inues fromthepoint where it
was inter rupted.
X To stop playback: whileplaybackis
inter rupted, selectÉagain andpress
W toconf irm.
or
X Select Éandconf irmbypressing W
twice inrapid succession.
Ì ishighlighted.
X To resta rtplayback: selectÌand
press Wtoconf irm.
Playba ckstart sat the beginning ofthe
DVD . Selecting
audioCD/DVD/MP3 discs
Selecting viathe media list X
In audio CD/DVDand MP3 mode: select
Media by
sliding VÆorturnin gcVd the
COMAND controller andpress Wto
conf irm.
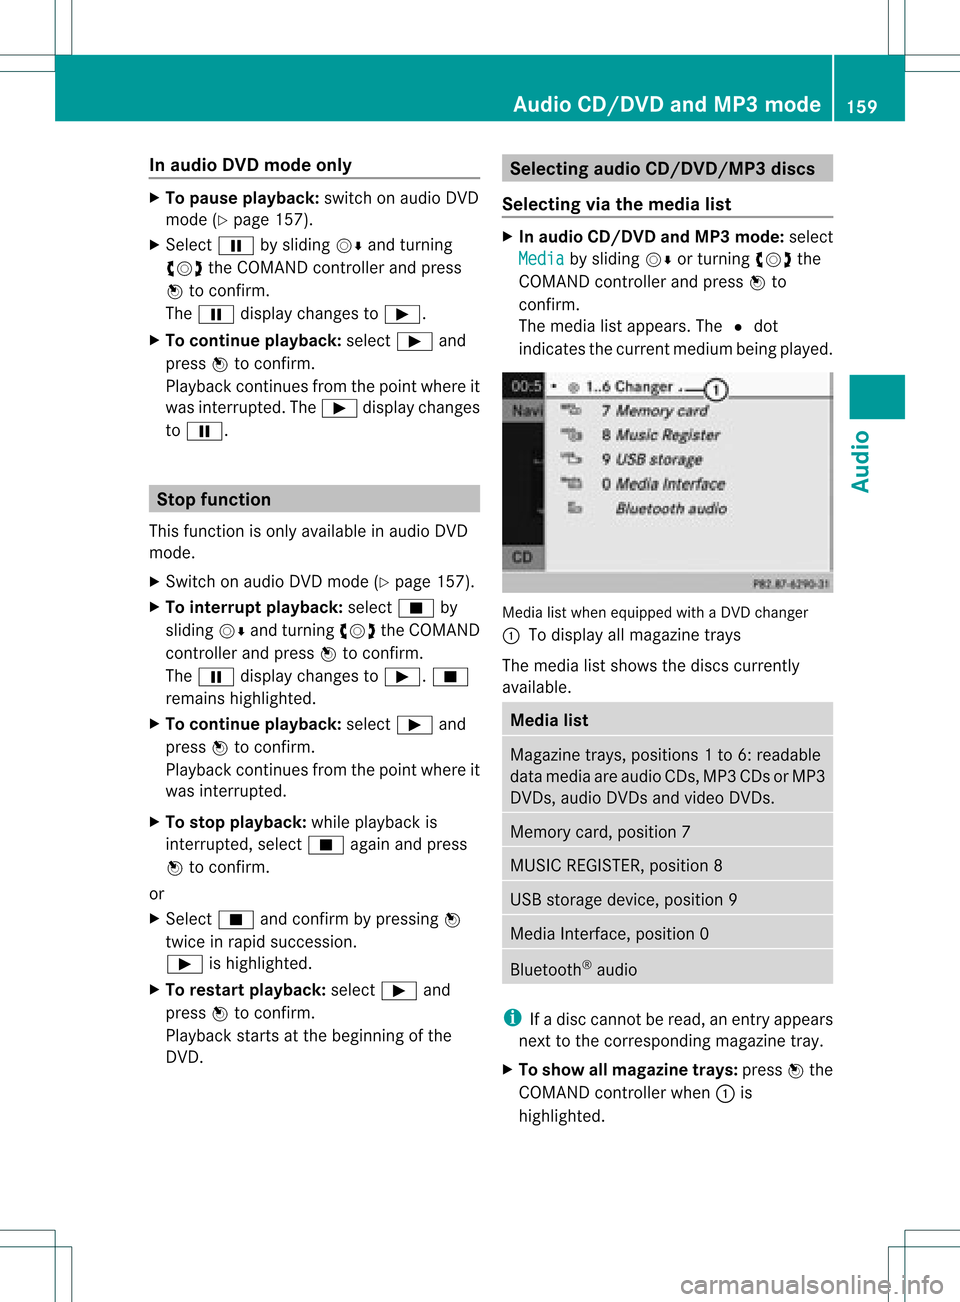
The media listappears. The#dot
indicates thecurrent medium beingplayed. Media
listwhen equipped withaDVD changer
: Todisplay allmagazine trays
The media listshows thediscs current ly
availa ble. Media
list Magazine
trays,positions 1to6: readable
data media areaudio CDs,MP3CDsorMP3
DVD s,audio DVDsand video DVDs. Memory
card,position 7 MUSIC
REGISTER, position8 USB
storage device,position 9 Media
Interface, position 0 Bluetooth
®
audio i
Ifadisc cann otbe read, anentr yappears
next tothe correspon dingmagazine tray.
X To show allmagaz inetrays: press Wthe
COMAND controller when :is
highlighted. Audio
CD/DVD andMP3 mode
159Audio Z
Page 166 of 234
see
acorresponding displayin the displa y/
selection window.Seetheexample ofthe
displa yin audi oCD mode (Ypage 158).
i The "Normal tracksequence" optionis
automaticall yselected whenyouchange
the medium youarecurrently listeningto
or when youselect adifferent medium. If
an option isselected, itremains selected
after COMAND isswitched onoroff. Notes
onMP3 mode
General informat ion Depending
onthe volume andformat ofthe
MP3 data, thelength oftime required for
reading thedata mayincrease.
Permissible datacarriers R
CD-R andCD-RW
R DVD-R andDVD-RW
R DVD+R andDVD+RW
R SD memory card
R USB storag edevi ce
Permis siblefilesyste ms R
ISO 9660/Jol ietstanda rdfor CDs
R UDF foraudio and videoDVDs
R FAT16 orFAT32 forSD memory cardsand
USB storag emedi a
Multis ession CD s For
multises sionC Ds, theconte ntofthe first
se ssi on determ inesho wCO MAND will
pro ces sthe CD. COMAND play sonl yone
se ssi on and gives priorityto the audio CD
se ssi on.
If po ssi ble, useCO MAND toplay onl yCDs
wh ich have been writte nino neses sion.
Fi le struc tureofadata carrie r Whe
nyou create adisc with compressed
music files,thetrack scan beorganized infolders.
Afolder mayalsocontainsubfolders.
A disc cancont ainam axim umof25 5fold ers.
Eac hfold ercan contain amax imum of
25 5track sand 255subf older s.
The disc may contain nomor eth an eigh t
dire ctory leve ls.File sbeyon dth eeight hleve l
will notb erecogn izedbythe system.
Tr ack and filenames When
youcreat eadisc with compr essed
music files,youcan assign names tothe
trac ksand folders.
COMAND usesthese names accordingly for
the display. Folderswhichcontain data other
than MP3 orWMA tracksare not displayed by
COMAND .
If MP3 orWMA filesarestor edinthe root
direct oryitself, theroot direct orywill also be
treat edasafolder. COMAND willthen show
the name ofthe root direct oryasthe folder
name.
You must observe thefollowing when
assigning tracknames :
R track nam esmust haveatleast one
ch arac ter.
R track nam esmust havetheex tens ion
"mp3 "or "wma".
R there must beafull stop bet ween thetrack
nam eand theex tens ion .
Ex ample ofaco rrect track nam e:
"Trac k1.m p3".
Per missibl efor ma ts COMA
NDsuppo rts th efoll owin gfor mat s:
R MPE G1Audi oLayer 3(MP3)
R Microsoft WindowsMediaAudioV2,V7,V8
and V9(WMA)
R additional musicfilesinAAC format with
the fileexten sions .aac,.mp4, .m4a
and .m4b, butnot copy-protect ediTunes
music fileswith theexten sion.m4p.
i If,inaddition toMP3 files, there areother
music filesinthese audioformats storedon 164
Audio
CD/DVD andMP3 modeAudio