radio MERCEDES-BENZ E-Class 2014 W212 Comand Manual
[x] Cancel search | Manufacturer: MERCEDES-BENZ, Model Year: 2014, Model line: E-Class, Model: MERCEDES-BENZ E-Class 2014 W212Pages: 270, PDF Size: 5.82 MB
Page 23 of 270
COMAND display
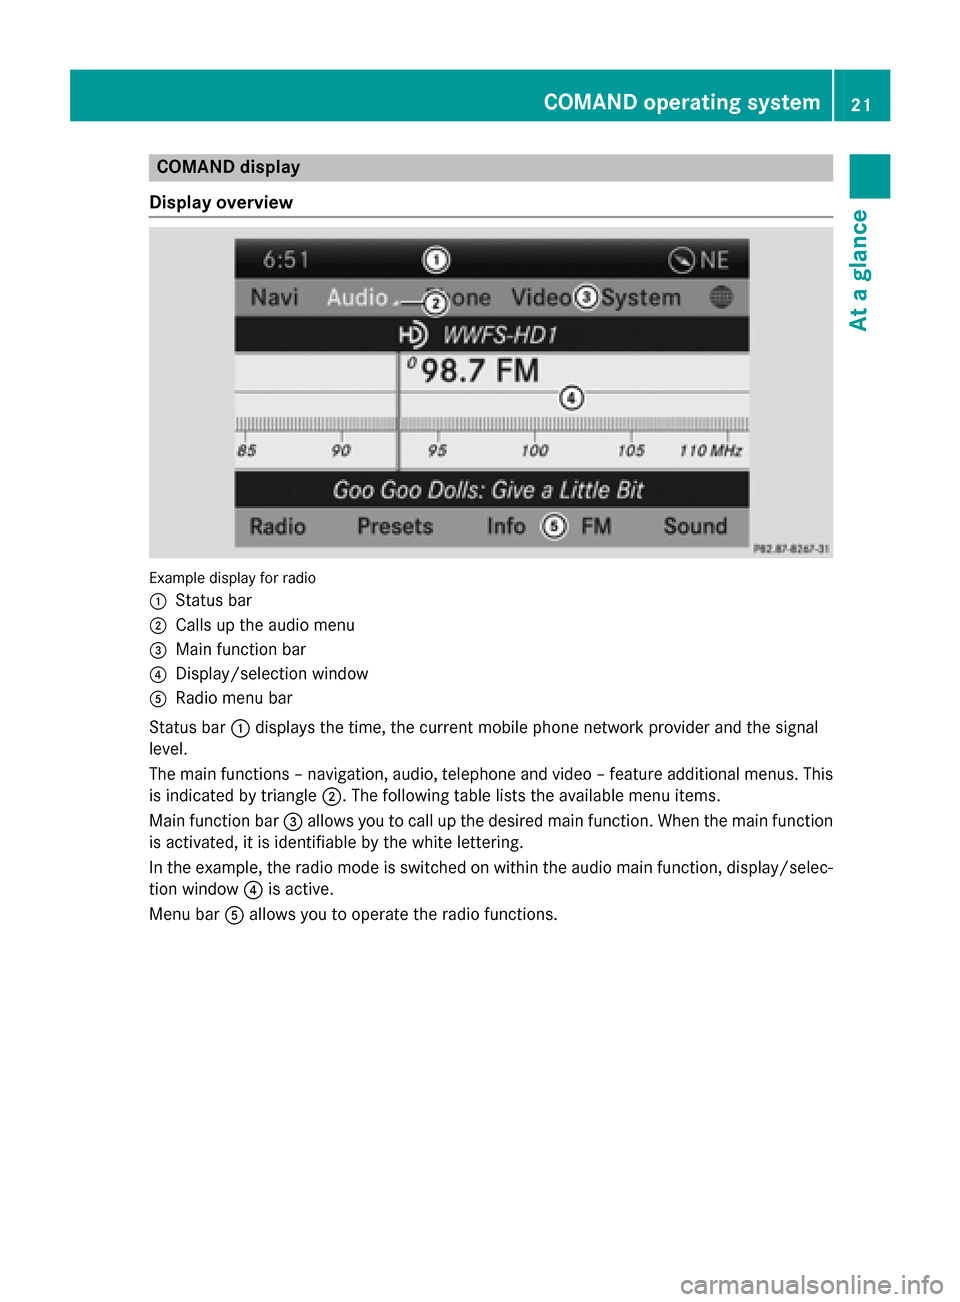
Display overview Example display for radio
0043 Status bar
0044 Calls up the audio menu
0087 Main function bar
0085 Display/selection window
0083 Radio menu bar
Status bar 0043displays the time, the current mobile phone network provider and the signal
level.
The main functions – navigation, audio, telephone and video – feature additional menus. This
is indicated by triangle 0044. The following table lists the available menu items.
Main function bar 0087allows you to call up the desired main function. When the main function
is activated, it is identifiable by the white lettering.
In the example, the radio mode is switched on within the audio main function, display/selec-
tion window 0085is active.
Menu bar 0083allows you to operate the radio functions. COMAND operating system
21At a glance
Page 24 of 270
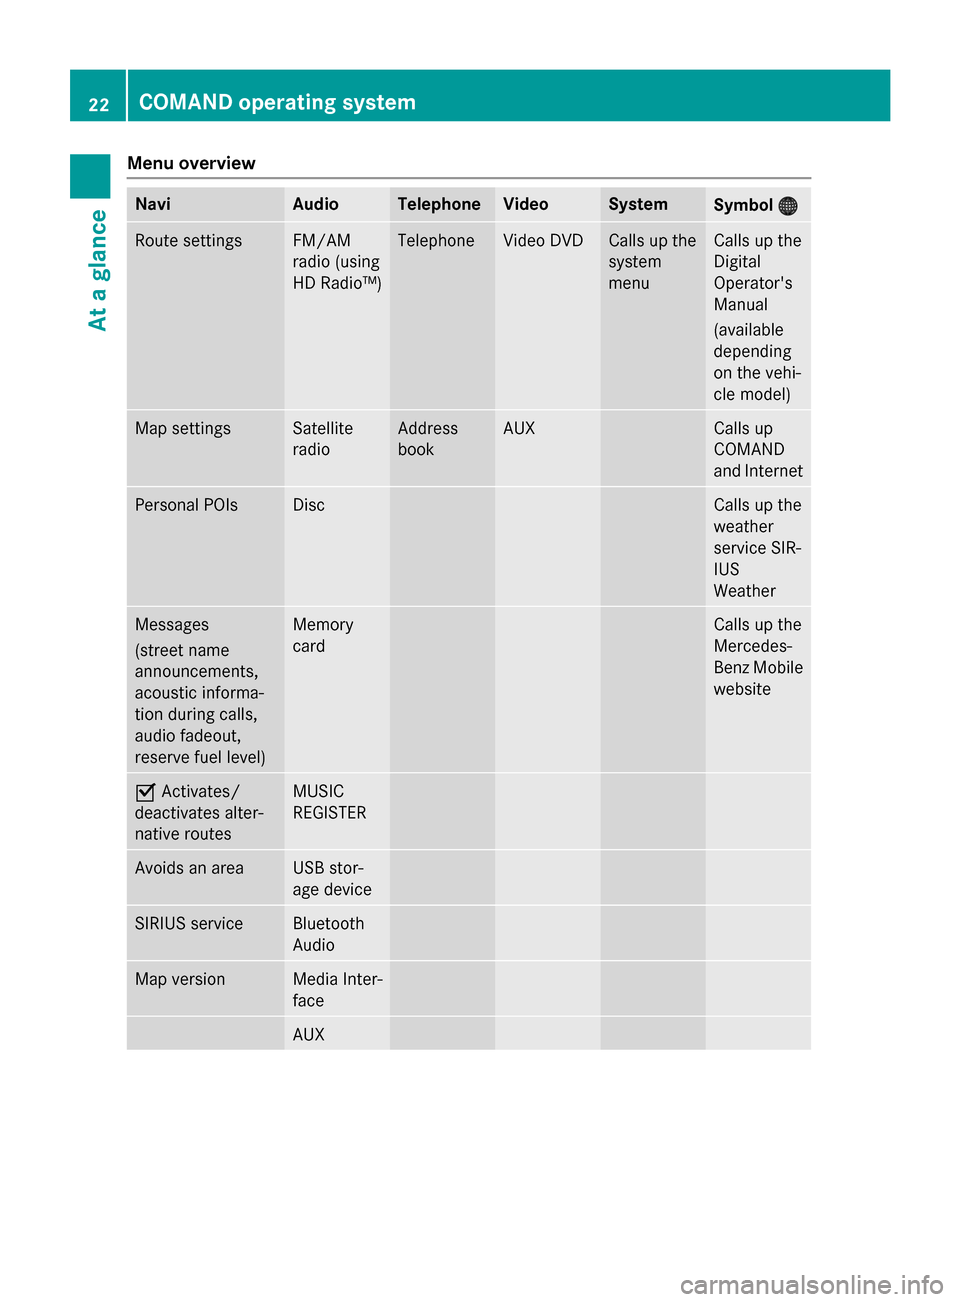
Menu overview
Navi Audio Telephone Video System
Symbol
00A7
00A7 Route settings FM/AM
radio (using
HD Radio™) Telephone Video DVD Calls up the
system
menu Calls up the
Digital
Operator's
Manual
(available
depending
on the vehi-
cle model)
Map settings Satellite
radio Address
book AUX Calls up
COMAND
and Internet
Personal POIs Disc Calls up the
weather
service SIR-
IUS
Weather
Messages
(street name
announcements,
acoustic informa-
tion during calls,
audio fadeout,
reserve fuel level) Memory
card Calls up the
Mercedes-
Benz Mobile
website 0073
Activates/
deactivates alter-
native routes MUSIC
REGISTER
Avoids an area USB stor-
age device
SIRIUS service Bluetooth
Audio
Map version Media Inter-
face
AUX22
COMAND operating systemAt a glance
Page 27 of 270
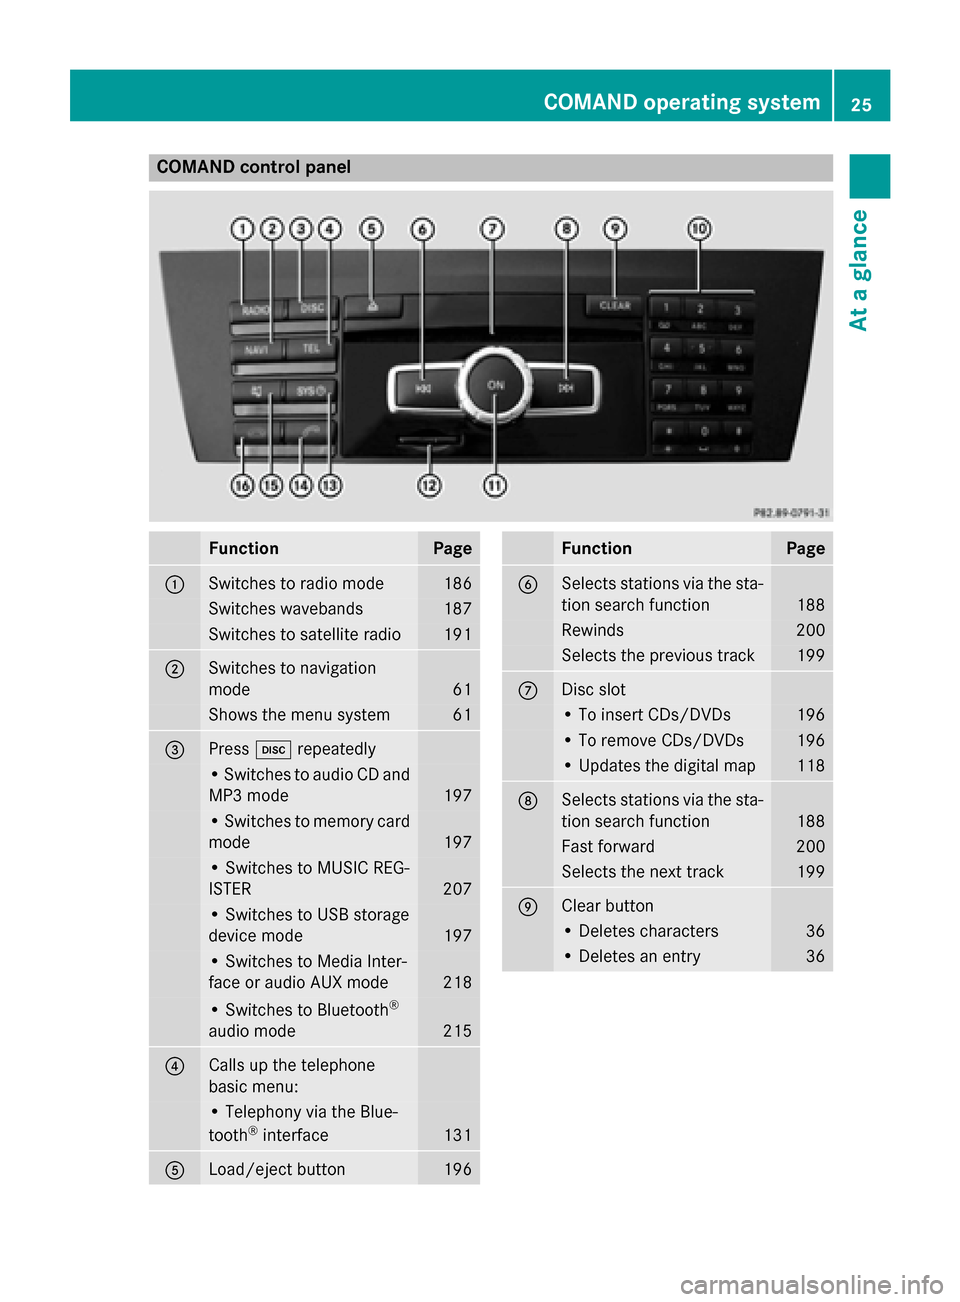
COMAND control panel
Function Page
0043
Switches to radio mode 186
Switches wavebands 187
Switches to satellite radio 191
0044
Switches to navigation
mode 61
Shows the menu system 61
0087
Press
003Arepeatedly • Switches to audio CD and
MP3 mode 197
• Switches to memory card
mode 197
• Switches to MUSIC REG-
ISTER
207
• Switches to USB storage
device mode
197
• Switches to Media Inter-
face or audio AUX mode
218
• Switches to Bluetooth
®
audio mode 215
0085
Calls up the telephone
basic menu: • Telephony via the Blue-
tooth ®
interface 131
0083
Load/eject button 196 Function Page
0084
Selects stations via the sta-
tion search function 188
Rewinds 200
Selects the previous track 199
006B
Disc slot
• To insert CDs/DVDs 196
• To remove CDs/DVDs 196
• Updates the digital map 118
006C
Selects stations via the sta-
tion search function 188
Fast forward 200
Selects the next track 199
006D
Clear button
• Deletes characters 36
• Deletes an entry 36COMAND operating system
25At a glance
Page 29 of 270
The COMAND controller can be:
R pressed briefly or pressed and held 0098
R turned clockwise or counter-clockwise
00790052007A
R slid left or right 009500520096
R slid forwards or backwards 009700520064
R slid diagonally 009100520078
Example of operation In the instructions, operating sequences are
described as follows:
X Press the 002Abutton.
Radio mode is activated.
X Select Radio
Radio by sliding 00520064and turning
00790052007A the COMAND controller and press 0098
to confirm.
X Confirm Station List
Station List by pressing0098.
The station list appears. Buttons on the COMAND controller
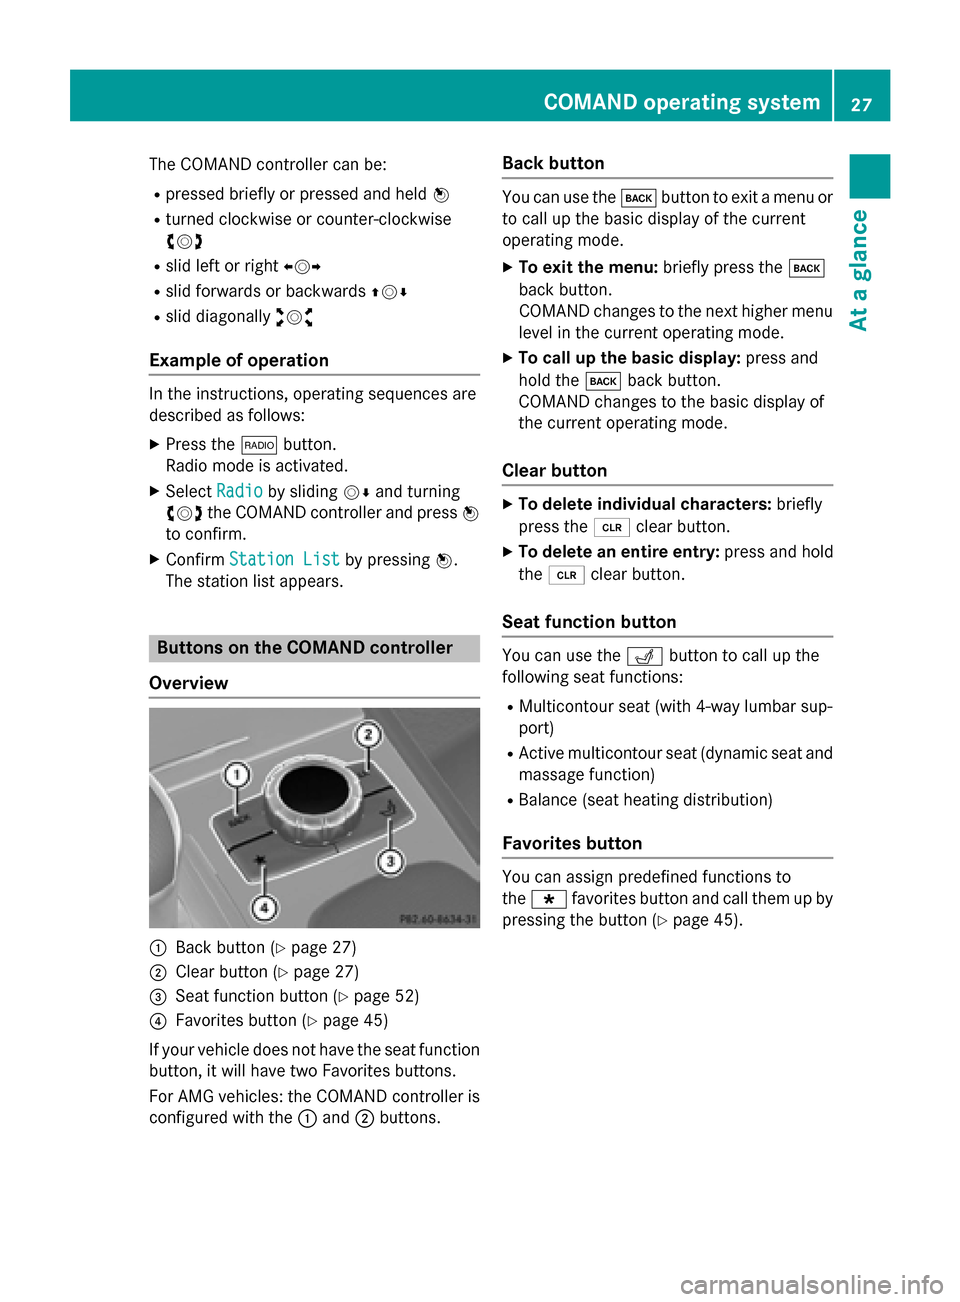
Overview 0043
Back button (Y page 27)
0044 Clear button (Y page 27)
0087 Seat function button (Y page 52)
0085 Favorites button (Y page 45)
If your vehicle does not have the seat function button, it will have two Favorites buttons.
For AMG vehicles: the COMAND controller is
configured with the 0043and 0044buttons. Back button You can use the
003Dbutton to exit a menu or
to call up the basic display of the current
operating mode.
X To exit the menu: briefly press the003D
back button.
COMAND changes to the next higher menu
level in the current operating mode.
X To call up the basic display: press and
hold the 003Dback button.
COMAND changes to the basic display of
the current operating mode.
Clear button X
To delete individual characters: briefly
press the 0084clear button.
X To delete an entire entry: press and hold
the 0084 clear button.
Seat function button You can use the
0050button to call up the
following seat functions:
R Multicontour seat (with 4-way lumbar sup-
port)
R Active multicontour seat (dynamic seat and
massage function)
R Balance (seat heating distribution)
Favorites button You can assign predefined functions to
the 0080 favorites button and call them up by
pressing the button (Y page 45). COMAND operating system
27At a glance
Page 30 of 270
Using COMAND
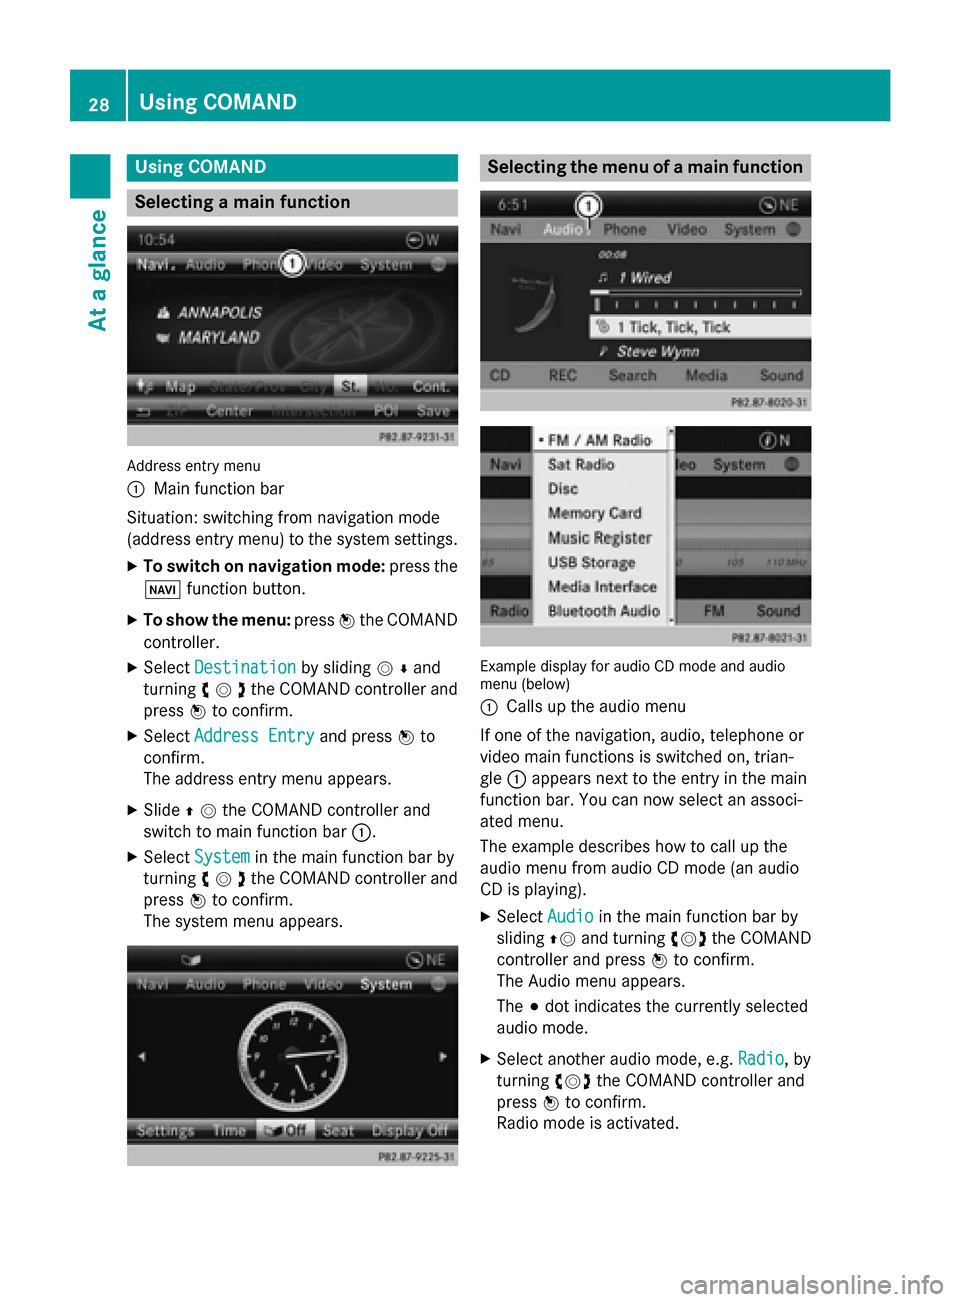
Selecting a main function
Address entry menu
0043
Main function bar
Situation: switching from navigation mode
(address entry menu) to the system settings.
X To switch on navigation mode: press the
00BE function button.
X To show the menu: press0098the COMAND
controller.
X Select Destination
Destination by sliding00520064and
turning 00790052007Athe COMAND controller and
press 0098to confirm.
X Select Address Entry Address Entry and press0098to
confirm.
The address entry menu appears.
X Slide 00970052the COMAND controller and
switch to main function bar 0043.
X Select System
System in the main function bar by
turning 00790052007Athe COMAND controller and
press 0098to confirm.
The system menu appears. Selecting the menu of a main function
Example display for audio CD mode and audio
menu (below)
0043
Calls up the audio menu
If one of the navigation, audio, telephone or
video main functions is switched on, trian-
gle 0043appears next to the entry in the main
function bar. You can now select an associ-
ated menu.
The example describes how to call up the
audio menu from audio CD mode (an audio
CD is playing).
X Select Audio Audioin the main function bar by
sliding 00970052and turning 00790052007Athe COMAND
controller and press 0098to confirm.
The Audio menu appears.
The 003Bdot indicates the currently selected
audio mode.
X Select another audio mode, e.g. Radio Radio, by
turning 00790052007Athe COMAND controller and
press 0098to confirm.
Radio mode is activated. 28
Using COMANDAt a glance
Page 32 of 270
Adjusting the volume for phone calls
You can adjust the volume for hands-free
mode during a telephone call.
X Turn the 0043control knob.
or X Press the 0081or0082 button on the mul-
tifunction steering wheel. Adjusting the sound settings
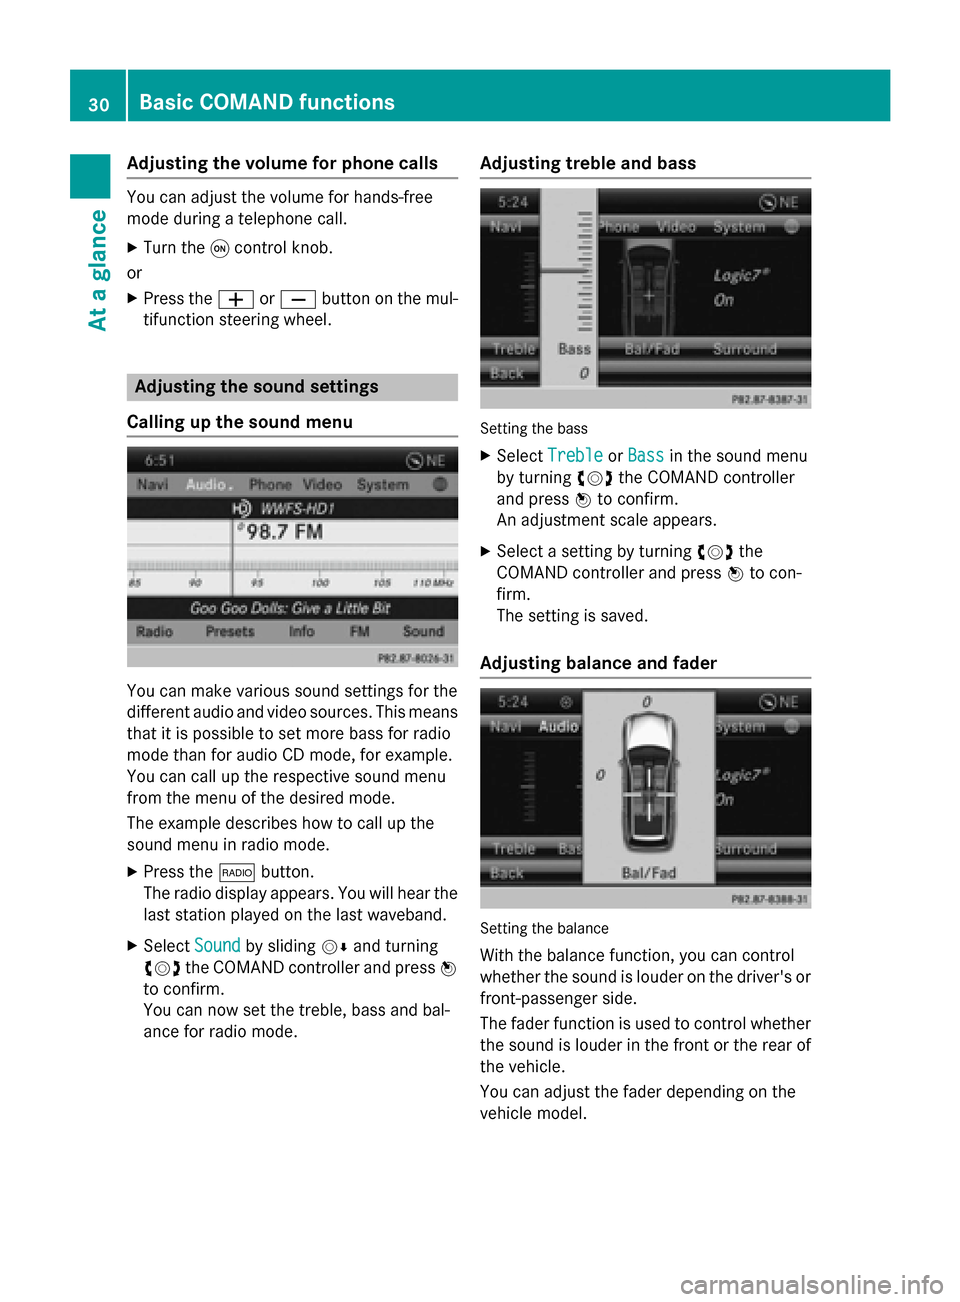
Calling up the sound menu You can make various sound settings for the
different audio and video sources. This means
that it is possible to set more bass for radio
mode than for audio CD mode, for example.
You can call up the respective sound menu
from the menu of the desired mode.
The example describes how to call up the
sound menu in radio mode.
X Press the 002Abutton.
The radio display appears. You will hear the
last station played on the last waveband.
X Select Sound
Sound by sliding 00520064and turning
00790052007A the COMAND controller and press 0098
to confirm.
You can now set the treble, bass and bal-
ance for radio mode. Adjusting treble and bass Setting the bass
X Select Treble Treble orBass
Bass in the sound menu
by turning 00790052007Athe COMAND controller
and press 0098to confirm.
An adjustment scale appears.
X Select a setting by turning 00790052007Athe
COMAND controller and press 0098to con-
firm.
The setting is saved.
Adjusting balance and fader Setting the balance
With the balance function, you can control
whether the sound is louder on the driver's or front-passenger side.
The fader function is used to control whether
the sound is louder in the front or the rear of the vehicle.
You can adjust the fader depending on the
vehicle model. 30
Basic COMAND functionsAt a glance
Page 33 of 270
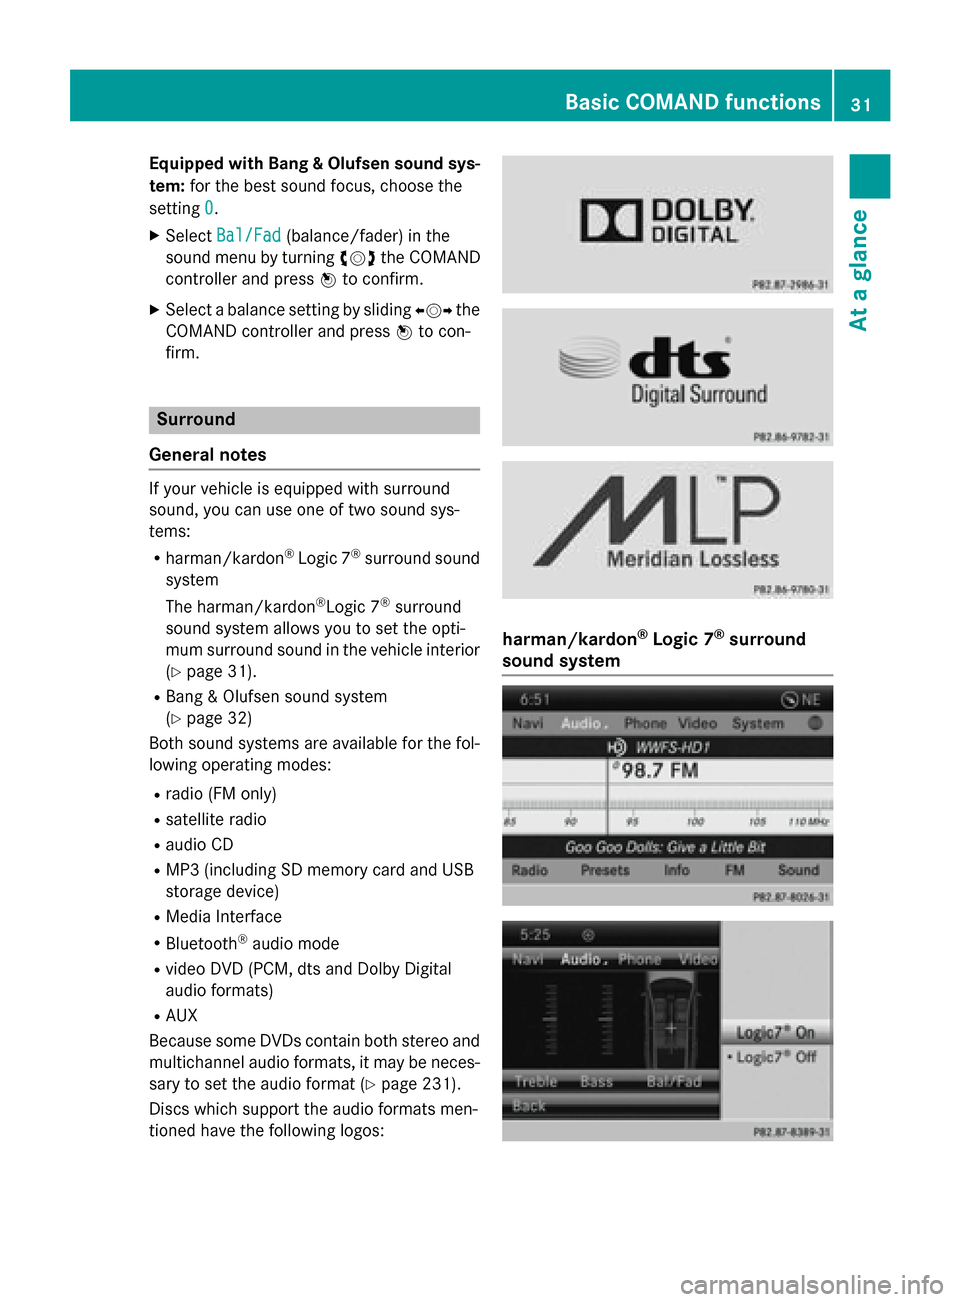
Equipped with Bang & Olufsen sound sys-
tem: for the best sound focus, choose the
setting 0
0.
X Select Bal/Fad
Bal/Fad (balance/fader) in the
sound menu by turning 00790052007Athe COMAND
controller and press 0098to confirm.
X Select a balance setting by sliding 009500520096the
COMAND controller and press 0098to con-
firm. Surround
General notes If your vehicle is equipped with surround
sound, you can use one of two sound sys-
tems:
R harman/kardon ®
Logic 7 ®
surround sound
system
The harman/kardon ®
Logic 7 ®
surround
sound system allows you to set the opti-
mum surround sound in the vehicle interior
(Y page 31).
R Bang & Olufsen sound system
(Y page 32)
Both sound systems are available for the fol-
lowing operating modes:
R radio (FM only)
R satellite radio
R audio CD
R MP3 (including SD memory card and USB
storage device)
R Media Interface
R Bluetooth ®
audio mode
R video DVD (PCM, dts and Dolby Digital
audio formats)
R AUX
Because some DVDs contain both stereo and multichannel audio formats, it may be neces-
sary to set the audio format (Y page 231).
Discs which support the audio formats men-
tioned have the following logos: harman/kardon
®
Logic 7 ®
surround
sound system Basic COMAND functions
31At a glance
Page 34 of 270
The example describes how to set the sur-
round sound for radio mode.
X To switch surround sound on/off: press
the 002A button.
The radio display appears. You will hear the
last station played on the last waveband.
X Select Sound
Soundby sliding 00520064and turning
00790052007A the COMAND controller and press 0098
to confirm.
X Select Surround
Surround and press0098to confirm.
X Select Logic7
Logic7 ®
®
On
On orLogic7
Logic7 ®
®
Off
Off by turn-
ing 00790052007A the COMAND controller and press
0098 to confirm.
Depending on your selection, surround
sound is switched on or off and the menu is
exited.
X To exit the menu without saving: press
the 003D back button or slide 009500520096the
COMAND controller.
i Please note the following: for the opti-
mum audio experience for all passengers
when Logic7 ®
is switched on, the balance
should be set to the center of the vehicle
interior.
You will achieve the best sound results by
playing video DVD media.
MP3 tracks should have a bit rate of at least
128 kbit/ s.
Surround sound playback does not func-
tion for mono signal sources, such as for
AM radio mode.
If radio reception is poor, e.g. in a tunnel,
you should switch off Logic7 ®
, since it may
otherwise switch dynamically between
stereo and mono and cause temporary
sound distortions.
On some stereo recordings, the sound
characteristics may differ from conven-
tional stereo playback.
i The
Logic7 Logic7 ®
®
On
On function creates a sur-
round sound experience for every
passenger when playing stereo recordings, for example. It enables optimum playback
of music and films on CD or video DVD with multichannel audio formats, such as MLP,
dts or Dolby Digital. This results in sound
characteristics like those intended by the
sound engineer when the original was
recorded.
i If you select
Logic7 Logic7®
®
Off
Off , the sound sys-
tem plays the tracks as stored on the
medium. Due to the design of the
passenger compartment, an optimum
audio experience cannot be guaranteed for
all passengers.
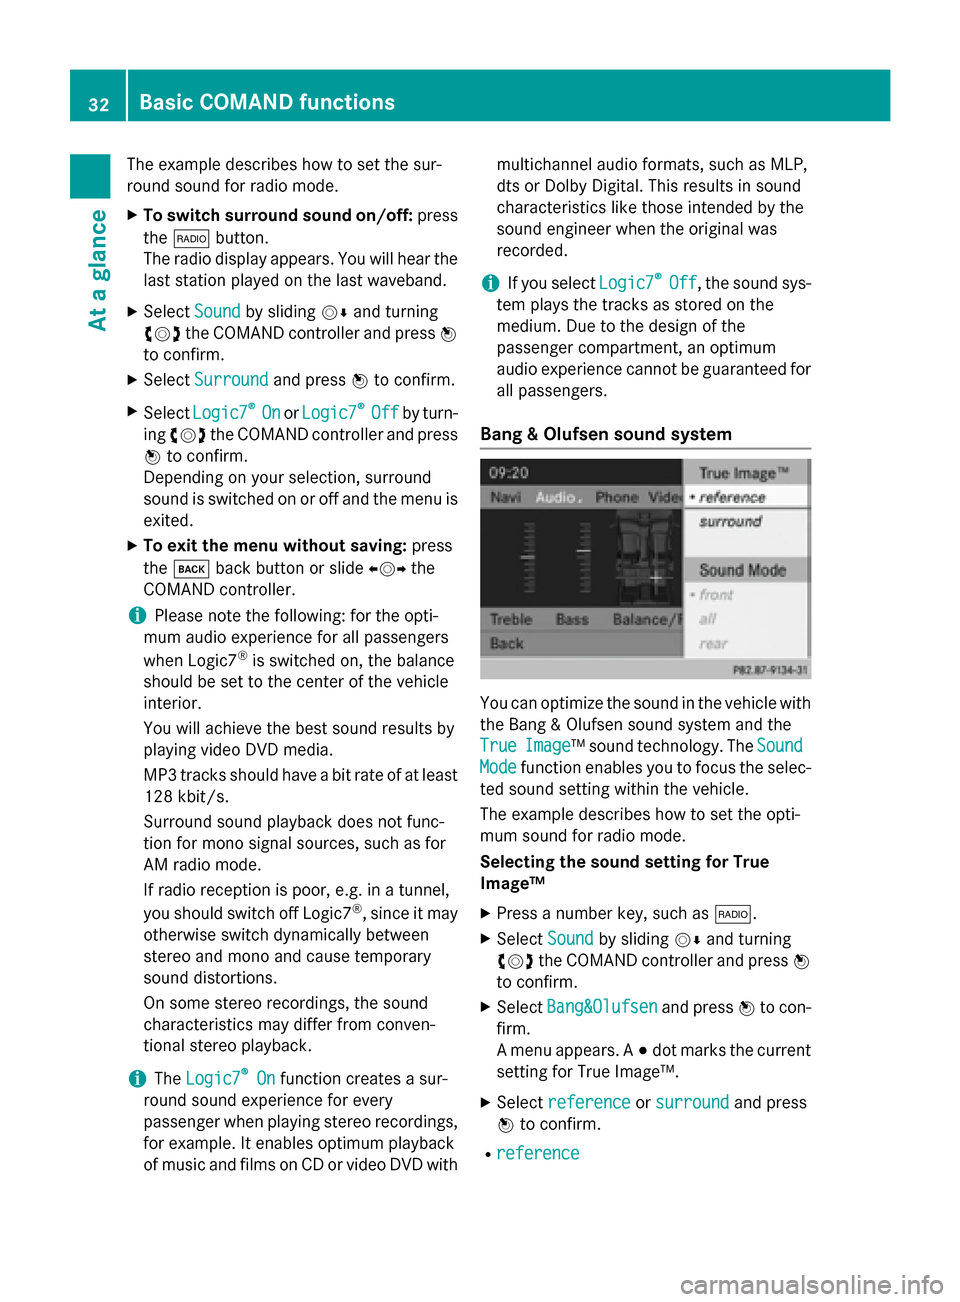
Bang & Olufsen sound system You can optimize the sound in the vehicle with
the Bang & Olufsen sound system and the
True True Image
Image™ sound technology. The Sound
Sound
Mode
Mode function enables you to focus the selec-
ted sound setting within the vehicle.
The example describes how to set the opti-
mum sound for radio mode.
Selecting the sound setting for True
Image™
X Press a number key, such as 002A.
X Select Sound Soundby sliding 00520064and turning
00790052007A the COMAND controller and press 0098
to confirm.
X Select Bang&Olufsen
Bang&Olufsen and press0098to con-
firm.
A menu appears. A 003Bdot marks the current
setting for True Image™.
X Select reference reference orsurround
surround and press
0098 to confirm.
R reference
reference 32
Basic COMAND functionsAt a glance
Page 35 of 270
This setting provides a crisp, clear, luxury
high-end sound setting for a studio atmos-
phere in your vehicle.
R surround
surround
This setting enables a wide-ranging sound
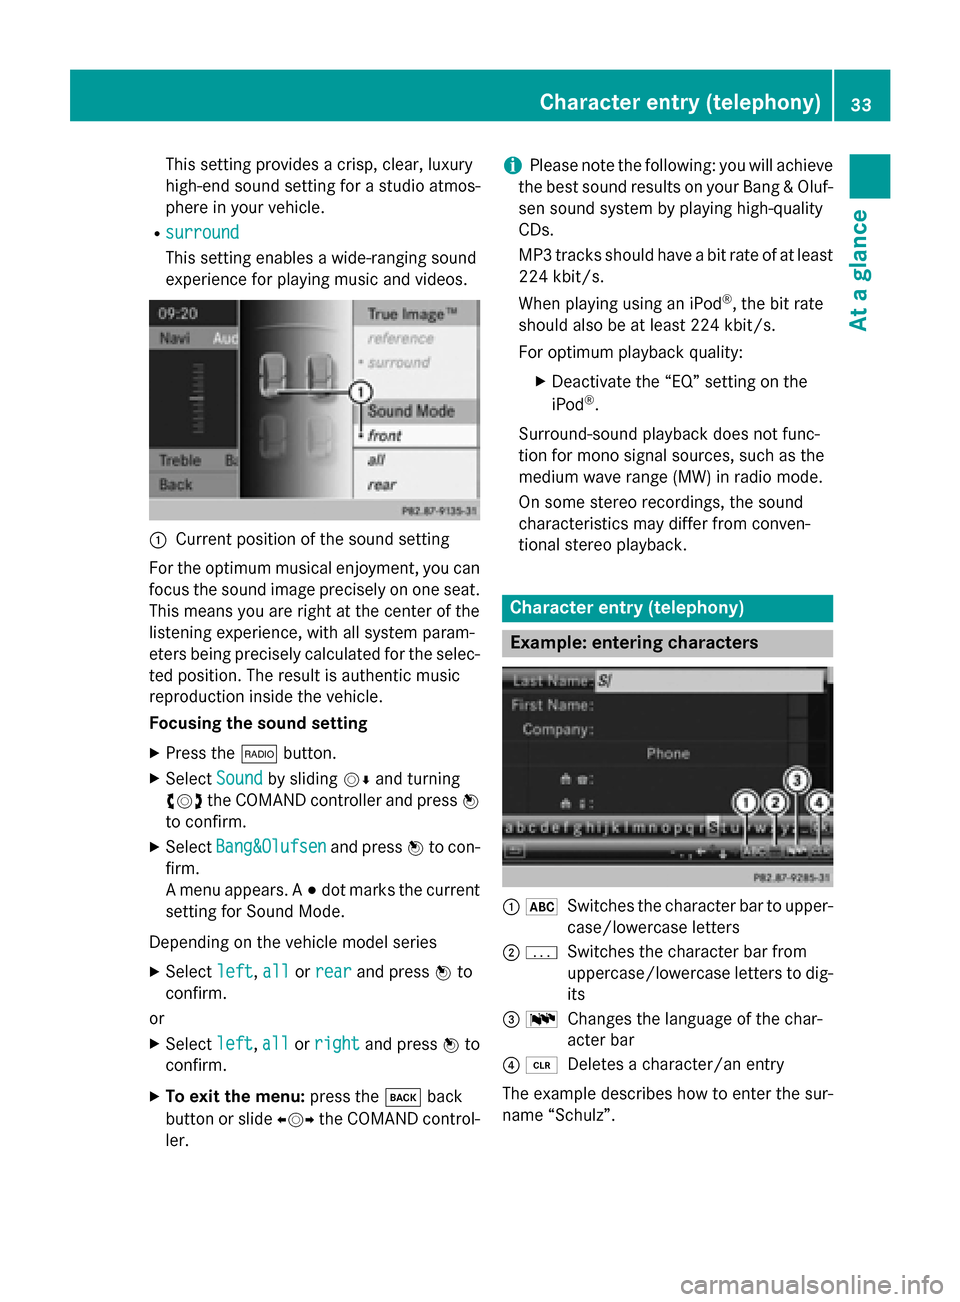
experience for playing music and videos. 0043
Current position of the sound setting
For the optimum musical enjoyment, you can
focus the sound image precisely on one seat. This means you are right at the center of the
listening experience, with all system param-
eters being precisely calculated for the selec-
ted position. The result is authentic music
reproduction inside the vehicle.
Focusing the sound setting
X Press the 002Abutton.
X Select Sound Soundby sliding 00520064and turning
00790052007A the COMAND controller and press 0098
to confirm.
X Select Bang&Olufsen
Bang&Olufsen and press0098to con-
firm.
A menu appears. A 003Bdot marks the current
setting for Sound Mode.
Depending on the vehicle model series X Select left
left, all allorrear
rear and press 0098to
confirm.
or
X Select left
left,all
allorright
right and press 0098to
confirm.
X To exit the menu: press the003Dback
button or slide 009500520096the COMAND control-
ler. i
Please note the following: you will achieve
the best sound results on your Bang & Oluf- sen sound system by playing high-quality
CDs.
MP3 tracks should have a bit rate of at least
224 kbit/s.
When playing using an iPod ®
, the bit rate
should also be at least 224 kbit/s.
For optimum playback quality:
XDeactivate the “EQ” setting on the
iPod ®
.
Surround-sound playback does not func-
tion for mono signal sources, such as the
medium wave range (MW) in radio mode.
On some stereo recordings, the sound
characteristics may differ from conven-
tional stereo playback. Character entry (telephony)
Example: entering characters
0043
0069
Switches the character bar to upper-
case/lowercase letters
0044 0042
Switches the character bar from
uppercase/lowercase letters to dig-
its
0087 0054
Changes the language of the char-
acter bar
0085 0084
Deletes a character/an entry
The example describes how to enter the sur-
name “Schulz”. Character entry (telephony)
33At a glance
Page 40 of 270
To do so, use the special cordless head-
phones (Y page 239). Using the headphones
on the correct sides ensures an optimal
sound.
You can connect your own headphones to a
special headphones jack. You can use the
remote control to operate them. Points to remember
R You can only adjust the volume for the
headphones supplied, directly on the head-
phones.
R Only entertainment functions, i.e. audio,
TV, video and Internet, for example, may be used with SPLITVIEW.
R Different media can be used on the driver
and front-passenger sides as long as they
use different media sources. Example: if a
medium from the single DVD drive is being
played on the driver's side, then another
medium that is also played from the single
DVD drive cannot be played separately on
the front-passenger side. However, other
media can be used at the same time on the
front-passenger side, including radio,
memory card, MUSIC REGISTER, Media
Interface, USB or AUX.
R If you use the same medium on both sides,
you can both carry out the respective set-
tings.
R Internet use is only available at any one
time to the driver or the front passenger.
A corresponding message appears on the
display.
R Internet can only be used, if it is set and
connected via a telephone on the driver's
side.
R The multifunction steering wheel can only
be used for functions which relate to the
driver's side. Switching SPLITVIEW on/off
Switching on SPLITVIEW
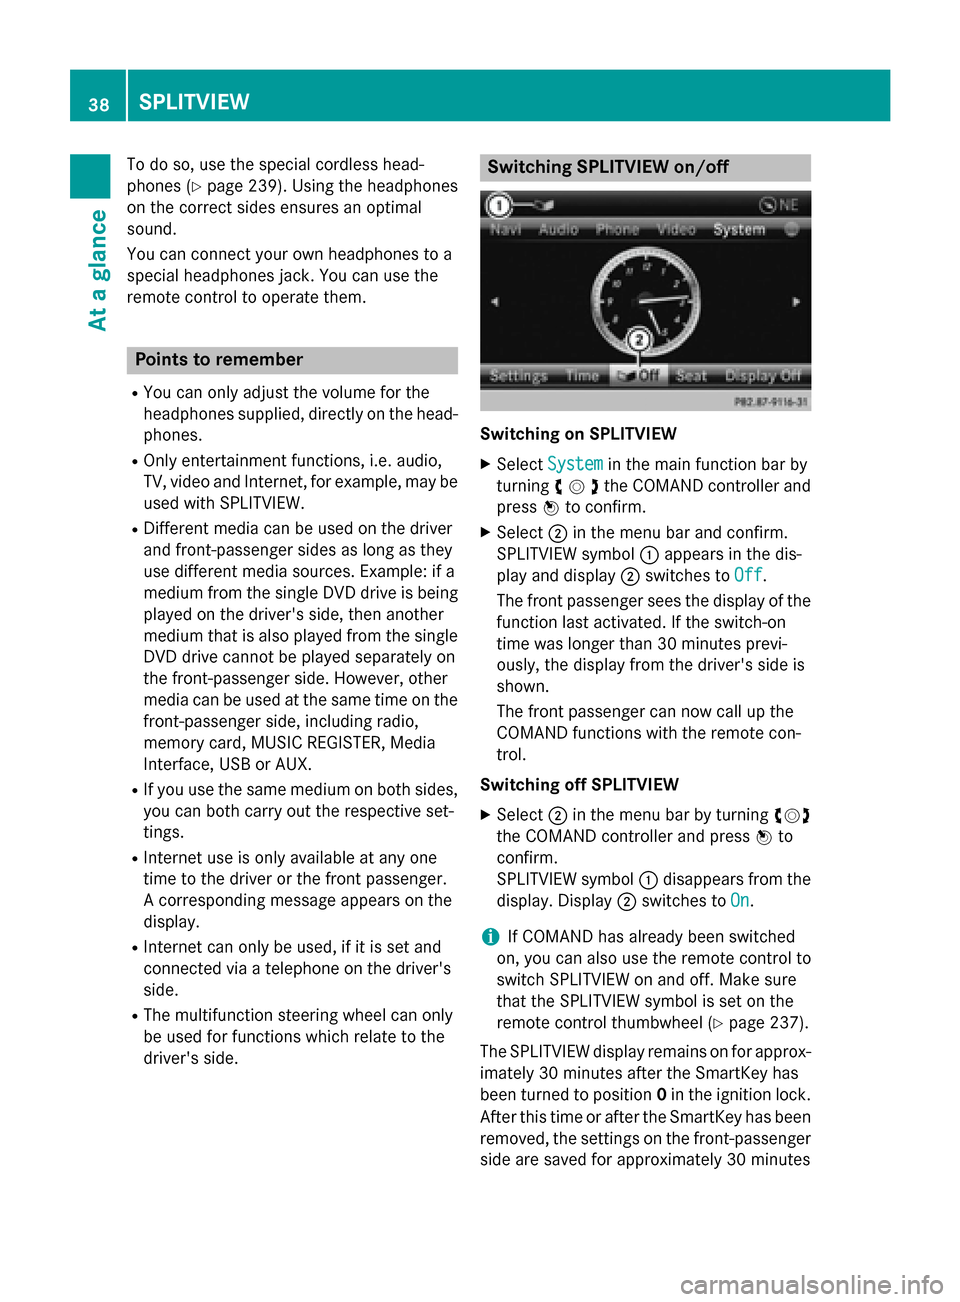
X Select System System in the main function bar by
turning 00790052007Athe COMAND controller and
press 0098to confirm.
X Select 0044in the menu bar and confirm.
SPLITVIEW symbol 0043appears in the dis-
play and display 0044switches to Off
Off .
The front passenger sees the display of the
function last activated. If the switch-on
time was longer than 30 minutes previ-
ously, the display from the driver's side is
shown.
The front passenger can now call up the
COMAND functions with the remote con-
trol.
Switching off SPLITVIEW X Select 0044in the menu bar by turning 00790052007A
the COMAND controller and press 0098to
confirm.
SPLITVIEW symbol 0043disappears from the
display. Display 0044switches to On
On.
i If COMAND has already been switched
on, you can also use the remote control to
switch SPLITVIEW on and off. Make sure
that the SPLITVIEW symbol is set on the
remote control thumbwheel (Y page 237).
The SPLITVIEW display remains on for approx-
imately 30 minutes after the SmartKey has
been turned to position 0in the ignition lock.
After this time or after the SmartKey has been
removed, the settings on the front-passenger side are saved for approximately 30 minutes 38
SPLITVIEWAt a glance