child lock MERCEDES-BENZ E-CLASS CABRIOLET 2011 Owners Manual
[x] Cancel search | Manufacturer: MERCEDES-BENZ, Model Year: 2011, Model line: E-CLASS CABRIOLET, Model: MERCEDES-BENZ E-CLASS CABRIOLET 2011Pages: 353, PDF Size: 8.42 MB
Page 10 of 353
Cell phone
see Mobile phone
Centra llocking
Automatic lockin g(on-board com-
puter) ............................................ .228
Locking/unlocking (key ).................. 72
Centre console ..................................... 32
Changing bulbs Dipped-bea mheadlamps ............... 122
Important safety notes ..................121
Main-beam headlamps ................... 123
Overview of bul btypes .................. 122
Parking lamps (front) .....................123
Standing lamps .............................. 123
Turn signals (front) ......................... 123
Child-proof locks
Child sea tlock ................................. 52
Important safety notes ....................61
Children
In the vehicle ................................... 51
Restraint systems ............................ 51
Child seat
Automatic recognition .....................53
Child sea tlock ................................. 52
Display message ............................ 237
ISOFIX .............................................. 54
On the front-passenger sea t............ 52
Problem (malfunction) .....................57
Recommendations ...........................59
Suitable positions ............................ 57
Cigarette lighter ................................ 272
Cleaning Trailer tow hitch ............................. 291
Climate control
Activating/deactivating rear win-
dow heating ................................... 135
Auxiliary heating/ventilatio n.......... 137
Controlling automatically ...............132
Convenience opening/closing (air
recirculation) ................................. 136
Cooling with aird ehumidification..131
Demisting the windows .................. 135
Demisting the windscree n............. 134
Important safety notes ..................128
Indicator lamp ................................ 132
Notes on using THERMATI Cauto-
matic climate control .....................129Notes on using THERMOTRONIC
automatic climate control
..............131
Overview of systems ......................128
Problems with cooling with air
dehumidification ............................ 132
Problem with the rear window
heating .......................................... 135
Rea rcontrol panel ......................... 130
Setting the aird istribution.............133
Setting the airflow .........................134
Setting the airv ents...................... 141
Setting the climate mode .............. .132
Setting the temperature ................133
Switching air-recirculation mode
on/off ............................................ 135
Switching on/off ........................... 131
Switching residua lheato n/off ......136
Switching the ZONE function on/
off .................................................. 134
THERMATI Cautomatic climate
control (2-zone) ............................. 129
THERMOTRONIC (3-zone) auto-
matic climate control .....................130
Clock( on-board computer) ...............226
Cockpit Overview .......................................... 26
see Instrument cluster
COMAND
see Separate operating instructions
Combination switch ..........................116
Constant headlamp mode see Daytime driving lamps
Consumptio nstatistic s(on -board
computer) .......................................... 217
Convenience closing feature ..............84
Convenience opening/closing (air-
recirculation mode) ........................... 136
Convenience opening feature ............83
Coolan t(engine)
Checkin gthe level ......................... 283
Display message ............................ 242
Notes ............................................. 337
Temperature gauge ........................ 212
Warning lamp ................................. 260
Cooling
see Climate control Index
7
Page 51 of 353
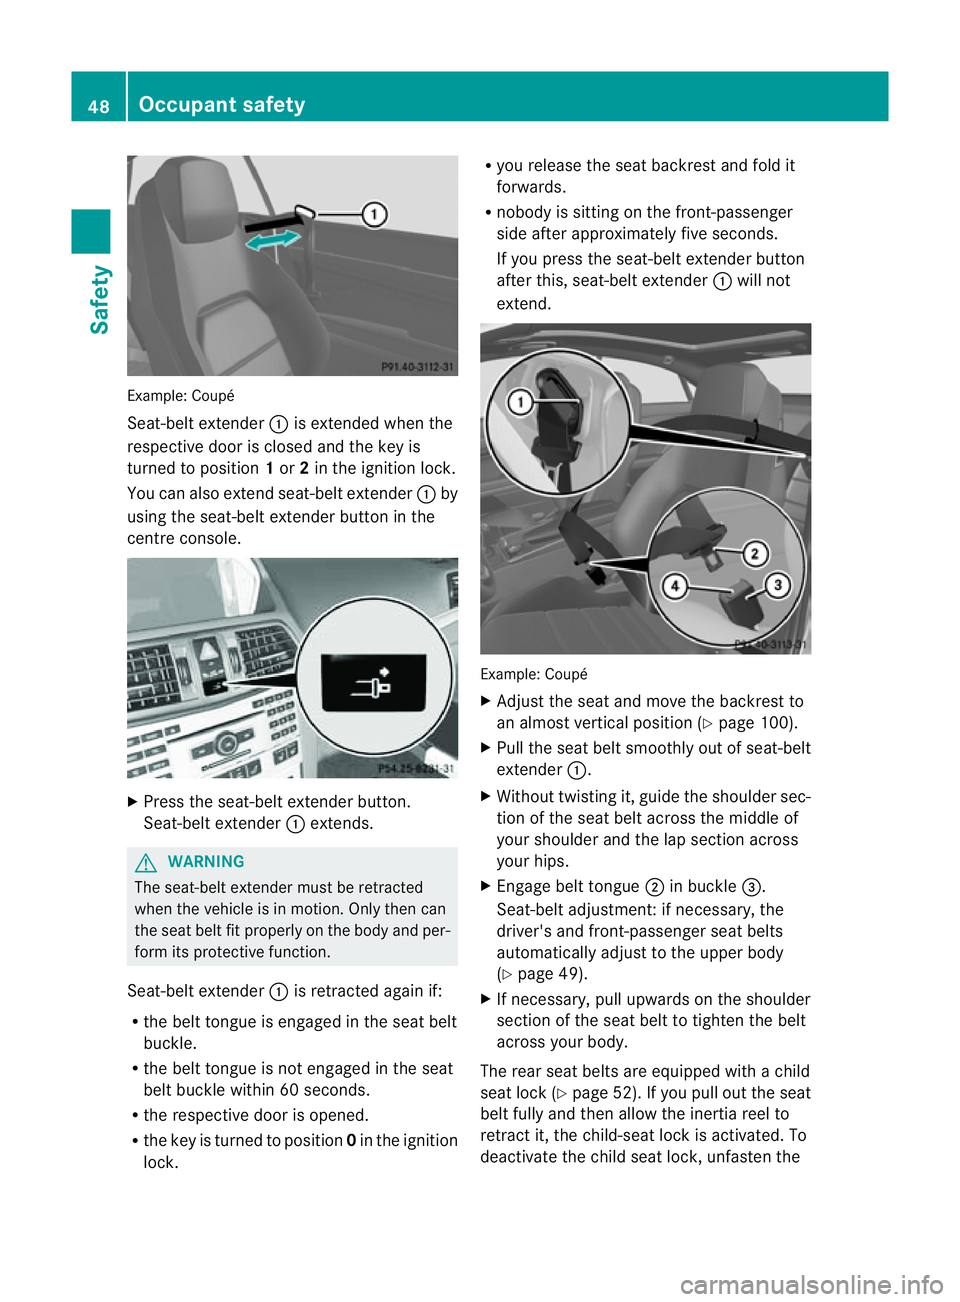
Example: Coupé
Seat-belt extender
:is extende dwhent he
respective door is closed and the key is
turned to position 1or 2in the ignition lock.
Yo uc an also extend seat-belt extender :by
using the seat-belt extende rbutton in the
centre console. X
Press th eseat-belt extender button.
Seat-belt extender :extends. G
WARNING
The seat-belt extender must be retracted
when th evehicl eisinm otion.Only then can
the sea tbelt fit properly on the body and per-
form its protective function.
Seat-belt extender :is retracted again if:
R the belt tongue is engaged in the seat belt
buckle.
R the belt tongue is not engaged in the seat
belt buckle within 60 seconds.
R the respective door is opened.
R the key is turned to position 0in the ignition
lock. R
you release the seat backrest and fold it
forwards.
R nobody is sitting on the front-passenger
side after approximately five seconds.
If you press the seat-belt extender button
after this, seat-belt extender :will not
extend. Example: Coupé
X
Adjust the seat and move the backrest to
an almost vertical position (Y page 100).
X Pull the seat belt smoothly out of seat-belt
extender :.
X Without twistin git, guide the shoulder sec-
tion of the seat belt across the middle of
your shoulder and the lap section across
your hips.
X Engage belt tongue ;in buckle =.
Seat-belt adjustment:ifn ecessary, the
driver's and front-passenger seat belts
automatically adjust to the upper body
(Y page 49).
X If necessary, pull upwards on the shoulder
section of the seat belt to tighten the belt
across your body.
The rear seat belts are equipped with achild
seat lock (Y page 52). If you pull out the seat
belt fully and then allow the inertia reel to
retract it, the child-seat lock is activated. To
deactivat ethe child seat lock, unfasten the 48
Occupant safetySafety
Page 55 of 353
tem could heat up and the child could burn
herself/himself on them.
If ac hild opens adoor, the child or othe rper-
sons could be injured as aresult. They could
get out and injure themselves or be injured by
ap assing vehicle.
Also observe the notes on HOLD .Relevant
information can be found in the index. G
WARNING
Unsecured or incorrectly positioned loads
increase the risk of injury for children and all
other occupant sinthe event of:
R an accident
R ab raking manoeuvre
R as udden change of direction
Do not carry heavy or hard objects in the vehi-
cle interior unless they are secured. You will
find further information under "Loading guide-
lines" in the index.
Child seat lock The seat belts on the rear seats are fitted with
ac
hild seat lock. When enabled, the child-
seat lock function ensures that the belt does
not slacken oncet he child seat is secured.
Installing achild restraint system:
X Always comply with the manufacturer's
installation instructions.
X Pull the seat belt smoothly from the inertia
reel.
X Engage the seat belt tongue in the belt
buckle.
Activating the child seat lock:
X Pull the seat belt out fully and let the inertia
reel retract it again.
While the seat belt is retracting, you should
hear aratchetin gsound. The child-seat lock
function is enabled.
X Push down on the child restraint system to
take up any slack. Removing
achild restraint system/deactivat-
ing the child seat lock:
X Always comply with the manufacturer's
installation instructions.
X Press the seat belt release button and
guide the belt tongue to the belt outlet.
The child-seat lock function is deactivated.
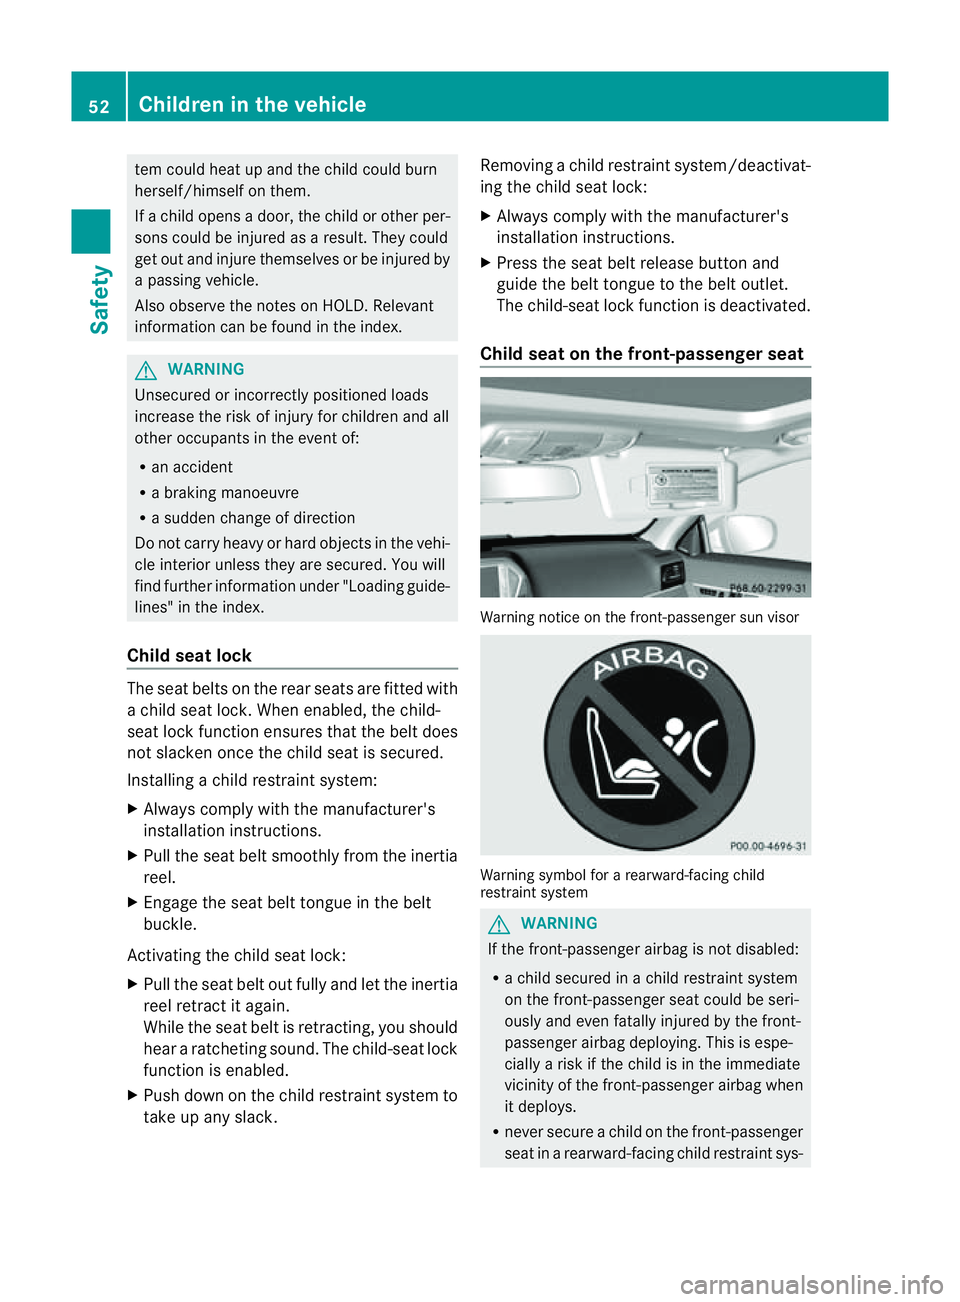
Child seat on the front-passenger seat Warning notice on the front-passenger sun visor
Warning symbol for
arearward-facing child
restraint system G
WARNING
If the front-passenger airbag is not disabled:
R ac hild secured in achild restraint system
on the front-passenger seat could be seri-
ously and even fatally injured by the front-
passenger airbag deploying. This is espe-
cially arisk if the child is in the immediate
vicinit yofthe front-passenger airbag when
it deploys.
R never secure achild on the front-passenger
seat in arearward-facing child restraint sys- 52
Children in thev
ehicleSafety
Page 56 of 353
tem. Onl
ysecurear earward-facing child
restraint syste monasuitablerear seat.
R always move the front-passenger seat to
the rearmost position if you secure achild
in af orward-facing child restraint system
on the front-passenger seat.
The front-passenger airbag is not disabled:
R on vehicles without automatic child seat
recognition on the front-passenger seat
R in vehicles with automatic child seat rec-
ognition in the front-passenger seat, if no
special child restraint system with trans-
ponders for automatic child seat recogni-
tion in the front-passenger seat has been
fitted
R on vehicles with automatic child seat rec-
ognition on the front-passenger seat, if the
PASSENGER AIRBAG OFF indicator lamp
4 is not lit.
To make you aware of this danger, acorre-
sponding warning sticker has been affixed on
the dashboard and on both sides of the sun
visor on the front-passenger side.
Information about recommended child
restraint systems is available at any
Mercedes-Benz Service Centre.
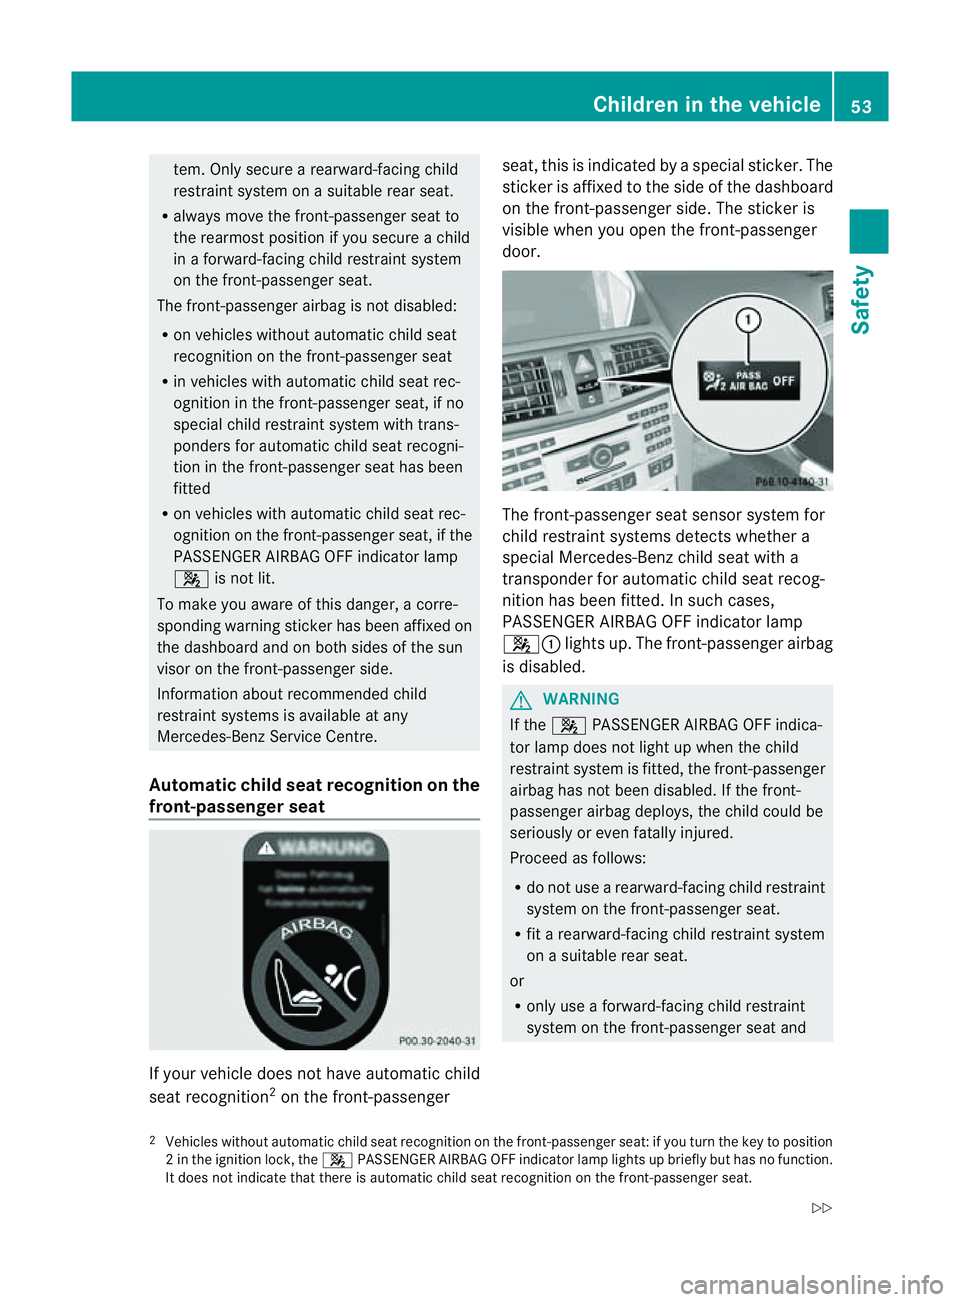
Automatic child seat recognition on the
front-passengers eatIf your vehicle does no
thave automatic child
seat recognition 2
on th efront-pa ssenger seat
,thisisi ndicated by aspecial sticker. The
sticker is affixe dtotheside of th edashboard
on th efront-pa ssenger side. The sticker is
visible when you open th efront-pa ssenger
door. The front-passenger seat sensor system for
child restraint systems detect swhether a
special Mercedes-Ben zchild seat with a
transponder for automatic child seat recog-
nition has been fitted. In such cases,
PASSENGER AIRBAG OFF indicator lamp
4: lights up. The front-passenger airbag
is disabled. G
WARNING
If the 4 PASSENGER AIRBAG OFF indica-
tor lamp does not light up when the child
restraint system is fitted, the front-passenger
airbag has not been disabled. If the front-
passenger airbag deploys, the child could be
seriously or even fatally injured.
Proceed as follows:
R do not use arearward-facing child restraint
system on the front-passenger seat.
R fit arearward-facing child restraint system
on asuitable rear seat.
or
R only use aforward-facing child restraint
system on the front-passenger seat and
2 Vehicles without automatic child seat recognition on the front-passenger seat: if you turn the key to position
2int he ignition lock, the 4PASSENGER AIRBAG OFF indicator lamp lights up briefly but has no function.
It does not indicate that there is automatic child seat recognition on the front-passenger seat. Children in the vehicle
53Safety
Z
Page 57 of 353
move the front-passenger seat to the rear-
most position.
R have the automatic child seat recognition
checked at aqualified specialist workshop.
To ensure that the automatic child seat rec-
ognition on the front-passenger seat func-
tions/communicates correctly, never place
objects, e.g. acushion, under the child
restraint system. The entire base of the child
restraint system must alwaysr est on the seat
cushion. An incorrectly fitted child restraint
system cannot perform its intended protec-
tive function in the event of an accident, and
could leadtoi njuries.
i If the front-passenger airbag is disabled
by the automatic child seat recognition, the
following remai nenable dont he front-
passenge rside:
R the sidebag
R the pelvisbag
R Cabriolet :the headbag
R Coupé:t he windowbag
R the belt tensioner G
WARNING
Do not place electronic devices on the front-
passenger seat, e.g.:
R laptops, when switched on
R mobile phones
R cards with transponders, e.g. ski passes or
access cards
Signals from electronic equipment can cause
interference in the automatic child seat rec-
ognition sensor system. This can lead to a
system malfunction. This may cause the
4 PASSENGER AIRBAG OFF indicator
lamp to light up without there being achild
seat with transponders for automatic child
seat recognition fitted. The front-passenger
airbag will not then deploy during an accident.
It is also possible that the 6SRS warning
lamp lights up and/or the 4PASSENGER
AIRBAG OFF indicator lamp does not light up briefly when you turn the key in the ignition
lock to position 2.
ISOFIXc hild seat securing system for
the rear seats ISOFIXisas
tandardised securing system for
specially designed child restraint systems on
the rear seats. Securing rings for two ISOFIX
child restraint systems are fitted on the left
and right of the rear seats.
Mercedes-Ben zrecommends the use of ISO-
FIX child restraint systems listed on
(Y page 59) together with the insertion
guides included. Using insertion guides
makes it easier to fit ISOFIXc hild restraint
systems. G
WARNING
Ac hild restraint system secured by the ISOFIX
child seat securing system does not provide
sufficient protection for children weighing
more than 22 kg. For this reason, do not
secure children weighing more than 22 kg in
ac hild restraint system secured by the ISOFIX
child seat securing system. If the child weighs
more than 22 kg, secure the child restraint
system using athree-point seat belt. G
WARNING
The child restraint system cannot perform its
protective function if it is not correctly fitted
to as uitable vehicle seat. The child cannot be
restrained in the event of an accident, heavy
braking or sudden changes of direction. The
child could be seriously or even fatally injured.
For this reason, when fittingac hild restraint
system, observe the manufacturer's installa-
tion instructions and the correct use of the
child restraint system.
For reasons of safety, only use child restraint
systems with the ISOFIX child seat securing
system on the rear seats.
We recommendt hat you use the ISOFIX child
restraint systems that have been recommen-
ded for Mercedes-Benz. 54
Children in the vehicleSafety
Page 64 of 353
Child-proof locks
Important safety notes G
WARNING
Do no tleave children unsupervised in the
vehicle, even if they are secured in achild
restraint system. They could injure them-
selves on parts of the vehicle. They could also
be seriously or even fatally injured by pro-
longed exposure to extreme heat or cold.
Do not expose the child restraint system to
direct sunlight. Parts of the child restraint sys-
tem could heat up and the child could burn
herself/himself on them.
If ac hild opens adoor, the child or other per-
sons could be injured as aresult. They could
get out and injure themselves or be injured by
ap assing vehicle.
Also observe the notes on HOLD .Relevant
information can be found in the index.
Override feature for the rear side win-
dows G
WARNING
Activate the override switch for the rear side
windows if children are travellin ginthe vehi-
cle. Otherwise, the children could open the
side windows while the vehicle is movin gand
injure themselves or others. X
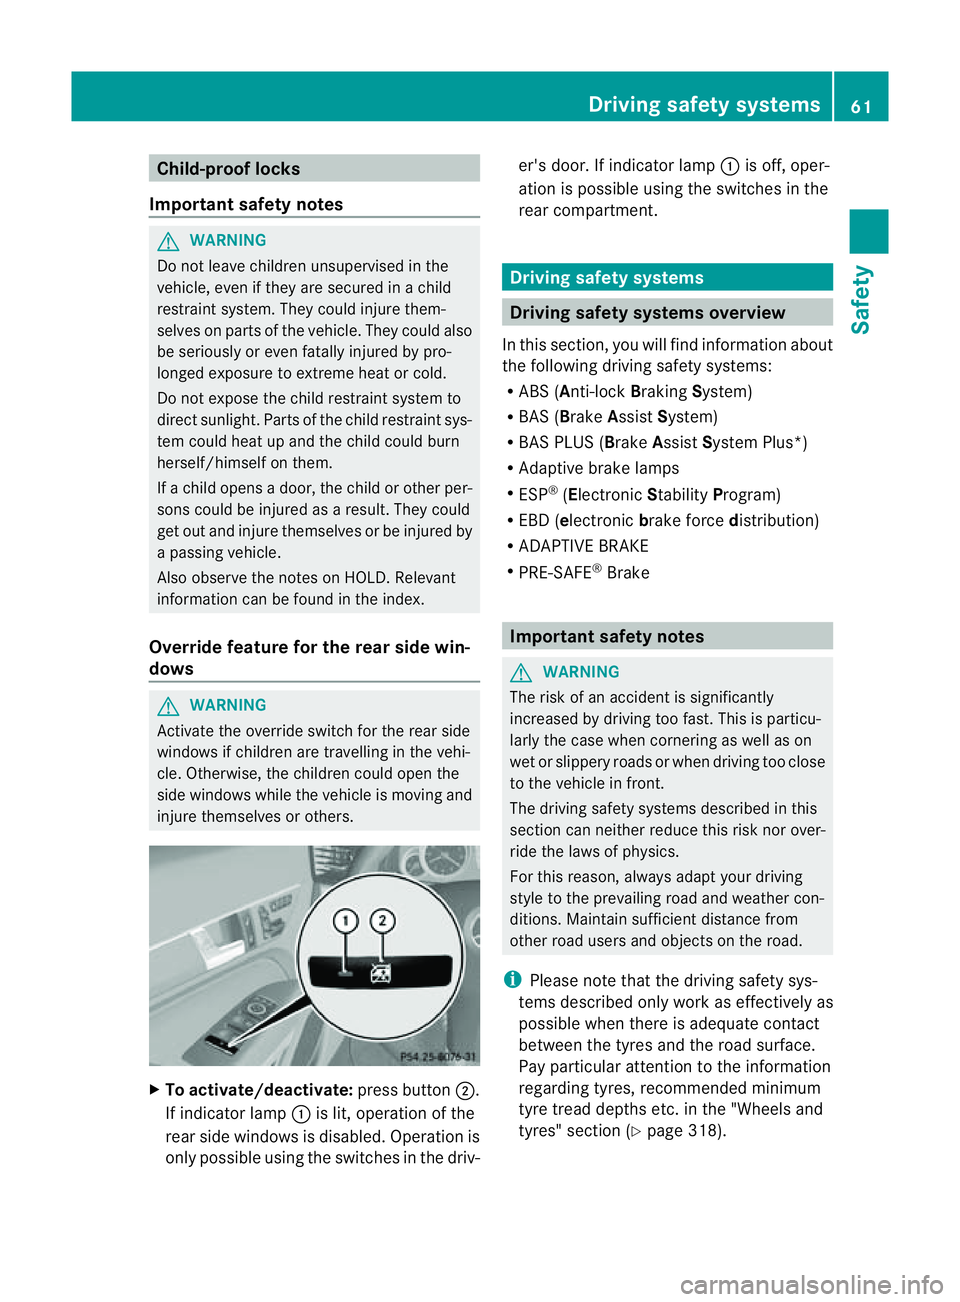
To activate/deactivate: press button;.
If indicator lamp :is lit, operation of the
rear side windows is disabled. Operation is
only possible using the switches in the driv- er's door. If indicator lamp
:is off, oper-
ation is possible using the switches in the
rear compartment. Driving safety systems
Driving safety system
soverview
In this section, you will find information about
the following driving safety systems:
R ABS (Anti-lock BrakingSystem)
R BAS (Brake AssistSystem)
R BAS PLUS ( BrakeAssist System Plus*)
R Adaptive brake lamps
R ESP ®
(Electronic StabilityProgram)
R EBD( electronic brake force distribution)
R ADAPTIV EBRAKE
R PRE-SAFE ®
Brake Important safety notes
G
WARNING
The risk of an acciden tissignificantly
increased by driving too fast. This is particu-
larly the case when cornering as well as on
wet or slippery roads or when driving too close
to the vehicle in front.
The driving safety systems described in this
section can neither reduce this risk nor over-
ride the laws of physics.
For this reason, always adapty our driving
style to the prevailing road and weather con-
ditions. Maintain sufficient distance from
other road users and object sonthe road.
i Please notet hat the driving safety sys-
tems described only work as effectively as
possible when there is adequate contact
between the tyres and the road surface.
Pay particular attention to the information
regarding tyres, recommended minimum
tyre tread depths etc. in the "Wheels and
tyres" section (Y page 318). Driving safety systems
61Safety Z
Page 75 of 353
Useful information
i This Owner's Manual describes all models
and all standard and optional equipment
available to your vehicle at the time of pub-
lication of the Owner's Manual. Country-
specific deviation sare possible. Please
not ethat your vehicle may not be equipped
with all feature sdescribed. This also
applies to safety-relevan tsystems and
functions.
i Pleas ereadt he information on qualified
specialist workshop s(Ypage 22). Key
Key functions
Locking an dunlocking centrally The key centrally locks/unlocks:
R
the doors
R the boot lid
R the fuel filler flap G
WARNING
Only for the United Kingdom: if the vehicle
has been locked with the key, the double lock
function is activated as standard. It is then not
possible to open the doors from inside the
vehicle.
Therefore, do not leave any people behind in
the vehicle, particularly children ,elderly peo-
ple or people in need of special assistanc eif
the vehicle has been locked with the key. As
ar esult, they may not be able to free them-
selves in the event of an emergency. As a
result, they could be seriously or even fatally
injured by prolonged exposure to extremely
high or low temperatures, for example. In this
case, rescuin gpeople from outside the vehi-
cle is difficult.
Deactivate the interior motion sensor before
you lock the vehicle with the key. The doors
can then be opened from the inside after the vehicle has been locked from the outside with
the key.
G
WARNING
If children are left unsupervised in the vehicle,
they could:
R open adoor from inside the vehicle at any
time, even if it has been locked
R start the vehicle using akey which has been
left in the vehicle
R release the parking brake
They could thereby endanger themselves and
others. Never leave children unsupervised in
the vehicle. Always take the key with you
when leaving the vehicle, even if you are only
leaving it for ashort time. G
WARNING
If ak ey ring is too heavy or too large, the
weight actin gonthe key could cause it to turn
in the ignition lock or catc honthe steering
wheel. This could cause the engine to be
switched off suddenly. You may lose control
of the vehicle and cause an accident. Do not
attac hany heavy or large key rings to the key
that is inserted in the ignition. :
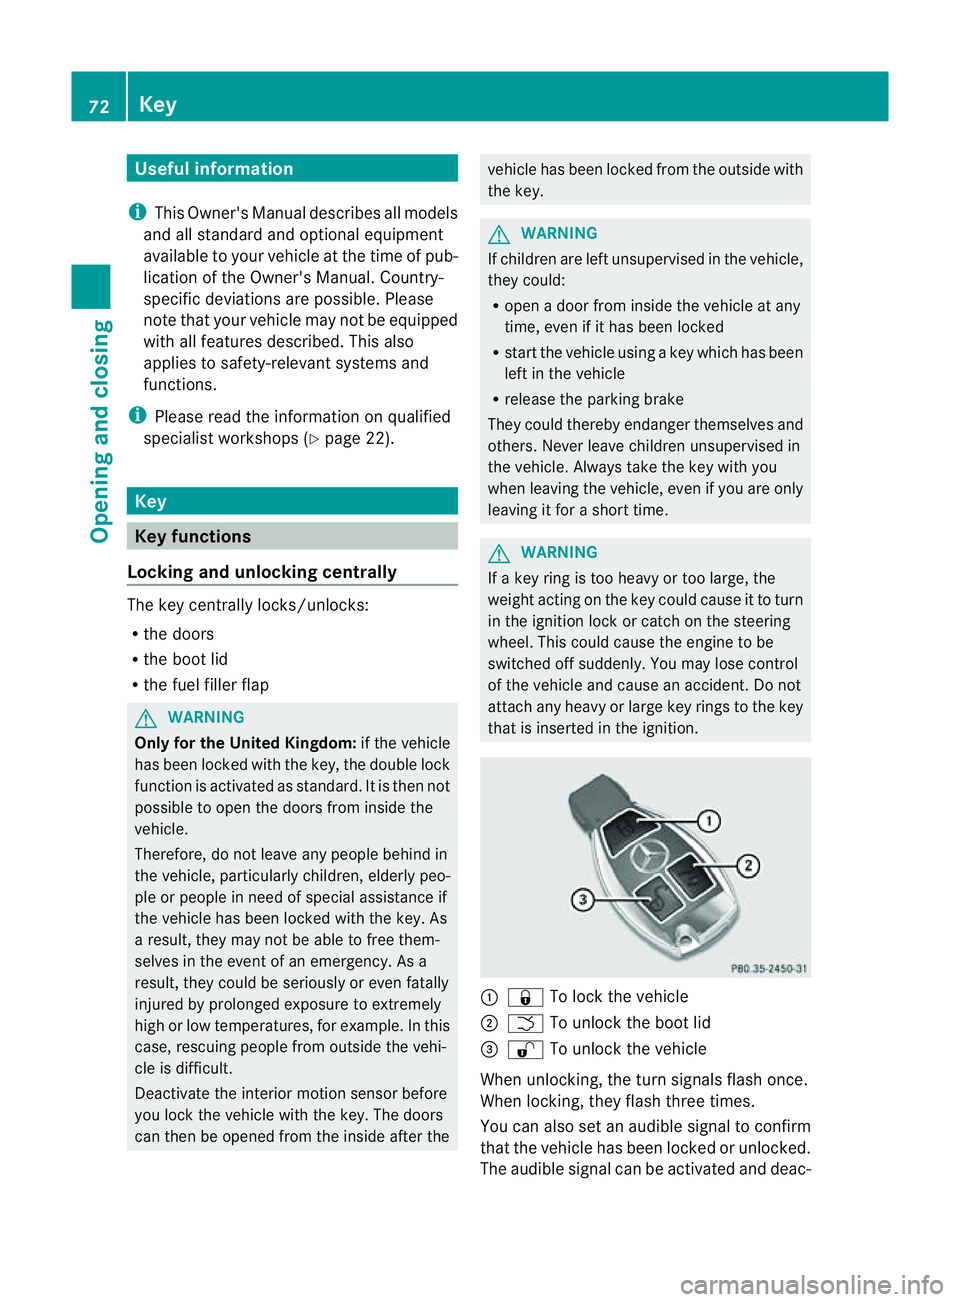
& To lock the vehicle
; F To unlock the boot lid
= % To unlock the vehicle
When unlocking, the turn signals flash once.
When locking, they flash three times.
You can also set an audible signal to confirm
that the vehicle has been locked or unlocked.
The audible signal can be activated and deac- 72
KeyOpening and closing
Page 77 of 353
Restoring the factory settings
X Press the %and& buttons simulta-
neously for approximately six seconds until
the battery check lamp flashe stwice. Emergenc
ykey element
General notes If th
evehicle can no longer be locked or
unlocked with th ekey, use th eemergency
key element.
If you use th eemergency key element to
unlock and open th edriver' sdoor or th eboot
lid, th eanti-thef talarm system will be trig-
gered (Y page 68).
There are several ways to tur noff the alarm:
X To turn the alarm off with the key: press
the % or& button on the key.
or
X Insert the key into the ignition lock.
or
X To deactivate the alarm with KEYLESS-
GO: press the Start/Stop button in the igni-
tion lock. The key must be in the vehicle.
or
X Lock or unlock the vehicle using KEYLESS-
GO. The key must be outside the vehicle.
Removing the emergency key element X
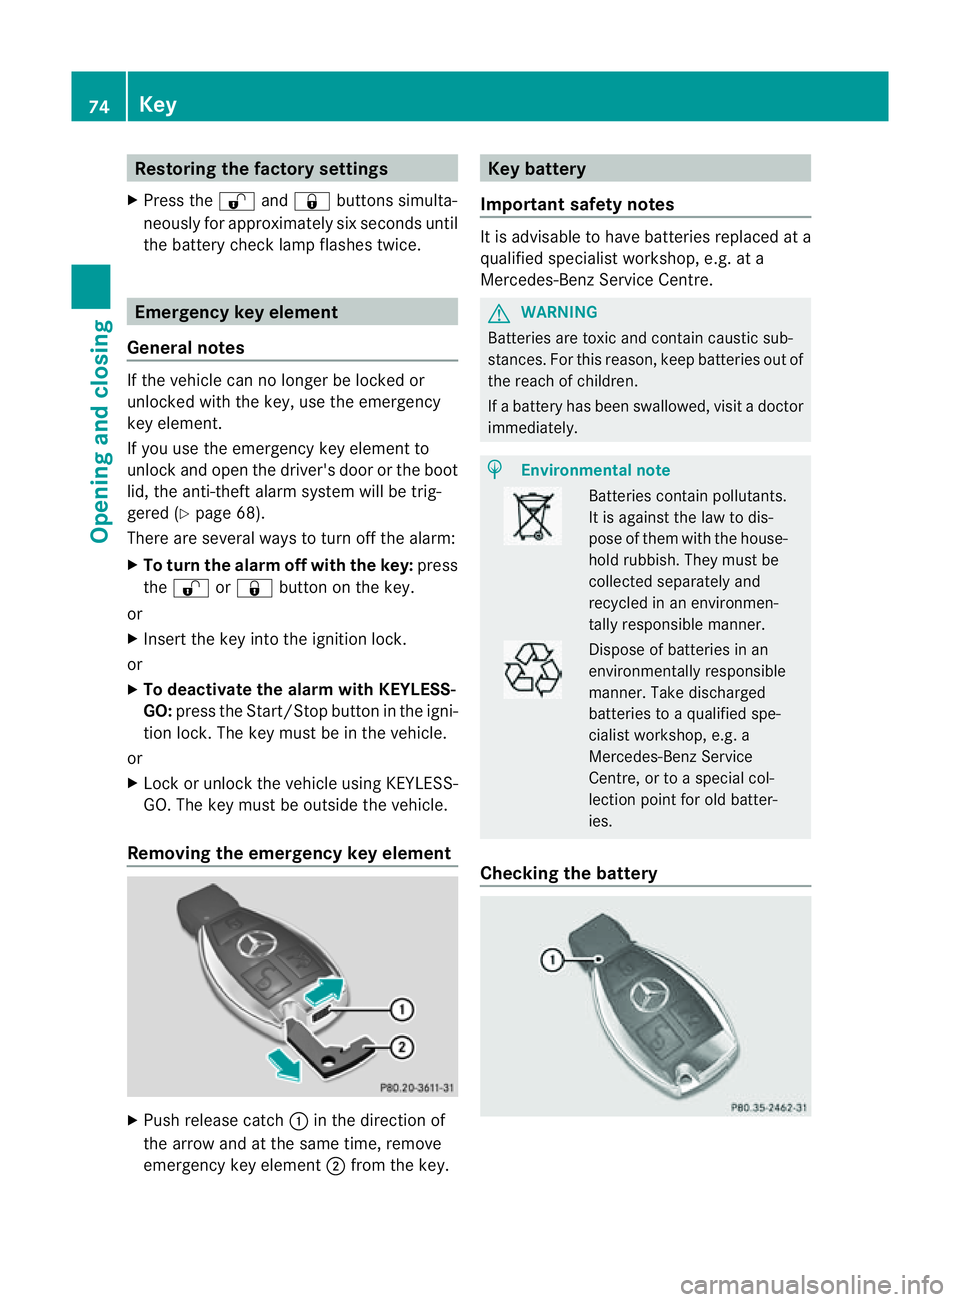
Pus hrelease catch :in the direction of
the arrow and at the same time, remove
emergency key element ;from the key. Keyb
attery
Important safety notes It is advisable to have batteries replaced at a
qualified specialist workshop, e.g. at a
Mercedes-Benz Service Centre.
G
WARNING
Batterie sare toxic and contain caustic sub-
stances. For this reason, keep batteries out of
the reach of children.
If ab attery has been swallowed ,visi tad octor
immediately. H
Environmental note Batteries contain pollutants.
It is against the law to dis-
pose of them with the house-
hold rubbish. They must be
collected separately and
recycled in an environmen-
tally responsible manner.
Dispose of batteries in an
environmentally responsible
manner. Take discharged
batteries to
aqualified spe-
cialist workshop, e.g. a
Mercedes-Benz Service
Centre, or to aspecial col-
lection point for old batter-
ies.
Checking the battery 74
KeyOpening and closing
Page 80 of 353
Problem Possible causes/consequences and
M Solutions
The key cannot be
turned in the ignition
lock. The key has been in position
0for aconsiderable time.
X Remove the key and reinsert it into the ignition lock.
X Check the starter battery and charge it if necessary
(Y page 305).
X Start the engine. The on-board voltage is too low.
X
Switch off non-essential consumers, e.g. seat heating or interior
lighting, and try to turn the key again.
If this does not work:
X Check the starter battery and charge it if necessary
(Y page 305).
or
X Jump-start the vehicle (Y page 309).
or
X Consult aqualified specialist workshop. Doors
Important safety notes
G
WARNING
Only for the United Kingdom: if the vehicle
has been locked with the key, the double lock
function is activated as standard. It is then not
possible to open the doors from inside the
vehicle.
Therefore, do not leave any people behind in
the vehicle, particularly children, elderly peo-
ple or people in need of special assistance if
the vehicle has been locked with the key. As
ar esult, they may not be able to free them-
selves in the event of an emergency. As a
result, they could be seriously or even fatally
injured by prolonged exposure to extremely
high or low temperatures, for example. In this
case, rescuing people from outside the vehi-
cle is difficult.
Deactivat ethe interior motion sensor before
you lock the vehicle with the key. The doors
can then be opened from the inside after the vehicle has been locked from the outside with
the key.
G
WARNING
If children are left unsupervised in the vehicle,
they could:
R open adoor from inside the vehicle at any
time, even if it has been locked
R start the vehicle using akey which has been
left in the vehicle
R release the parking brake
They could thereby endanger themselves and
others. Never leave children unsupervised in
the vehicle. Always take the key with you
when leaving the vehicle, even if you are only
leaving it for ashort time. Unlocking and opening the doors
from the inside
For all countries except the United King-
dom: you can open adoor from inside the
vehicle even if it has been locked. Doors
77Opening and closing Z
Page 83 of 353
i
You will fin ddetails of the boot lid opening
dimension sinthe Technical data section
(Y page 343).
The boot lid can be:
R opened and closed manually fro moutside
R opened automatically from outside
R opened automatically from inside
R locke dseparately
R unlocked wit hthe emergenc ykey element Opening/closing manually
Opening X
Press the %button on the key. X
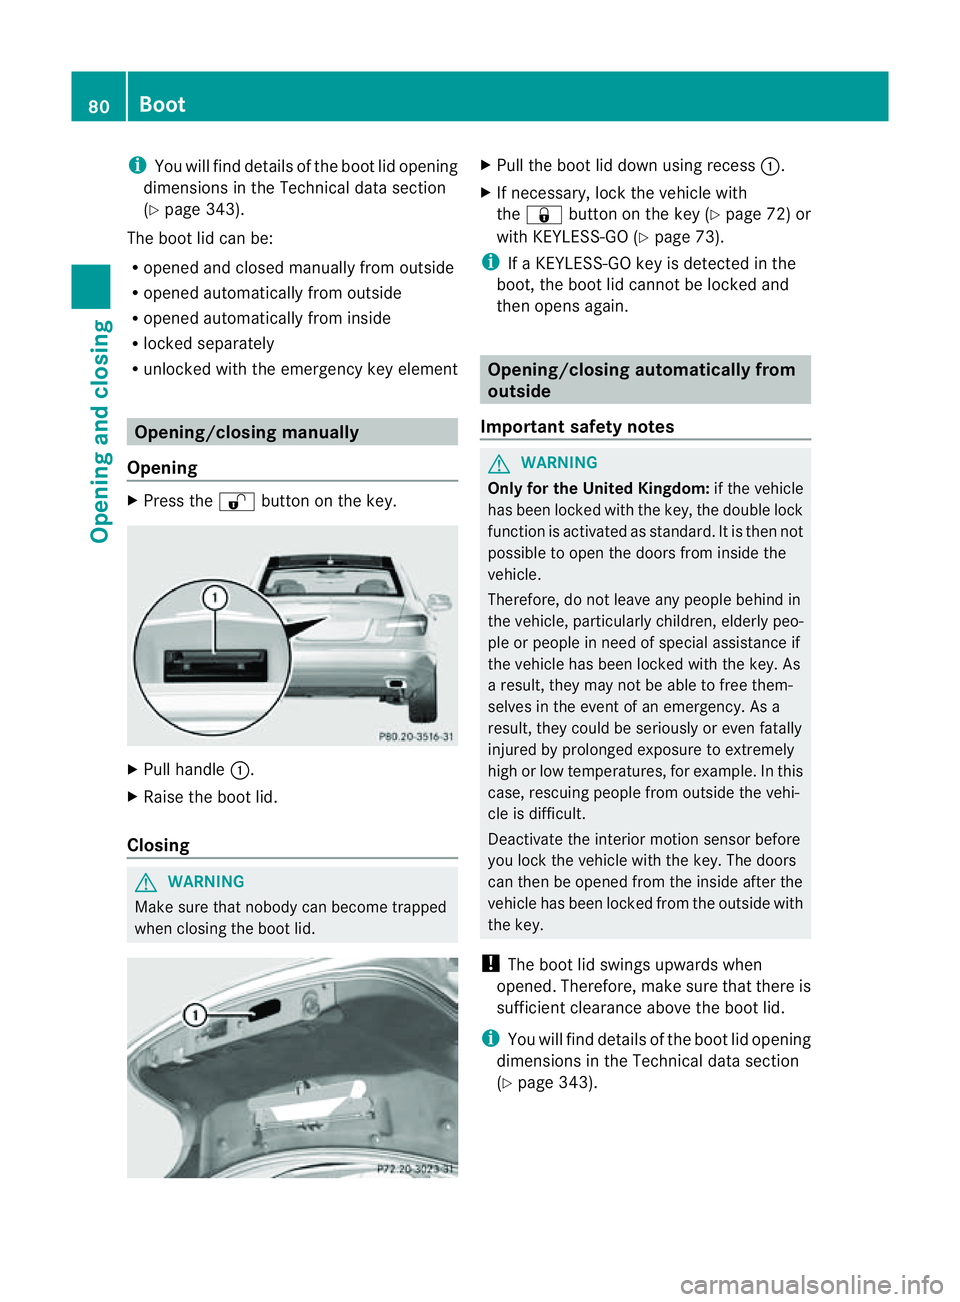
Pull handle :.
X Raise the boot lid.
Closing G
WARNING
Make sure that nobody can become trapped
when closing the boot lid. X
Pull the boot lid down using recess :.
X If necessary, lock the vehicle with
the & button on the key (Y page 72) or
with KEYLESS-GO (Y page 73).
i IfaK EYLESS-GO key is detected in the
boot, the boot lid cannot be locked and
then opens again. Opening/closing automatically from
outside
Important safet ynotes G
WARNING
Only for the United Kingdom: if the vehicle
has been locked with the key, the double lock
function is activated as standard. It is then not
possible to open the doors from inside the
vehicle.
Therefore, do not leave any people behind in
the vehicle, particularly children ,elderly peo-
ple or people in need of special assistanc eif
the vehicle has been locked with the key. As
ar esult, they may not be able to free them-
selves in the event of an emergency. As a
result, they could be seriously or even fatally
injured by prolonged exposure to extremely
high or low temperatures, for example. In this
case, rescuin gpeople from outside the vehi-
cle is difficult.
Deactivate the interior motion sensor before
you lock the vehicle with the key. The doors
can then be opened from the inside after the
vehicle has been locked from the outside with
the key.
! The boot lid swings upwards when
opened. Therefore, make sure that ther eis
sufficien tclearance above the boot lid.
i You will fin ddetails of the boot lid opening
dimension sinthe Technical data section
(Y page 343). 80
BootOpening and closing