MERCEDES-BENZ E-CLASS CABRIOLET 2012 Owners Manual
Manufacturer: MERCEDES-BENZ, Model Year: 2012, Model line: E-CLASS CABRIOLET, Model: MERCEDES-BENZ E-CLASS CABRIOLET 2012Pages: 389, PDF Size: 9.32 MB
Page 111 of 389
Useful information
i This Owner's Manual describes all mod-
els, series and optional equipment for your
vehicle that were available at the time of
going to press. National variations are pos-
sible. Note that your vehicle may not be
equipped with all of the functions descri-
bed. This is also the case for systems and
functions relevant to safety.
i Read the information on qualified special-
ist workshops: (Y page 23). Correct driver's seat position
X
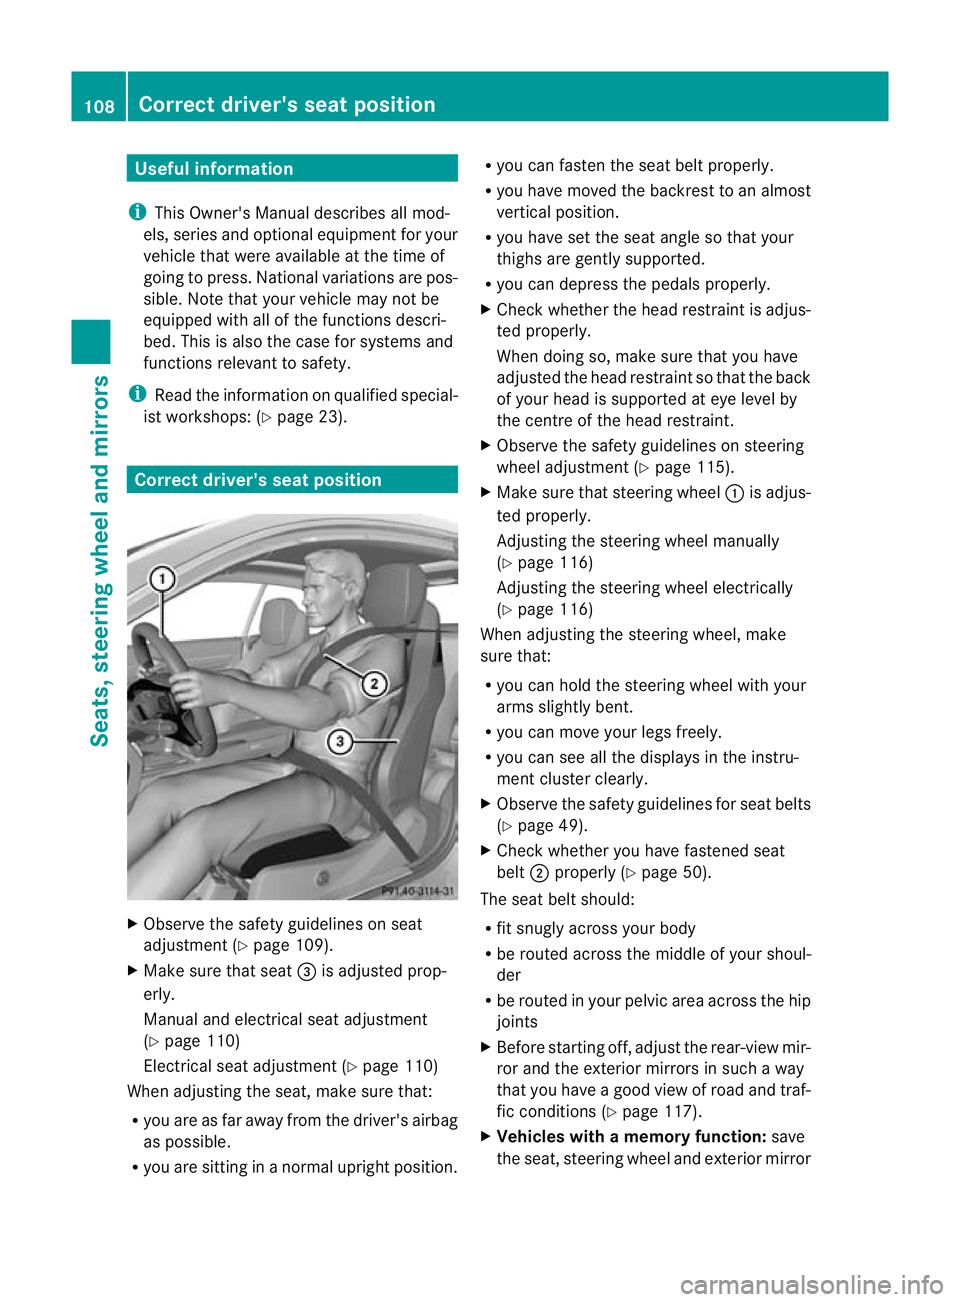
Observe the safety guidelines on seat
adjustment (Y page 109).
X Make sure that seat =is adjusted prop-
erly.
Manual and electrical seat adjustment
(Y page 110)
Electrical seat adjustment (Y page 110)
When adjusting the seat, make sure that:
R you are as far away from the driver's airbag
as possible.
R you are sitting in a normal upright position. R
you can fasten the seat belt properly.
R you have moved the backrest to an almost
vertical position.
R you have set the seat angle so that your
thighs are gently supported.
R you can depress the pedals properly.
X Check whether the head restraint is adjus-
ted properly.
When doing so, make sure that you have
adjusted the head restraint so that the back
of your head is supported at eye level by
the centre of the head restraint.
X Observe the safety guidelines on steering
wheel adjustment (Y page 115).
X Make sure that steering wheel :is adjus-
ted properly.
Adjusting the steering wheel manually
(Y page 116)
Adjusting the steering wheel electrically
(Y page 116)
When adjusting the steering wheel, make
sure that:
R you can hold the steering wheel with your
arms slightly bent.
R you can move your legs freely.
R you can see all the displays in the instru-
ment cluster clearly.
X Observe the safety guidelines for seat belts
(Y page 49).
X Check whether you have fastened seat
belt ;properly (Y page 50).
The seat belt should:
R fit snugly across your body
R be routed across the middle of your shoul-
der
R be routed in your pelvic area across the hip
joints
X Before starting off, adjust the rear-view mir-
ror and the exterior mirrors in such a way
that you have a good view of road and traf-
fic conditions (Y page 117).
X Vehicles with a memory function: save
the seat, steering wheel and exterior mirror 108
Correct driver's seat positionSeats, steering wheel and mirrors
Page 112 of 389
settings with the memory function
(Y
page 120). Seats
Important safety notes
G
WARNING
The seats can still be adjusted when there is
no key in the ignition lock. For this reason,
children should never be left unsupervised in
the vehicle. They could adjust the seats and
become trapped. G
WARNING
Only adjust the driver's seat when the vehicle
is stationary. You will otherwise be distracted
from the road and traffic conditions and you
could lose control of the vehicle as a result of
the seat moving. This could cause an acci-
dent. G
WARNING
If you adjust the seat height carelessly, you or
others could be trapped and thereby injured.
Children in particular could unintentionally
press the buttons to electrically adjust the
seats and become trapped.
Take care that:
R while moving the seats, your hands do not
get under the lever assembly of the seat
adjustment system.
R children in the vehicle do not slide their
hands under the levers. G
WARNING
Make sure that nobody can become trapped
when adjusting the seats.
Observe the notes on airbags.
Secure children as recommended; see the
"Children in the vehicle" section. G
WARNING
Make sure that the back of your head is sup-
ported at eye level by the central area of the head restraint. If your head is not supported
correctly by the head restraint, you could suf-
fer a severe neck injury in the event of an
accident. Never drive if the head restraints are
not engaged and set correctly.
G
WARNING
As eat belt can only offer its intended degree
of protection when the backrest is almost ver-
tical and the occupant is sitting upright. Avoid
seat positions that do not allow the seat belt
to be routed correctly. Adjust the backrest so
that it is as upright as possible. Never travel
with the backrest reclined too far backwards.
You could otherwise be seriously or even
fatally injured in the event of an accident or
sudden braking.
! To avoid damage to the seats and the seat
heating, observe the following information:
R do not spill any liquids on the seats. If
liquid is spilled on the seats, dry them as
soon as possible.
R if the seat covers are damp or wet, do not
switch on the seat heating. The seat
heating should also not be used to dry
the seats.
R clean the seat covers as recommended;
see the "Interior care" section.
R do not transport heavy loads on the
seats. Do not place sharp objects on the
seat cushions, e.g. knives, nails or tools.
The seats should only be occupied by
passengers, if possible.
R when the seat heating is in operation, do
not cover the seats with insulating mate-
rials, e.g. blankets, coats, bags, seat cov-
ers, child seats or booster seats.
! To avoid damage to the seats and the seat
heating, observe the following information:
R do not spill any liquids on the seats. If
liquid is spilled on the seats, dry them as
soon as possible.
R if the seat covers are damp or wet, do not
switch on the seat heating. The seat Seats
109Seats, steering wheel and mirrors Z
Page 113 of 389
heating should also not be used to dry
the seats.
R clean the seat covers as recommended;
see "Interior care".
R do not transport heavy loads on the
seats. Do not place sharp objects on the
seat cushions, e.g. knives, nails or tools.
The seats should only be occupied by
passengers, if possible.
R when the seat heating is in operation, do
not cover the seats with insulating mate-
rials, e.g. blankets, coats, bags, seat cov-
ers, child seats or booster seats.
! Make sure that there are no objects in the
footwell or behind the seats when moving
the seat back. There is a risk that the seats
and/or the objects could be damaged.
i The head restraints in the front seats are
fitted with the NECK-PRO system
(Y page 47). For this reason, it is not pos-
sible to remove the head restraints from
the front seats.
For more information, contact a qualified
specialist workshop.
i Further related subjects:
R Through-loading feature in the rear
bench seat (Coupé) (folding the rear
bench seat forward) (Y page 288)Adjusting the seats manually and
electrically
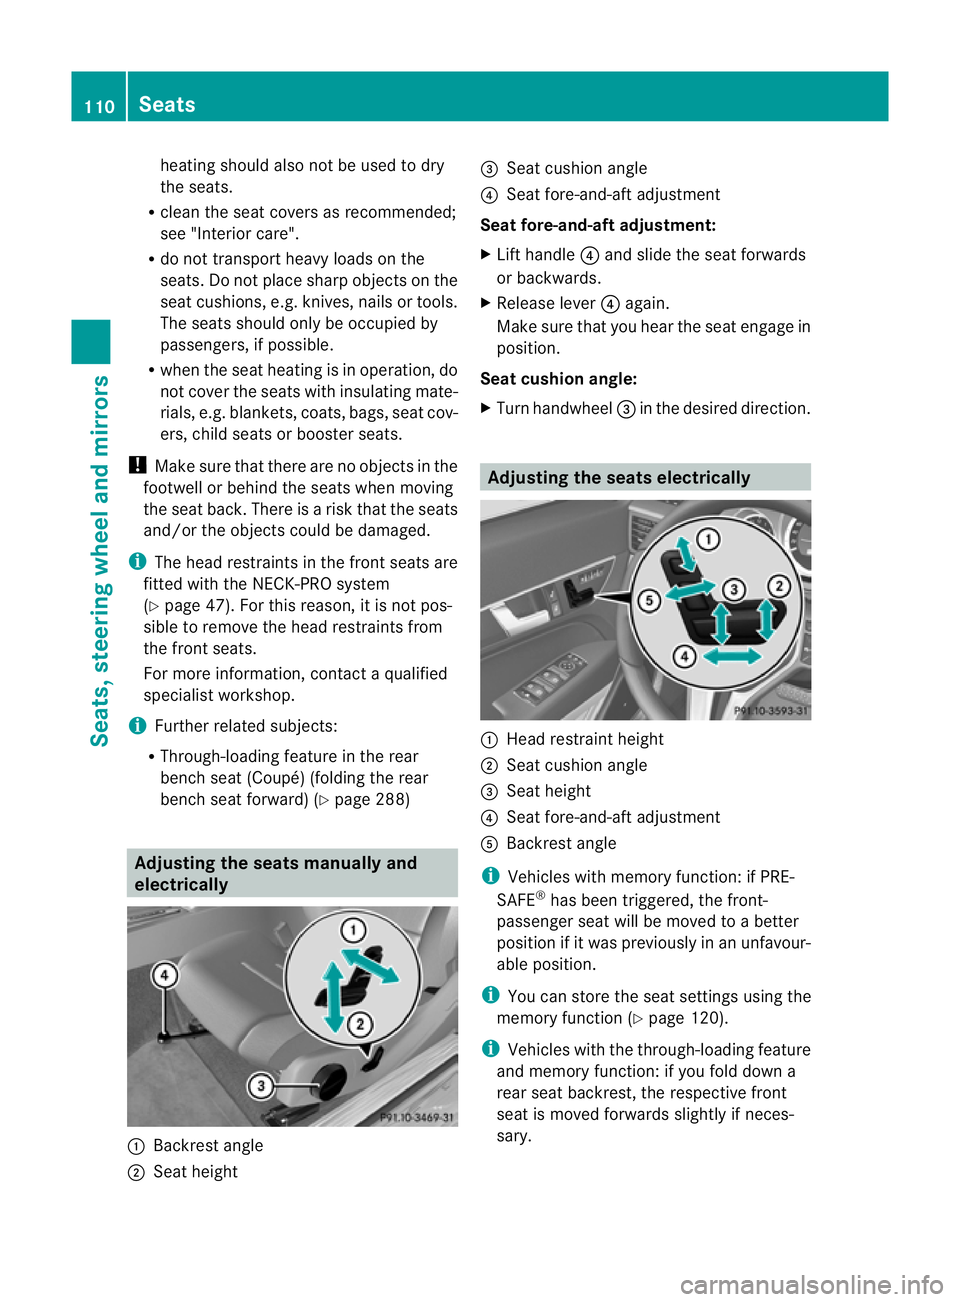
:
Backrest angle
; Seat height =
Seat cushion angle
? Seat fore-and-aft adjustment
Seat fore-and-aft adjustment:
X Lift handle ?and slide the seat forwards
or backwards.
X Release lever ?again.
Make sure that you hear the seat engage in
position.
Seat cushion angle:
X Turn handwheel =in the desired direction. Adjusting the seats electrically
:
Head restraint height
; Seat cushion angle
= Seat height
? Seat fore-and-aft adjustment
A Backrest angle
i Vehicles with memory function: if PRE-
SAFE ®
has been triggered, the front-
passenger seat will be moved to a better
position if it was previously in an unfavour-
able position.
i You can store the seat settings using the
memory function (Y page 120).
i Vehicles with the through-loading feature
and memory function: if you fold down a
rear seat backrest, the respective front
seat is moved forwards slightly if neces-
sary. 110
SeatsSeats, steering wheel and mirrors
Page 114 of 389
i
Vehicles with memory function: when the
seat is moved forwards or backwards, the
headresti s moved up or down automati-
cally. Adjusting the head restraints
Adjusting the head restraints manually Adjusting the head restraint height
X
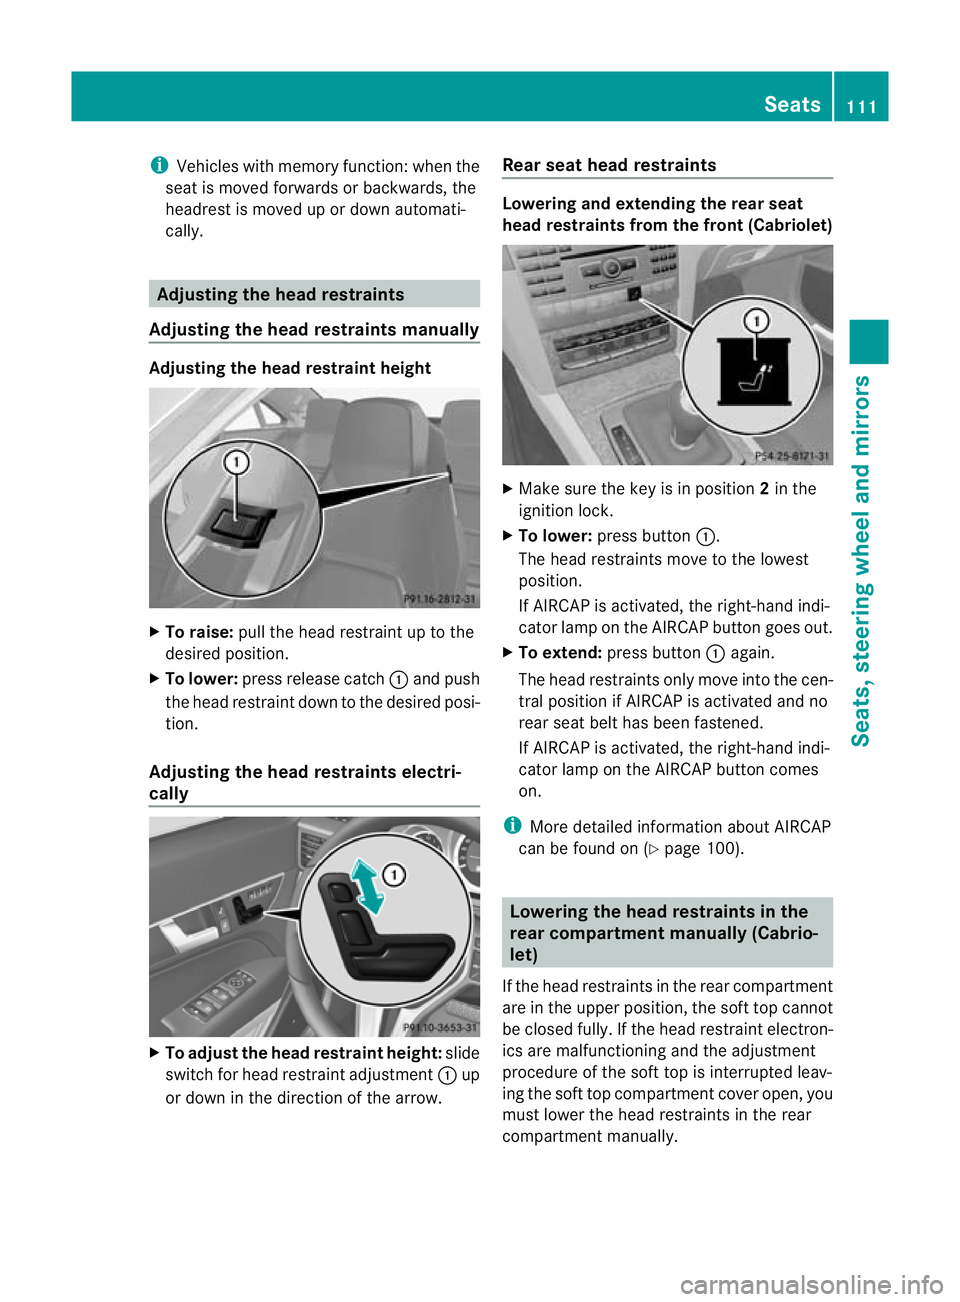
To raise: pull the head restraint up to the
desired position.
X To lower: press release catch :and push
the head restraint down to the desired posi-
tion.
Adjusting the head restraints electri-
cally X
To adjust the head restraint height: slide
switch for head restraint adjustment :up
or down in the direction of the arrow. Rear seat head restraints Lowering and extending the rear seat
head restraints from the front (Cabriolet)
X
Make sure the key is in position 2in the
ignition lock.
X To lower: press button :.
The head restraints move to the lowest
position.
If AIRCAP is activated, the right-hand indi-
cator lamp on the AIRCAP button goes out.
X To extend: press button :again.
The head restraints only move into the cen-
tral position if AIRCAP is activated and no
rear seat belt has been fastened.
If AIRCAP is activated, the right-hand indi-
cator lamp on the AIRCAP button comes
on.
i More detailed information aboutA IRCAP
can be found on (Y page 100). Lowering the head restraints in the
rear compartment manually (Cabrio-
let)
If the head restraints in the rear compartment
are in the upper position, the soft top cannot
be closed fully. If the head restraint electron-
ics are malfunctioning and the adjustment
procedure of the soft top is interrupted leav-
ing the soft top compartment cover open, you
must lowert he head restraints in the rear
compartmentm anually. Seats
111Seats, steering wheel and mirrors Z
Page 115 of 389
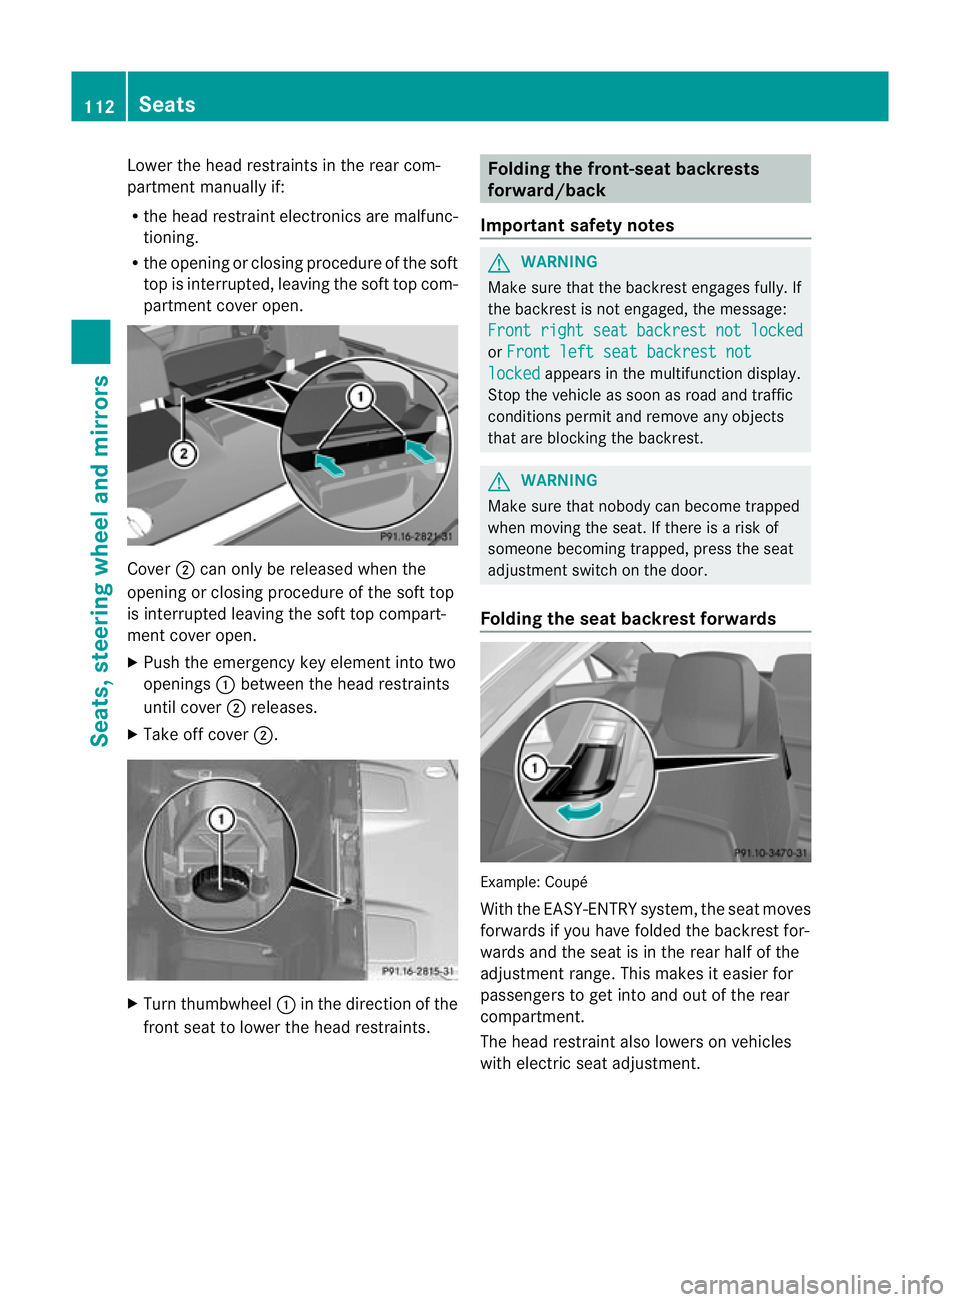
Lower the head restraints in the rear com-
partment manually if:
R the head restraint electronics are malfunc-
tioning.
R the opening or closing procedure of the soft
top is interrupted, leaving the soft top com-
partment cover open. Cover
;can only be released when the
opening or closing procedure of the soft top
is interrupted leaving the soft top compart-
ment cover open.
X Push the emergency key element into two
openings :betwee nthe head restraints
until cover ;releases.
X Take off cover ;. X
Turn thumbwheel :in the direction of the
front seat to lower the head restraints. Folding the front-seat backrests
forward/back
Important safety notes G
WARNING
Make sure that the backrest engages fully. If
the backrest is not engaged, the message:
Front right seat backrest not locked or
Front left seat backrest not locked appears in the multifunction display.
Stop the vehicle as soon as road and traffic
conditions permit and remove any objects
that are blocking the backrest. G
WARNING
Make sure that nobody can become trapped
when moving the seat. If there is a risk of
someone becoming trapped, press the seat
adjustment switch on the door.
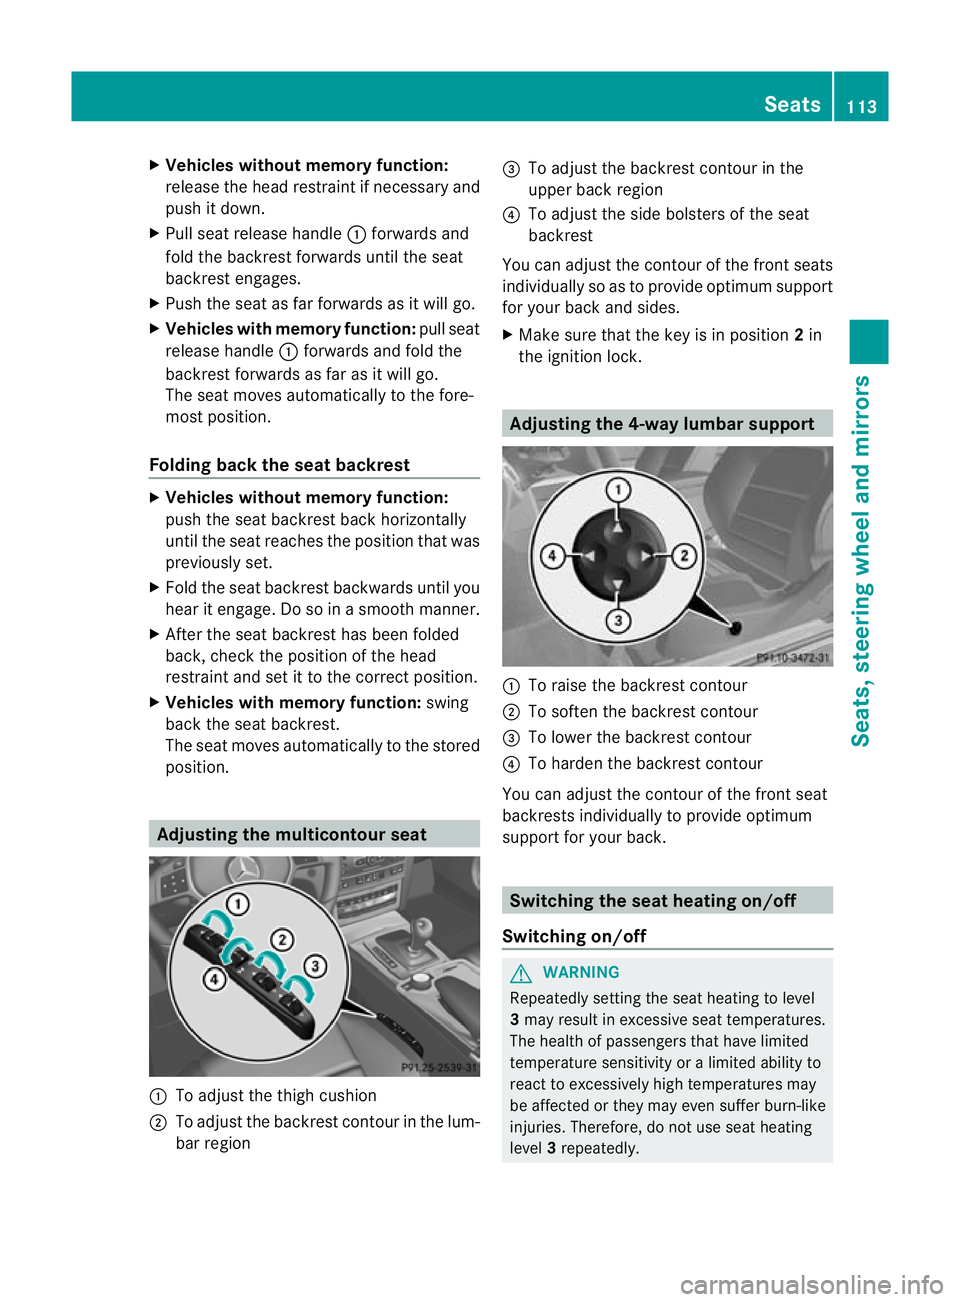
Folding the seat backrest forwards Example: Coupé
With the EASY-ENTRY system, the seat moves
forwards if you have folded the backrest for-
wards and the seat is in the rear half of the
adjustment range. This makes it easier for
passengers to get into and out of the rear
compartment.
The head restraint also lowers on vehicles
with electric seat adjustment.112
SeatsSeats, steering wheel and mirrors
Page 116 of 389
X
Vehicles withou tmemor yfunction:
release the head restraint if necessary and
push it down.
X Pull sea trelease handle :forwards and
fold the backrest forwards until the seat
backrest engages.
X Push the seat as far forwards as it will go.
X Vehicles with memory function: pull seat
release handle :forwards and fold the
backrest forwards as far as it will go.
The seat moves automatically to the fore-
most position.
Folding back the seat backrest X
Vehicles without memory function:
push the seat backrest back horizontally
until the seat reaches the position that was
previously set.
X Fold the seat backrest backwards until you
hear it engage. Do so in a smooth manner.
X After the seat backrest has been folded
back, chec kthe position of the head
restraint and set it to the correct position.
X Vehicles with memory function: swing
back the seat backrest.
The seat moves automatically to the stored
position. Adjusting the multicontour seat
:
To adjust the thigh cushion
; To adjust the backrest contour in the lum-
bar region =
To adjust the backrest contour in the
upper back region
? To adjust the side bolsters of the seat
backrest
You can adjust the contour of the front seats
individually so as to provide optimum support
for your back and sides.
X Make sure that the key is in position 2in
the ignition lock. Adjusting the 4-way lumbar support
:
To raise the backrest contour
; To soften the backrest contour
= To lower the backrest contour
? To harden the backrest contour
You can adjust the contour of the front seat
backrests individually to provide optimum
support for your back. Switching the seat heating on/off
Switching on/off G
WARNING
Repeatedly setting the seat heating to level
3 may result in excessive seat temperatures.
The health of passengers that have limited
temperature sensitivity or a limited ability to
react to excessively high temperatures may
be affected or they may even suffer burn-like
injuries. Therefore, do not use seat heating
level 3repeatedly. Seats
113Seats, steering wheel and mirrors Z
Page 117 of 389
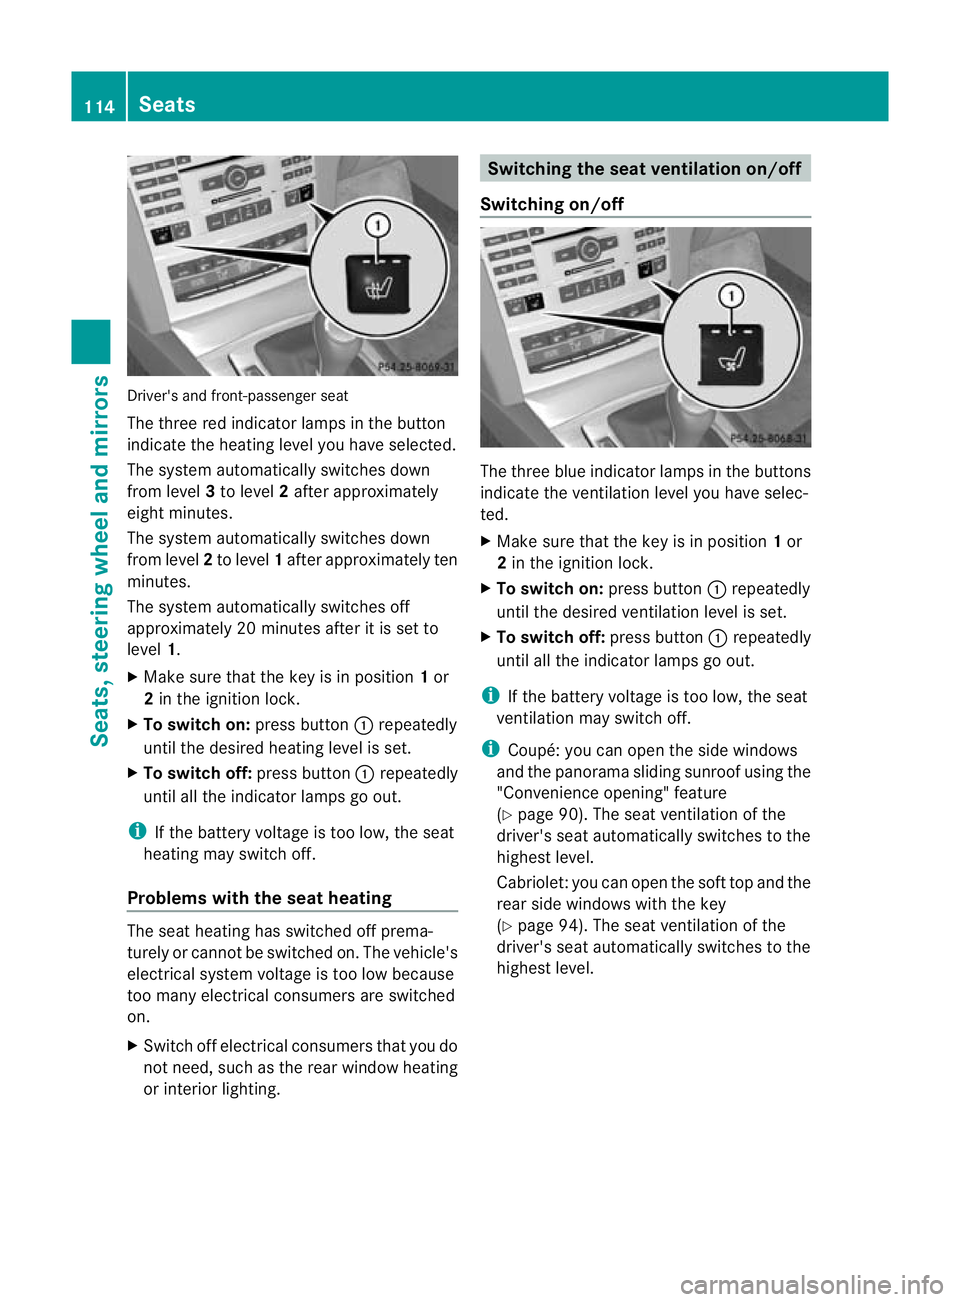
Driver's and front-passenge
rseat
The three red indicato rlamps in the button
indicate the heating level you have selected.
The system automatically switches down
from level 3to level 2after approximately
eigh tminutes.
The system automatically switches down
fro ml evel 2to level 1after approximately ten
minutes.
The system automatically switches off
approximately 20 minutes after it is set to
level 1.
X Make sure that the key is in position 1or
2 in the ignition lock.
X To switch on: press button:repeatedly
until the desired heating level is set.
X To switch off: press button:repeatedly
until all the indicator lamps go out.
i If the battery voltage is too low, the seat
heating may switch off.
Problems with the seat heating The seat heating has switched off prema-
turely or cannot be switched on. The vehicle's
electrical system voltage is too low because
too many electrical consumers are switched
on.
X Switch off electrical consumers that you do
not need, such as the rear window heating
or interior lighting. Switching the seat ventilation on/off
Switching on/off The three blue indicator lamps in the buttons
indicate the ventilation level you have selec-
ted.
X
Make sure that the key is in position 1or
2 in the ignition lock.
X To switch on: press button:repeatedly
until the desired ventilation level is set.
X To switch off: press button:repeatedly
until all the indicator lamps go out.
i If the battery voltage is too low, the seat
ventilation may switch off.
i Coupé: you can open the side windows
and the panorama sliding sunroof using the
"Convenience opening" feature
(Y page 90). The seat ventilation of the
driver's seat automatically switches to the
highest level.
Cabriolet: you can open the soft top and the
rear side windows with the key
(Y page 94). The seat ventilation of the
driver's seat automatically switches to the
highest level. 114
SeatsSeats, steering wheel and mirrors
Page 118 of 389
Problems with the seat ventilation
The seat ventilation has switched off prema-
turely or cannot be switched on. The vehicle's
electrical system voltage is too low because
too many electrical consumers are switched
on.
X Switch off electrical consumers that you do
not need, such as the rear window heating
or interior lighting. AIRSCARF (Cabriolet)
G
WARNING
Very hot air can flow out of the AIRSCARF
vents in the head restraints when AIRSCARF
is in operation. This can cause burns on unpro-
tected skin near the AIRSCARF vents. Lower
the heating output in good time, when neces-
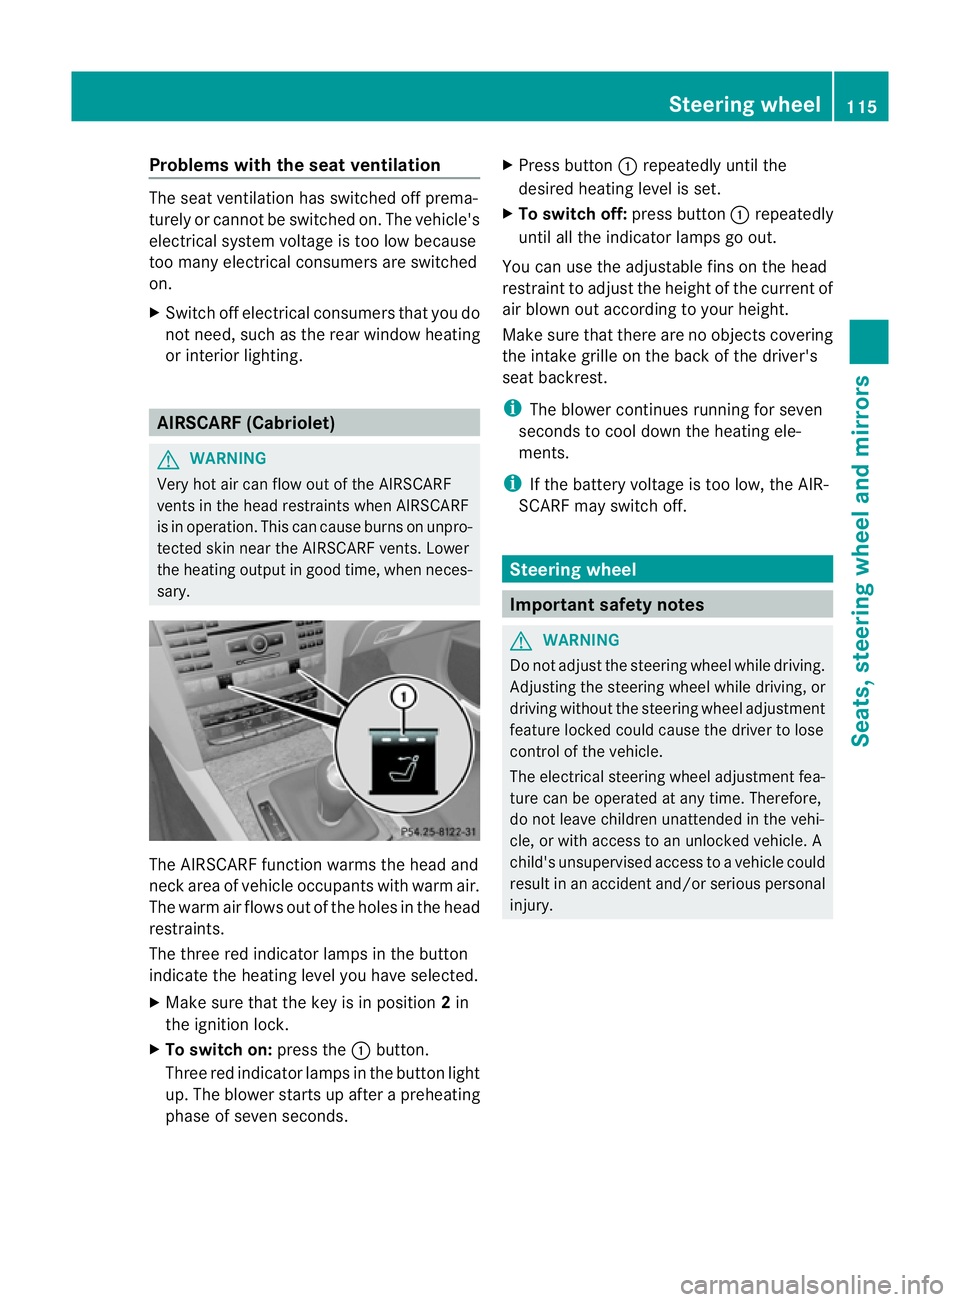
sary. The AIRSCARF function warms the head and
neck area of vehicle occupants with warm air.
The warm air flows out of the holes in the head
restraints.
The three red indicator lamps in the button
indicate the heating level you have selected.
X Make sure that the key is in position 2in
the ignition lock.
X To switch on: press the:button.
Three red indicator lamps in the button light
up. The blower starts up after a preheating
phase of seven seconds. X
Press button :repeatedly until the
desired heating level is set.
X To switch off: press button:repeatedly
until all the indicator lamps go out.
You can use the adjustable fins on the head
restraint to adjust the height of the current of
air blown out according to your height.
Make sure that there are no objects covering
the intake grille on the back of the driver's
seat backrest.
i The blower continues running for seven
seconds to cool down the heating ele-
ments.
i If the battery voltage is too low, the AIR-
SCARF may switch off. Steering wheel
Important safety notes
G
WARNING
Do not adjust the steering wheel while driving.
Adjusting the steering wheel while driving, or
driving without the steering wheel adjustment
feature locked could cause the driver to lose
control of the vehicle.
The electrical steering wheel adjustment fea-
ture can be operated at any time. Therefore,
do not leave children unattended in the vehi-
cle, or with access to an unlocked vehicle. A
child's unsupervised access to a vehicle could
result in an accident and/or serious personal
injury. Steering wheel
115Seats, steering wheel and mirrors Z
Page 119 of 389
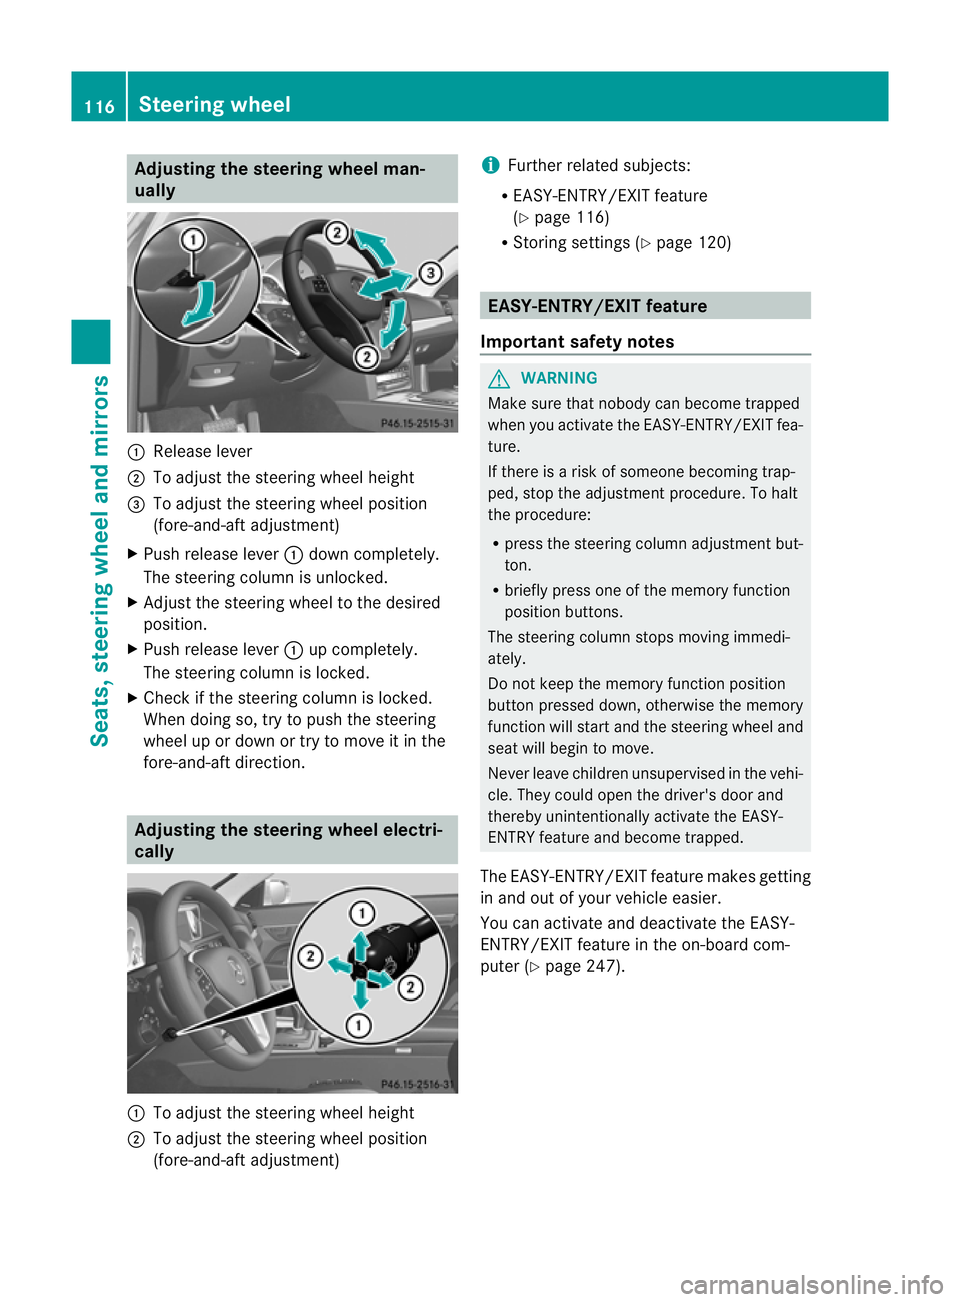
Adjusting the steering wheel man-
ually :
Release lever
; To adjust the steering wheel height
= To adjust the steering wheel position
(fore-and-aft adjustment)
X Push release lever :down completely.
The steering column is unlocked.
X Adjus tthe steering wheel to the desired
position.
X Push release lever :up completely.
The steering column is locked.
X Check if the steering column is locked.
When doing so, try to push the steering
wheel up or down or try to move it in the
fore-and-aft direction. Adjusting the steering wheel electri-
cally
:
To adjust the steering wheel height
; To adjust the steering wheel position
(fore-and-aft adjustment) i
Further related subjects:
R EASY-ENTRY/EXIT feature
(Y page 116)
R Storing settings (Y page 120) EASY-ENTRY/EXIT feature
Important safety notes G
WARNING
Make sure that nobody can become trapped
when you activate the EASY-ENTRY/EXIT fea-
ture.
If there is a risk of someone becoming trap-
ped, stop the adjustment procedure. To halt
the procedure:
R press the steering column adjustment but-
ton.
R briefly press one of the memory function
position buttons.
The steering column stops moving immedi-
ately.
Do not keep the memory function position
button pressed down, otherwise the memory
function will start and the steering wheel and
seat will begin to move.
Never leave children unsupervised in the vehi-
cle. They could open the driver's door and
thereby unintentionally activate the EASY-
ENTRY feature and become trapped.
The EASY-ENTRY/EXIT feature makes getting
in and out of your vehicle easier.
You can activate and deactivate the EASY-
ENTRY/EXIT feature in the on-board com-
puter (Y page 247). 116
Steering wheelSeats, steering wheel and mirrors
Page 120 of 389
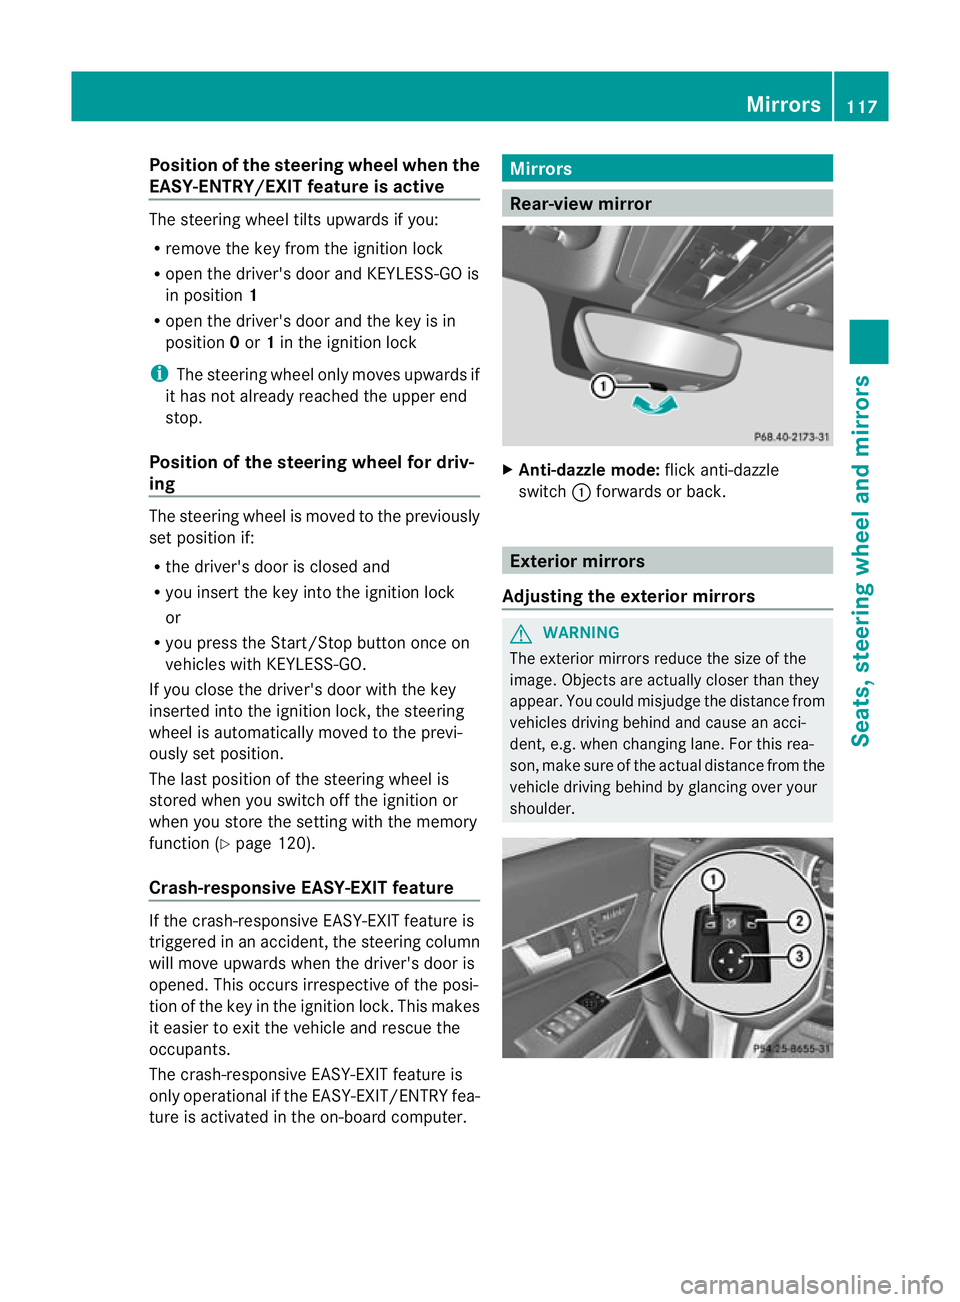
Position of the steering wheel when the
EASY-ENTRY/EXIT featurei s activeThe steering wheel tilts upwards if you:
R
remove the key from the ignition lock
R open the driver's door and KEYLESS-GO is
in position 1
R open the driver's door and the key is in
position 0or 1in the ignition lock
i The steering wheel only moves upwards if
it has not already reached the upper end
stop.
Position of the steering wheel for driv-
ing The steering wheel is moved to the previously
set position if:
R the driver's door is closed and
R you insert the key into the ignition lock
or
R you press the Start/Stop button once on
vehicles with KEYLESS-GO.
If you close the driver's door with the key
inserted into the ignition lock, the steering
wheel is automatically moved to the previ-
ously set position.
The last position of the steering wheel is
stored when you switch off the ignition or
when you store the setting with the memory
function (Y page 120).
Crash-responsive EASY-EXIT feature If the crash-responsive EASY-EXIT feature is
triggered in an accident, the steering column
will move upwards when the driver's door is
opened. This occurs irrespective of the posi-
tion of the key in the ignition lock. This makes
it easier to exit the vehicle and rescue the
occupants.
The crash-responsive EASY-EXIT feature is
only operational if the EASY-EXIT/ENTRY fea-
ture is activated in the on-board computer. Mirrors
Rear-view mirror
X
Anti-dazzle mode: flick anti-dazzle
switch :forwards or back. Exterior mirrors
Adjusting the exterior mirrors G
WARNING
The exterior mirrors reduce the size of the
image. Objects are actually closer than they
appear. You could misjudge the distance from
vehicles driving behind and cause an acci-
dent, e.g. when changin glane. For this rea-
son, make sure of the actual distance from the
vehicle driving behind by glancing ove ryour
shoulder. Mirrors
117Seats, steering wheel and mirrors Z