key MERCEDES-BENZ E-Class CABRIOLET 2013 C207 Owners Manual
[x] Cancel search | Manufacturer: MERCEDES-BENZ, Model Year: 2013, Model line: E-Class CABRIOLET, Model: MERCEDES-BENZ E-Class CABRIOLET 2013 C207Pages: 372, PDF Size: 12.69 MB
Page 209 of 372
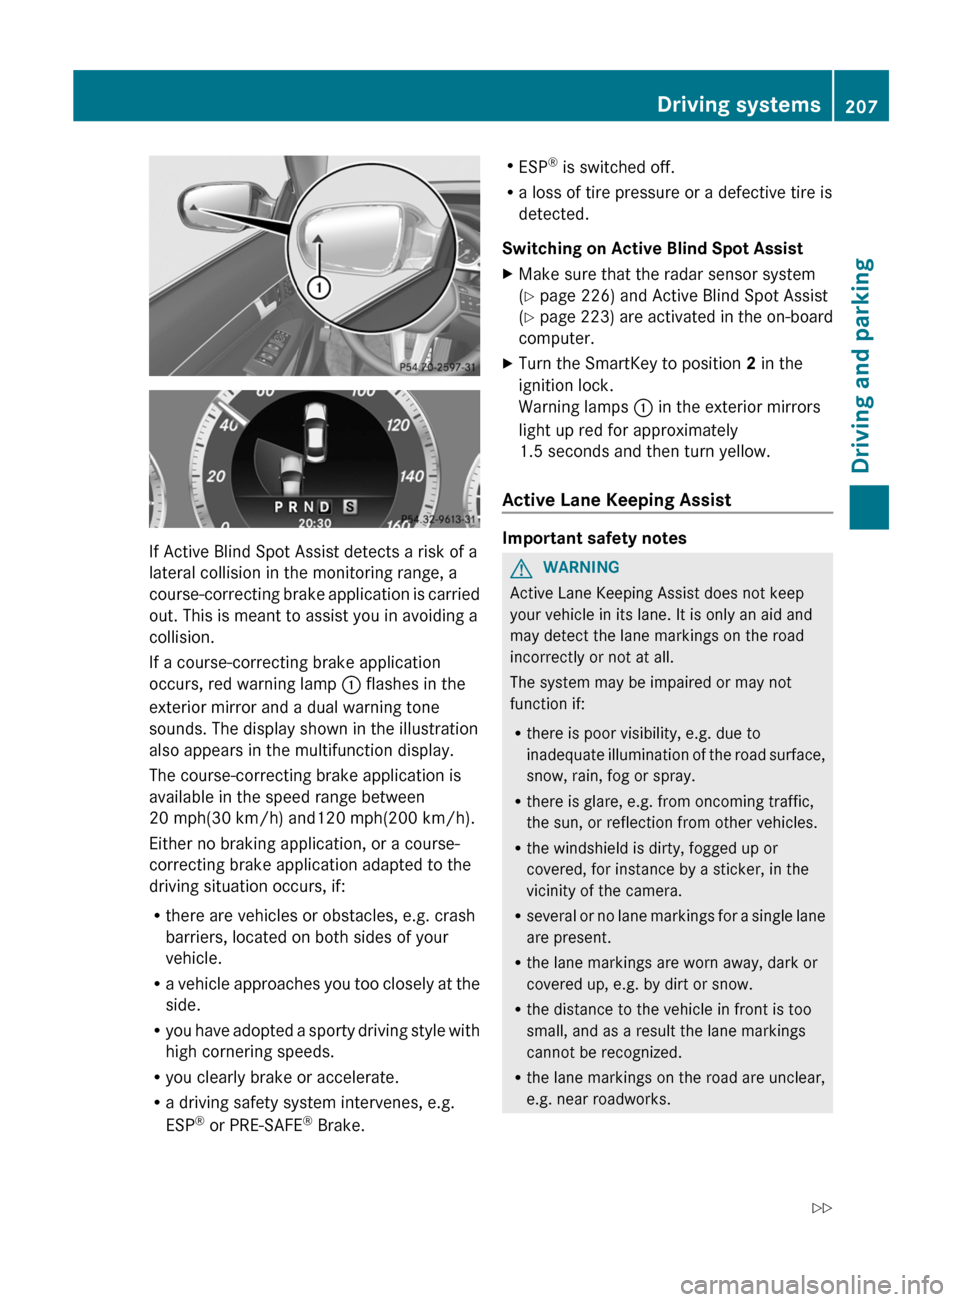
If Active Blind Spot Assist detects a risk of a
lateral collision in the monitoring range, a
course-correcting
brake application is carried
out. This is meant to assist you in avoiding a
collision.
If a course-correcting brake application
occurs, red warning lamp : flashes in the
exterior mirror and a dual warning tone
sounds. The display shown in the illustration
also appears in the multifunction display.
The course-correcting brake application is
available in the speed range between
20 mph(30 km/h) and120 mph(200 km/h).
Either no braking application, or a course-
correcting brake application adapted to the
driving situation occurs, if:
R there are vehicles or obstacles, e.g. crash
barriers, located on both sides of your
vehicle.
R a vehicle approaches you too closely at the
side.
R you have adopted a sporty driving style with
high cornering speeds.
R you clearly brake or accelerate.
R a driving safety system intervenes, e.g.
ESP ®
or PRE-SAFE ®
Brake. R
ESP ®
is switched off.
R a loss of tire pressure or a defective tire is
detected.
Switching on Active Blind Spot Assist
X Make sure that the radar sensor system
(Y page 226) and Active Blind Spot Assist
(Y page
223) are activated in the on-board
computer.
X Turn the SmartKey to position 2 in the
ignition lock.
Warning lamps : in the exterior mirrors
light up red for approximately
1.5 seconds
and then turn yellow.
Active Lane Keeping Assist Important safety notes
G
WARNING
Active Lane Keeping Assist does not keep
your vehicle in its lane. It is only an aid and
may detect the lane markings on the road
incorrectly or not at all.
The system may be impaired or may not
function if:
R there is poor visibility, e.g. due to
inadequate
illumination of the road surface,
snow, rain, fog or spray.
R there is glare, e.g. from oncoming traffic,
the sun, or reflection from other vehicles.
R the windshield is dirty, fogged up or
covered, for instance by a sticker, in the
vicinity of the camera.
R several or no lane markings for a single lane
are present.
R the lane markings are worn away, dark or
covered up, e.g. by dirt or snow.
R the distance to the vehicle in front is too
small, and as a result the lane markings
cannot be recognized.
R the lane markings on the road are unclear,
e.g. near roadworks. Driving systems
207
Driving and parking
Z
Page 216 of 372
Steam from an overheated engine can cause
serious
burns which can occur just by opening
the engine hood. Stay away from the engine
if you see or hear steam coming from it.
Stop the vehicle in a safe location away from
other traffic. Turn off the engine, get out of the
vehicle and do not stand near the vehicle until
the engine has cooled down.
! A display message is shown if the coolant
temperature is too high.
If the coolant temperature is over
248 ‡(120 †), do not continue driving. The
engine will otherwise be damaged.
The coolant temperature gauge is in the
instrument cluster on the right-hand side
(Y page 29).
Under normal operating conditions and with
the specified coolant level, the coolant
temperature may rise to 248 ‡ (120 †). Tachometer
! Do not drive in the overrevving range, as
this could damage the engine.
The
red band in the tachometer indicates the
engine's overrevving range.
The fuel supply is interrupted to protect the
engine when the red band is reached. Outside temperature display
G
WARNING
The outside temperature indicator is not
designed to serve as an ice-warning device
and is therefore unsuitable for that purpose.
Indicated temperatures just above the
freezing
point do not guarantee that the road
surface is free of ice. The road may still be icy,
especially in wooded areas or on bridges.
The outside temperature display is in the
multifunction display ( Y page 215).
Changes in the outside temperature are
displayed after a short delay. Speedometer with segments
The segments in the speedometer indicate
which speed range is available.
R Cruise control activated ( Y page 174):
The segments light up from the stored
speed to the maximum speed.
R DISTRONIC PLUS activated (Y page 177):
One or two segments in the set speed
range light up.
R DISTRONIC
PLUS detects a vehicle in front:
The segments between the speed of the
vehicle in front and the stored speed light
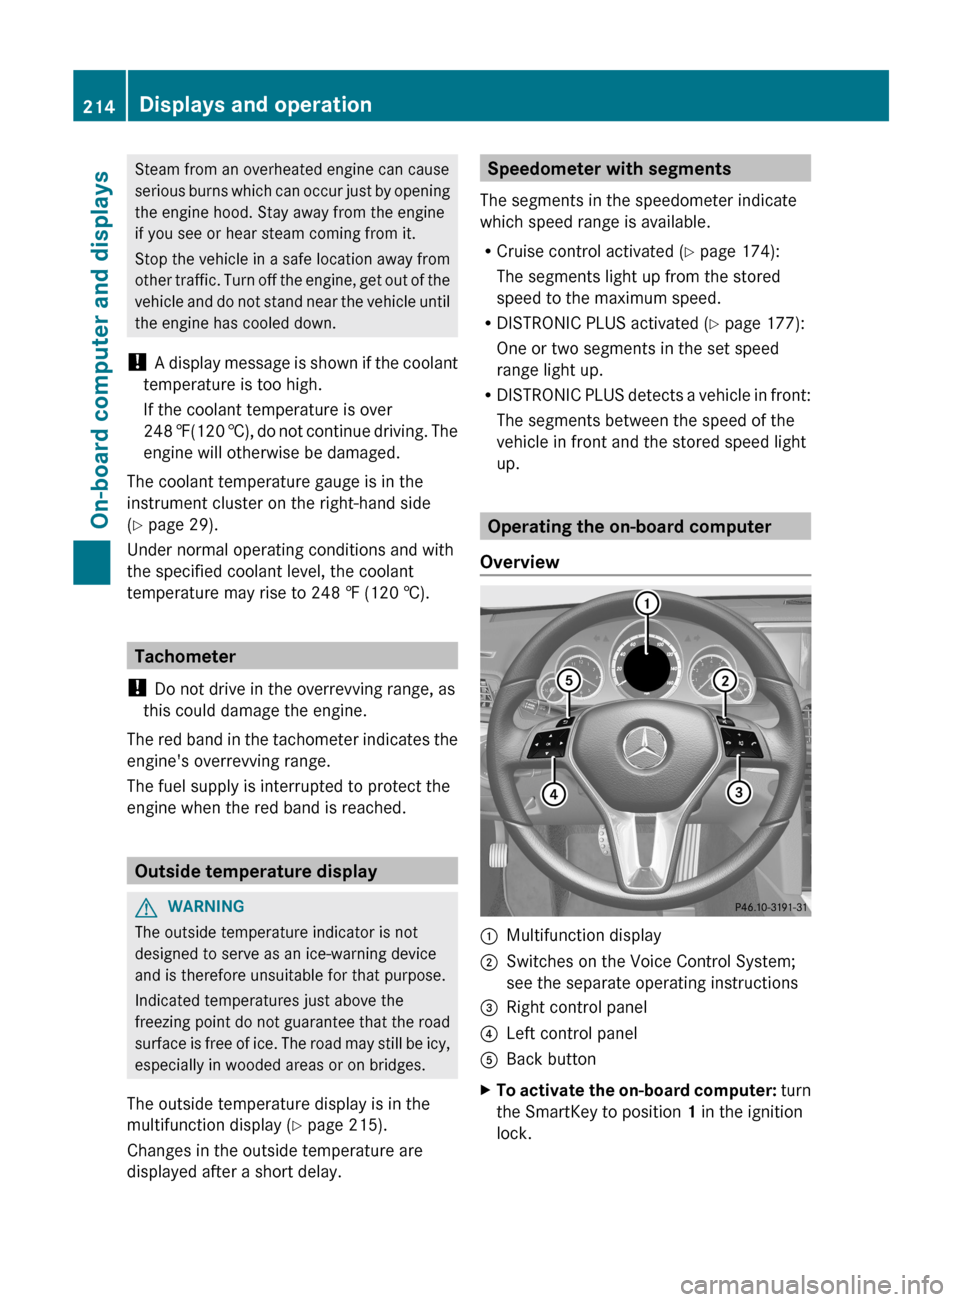
up. Operating the on-board computer
Overview :
Multifunction display
; Switches on the Voice Control System;
see the separate operating instructions
= Right control panel
? Left control panel
A Back button
X To activate the on-board computer:
turn
the SmartKey to position 1 in the ignition
lock. 214
Displays and operation
On-board computer and displays
Page 227 of 372
For further information about Adaptive
Highbeam Assist, see (
Y page 127).
Activating/deactivating surround
lighting and exterior lighting delayed
switch-off
X Press the = or ; button on the
steering wheel to select the Sett. menu.
X Press the : or 9 button to select the
Lights submenu.
X Press a to confirm.
X Press : or 9 to select the
Surround Lighting function.
When the Surround Lighting function is
activated, the light cone and the area
around the vehicle are displayed in red in
the multifunction display.
X Press the a button to save the setting.
Deactivating delayed switch-off of the
exterior lighting temporarily:
X Before leaving the vehicle, turn the
SmartKey
to position 0 in the ignition lock.
X Turn the SmartKey to position 2 in the
ignition lock.
The exterior lighting delayed switch-off is
deactivated.
Delayed switch-off of the exterior lighting is
reactivated the next time you start the
engine.
If you have activated the Surround
Lighting
function and the light switch is set
to Ã, the following functions are activated
when it is dark:
R Surround lighting: the exterior lighting
remains lit for 40 seconds after unlocking
with the SmartKey. If you start the engine,
the surround lighting is switched off and
the automatic headlamp mode is activated
(Y page 121).
R Exterior lighting delayed switch-off: the
exterior lighting remains lit for 60seconds
after the engine is switched off. If you close
all the doors and the trunk lid, the exterior
lighting goes off after 5 seconds. i
Depending on your vehicle's equipment,
when the surround lighting and delayed
switch-off exterior lighting are on, the
following light up:
R Parking lamps
R Front fog lamps
R Low-beam headlamps
R Daytime running lamps
R Side marker lamps
R Surround lighting in the exterior mirrors
Activating/deactivating the interior
lighting delayed switch-off
If you activate the Interior Lighting
Delay function, the interior lighting remains
on for 20seconds after you remove the
SmartKey from the ignition lock.
X Press the = or ; button on the
steering wheel to select the Sett. menu.
X Press the :
or 9 button to select the
Lights submenu.
X Press a to confirm.
X Press : or 9 to select the Light.
Delay function.
When the Interior Lighting Delay
function
is activated, the vehicle interior is
displayed in red in the multifunction
display.
X Press the a button to save the setting.
Vehicle Activating/deactivating the automatic
door locking mechanism
X
Press the = or ; button on the
steering wheel to select the Sett. menu.
X Press : or 9 to select the Vehicle
submenu.
X Press a to confirm. Menus and submenus
225
On-board computer and displays Z
Page 256 of 372
Display messages Possible causes/consequences and
M SolutionsK
Open/Close
Convertible Top
Completely The roof is not locked.
If
you drive at speeds of more than 25 mph (40 km/h), you cannot
open or close the soft top.
X Pull over and stop the vehicle safely as soon as possible, paying
attention to road and traffic conditions.
X Push or pull the soft-top switch until the soft top is fully open or
closed ( Y page 90). K
Start Engine See
Operator's Manual The on-board voltage is too low.
X
Start the engine. The soft top has been opened and closed several times in a row.
The soft-top drive has been switched off automatically for safety
reasons.
You
can open and close the soft top again after approximately ten
minutes.
X Switch off the ignition and turn it back on.
X Repeat the opening or closing procedure ( Y page 90).¥
Check Washer Fluid The washer fluid level in the washer fluid reservoir has dropped
below the minimum.
X
Add washer fluid ( Y page 297).SmartKey
Display messages Possible causes/consequences and
M SolutionsÂ
Key Does Not
Belong to Vehicle You have put the wrong SmartKey in the ignition lock.
X
Use the correct SmartKey. Â
Take
Your Key from
Ignition The SmartKey is in the ignition lock.
X
Remove the SmartKey. Â
Obtain a New Key The SmartKey needs to be replaced.
X
Visit a qualified specialist workshop. Â
Replace
Key Battery The batteries of the KEYLESS-GO key are discharged.
X
Change the batteries ( Y page 75).254
Display messages
On-board computer and displays
Page 257 of 372
Display messages Possible causes/consequences and
M SolutionsÂ
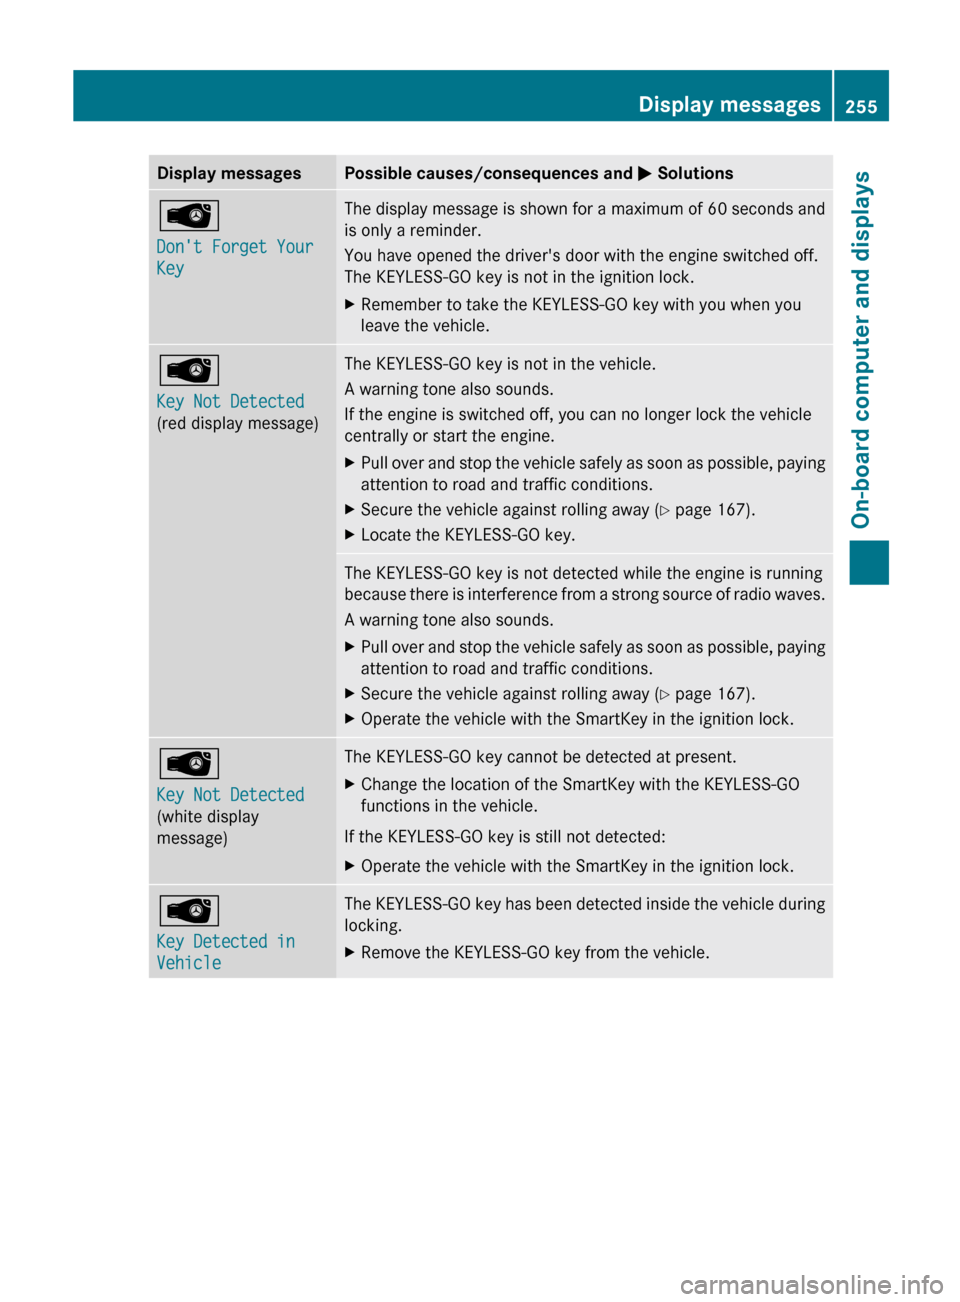
Don't Forget Your
Key The display message is shown for a maximum of 60 seconds and
is only a reminder.
You have opened the driver's door with the engine switched off.
The KEYLESS-GO key is not in the ignition lock.
X
Remember to take the KEYLESS-GO key with you when you
leave the vehicle. Â
Key Not Detected
(red display message) The KEYLESS-GO key is not in the vehicle.
A warning tone also sounds.
If the engine is switched off, you can no longer lock the vehicle
centrally or start the engine.
X
Pull over and stop the vehicle safely as soon as possible, paying
attention to road and traffic conditions.
X Secure the vehicle against rolling away ( Y page 167).
X Locate the KEYLESS-GO key. The KEYLESS-GO key is not detected while the engine is running
because
there is interference from a strong source of radio waves.
A warning tone also sounds.
X Pull over and stop the vehicle safely as soon as possible, paying
attention to road and traffic conditions.
X Secure the vehicle against rolling away ( Y page 167).
X Operate the vehicle with the SmartKey in the ignition lock. Â
Key Not Detected
(white display
message) The KEYLESS-GO key cannot be detected at present.
X
Change the location of the SmartKey with the KEYLESS-GO
functions in the vehicle.
If the KEYLESS-GO key is still not detected:
X Operate the vehicle with the SmartKey in the ignition lock. Â
Key Detected in
Vehicle The KEYLESS-GO key has been detected inside the vehicle during
locking.
X
Remove the KEYLESS-GO key from the vehicle. Display messages
255
On-board computer and displays Z
Page 258 of 372
Display messages Possible causes/consequences and
M SolutionsÂ
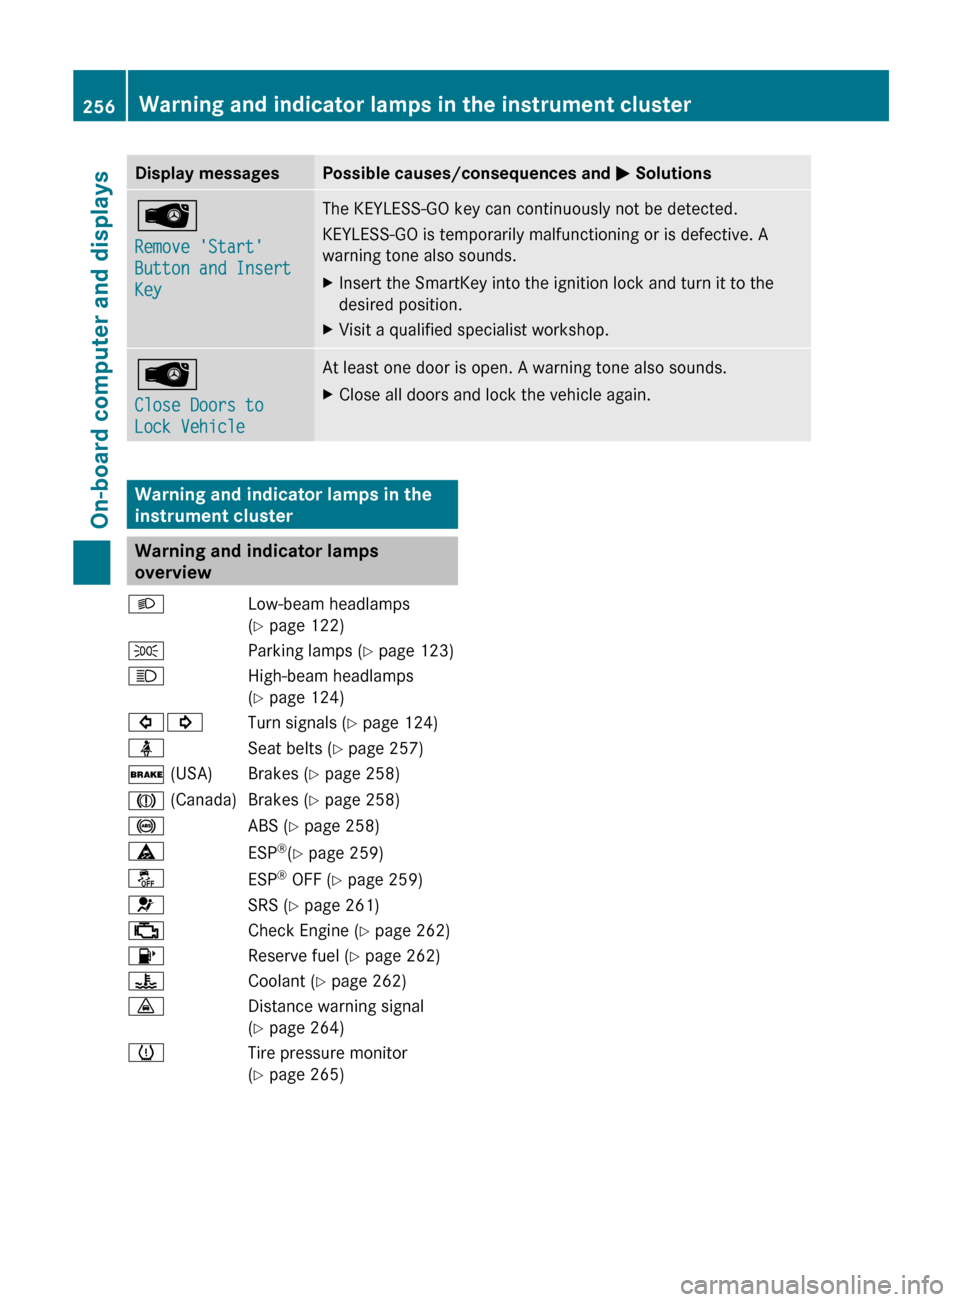
Remove 'Start'
Button and Insert
Key The KEYLESS-GO key can continuously not be detected.
KEYLESS-GO is temporarily malfunctioning or is defective. A
warning tone also sounds.
X
Insert the SmartKey into the ignition lock and turn it to the
desired position.
X Visit a qualified specialist workshop. Â
Close Doors to
Lock Vehicle At least one door is open. A warning tone also sounds.
X
Close all doors and lock the vehicle again. Warning and indicator lamps in the
instrument cluster
Warning and indicator lamps
overview
L Low-beam headlamps
(Y page 122)
T Parking lamps (Y page 123)
K High-beam headlamps
(Y page 124)
#! Turn signals (Y page 124)
ü Seat belts (Y page 257)
$ (USA) Brakes (Y page 258)
J (Canada) Brakes (Y page 258)
! ABS (Y page 258)
ä ESP®
(Y page 259)
å ESP®
OFF (Y page 259)
6 SRS (Y page 261)
; Check Engine (Y page 262)
8 Reserve fuel (Y page 262)
? Coolant (Y page 262)
· Distance warning signal
(Y page 264)
h Tire pressure monitor
(Y page 265)256
Warning and indicator lamps in the instrument clusterOn-board computer and displays
Page 271 of 372
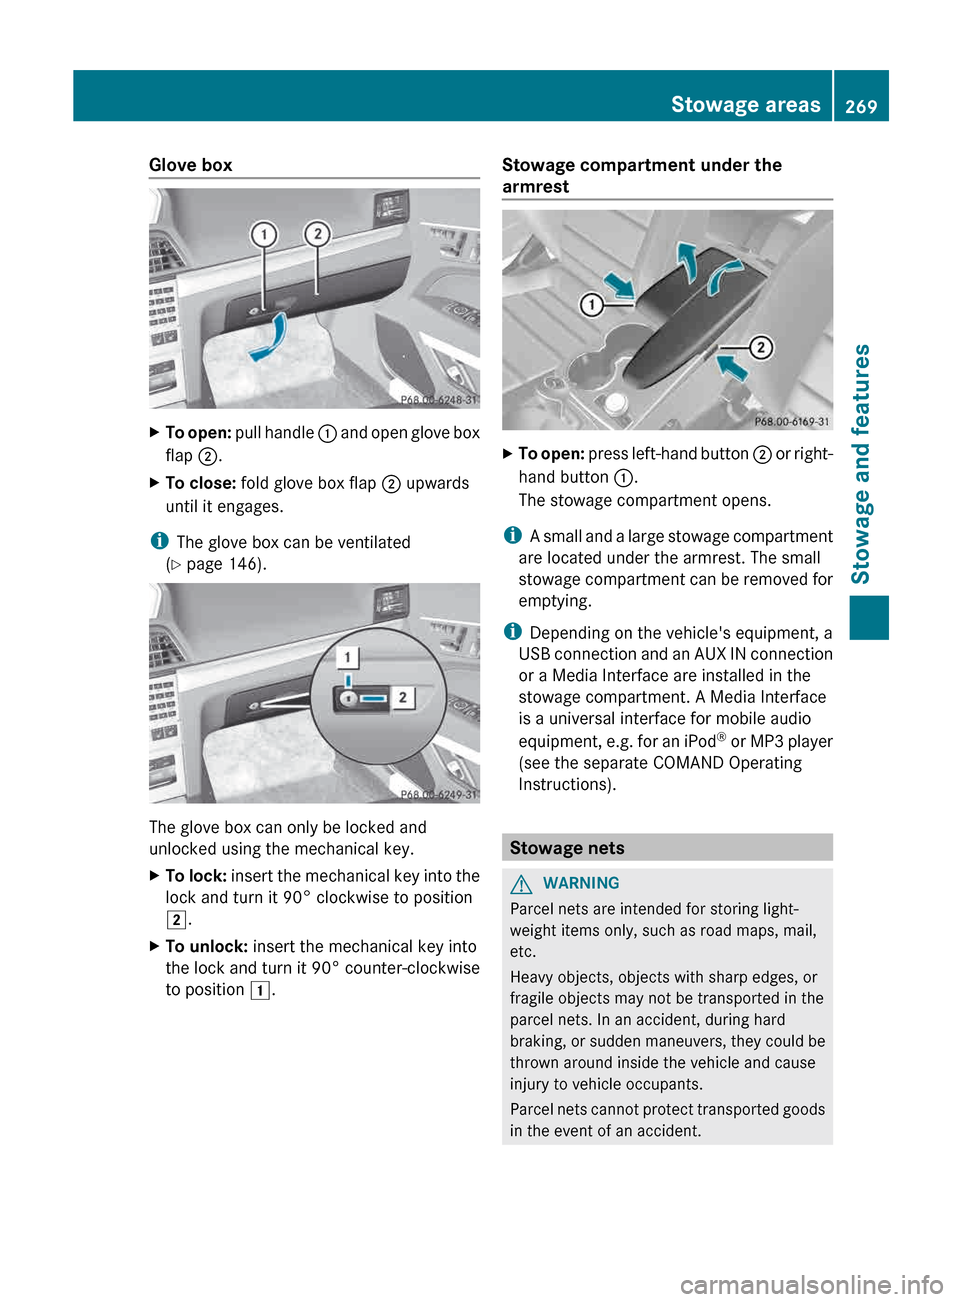
Glove box
X
To open: pull handle : and open glove box
flap ;.
X To close: fold glove box flap ; upwards
until it engages.
i The glove box can be ventilated
(Y page 146). The glove box can only be locked and
unlocked using the mechanical key.
X
To lock:
insert the mechanical key into the
lock and turn it 90° clockwise to position
2.
X To unlock: insert the mechanical key into
the lock and turn it 90° counter-clockwise
to position 1. Stowage compartment under the
armrest
X
To open:
press left-hand button ; or right-
hand button :.
The stowage compartment opens.
i A
small and a large stowage compartment
are located under the armrest. The small
stowage compartment can be removed for
emptying.
i Depending on the vehicle's equipment, a
USB connection and an AUX IN connection
or a Media Interface are installed in the
stowage compartment. A Media Interface
is a universal interface for mobile audio
equipment, e.g. for an iPod ®
or MP3 player
(see the separate COMAND Operating
Instructions). Stowage nets
G
WARNING
Parcel nets are intended for storing light-
weight items only, such as road maps, mail,
etc.
Heavy objects, objects with sharp edges, or
fragile objects may not be transported in the
parcel nets. In an accident, during hard
braking,
or sudden maneuvers, they could be
thrown around inside the vehicle and cause
injury to vehicle occupants.
Parcel nets cannot protect transported goods
in the event of an accident. Stowage areas
269
Stowage and features Z
Page 277 of 372
Rear window roller sunblind (Coupe)
Important safety notes G
WARNING
When leaving the vehicle, always remove the
SmartKey from the ignition lock. Always take
the SmartKey with you and lock the vehicle.
Do not leave children unattended in the
vehicle, even if they are secured in a child
restraint system, or with access to an
unlocked vehicle. A child's unsupervised
access
to a vehicle could result in an accident
and/or serious personal injury. The children
could:
R injure themselves on parts of the vehicle
R be seriously or fatally injured through
excessive exposure to extreme heat or cold
R injure themselves or cause an accident with
vehicle equipment that can be operated
even if the SmartKey is removed from the
ignition lock or removed from the vehicle,
such as seat adjustment, steering wheel
adjustment, or the memory function
If children open a door, they could injure other
persons or get out of the vehicle and injure
themselves or be injured by following traffic.
Do not expose the child restraint system to
direct sunlight. The child restraint system's
metal parts, for example, could become very
hot, and the child could be burned on these
parts. G
WARNING
When adjusting a roller sunblind, the roller
blind moves up or down. You might become
trapped in the process.
In
the event of danger, briefly press the button
for the roller sunblind to change the roller
blind's direction of movement.
Extending/retracting the roller
sunblind !
Make sure that the roller sunblind can
move freely. Otherwise, the roller sunblind
or other objects could be damaged. X
Turn the SmartKey to position 2 in the
ignition lock ( Y page 151).
X To extend or retract: briefly press
button :.
The roller sunblind fully extends or fully
retracts. Ashtray
Front ashtray !
The stowage space under the ashtray is
not heat resistant. Before placing lit
cigarettes in the ashtray, make sure that
the
ashtray is properly engaged. Otherwise,
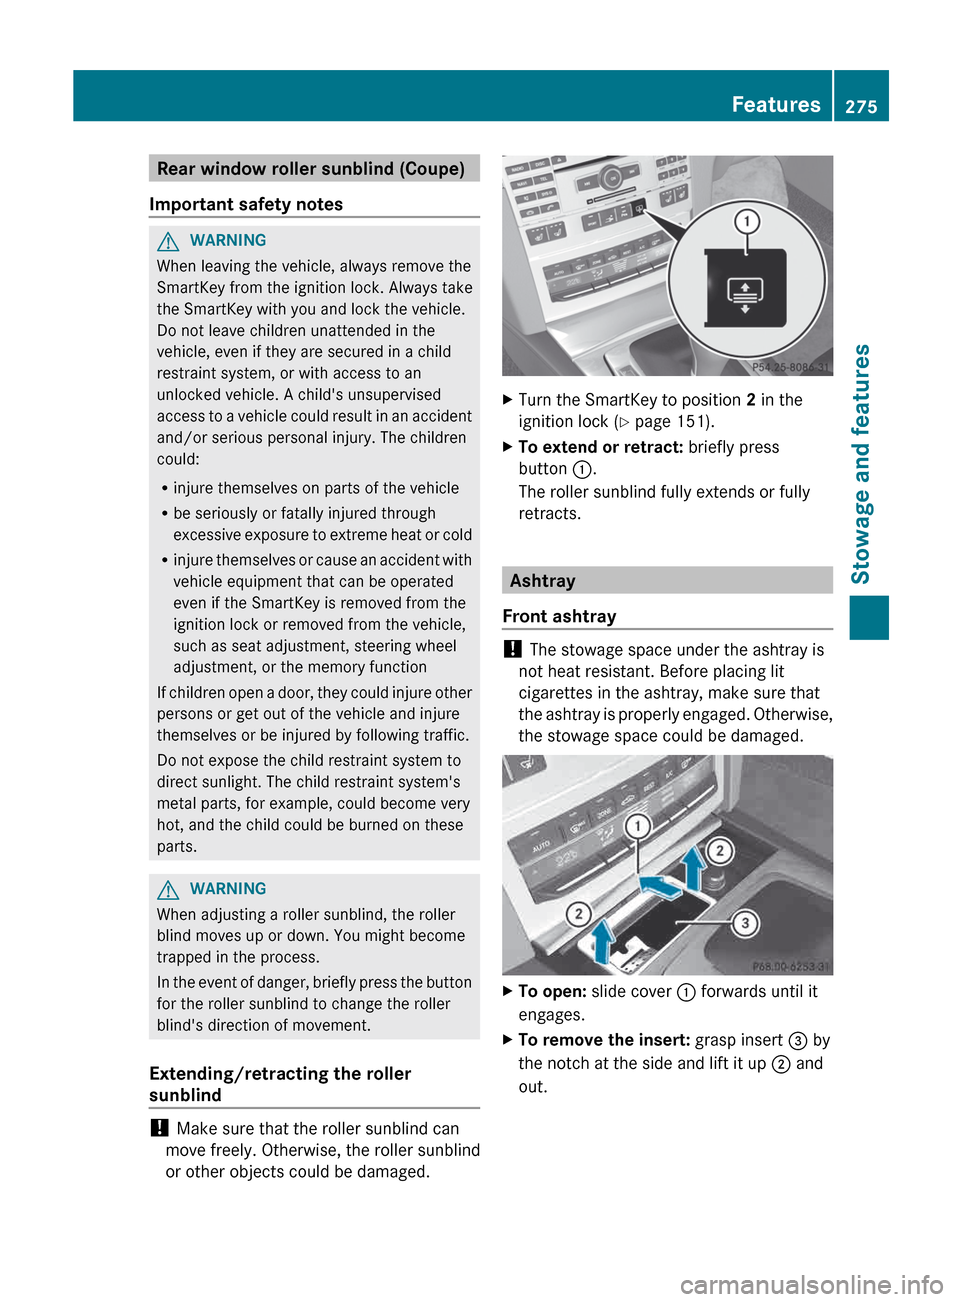
the stowage space could be damaged. X
To open: slide cover : forwards until it
engages.
X To remove the insert: grasp insert = by
the notch at the side and lift it up ; and
out. Features
275
Stowage and features Z
Page 278 of 372
X
To re-install the insert: press insert =
into the holder until it engages.
X To close: briefly press cover : at the
front.
The cover moves back.
i You can remove the ashtray insert and
use the resulting compartment for
stowage.
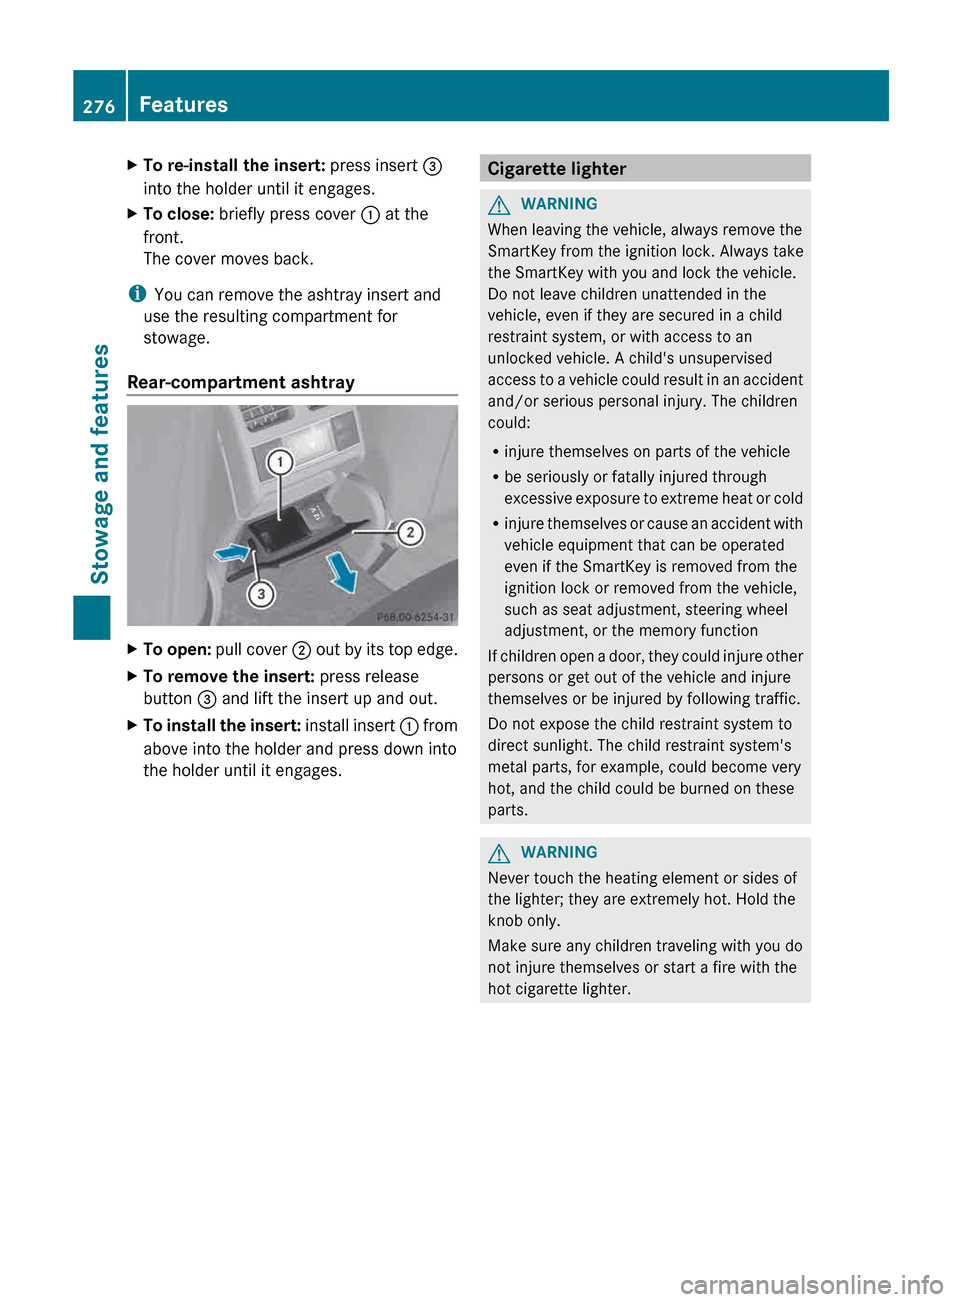
Rear-compartment ashtray X
To open: pull cover ; out by its top edge.
X To remove the insert: press release
button = and lift the insert up and out.
X To install the insert:
install insert : from
above into the holder and press down into
the holder until it engages. Cigarette lighter
G
WARNING
When leaving the vehicle, always remove the
SmartKey from the ignition lock. Always take
the SmartKey with you and lock the vehicle.
Do not leave children unattended in the
vehicle, even if they are secured in a child
restraint system, or with access to an
unlocked vehicle. A child's unsupervised
access
to a vehicle could result in an accident
and/or serious personal injury. The children
could:
R injure themselves on parts of the vehicle
R be seriously or fatally injured through
excessive exposure to extreme heat or cold
R injure themselves or cause an accident with
vehicle equipment that can be operated
even if the SmartKey is removed from the
ignition lock or removed from the vehicle,
such as seat adjustment, steering wheel
adjustment, or the memory function
If children open a door, they could injure other
persons or get out of the vehicle and injure
themselves or be injured by following traffic.
Do not expose the child restraint system to
direct sunlight. The child restraint system's
metal parts, for example, could become very
hot, and the child could be burned on these
parts. G
WARNING
Never touch the heating element or sides of
the lighter; they are extremely hot. Hold the
knob only.
Make sure any children traveling with you do
not injure themselves or start a fire with the
hot cigarette lighter. 276
Features
Stowage and features
Page 279 of 372
X
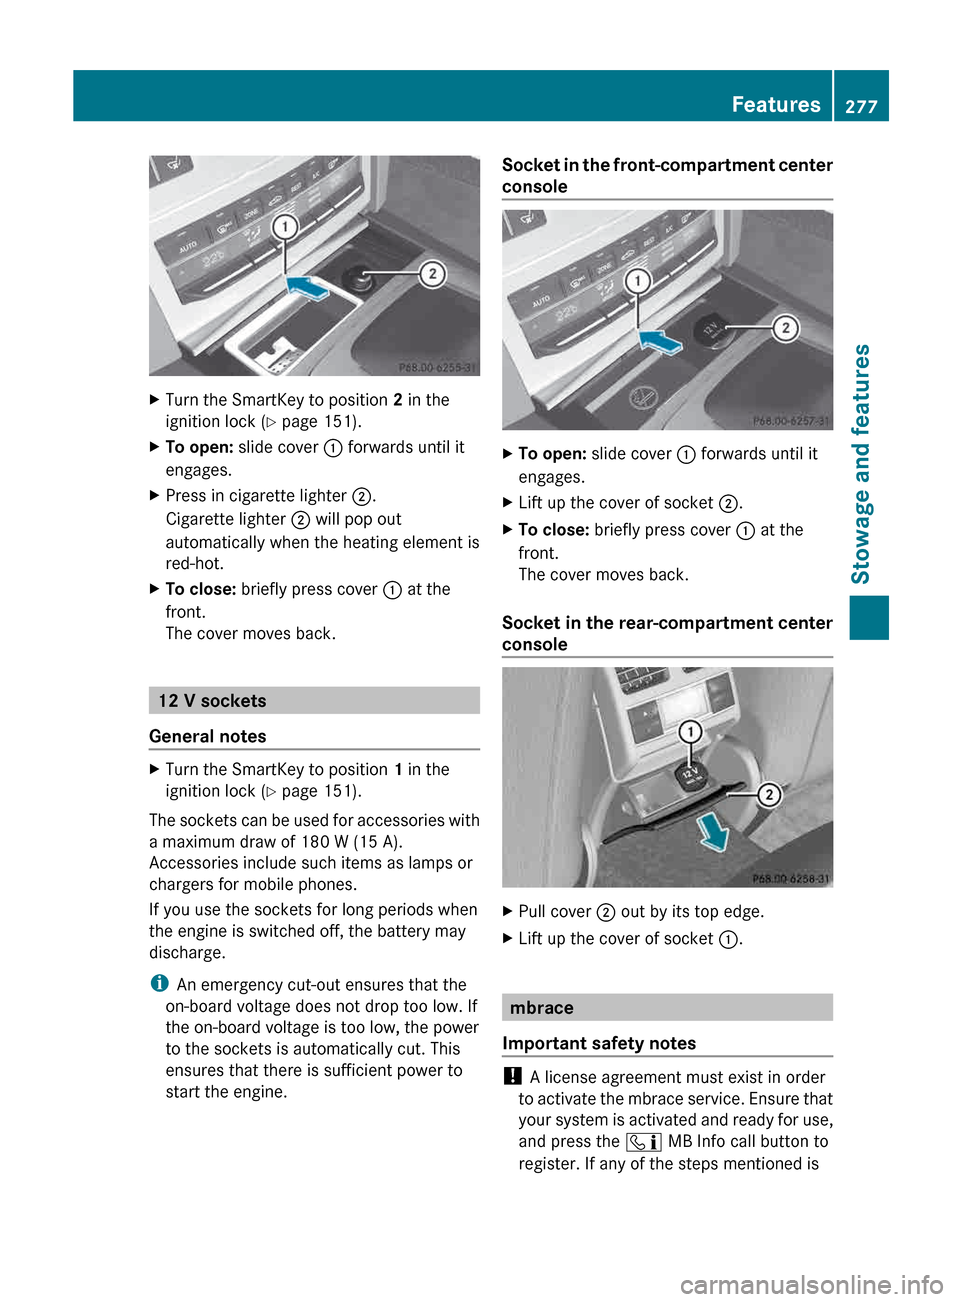
Turn the SmartKey to position 2 in the
ignition lock ( Y page 151).
X To open: slide cover : forwards until it
engages.
X Press in cigarette lighter ;.
Cigarette lighter ; will pop out
automatically when the heating element is
red-hot.
X To close: briefly press cover : at the
front.
The cover moves back. 12 V sockets
General notes X
Turn the SmartKey to position 1 in the
ignition lock ( Y page 151).
The sockets can be used for accessories with
a maximum draw of 180 W (15 A).
Accessories include such items as lamps or
chargers for mobile phones.
If you use the sockets for long periods when
the engine is switched off, the battery may
discharge.
i An emergency cut-out ensures that the
on-board voltage does not drop too low. If
the on-board voltage is too low, the power
to the sockets is automatically cut. This
ensures that there is sufficient power to
start the engine. Socket in the front-compartment center
console
X
To open: slide cover : forwards until it
engages.
X Lift up the cover of socket ;.
X To close: briefly press cover : at the
front.
The cover moves back.
Socket in the rear-compartment center
console X
Pull cover ; out by its top edge.
X Lift up the cover of socket :. mbrace
Important safety notes !
A license agreement must exist in order
to
activate the mbrace service. Ensure that
your system is activated and ready for use,
and press the ï MB Info call button to
register. If any of the steps mentioned is Features
277
Stowage and features Z