check engine light MERCEDES-BENZ E-Class CABRIOLET 2013 C207 User Guide
[x] Cancel search | Manufacturer: MERCEDES-BENZ, Model Year: 2013, Model line: E-Class CABRIOLET, Model: MERCEDES-BENZ E-Class CABRIOLET 2013 C207Pages: 372, PDF Size: 12.69 MB
Page 83 of 372
X
Turn the mechanical key counter-clockwise
to position 1.
The door is unlocked.
X Turn the mechanical key back and remove
it.
X Insert the mechanical key into the
SmartKey.
If you use the mechanical key to unlock and
open the driver's door, the anti-theft alarm
system will be triggered
(Y page 70). Locking the vehicle (mechanical key)
If
the vehicle can no longer be locked with the
SmartKey, use the mechanical key.
X Open the driver's door.
X Close the front-passenger door and the
trunk lid.
X Press the locking button (Y page 79).
X Check whether the locking knob on the
front-passenger door is still visible. If
necessary,
press the locking knob down by
hand ( Y page 79).
X Close the driver's door.
X Take the mechanical key out of the
SmartKey (Y page 74).
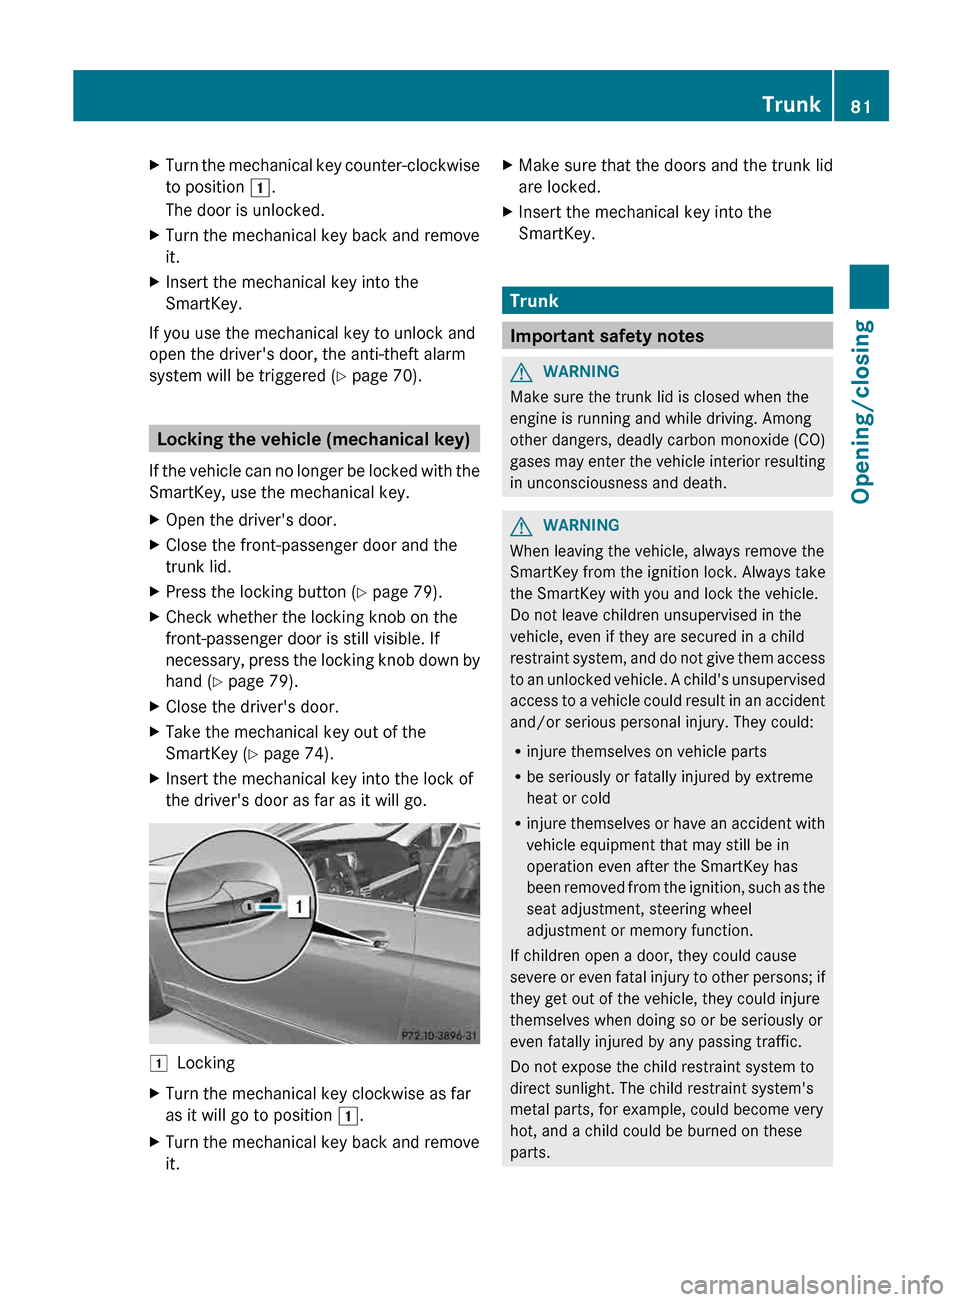
X Insert the mechanical key into the lock of
the driver's door as far as it will go. 1
Locking
X Turn the mechanical key clockwise as far
as it will go to position 1.
X Turn the mechanical key back and remove
it. X
Make sure that the doors and the trunk lid
are locked.
X Insert the mechanical key into the
SmartKey. Trunk
Important safety notes
G
WARNING
Make sure the trunk lid is closed when the
engine is running and while driving. Among
other dangers, deadly carbon monoxide (CO)
gases
may enter the vehicle interior resulting
in unconsciousness and death. G
WARNING
When leaving the vehicle, always remove the
SmartKey from the ignition lock. Always take
the SmartKey with you and lock the vehicle.
Do not leave children unsupervised in the
vehicle, even if they are secured in a child
restraint
system, and do not give them access
to an unlocked vehicle. A child's unsupervised
access to a vehicle could result in an accident
and/or serious personal injury. They could:
R injure themselves on vehicle parts
R be seriously or fatally injured by extreme
heat or cold
R injure themselves or have an accident with
vehicle equipment that may still be in
operation even after the SmartKey has
been removed from the ignition, such as the
seat adjustment, steering wheel
adjustment or memory function.
If children open a door, they could cause
severe or even fatal injury to other persons; if
they get out of the vehicle, they could injure
themselves when doing so or be seriously or
even fatally injured by any passing traffic.
Do not expose the child restraint system to
direct sunlight. The child restraint system's
metal parts, for example, could become very
hot, and a child could be burned on these
parts. Trunk
81
Opening/closing Z
Page 131 of 372

The interior lighting automatically switches
on if you:
R
unlock the vehicle
R open a door
R remove
the SmartKey from the ignition lock
The interior light is activated for a short while
when the SmartKey is removed from the
ignition lock. You can activate this delayed
switch-off using the on-board computer
(Y page 225).
Manual interior lighting control Front overhead control panel
:
u To switch the rear interior lighting
on/off (Coupe only)
; | To switch the automatic interior
lighting control on/off
= p To switch the right-hand reading
lamp on/off
? c To switch the front interior lighting
on/off
A p
To switch the left-hand reading lamp
on/off
X To switch the front interior lighting on/
off: press the c button.
X To switch the rear interior lighting on/
off (Coupe only): press the u button.
X To switch the reading lamps on/off:
press the p button. Crash-responsive emergency lighting
The
interior lighting is activated automatically
if the vehicle is involved in an accident.
X To switch off the crash-responsive
emergency lighting: press the hazard
warning lamp button.
or
X Lock and then unlock the vehicle using the
SmartKey. Replacing bulbs
Important safety notes
Xenon bulbs G
DANGER
Xenon bulbs carry a high voltage. You could
get
an electric shock and be seriously or even
fatally injured if you touch the electric
contacts on Xenon bulbs. Therefore, never
remove the cover from Xenon bulbs.
Do not change the Xenon bulbs yourself, but
have them replaced at a qualified workshop.
If your vehicle is equipped with Xenon bulbs,
you can recognize this by the following: the
cone of light from the Xenon bulbs moves
from the top to the bottom and back again
when you start the engine. For this to be
observed, the lights must be switched on
before starting the engine.
Bulbs and lamps are an important aspect of
vehicle safety. You must therefore make sure
that these function correctly at all times.
Have the headlamp setting checked regularly.
Other bulbs G
WARNING
Bulbs and lamps can become very hot. For
this reason, allow them to cool down before
changing them. Otherwise, you could burn
yourself when you touch them. Replacing bulbs
129
Lights and windshield wipers
Z
Page 159 of 372
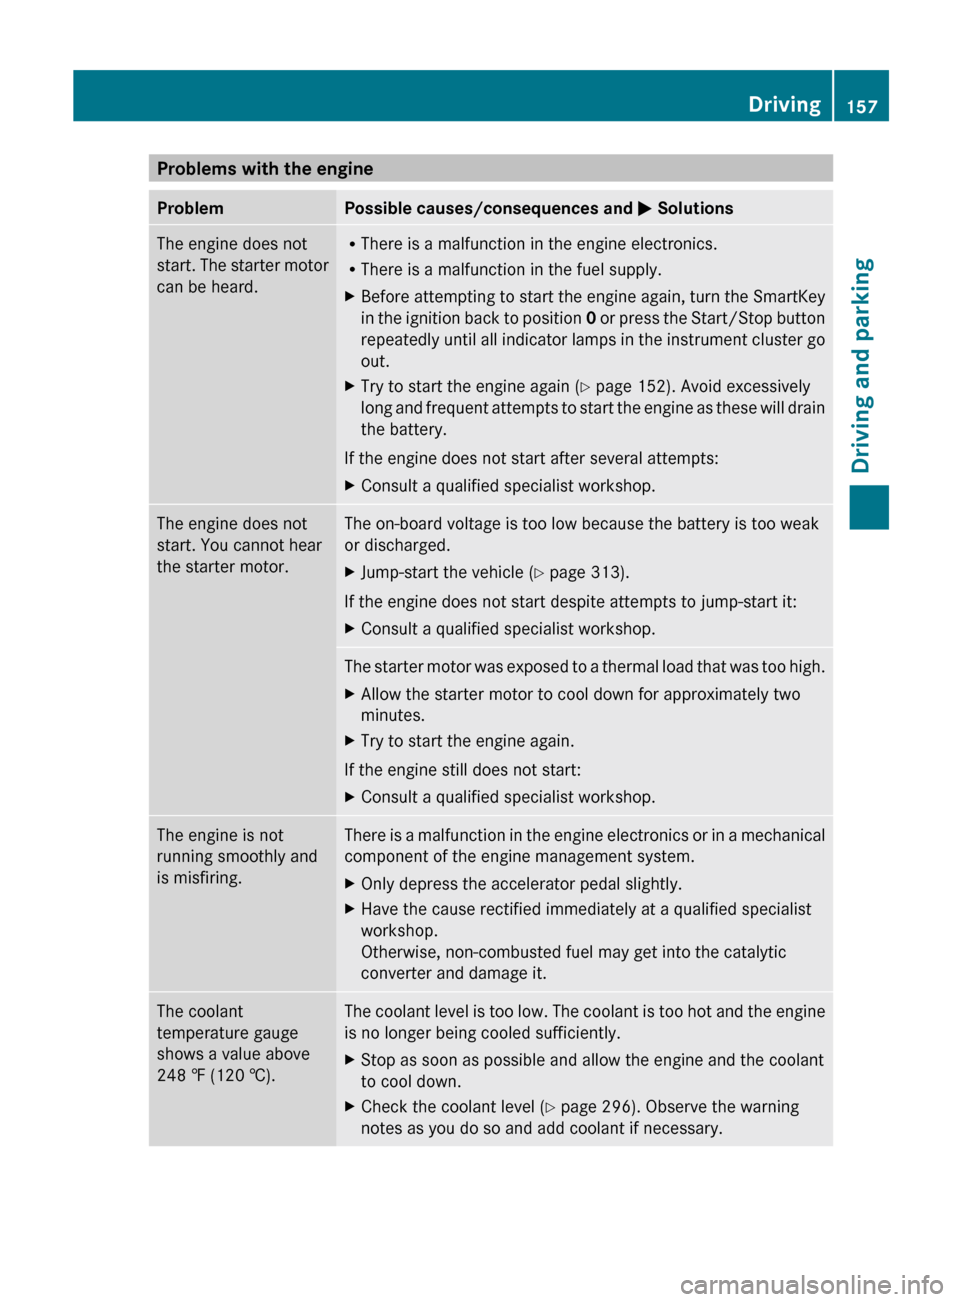
Problems with the engine
Problem Possible causes/consequences and
M SolutionsThe engine does not
start.
The starter motor
can be heard. R
There is a malfunction in the engine electronics.
R There is a malfunction in the fuel supply.
X Before attempting to start the engine again, turn the SmartKey
in
the ignition back to position 0 or press the Start/Stop button
repeatedly until all indicator lamps in the instrument cluster go
out.
X Try to start the engine again (Y page 152). Avoid excessively
long
and frequent attempts to start the engine as these will drain
the battery.
If the engine does not start after several attempts:
X Consult a qualified specialist workshop. The engine does not
start. You cannot hear
the starter motor. The on-board voltage is too low because the battery is too weak
or discharged.
X
Jump-start the vehicle (Y page 313).
If the engine does not start despite attempts to jump-start it:
X Consult a qualified specialist workshop. The starter motor was exposed to a thermal load that was too high.
X
Allow the starter motor to cool down for approximately two
minutes.
X Try to start the engine again.
If the engine still does not start:
X Consult a qualified specialist workshop. The engine is not
running smoothly and
is misfiring. There is a malfunction in the engine electronics or in a mechanical
component of the engine management system.
X
Only depress the accelerator pedal slightly.
X Have the cause rectified immediately at a qualified specialist
workshop.
Otherwise, non-combusted fuel may get into the catalytic
converter and damage it. The coolant
temperature gauge
shows a value above
248 ‡
(120 †). The coolant level is too low. The coolant is too hot and the engine
is no longer being cooled sufficiently.
X
Stop as soon as possible and allow the engine and the coolant
to cool down.
X Check the coolant level (Y page 296). Observe the warning
notes as you do so and add coolant if necessary. Driving
157
Driving and parking Z
Page 160 of 372
Automatic transmission
Important safety notes
G
WARNING
If the engine speed is above the idling speed
and you engage transmission position D or
R,
the vehicle could pull away suddenly. There
is a risk of an accident.
When engaging transmission position D or R,
always firmly depress the brake pedal and do
not simultaneously accelerate. G
WARNING
The automatic transmission switches to
neutral position N when you switch off the
engine. The vehicle may roll away. There is a
risk of an accident.
After switching off the engine, always switch
to parking position P. Prevent the parked
vehicle from rolling away by applying the
parking brake. Selector lever
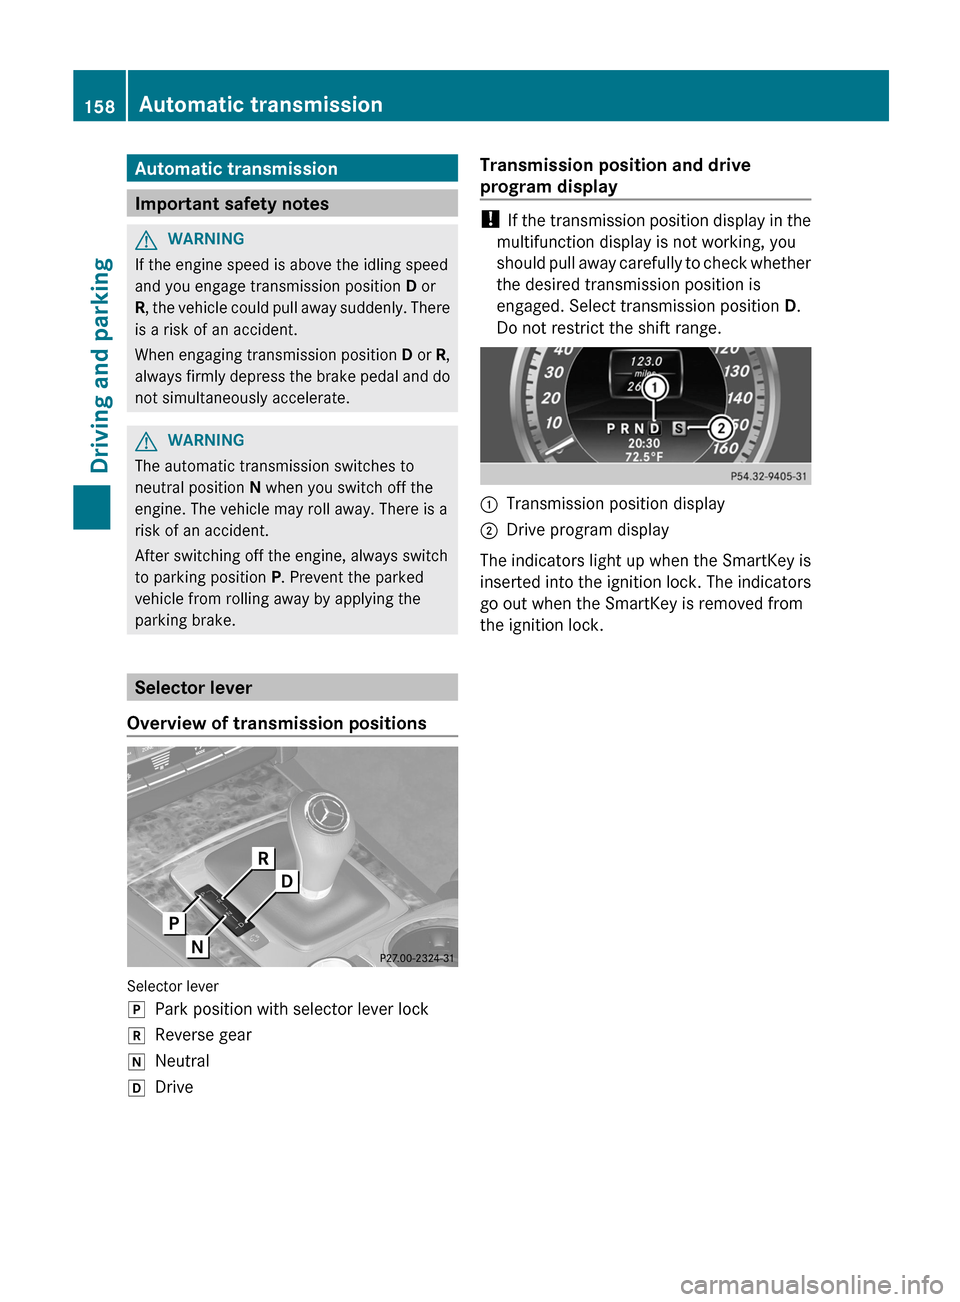
Overview of transmission positions Selector lever
j
Park position with selector lever lock
k Reverse gear
i Neutral
h Drive Transmission position and drive
program display !
If
the transmission position display in the
multifunction display is not working, you
should pull away carefully to check whether
the desired transmission position is
engaged. Select transmission position D.
Do not restrict the shift range. :
Transmission position display
; Drive program display
The indicators light up when the SmartKey is
inserted
into the ignition lock. The indicators
go out when the SmartKey is removed from
the ignition lock. 158
Automatic transmission
Driving and parking
Page 168 of 372
vehicle with the SmartKey or with KEYLESS-
GO.
The position of the fuel filler cap is displayed
8 in the instrument cluster. The arrow
next to the filling pump indicates the side of
the vehicle.
Opening
X
Switch off the engine.
X Remove the SmartKey from the ignition
lock.
X KEYLESS-GO: open the driver’s door.
This corresponds to key position 0:
"SmartKey removed".
The driver’s door can be closed again.
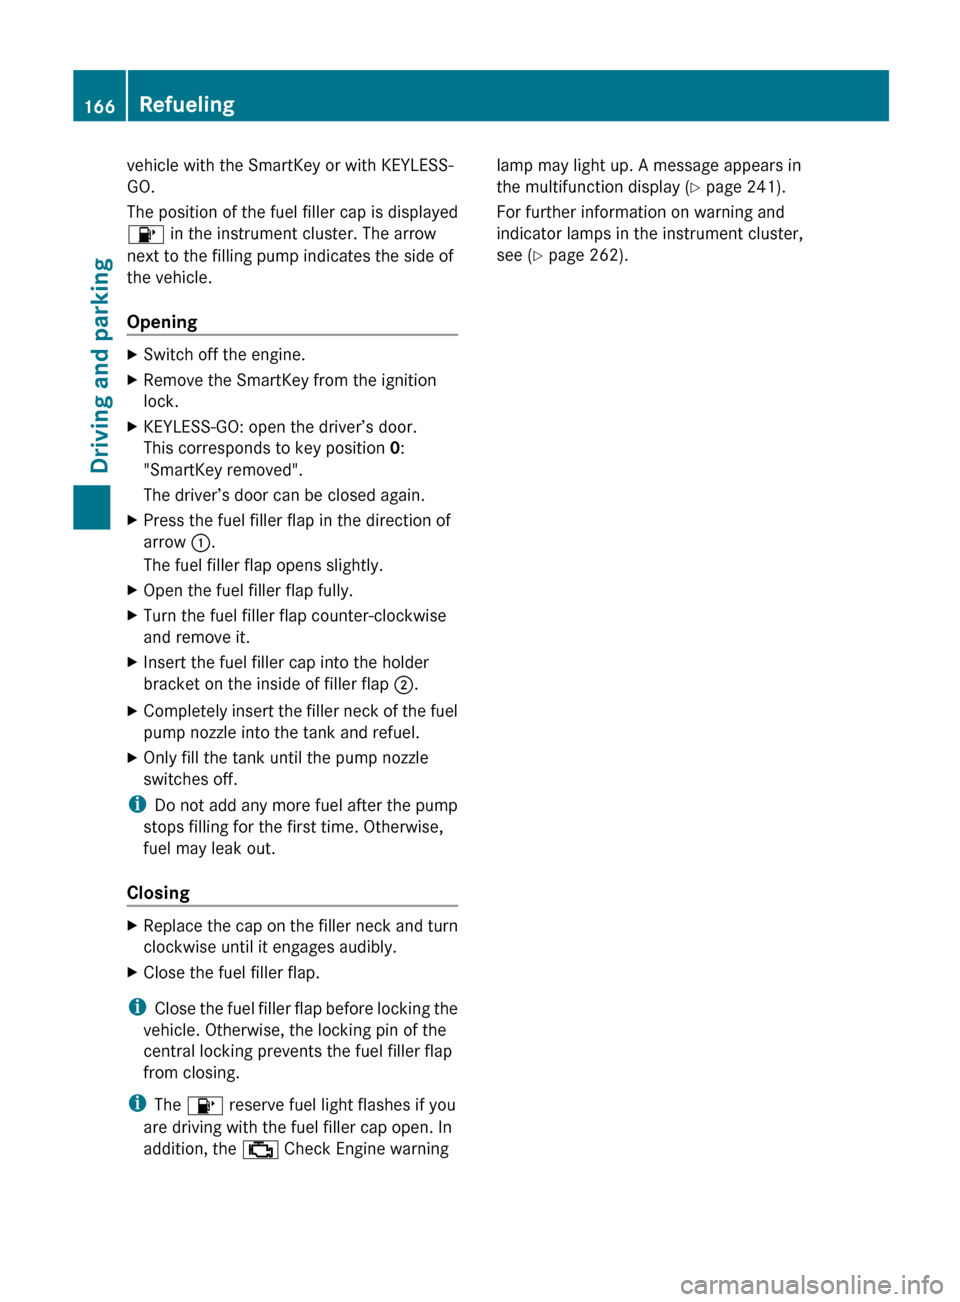
X Press the fuel filler flap in the direction of
arrow :.
The fuel filler flap opens slightly.
X Open the fuel filler flap fully.
X Turn the fuel filler flap counter-clockwise
and remove it.
X Insert the fuel filler cap into the holder
bracket on the inside of filler flap ;.
X Completely insert the filler neck of the fuel
pump nozzle into the tank and refuel.
X Only fill the tank until the pump nozzle
switches off.
i Do not add any more fuel after the pump
stops filling for the first time. Otherwise,
fuel may leak out.
Closing X
Replace the cap on the filler neck and turn
clockwise until it engages audibly.
X Close the fuel filler flap.
i Close the fuel filler flap before locking the
vehicle. Otherwise, the locking pin of the
central locking prevents the fuel filler flap
from closing.
i The 8 reserve fuel light flashes if you
are driving with the fuel filler cap open. In
addition, the ; Check Engine warning lamp may light up. A message appears in
the multifunction display
(Y page 241).
For further information on warning and
indicator lamps in the instrument cluster,
see ( Y page 262).166
Refueling
Driving and parking
Page 174 of 372
!
Depressing the brake pedal constantly
results
in excessive and premature wear to
the brake pads.
If the brakes have been subjected to a heavy
load, do not stop the vehicle immediately, but
drive on for a short while. This allows the
airflow to cool the brakes more quickly.
Wet roads If you have driven for a long time in heavy rain
without braking, there may be a delayed
reaction
from the brakes when braking for the
first time. This may also occur after the
vehicle has been washed or driven through
deep water.
You have to depress the brake pedal more
firmly. Maintain a greater distance from the
vehicle in front.
After driving on a wet road or having the
vehicle washed, brake firmly while paying
attention to the traffic conditions. This will
warm up the brake discs, thereby drying them
more quickly and protecting them against
corrosion.
Limited braking performance on salt-
treated roads If you drive on salted roads, a layer of salt
residue may form on the brake discs and
brake pads. This can result in a significantly
longer braking distance.
R
Brake
occasionally to remove any possible
salt residue. Make sure that you do not
endanger other road users when doing so.
R Carefully depress the brake pedal and the
beginning and end of a journey.
R Maintain a greater distance to the vehicle
ahead.
Servicing the brakes G
WARNING
If brake pads or brake fluid other than those
recommended are used, the braking
properties of the vehicle can be degraded to an extent that safe braking is substantially
impaired. This could result in an accident.
G
WARNING
Make sure that you do not endanger other
road users when you apply the brakes.
! If
the red brake warning lamp lights up in
the instrument cluster and you hear a
warning tone while the engine is running,
the brake fluid level may be too low.
Observe additional warning messages in
the multifunction display.
The brake fluid level may be too low due to
brake pad wear or leaking brake lines.
Have the brake system checked
immediately. This work should be carried
out at a qualified specialist workshop.
! Vehicles with 4MATIC: function or
performance tests may only be carried out
on a 2-axle dynamometer. If you are
planning to have the vehicle tested on such
a dynamometer, contact an authorized
Mercedes-Benz Center to obtain further
information first. Otherwise, you could
damage the drive train or the brake system.
! Vehicles with 4MATIC: as the ESP®
system operates automatically, the engine
and the ignition must be switched off
(SmartKey in position 0 or 1 in the ignition
lock or Start/Stop button in position 0 or
1) while the parking brake is being tested
on a brake dynamometer.
Braking maneuvers triggered automatically
by ESP ®
may seriously damage the brake
system. 172
Driving tips
Driving and parking
Page 233 of 372
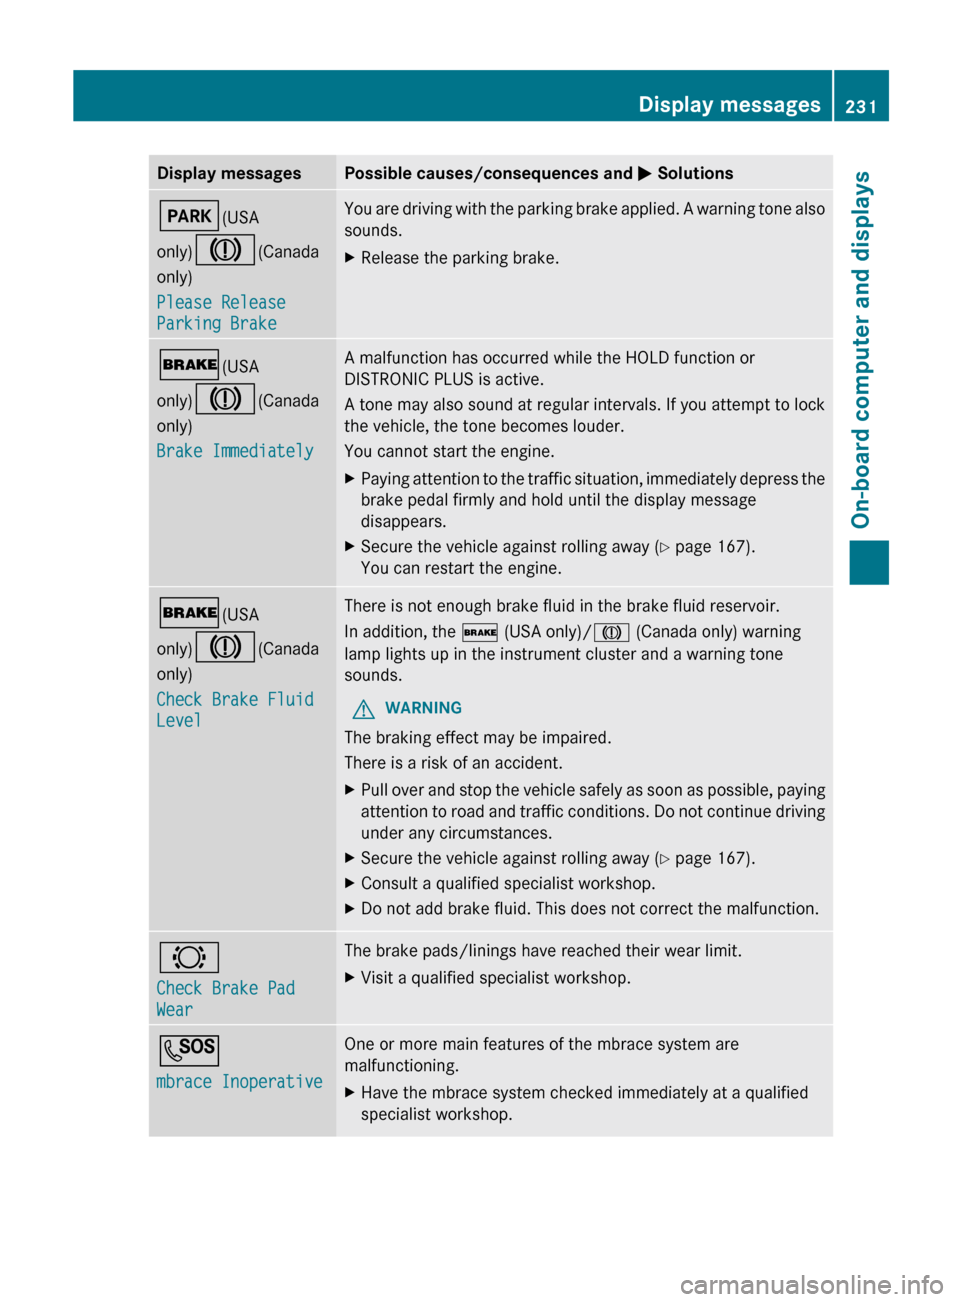
Display messages Possible causes/consequences and
M SolutionsF(USA
only)J(Canada
only)
Please Release
Parking Brake You are driving with the parking brake applied. A warning tone also
sounds.
X
Release the parking brake. $(USA
only)J(Canada
only)
Brake Immediately A malfunction has occurred while the HOLD function or
DISTRONIC PLUS is active.
A
tone may also sound at regular intervals. If you attempt to lock
the vehicle, the tone becomes louder.
You cannot start the engine.
X Paying attention to the traffic situation, immediately depress the
brake pedal firmly and hold until the display message
disappears.
X Secure the vehicle against rolling away ( Y page 167).
You can restart the engine. $(USA
only)J(Canada
only)
Check Brake Fluid
Level There is not enough brake fluid in the brake fluid reservoir.
In addition, the $ (USA only)/J (Canada only) warning
lamp lights up in the instrument cluster and a warning tone
sounds.
G WARNING
The braking effect may be impaired.
There is a risk of an accident.
X Pull over and stop the vehicle safely as soon as possible, paying
attention
to road and traffic conditions. Do not continue driving
under any circumstances.
X Secure the vehicle against rolling away ( Y page 167).
X Consult a qualified specialist workshop.
X Do not add brake fluid. This does not correct the malfunction. #
Check Brake Pad
Wear The brake pads/linings have reached their wear limit.
X
Visit a qualified specialist workshop. G
mbrace Inoperative One or more main features of the mbrace system are
malfunctioning.
X
Have the mbrace system checked immediately at a qualified
specialist workshop. Display messages
231
On-board computer and displays Z
Page 264 of 372
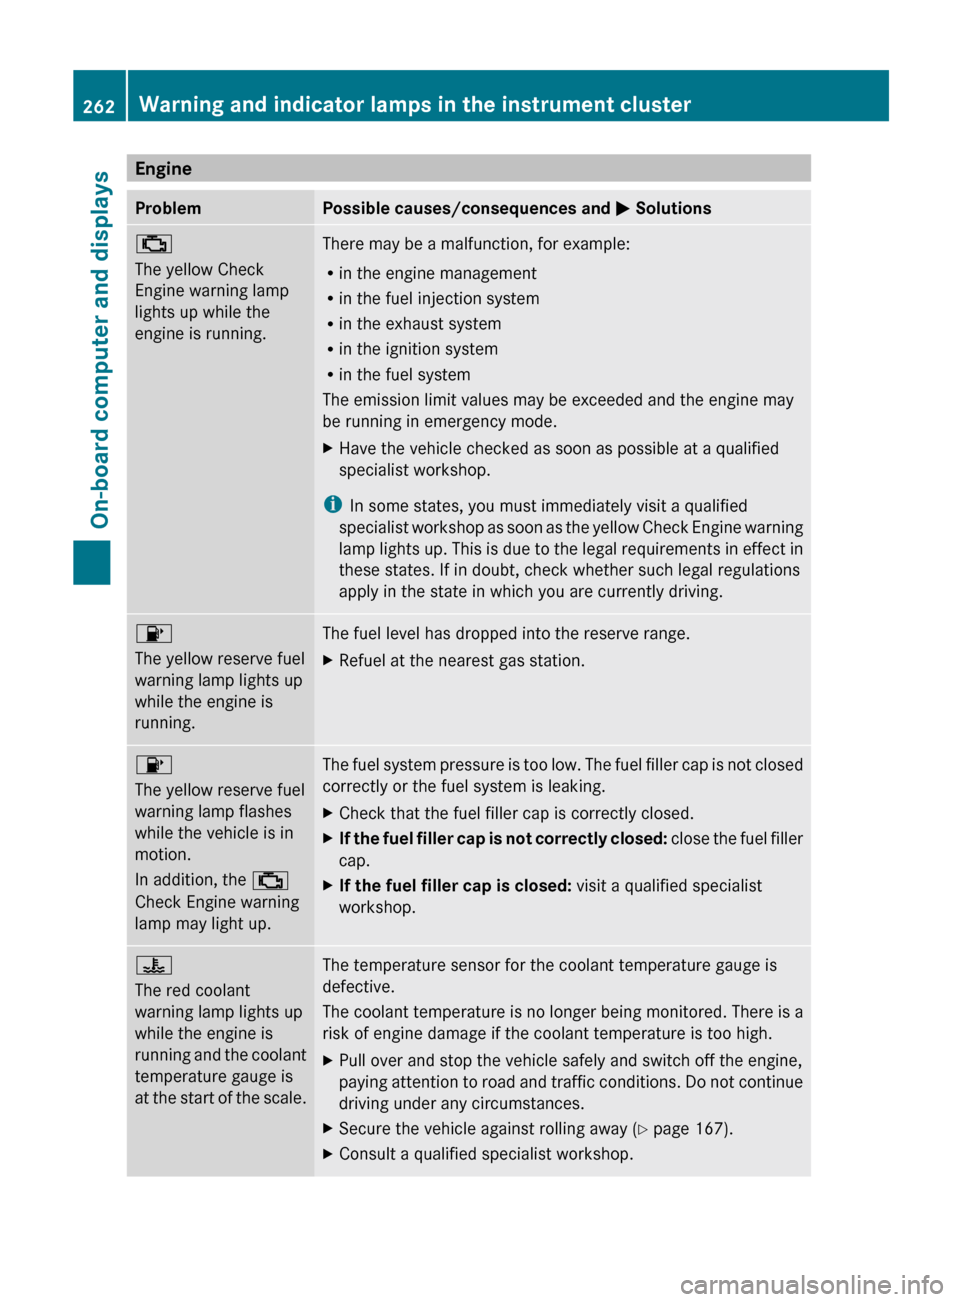
Engine
Problem Possible causes/consequences and
M Solutions;
The yellow Check
Engine warning lamp
lights up while the
engine is running.
There may be a malfunction, for example:
R
in the engine management
R in the fuel injection system
R in the exhaust system
R in the ignition system
R in the fuel system
The emission limit values may be exceeded and the engine may
be running in emergency mode.
X Have the vehicle checked as soon as possible at a qualified
specialist workshop.
i In some states, you must immediately visit a qualified
specialist
workshop as soon as the yellow Check Engine warning
lamp lights up. This is due to the legal requirements in effect in
these states. If in doubt, check whether such legal regulations
apply in the state in which you are currently driving. 8
The yellow reserve fuel
warning lamp lights up
while the engine is
running.
The fuel level has dropped into the reserve range.
X
Refuel at the nearest gas station. 8
The yellow reserve fuel
warning lamp flashes
while the vehicle is in
motion.
In addition, the ;
Check Engine warning
lamp may light up.
The fuel system pressure is too low. The fuel filler cap is not closed
correctly or the fuel system is leaking.
X
Check that the fuel filler cap is correctly closed.
X If the fuel filler cap is not correctly closed:
close the fuel filler
cap.
X If the fuel filler cap is closed: visit a qualified specialist
workshop. ?
The red coolant
warning lamp lights up
while the engine is
running
and the coolant
temperature gauge is
at the start of the scale. The temperature sensor for the coolant temperature gauge is
defective.
The
coolant temperature is no longer being monitored. There is a
risk of engine damage if the coolant temperature is too high.
X Pull over and stop the vehicle safely and switch off the engine,
paying
attention to road and traffic conditions. Do not continue
driving under any circumstances.
X Secure the vehicle against rolling away ( Y page 167).
X Consult a qualified specialist workshop.262
Warning and indicator lamps in the instrument cluster
On-board computer and displays
Page 266 of 372
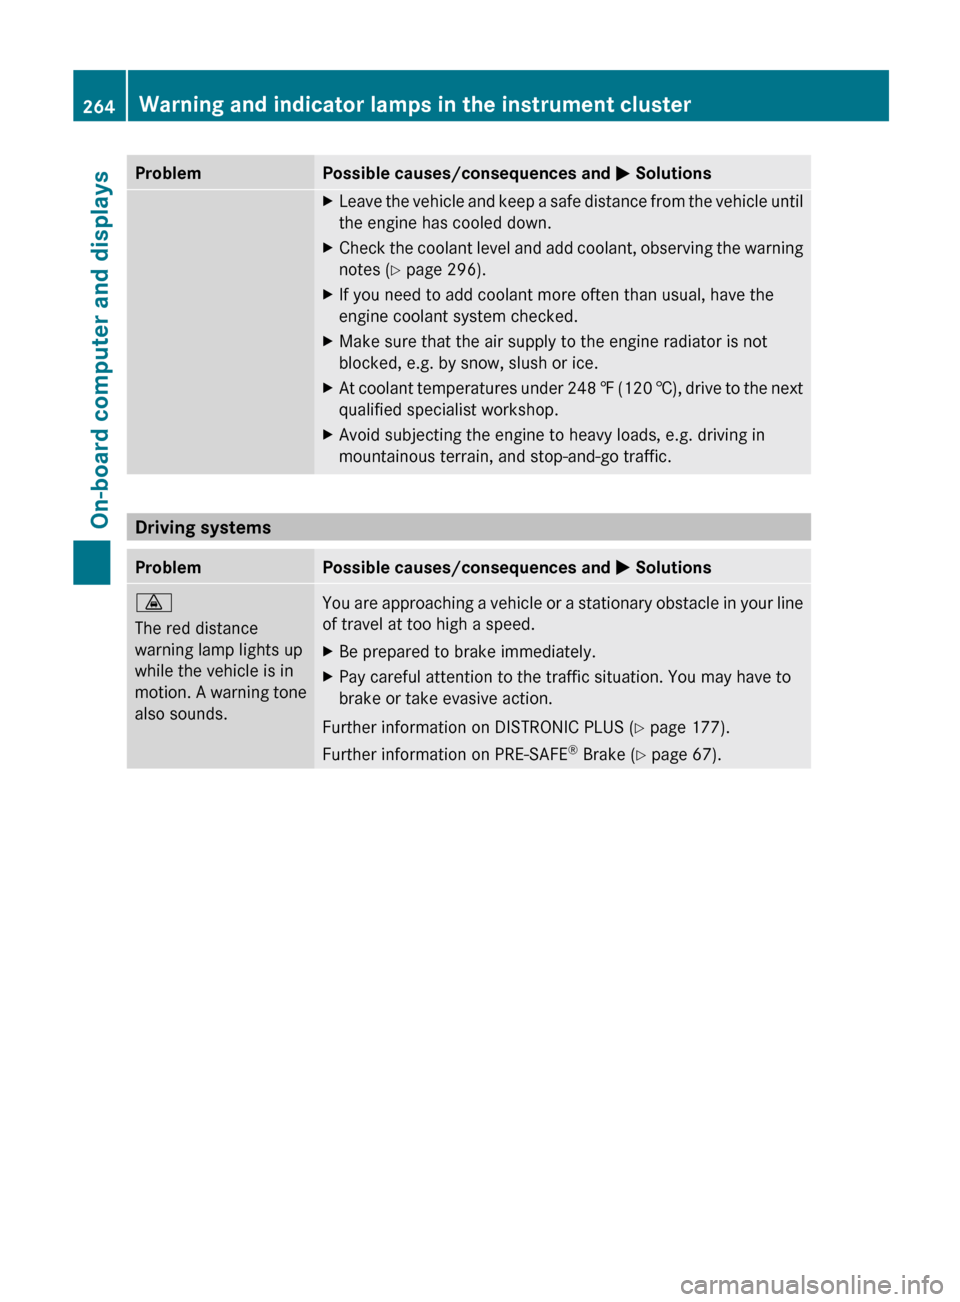
Problem Possible causes/consequences and
M SolutionsX
Leave the vehicle and keep a safe distance from the vehicle until
the engine has cooled down.
X Check the coolant level and add coolant, observing the warning
notes ( Y page 296).
X If you need to add coolant more often than usual, have the
engine coolant system checked.
X Make sure that the air supply to the engine radiator is not
blocked, e.g. by snow, slush or ice.
X At coolant temperatures under 248 ‡ (120 †), drive to the next
qualified specialist workshop.
X Avoid subjecting the engine to heavy loads, e.g. driving in
mountainous terrain, and stop-and-go traffic. Driving systems
Problem Possible causes/consequences and
M Solutions·
The red distance
warning lamp lights up
while the vehicle is in
motion.
A warning tone
also sounds. You are approaching a vehicle or a stationary obstacle in your line
of travel at too high a speed.
X
Be prepared to brake immediately.
X Pay careful attention to the traffic situation. You may have to
brake or take evasive action.
Further information on DISTRONIC PLUS ( Y page 177).
Further information on PRE-SAFE ®
Brake (Y page 67). 264
Warning and indicator lamps in the instrument cluster
On-board computer and displays
Page 297 of 372
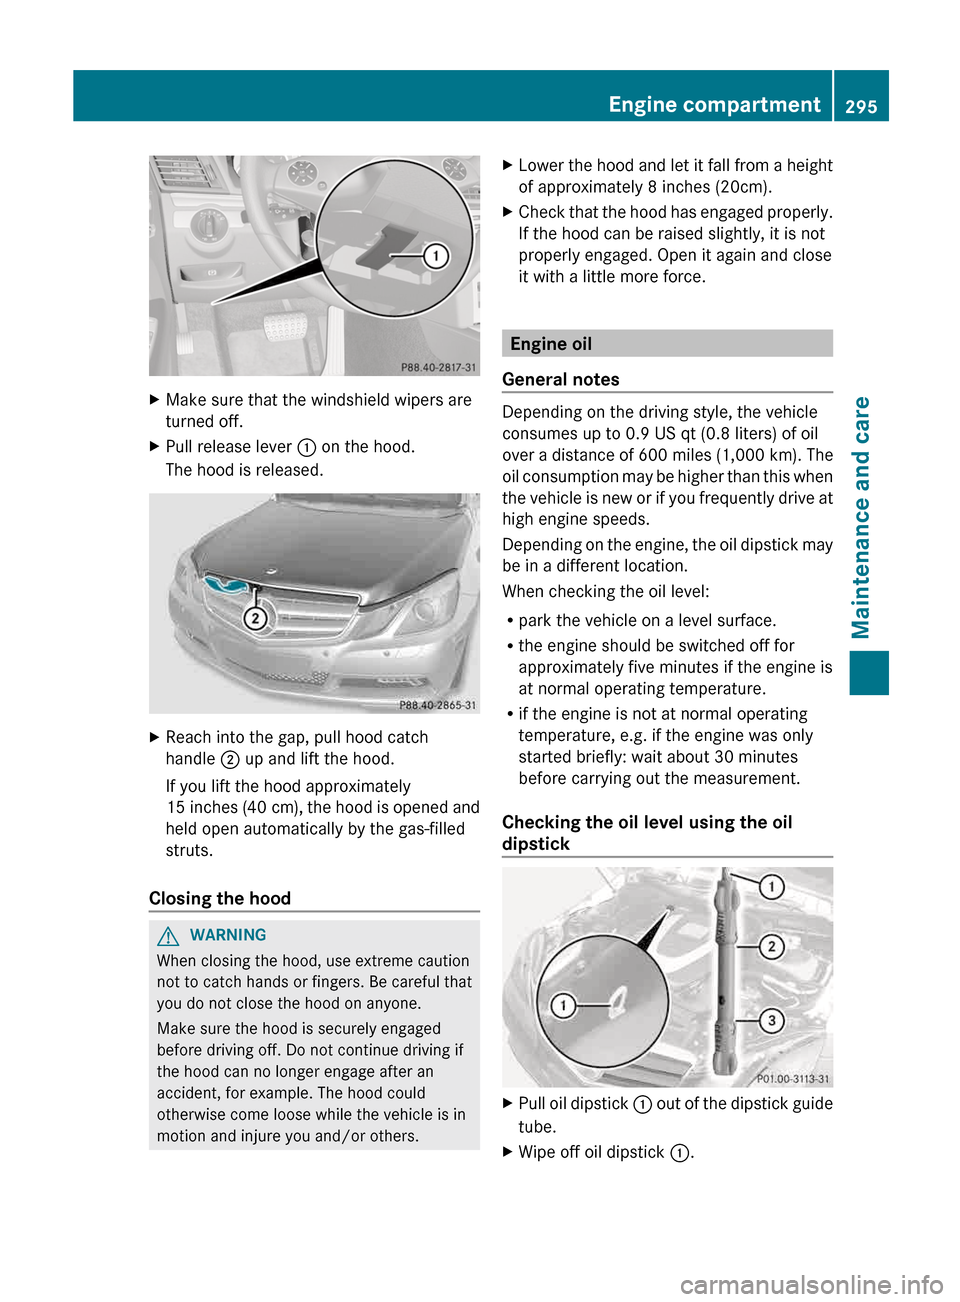
X
Make sure that the windshield wipers are
turned off.
X Pull release lever : on the hood.
The hood is released. X
Reach into the gap, pull hood catch
handle ; up and lift the hood.
If you lift the hood approximately
15 inches
(40 cm), the hood is opened and
held open automatically by the gas-filled
struts.
Closing the hood G
WARNING
When closing the hood, use extreme caution
not to catch hands or fingers. Be careful that
you do not close the hood on anyone.
Make sure the hood is securely engaged
before driving off. Do not continue driving if
the hood can no longer engage after an
accident, for example. The hood could
otherwise come loose while the vehicle is in
motion and injure you and/or others. X
Lower the hood and let it fall from a height
of approximately
8 inches (20cm).
X Check that the hood has engaged properly.
If the hood can be raised slightly, it is not
properly engaged. Open it again and close
it with a little more force. Engine oil
General notes Depending on the driving style, the vehicle
consumes up to 0.9 US qt
(0.8 liters) of oil
over a distance of 600 miles (1,000 km). The
oil consumption may be higher than this when
the vehicle is new or if you frequently drive at
high engine speeds.
Depending on the engine, the oil dipstick may
be in a different location.
When checking the oil level:
R park the vehicle on a level surface.
R the engine should be switched off for
approximately five minutes if the engine is
at normal operating temperature.
R if the engine is not at normal operating
temperature, e.g. if the engine was only
started briefly: wait about 30 minutes
before carrying out the measurement.
Checking the oil level using the oil
dipstick X
Pull oil dipstick :
out of the dipstick guide
tube.
X Wipe off oil dipstick :. Engine compartment
295
Maintenance and care Z