display MERCEDES-BENZ E-Class CABRIOLET 2014 C207 Owner's Guide
[x] Cancel search | Manufacturer: MERCEDES-BENZ, Model Year: 2014, Model line: E-Class CABRIOLET, Model: MERCEDES-BENZ E-Class CABRIOLET 2014 C207Pages: 394, PDF Size: 5.28 MB
Page 78 of 394
Observe information regarding indicator and
warning lamps (Y
page 278) as well as
display messages (Y page 251).ADAPTIVE BRAKE
ADAPTIVE BRAKE enhances braking safety
and offers increased braking comfort. In
addition to the braking function, ADAPTIVE
BRAKE also has the HOLD function
(Y page 201) and hill start assist
(Y page 168). PRE-SAFE
®
Brake
General information i
Observe the "Important safety notes"
section (Y page 68).
PRE-SAFE ®
Brake is only available for
vehicles with the Driving Assistance package.
For PRE-SAFE ®
Brake to assist you when
driving, the radar sensor system and the
camera system must be switched on and be
operational.
With the help of the radar sensor system and
the camera system, PRE-SAFE ®
Brake can
detect obstacles that are in front of your
vehicle for an extended period of time.
In addition, pedestrians in the path of your
vehicle can be detected.
PRE-SAFE ®
Brake detects pedestrians using
typical characteristics such as the body
contours and posture of aperson standing
upright.
i Observe the restrictions described in the
"Important safety notes"
section“ (Y page 76).
PRE-SAFE ®
Brake can help you to minimize
the risk of a collision with a vehicle ahead or
a pedestrian, and reduce the effects of such
a collision. If PRE-SAFE ®
Brake has detected
a risk of collision, you will be warned visually
and acoustically as well as by automatic
braking. Important safety notes G
WARNING
PRE-SAFE ®
Brake will initially brake your
vehicle by a partial application of the brakes
if a danger of collision is detected. There may
be a collision unless you brake yourself. Even
after subsequent full application of the brakes
a collision cannot always be avoided,
particularly when approaching at too high a
speed. There is a risk of an accident.
Always apply the brakes yourself and try to
take evasive action, provided it is safe to do
so. G
WARNING
PRE-SAFE ®
Brake cannot always clearly
identify objects and complex traffic
conditions.
In these cases, PRE-SAFE ®
Brake may:
R give an unnecessary warning and then
brake the vehicle
R not give a warning or intervene
There is a risk of an accident.
Always pay particular attention to the traffic
situation and be ready to brake, especially if
PRE-SAFE ®
Brake warns you. Terminate the
intervention in a non-critical driving situation.
In order to maintain the appropriate distance
to the vehicle in front and thus prevent a
collision, you must apply the brakes yourself. G
WARNING
PRE-SAFE ®
Brake does not react:
R to small people, e.g. children
R to animals
R to oncoming vehicles
R to crossing traffic
R when cornering
As a result, PRE-SAFE ®
Brake may neither
give warnings nor intervene in all critical
situations. There is a risk of an accident.
Always pay careful attention to the traffic
situation and be ready to brake. 76
Driving safet
ysystemsSafety
Page 79 of 394
In the event of snowfall or heavy rain, the
recognition can be impaired.
Recognitio nby the rada rsensor system is
also impaired in the event of:
R dirt on the sensors or anything else
covering the sensors
R interference by other radar sources
R there are strong radar reflections, for
example in parking garages
R a narrow vehicle traveling in front, e.g. a
motorbike
R a vehicle traveling in fron tonadifferent line
relative to the center of your vehicle
Recognition by the camera system is also
impaired in the event of:
R dirt on the camera or if the camera is
covered
R there is glare on the camera system, e.g.
from the sun being low in the sky
R darkness
R if:
-pedestrians move quickly, e.g. into the
path of the vehicle
- the camera system no longer recognizes
a pedestrian as a person due to special
clothing or other objects
- a pedestrian is concealed by other
objects
- the typical outline of a person is not
distinguishable from the background
Following damage to the fron tend of the
vehicle, have the configuratio nand operation
of the rada rsensors checked at a qualified
specialist workshop. This also applies to
collisions at low speeds where there is no
visible damage to the fron tofthe vehicle.
Following damage to the windshield, have the
configuration and operation of the camera
system checked at a qualified specialist
workshop. Function X
To activate/deactivate: activate or
deactivate PRE-SAFE ®
Brake in the on-
board computer (Y page 241).
If the PRE-SAFE ®
Brake is not activated, the
0001 symbol appears in the multifunction
display.
Starting at a speed of around 4 mph
(7 km/h), this function warns you if you
rapidly approach a vehicle in front.An
intermitten twarning tone will then sound and
the 000A distance warning lamp will light up
in the instrument cluster.
X Brake immediately to defuse the situation.
or
X Take evasive action provide ditis safe to do
so.
PRE-SAFE ®
Brake can also brake the vehicle
automatically under the following conditions:
R the driver and front-passenger have their
seat belts fastened
and
R the vehicle speed is between
approximately 4mph (7 km/h) and
124 mph (200 km/h)
At a speed of up to approximately 44 mph
(70 km/h), PRE-SAFE ®
Brake can also detect:
R stationary objects in the path of your
vehicle, e.g. stopped or parked vehicles
R pedestrians in the path of your vehicle
i If there is an increased risk of collision,
preventive passenger protection measures
(PRE-SAFE ®
) are activated.
If the risk of collision with the vehicle in front
remains and you do not brake, take evasive
action or accelerate significantly, the vehicle
may perform automatic emergency braking,
up to the point of full brake application.
Automatic emergency braking is not
performed until immediately prior to an
imminent accident. Driving safet
ysystems
77Safety Z
Page 102 of 394
i
Vehicle height when opening/closing the
soft top (Y page 390).
i Make sure that the soft top is dry and
clean before closing it. Otherwise, water or
dirt could enter the vehicle interior or trunk.
You can open or close the soft top:
R when the vehicle is stationary or
R when you do not exceed aspeed of
25 mph (40 km/h).
If there is a strong head wind, it may not be
possible to close the soft top fully. In this
case, reduce speed or stop in order to close
the soft top fully.
For safety reasons, Mercedes-Benz
recommends that you only open or close the
soft top when the vehicle is stationary.
If the soft top does not open or close fully, the
soft-top hydraulics are depressurized and the
soft top is lowered:
R after approximately 7minutes when the
ignition is switched on
R immediately if the ignition is switched off Opening and closing with the soft top
switch
Important safety notes G
WARNING
When opening or closing the soft top, there is
a risk that parts of the body could become
trapped by moving parts such as the roof
mechanism, the trunk lid, or the side
windows .There is a risk of injury.
When opening or closing the roof, make sure
that no parts of the body are in the vicinity of
moving parts. Release the switch if somebody
becomes trapped. G
WARNING
If the vehicle speed exceeds 25 mph
(40 km/h) the soft top stops during the
opening or closing procedure. This impairs your view to the rear. There is a risk of an
accident.
Reduce your speed to below 25 mph
(40 km/h) or stop the vehicle in accordance
with the traffic conditions.P
ress or pull the
soft-top switch again in order to open or close
the soft top fully.
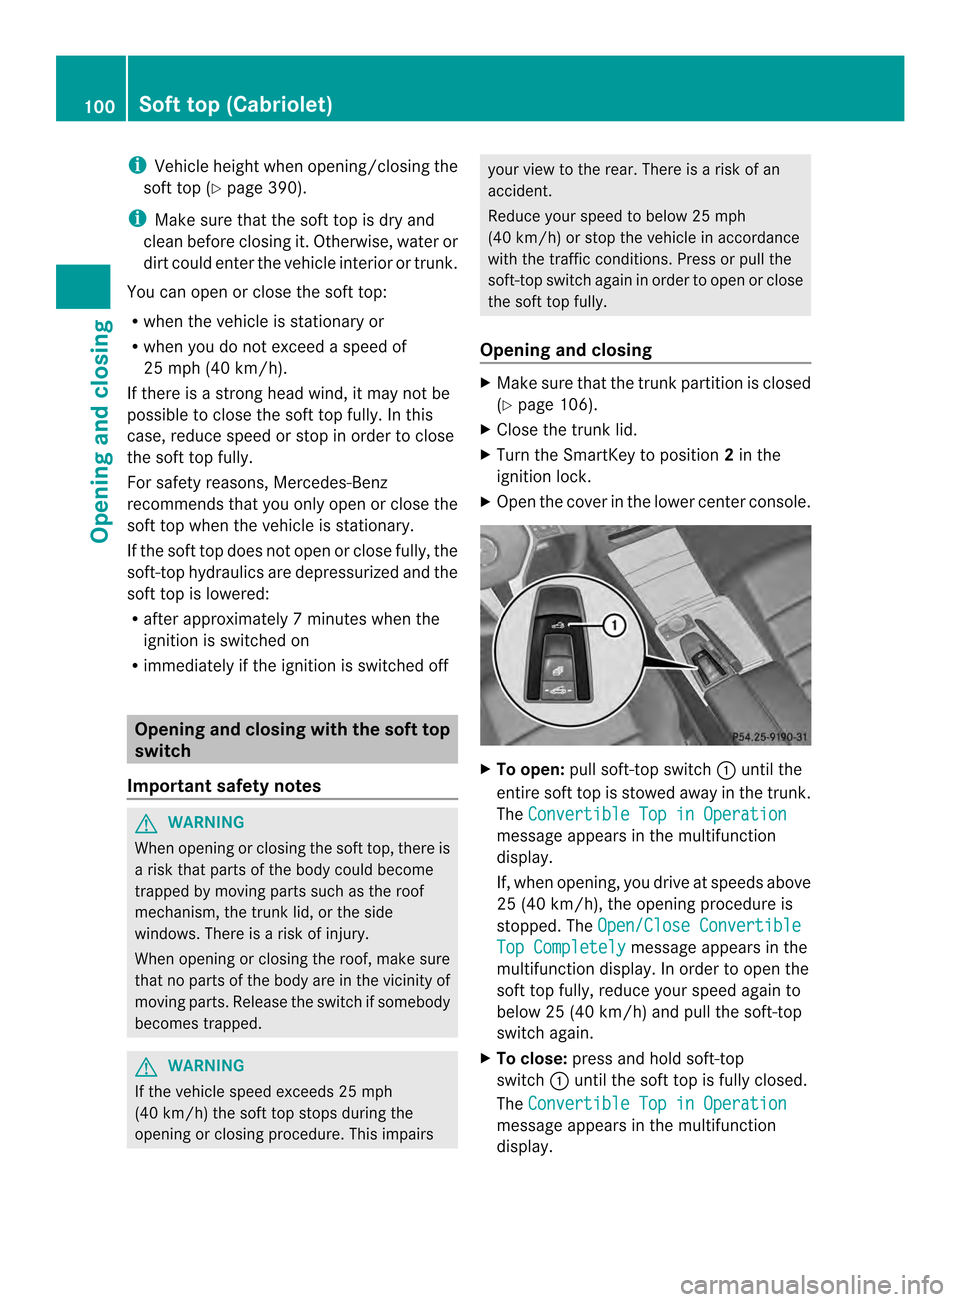
Opening and closing X
Make sure that the trunk partition is closed
(Y page 106).
X Close the trunk lid.
X Turn the SmartKey to position 2in the
ignitio nlock.
X Open the cover in the lower center console. X
To open: pull soft-top switch 0002until the
entire soft top is stowed away in the trunk.
The Convertible Top in Operation message appears in the multifunction
display.
If, when opening, you drive at speeds above
25 (40 km/h), the opening procedure is
stopped. The
Open/Close Convertible Top Completely message appears in the
multifunction display .Inorder to open the
soft top fully, reduce yours peed again to
below 25 (40 km/h) and pull the soft-top
switch again.
X To close: press and hold soft-top
switch 0002until the soft top is fully closed.
The Convertible Top in Operation message appears in the multifunction
display.100
Soft top (Cabriolet)Opening and closing
Page 103 of 394
If, when closing, you drive at speeds above
25 mph (40 km/h), the opening procedure
is stopped. The Open/Close Convertible Top Completely message
appears in the multifunctio ndisplay. In
order to close the soft top fully, reduce your
speed again to below 25 mph (40 km/h)
and press the soft-top switch again. Opening and closing using the
SmartKey
Important safety notes G
WARNING
When opening or closing the soft top, there is
a risk that parts of the body could become
trapped by moving parts such as the roof
mechanism, the trunk lid, or the side
windows .There is a risk of injury.
When opening or closing the roof, make sure
that no parts of the body are in the vicinity of
moving parts. Release the switch if somebody
becomes trapped.
Opening and closing The SmartKey must be near the door handle.
X To open: press and hold the 000Ebutton
on the SmartKey until the soft top is fully
opened.
The Convertible Top in Operation message appears in the multifunction
display. The seat ventilation is switched on.
The rear side windows open.
X To close: press and hold the 000Dbutton
on the SmartKey until the soft top is fully
closed.
The Convertible Top in Operation message appears in the multifunction
display. The soft top and the side windows
close. Closing the soft top manually
Important safety notes G
WARNING
Closing the soft top manually is a complex,
technically challenging procedure which can
also be physically demanding. You or others
can become trapped. There is a risk of injury.
Where possible, have the soft top closed
manually at a qualified specialist workshop.
If the soft top cannot be closed automatically,
check the following points:
R is the trunk partition engaged
(Y page 106)?
R are the head restraints on the rear bench
seats extended?
R is the trunk lid closed?
R is the on-board voltage sufficient?
Start the engine if necessary.
If automatic operation still does not work, the
soft top can be closed manually.
To carry out this work, you will need the
assistance of another person.
Closing the soft top X
Apply the parking brake.
X Open the side windows.
X Lower the head restraints automatically
(Y page 119) or manually (Y page 119).
X Remove the SmartKey from the ignition
lock.
X Open the trunk.
X Take the two straps out of the vehicle tool
kit (Y page 328).
X Take the hex-socket wrench out of the
Operator's Manual wallet and keep it with
you. Soft top (Cabriolet)
101Opening and closing Z
Page 107 of 394

X
Lower soft-top compartment lid 001E.X
With yourh and flat, pres sdown the
material tensioning frame until it rests on
soft-top support 001Fof the soft-top
compartment lid.
X With your hand flat, press the soft-top
compartment cover forwards/downwards
on both sides simultaneously until it
engages in the guide. Apply your hands to
the points indicated with arrows.
At the same time, press the material
tensioning frame gently downwards with
your flat hand. X
Insert the Allen key into the roof lock.
X Turn the Allen key counter-clockwise 0024as
far as possible.
X Have the soft-top mechanism repaired
immediately at a specialist workshop.
i Press the soft-top compartment lid again
if the trunk lid cannot be opened.
! Do not under any circumstances open the
trunk lid with the emergency key. You could
otherwise damage the trunk lid and the
soft-top compartment cover. Relocking the soft top
Important safety notes G
WARNING
If you do not fully open/close the soft top, the
soft-top hydraulics depressurize after a short
time. This causes the soft top to lower
unexpectedly and may cause you or others to
be trapped. There is a risk of injury.
Always open or close the soft top completely.
The soft top is not locked if:
R the Convertible Top in Operation message appears in the multifunction
display.
R you hear a warning tone for up to ten
seconds when pulling away or while driving.
To lock You can lock the soft top again if it is not
locked fully.
X
Pull over and stop the vehicle safely as soon
as possible, paying attention to road and
traffic conditions.
X Turn the SmartKey to position 2in the
ignition lock.
X Press the soft-top switch (Y page 100). Soft top (Cabriolet)
105Opening and closing Z
Page 118 of 394
Useful information
i This Operator's Manual describes all
models and all standard and optional
equipment of your vehicle available at the
time of publication of the Operator's
Manual. Country-specific differences are
possible. Please note that your vehicle may
not be equipped with all features
described. This also applies to safety-
related systems and functions.
i Read the information on qualified
specialist workshops: (Y page 25).Correct driver's seat position
G
WARNING
You could lose control of your vehicle if you
do the following while driving:
R adjust the driver's seat, head restraint,
steering wheel or mirrors
R faste nthe seat belt
There is a risk of an accident.
Adjust the driver's seat, head restraint,
steering wheel and mirror and fasten your
seat belt before starting the engine. X
Observe the safety guidelines on seat
adjustment (Y page 117).
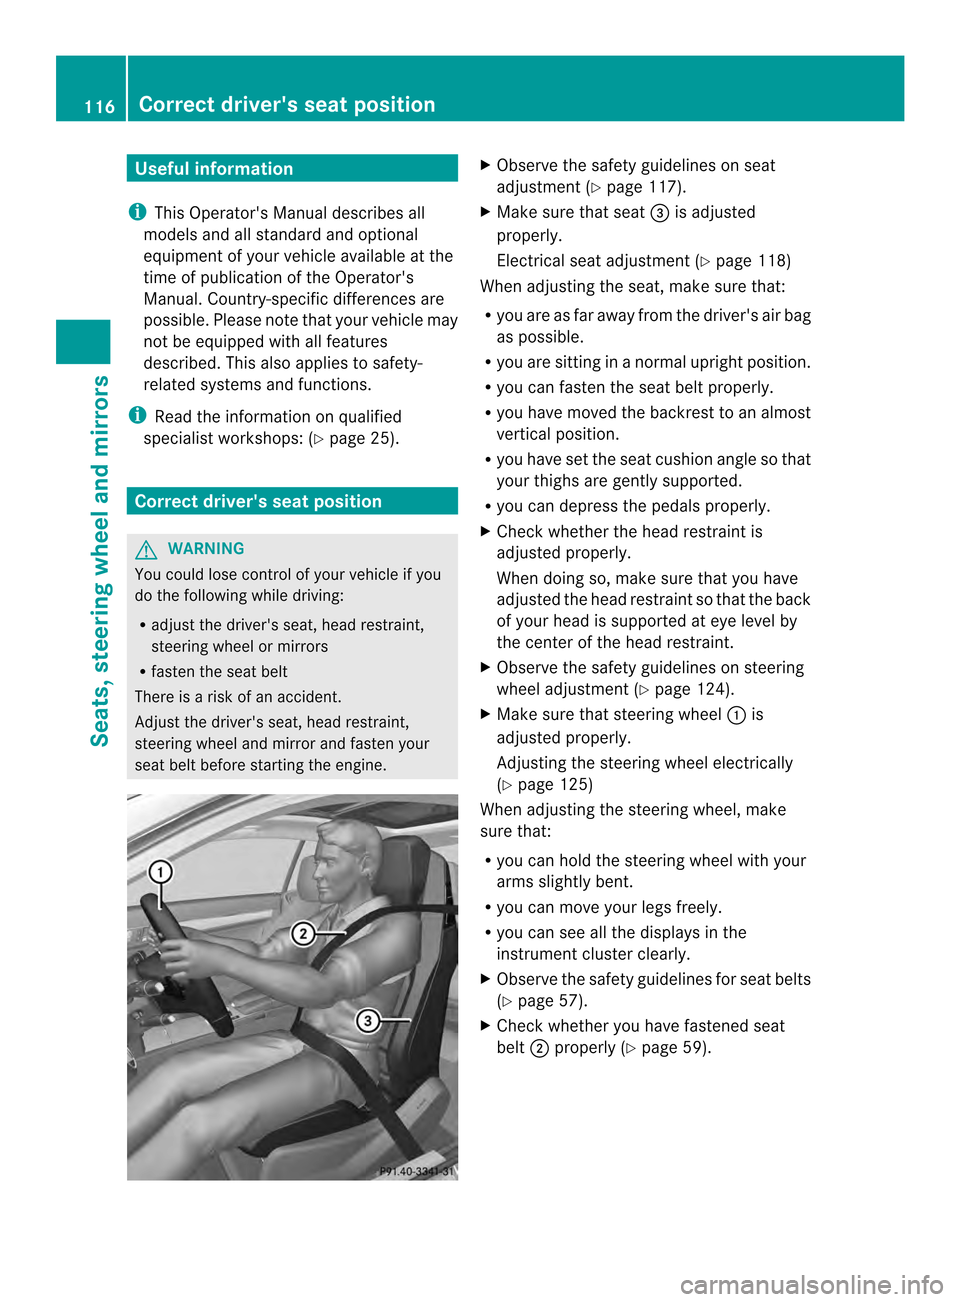
X Make sure that seat 0023is adjusted
properly.
Electrical seat adjustment (Y page 118)
When adjusting the seat, make sure that:
R you are as far away from the driver's air bag
as possible.
R you are sitting in a normal upright position.
R you can fasten the seat belt properly.
R you have moved the backrest to an almost
vertical position.
R you have set the seat cushion angle so that
your thighs are gently supported.
R you can depress the pedals properly.
X Check whether the head restraint is
adjusted properly.
When doing so, make sure that you have
adjusted the head restraint so that the back
of your head is supported at eye level by
the center of the head restraint.
X Observe the safety guidelines on steering
wheel adjustment (Y page 124).
X Make sure that steering wheel 0002is
adjusted properly.
Adjusting the steering wheel electrically
(Y page 125)
When adjusting the steering wheel, make
sure that:
R you can hold the steering wheel with your
arms slightly bent.
R you can move your legs freely.
R you can see all the displays in the
instrumentc luster clearly.
X Observe the safety guidelines for seat belts
(Y page 57).
X Check whether you have fastened seat
belt 0003properly (Y page 59).116
Correct driver's seat positionSeats, steering wheel and mirrors
Page 142 of 394

Adaptive Highbea
mAssist cannot take into
account road, weather or traffic conditions.
Adaptive Highbeam Assist is only an aid. You
are responsible for adjusting the vehicle's
lighting to the prevailing light, visibility and
traffic conditions.
In particular, the detection of obstacles can
be restricted if there is:
R poor visibility, e.g. due to fog, heavy rain or
snow
R dirt on the sensors or the sensors are
obscured
General notes You can use this function to set the
headlamps to change between low beam and
high beam automatically. The system
recognizes vehicles with their lights on, either
approaching from the opposite direction or
traveling in front of your vehicle, and
consequently switches the headlamps from
high beam to low beam.
The system automatically adapts the low-
beam headlamp range depending on the
distance to the other vehicle. Once the
system no longer detects any other vehicles,
it reactivates the high-beam headlamps. The system's optical sensor is located behind
the windshield near the overhead control
panel.
Switching Adaptive Highbeam Assist
on/off 0002
High-beam headlamps
0003 Turn signal, right
0023 High-beam flasher
0022 Turn signal, left
X To switch on: turn the light switch to
0004.
X Press the combination switch beyond the
pressure point in the direction of
arrow 0002.
The 0003 indicator lamp in the
multifunction display lights up when it is
dark and the light sensor activates the low-
beam headlamps.
If you are driving at speeds above
approximately 16 mph (25 km/h):
The headlamp range is set automatically
depending on the distance between the
vehicle and other road users.
If you are driving at speeds above
approximately 19 mph (30 km/h) and no
other road users have been detected:
The high-beam headlamps are switched on
automatically. The 000Aindicator lamp in
the instrument cluster also lights up.
If you are driving at speeds below
approximately 16 mph (25 km/h) or other
road users have been detected or the roads
are adequately lit: 140
Exterior lightingLights and windshield wipers
Page 143 of 394
The high-beam headlamps are switched off
automatically. The 000Aindicator lamp in
the instrument cluster goes out. The 0003
indicator lamp in the multifunction display
remains lit.
X To switch off: move the combination
switch back to its normal position or move
the light switch to another position.
The 0003 indicator lamp in the instrument
cluster goes out. Headlamps fogged up on the inside
The headlamps may fog up on the inside if
there is high atmospheric humidity.
X Switch on the light and drive off.
The level of moisture diminishes,
depending on the length of the journey and
the weather conditions (humidity and
temperature).
If the level of moisture does not diminish:
X Have the headlamps checked at a qualified
specialist workshop. Interior lighting
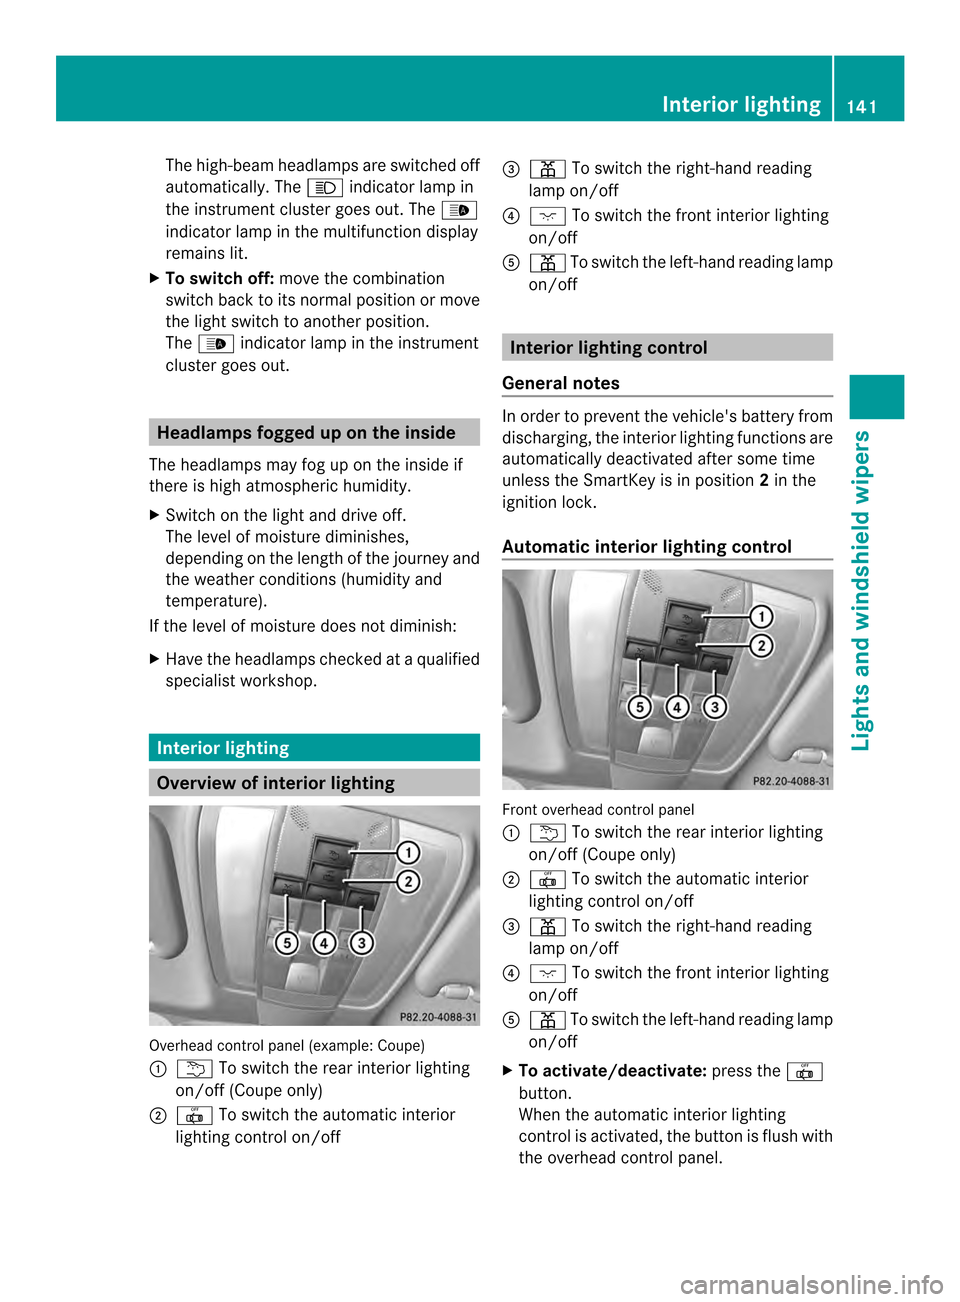
Overview of interior lighting
Overhead control panel (example: Coupe)
0002
0001 To switch the rear interior lighting
on/of f(Coupe only)
0003 001B To switch the automatic interior
lighting control on/off 0023
0012 To switch the right-hand reading
lamp on/off
0022 0004 To switch the front interior lighting
on/off
0020 0012 To switch the left-hand reading lamp
on/off Interior lighting control
General notes In order to preven
tthe vehicle's battery from
discharging, the interior lighting functions are
automatically deactivated after some time
unless the SmartKey is in position 2in the
ignition lock.
Automatic interior lighting control Front overhead control panel
0002
0001 To switch the rear interior lighting
on/off (Coupe only)
0003 001B To switch the automatic interior
lighting control on/off
0023 0012 To switch the right-hand reading
lamp on/off
0022 0004 To switch the front interior lighting
on/off
0020 0012 To switch the left-hand reading lamp
on/off
X To activate/deactivate: press the001B
button.
When the automatic interior lighting
control is activated, the button is flush with
the overhead control panel. Interior lighting
141Lights and windshield wipers Z
Page 151 of 394
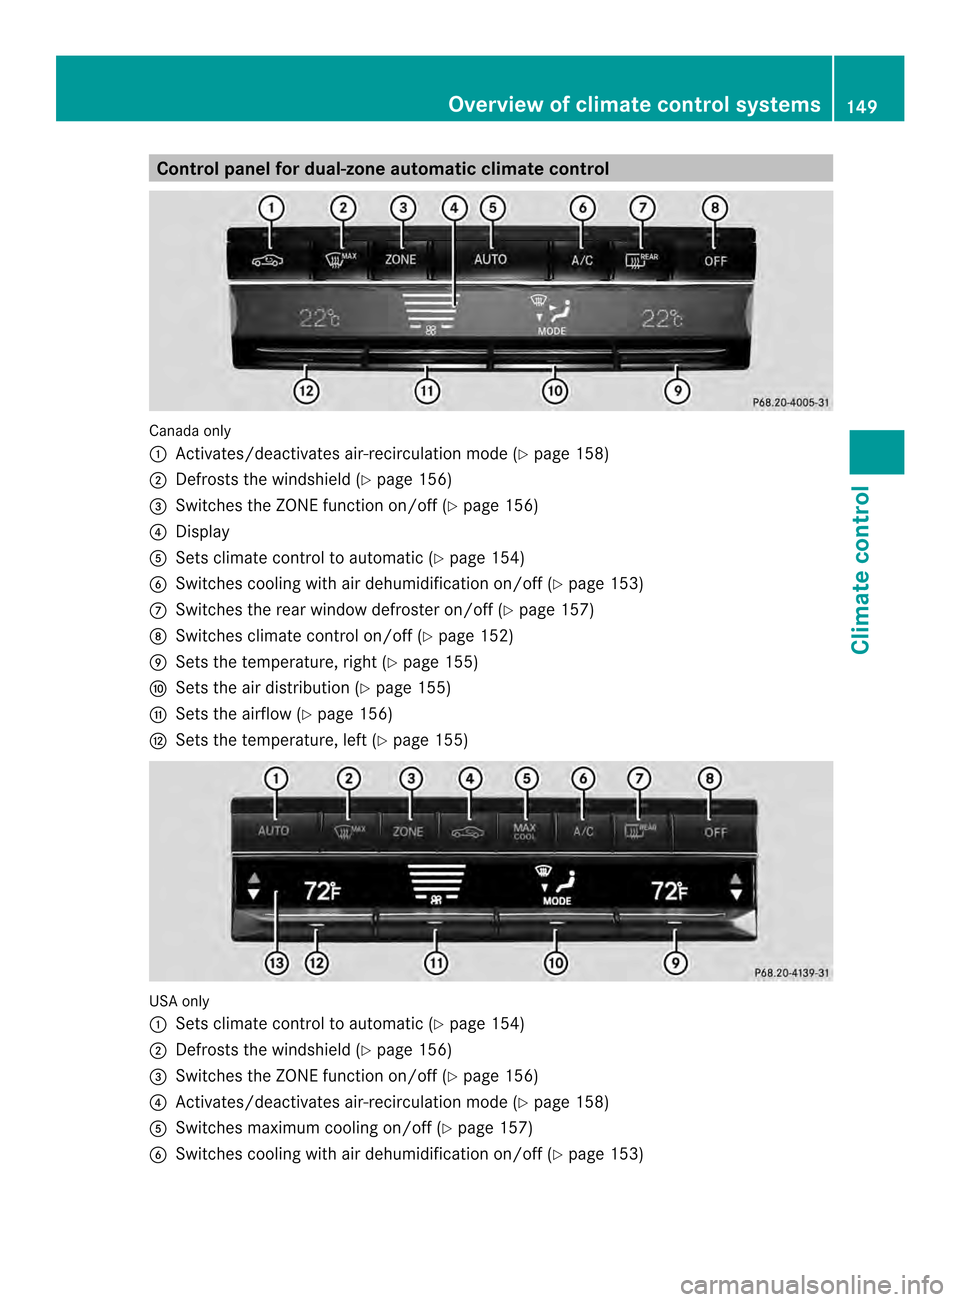
Control panel for dual-zone automatic climate control
Canada only
0002
Activates/deactivates air-recirculation mode (Y page 158)
0003 Defrosts the windshield (Y page 156)
0023 Switches the ZONE function on/off (Y page 156)
0022 Display
0020 Sets climate control to automatic (Y page 154)
0021 Switches cooling with air dehumidification on/of f(Ypage 153)
0014 Switches the rear window defroster on/off (Y page 157)
0015 Switches climate control on/off (Y page 152)
0016 Sets the temperature, right (Y page 155)
0017 Sets the air distribution (Y page 155)
0018 Sets the airflow (Y page 156)
001A Sets the temperature, left (Y page 155)USA only
0002
Sets climate control to automatic (Y page 154)
0003 Defrosts the windshield (Y page 156)
0023 Switches the ZONE function on/off (Y page 156)
0022 Activates/deactivates air-recirculation mode (Y page 158)
0020 Switches maximum cooling on/off (Y page 157)
0021 Switches cooling with air dehumidification on/off ( Ypage 153) Overview of climate control systems
149Climate control
Page 152 of 394

0014
Switches the rea rwindow defroster on/off (Y page 157)
0015 Switches climate control on/off (Y page 152)
0016 Sets the temperature, right (Y page 155)
0017 Sets the air distribution (Y page 155)
0018 Sets the airflow (Y page 156)
001A Sets the temperature, left (Y page 155)
001B Display Information about using dual-zone
automatic climate control
Automatic climate control The following contains notes and
recommendations on optimum use of dual-
zone automatic climate control.
R
Activate climate control using the 0004and
0005 buttons .The indicator lamps above
the 0004 and0005 buttons light up.
R Set the temperature to 72 ‡ (22 †).
R Only use the "Windshield defrosting"
function briefly until the windshield is clear
again.
R Only use air-recirculation mode briefly, e.g.
if there are unpleasant outside odors or
when in a tunnel. The windows could
otherwise fog up, since no fresh air is drawn
into the vehicle in air-recirculation mode.
R Use the ZONE function to adopt the
temperature settings on the driver's side
for the front-passenger side as well. The
indicator lamp above the 0003button goes
out.
R Vehicles with COMAND: if you change the
settings of the climate control system, the
climate status display appears for
approximately three seconds at the bottom
of the screen in the COMAND display. See
also the separate COMAND operating
instructions. You will see the current
settings of the various climate control
functions. ECO start/stop function During automatic engine switch-off, the ECO
start/stop function only operates at a
reduced capacity. If you require the full
climate control output, you can switch off the
ECO start/stop function by pressing the ECO
button (Y
page 170). 150
Overview of climate control systemsClimate control