keyless MERCEDES-BENZ E-Class CABRIOLET 2016 C207 Owner's Guide
[x] Cancel search | Manufacturer: MERCEDES-BENZ, Model Year: 2016, Model line: E-Class CABRIOLET, Model: MERCEDES-BENZ E-Class CABRIOLET 2016 C207Pages: 322, PDF Size: 7.97 MB
Page 144 of 322
GWARNING
Electrostatic buildup can create sparks and
ignite fuel vapors. There is a risk of fire and
explosion.
Always touch the vehicle body before opening
the fuel filler flap or touching the fuel pump
nozzle. Any existing electrostatic buildup is
thereby discharged.
!Do not use diesel to refuel vehicles with a
gasoline engine. Do not switch on the ignition
if you accidentally refuel with the wrong fuel.
Otherwise, the fuel will enter the fuel system. Even small amounts of the wrong fuel could
result in damage to the fuel system and the
engine. Notify a qualified specialist workshop
and have the fuel tank and fuel lines drained
completely.
!Overfilling the fuel tank could damage the
fuel system.
!Take care not to spill any fuel on painted
surfaces. You could otherwise damage the
paintwork.
!Use a filter when refueling from a fuel can.
Otherwise, the fuel lines and/or injection sys-
tem could be blocked by particles from the
fuel can.
Do not get into the vehicle again during the refu-
eling process. Otherwise, electrostatic charge
could build up again.
If you overfill the fuel tank, fuel could spray out
when the fuel pump nozzle is removed.
iFlexible Fuel vehicles can be recognized by
the Ethanol up to E85 sticker on the inside of
the fuel filler flap.
For further information on fuel and fuel quality
(
Ypage 313).
Refueling
General information
Pay attention to the important safety notes
(Ypage 141).
The fuel filler flap is unlocked or locked auto-
matically when you unlock or lock the vehicle
with the key or using KEYLESS-GO. The position of the fuel filler cap is displayed
8
in the instrument cluster. The arrow next
to the filling pump indicates the side of the vehi-
cle.
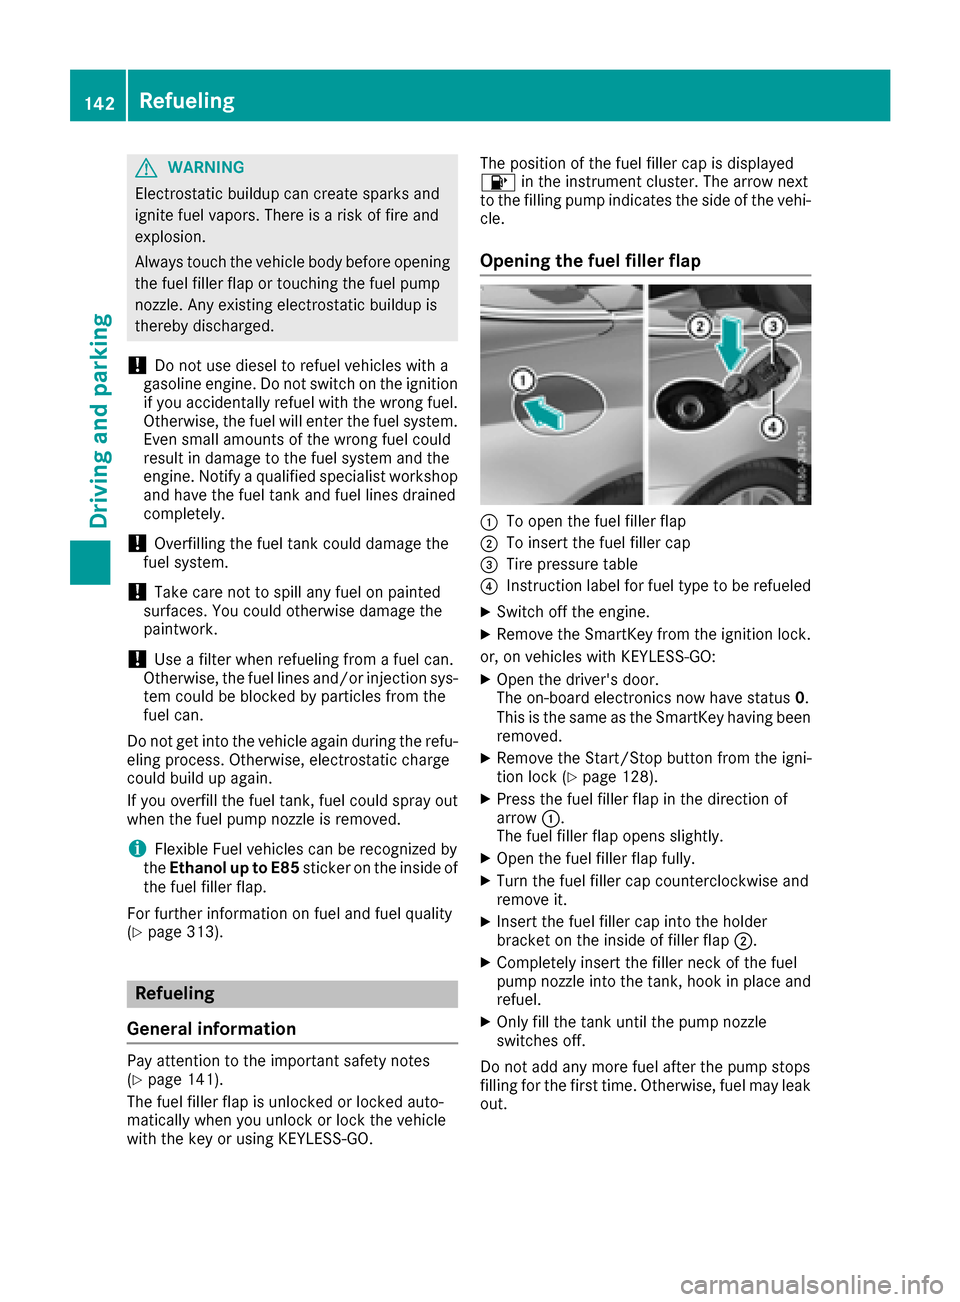
Opening the fuel filler flap
:To open the fuel filler flap
;To insert the fuel filler cap
=Tire pressure table
?Instruction label for fuel type to be refueled
XSwitch off the engine.
XRemove the SmartKey from the ignition lock.
or, on vehicles with KEYLESS‑GO:
XOpen the driver's door.
The on-board electronics now have status 0.
This is the same as the SmartKey having been
removed.
XRemove the Start/Stop button from the igni-
tion lock (Ypage 128).
XPress the fuel filler flap in the direction of
arrow :.
The fuel filler flap opens slightly.
XOpen the fuel filler flap fully.
XTurn the fuel filler cap counterclockwise and
remove it.
XInsert the fuel filler cap into the holder
bracket on the inside of filler flap ;.
XCompletely insert the filler neck of the fuel
pump nozzle into the tank, hook in place and
refuel.
XOnly fill the tank until the pump nozzle
switches off.
Do not add any more fuel after the pump stops
filling for the first time. Otherwise, fuel may leak
out.
142Refueling
Driving and parking
Page 146 of 322
Problems with fuel and the fuel tank
ProblemPossible causes/consequences andMSolutions
Fuel is leaking from the
vehicle.GWARNING
The fuel line or the fuel tank is faulty.
Risk of explosion or fire.
XApply the electric parking brake.
XSwitch off the engine.
XRemove the SmartKey from the ignition lock.
or, on vehicles with KEYLESS‑GO:
XOpen the driver's door.
The on-board electronics now have status 0. This is the same as the
SmartKey having been removed.
XDo not restart the engine under any circumstances.
XConsult a qualified specialist workshop.
The fuel filler flap cannot
be opened.The fuel filler flap is not unlocked.
XUnlock the vehicle (Ypage 73).
The SmartKey battery is discharged or nearly discharged.
XUnlock the vehicle using the mechanical key (Ypage 75).
The fuel filler flap is unlocked, but the opening mechanism is jammed.
XConsult a qualified specialist workshop.
Parking
Important safety notes
GWARNING
Flammable material such as leaves, grass or
twigs may ignite if they come into contact with
hot parts of the exhaust system or exhaust
gas flow. There is a risk of fire.
Park the vehicle so that no flammable mate-
rials come into contact with parts of the vehi-
cle which are hot. Take particular care not to
park on dry grassland or harvested grain
fields.
GWARNING
If you leave children unsupervised in the vehi-
cle, they could set it in motion by, for example:
Rrelease the parking brake.
Rshift the automatic transmission out of the
parking position P.
Rstart the engine.
In addition, they may operate vehicle equip-
ment and become trapped. There is a risk of
an accident and injury.
When leaving the vehicle, always take the
SmartKey with you and lock the vehicle. Never
leave children unsupervised in the vehicle.
!Always secure the vehicle correctly against
rolling away. Otherwise, the vehicle or its driv-
etrain could be damaged.
144Parking
Driving and parking
Page 147 of 322
To ensure that the vehicle is secured against
rolling away unintentionally:
Rthe parking brake must be applied.
Rthe transmission must be in positionPand the
Smartkey must be removed from the ignition lock.
Rthe front wheels must be turned towards the
curb on steep uphill or downhill gradients.
Switching off the engine
Important safety notes
GWARNING
The automatic transmission switches to neu-
tral position Nwhen you switch off the engine.
The vehicle may roll away. There is a risk of an
accident.
After switching off the engine, always switch
to parking position P. Prevent the parked vehi-
cle from rolling away by applying the parking
brake.
Vehicles with automatic transmission
XApply the parking brake firmly.
XShift the transmission to position P.
XWith the Smartkey:turn the Smartkey to
position 0in the ignition lock and remove it.
The immobilizer is activated.
XWith KEYLESS-GO: press the KEYLESS-GO
Start/Stop button (Ypage 128).
The engine stops and all the indicator lamps in
the instrument cluster go out.
When the driver's door is closed, this corre-
sponds to Smartkey position 1. When the
driver's door is open, this corresponds to
Smartkey position 0: "Smartkey removed".
If you switch the engine off with the transmis-
sion in position Ror D, the automatic transmis-
sion shifts to Nautomatically.
With the Smartkey: if you then open the driv-
er's door or the front-passenger door or remove the Smartkey from the ignition, the automatic
transmission shifts to Pautomatically.
With KEYLESS-GO: if you then open the driver's
or front-passenger door, the automatic trans-
mission shifts to P. If you want the automatic transmission to
remain in neutral
N, e.g. when having the vehicle
cleaned in an automatic car wash with a towing
system:
XVehicles with KEYLESS-GO: remove the
Start/Stop button from the ignition lock.
XInsert the Smartkey into the ignition lock.
XAll vehicles: switch the ignition on.
XDepress the brake pedal and keep it
depressed.
XShift to neutral N.
XRelease the brake pedal.
XRelease the parking brake.
XSwitch off the ignition and leave the Smartkey
in the ignition lock.
Parking brake
GWARNING
If you must brake the vehicle with the parking brake, the braking distance is considerably
longer and the wheels could lock. There is an
increased danger of skidding and accidents.
Only use the parking brake to brake the vehi-
cle when the service brake is faulty. Do not
apply the parking brake too firmly. If the
wheels lock, release the parking brake until
the wheels begin turning again.
GWARNING
If you leave children unsupervised in the vehi-
cle, they could set it in motion by, for example:
Rrelease the parking brake.
Rshift the automatic transmission out of the
parking position P.
Rstart the engine.
In addition, they may operate vehicle equip-
ment and become trapped. There is a risk of
an accident and injury.
When leaving the vehicle, always take the
SmartKey with you and lock the vehicle. Never
leave children unsupervised in the vehicle.
Parking145
Driving and parking
Z
Page 226 of 322
Display messagesPossible causes/consequences andMSolutions
Â
ReplaceKey Batter y
The battery of th eKEYLESS-GO ke yis discharged.
XChange th ebatterie s (Ypage 76) .
Â
Don't Forget You rKey
The KEYLESS-GO ke yis no tin th eignition lock. You hav eopened th e
driver's door wit hth eengin eswitched off .
This display message is shown in th emultifunction display for amax -
imum of 60 seconds and is simply areminder.
XRemembe rto tak eth eKEYLESS-GO ke ywit hyou when you leav e
th evehicle.
Â
Key Not Detected(re ddisplay message )
The KEYLESS-GO ke yis no tin th evehicle.
A warning tone also sounds.
If th eengin eis switched off ,you can no longer loc kth evehicl ecen-
trally or start th eengine.
XPull ove rand stop th evehicl esafely as soo nas possible, payin g
attention to roa dand traffic conditions.
XSecur eth evehicl eagainst rollin gaway (Ypage 144).
XLocate th eKEYLESS-GO key.
A stron gsource of radi owave sis causing interferenc eand this is
preventing th eKEYLESS-GO ke yfrom bein grecognized when th e
engin eis running.
A warning tone also sounds.
XPull ove rand stop th evehicl esafely as soo nas possible, payin g
attention to roa dand traffic conditions.
XSecur eth evehicl eagainst rollin gaway (Ypage 144).
XInsertth eSmartKey int oth eignition loc kand bring int oke ymode.
Â
Key Not Detected(whit edisplay message )
The KEYLESS-GO ke ycanno tbe detecte dat present.
XChange th elocation of th eSmartKey wit hth eKEYLESS-GO func-
tion sin th evehicle.
If th eKEYLESS-GO ke yis still no tdetected:
XOperat eth evehicl ewit hth eSmartKey in th eignition lock.
Â
Remove 'Start 'But ‐ton and Insert Key
The KEYLESS-GO ke ycan continuousl yno tbe detected.
KEYLESS-GO is temporarily malfunctioning or is defective. Awarning
tone also sounds.
XInser tth eSmartKey int oth eignition loc kand tur nit to th edesire d
position .
XVisitaqualified specialist workshop .
Warning and indicat orlamps in the instrume nt cluster
General notes
Some systems carry out aself-diagnosis when th eignition is switched on .Therefore ,som eindicator
and warning lamp smay ligh tup or flas htemporarily. This behavio ris non-critical .These indicator
224Warning and indicator lamps in the instrument cluster
On-board computer and displays
Page 262 of 322
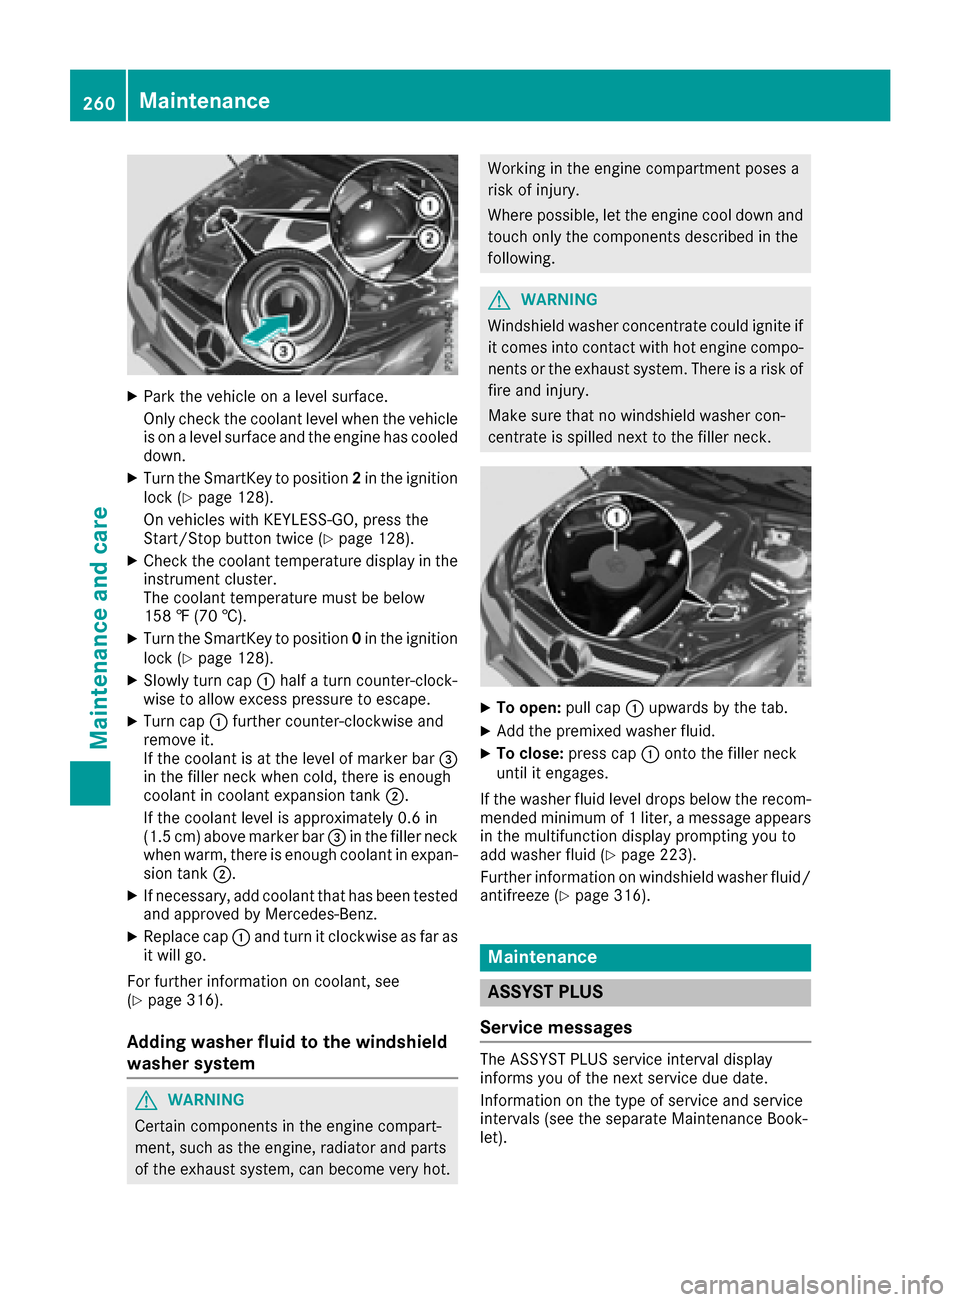
XPark the vehicle on a level surface.
Only check the coolant level when the vehicleis on a level surface and the engine has cooled
down.
XTurn the SmartKey to position 2in the ignition
lock (Ypage 128).
On vehicles with KEYLESS-GO, press the
Start/Stop button twice (
Ypage 128).
XCheck the coolant temperature display in the
instrument cluster.
The coolant temperature must be below
158 ‡ (70 †).
XTurn the SmartKey to position 0in the ignition
lock (Ypage 128).
XSlowly turn cap :half a turn counter-clock-
wise to allow excess pressure to escape.
XTurn cap :further counter-clockwise and
remove it.
If the coolant is at the level of marker bar =
in the filler neck when cold, there is enough
coolant in coolant expansion tank ;.
If the coolant level is approximately 0.6 in
(1.5 cm) above marker bar =in the filler neck
when warm, there is enough coolant in expan-
sion tank ;.
XIf necessary, add coolant that has been tested
and approved by Mercedes-Benz.
XReplace cap :and turn it clockwise as far as
it will go.
For further information on coolant, see
(
Ypage 316).
Adding washer fluid to the windshield
washer system
GWARNING
Certain components in the engine compart-
ment, such as the engine, radiator and parts
of the exhaust system, can become very hot.
Working in the engine compartment poses a
risk of injury.
Where possible, let the engine cool down and touch only the components described in the
following.
GWARNING
Windshield washer concentrate could ignite if it comes into contact with hot engine compo-
nents or the exhaust system. There is a risk of
fire and injury.
Make sure that no windshield washer con-
centrate is spilled next to the filler neck.
XTo open: pull cap:upwards by the tab.
XAdd the premixed washer fluid.
XTo close: press cap :onto the filler neck
until it engages.
If the washer fluid level drops below the recom-
mended minimum of 1 liter, a message appears
in the multifunction display prompting you to
add washer fluid (
Ypage 223).
Further information on windshield washer fluid/
antifreeze (
Ypage 316).
Maintenance
ASSYST PLUS
Service messages
The ASSYST PLUS service interval display
informs you of the next service due date.
Information on the type of service and service
intervals (see the separate Maintenance Book-
let).
260Maintenance
Maintenance and care
Page 264 of 322
Care
General notes
HEnvironmental note
Dispose of empty packaging and cleaning
cloths in an environmentally responsible man- ner.
!For cleaning your vehicle, do not use any of
the following:
Rdry, rough or hard cloths
Rabrasive cleaning agents
Rsolvents
Rcleaning agents containing solvents
Do not scrub.
Do not touch the surfaces or protective films
with hard objects, e.g. a ring or ice scraper.
You could otherwise scratch or damage the
surfaces and protective film.
!Do not park the vehicle for an extended
period straight after cleaning it, particularly
after having cleaned the wheels with wheel
cleaner. Wheel cleaners could cause
increased corrosion of the brake discs and
brake pads/linings. For this reason, you
should drive for a few minutes after cleaning.
Braking heats the brake discs and the brake
pads/linings, thus drying them. The vehicle
can then be parked.
Regular care of your vehicle is a condition for
retaining the quality in the long term.
Use care products and cleaning agents recom-
mended and approved by Mercedes-Benz.
Washing the vehicle and cleaning the
paintwork
Automatic car wash
GWARNING
Braking efficiency is reduced after washing
the vehicle. There is a risk of an accident.
After the vehicle has been washed, brake
carefully while paying attention to the traffic
conditions until full braking power is restored.
!If DISTRONIC PLUS or the HOLD function is
activated, the vehicle brakes automatically in
certain situations.
To prevent damage to the vehicle, deactivate DISTRONIC PLUS and the HOLD function in
the following or other similar situations:
Rwhen towing the vehicle
Rin the car wash
!Preferably use automatic car washes with
adjustable high-pressure pre-cleaning. This
corresponds with the specification for the
Cabriolet program. In car washes that use
high water pressures, there is a risk that a
small amount of water may leak into the vehi-
cle.
!Make sure that the vehicle is not subse-
quently treated with hot wax.
!Never clean your vehicle in a Touchless
Automatic Car Wash as these use special
cleaning agents. These cleaning agents can
damage the paintwork or plastic parts.
!Make sure that:
Rthe side windows and the sliding sunroof or
soft top are fully closed.
Rthe ventilation/heating is switched off (the
OFF button has been pressed).
Rthe windshield wiper switch is in position 0.
Ot
herwise, the vehicle might be damaged.
!In car washes with a towing mechanism,
make sure that the automatic transmission is in transmission position N, otherwise the
vehicle could be damaged.
RVehicles with a SmartKey:
Do not remove the SmartKey from the igni-
tion lock. Do not open the driver's door or
front-passenger door when the engine is
switched off. Otherwise, the automatic
transmission selects park position Pauto-
matically and locks the wheels. You can
prevent this by shifting the automatic trans-
mission to Nbeforehand.
RVehicles with KEYLESS-GO:
Do not open the driver's door or front-
passenger door when the engine is
switched off. Otherwise, the automatic
transmission selects park position Pauto-
matically and locks the wheels.
Observe the following to make sure that the
automatic transmission stays in position N:
262Care
Maintenance and care
Page 265 of 322
XMake sure the vehicle is stationary and the
ignition is switched off.
XTurn the SmartKey to position2in the ignition
lock (Ypage 128).
Use the SmartKey instead of the Start/Stop
button on vehicles with KEYLESS-GO.
XDepress and hold the brake pedal.
XShift the automatic transmission to position
N.
XRelease the brake pedal.
XRelease the parking brake.
XSwitch off the ignition and leave the SmartKey
in the ignition lock.
You can wash the vehicle in an automatic car
wash from the very start.
If the vehicle is very dirty, pre-wash it before
cleaning it in an automatic car wash.
After using an automatic car wash, wipe off wax
from the windshield and the wiper blades. This
will prevent smears and reduce wiping noises
caused by residue on the windshield.
Washing by hand
In some countries, washing by hand is only
allowed at specially equipped washing bays.
Observe the legal requirements in each country.
XDo not use hot water and do not wash the
vehicle in direct sunlight.
XUse a soft sponge to clean.
XUse a mild cleaning agent, such as a car
shampoo approved by Mercedes-Benz.
XThoroughly hose down the vehicle with a gen-
tle jet of water.
XDo not point the water jet directly towards the
air inlet.
XUse plenty of water and rinse out the sponge
frequently.
XRinse the vehicle with clean water and dry
thoroughly with a chamois.
XDo not let the cleaning agent dry on the paint- work.
Carefully remove all deposits of road salt as
soon as possible when driving in winter.
Power washers
GWARNING
The water jet from a circular jet nozzle (dirt
blasters) can cause invisible exterior damage
to the tires or chassis components. Compo-
nents damaged in this way may fail unexpect-
edly. There is a risk of an accident.
Do not use power washers with circular jet
nozzles to clean the vehicle. Have damaged
tires or chassis components replaced imme-
diately.
!Always maintain a distance of at least
11.8 in (30 cm) between the vehicle and the
power washer nozzle. Information about the
correct distance is available from the equip-
ment manufacturer.
Move the power washer nozzle around when
cleaning your vehicle.
Do not aim directly at any of the following:
RTires
RDoor gaps, joints etc.
RSoft top
RWind deflector net
RElectrical components
RBattery
RConnectors
RLights
RSeals
RTrim elements
RVentilation slots
Damaged seals or electrical components can
lead to leaks or failures.
Cleaning the paintwork
!Do not affix:
Rstickers
Rfilms
Rmagnetic plates or similar items
to painted surfaces. You could otherwise
damage the paintwork.
Scratches, corrosive deposits, areas affected by
corrosion and damage caused by inadequate
care cannot always be completely repaired. In
such cases, visit a qualified specialist workshop.
XRemove dirt immediately, where possible,
while avoiding rubbing too hard.
XSoak insect remains with insect remover and
rinse off the treated areas afterwards.
XSoak bird droppings with water and rinse off
the treated areas afterwards.
Care263
Maintenance and care
Z
Page 267 of 322
Cleaning AIRCAP
Cleaning the wind deflector
!Do not use high-pressure cleaning equip-
ment to clean the net.
Clean the wind deflector on the windshield with
the soft top closed.
XApply the parking brake firmly.
XVehicles with SmartKey: turn the SmartKey
to position 2in the ignition lock (Ypage 128).
XVehicles with KEYLESS-GO: press the
Start/Stop button twice (Ypage 128).
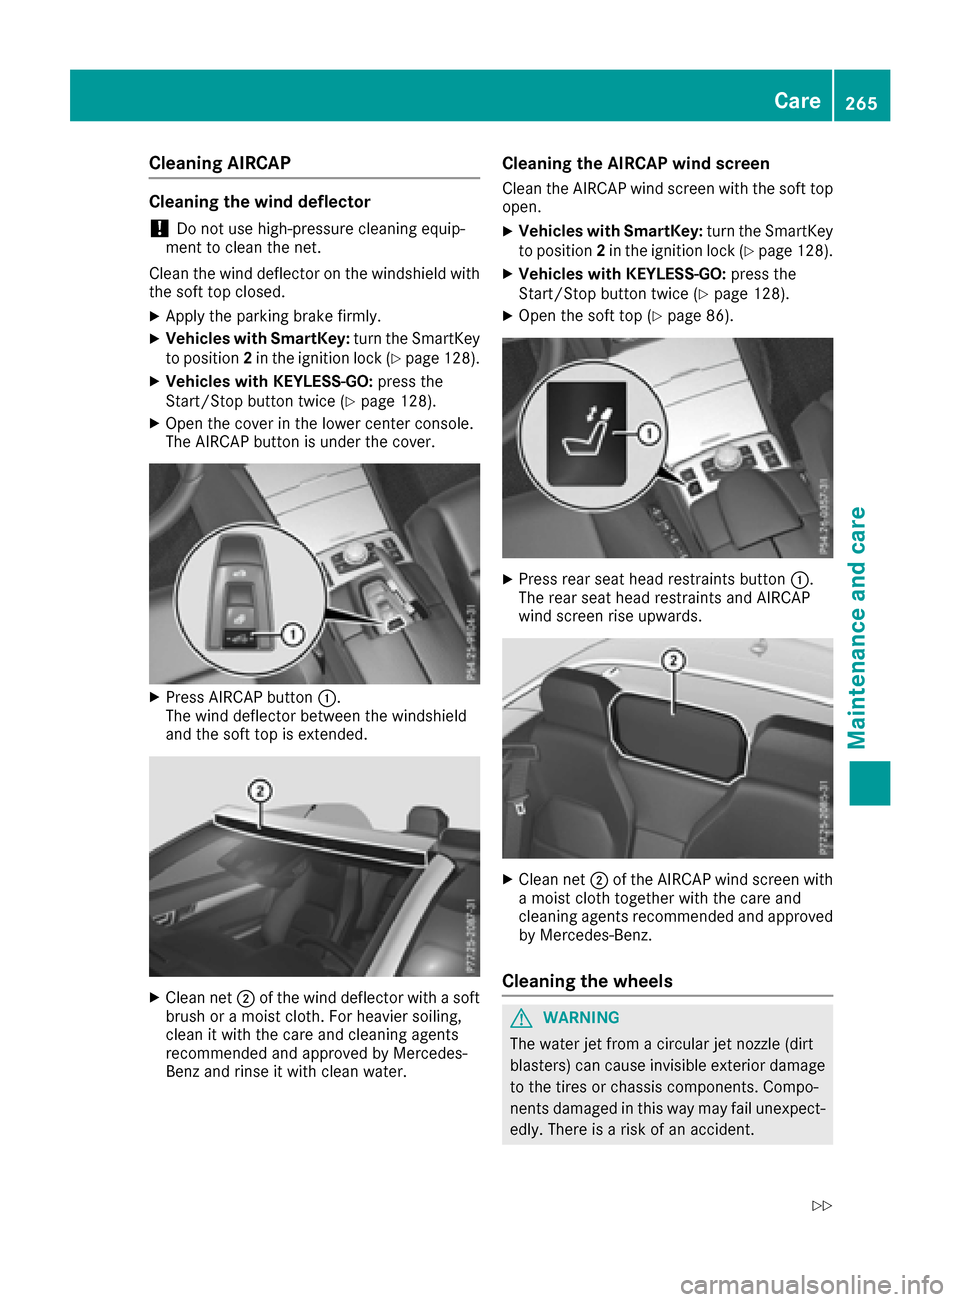
XOpen the cover in the lower center console.
The AIRCAP button is under the cover.
XPress AIRCAP button :.
The wind deflector between the windshield
and the soft top is extended.
XClean net ;of the wind deflector with a soft
brush or a moist cloth. For heavier soiling,
clean it with the care and cleaning agents
recommended and approved by Mercedes-
Benz and rinse it with clean water.
Cleaning the AIRCAP wind screen
Clean the AIRCAP wind screen with the soft top
open.
XVehicles with SmartKey: turn the SmartKey
to position 2in the ignition lock (Ypage 128).
XVehicles with KEYLESS-GO: press the
Start/Stop button twice (Ypage 128).
XOpen the soft top (Ypage 86).
XPress rear seat head restraints button :.
The rear seat head restraints and AIRCAP
wind screen rise upwards.
XClean net ;of the AIRCAP wind screen with
a moist cloth together with the care and
cleaning agents recommended and approved by Mercedes-Benz.
Cleaning the wheels
GWARNING
The water jet from a circular jet nozzle (dirt
blasters) can cause invisible exterior damage
to the tires or chassis components. Compo-
nents damaged in this way may fail unexpect-
edly. There is a risk of an accident.
Care265
Maintenance and care
Z
Page 272 of 322
Where will I find...?
Vehicle tool kit
General notes
The vehicle tool kit can be found in the stowage
well under the trunk floor (Ypage 243).
Vehicles with a "Minispare" emergency
spare wheel
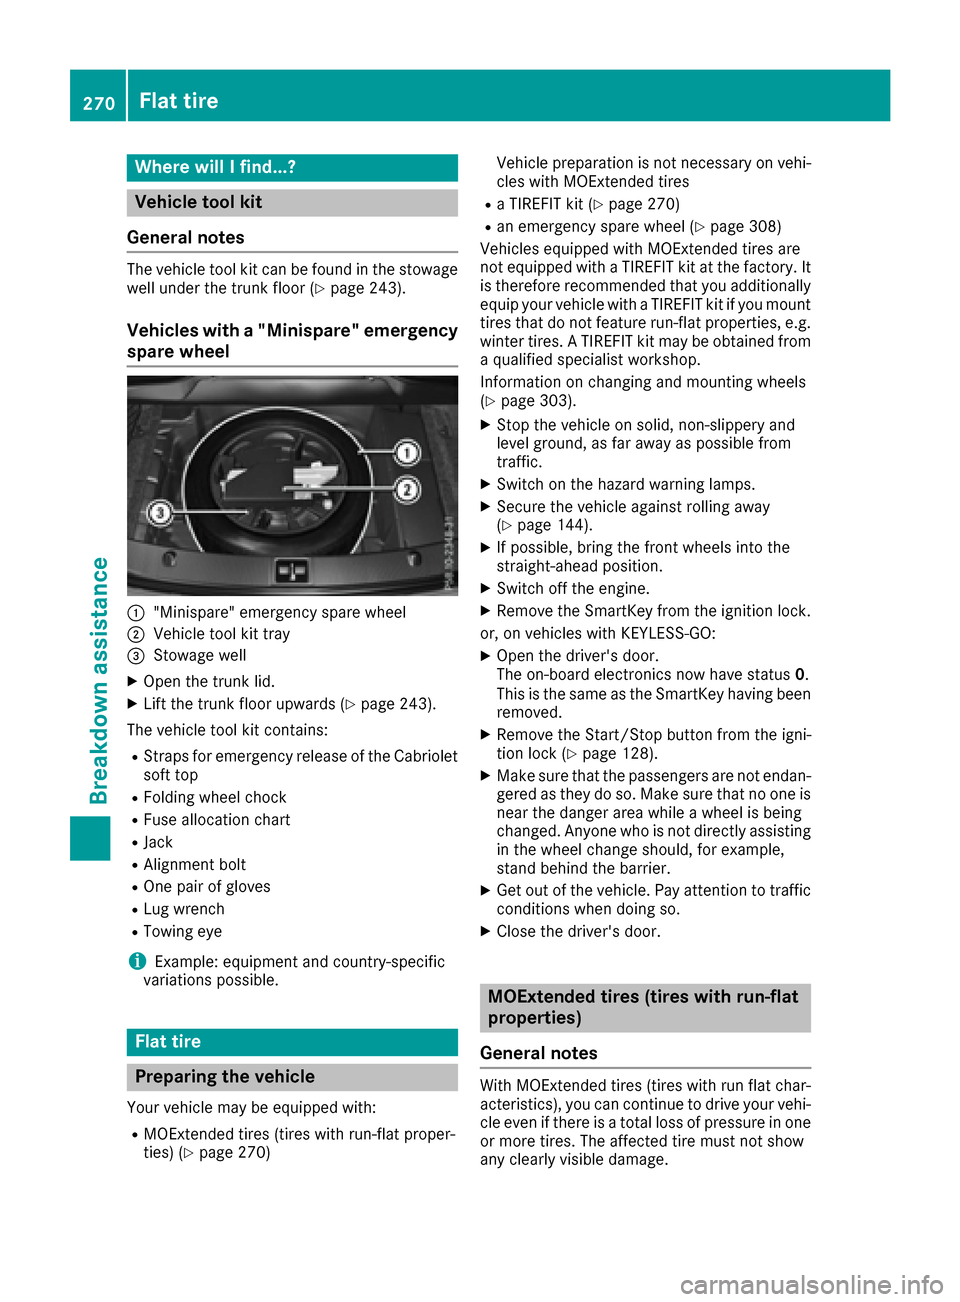
:"Minispare" emergency spare wheel
;Vehicle tool kit tray
=Stowage well
XOpen the trunk lid.
XLift the trunk floor upwards (Ypage 243).
The vehicle tool kit contains:
RStraps for emergency release of the Cabriolet
soft top
RFolding wheel chock
RFuse allocation chart
RJack
RAlignment bolt
ROne pair of gloves
RLug wrench
RTowing eye
iExample: equipment and country-specific
variations possible.
Flat tire
Preparing the vehicle
Your vehicle may be equipped with:
RMOExtended tires (tires with run-flat proper-
ties) (Ypage 270) Vehicle preparation is not necessary on vehi-
cles with MOExtended tires
Ra TIREFIT kit (Ypage 270)
Ran emergency spare wheel (Ypage 308)
Vehicles equipped with MOExtended tires are
not equipped with a TIREFIT kit at the factory. It
is therefore recommended that you additionally
equip your vehicle with a TIREFIT kit if you mount
tires that do not feature run-flat properties, e.g.
winter tires. A TIREFIT kit may be obtained from
a qualified specialist workshop.
Information on changing and mounting wheels
(
Ypage 303).
XStop the vehicle on solid, non-slippery and
level ground, as far away as possible from
traffic.
XSwitch on the hazard warning lamps.
XSecure the vehicle against rolling away
(Ypage 144).
XIf possible, bring the front wheels into the
straight-ahead position.
XSwitch off the engine.
XRemove the SmartKey from the ignition lock.
or, on vehicles with KEYLESS‑GO:
XOpen the driver's door.
The on-board electronics now have status 0.
This is the same as the SmartKey having been
removed.
XRemove the Start/Stop button from the igni-
tion lock (Ypage 128).
XMake sure that the passengers are not endan-
gered as they do so. Make sure that no one is near the danger area while a wheel is being
changed. Anyone who is not directly assisting
in the wheel change should, for example,
stand behind the barrier.
XGet out of the vehicle. Pay attention to traffic
conditions when doing so.
XClose the driver's door.
MOExtended tires (tires with run-flat
properties)
General notes
With MOExtended tires (tires with run flat char-
acteristics), you can continue to drive your vehi-
cle even if there is a total loss of pressure in one
or more tires. The affected tire must not show
any clearly visible damage.
270Flat tire
Breakdown assistance
Page 282 of 322
XStart the engine of the donor vehicle and run it at idling speed.
XConnect negative terminal?of donor battery Bto ground point Aof your vehicle using the
jumper cable, connecting the jumper cable to battery of other vehicle Bfirst.
XStart the engine.
XBefore disconnecting the jumper cables, let the engine run for several minutes.
XFirst, remove the jumper cables from ground point Aand negative terminal ?, then from pos-
itive clamp ;and positive terminal =. Begin each time at the contacts on your own vehicle first.
XClose cover:of positive clamp ;after removing the jumper cables.
XHave the battery checked at a qualified specialist workshop.
Jump-starting is not considered to be a normal operating condition.
iJumper cables and further information regarding jump-starting can be obtained at any qualified
specialist workshop.
Towing and tow-starting
Important safety notes
GWARNING
Functions relevant to safety are restricted or
no longer available if:
Rthe engine is not running.
Rthe brake system or the power steering is
malfunctioning.
Rthere is a malfunction in the voltage supply or the vehicle's electrical system.
If your vehicle is being towed, much more
force may be necessary to steer or brake.
There is a risk of an accident.
In such cases, use a tow bar. Before towing,
make sure that the steering moves freely.
GWARNING
When towing or tow-starting another vehicle
and its weight is greater than the permissible
gross weight of your vehicle, the:
Rthe towing eye could detach itself
Rthe vehicle/trailer combination could roll-
over.
There is a risk of an accident.
When towing or tow-starting another vehicle,
its weight should not be greater than the per- missible gross weight of your vehicle. Details on the permissible gross vehicle weight
of your vehicle can be found on the vehicle iden-
tification plate (
Ypage 311).
!When COLLISION PREVENTION ASSIST
PLUS, DISTRONIC PLUS or the HOLD function
is activated, the vehicle brakes automatically
in certain situations.
To avoid damage to the vehicle, deactivate
these systems in the following or similar sit-
uations:
Rwhen towing the vehicle
Rin the car wash
!Only secure the tow rope or tow bar at the
towing eyes. Otherwise, the vehicle could be
damaged.
!Do not use the towing eye for recovery, this
could damage the vehicle. If in doubt, recover
the vehicle with a crane.
!When towing, pull away slowly and
smoothly. If the tractive power is too high, the
vehicles could be damaged.
!Do not tow with sling-type equipment. This
could damage the vehicle.
!On vehicles with KEYLESS-GO, use the
SmartKey instead of the Start/Stop button.
Turn the SmartKey to position 2in the ignition
lock and shift the automatic transmission to
N. Then, turn the SmartKey back to 0and
leave it in the ignition lock.
!The vehicle can be towed a maximum of
30 miles (50km). The towing speed of 30 mph
(50 km/h) must not be exceeded.
280Towing and tow-starting
Breakdown assistance