display MERCEDES-BENZ E-Class CABRIOLET 2017 A207 Owner's Guide
[x] Cancel search | Manufacturer: MERCEDES-BENZ, Model Year: 2017, Model line: E-Class CABRIOLET, Model: MERCEDES-BENZ E-Class CABRIOLET 2017 A207Pages: 322, PDF Size: 7.97 MB
Page 24 of 322

Introduction
The printedOperator's Manual provide sinfor-
mation about th esaf eoperation of your vehicle.
The Digital Operator's Manual additionally
describe sfurther function sand equipmen t
installed in your vehicle. The function sof th e
vehicl eand multimedia system are describe din
th eDigital Operator's Manual. You can call up
th eDigital Operator's Manual via th emultimedia
system.
iYou will no tincur any cost swhen calling up
th eDigital Operator's Manual. The Digital
Operator's Manual works without connecting
to th eInternet .
Ther eare three ways to access th etopic sof th e
Digital Operator's Manual:
RVisua lsearch
The visual search allows you to explor eyour
vehicl e"virtually". Starting from either th e
vehicl eexterio rvie wor interio rview, you can
access man yof th edifferen ttopic scovered
by th eDigital Operator's Manual. To access
th evehicl einterior section ,select th e"Vehi-
cle interior" view.
RKeywor dsearch
The keyword search allows you to search for a
keyword by enterin gcharacters. Further
information can be foun din th eDigital Oper -
ator's Manual in th e"Audio 20 "or "COMAND "
section under th e"Character entr y(teleph -
ony)" keyword .
RContents
You can select individual section sin th econ-
tents
.
iThe Digital Operator's Manual is deactiva-
te dfor safet yreason swhile driving .
Operation
Calling up the Digital Operator's Man-
ual
XPress theØ buttonin th ecenter console.
The overview relating to th evehicl eappears.
XSelec tth e"Operator' sManual" men uitem by
turnin g3 or pressin g7 thecontroller .
XConfirm7 themessage about th ewarning
and safet ynotes.
The basic men ufor th eDigital Operator's
Manual appears.
Operating the Digital Operator's Man-
ual
General notes
Pleas eobserv eth einformation about th eoper -
ation of th econtroller (Ypage 235).
Content pages
The conten tpages can be accessed by mean sof
a visual search , akeyword search or usin gth e
contents .
XTo scroll forwards/backwards: turn3
th econtroller .
XTo displayin full-screen or animation: slide
8 thecontroller to th elef t:.
XTo select information texts or sav ebook -
marks: slide9 thecontroller to th e
right ;.
XTo select alink :slide 6thecontroller
downwards =.
XTo exitacontent page: select the%
symbol ?.
22Digital Operator's Manual
Page 35 of 322
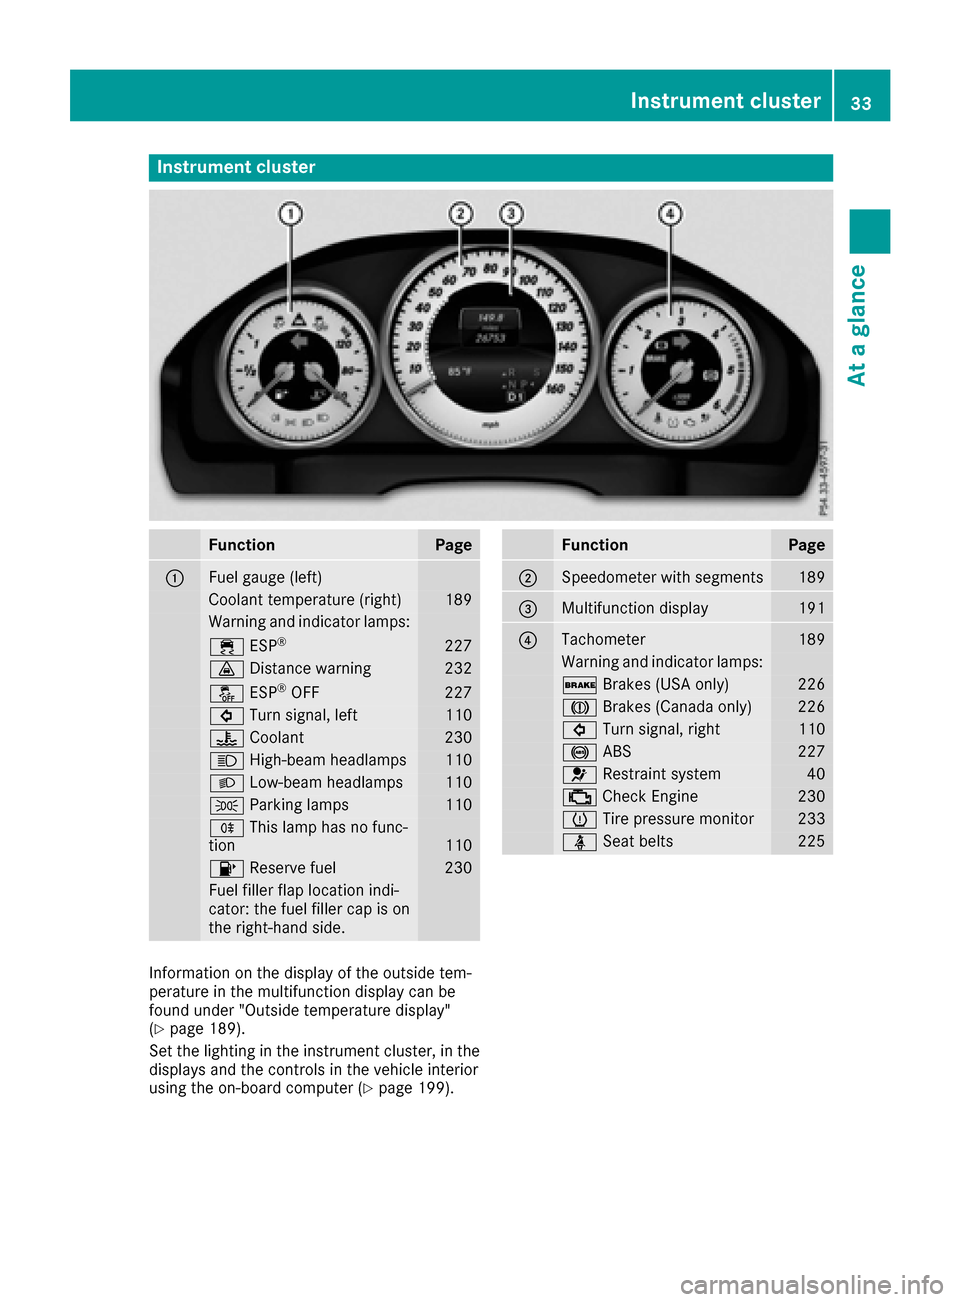
Instrument cluster
FunctionPage
:Fuelgauge (left)
Coolan ttemperature (right )189
Warning and indicator lamps:
÷ ESP®22 7
· Distanc ewarning23 2
å ESP®OF F227
# Turn signal, lef t110
? Coolan t230
K High-beam headlamps110
L Low-beam headlamps110
T Parking lamp s110
R This lamp has no func-
tion11 0
8 Reserve fuel230
Fue lfiller flap location indi-
cator: th efuel filler cap is on
th eright-hand side .
FunctionPage
;Speedometer wit hsegments18 9
=Multifunction display191
?Tachometer189
Warning and indicator lamps:
$ Brakes(US Aonly)22 6
J Brakes(Canada only)22 6
# Turn signal, right110
! ABS227
6 Restrain tsystem40
; CheckEngin e230
h Tirepressur emonitor23 3
ü Seat belt s225
Information on th edisplay of th eoutside tem-
peratur ein th emultifunction display can be
foun dunder "Outside temperature display"
(
Ypage 189).
Se tth elighting in th einstrumen tcluster, in th e
displays and th econtrol sin th evehicl einterior
usin gth eon-board computer (
Ypage 199).
Instrument cluster33
At a glance
Page 36 of 322
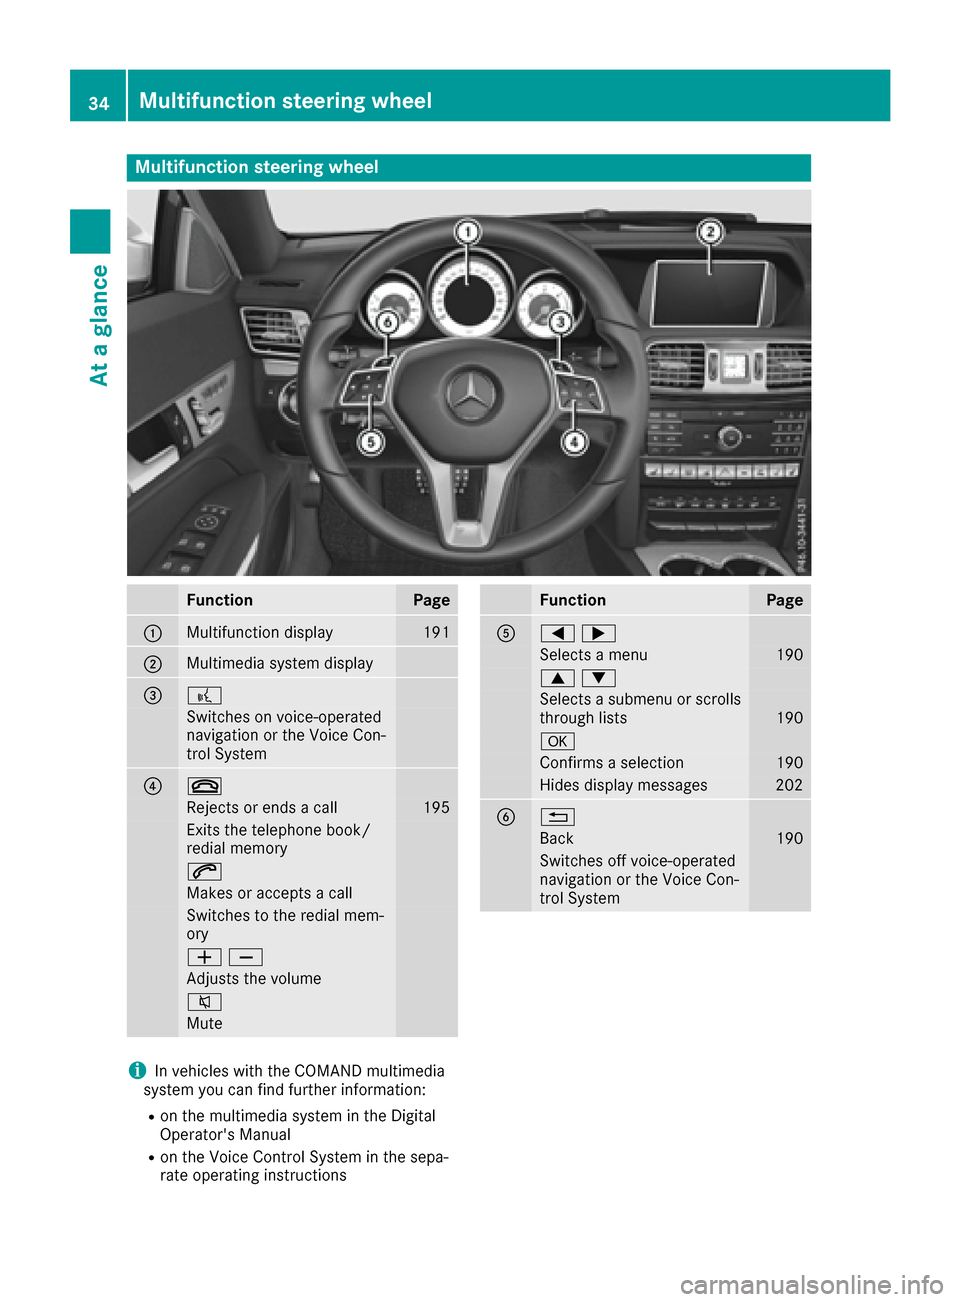
Multifunction steering wheel
FunctionPage
:Multifunction display191
;Multimedia system display
=?
Switches on voice-operated
navigation or the Voice Con-
trol System
?~
Rejects or ends a call195
Exits the telephone book/
redial memory
6
Makes or accepts a call
Switches to the redial mem-
ory
WX
Adjusts the volume
8
Mute
FunctionPage
A=;
Selects a menu190
9:
Selects a submenu or scrolls
through lists190
a
Confirms a selection190
Hides display messages202
B%
Back190
Switches off voice-operated
navigation or the Voice Con-
trol System
iIn vehicles with the COMAND multimedia
system you can find further information:
Ron the multimedia system in the Digital
Operator's Manual
Ron the Voice Control System in the sepa-
rate operating instructions
34Multifunction steering wheel
At a glance
Page 51 of 322
Prerequisites
To be classified correctly, the front passenger
must sit:
Rwith the seat belt fastened correctly
Rin an almost upright position with their back
against the seat backrest
Rwith their feet resting on the floor, if possible
If the front passenger does not observe these
conditions, OCS may produce a false classifica-
tion, e.g. because the front passenger:
Rtransfers their weight by supporting them-
selves on a vehicle armrest
Rsits in such a way that their weight is raised
from the seat cushion
If it is absolutely necessary to install a child
restraint system on the front-passenger seat, be
sure to observe the correct positioning of the
child restraint system. Never place objects
under or behind the child restraint system, e.g.
cushions. The entire base of the child restraint
system must always rest on the seat cushion of the front-passenger seat. The backrest of the
forward-facing child restraint system must lie as
flat as possible against the backrest of the front-
passenger seat.
The child restraint system must not touch the
roof or be subjected to a load by the head
restraint. Adjust the angle of the seat backrest
and the head restraint position accordingly.
Only then can OCS be guaranteed to function
correctly. Always observe the child restraint sys-
tem manufacturer's installation instructions.
Occupant Classification System opera-
tion (OCS)
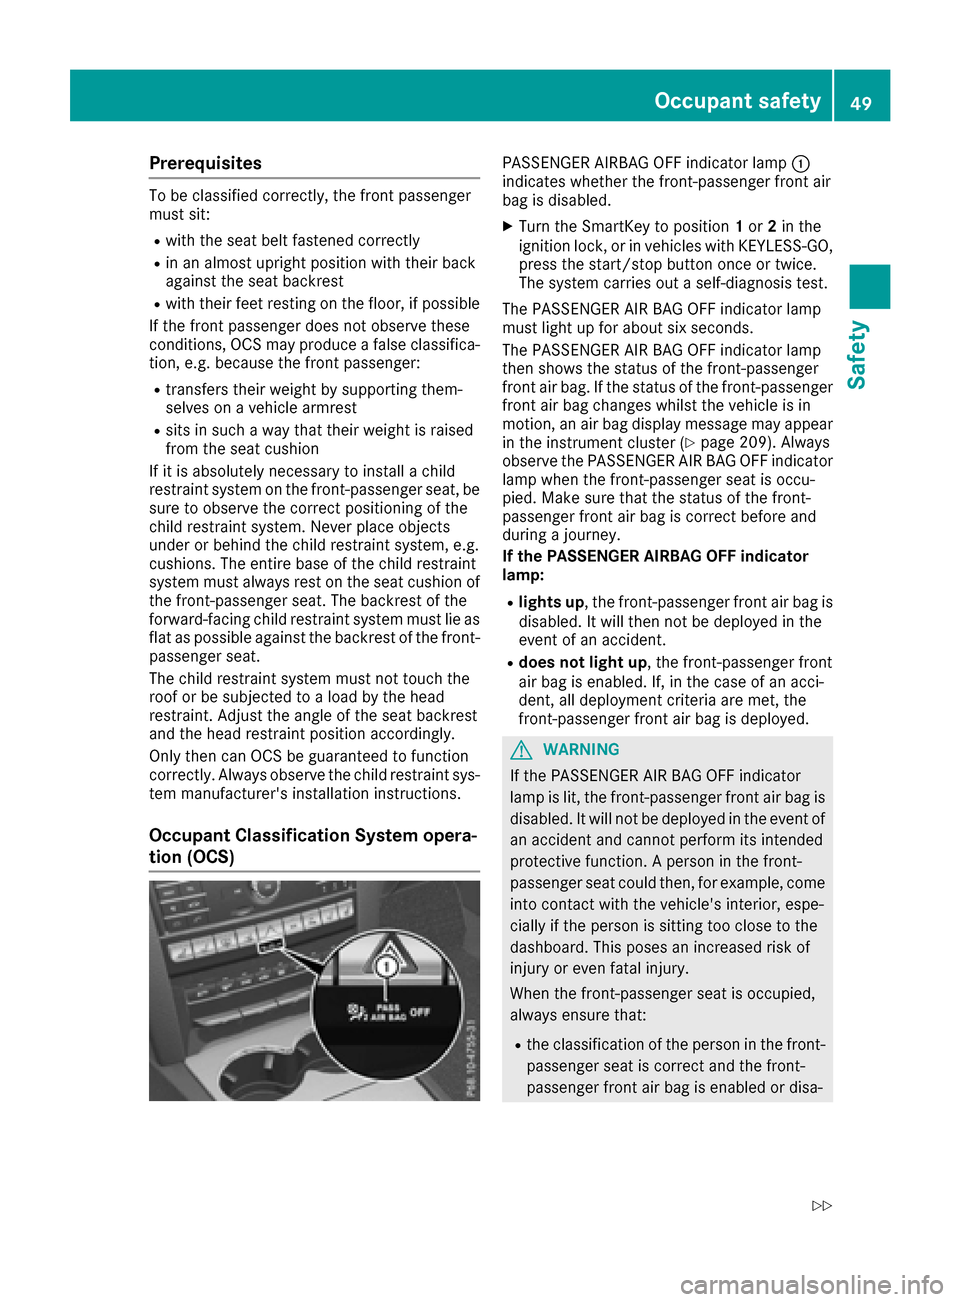
PASSENGER AIRBAG OFF indicator lamp :
indicates whether the front-passenger front air
bag is disabled.
XTurn the SmartKey to position 1or 2in the
ignition lock, or in vehicles with KEYLESS-GO,
press the start/stop button once or twice.
The system carries out a self-diagnosis test.
The PASSENGER AIR BAG OFF indicator lamp
must light up for about six seconds.
The PASSENGER AIR BAG OFF indicator lamp
then shows the status of the front-passenger
front air bag. If the status of the front-passenger
front air bag changes whilst the vehicle is in
motion, an air bag display message may appear
in the instrument cluster (
Ypage 209). Always
observe the PASSENGER AIR BAG OFF indicator
lamp when the front-passenger seat is occu-
pied. Make sure that the status of the front-
passenger front air bag is correct before and
during a journey.
If the PASSENGER AIRBAG OFF indicator
lamp:
Rlights up, the front-passenger front air bag is
disabled. It will then not be deployed in the
event of an accident.
Rdoes not light up, the front-passenger front
air bag is enabled. If, in the case of an acci-
dent, all deployment criteria are met, the
front-passenger front air bag is deployed.
GWARNING
If the PASSENGER AIR BAG OFF indicator
lamp is lit, the front-passenger front air bag is
disabled. It will not be deployed in the event of
an accident and cannot perform its intended
protective function. A person in the front-
passenger seat could then, for example, come
into contact with the vehicle's interior, espe-
cially if the person is sitting too close to the
dashboard. This poses an increased risk of
injury or even fatal injury.
When the front-passenger seat is occupied,
always ensure that:
Rthe classification of the person in the front- passenger seat is correct and the front-
passenger front air bag is enabled or disa-
Occupant safety49
Safety
Z
Page 53 of 322
soon as possible. Consult an authorized
Mercedes-Benz Center. Only have the front-
passenger seat repaired at an authorized
Mercedes-Benz Center.
If the front-passenger seat, the seat cover or theseat cushion are damaged, have the necessary
repair work carried out at an authorized
Mercedes-Benz Center.
For safety reasons, Mercedes-Benz recom-
mends that you only use seat accessories that
have been approved by Mercedes-Benz.
If the driver's air bag deploys, this does not
mean that the front-passenger front air bag will
also deploy. The Occupant Classification Sys-
tem (OCS) categorizes the occupant on the
front-passenger seat. Depending on the result,
the front-passenger air bag is activated or deac-
tivated.
System self-test
GDANGER
If the PASSENGER AIR BAG OFF indicator
lamp does not light up during the system self-
test, then the system is malfunctioning. The
front-passenger front air bag might be trig-
gered unintentionally or might not be trig-
gered at all in the event of an accident with
high deceleration. This poses an increased
risk of injury or even fatal injury.
In this case the front-passenger seat may not
be used. Do not install a child restraint system
on the front-passenger seat. Have the Occu-
pant Classification System (OCS) checked
and repaired immediately at a qualified spe-
cialist workshop.
GWARNING
If the PASSENGER AIR BAG OFF indicator
lamp remains lit after the system self-test, the
front-passenger front air bag is disabled. It will
not be deployed in the event of an accident. In
this case, the front-passenger front air bag
cannot perform its intended protective func-
tion, e.g. when a person is seated in the front-
passenger seat.
That person could, for example, come into
contact with the vehicle's interior, especially
if the person is sitting too close to the dash-
board. This poses an increased risk of injury or
even fatal injury.
When the front-passenger seat is occupied,
always ensure that:
Rthe classification of the person in the front- passenger seat is correct and the front-
passenger front air bag is enabled or disa-
bled in accordance with the person in the
front-passenger seat
Rthe person is seated properly with a cor-
rectly fastened seatbelt
Rthe front-passenger seat has been moved
as far back as possible
If the PASSENGER AIR BAG OFF indicator
lamp remains lit when it should not, the front-
passenger seat may not be used. Do not
install a child restraint system on the front-
passenger seat. Have the Occupant Classifi-
cation System (OCS) checked and repaired
immediately at a qualified specialist work-
shop.
GWARNING
Objects between the seat surface and the
child restraint system could affect OCS oper- ation. This could result in the front-passenger
air bag not functioning as intended during an
accident. This poses an increased risk of
injury or even fatal injury.
Do not place any objects between the seat
surface and the child restraint system. The
entire base of the child restraint system must
always rest on the seat cushion of the front-
passenger seat. The backrest of the forward-
facing child restraint system must, as far as
possible, be resting on the backrest of the
front-passenger seat. Always comply with the
child restraint system manufacturer's instal-
lation instructions.
After the system self-test, the PASSENGER AIR
BAG OFF indicator lamp displays the status of
the front-passenger front air bag (
Ypage 49).
For more information about the OCS, see "Prob-
lems with the Occupant Classification System"
(
Ypage 52).
Occupant safety51
Safety
Z
Page 67 of 322

Activating/deactivating
The COLLISION PREVENTION ASSIST PLUSis
automatically active after switching on th eigni-
tion .
You can activat eor deactivat eCOLLISION PRE -
VENTION ASSIST PLU Sin th eon-board com-
puter (
Ypage 197). When deactivated, th edis-
tance warning function and th eautonomous
braking function are also deactivated.
If COLLISION PREVENTION ASSIST PLU Sis
deactivated, th eæ symbol appear sin th e
assistanc egraphic sdisplay.
Distance warning function
Genera linformation
The distanc ewarning function can help you to
minimiz eth eris kof afront-en dcollision wit h a
vehicl eahead or reduce th eeffects of suc h a
collision .If th edistanc ewarning function
detects that there is aris kof acollision ,you will
be warned visually and acoustically.
Important safety notes
iObserv eth e"Importan tsafet ynotes" sec -
tion for drivin gsafet ysystems (Ypage 61).
GWARNIN G
The distanc ewarning function does no treact:
Rto people or animals
Rto oncomin gvehicles
Rto crossing traffic
Rwhen cornering
Thus ,th edistanc ewarning function canno t
provid e awarning in all critical situations.
There is aris kof an accident.
Always pay careful attention to th etraffic sit -
uation and be read yto brake.
GWARNIN G
The distanc ewarning function canno talways
clearly identify objects and complex traffic
situations.
In suc hcases, th edistanc ewarning function
may:
Rgiv ean unnecessary warning
Rno tgiv e a warning
There is aris kof an accident.
Always pay careful attention to th etraffic sit -
uation and do no trel ysolely on th edistanc e
warning function .
Function
Starting ataspee dof around 4mph (7 km/h),
th edistanc ewarning function warn syou if you
rapidly approac h avehicl ein front. An intermit -
tent warning tone will then sound, and th e·
distanc ewarning lamp will ligh tup in th einstru-
men tcluster.
XBrake immediately in order to increas eth e
distanc efrom th evehicl ein front.
or
XTak eevasive action ,provided it is saf eto do
so.
Due to th enature of th esystem, particularly
complicated but non-critical drivin gcondition s
may also caus eth esystem to display awarning .
Wit hth ehelp of th eradar sensor system, th e
distanc ewarning function can detec tobstacles
that are in th epat hof your vehicl efor an exten-
ded period of time.
Up to aspee dof around 44 mph (70 km/h), th e
distanc ewarning function can also reac tto sta-
tionary obstacles, suc has stoppe dor parked
vehicles.
Aut onom ous braking function
If thedriver does no treac tto th edistanc ewarn -
ing signal in acritical situation ,COLLISION PRE -
VENTION ASSIST PLU Scan assist wit hth e
autonomous braking function .
The autonomous braking function :
Rgives thedriver mor etime to reac tto critical
drivin gsituation s
Rcan help th edriver to avoi dan acciden tor
Rreduce sth eeffects of an acciden t
The autonomous braking function is available in
th efollowin gspee dranges :
Rfrom4mph (7 km/h) to approx .65 mph
(10 5km/ h)for moving objects
Rfrom 4 mph (7 km/h) to approx. 31 mph
(50 km/h) for stationary objects
Due to the nature of the system, particularly
complicated but non-critical driving conditions
may also cause the Autonomous Braking Func-
tion to intervene.
Driving safety systems65
Safety
Z
Page 69 of 322
ESP®assists the driver when pulling away on
wet or slippery roads. ESP®can also stabilize
the vehicle during braking.
ETS (Electronic Traction System)
ETS traction control is part of ESP®.
Traction control brakes the drive wheels indi-
vidually if they spin. This enables you to pull
away and accelerate on slippery surfaces, for
example if the road surface is slippery on one
side. In addition, more drive torque is transfer-
red to the wheel or wheels with traction.
Traction control remains active, even if you
deactivate ESP
®.
Important safety notes
iObserve the "Important safety notes" sec-
tion (Ypage 61).
GWARNING
If ESP
®is malfunctioning, ESP®is unable to
stabilize the vehicle. Additionally, further driv-
ing safety systems are deactivated. This
increases the risk of skidding and an accident.
Drive on carefully. Have ESP
®checked at a
qualified specialist workshop.
When towing the vehicle with the rear axle
raised, observe the notes on ESP
®
(Ypage 282).
If the å ESP®OFF warning lamp lights up
continuously, then ESP®is deactivated.
If the ÷ ESP®warning lamp and the å
ESP®OFF warning lamp are lit continuously,
ESP®is not available due to a malfunction.
Observe the information on warning lamps
(
Ypage 227) and display messages which may
be shown in the instrument cluster
(
Ypage 203).
iOnly use wheels with the recommended tire
sizes. Only then will ESP®function properly.
Characteristics of ESP®
General information
If the ÷ ESP warning lamp goes out before
beginning the journey, ESP®is automatically
active. If ESP
®intervenes, the
÷ESP®warning lamp
flashes in the instrument cluster.
If ESP
®intervenes:
XDo not deactivate ESP®under any circum-
stances.
XOnly depress the accelerator pedal as far as
necessary when pulling away.
XAdapt your driving style to suit the prevailing
road and weather conditions.
ECO start/stop function
The ECO start/stop function switches the
engine off automatically when the vehicle stops
moving. The engine starts automatically when
the driver wants to pull away again. ESP
®
remains in its previously selected status. Exam-
ple: if ESP®was deactivated before the engine
was switched off, ESP®remains deactivated
when the engine is switched on again.
Deactivating/activating ESP®
Important safety notes
You can select between the following states of
ESP®:
RESP®is activated.
RESP®is deactivated.
GWARNING
If you deactivate ESP
®, ESP®no longer sta-
bilizes the vehicle. There is an increased risk
of skidding and an accident.
Only deactivate ESP
®in the situations descri-
bed in the following.
It may be best to deactivate ESP
®in the follow-
ing situations:
Rwhen using snow chains
Rin deep snow
Ron sand or gravel
iActivate ESP®as soon as the situations
described above no longer apply. ESP®will
otherwise not be able to stabilize the vehicle if
the vehicle starts to skid or a wheel starts to
spin.
!Avoid spinning the driven wheels for an
extended period with ESP®deactivated. You
could otherwise damage the drivetrain.
Driving safet ysystem s67
Safety
Z
Page 70 of 322
Deactivating/activating ESP®
You can deactivateor activat eES P®via th eon -
boar dcomputer (Ypage 196).
ESP®deactivated :
The å ESP®OF Fwarnin glamp in th einstru-
men tcluster lights up.
ESP
®activated :
The å ESP®OF Fwarnin glamp in th einstru-
men tcluster goe sout .
Characteristics when ESP®is deactivate d
If ESP®is deactivated and on eor mor ewheels
start to spin ,th e÷ ESP®warnin glamp in th e
instrumen tcluster flashes .In suc hsituations,
ES P
®will no tstabiliz eth evehicle.
If you deactivat eES P®:
RESP®no longer improves drivin gstability.
REngin etorque is no longer limite dand th e
drive wheels are able to spin .
The spinning of th ewheels result sin acutting
action fo rbette rtraction on loos esurfaces.
RTraction control is still activated.
RCOLLISION PREVENTION ASSIST is no longer
available; no ris it activated if you brak efirmly
wit hassistanc efrom ES P
®.
RPRE-SAF E®is no longer available, no ris it
activated if you brak efirmly and ES P®inter-
venes.
RPRE-SAF E®Brake is no longer available, it is
also no tactivated if you brak efirmly and ES P®
intervenes.
RESP®still provides support when you brak e
firmly.
ESP®trailer stabilization
General information
If your vehicle/trailer combination begin sto
swerve, ES P®assistsyou in this situation .ES P®
slows th evehicl edown by brakin gand limiting
th eengin eoutput until th evehicle/trailer com-
bination has stabilized.
Important safet ynotes
GWARNIN G
If roa dand weather condition sare poor,
trailer stabilization will no tbe able to preven t
th evehicle/trailer combination from swerv-
ing. Trailer swit h a highcenter of gravit ycan
ti p ove rbefore ES P®can detec tthis. There is
a ris kof an accident.
Always adapt your drivin gstyle to th eprevail -
in g roa dand weather conditions.
If your vehicl ewit htrailer (vehicle/trailer com-
bination )begin sto lurch, you can only stabiliz e
th evehicle/trailer combination by depressin g
th ebrak efirmly.
ES P
®trailer stabilization is active abov espeeds
of about 65 km/h.
ES P
®trailer stabilization doe sno twor kif ES P®
is deactivated or disabled because of amalfunc -
tion .
EBD (electronic brak eforce distribu-
tion)
General information
EB Dmonitors and control sth ebrak epressur e
on th erea rwheels to improv edrivin gstabilit y
while braking.
Important safet ynotes
iObserv eth e"Importan tsafet ynotes" sec -
tion fo rdrivin gsafet ysystems (Ypage 61).
GWARNIN G
If EB Dis malfunctioning, th erea rwheels can
lock, e.g. under full braking. This increase sth e
ris kof skiddin gand an accident.
You should therefore adapt your drivin gstyle
to th edifferen thandlin gcharacteristics .Hav e
th ebrak esystem checke dat aqualified spe -
cialist workshop .
Observ einformation regarding indicato rand
warnin glamp s (
Ypage 227) as well as display
message s (Ypage 204).
ADAPTIVE BRAKE
i
Observ eth e"Importan tsafet ynotes" sec -
tion (Ypage 61).
ADAPTIV EBRAKE enhance sbrakin gsafet yand
offer sincrease dbrakin gcomfort .In addition to
68Driving safety systems
Safety
Page 88 of 322
Make sure that the soft top is dry and clean
before closing it. Otherwise, water or dirt could
enter the vehicle interior or trunk.
You can open or close the soft top:
Rwhen the vehicle is stationary or
Rwhen you do not exceed a speed of 25 mph
(40 km/h)
If there is a strong head wind, it may not be pos-
sible to close the soft top fully. In this case,
reduce speed or stop in order to close the soft
top fully.
For safety reasons, Mercedes-Benz recom-
mends that you only open or close the soft top
when the vehicle is stationary.
If the soft top does not open or close fully, the
soft-top hydraulics are depressurized and the
soft top is lowered:
Rafter approximately 7 minutes when the igni-
tion is switched on
Rimmediately if the ignition is switched off
Opening/closing with the soft top
switch
Important safety notes
GWARNING
When opening or closing the soft top, there is a risk that parts of the body could become
trapped by moving parts such as the roof
mechanism, the trunk lid, or the side win-
dows. There is a risk of injury.
When opening or closing the roof, make sure
that no parts of the body are in the vicinity of
moving parts. Release the switch if somebody
becomes trapped.
GWARNING
If the vehicle speed exceeds 25 mph
(40 km/h) the soft top stops during the open- ing or closing procedure. This impairs your
view to the rear. There is a risk of an accident.
Reduce your speed to below 25 mph
(40 km/h) or stop the vehicle in accordance
with the traffic conditions. Press or pull the
soft-top switch again in order to open or close
the soft top fully.
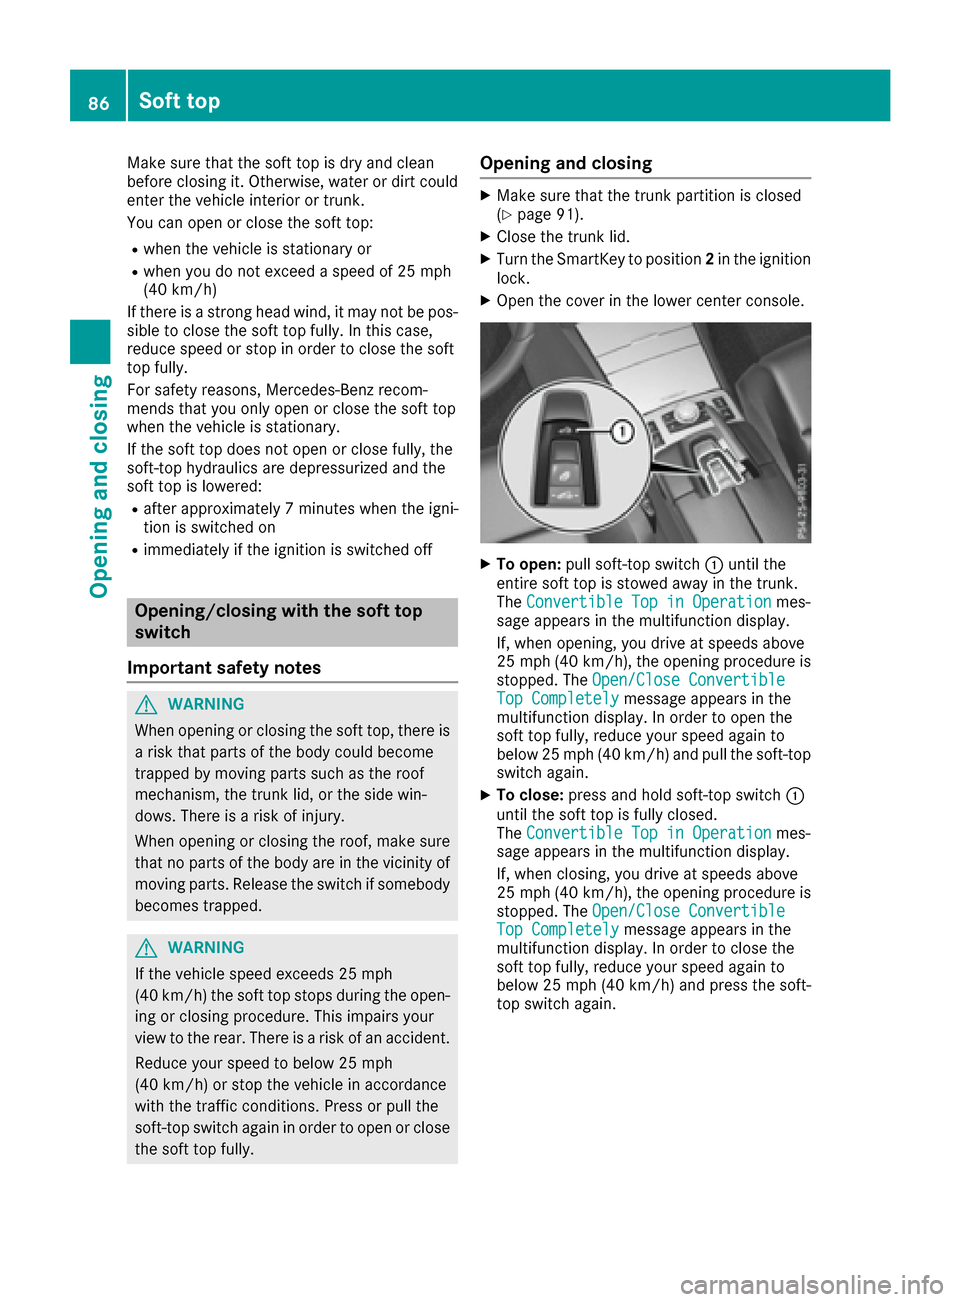
Opening and closing
XMake sure that the trunk partition is closed
(Ypage 91).
XClose the trunk lid.
XTurn the SmartKey to position 2in the ignition
lock.
XOpen the cover in the lower center console.
XTo open: pull soft-top switch :until the
entire soft top is stowed away in the trunk.
The Convertible Top in Operation
mes-
sage appears in the multifunction display.
If, when opening, you drive at speeds above
25 mph (40 km/h), the opening procedure is
stopped. The Open/Close Convertible
Top Completelymessage appears in the
multifunction display. In order to open the
soft top fully, reduce your speed again to
below 25 mph (40 km/h) and pull the soft-top
switch again.
XTo close: press and hold soft-top switch :
until the soft top is fully closed.
The Convertible Top in Operation
mes-
sage appears in the multifunction display.
If, when closing, you drive at speeds above
25 mph (40 km/h), the opening procedure is
stopped. The Open/Close Convertible
Top Completelymessage appears in the
multifunction display. In order to close the
soft top fully, reduce your speed again to
below 25 mph (40 km/h) and press the soft-
top switch again.
86Soft top
Opening and closing
Page 89 of 322
Opening/closing using the SmartKey
Important safety notes
GWARNING
When opening or closing the soft top, there is a risk that parts of the body could become
trapped by moving parts such as the roof
mechanism, the trunk lid, or the side win-
dows. There is a risk of injury.
When opening or closing the roof, make sure
that no parts of the body are in the vicinity of
moving parts. Release the switch if somebody
becomes trapped.
Opening and closing
The SmartKey must be near the door handle.
XTo open: press the %button in the Smart-
Key until the soft top is completely opened.
The Convertible Top in Operation
mes-
sage appears in the multifunction display. The
seat ventilation is switched on. The rear side
windows open.
XTo close: press the&button in the Smart-
Key until the soft top is completely closed.
The Convertible Top in Operation
mes-
sage appears in the multifunction display. The soft top and the side windows close.
Closing the soft top manually
Important safety notes
GWARNING
Closing the soft top manually is a complex,
technically challenging procedure which can
also be physically demanding. You or others
can become trapped. There is a risk of injury.
Where possible, have the soft top closed man-
ually at a qualified specialist workshop.
If the soft top cannot be closed automatically,
check the following points:
Ris the trunk partition engaged (Ypage 91)?
Rare the head restraints on the rear bench
seats extended?
Ris the trunk lid closed?
Ris the on-board voltage sufficient?
Start the engine if necessary.
If automatic operation still does not work, the
soft top can be closed manually.
To carry out this work, you will need the assis-
tance of another person.
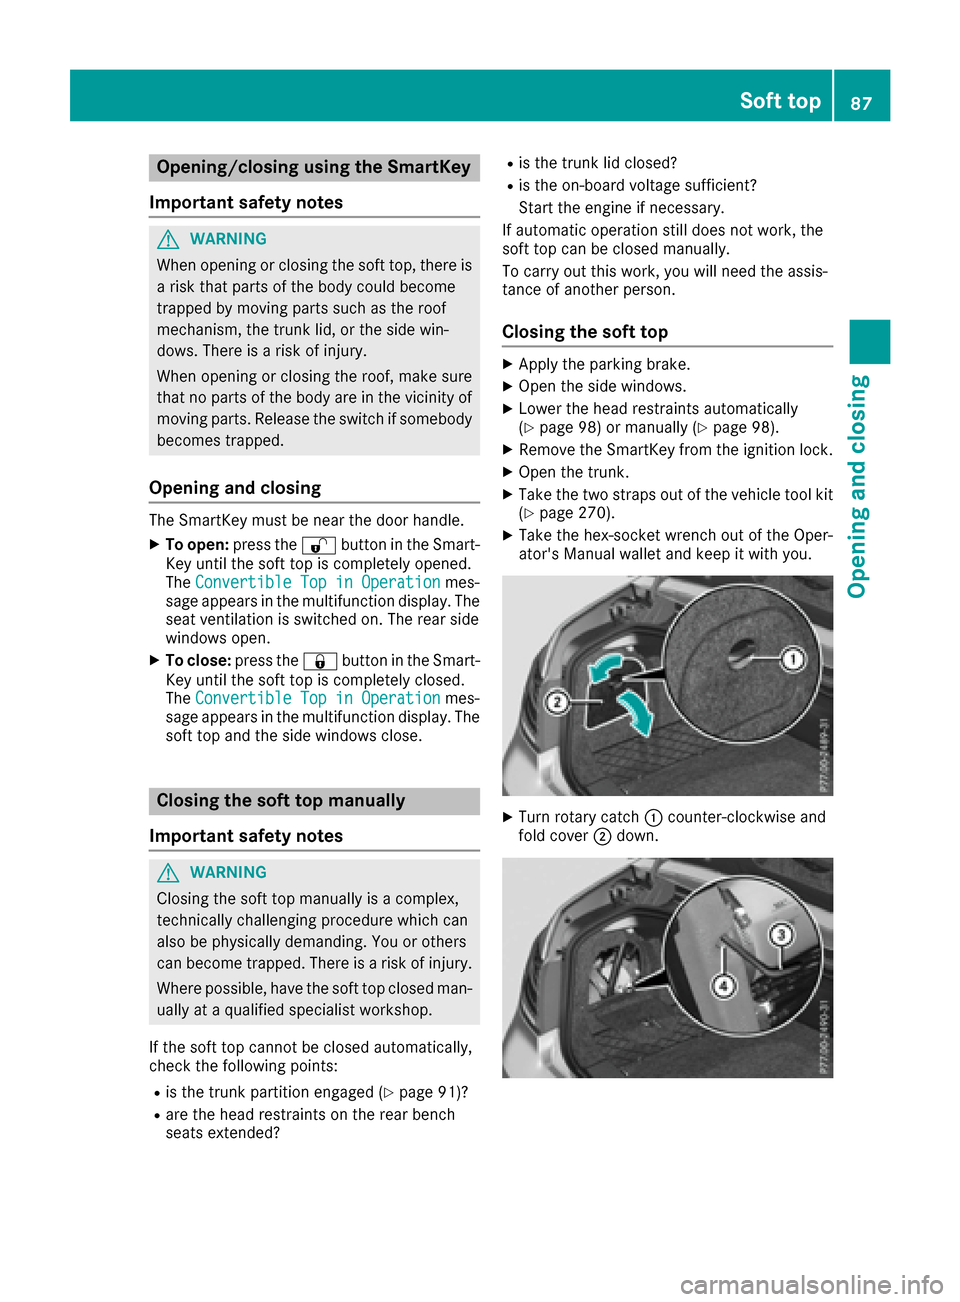
Closing the soft top
XApply the parking brake.
XOpen the side windows.
XLower the head restraints automatically
(Ypage 98) or manually (Ypage 98).
XRemove the SmartKey from the ignition lock.
XOpen the trunk.
XTake the two straps out of the vehicle tool kit
(Ypage 270).
XTake the hex-socket wrench out of the Oper-
ator's Manual wallet and keep it with you.
XTurn rotary catch :counter-clockwise and
fold cover ;down.
Soft top87
Opening and closing
Z