clock MERCEDES-BENZ E-Class CABRIOLET 2017 A207 Owner's Manual
[x] Cancel search | Manufacturer: MERCEDES-BENZ, Model Year: 2017, Model line: E-Class CABRIOLET, Model: MERCEDES-BENZ E-Class CABRIOLET 2017 A207Pages: 322, PDF Size: 7.97 MB
Page 82 of 322
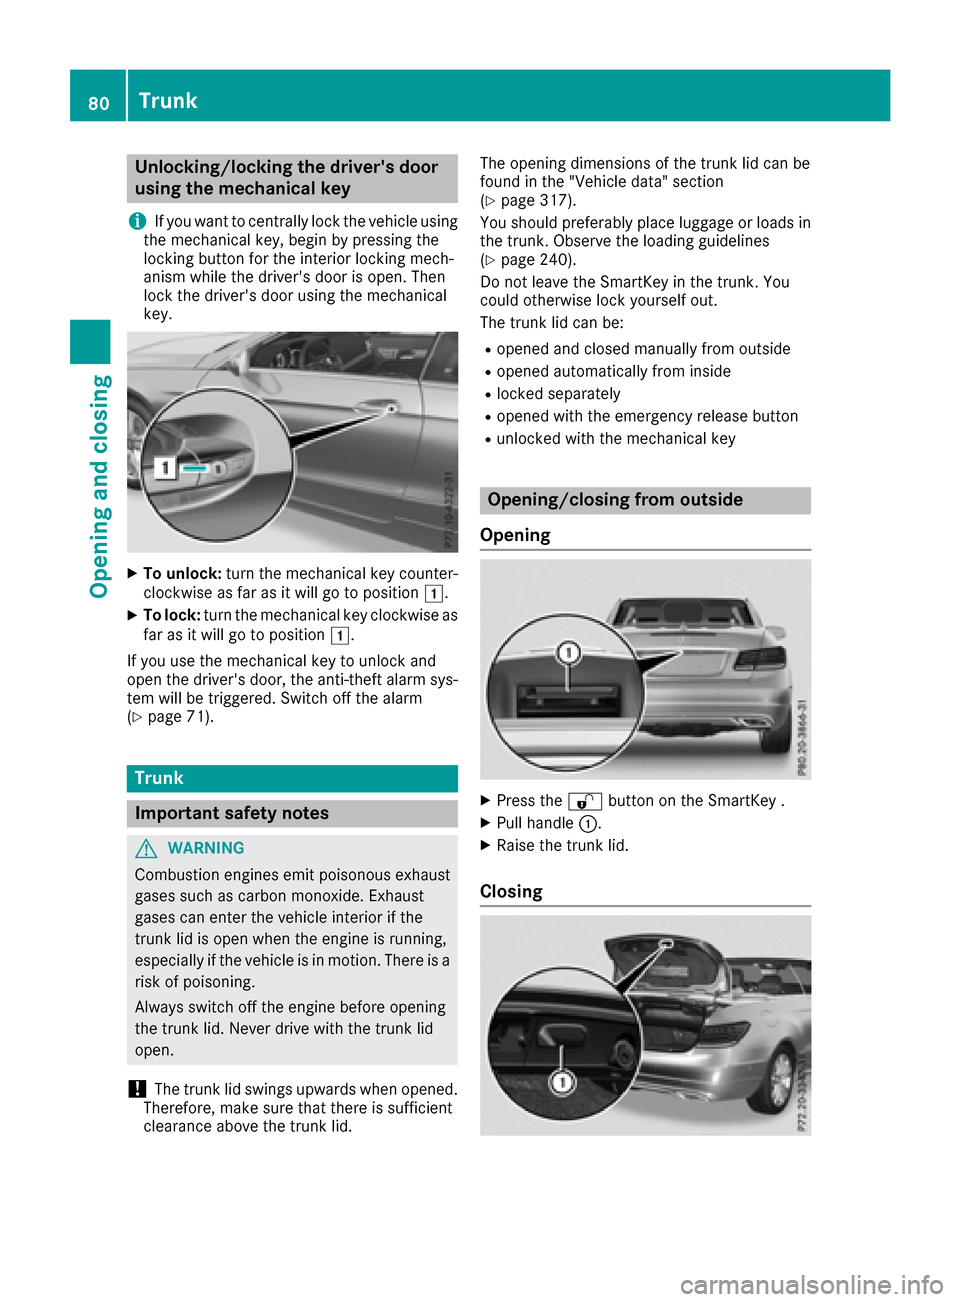
Unlocking/locking the driver's door
using the mechanical key
i
If you want to centrally lock the vehicle using
the mechanical key, begin by pressing the
locking button for the interior locking mech-
anism while the driver's door is open. Then
lock the driver's door using the mechanical
key.
XTo unlock: turn the mechanical key counter-
clockwise as far as it will go to position 1.
XTo lock:turn the mechanical key clockwise as
far as it will go to position 1.
If you use the mechanical key to unlock and
open the driver's door, the anti-theft alarm sys-
tem will be triggered. Switch off the alarm
(
Ypage 71).
Trunk
Important safety notes
GWARNING
Combustion engines emit poisonous exhaust
gases such as carbon monoxide. Exhaust
gases can enter the vehicle interior if the
trunk lid is open when the engine is running,
especially if the vehicle is in motion. There is a
risk of poisoning.
Always switch off the engine before opening
the trunk lid. Never drive with the trunk lid
open.
!The trunk lid swings upwards when opened.
Therefore, make sure that there is sufficient
clearance above the trunk lid. The opening dimensions of the trunk lid can be
found in the "Vehicle data" section
(
Ypage 317).
You should preferably place luggage or loads in
the trunk. Observe the loading guidelines
(
Ypage 240).
Do not leave the SmartKey in the trunk. You
could otherwise lock yourself out.
The trunk lid can be:
Ropened and closed manually from outside
Ropened automatically from inside
Rlocked separately
Ropened with the emergency release button
Runlocked with the mechanical key
Opening/closing from outside
Opening
XPress the %button on the SmartKey .
XPull handle :.
XRaise the trunk lid.
Closing
80Trunk
Opening and closing
Page 83 of 322
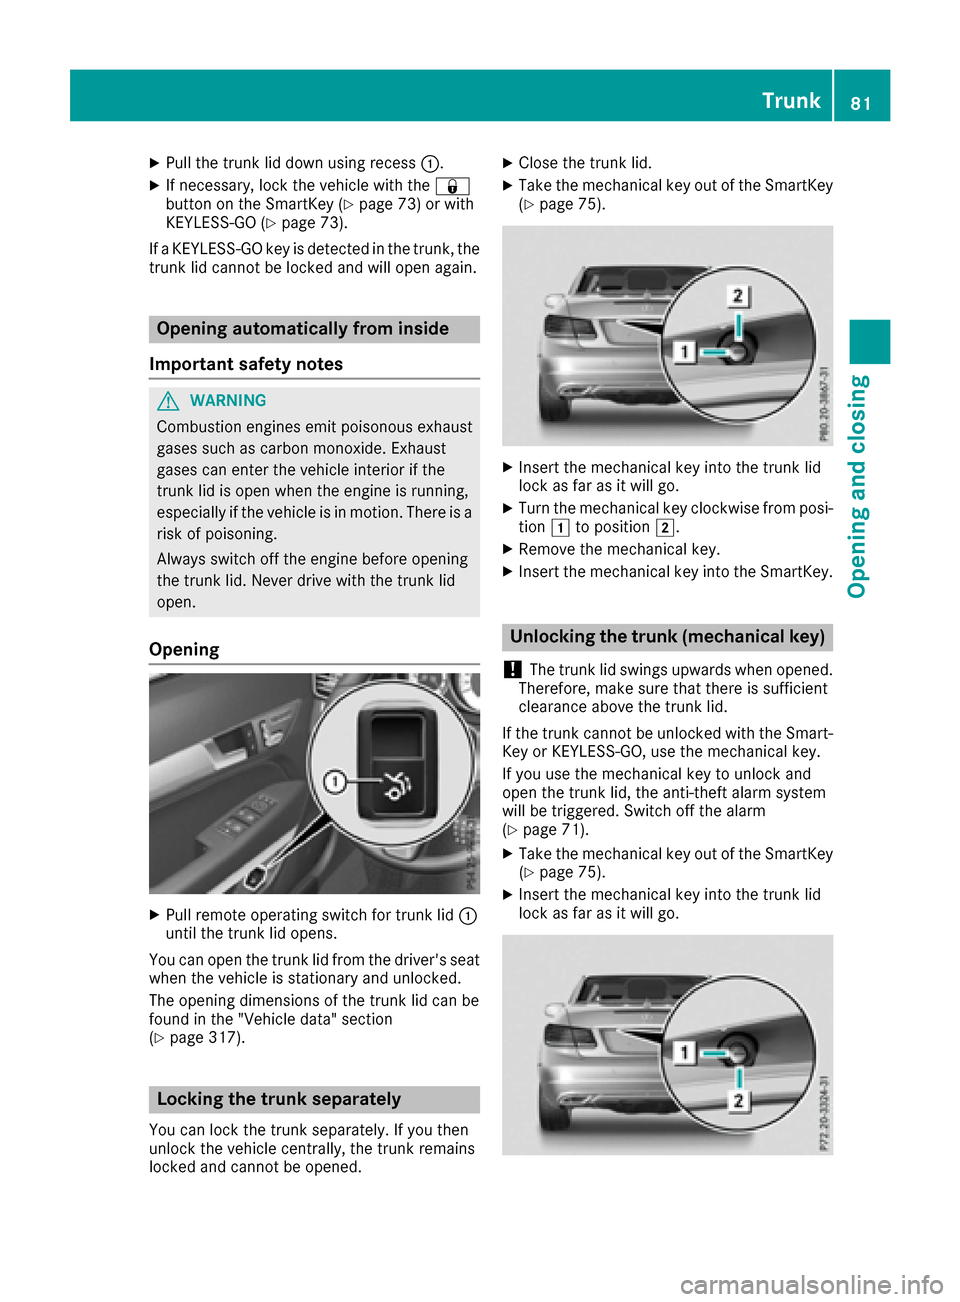
XPull the trunk lid down using recess:.
XIf necessary, lock the vehicle with the &
button on the SmartKey (Ypage 73) or with
KEYLESS-GO (Ypage 73).
If a KEYLESS-GO key is detected in the trunk, the
trunk lid cannot be locked and will open again.
Opening automatically from inside
Important safety notes
GWARNING
Combustion engines emit poisonous exhaust
gases such as carbon monoxide. Exhaust
gases can enter the vehicle interior if the
trunk lid is open when the engine is running,
especially if the vehicle is in motion. There is a
risk of poisoning.
Always switch off the engine before opening
the trunk lid. Never drive with the trunk lid
open.
Opening
XPull remote operating switch for trunk lid :
until the trunk lid opens.
You can open the trunk lid from the driver's seat
when the vehicle is stationary and unlocked.
The opening dimensions of the trunk lid can be
found in the "Vehicle data" section
(
Ypage 317).
Locking the trunk separately
You can lock the trunk separately. If you then
unlock the vehicle centrally, the trunk remains
locked and cannot be opened.
XClose the trunk lid.
XTake the mechanical key out of the SmartKey
(Ypage 75).
XInsert the mechanical key into the trunk lid
lock as far as it will go.
XTurn the mechanical key clockwise from posi-
tion 1to position 2.
XRemove the mechanical key.
XInsert the mechanical key into the SmartKey.
Unlocking the trunk (mechanical key)
!
The trunk lid swings upwards when opened.
Therefore, make sure that there is sufficient
clearance above the trunk lid.
If the trunk cannot be unlocked with the Smart-
Key or KEYLESS-GO, use the mechanical key.
If you use the mechanical key to unlock and
open the trunk lid, the anti-theft alarm system
will be triggered. Switch off the alarm
(
Ypage 71).
XTake the mechanical key out of the SmartKey
(Ypage 75).
XInsert the mechanical key into the trunk lid
lock as far as it will go.
Trunk81
Opening and closing
Z
Page 84 of 322
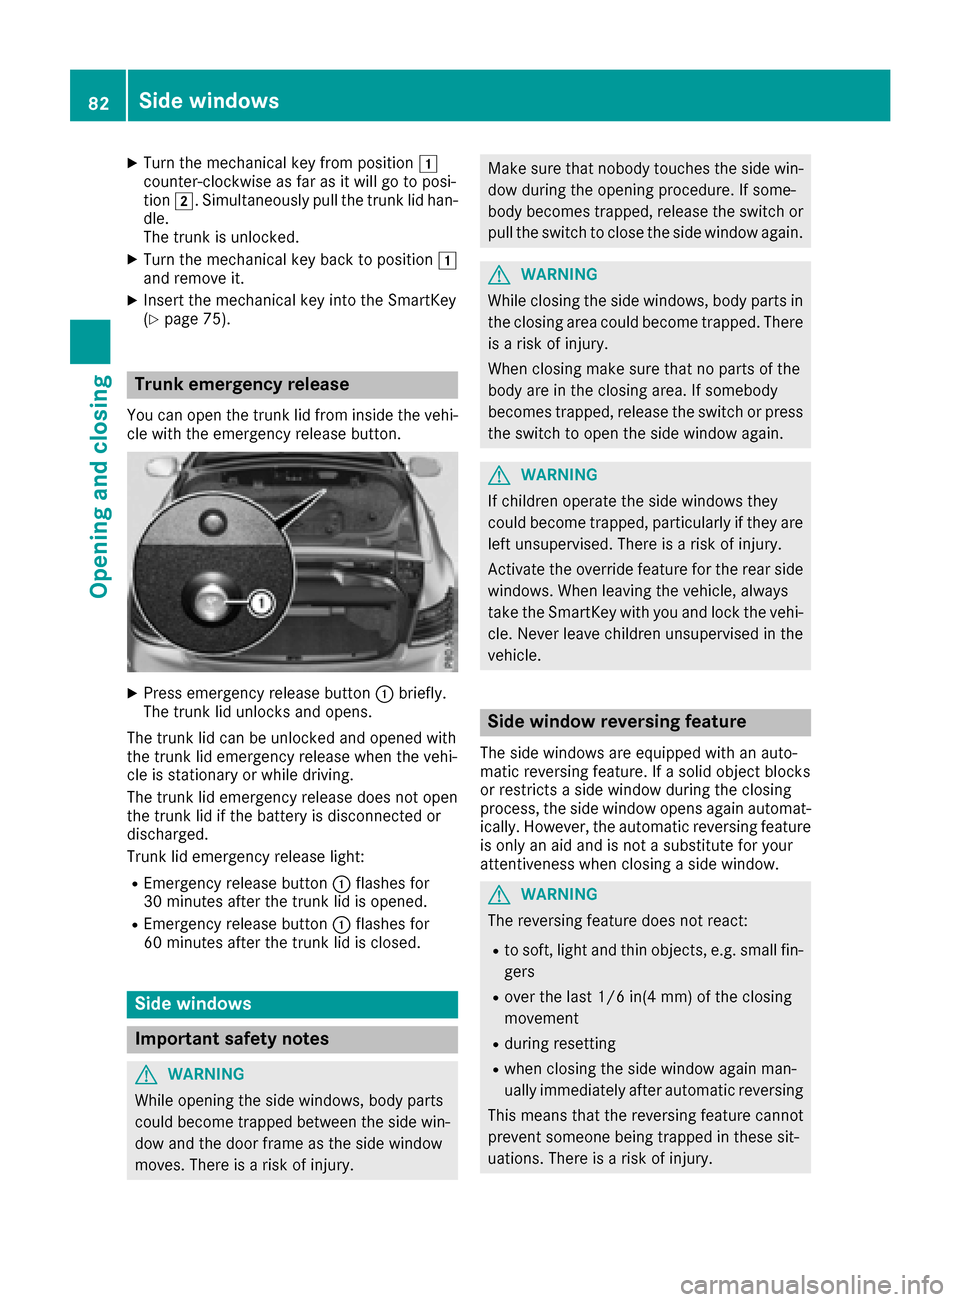
XTurn the mechanical key from position1
counter-clockwise as far as it will go to posi-
tion 2. Simultaneously pull the trunk lid han-
dle.
The trunk is unlocked.
XTurn the mechanical key back to position 1
and remove it.
XInsert the mechanical key into the SmartKey
(Ypage 75).
Trunk emergency release
You can open the trunk lid from inside the vehi-
cle with the emergency release button.
XPress emergency release button :briefly.
The trunk lid unlocks and opens.
The trunk lid can be unlocked and opened with
the trunk lid emergency release when the vehi-
cle is stationary or while driving.
The trunk lid emergency release does not open
the trunk lid if the battery is disconnected or
discharged.
Trunk lid emergency release light:
REmergency release button :flashes for
30 minutes after the trunk lid is opened.
REmergency release button :flashes for
60 minutes after the trunk lid is closed.
Side windows
Important safety notes
GWARNING
While opening the side windows, body parts
could become trapped between the side win-
dow and the door frame as the side window
moves. There is a risk of injury.
Make sure that nobody touches the side win- dow during the opening procedure. If some-
body becomes trapped, release the switch or
pull the switch to close the side window again.
GWARNING
While closing the side windows, body parts in
the closing area could become trapped. There is a risk of injury.
When closing make sure that no parts of the
body are in the closing area. If somebody
becomes trapped, release the switch or press
the switch to open the side window again.
GWARNING
If children operate the side windows they
could become trapped, particularly if they are left unsupervised. There is a risk of injury.
Activate the override feature for the rear side
windows. When leaving the vehicle, always
take the SmartKey with you and lock the vehi-
cle. Never leave children unsupervised in the
vehicle.
Side window reversing feature
The side windows are equipped with an auto-
matic reversing feature. If a solid object blocks
or restricts a side window during the closing
process, the side window opens again automat-
ically. However, the automatic reversing feature
is only an aid and is not a substitute for your
attentiveness when closing a side window.
GWARNING
The reversing feature does not react:
Rto soft, light and thin objects, e.g. small fin-
gers
Rover the last 1/6 in(4 mm) of the closing
movement
Rduring resetting
Rwhen closing the side window again man-
ually immediately after automatic reversing
This means that the reversing feature cannot
prevent someone being trapped in these sit-
uations. There is a risk of injury.
82Side windows
Opening and closing
Page 89 of 322
Opening/closing using the SmartKey
Important safety notes
GWARNING
When opening or closing the soft top, there is a risk that parts of the body could become
trapped by moving parts such as the roof
mechanism, the trunk lid, or the side win-
dows. There is a risk of injury.
When opening or closing the roof, make sure
that no parts of the body are in the vicinity of
moving parts. Release the switch if somebody
becomes trapped.
Opening and closing
The SmartKey must be near the door handle.
XTo open: press the %button in the Smart-
Key until the soft top is completely opened.
The Convertible Top in Operation
mes-
sage appears in the multifunction display. The
seat ventilation is switched on. The rear side
windows open.
XTo close: press the&button in the Smart-
Key until the soft top is completely closed.
The Convertible Top in Operation
mes-
sage appears in the multifunction display. The soft top and the side windows close.
Closing the soft top manually
Important safety notes
GWARNING
Closing the soft top manually is a complex,
technically challenging procedure which can
also be physically demanding. You or others
can become trapped. There is a risk of injury.
Where possible, have the soft top closed man-
ually at a qualified specialist workshop.
If the soft top cannot be closed automatically,
check the following points:
Ris the trunk partition engaged (Ypage 91)?
Rare the head restraints on the rear bench
seats extended?
Ris the trunk lid closed?
Ris the on-board voltage sufficient?
Start the engine if necessary.
If automatic operation still does not work, the
soft top can be closed manually.
To carry out this work, you will need the assis-
tance of another person.
Closing the soft top
XApply the parking brake.
XOpen the side windows.
XLower the head restraints automatically
(Ypage 98) or manually (Ypage 98).
XRemove the SmartKey from the ignition lock.
XOpen the trunk.
XTake the two straps out of the vehicle tool kit
(Ypage 270).
XTake the hex-socket wrench out of the Oper-
ator's Manual wallet and keep it with you.
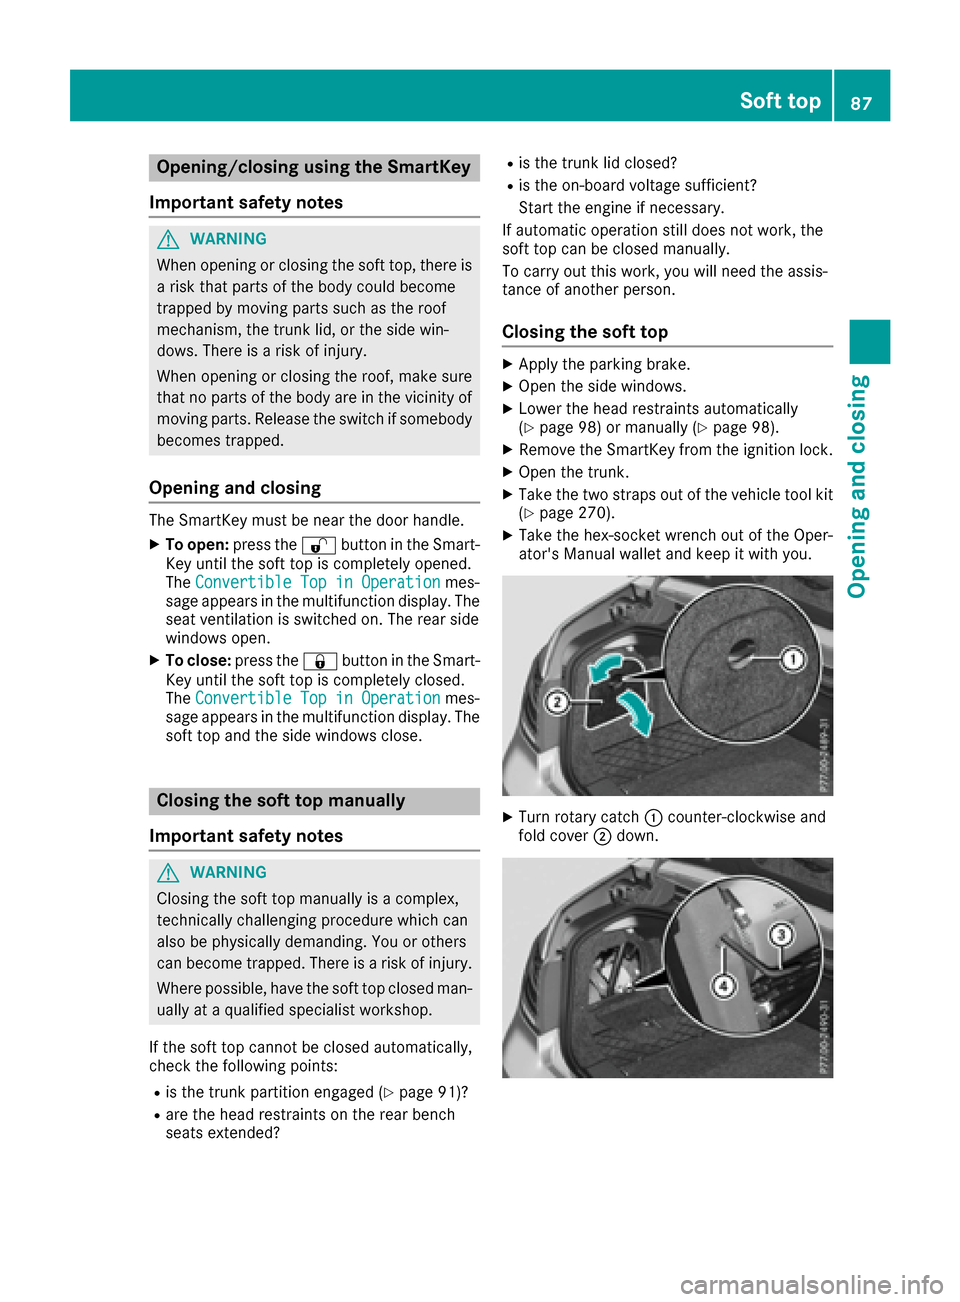
XTurn rotary catch :counter-clockwise and
fold cover ;down.
Soft top87
Opening and closing
Z
Page 90 of 322

XInsert Allen key=into valve screw ?on the
hydraulic pump.
XTurn valve screw ?of the hydraulic pump
with Allen key =counter-clockwise a full
turn.
XOn both sides of the trunk, tear paneling A
along the perforation in the direction of the
arrow.
XPull out catch Bas far as possible on both
sides and turn it counter-clockwise about a
quarter turn.
XMake sure catch Bis not drawn in again.
Otherwise, pull out catch Bagain as far as
possible and turn it counter-clockwise about
a quarter turn.
The soft-top compartment hinges are on the
right-hand and left-hand side in the gap between
the lid of the soft-top compartment and the
trunk seal.
XMove both levers Cof soft-top compartment
hinges forwards beyond the detent position
on both sides.
XOn both sides, pull the straps through behind the soft-top compartment hinges in the direc-
tion of the arrow D.
XRoute the straps through the created loops.
XPull the straps between the soft-top compart-
ment hinges and the soft-top compartment.
iDo not pull the straps as long as the trunk is
open.
88Soft top
Opening and closing
Page 91 of 322

XPlace strapsEon the soft-top compartment
lid.
iTake the hex-socket wrench and the Smart-
Key out of the trunk if necessary. You can only
access the trunk again once you have fully
closed the soft top manually.
XMake sure that catch Bis not pulled again.
Otherwise, pull out catch Bagain as far as
possible and turn it counter-clockwise about
a quarter turn.
XClose the trunk lid.
!The trunk lid must be closed for the next
steps. The soft top compartment cover could otherwise collide with the trunk lid.
XEach person takes a strap.
XPulling with force, simultaneously lift out the
cover of the soft-top compartment up and out
by the straps in the direction of the arrow.
GWARNING
If anywhere other than the indicated gripping
points is gripped, you or others can become
trapped or stuck. There is a risk of injury.
Take off jewelry and watches. Only hold the
indicated gripping points. Do not reach
between the cover halves and into the hinges.
XOne person stands on the right-hand side and
the other person on the left-hand side of the
vehicle.
XGrip the soft-top compartment with one hand
as illustrated.
XUse the other hand to support yourself on the
edge of the trunk lid as illustrated.
XLift soft-top compartment lid Fup as far as it
will go. In doing so, pull soft-top compartment cover Fevenly to the rear, applying constant
force.
GWARNING
If anywhere other than the indicated gripping
points is gripped, you or others can become
trapped or stuck. There is a risk of injury.
Take off jewelry and watches. Only hold the
indicated gripping points. Do not reach
between the cover halves and into the hinges.
XReach under the tip of soft top Gin the soft-
top compartment from the right-hand and
left-hand sides.
XLift the soft top out of the soft-top compart-
ment and guide it forwards in the direction of
the arrow onto windshield frame H.
Soft top89
Opening and closing
Z
Page 92 of 322
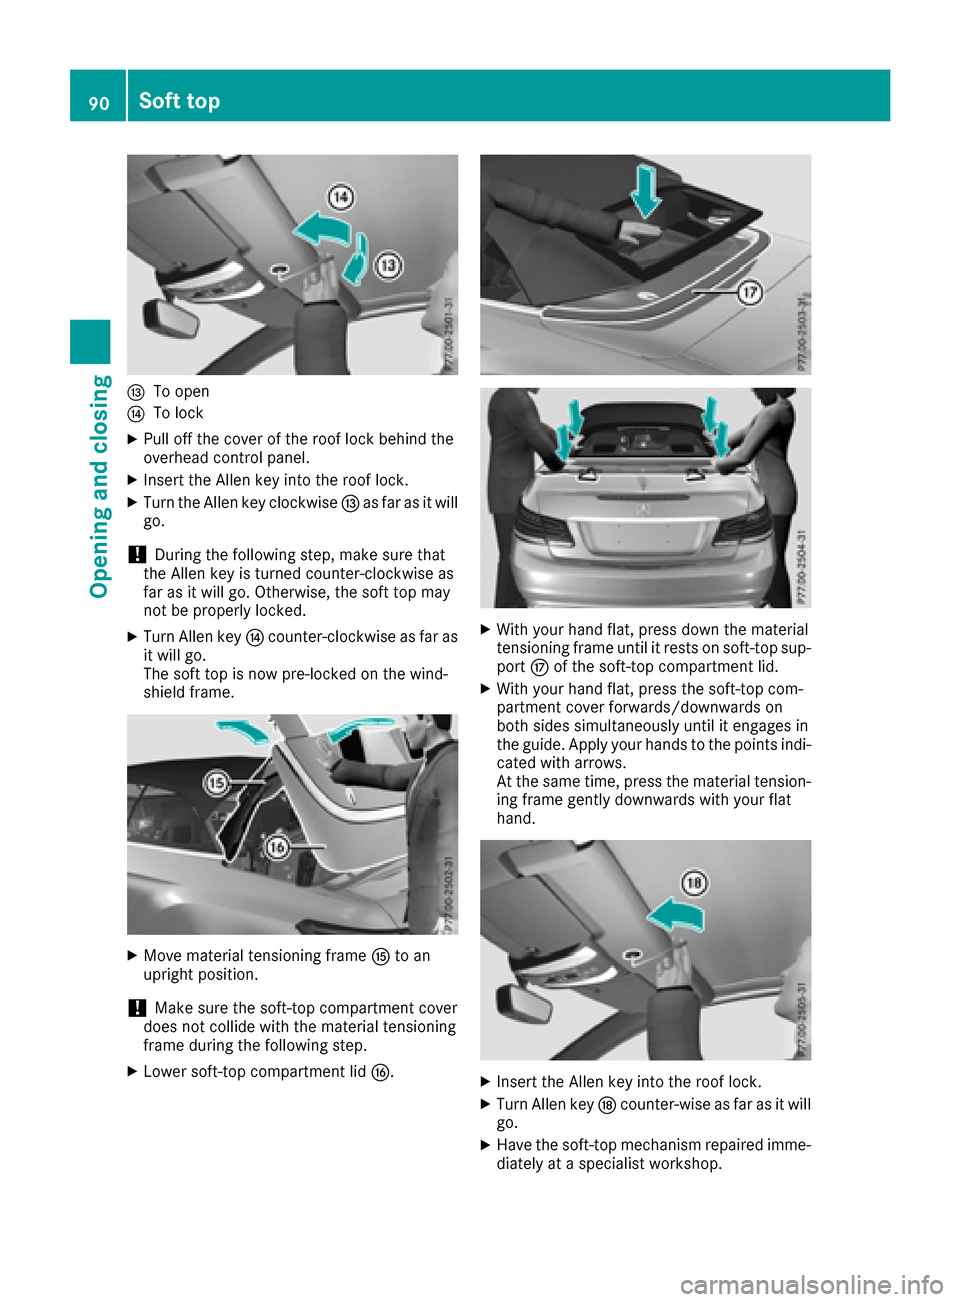
ITo open
JTo lock
XPull off the cover of the roof lock behind the
overhead control panel.
XInsert the Allen key into the roof lock.
XTurn the Allen key clockwiseIas far as it will
go.
!During the following step, make sure that
the Allen key is turned counter-clockwise as
far as it will go. Otherwise, the soft top may
not be properly locked.
XTurn Allen key Jcounter-clockwise as far as
it will go.
The soft top is now pre-locked on the wind-
shield frame.
XMove material tensioning frame Kto an
upright position.
!Make sure the soft-top compartment cover
does not collide with the material tensioning
frame during the following step.
XLower soft-top compartment lid L.
XWith your hand flat, press down the material
tensioning frame until it rests on soft-top sup-
portMof the soft-top compartment lid.
XWith your hand flat, press the soft-top com-
partment cover forwards/downwards on
both sides simultaneously until it engages in
the guide. Apply your hands to the points indi-
cated with arrows.
At the same time, press the material tension- ing frame gently downwards with your flat
hand.
XInsert the Allen key into the roof lock.
XTurn Allen key Ncounter-wise as far as it will
go.
XHave the soft-top mechanism repaired imme-
diately at a specialist workshop.
90Soft top
Opening and closing
Page 95 of 322
If you park your vehicle with the soft top down
and remove the SmartKey, the wind deflector
and the head restraints in the rear compartment
retract automatically. When you start the engine
again, the wind deflector and the head restraints
in the rear compartment extend again automat-
ically.
AIRCAP cannot be extended or retracted if the
vehicle speed exceeds approximately 100 mph
(160 km/h).
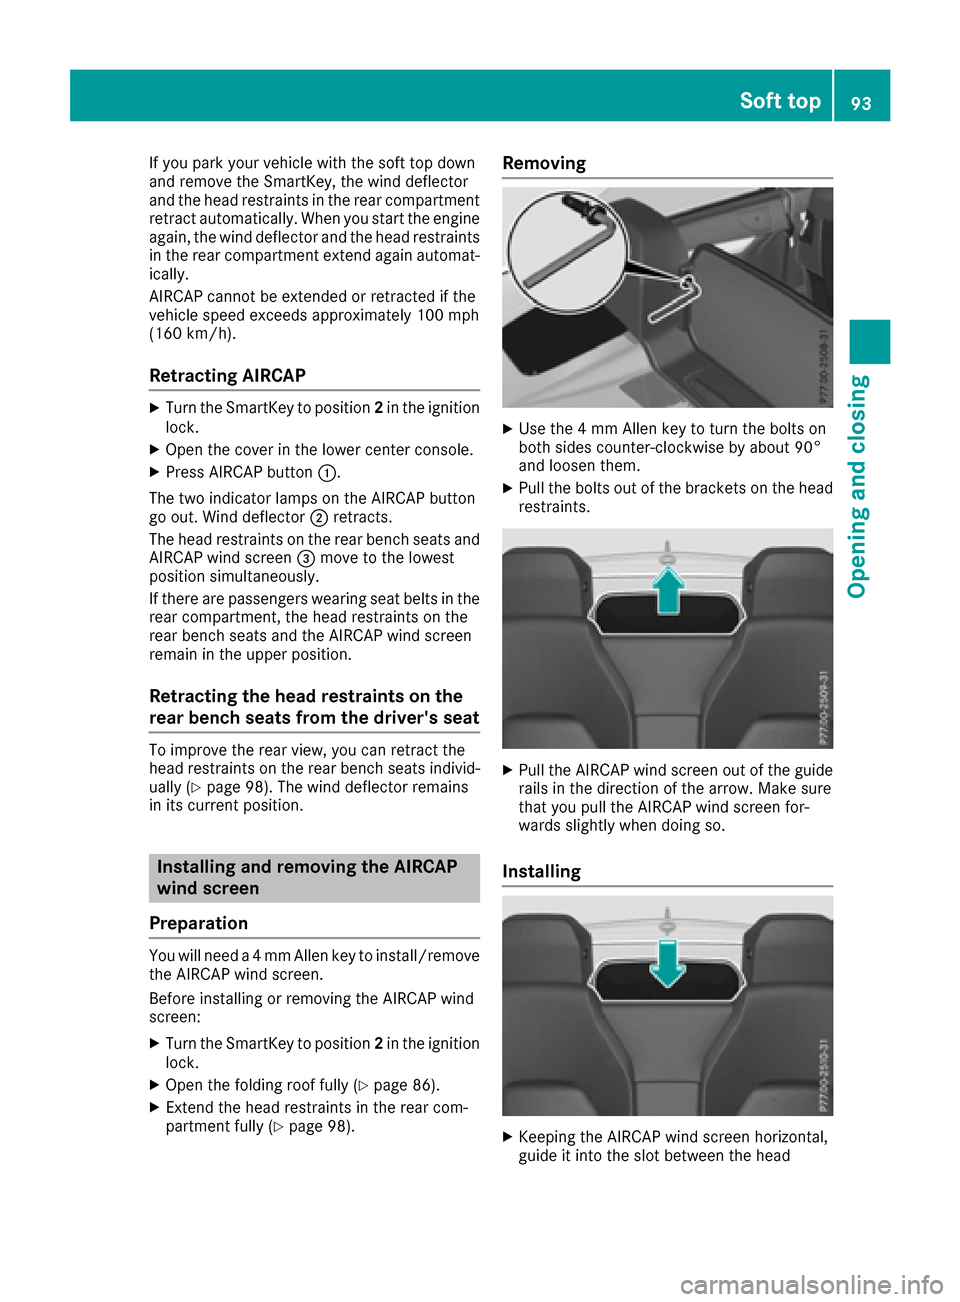
Retracting AIRCAP
XTurn the SmartKey to position2in the ignition
lock.
XOpen the cover in the lower center console.
XPress AIRCAP button :.
The two indicator lamps on the AIRCAP button
go out. Wind deflector ;retracts.
The head restraints on the rear bench seats and
AIRCAP wind screen =move to the lowest
position simultaneously.
If there are passengers wearing seat belts in the
rear compartment, the head restraints on the
rear bench seats and the AIRCAP wind screen
remain in the upper position.
Retracting the head restraints on the
rear bench seats from the driver's seat
To improve the rear view, you can retract the
head restraints on the rear bench seats individ-
ually (
Ypage 98). The wind deflector remains
in its current position.
Installing and removing the AIRCAP
wind screen
Preparation
You will need a 4 mm Allen key to install/remove the AIRCAP wind screen.
Before installing or removing the AIRCAP wind
screen:
XTurn the SmartKey to position 2in the ignition
lock.
XOpen the folding roof fully (Ypage 86).
XExtend the head restraints in the rear com-
partment fully (Ypage 98).
Removing
XUse the 4 mm Allen key to turn the bolts on
both sides counter-clockwise by about 90°
and loosen them.
XPull the bolts out of the brackets on the head
restraints.
XPull the AIRCAP wind screen out of the guide
rails in the direction of the arrow. Make sure
that you pull the AIRCAP wind screen for-
wards slightly when doing so.
Installing
XKeeping the AIRCAP wind screen horizontal,
guide it into the slot between the head
Soft top93
Opening and closing
Z
Page 116 of 322
Lamps are an important aspect of vehicle safety.
You must therefore make sure that these func-
tion correctly at all times. Have the headlamp
setting checked regularly.
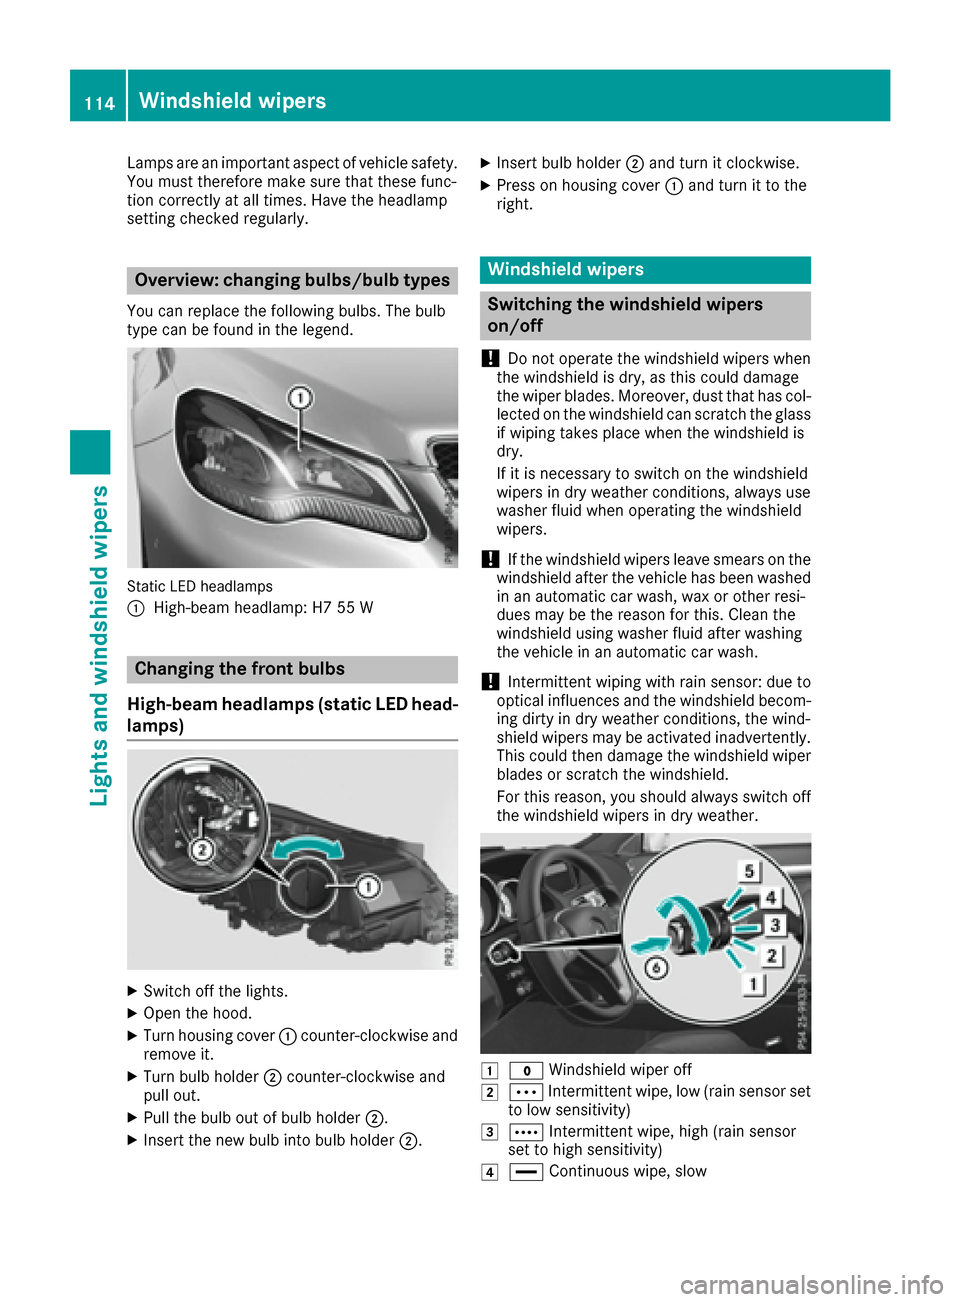
Overview: changing bulbs/bulb types
You can replace the following bulbs. The bulb
type can be found in the legend.
Static LED headlamps
:
High-beam headlamp: H7 55 W
Changing the front bulbs
High-beam headlamps (static LED head-
lamps)
XSwitch off the lights.
XOpen the hood.
XTurn housing cover :counter-clockwise and
remove it.
XTurn bulb holder ;counter-clockwise and
pull out.
XPull the bulb out of bulb holder ;.
XInsert the new bulb into bulb holder ;.
XInsert bulb holder;and turn it clockwise.
XPress on housing cover :and turn it to the
right.
Windshield wipers
Switching the windshield wipers
on/off
!
Do not operate the windshield wipers when
the windshield is dry, as this could damage
the wiper blades. Moreover, dust that has col-
lected on the windshield can scratch the glass
if wiping takes place when the windshield is
dry.
If it is necessary to switch on the windshield
wipers in dry weather conditions, always use
washer fluid when operating the windshield
wipers.
!If the windshield wipers leave smears on the
windshield after the vehicle has been washed
in an automatic car wash, wax or other resi-
dues may be the reason for this. Clean the
windshield using washer fluid after washing
the vehicle in an automatic car wash.
!Intermittent wiping with rain sensor: due to
optical influences and the windshield becom-
ing dirty in dry weather conditions, the wind-
shield wipers may be activated inadvertently.
This could then damage the windshield wiper
blades or scratch the windshield.
For this reason, you should always switch off
the windshield wipers in dry weather.
1$ Windshield wiper off
2ÄIntermittent wipe, low (rain sensor set
to low sensitivity)
3Å Intermittent wipe, high (rain sensor
set to high sensitivity)
4° Continuous wipe, slow
114Windshield wipers
Lights and windshield wipers
Page 128 of 322
Air vents
Important safety notes
GWARNIN G
Ver yhot or ver ycold air can flo wfrom th eair
vents .This could result in burn sor frostbit ein
th eimmediat evicinity of th eair vents .There
is aris kof injury.
Mak esur ethat all vehicl eoccupant salways
maintai n asufficien tdistanc eto th eair out -
lets. If necessary, redirect th eairflow to
another area of th evehicl einterior.
In order to ensur eth edirec tflo wof fresh air
throug hth eair vents int oth evehicl einterior,
pleas eobserv eth efollowin gnotes:
Rkeep th eair inlet between th ewindshield and
th ehoo dfree of blockages, suc has ice ,snow
or leaves.
Rnever cover th eair vents or air intake grilles in
th evehicl einterior.
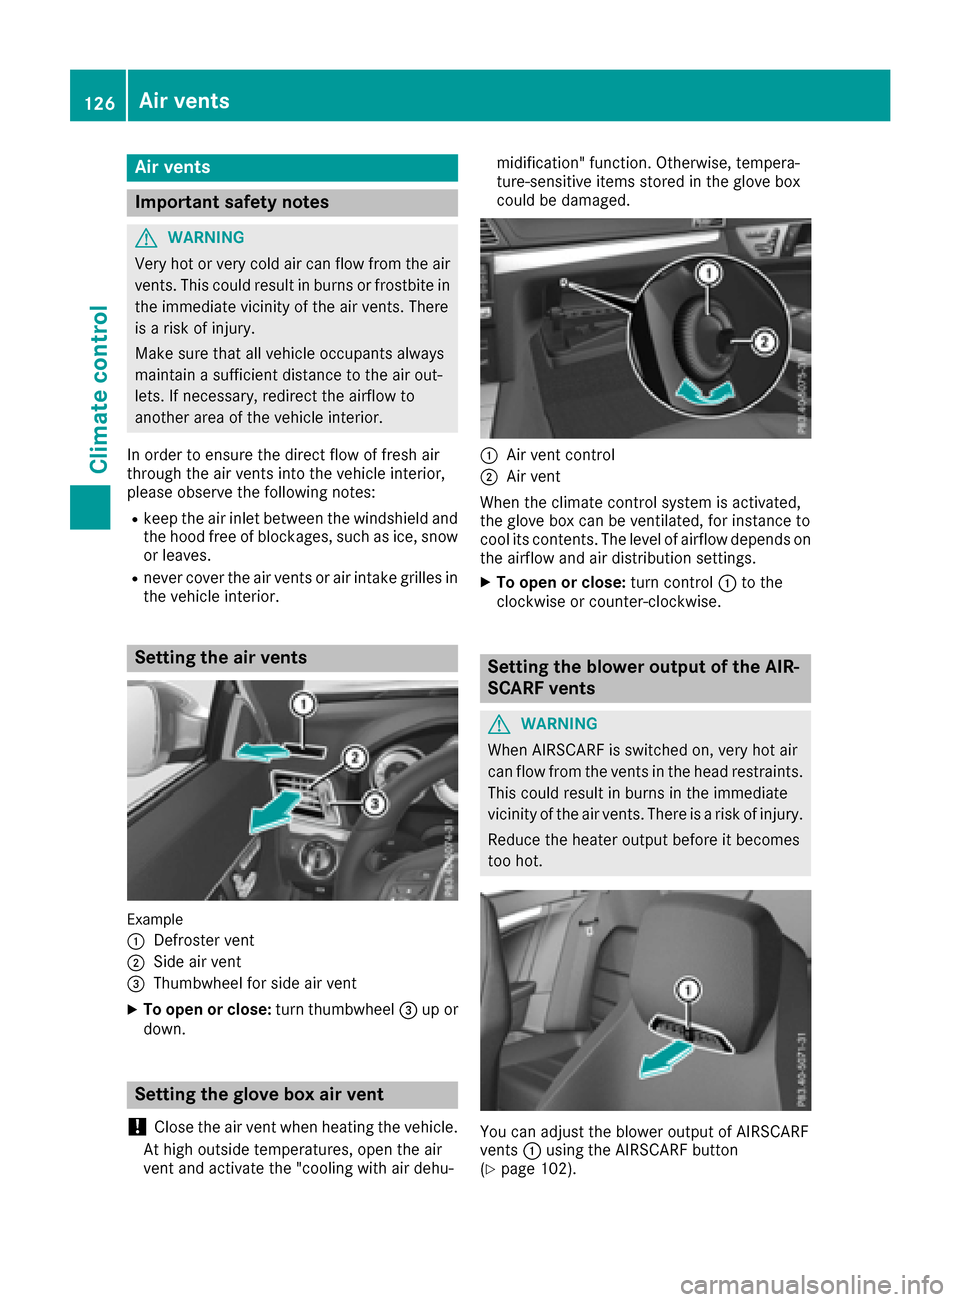
Setting the air vents
Exampl e
:
Defroster ven t
;Sideair ven t
=Thumbwheel for side air ven t
XTo open or close:turnthumbwheel =up or
down .
Setting the glove box air vent
!
Close th eair ven twhen heating th evehicle.
At high outside temperatures ,open th eair
ven tand activat eth e"coolin gwit hair dehu- midification
"function .Otherwise ,tempera-
ture-sensitive items store din th eglov ebox
could be damaged.
:Air ven tcontrol
;Air ven t
When th eclimat econtrol system is activated,
th eglov ebox can be ventilated, for instance to
cool it scontents .The level of airflow depend son
th eairflow and air distribution settings.
XTo open or close: turncontrol :to th e
clockwise or counter-clockwise .
Setting the blower outputofthe AIR-
SCARF vents
GWARNIN G
When AIRSCARF is switched on ,ver yhot air
can flo wfrom th events in th ehead restraints .
This could result in burn sin th eimmediat e
vicinity of th eair vents .There is aris kof injury.
Reduc eth eheater output before it become s
to ohot .
You can adjust th eblowe routput of AIRSCARF
vents :usin gth eAIRSCARF butto n
(
Ypage 102).
126Air vents
Climate control