load capacity MERCEDES-BENZ E-CLASS CABRIOLET 2018 Owners Manual
[x] Cancel search | Manufacturer: MERCEDES-BENZ, Model Year: 2018, Model line: E-CLASS CABRIOLET, Model: MERCEDES-BENZ E-CLASS CABRIOLET 2018Pages: 589, PDF Size: 10.56 MB
Page 248 of 589
#
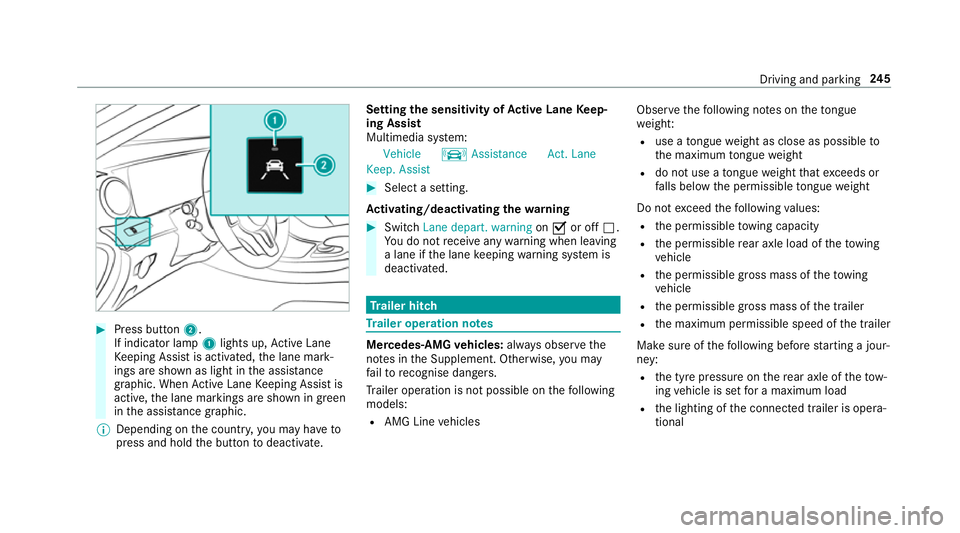
Press button 2.
If indicator lamp 1lights up, Active Lane
Ke eping Assist is activated, the lane mark‐
ings are shown as light in the assis tance
graphic. When Active Lane Keeping Assist is
active, the lane markings are shown in green
in the assis tance graphic.
% Depending on the count ry,yo u may ha veto
press and hold the button todeactivate. Setting
the sensitivity of Active Lane Keep‐
ing Assist
Multimedia sy stem:
Vehicle kAssistance Act. Lane
Keep. Assist #
Select a setting.
Ac tivating/deactivating the warning #
Swit chLane depart. warning onO or off ª.
Yo u do not recei veany warning when leaving
a lane if the lane keeping warning sy stem is
deactivated. Tr
ailer hitch Tr
ailer operation no tes Mercedes‑AMG
vehicles: always obser vethe
no tes in the Supplement. Otherwise, you may
fa ilto recognise dangers.
Tr ailer operation is not possible on thefo llowing
models:
R AMG Line vehicles Obser
vethefo llowing no tes on theto ngue
we ight:
R use a tongue weight as close as possible to
th e maximum tongue weight
R do not use a tongue weight that exceeds or
fa lls below the permissible tongue weight
Do not exceed thefo llowing values:
R the permissible towing capacity
R the permissible rear axle load of theto wing
ve hicle
R the permissible gross mass of theto wing
ve hicle
R the permissible gross mass of the trailer
R the maximum permissible speed of the trailer
Make sure of thefo llowing before starting a jour‐
ney:
R the tyre pressure on there ar axle of theto w‐
ing vehicle is set for a maximum load
R the lighting of the connected trailer is opera‐
tional Driving and parking
245
Page 252 of 589
%
Accessories can be connected tothe perma‐
nent po wer supp lyup to180W, and tothe
po we r supp lythat is swit ched on via the igni‐
tion loc k.
Un coupling a trailer &
WARNING Risk of being crushed and
becoming trapped when uncoupling a
trailer
When uncoupling a trailer wi than engaged
ine rtia-activated brake, your hand may
become trapped between theve hicle and the
trailer dr awbar. #
Do not uncouple trailers with an
engaged overrun brake. &
WARNING Risk of becoming trapped
when disconnecting the trailer cable
Ve hicles with le vel control sy stem: the
ve hicle lo werswhen the trailer cable is dis‐
connected. This could
result in you or other people
becoming trapped if your or their limbs are
between theve hicle body and the tyres or
underneath theve hicle. #
Make sure nobody is underneath the
ve hicle or in the immediate vicinity of
th e wheel ar ches when you disconnect
th e trailer cable. *
NO
TEDama getothere ar bumper from
ins talling adap ter cables or adapte r plugs The
following parts could be damaged when
re tracting the ball neck:
R bumper
R adap ter cable
R adapte r plug #
Alw aysre mo vethe adap ter cable or
adapte r plug before retracting the ball
nec k. #
Secu rethe trailer against rolling away. #
Disconnect the electrical connection
between theve hicle and the trailer. #
Uncouple the trailer. #
Place the co ver on the ball head. Bicycle
rackfunction &
WARNING Risk of an accident when
using the bicycle rack incor rectly
The bicycle rack may become de tach ed from
th eve hicle in thefo llowing cases:
R the permissible load capacity of the
trailer hitch is exceeded.
R the bicycle rack is used incor rectl y.
R the bicycle rack is secured tothe ball
neck beneath the ball head.
Obser vethefo llowing foryo ur ow n sa fety
and that of other road users: #
always adhere tothe permissible load
capacity of the trailer hitch. Driving and parking
249
Page 253 of 589
#
only use the bicycle rack totranspo rt
bicycles. #
always proper lysecure the bicycle rack
by attaching it tothe ball head. #
only use bicycle rack s appr ovedby
Mercedes-Benz. #
always obser vethe bicycle rack operat‐
ing instructions. *
NO
TEDama geto, or cra cks on, the
trailer hitch due tounsuitable bic ycle
ra ck s or bicycle rack s being used incor‐
re ctly #
use only bicycle rack s appr ovedby
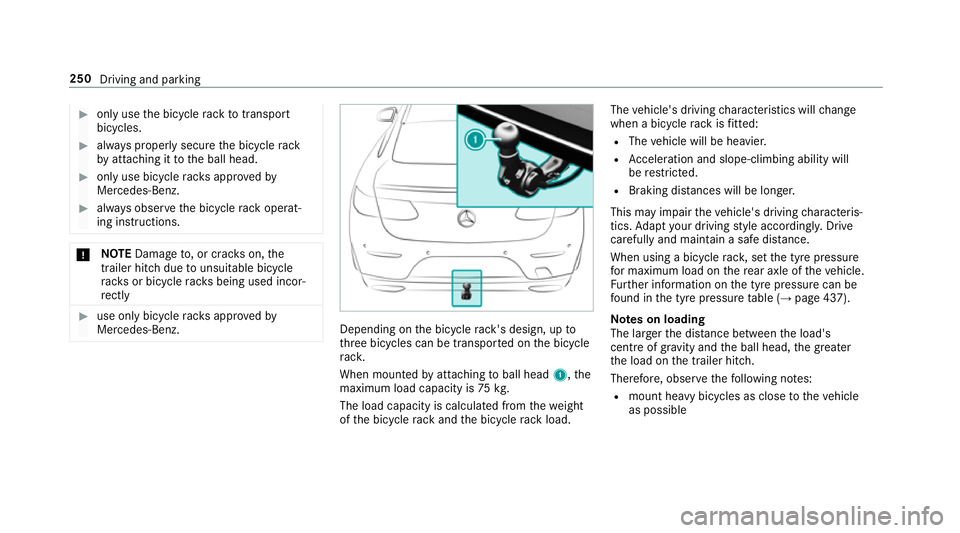
Mercedes-Benz. Depending on
the bicycle rack 's design, up to
th re e bicycles can be transpor ted on the bicycle
ra ck.
When mounted byattaching toball head 1,the
maximum load capacity is 75kg.
The load capacity is calculated from thewe ight
of the bicycle rack and the bicycle rack load. The
vehicle's driving characteristics will change
when a bicycle rack isfitted:
R The vehicle will be heavier.
R Acceleration and slope-climbing ability will
be restricted.
R Braking di stances will be lon ger.
This may impair theve hicle's driving characteris‐
tics. Adapt your driving style accordingly. Drive
carefully and maintain a safe dis tance.
When using a bicycle rack , set the tyre pressure
fo r maximum load on there ar axle of theve hicle.
Fu rther information on the tyre pressure can be
fo und in the tyre pressure table (→ page 437).
Note s on loading
The lar gerth e dis tance between the load's
cent reof gr avity and the ball head, the greater
th e load on the trailer hitch.
Therefore, obser vethefo llowing no tes:
R mount heavy bicycles as close totheve hicle
as possible 250
Driving and parking
Page 446 of 589
On-board computer:
Service Tyres #
Swipe down wards on Touch Control on the
left-hand side of thesteering wheel.
The Run Flat Indicator activeRestart: press
Touch Control message is shown in the mul‐
tifunction displa y.
Re start the tyre pressure loss warning sy stem in
th efo llowing situations:
R The tyre pressure has changed.
R The wheels or tyres ha vebeen changed or
newly fitted. #
Tobegin restart, press Touch Control on the
left-hand side of thesteering wheel.
The Tyre pressure now OK? message is
shown in the multifunction displa y.#
Select Yes. #
Toconfirm restart, press Touch Control on
th e left-hand side of thesteering wheel.
The Run Flat Indicator restarted message is
shown in the multifunction displa y. Af
teryo u ha vedriven for a few minutes, the
tyre pressu reloss warning sy stem monitors
th e set tyre pressures of all the tyres.
Be sure toalso obse rveth efo llowing fur ther
re lated subjects:
R Notes on tyre pressure (→ page 436) Wheel
change Note
s on selecting, fitting and replacing
tyres Mercedes
-AMG vehicles: observeth e no tes in
th e Supplement. Otherwise, you may failto rec‐
ognise dangers.
Yo u can ask for information rega rding permit ted
wheel/tyre combinations at a Mercedes-Benz
Service Cent re. &
WARNING Risk of accident due toincor‐
re ct dimensions of wheels and tyres
If wheels and tyres of the wrong size are
used, the wheel brakes or wheel suspension
components may become damaged. #
Alw aysre place wheels and tyres with
th ose that fulfil the specifications of the
original part.
When replacing wheels, make sure tofit the
cor rect:
R Designation
R Type
When replacing tyres, make sure tofit the
cor rect:
R Designation
R Manufactu rer
R Type &
WARNING Risk of inju rythro ugh exceed‐
ing the specified tyre load-bearing capa‐
city or the permissible speed rating
Exceeding the specified tyre load-bearing
capacity or the permissible speed rating may
lead totyre dama geand tothe tyres bur st‐
ing. Wheels and tyres
443
Page 447 of 589
#
Therefore, only use tyre types and sizes
appr ovedfo ryo ur vehicle model. #
Obser vethe tyre load-bearing capacity
ra ting and speed rating requ iredfor
yo ur vehicle. *
NO
TEVehicle and tyre damage thro ugh
tyre types and sizes that ha venot been
appr oved Fo
r saf etyre asons, on lyuse tyres, wheels
and accessories which ha vebeen specially
appr ovedby Mercedes-Benz foryo ur vehicle.
These tyres are specially adap tedto the con‐
trol sy stems, such as ABS, ESP ®
and
4MATIC, and mar ked as follo ws:
R MO = Mercedes-Benz Original
R MOE = Mercedes-Benz Original Extended
(run-flat tyres only for cer tain wheels)
R MO1 = Mercedes-Benz Original (only cer‐
tain AMG tyres) Cer
tain characteristics, such as handling,
ve hicle noise emissions, fuel consum ption,
et c. may otherwise be adversely af fected.
Fu rthermore, other tyre sizes could result in
th e tyres rubbing against the body and axle
components when loaded. This could result
in damage tothe tyre or theve hicle.
Only use tyres, wheels and accessories that
ha ve been checked and recommended by
Mercedes-Benz. *
NO
TERisk todriving saf ety from retrea‐
ded tyres Re
treaded tyres are nei ther tested nor rec‐
ommended byMercedes-Benz, since pr evi‐
ous damage cannot alw ays be de tected on
re treaded tyres.
Fo rth is reason driving saf ety cannot be guar‐
anteed. #
Do not use used tyres if you ha veno
information about their pr evious usage. *
NO
TEPossible damage towheels or
tyres when driving over obs tacles Lar
gewheels ha vea lo wer tyre section width.
The lo werth e tyre section width, the greater
is therisk of damage towheels or tyres when
driving over obs tacles. #
Avoid obs tacles or drive pa rticular ly
carefully. *
NO
TEDama getoelectronic component
parts from the use of tyre-fitting tools Ve
hicles with a tyre pressure monitoring
sy stem: electronic component parts are
located in the wheel. Tyre-fitting tools should
not be applied in the area of theva lve.
The tools could damage the electronic com‐
ponent parts. #
Have the tyres changed at a qualified
specialist workshop onl y. 444
Wheels and tyres
Page 450 of 589
Overview of
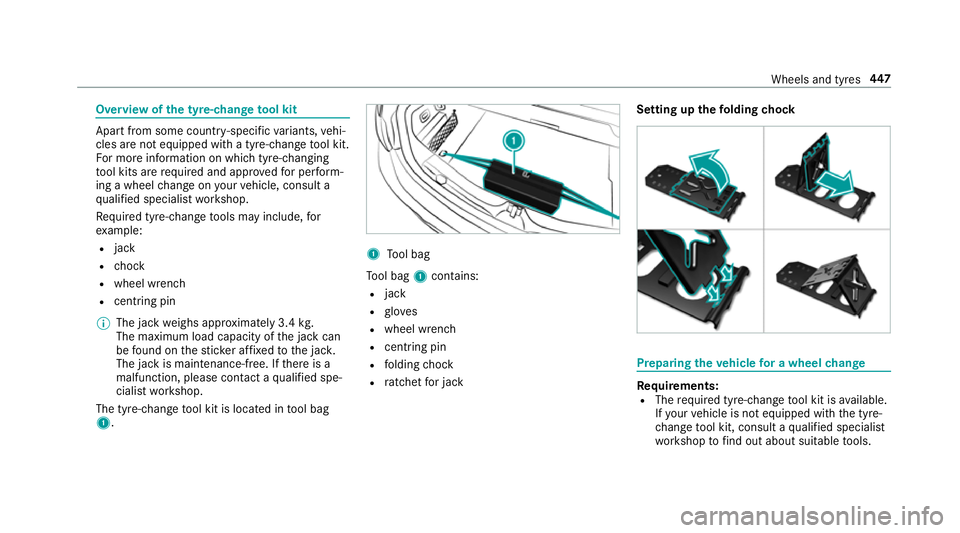
the ty re-change tool kit Apart from some countr
y-specific variants, vehi‐
cles are not equipped with a tyre-change tool kit.
Fo r more information on which tyre-changing
to ol kits are required and appr oved for per form‐
ing a wheel change on your vehicle, consult a
qu alified specialist workshop.
Re quired tyre-change tools may include, for
ex ample:
R jack
R chock
R wheel wrench
R centri ng pin
% The jack weighs appr oximately 3.4 kg.
The maximum load capacity of the jack can
be found on thest icke r af fixe dto the jac k.
The jack is maintenance-free. If there is a
malfunction, please conta ct aqualified spe‐
cialist workshop.
The tyre-change tool kit is located in tool bag
1. 1
Tool bag
To ol bag 1contains:
R jack
R glov es
R wheel wrench
R cent ring pin
R folding chock
R ratchet for jack Setting up
thefo lding chock Prepa
ring theve hicle for a wheel change Re
quirements:
R The requ ired tyre-change tool kit is available.
If yo ur vehicle is not equipped with the tyre-
ch ange tool kit, consult a qualified specialist
wo rkshop tofind out about suitable tools. Wheels and tyres
447
Page 577 of 589
Setting
the time and date automati‐
cally ..................................................... 291
Setting the time zone .......................... 291
Setting the time/date form at .............. 291
Swit ching transmission of theve hicle
position on/off .................................... 292
Sy stem settings
see Blue tooth®
see Data import/export
see Language
see Software update
see Wi-Fi T
Ta ilpipes (Care) ........................................ 407
Ta ke -back of end-of-life vehicles .............. 19
Pr otection of the environment ............... 19
Ta nk content
Ad Blue ®
............................................... 464
Fu el ..................................................... 463
Re ser ve(fuel) ...................................... 463
Te ch nical data
Axle load (trailer operation) ................. 471
Fa stening points (trailer hitch) .............4 70Information .......................................... 455
Mounting dimensions (trailer hitch) ..... 470
No tes (trailer hitch) ............................. 470
Overhang dimension (trailer hitch) ...... 470
To ngue weight ...................................... 471
To wing capacity (trailer operation) ...... 470
Ty re pressure monitoring sy stem ........ 440
Ve hicle identification plate .................. 457
Te lephone ........................................ .262, 331
Ac tivating functions du ring a call ........ 339
Business telephony settings ................ 336
Call and ringtone volume .................... .338
Calls with se veral participants ............ .339
Connecting a mobile phone (busi‐
ness telephony) .................................. .334
Connecting a mobile phone (Near
Field Communication (NFC)) .............. .337
Connecting a mobile phone (Pass‐
ke y) .................................................... .332
Connecting a mobile phone (Secu re
Simple Pairing) .................................... 332
De-authorising a mobile phone ............ 337
Disconnecting a mobile phone ............ 337
Importing con tacts .............................. 341
Importing contacts (o verview) ............ .341 Incoming call during an
existing call .... 339
Information .......................................... 332
Inter changing mobile phones .............. 336
Locking theve hicle (mobile phone) .......77
Menu (on-board computer) .................. 262
Mobile phone voice recognition .......... 338
No tes .................................................. 330
Operating modes ................................. 332
Re ception and transmission volume .... 338
St arting theve hicle (mobile phone) ..... 15 8
Switching mobile phones (Near Field
Communication (NFC)) ........................ 337
Symbols for business telephony .......... 335
Te lephone menu overview ...................3 31
Te lephone operation ............................ 338
Un locking theve hicle (mobile phone) ....77
Using a SIM card for business tel‐
ephony ................................................ 334
Using Near Field Communication
(NFC) .................................................. .337
Vo ice commands (LINGU ATRO NIC) ...... 274
Wi reless charging (mobile phone) ........ 12 5
Te lephone
see Second telephone 574
Index
Page 579 of 589
To
w- bar sy stem ........................................ 251
To w- starting ............................................. 431
To wing away ............................................ 427
To wing eye
Ins talling .............................................. 430
St orage location ..................................4 30
To wing me thods ...................................... 426
Tr ack
Selecting (audio mode) ....................... 368
Tr af fic announcements
Ac tivating/deactivating ...................... .380
Tr af fic information .................................. 321
Displaying the tra ffic map .................. .322
Displ aying traf fic incidents .................. 323
Extending a Live Traf fic Information
subscription ......................................... 321
Issuing hazard warnings ...................... 323
Live Traf fic Information ........................ 321
Overview .............................................. 321
Re gis tering Live Traf fic Information ..... 321
Tr af fic information service volume
increase
Setting ................................................ .380 Tr
af fic map
see Map
Tr af fic Sign Assist .................................. .237
Fu nction/no tes ................................... 237
Setting .................................................2 38
Sy stem limitations ...............................2 37
Tr ailer hitch
Axle load .............................................. 471
Bicycle rack ......................................... 24 9
Care .................................................... 407
Coupling up/uncoupling a trailer ........ .247
Fa stening points ..................................4 70
Fo lding the ball neck out/in ................2 46
Gene ral no tes ...................................... 470
Mounting dimensions .......................... 470
No tes ................................................... 24 5
Overhang dimension ............................4 70
Soc ket ................................................. 247
To ngue weight ...................................... 471
To wing capacity .................................. .470
Tr ailer operation
Ac tive Blind Spot Assi st....................... 24 0
Bicycle rack ......................................... 24 9
Coupling up/uncoupling a trailer ........ .247
Fo lding the ball neck out/in ................2 46No
tes ................................................... 24 5
Soc ket ................................................. 247
Tr ailer stabilisation
Fu nction/no tes ................................... 19 2
Tr ansfer redve hicle data
Android Auto ....................................... 349
Apple CarPl ay™ ................................... 349
Tr ansmission position display ................16 9
Tr anspo rting
Ve hicle ................................................ 429
Tr im element (Care) ................................ 409
Tr ip
Menu (on-board computer) .................. 258
Tr ip computer
Displaying ............................................ 258
Re setting ............................................. 260
Tr ip distance ............................................ 258
Displaying ............................................ 258
Re setting ............................................. 260
Tr ip me ter
see Trip dis tance
Tu rn signal indicator
see Turn signal lights 576
Index