tow bar MERCEDES-BENZ E-CLASS CABRIOLET 2018 Owners Manual
[x] Cancel search | Manufacturer: MERCEDES-BENZ, Model Year: 2018, Model line: E-CLASS CABRIOLET, Model: MERCEDES-BENZ E-CLASS CABRIOLET 2018Pages: 589, PDF Size: 10.56 MB
Page 5 of 589
Symbols
........................................................ 5At
agl ance .................................................... 6
Cockpit ........................................................... 6
Wa rning and indicator lamps .......................... 8
Overhead control panel ................................ 12
Door control panel and seat adjustment ....... 14
Emergencies and breakdowns ...................... 16Digital Owner's Manual
.............................18
Calling up the Digital Owner's Manual ..........18 Genera
l notes............................................. 19
Pr otection of the environment ......................19
Ta ke -ba ckof end-of-life vehicles ...................19
Mercedes-Benz Genuine Parts ......................20
Owner's Manual ............................................ 21
Operating saf ety .......................................... .21
Declaration of Conformity ............................ 23
Diagno stics connection ................................ 24
Qualified specialist workshop ....................... 25
Ve hicle registration ....................................... 25
Cor rect use of theve hicle ............................25 Information on
the REA CHregulation ........... 26
Implied warranty .......................................... .26
QR code forre scue card ...............................26
Data storage .................................................26
Copyright ...................................................... 29 Occupant saf
ety......................................... 30
Re stra int sy stem ...........................................30
Seat belts ..................................................... 32
Airbags ......................................................... 38
Ro ll bar ........................................................ .45
PRE-SAFE ®
sy stem ....................................... 46
Safely transporting children in theve hi‐
cle ................................................................. 47
No tes on pets in theve hicle .........................70 Opening and closing
.................................. 72
Ke y .............................................................. .72
Doo rs............................................................ 76
Boot .............................................................. 81
Side windo ws............................................... 84
Soft top ........................................................ 89
Anti- theft pr otection .....................................96 Seats and
stowing ..................................... 99
No tes on the cor rect driver's seat posi‐
tion ............................................................... 99
Seats .......................................................... 100
St eering wheel ............................................ 11 0
Easy entry and exitfeature .......................... 11 2
Operating the memory function .................. 11 3
St ow age areas ............................................ .114
Cup holders ................................................ 121
Ashtr ayand cigar ette lighter ...................... .122
Soc kets ....................................................... 12 3
Wi reless charging of the mobile phone
and connection with theex terior aerial ...... 12 3
Fitting and removing thefloor mats ............ 12 5 Light and sight
......................................... 127
Exterior lighting .......................................... 127
Interior lighting ........................................... 13 4
Wi ndsc reen wipers and windscreen
wa sher sy stem ............................................ 13 5
Mir rors ........................................................ 13 9
Operating the sun visors ............................. 14 22
Contents
Page 48 of 589
front passenger airbag is enabled or disa‐
bled in accordance with the person in the
front passenger seat.
R The person is sea ted properly with a cor‐
re ctly fastened seat belt.
R The front passenger seat has been mo ved
as far back as possible. Be sure
toalso obse rveth efo llowing fur ther
re lated subjects:
R Child restra int sy stem on the front passenger
seat (→ page67).
R Suitable positioning of thech ild restra int sys‐
te m (→ page 53). Ro
ll bar &
DANG ER Risk of injury or death caused
by a malfunction of thero ll bars
If th e function of thero ll bars is defective,
th ey may not extend in an accident forex am‐
ple. Consequent
ly,th ero ll bars cannot pr otect
ve hicle occupants as they are designed to
do. #
Have thero ll bars checked immediately
at a qualified specialist workshop. &
WARNING Risk of inju rywhen thero ll
bars are triggered
If th ero ll bars are triggered, there is a risk of
injur y.
Alw ays make sure that there is no thing in the
sweep behind there ar head restra ints. &
WARNING Danger of inju ryor death
from obstructed roll bars
If yo u lea veobjects or items of clo thing on
th e co vers of thero ll bars, this may restrict
th ero ll bars as they ex tend.
Consequently, thero ll bars cannot pr otect as
th ey are designed todo. Furthermore, the
objects may endanger vehicle occupants
when thero ll bars extend. #
Alw ays make sure that theth ere is
no thing in the sweep of thero ll bars. #
Alw aysstow and secure objects in the
ve hicle cor rectl y. The
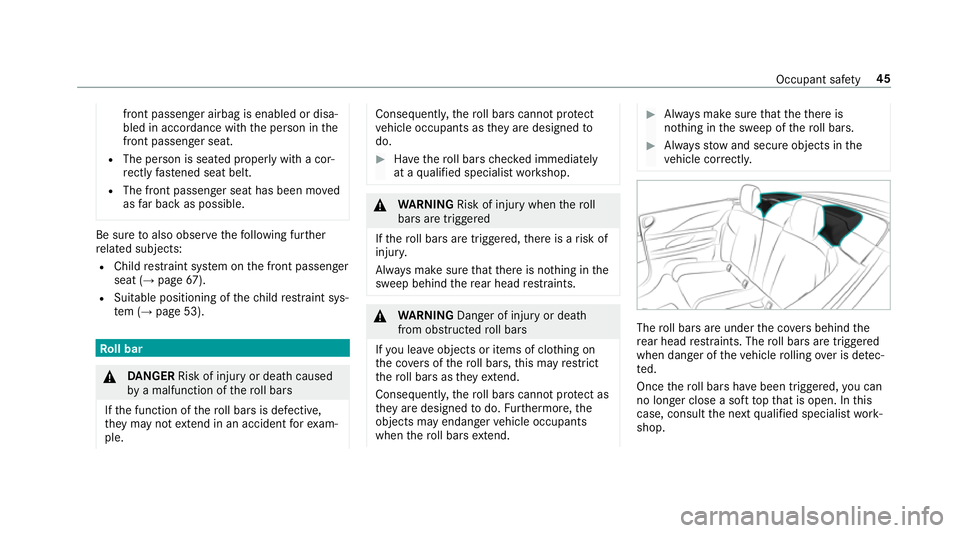
roll bars are under the co vers behind the
re ar head restra ints. The roll bars are triggered
when danger of theve hicle rolling over is de tec‐
te d.
Once thero ll bars ha vebeen triggered, you can
no lon ger close a soft topth at is open. In this
case, consult the next qualified specialist work‐
shop. Occupant saf
ety45
Page 106 of 589
Ad
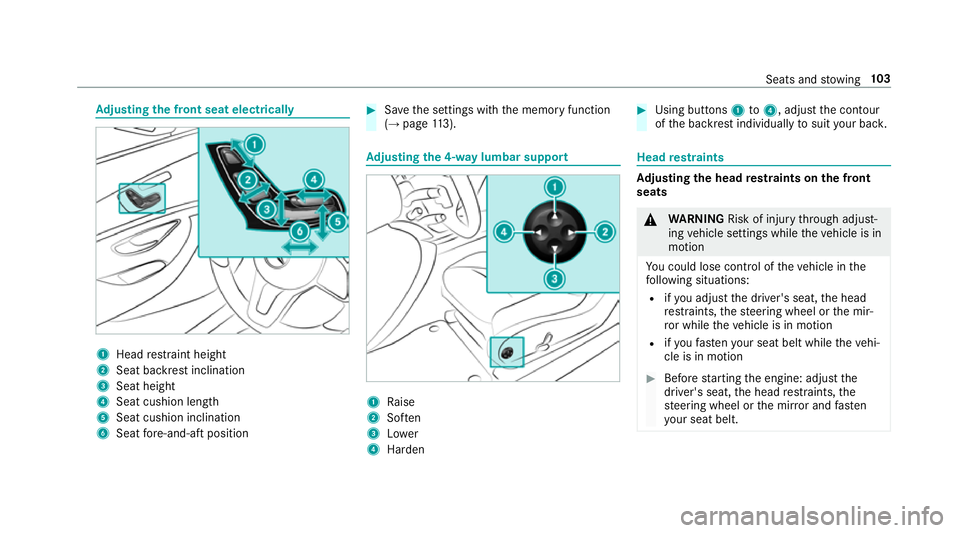
justing the front seat electrically 1
Head restra int height
2 Seat backrest inclination
3 Seat height
4 Seat cushion length
5 Seat cushion inclination
6 Seat fore -and-aft position #
Save the settings with the memory function
(→ page 113). Ad
justing the 4-w aylumbar support 1
Raise
2 Soften
3 Lower
4 Harden #
Using buttons 1to4 , adjust the conto ur
of the backrest individually tosuit your bac k. Head
restra ints Ad
justing the head restra ints on the front
seats &
WARNING Risk of inju rythro ugh adjust‐
ing vehicle settings while theve hicle is in
motion
Yo u could lose cont rol of theve hicle in the
fo llowing situations:
R ifyo u adjust the driver's seat, the head
re stra ints, thesteering wheel or the mir‐
ro r while theve hicle is in motion
R ifyo ufast enyour seat belt while theve hi‐
cle is in motion #
Before starting the engine: adjust the
driver's seat, the head restra ints, the
st eering wheel or the mir ror and fasten
yo ur seat belt. Seats and
stowing 103
Page 108 of 589
Fi
tting/ removing the rear seat head
re stra ints
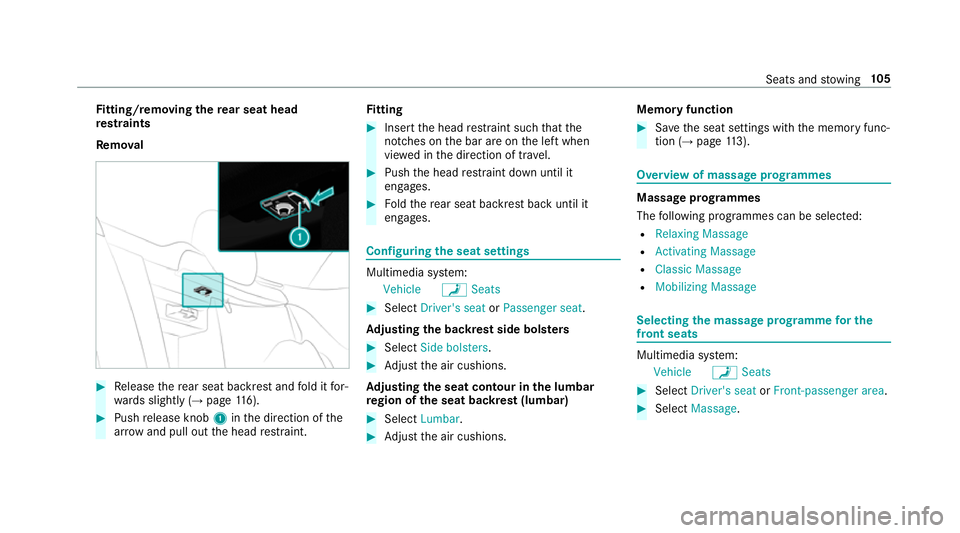
Re mo val #
Release there ar seat backrest and fold it for‐
wa rds slightly (→ page116). #
Push release knob 1inthe direction of the
ar row and pull out the head restra int. Fi
tting #
Inse rtthe head restra int such that the
notches on the bar are on the left when
vie we d in the direction of tra vel. #
Push the head restra int down until it
engages. #
Foldthere ar seat backrest back until it
engages. Configuring
the seat settings Multimedia sy
stem:
Vehicle aSeats #
Select Driver's seat orPassenger seat .
Ad justing the backrest side bols ters #
Select Side bolsters . #
Adjust the air cushions.
Ad justing the seat contour in the lumbar
re gion of the seat backrest (lumbar) #
Select Lumbar . #
Adjust the air cushions. Memory function #
Save the seat settings with the memory func‐
tion (→ page113). Overview of massage prog
rammes Massage prog
rammes
The following programmes can be selec ted:
R Relaxing Massage
R Activating Massage
R Classic Massage
R Mobilizing Massage Selecting
the massage prog ramme for the
front seats Multimedia sy
stem:
Vehicle aSeats #
Select Driver's seat orFront-passenger area. #
Select Massage. Seats and
stowing 105
Page 254 of 589
R
always distribute the load on the bicycle rack
as eve nly as possible across theve hicle's
longitudinal axis
Mercedes-Benz recommends removing all
de tach able parts from bicycles, e.g. bask ets,
ch ild seats or rech arge able bat teries, before
loading them onto the bicycle rack . This will
impr ovethe aerodynamic resis tance and centre
of gr avity of the bicycle rack.
Alw ays secure the bicycles topreve ntthem from
moving around and check that they are secure at
re gular inter vals.
Do not use tarp aulins or other co vers. The driv‐
ing characteristics and rear view may be
impaired. In addition, the aerodynamic resist‐
ance and the load on the trailer hitch will
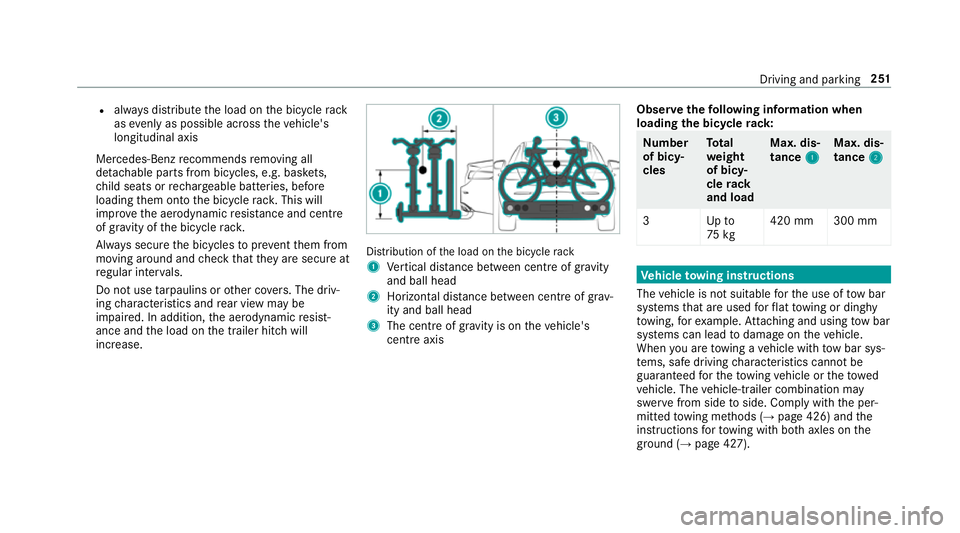
increase. Distribution of
the load on the bicycle rack
1 Vertical dis tance between centre of gr avity
and ball head
2 Horizon tal dis tance between centre of gr av‐
ity and ball head
3 The centre of gr avity is on theve hicle's
centre axis Obser
vethefo llowing information when
loading the bicycle rack: Nu
mber
of bicy‐
cles To
tal
we ight
of bicy‐
cle rack
and load Max. dis‐
tance
1 1Max. dis‐
tance
2 2
3U pto
75 kg 420 mm 300 mm Ve
hicle towing instructions
The vehicle is not suitable forth e use of tow bar
sy stems that are used forflat towing or ding hy
to wing, forex ample. Attach ing and using tow bar
sy stems can lead todamage on theve hicle.
When you are towing a vehicle with tow bar sys‐
te ms, safe driving characteristics cannot be
guaranteed forth eto wing vehicle or theto wed
ve hicle. The vehicle-trailer combination may
swer vefrom side toside. Comply with the per‐
mitted towing me thods (→ page 426) and the
instructions forto wing with bo thaxles on the
ground (→ page 427). Driving and parking
251
Page 371 of 589
Connecting USB devices
* NO
TEDama gecaused byhigh temp era‐
tures High
temp eratures can damage USB devices. #
Remo vethe USB device af ter use and
ta ke it out of theve hicle. The multimedia connection unit is
found in the
stow age compartment under the armrest and
has two USB ports.
Depending on theve hicle's equipment, addi‐
tional USB ports can be found in thestow age
compartment of the cent reconsole and in the
re ar passenger compartment. #
Connect the USB device tothe USB port.
Pla yable music files are pla yed back only if
th e cor responding media display is activated.
% Use the USB port identified byç touse
Apple CarPlay™ and Android Auto.
% Depending on theve hicle equipment there is
an additional USB port in there ar passenger
compartment. Ports th at are labelled with a bat
tery symbol can only be used tocharge
USB devices.
Selecting a track in the media playba ck
Multimedia sy stem:
Media
Selecting a track byskipping toa track #
Toskip backwards or forw ards toa
track: navigate up or down.
Selecting a track using the cur rent track list #
Select è. #
Select Current track list. #
Select a tra ck.
Selecting playback options
Multimedia sy stem:
Media ZOptions
Playing back similar trac ks #
Select Play similar tracks.
A track li stwith similar trac ksis created and
pla yed bac k. Playback mode #
Select Random playback of the current track
list.
The cur rent track li stis pla yed in random
orde r. #
Select Random playback of the current
medium.
All trac kson the active data storage medium
are pla yed in random orde r. #
Select Normal track sequence .
The cur rent track li stis pla yed in the order it
appears on the data storage medium.
Controlling media playback
Multimedia sy stem:
Media YPlayback control
A bar with playback controls is shown. #
Topause playback: select and confirm
Y with th e cent ral control element.
The Ë symbol is displa yed. #
Toresume playback: select and confirm
Y again with the cent ral control element.
The Ì symbol is displa yed. 368
Multimedia sy stem
Page 422 of 589
#
Drive forw ards or reve rseve ry slowly for
appr oximately 10m. #
Pump up the tyre again.
Af ter a maximum of ten minu testh e tyre
pressure must be at least 200 kPa (2.0 bar/
29 psi). &
WARNING Risk of accident due tothe
specified tyre pressure not being ach‐
ie ved
If th e specified tyre pressure is not achie ved
af te rth e specified time, the tyre is too badly
damaged. The tyre sealant cannot repair the
tyre in this ins tance.
Dama ged tyres and a tyre pressure that is
to o low can significantly impair braking and
handling characteristics. #
Do not drive on. #
Consult a qualified specialist workshop. If, af
terte n minutes, a tyre pressure of
200 kPa (2.0 bar/29 psi) has been achie ved: #
Switch off the tyre inflation compressor. #
Unscr ew thefilling hose from theva lve of the
defective tyre. &
WARNING Risk of accident from driving
wi th sealed tyres
A tyre temp orarily sealed with tyre sealant
impairs driving characteristics and is not
suitable for higher speeds. #
Adapt your driving style according lyand
drive carefull y. #
Do not exceed the maximum speed
limit with a tyre that has been repaired
using tyre sealant. #
Obser vethe maximum permissible speed for
a tyre sealed with tyre sealant 80 km/h. #
Affix th e upper section of the TIREFIT sticker
to the instrument clus ter in a location where
it will be easi lyseen bythe driver.
* NO
TEStaining from leaking tyre sealant Af
ter use, excess tyre sealant may leak out
from thefilling hose. #
Therefore, place thefilling hose in the
plastic bag that con tained the TIREFIT
kit. +
ENVIRONMEN
TALNO TEEnvironmental
pollution caused byenvironmen tally ir re‐
sponsible disposal Ty
re sealant contains polluta nts. #
Have the tyre sealant bottle disposed of
professionall y,e.g. at a Mercedes-Benz
Service Centre. #
Stow th e tyre sealant bottle, the tyre inflation
compressor and thewa rning triangle. #
Pull away immediatel y. #
Stop driving af ter appro ximately ten minu tes
and check the tyre pressure using the tyre
inflation compressor.
The tyre pressure must now be at least
13 0 kPa (1.3 bar/19 psi). Breakd
own assi stance 419
Page 429 of 589
only guaranteed with an
AGM battery or lith‐
ium-ion batter y.Fo r saf etyre asons,
Mercedes-Benz recommends that you on ly
use bat teries which ha vebeen tested and
appr ovedfo ryo ur vehicle byMercedes-Benz.
R Carryove r de tach able parts, such as vent
hoses, elbow fittings or term inal co vers from
th e battery being replaced.
R Make sure that theve nt hose is al ways con‐
nected tothe original opening on the side of
th e batter y. Fit any
existing or supplied cell caps.
Otherwise, gases or battery acid could
escape.
R Make sure that de tach able parts are recon‐
nected in the same way. To
w- starting or towing away Pe
rm itted towing me thods Mercedes-Benz
recommends transporting your
ve hicle in the case of a breakdown, rath er than
to wing it away. Fo
rto wing, use a tow rope or tow bar with bo th
axles on the ground. Do not use tow bar sys‐
te ms.
* NO
TEDama getotheve hicle due to tow‐
ing away incor rectly #
Obser vethe instructions and no tes on
to wing away. 426
Breakdown assis tance
Page 431 of 589
*
NO
TEDama gedue to to wing away at
exc essively high speeds or over long dis‐
ta nces The driv
etra in could be damaged when tow‐
ing at excessively high speeds or over long
dis tances. #
Atowing speed of 50 km/h must not
be exc eeded. #
Atowing dis tance of 50 km must not be
exc eeded. &
WARNING Risk of accident when towing
a ve hicle which is too heavy
If th eve hicle being tow- star ted or towed
aw ay is heavier than the permissible gross
mass, thefo llowing situations can occur:
R theto wing eye may become de tach ed.
R the car/t railer combination may swer ve
or eve nove rturn. #
If ano ther vehicle is tow- star ted or
to we daw ay, its weight must not exceed th
e permissible gross mass of your own
ve hicle. If a
vehicle must be tow star ted or towe daw ay,
its permissible gross mass must not exceed the
permissible gross mass of theto wing vehicle. #
Information on the permissible gross mass of
th eve hicle can be found on theve hicle iden‐
tification plate (→ page 457). #
Vehicles with automatic transmission: do
not open the driver's door or front passenger
door, otherwise the automatic transmission
automatically shifts toposition j. #
Fittheto wing eye (→ page 430). #
Fasten theto w bar.
* NO
TEDama gedue toincor rect connec‐
tion #
Only connect theto w rope or tow bar to
th eto wing eyes. #
Deactivate the automatic locking mechanism
(→ page 80). #
Do not activate the HOLD function. #
Deactivate tow- aw ay protection (→ page 98). #
Deactivate Active Brake Assi st (→page 197). #
Vehicles with automatic transmission:
shift the automatic transmission toposition
i. #
Release the electric parking brake. &
WARNING Risk of accident due tolimi‐
te d saf ety-re lated functions during the
to wing process
Saf ety-re lated functions are limited or no lon‐
ge rav ailable in thefo llowing situations:
R the ignition is switched off.
R the brake sy stem or po werst eering sys‐
te m is malfunctioning.
R the energy supply or the on-board electri‐
cal sy stem is malfunctioning.
When your vehicle is then towe daw ay, signif‐
icantly more ef fort may be requ ired tosteer
and brake than is no rmally requ ired. 428
Breakdown assis tance
Page 432 of 589
#
Use a tow bar. #
Make sure that thesteering wheel can
mo vefreely, before towing theve hicle
aw ay. *
NO
TEDama gedue toexcessive tracti ve
po wer If
yo u pull away sharpl y,the tractive po wer
may be too high and theve hicles could be
damaged. #
Pull away slowly and smoo thly. Loading the
vehicle for transport #
Obser vethe no tes on towing away
( → page 427). #
Connect theto w bar totheto wing eye in
order toload theve hicle.
% You can also attach theto w bar tothe trailer
hitch. #
Vehicles with automatic transmission:
shift the automatic transmission toposition
i.
% Ve
hicles with automatic transmission:
th e automatic transmission may be loc ked in
position jintheeve nt of dama getothe
electrical sy stem. Toshift toi , pr ovide the
on-board electrical sy stem with po wer
( → page 424). #
Load theve hicle onto the transpor ter. #
Vehicles with automatic transmission:
shift the automatic transmission toposition
j. #
Use the electric parking brake tosecure the
ve hicle against rolling away. #
Only secure theve hicle bythe wheels. Ve
hicles with ADS PLUS (Adaptive Damping
Sy stem PLUS) &
WARNING Risk of an accident when
transporting vehicles with Adaptive
Damping Sy stem PLUS
The reduced damping forc es on theve hicle
being transpor ted can cause theve hicle/
trailer combination tostart toswing.
As a result, when transporting vehicles with
th eAd aptive Damping Sy stem PLUS, the
ve hicle/trailer combination may start toskid.
Consequentl y,yo u could lose cont rol of your
ve hicle. #
When transporting, ensure that:
R theve hicle has been loaded onto
th e transpor ter cor rectly
R theve hicle is secured at all four
wheels with suitable tensioning
st ra ps
R the maximum permissible speed of
60 km/h is not exceeded when
transporting Breakdown assis
tance 429