check engine MERCEDES-BENZ E-CLASS COUPE 2009 Owners Manual
[x] Cancel search | Manufacturer: MERCEDES-BENZ, Model Year: 2009, Model line: E-CLASS COUPE, Model: MERCEDES-BENZ E-CLASS COUPE 2009Pages: 313, PDF Size: 7.76 MB
Page 13 of 313
J
Jack Operation ....................................... 269
Storage location ............................ 207
Jump-starting ..................................... 276
Jump leads ..................................... 276K
Key ........................................................ 62
Changing the battery .....................259
Checking the battery .....................259
Closing the soft top .......................162
Convenience closing feature ............97
Convenience opening feature ..........96
Display message ............................ 225
Loss ............................................... 248
Malfunction ................................... .247
Modifying the programming .............62
Opening the soft top ......................162
KEYLESS-GO
Button .............................................. 66
Changing the battery .....................259
Checking the battery .....................259
Convenience closing ........................97
Display message ............................ 225
Locking ............................................ 62
Malfunction ................................... .247
Starting the engine ..........................99
Unlocking ......................................... 62
Keyp ositions
Key .................................................. 65
KEYLESS GO .................................... 66
Kickdown ................................... 105, 106L
Lamps see Warning and indicator lamps
Lashing eyelets ................................. 170
Licenc eplate lighting
Display message ............................ 224
Lighting
see Lights
Lights
Active light function ...................85, 91
Automatic headlamp mode ........82, 88
Combination switch ...................80, 87Cornering light function
.............85, 92
Daytime driving lights ................82, 88
Dipped-bea mheadlamps ...........82, 88
Display message ............................ 225
Foglamps ....................... 82, 86, 88, 92
Hazard warning lamps ...............84, 91
Headlamp flasher ....................... 82, 88
Headlamp range ........................ 86, 93
Ligh tswitch ............................... 80, 87
Main-beam headlamps .............. .83, 89
Motorway mode ......................... 86, 92
Rea rfoglamp ............................. 83, 89
Switching surround lighting on/
off (on-board computer) ................. 120
Switching the daytime driving
lights on/off (on-board computer) .119
Switching the exterio rlighting
delayed switch-off on/off (on-
board computer) ............................ 120
Switching the Intelligent Light
System on/off (on-board com-
puter) ............................................. 119
Turn signals ............................... 84, 91
LIMi ndicator lamp
Cruise control ................................ 123
DISTRONI CPLUS ........................... 126
Variabl eSPEEDTRONIC .................133
Loading guidelines ............................165
Locking Automatic ........................................ 63
Emergency locking ........................250
From the insid e(central locking
button) ............................................. 64
Luggage compartment cover
Display message ............................ 216
Luggage cover
see Boot separator
Luggage net
Front-passenger footwell ...............169
Lumbar support
4-way ............................................... 6910
Index 207_AKB; 2; 3, en-GB
mkalafa,
Version: 2.11.8.1 2009-07-23T10:23:49+02:00-Seite 10
Page 38 of 313
Never tamper with electronic components
and their software.
SRS (Supplemental Restraint System)
SRS reduces the risk of occupants coming
into contact with the vehicle's interior in the
event of an accident. It can also reduce the
forces to which occupants are subjected dur-
ing an accident.
SRS consists of:
R the 0081 SRS warning lamp
R belt tensioners
R belt force limiters
R airbags
The 0081
0081 SRS warning lamp The SRS functions are checked regularly
when you turn on the ignition and when the
engine is running. Therefore, malfunctions
can be detected in good time.
The 0081 SRS warning lamp in the instrument
cluster lights up when the ignition is switched
on. It goes out no later than afew seconds
after the engine is started. G
Risk of injury
If SRS is malfunctioning, individual systems
may be activated unintentionally or not be
deployed in the event of an accident with
heavy braking.
Am alfunction has occurred if the 0081SRS
warning lamp:
R does not light up when you switch on the
ignition
R does not go out after the engine has been
running for afew seconds
R lights up again once the engine is running
In this case, have SRS checked immediately
at aq ualifieds pecialist workshop. Triggering of belt tensioners, belt force
limiters and airbags In the event of
acollision, the airbagc ontrol
unit evaluates important physical data such
as duration, direction and force of the vehicle
deceleration or acceleration. Based on the
evaluation of this data and in the event of lon-
gitudinal deceleration, in acollision, and
depending on the rate of deceleration, the
airbagc ontrol unit pre-emptively triggers the
belt tensioners in the first stage.
i The belt tensioners can only be triggered
if the belt tongue is correctly engaged in the
seat belt buckle.
The front airbags are only deployed if there is
an even higher rate of vehicle deceleration in
al ongitudinal direction.
Your vehicle has adaptive, duals tage front
airbags. When the first activation threshold is
reached, the front airbagisf illedwith enough
propellant gas to reduce the risk of injuries.
The front airbagiso nly fullydeployed if asec-
ond threshold is reached within afew milli-
seconds, due to the control unit having detec-
ted further deceleration.
Criteria for triggering belt tensioners and
airbags
In the first stage of acollision, the airbagc on-
trol unit evaluates the duration and direction
of vehicle acceleration or deceleration, in
order to determine whether it is necessary to
trigger abelt tensioner or an airbag.
The belt tensioner and airbagt riggering
thresholds are variable and are adapted to the
rate of deceleration of the vehicle. This proc-
ess is pre-emptive in nature as the airbag
must be deployed during –and not at the end
of –t he collision.
i Airbags are not deployed in all types of
accidents. They are controlled by complex
sensor technology and evaluation logic.
This process is pre-emptive in nature as
airbagd eployment must take place during
the impact and must be adapted to provide Occupant safety
35Safety
207_AKB; 2; 3, en-GB
mkalafa, Version: 2.11.8.1 2009-07-23T10:23:49+02:00-Seite 35 Z
Page 57 of 313
R
dirt on the sensor sorthe sensor sare cov-
ered
R snow or heavy rain
R interferencebyo ther radar sources
R strong radar reflections, for example in
multi-storey car parks
BASP LUS does not react to people or ani-
mals, oncoming vehicles and crossing traffic.
BASP LUS may not detec tnarro wvehicles
such as motorcycles and vehicles driving on
ad ifferen tline.
Following acollision or crash-related damage
to the fron tend of the vehicle, have the con-
figuration and operation of the radar sensors
checked at aMercedes-Benz Service Centre.
If BASP LUS is not available due to amalfunc-
tion in the radar sensor system, the braking
system remains available with full brake
boostin geffec tand BAS. Adaptive brake lamps
i Adaptiv ebrake lamps are only available in
certain countries.
If you brake sharply from aspeed of more
than 50 km/ horifb raking is assisted by BAS
or BAS PLUS* ,the brake lamp sflashr apidly.
In this way, traffic travelling behind you is
warned in an even more noticeable manner.
If you brake sharply from aspee dofm ore
than 70 km/h to astandstill, the hazard warn-
ing lamp sare activated automatically.Ift he
brakes are applieda gain, the brake lamps
light up continuously.T he hazard warning
lamp sswitch off automatically if you travel
faster than 10 km/h .You can alsos witch off
the hazard warning lamp susing the hazard
warning switch button (Y page84). ESP
®
(Electronic Stability Program)
ESP ®
monitors driving stability and traction,
i.e. power transmission between tyres and
the road surface.
If ESP ®
detects that the vehicl eisdeviating
from the direction desired by the driver, one
or more wheels are braked to stabilise the
vehicle. If necessary ,the engine outpu tisalso
modified to keep the vehicl eonthe desired
course withi nphysical limits. ESP ®
assists
the drive rwhen pulling away on wet or slip-
pery roads. ESP ®
can alsos tabilise the vehi-
cle during braking.
When ESP ®
intervenes, the 00C6warning
lamp flashes in the instrument cluster. G
Risk of accident
If the 00C6 warning lamp in the instrument
cluster flashes, proceed as follows:
R do not deactivate ESP ®
under any circum-
stances.
R only depress the accelerator peda lasfar as
necessary when pulling away.
R adapt yourd riving style to suitt he prevail-
ing road and weather conditions.
Otherwise, the vehicl ecoulds kid.
ESP ®
cannot reduce the risk of an accident if
you drive too fast. ESP ®
cannot overrid ethe
lawsofp hysics.
! If the vehicl eistobetowed with the front
or rear axle raised, the ignitio nmust be
switched off (key in position 0or 1in the
ignitio nlock). Application of the brakes by
ESP ®
coul dotherwise destroy the brake
system on the front or rear axle.
i Only use wheels with the recommended
tyre sizes. Only then willE SP®
function
properly. 54
Driving safety systemsSafety
*o
ptional
207_AKB; 2; 3, en-GB
mkalafa,
Version: 2.11.8.1 2009-07-23T10:23:49+02:00-Seite 54
Page 61 of 313
The braking action of PRE-SAFE
®
Brake is
ended automatically if:
R you manoeuvre to avoid the obstacle.
R you drive slower than approximately
15 km/h.
R there is no longer an obstacle detected in
frontofy our vehicle.
R there is no longer any danger of acollision.
Following acollision or crash-related damage
to the fronte nd of the vehicle, have the con-
figuration and operation of the radar sensors
checked. Choose aqualified specialist work-
shop for this which has the necessary spe-
cialist knowledge and tools for the work
required. Mercedes-Benz recommends that
you use aMercedes-Benz Servic eCentre for
this purpose. Anti-theft systems
Immobiliser
The immobiliser prevent syour vehicle from
being started without the correc tkey.
Activating the immobiliser X
With the key: remove the key from the
ignition lock.
X With KEYLESS GO*: press the start/stop
button on the dashboard.
The engine switches off.
Deactivating the immobiliser X
With the key: turn the key to position 2in
the ignition lock.
X With KEYLESS GO*: press the start/stop
button on the dashboard twice without
depressing the brake.
i The immobiliser is alway sdeactivated
when you start the engine. ATA* (anti-theft alarms
ystem)
Av isual and audibl ealarm is triggered when
the alarm system is primed and you open:
R ad oor
R ad oor or the boot lid with the emergency
key element
R the boot lid
R the bonnet
The alarm is not switched off even if you close
ad oor again. X
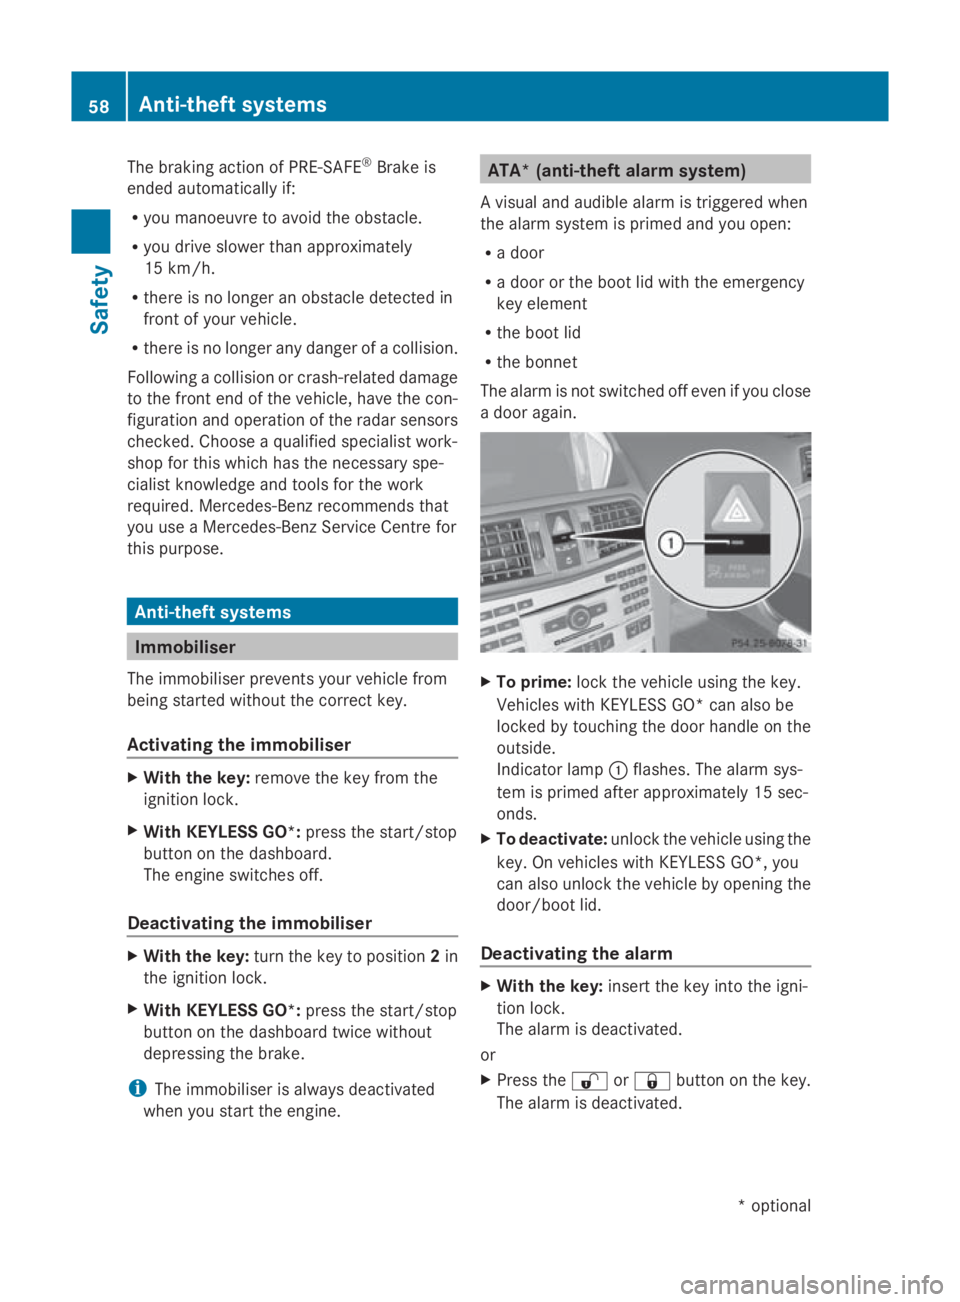
To prime: lock the vehicle using the key.
Vehicles with KEYLESS GO* can also be
locked by touchin gthe door handle on the
outside.
Indicator lamp 0046flashes. The alarm sys-
tem is primed after approximately 15 sec-
onds.
X To deactivate: unlock the vehicle using the
key. On vehicles with KEYLESS GO* ,you
can also unlock the vehicle by opening the
door/boot lid.
Deactivating the alarm X
With the key: insert the key into the igni-
tion lock.
The alarm is deactivated.
or
X Press the 0036or0037 button on the key.
The alarm is deactivated. 58
Anti-theft systemsSafety
*o
ptional
207_AKB; 2; 3, en-GB
mkalafa,
Version: 2.11.8.1 2009-07-23T10:23:49+02:00-Seite 58
Page 126 of 313
to avoi
dexceeding the se tspeed. On long and
steep downhil lgradients ,especially if the
vehicl eisladen or towing atrailer, yo umust
shift to alower gear in good tim eorselect
shift range 1,2or 3on vehicles with auto-
matic transmission* .Bydoing so ,you will
make us eofthe braking effect of the engine,
which relieves the load on the brake system
and prevents the brakes fro moverheating
and wearing too quickly. G
Ris
kofa ccident
Do not change down for additional engine
braking on aslipper yroads urface. This could
cause the drive wheels to lose their gri pand
the vehicl ecould skid.
Use cruis econtrol onl yifroada nd traffi ccon-
ditions make it appropriate to maintain a
stead yspeed foraprolonge dperiod. Youc an
store any roa dspeed above 30 km/h. G
Ris
kofa ccident
Cruise control cannot take account of road
and traffi cconditions.
Alway spayattentio ntotrafficconditions
eve nw henc ruis econtrol is activated.
Cruise control is onl yanaiddesigne dtoassist
driving. Yo uareresponsibl efor the vehicle's
spee dand for braking in good time. G
Ris
kofa ccident
Do not us ecruis econtrol:
R in roa dand traffi cconditions which do not
allo wyouto maintain aconstant spee d(e.g.
heav ytraffi corw inding roads). Yo ucould
otherwis ecause an accident.
R on slippery roads .Braking or accelerating
could cause the drive wheels to lose trac-
tio na nd the vehicl ecould the nskid.
R when there is poor visibility, e.g .due to fog,
heav yrainors now
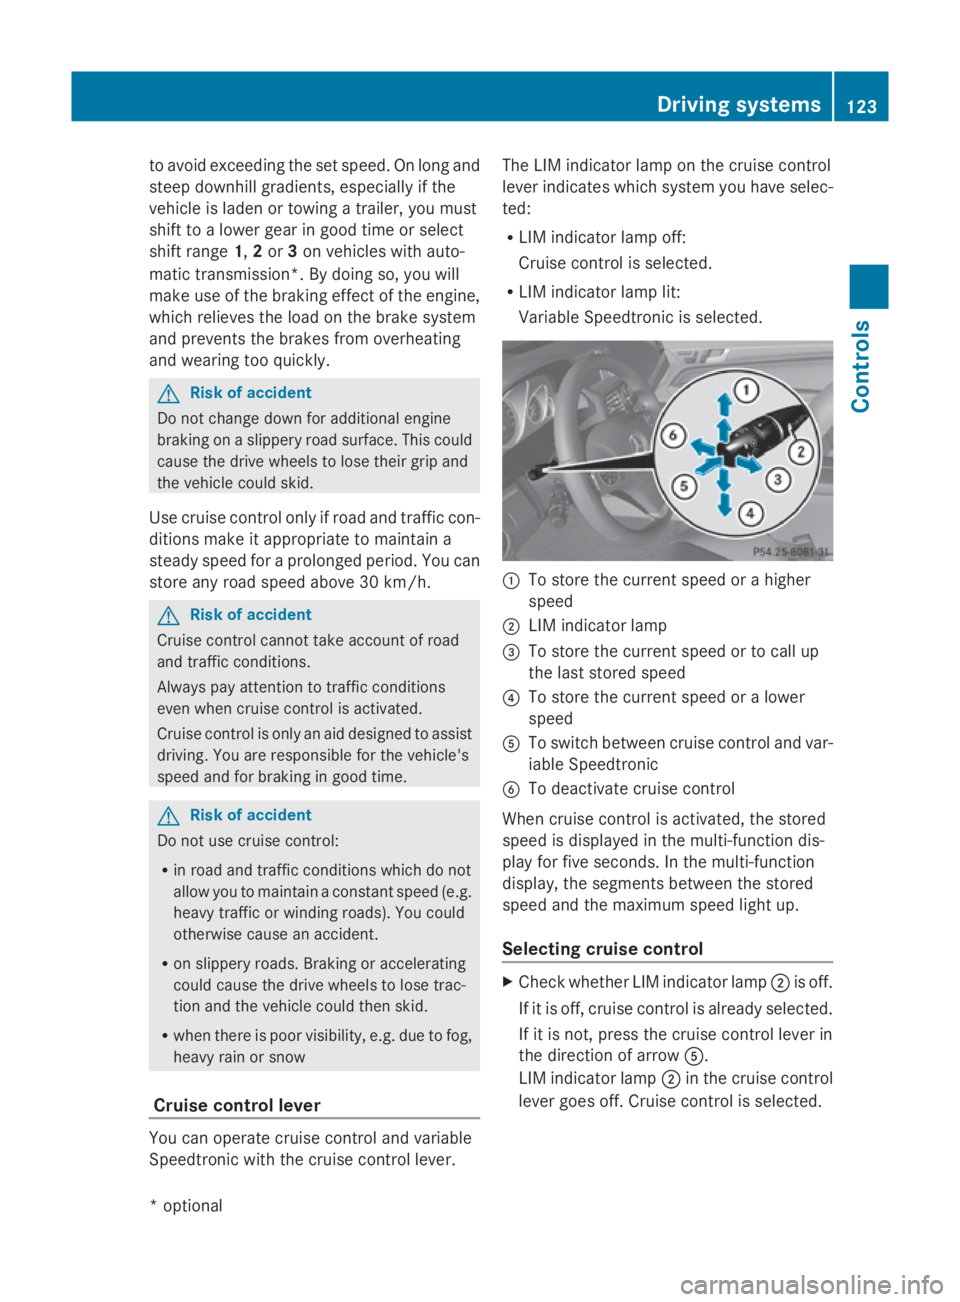
Cruis econtro llever Yo
uc an operate cruis econtrol and variable
Speedtroni cwitht he cruis econtrol lever. Th
eL IM indicator lamp on the cruis econtrol
lever indicates which syste myouhave selec-
ted:
R LIM indicator lamp off:
Cruise control is selected.
R LIM indicator lamp lit:
Variable Speedtroni ciss elect ed. 0046
To store the current spee dorahigher
speed
0047 LIM indicator lamp
008A To store the current spee dortocallup
the last stored speed
0088 To store the current spee doralower
speed
0086 To switch between cruis econtrol and var-
iabl eSpeedtronic
0087 To deactivate cruis econtrol
When cruis econtrol is activated ,the stored
spee disd isplayed in the multi-functio ndis-
play for five seconds. In the multi-function
display, the segments between the stored
spee dand the maximum spee dlight up.
Selecting cruis econtrol X
Check whether LIM indicator lamp 0047is off.
If it is off ,cruis econtrol is already selected.
If it is not, press the cruis econtrol lever in
the directio nofarrow 0086.
LIM indicator lamp 0047in the cruis econtrol
lever goes off .Cruise control is selected. Driving systems
123Controls
*optio nal
207_AKB; 2; 3, en-GB
mkalafa
,V ersion: 2.11.8.1
2009-07-23T10:23:49+02:00
-Seite 123 Z
Page 130 of 313
Selecting Distronic Plus
X
Check whether LIM indicator lamp 008Ais off.
If it is off, Distronic Plus is already selected.
If it is not, press the cruise control lever in
the direction of arrow 0087.
LIM indicator lamp 008Ain the cruise control
lever goes off. Distronic Plus is selected.
Switching on Distronic, storing the cur-
rent speed and maintaining it G
Risk of accident
The vehicle can be braked when DISTRONIC
PLUS is activated. For this reason, deactivate
DISTRONIC PLUS if the vehicle is to be set in
motion by other means (e.g. in acar wash or
by towing).
You can activate Distronic Plus in the follow-
ing circumstances:
R after the engine has been running for about
two minutes
R if the parking brake is not applied
R if ESP ®
is activated
R if the automatic transmission* is in position
D
R if the bonnet is closed
R if the driver's door is closed and you switch
from Pto Dor your seat belt is fastened.
R if the front-passenger door is closed
Activating while driving
When driving at speeds below 30 km/h, you
can only activate Distronic Plus if the vehicle
in front has been detected and is shown in the
multi-function display.Ift he vehicle in front is
not shown in the multi-function display and is
no longer being detected, because it has
changed lanes, for example, Distronic Plus is
deactivated and atone sounds. X
Briefly pull the cruise control lever towards
you 0088or press it up 0046or down 0086to the
pressure point.
Distronic Plus is selected.
X Keep the cruise control lever pressed
up 0046 or down 0086until the desired speed
is set.
X Remove your foot from the accelerator
pedal.
Your vehicle adapts its speed to that of the
vehicle in front,b ut only up to the stored
speed.
i If you do not fully release the accelerator
pedal, the DISTRONIC PLUS suspended
message appears in the multi-function dis-
play.T he set distance to aslower-moving
vehicle in front will then not be maintained.
You will be driving at the speed you deter-
mine by the position of the accelerator
pedal.
Activating when driving towards asta-
tionary vehicle
If the vehicle in front of you is stationary, you
can only activate Distronic Plus once your
vehicle is stationary as well.
X Briefly pull the cruise control lever towards
you 0088.
Distronic Plus is selected.
i Distronic Plus can only be activated at
under 30 km/hi favehicle in front has been
detected. Therefore, the Distronic Plu sdis-
tance displayint he instrument cluster
should be activated.
X Keep the cruis econtrol leve rpressed
up 0046 or down 0086until the desired speed
is set.
i You can use the cruis econtrol leve rtoset
the stored spee dand the thumbwheel on
the cruis econtrol leve rtoset the specified
minimu mdistance (Y page129). Driving systems
127Controls
*optional
207_AKB; 2; 3, en-GB
mkalafa,
Version: 2.11.8.1 2009-07-23T10:23:49+02:00-Seite 127 Z
Page 137 of 313
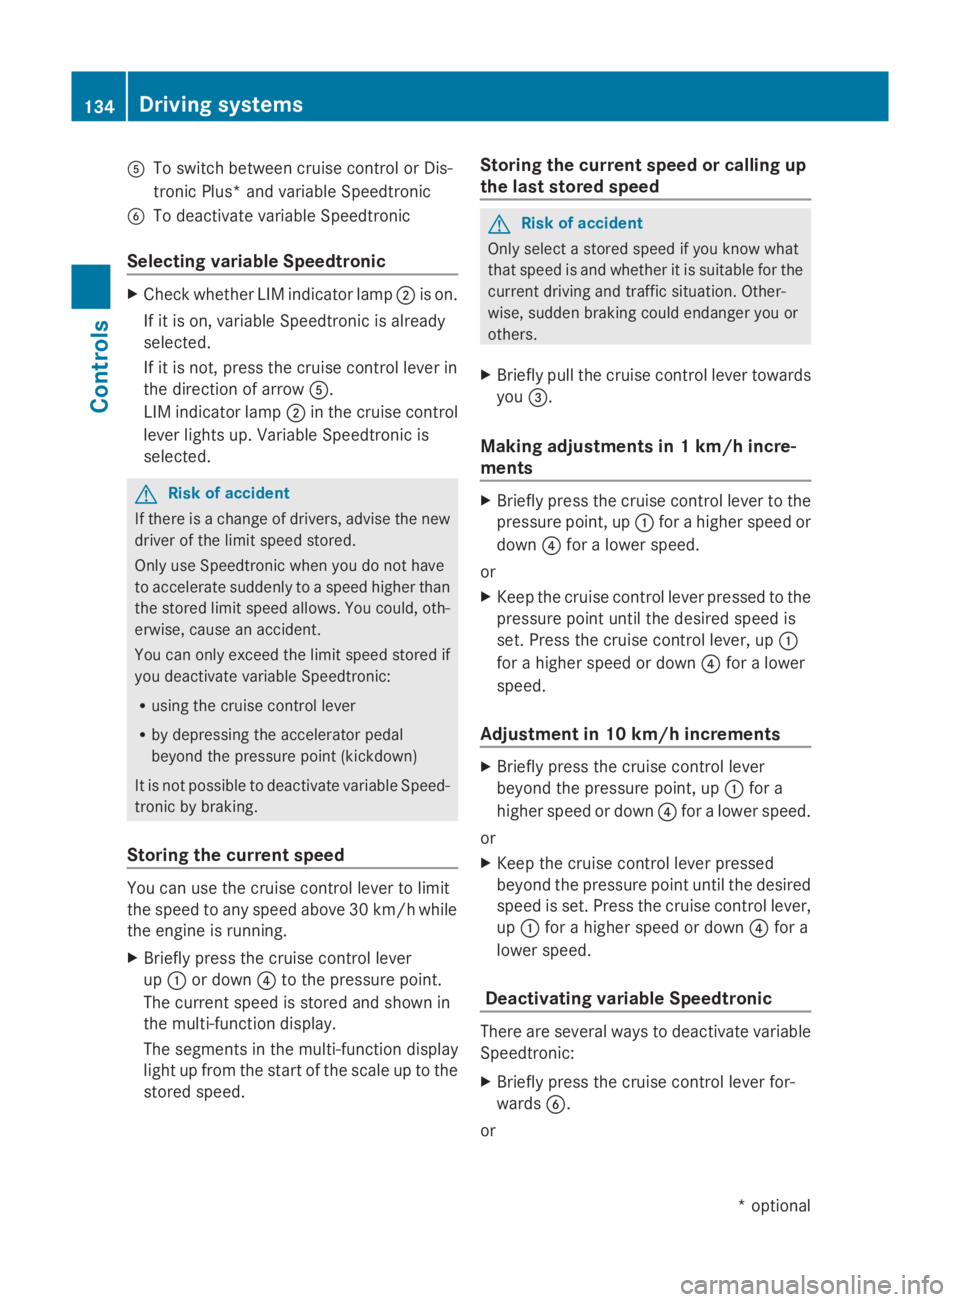
0086
To switch between cruise control or Dis-
tronic Plus* and variable Speedtronic
0087 To deactivate variable Speedtronic
Selecting variable Speedtronic X
Check whether LIM indicator lamp 0047is on.
If it is on, variable Speedtronic is already
selected.
If it is not,p ress the cruise control lever in
the direction of arrow 0086.
LIM indicator lamp 0047in the cruise control
lever lights up. Variable Speedtronic is
selected. G
Risk of accident
If there is achange of drivers, advise the new
driver of the limit speed stored.
Only use Speedtronic when you do not have
to accelerate suddenly to aspeed higher than
the stored limit speed allows. You could, oth-
erwise, cause an accident.
You can only exceed the limit speed stored if
you deactivate variable Speedtronic:
R using the cruise control lever
R by depressing the accelerator pedal
beyond the pressure point (kickdown)
It is not possible to deactivate variable Speed-
tronic by braking.
Storing the current speed You can use the cruise control lever to limit
the speed to any speed above 30 km/hw
hile
the engine is running.
X Briefly press the cruise control lever
up 0046 or down 0088to the pressure point.
The current speed is stored and shown in
the multi-function display.
The segments in the multi-function display
light up from the start of the scale up to the
stored speed. Storing the current speed or calling up
the last stored speed G
Risk of accident
Only select astored speed if you know what
that speed is and whether it is suitable for the
current driving and traffic situation. Other-
wise, sudden braking could endanger you or
others.
X Briefly pull the cruise control lever towards
you 008A.
Making adjustments in 1km/h incre-
ments X
Briefly press the cruise control lever to the
pressure point, up 0046for ahigher speed or
down 0088for alower speed.
or
X Keep the cruise control lever pressed to the
pressure point until the desired speed is
set. Press the cruise control lever, up 0046
for ahigher speed or down 0088for alower
speed.
Adjustment in 10 km/h increments X
Briefly press the cruise control lever
beyond the pressure point, up 0046for a
higher speed or down 0088for alower speed.
or
X Keep the cruise control lever pressed
beyond the pressure point until the desired
speed is set. Press the cruise control lever,
up 0046 for ahigher speed or down 0088for a
lower speed.
Deactivating variable Speedtronic There are several waystod
eactivate variable
Speedtronic:
X Briefly press the cruise control lever for-
wards 0087.
or 134
Driving systemsControls
*o
ptional
207_AKB; 2; 3, en-GB
mkalafa,
Version: 2.11.8.1 2009-07-23T10:23:49+02:00-Seite 134
Page 185 of 313
X
Lower the bonnet and let it fall from a
heightofa pproximately 20 cm.
X Check that the bonnet has engage dprop-
erly.
i If the bonnet can be raiseds lightly, it is
not properl yengaged. Open it again and
close it with alittle more force. Engine oil
Depending on driving style, the vehicle con-
sumes up to 0.8 loil per 1,000 km. The oil
consumption may be highert han this when
the vehicle is new or if you frequently drive at
high engine speeds.
Checking the engine oil level Before checking the engine oil level the fol-
lowing conditions for the vehicle shouldbe
met:
R
the vehicle shouldbep arked on level
ground.
R the engine shouldbes witched off for at
least five minutes if the engine is at normal
operating temperature.
R the engine shouldbes witched off for at
least 30 minutes if the engine is not at
operating temperature (i.e. if you only start
the engine briefly).
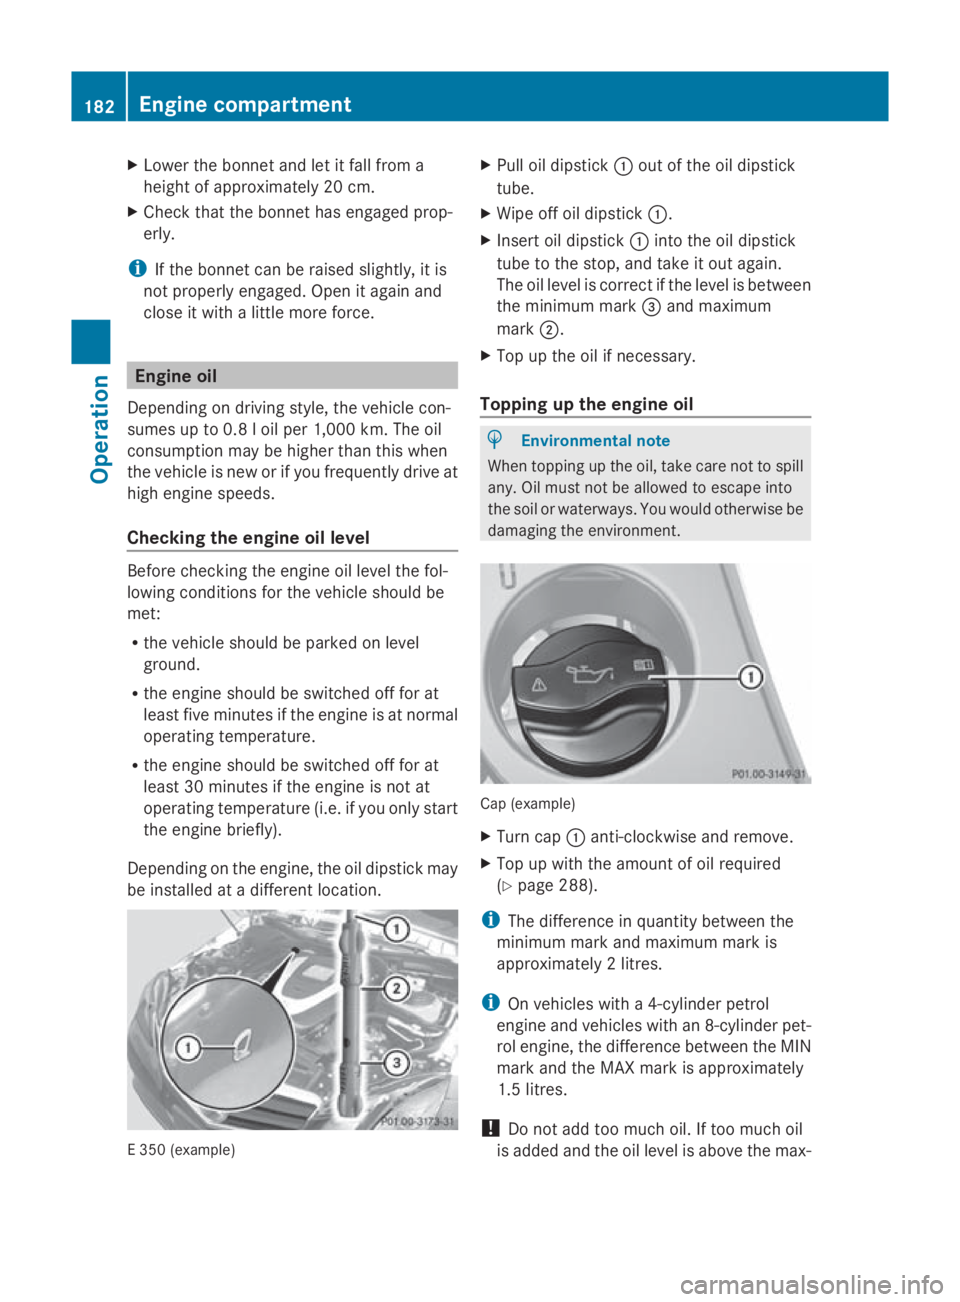
Depending on the engine, the oil dipstick may
be installed at adifferent location. E3
50 (example) X
Pullo il dipstick 0046out of the oil dipstick
tube.
X Wipe off oil dipstick 0046.
X Insert oil dipstick 0046into the oil dipstick
tube to the stop, and take it out again.
The oil level is correct if the level is between
the minimum mark 008Aand maximum
mark 0047.
X Top up the oil if necessary.
Topping up the engine oil H
Environmental note
When topping up the oil, take care not to spill
any. Oil must not be allowed to escape into
the soil or waterways. You would otherwis ebe
damaging the environment. Cap (example)
X Turn cap 0046anti-clockwise and remove.
X Top up with the amount of oil required
(Y page 288).
i The difference in quantity betwee nthe
minimum mark and maximu mmark is
approximately 2litres.
i On vehicle switha4-cylinder petrol
engine and vehicle swith an 8-cylinder pet-
rol engine, the difference betwee nthe MIN
mark and the MAX mark is approximately
1.5 litres.
! Do not add too much oil. If too much oil
is added and the oil level is above the max- 182
Engine compartmentOperation
207_AKB; 2; 3, en-GB
mkalafa
,V ersion: 2.11.8.1
2009-07-23T10:23:49+02:00
-Seite 182
Page 186 of 313
imum mark on the dipstick
,the engine or
catalytic converter could be damaged.
Have excess oil siphoned off.
X Replace cap 0046on the filler nec kand
tighten clockwise.
Ensure that the cap lock sintop lace
securely.
For further information on engine oil, see
(Y page 288). Coolant
Only chec kthe coolan tlevel when the vehicle
is on alevel surface and the engine has cooled
down.
X Turn the key to position 2(Y page 65) in
the ignition lock.
X Check the coolan ttemperature gauge in
the instrumen tcluster. G
Risk of injury
The cooling system is pressurised. Therefore,
only unscrew the cap onc ethe engine has
coole ddown. The coolan ttemperature gauge
must display less than 70 †. Otherwise, you
could be scalde difhot coolan tescapes.
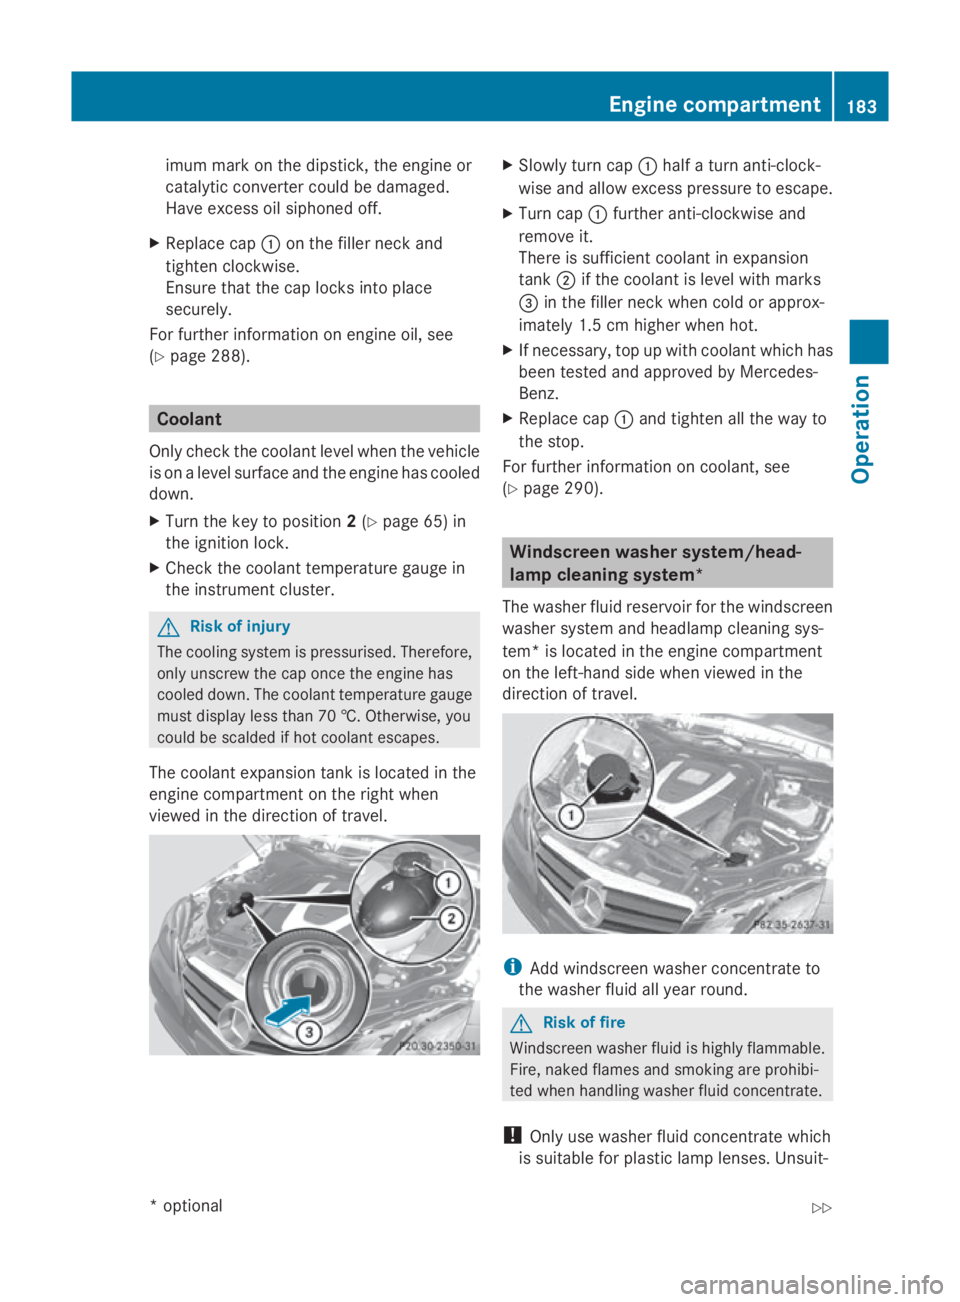
The coolan texpansion tan kislocated in the
engine compartmen tonthe right when
viewed in the direction of travel. X
Slowly tur ncap 0046 half aturna nti-clock-
wise and allow excess pressure to escape.
X Turn cap 0046further anti-clockwise and
remove it.
There is sufficien tcoolan tinexpansion
tank 0047if the coolan tislevel with marks
008A in the filler nec kwhen cold or approx-
imately 1. 5cmhigher when hot.
X If necessary, top up with coolan twhich has
been tested and approved by Mercedes-
Benz.
X Replace cap 0046and tighten all the way to
the stop.
For further information on coolant, see
(Y page 290). Windscreen washer system/head-
lam
pcleaning system*
The washer fluid reservoir for the windscreen
washer system and headlamp cleaning sys-
tem *isl ocated in the engine compartment
on the left-han dside when viewed in the
direction of travel. i
Add windscreen washer concentrate to
the washer fluid all year round. G
Risk of fire
Windscreen washer fluid is highly flammable.
Fire ,naked flames and smoking are prohibi-
ted when handlin gwasher fluid concentrate.
! Only use washer fluid concentrate which
is suitable for plastic lamp lenses. Unsuit- Engine compartment
183Operation
*optional
207_AKB; 2; 3, en-GB
mkalafa,
Version: 2.11.8.1
2009-07-23T10:23:49+02:0
0-Seite1 83 Z
Page 193 of 313
Once you have fitted the winter tyres:
X
Check the tyre pressures (Y page 186).
X Restart the tyre pressure loss warning sys-
tem (Y page 187). G
Risk of accident
If you fit the spare wheel* when driving with
winter tyres, bear in mind that driving stability
will be impaired owing to unstable cornering
characteristics caused by the different tyres.
You should therefore adapty our driving style
and drive carefully.
Have the spare wheel* replaced at the near-
est qualified specialist workshop which has
the necessary specialist knowledge and tools
to carry out the work required. Mercedes-
Benz recommends that you use aMercedes-
Benz Service Centre for this purpose. In par-
ticular, work relevant to safety or on safety-
related systems must be carried out at aquali-
fied specialist workshop. Snow chains
For safety reasons, Mercedes-Benz recom-
mends that you only use snow chains which
have been speciallya pproved for your vehicle
by Mercedes-Benz,ora re ofacorresponding
standard of quality.
If you intend to fit snow chains, pleaseb ear
the following points in mind:
R you may not attach snow chains to all
wheel-tyre combinations; see the "Tyres
and wheels" section in the "Technical data"
chapter.
R snow chains must not be fitted to emer-
gency spare wheels, e.g. a"Minispare"
emergency spare wheel.
R Fit snow chains only in pairs and only to the
rear wheels. Comply with the manufactur-
er's installation instructions.
Do not exceed the maximum permissible
speed of 50 km/h.
i You may wish to deactivate ESP ®
when
pulling awayw ith snow chains fitted (Y
page 54). This way,y ou can allowthe
wheels to spin in acontrolled manner, ach-
ieving an increased driving force (cutting
action). Winter driving
G
Risk of accident
Do not shift down for additional engine brak-
ing on aslippery road surface. This could
cause the drive wheels to lose their grip and
the vehicle could skid.
You should drive particularly carefully on slip-
pery road surfaces. Avoid sudden accelera-
tion, steering and braking manoeuvres.
If the vehicle threatens to skid or cannot be
stopped when moving at low speed:
X Vehicles with manual transmission: engage
neutral.
X Vehicles with automatic transmission*:
shift the selector lever to N.
X Try to bring the vehicle under control by
using corrective steering. Driving tips
Rolling with the engines
witchedoff G
Risk of accident
Never switch the engine off while the vehicle
is in motion.
There is no power assistance for the steering
and the service brake when the engine is not
running.
You will require considerably more effort to
steer and brake and you could therefore lose
control of the vehicle and cause an accident. 190
Driving tipsOperation
*o
ptional
207_AKB;2;3,e
n-GB
mkalafa, Version: 2.11.8.1 2009-07-23T10:23:49+02:00-Seite 190