seat adjustment MERCEDES-BENZ E-CLASS COUPE 2009 Owners Manual
[x] Cancel search | Manufacturer: MERCEDES-BENZ, Model Year: 2009, Model line: E-CLASS COUPE, Model: MERCEDES-BENZ E-CLASS COUPE 2009Pages: 313, PDF Size: 7.76 MB
Page 16 of 313
Restraint system
For childre n..................................... 42
See SRS .......................................... 35
Rev counter ........................................ 107
Reverse gear Engaging (manual transmission) ....102
Reversing camera ............................. 143
Cleaning ......................................... 202
Reversing lamps
Display message ............................ 224
Roll bar ................................................ 41
Display message ............................ 229
Roller blind
see Roller sunblind
Roller sunblind
Panorama sliding sunroo f.............. 159
Rea rwindow .................................. 173
Roof
see Soft top
Roof carrier ....................................... 171
Roof load (maximum) ........................291
Route see Route guidance .......................112
Route guidance
On-board computer .......................112 S
Seat Adjusting ............................. 66, 67, 68
Correct driver's sea tposition ........... 80
Storing settings ............................... 75
Seat belt
Adjusting the driver's and front-
passenger sea tbelt. ........................ 79
Display message ......................79, 216
Fault .............................................. 239
Switching bel tadjustment on/off
(on-board computer) ......................121
Seat belts
Fastening ......................................... 76
Warning lamp ........................... 79, 236
Seat covers
Cleaning ......................................... 204
Seat heating ........................................ .71
Seat ventilation ................................... 71
Malfunction indicator lamp ............230
Securing aload .................................. 170Selector lever
Display message ............................ 209
Sensors
Cleaning ......................................... 202
Service indicator
see Service interva ldispla y........... 197
Service products ............................... 287
Brake fluid .................................... 290
Coolant .......................................... 290
Engine oil ....................................... 288
Fuel ................................................ 287
Windscreen washer fluid ................291
Settings
Calling up astored setting ...............75
Factory (on-board computer) .........122
On-board computer .......................117
Shift ranges ....................................... 103
Sidebag ................................................ 39
Side windows Convenience closing ........................97
Convenience opening ......................96
Fault .............................................. 245
Opening/closing .............................. 94
Ski rack .............................................. 171
Sliding sunroof see Panorama sliding sunroof
Sno wchains ...................................... 190
Socket Cockpi t.......................................... 174
Rea rcompartment ......................... 174
Soft top .............................................. 160
AIRCAP .......................................... 164
Boot separator ............................... 162
Closing (key )................................. 162
Closing (switch) ............................. 161
Closing manually in an emergency .250
Display message ............................ 229
Draught stop .................................. 163
Fitting/removing the AIRCAP
draugh tstop .................................. 258
Malfunction ................................... .245
Opening (key )................................ 162
Opening (switch) ............................ 161
Re-locking ...................................... 162
Soft-top switch .................................. 161 Index
13 207_AKB; 2; 3, en-GB
mkalafa,
Version: 2.11.8.1 2009-07-23T10:23:49+02:00-Seite 13
Page 70 of 313
childre
nshoul dnever be left unsupervised in
the vehicle .The yc ould become trapped when
adjusting aseat G
Risk of accident
Only adjust the driver' sseatw hent he vehicle
is stationary. You will otherwise be distracted
from the roa dand traffi cconditions and you
could los econtrol of the vehicle as aresult of
the sea tmoving. Thi scould cause an acci-
dent. G
Risk of injury
Make sure that nobody can become trapped
whe nyou adjust the seat.
Observe the notes concerning the airba gsys-
tem.
Secure childre nasrecommended; see the
"Childre ninthe vehicle "section. G
Risk of injury
Make sure that the centra lareaoft he head
restraint supports the back of your hea dat
abou teye level .You could seriously injure
your neck if your hea disnot correctly sup-
ported by the hea drestraint in the event of an
accident. Neve rtrave lwithou tac orrectly
adjuste dand engaged hea drestraint.
! Whe nyou move the seats, make sure that
there are no objects in the footwel lor
behind the seats. Otherwise, yo ucould
damag ethe seats and the objects.
i The hea drestraints in the front seats are
fitted with the NECK-PR Osystem
(Y page 41). For this reason, it is not pos-
sible to remove the hea drestraints from
the front seats.
Pleas econtact aMercedes-Benz Service
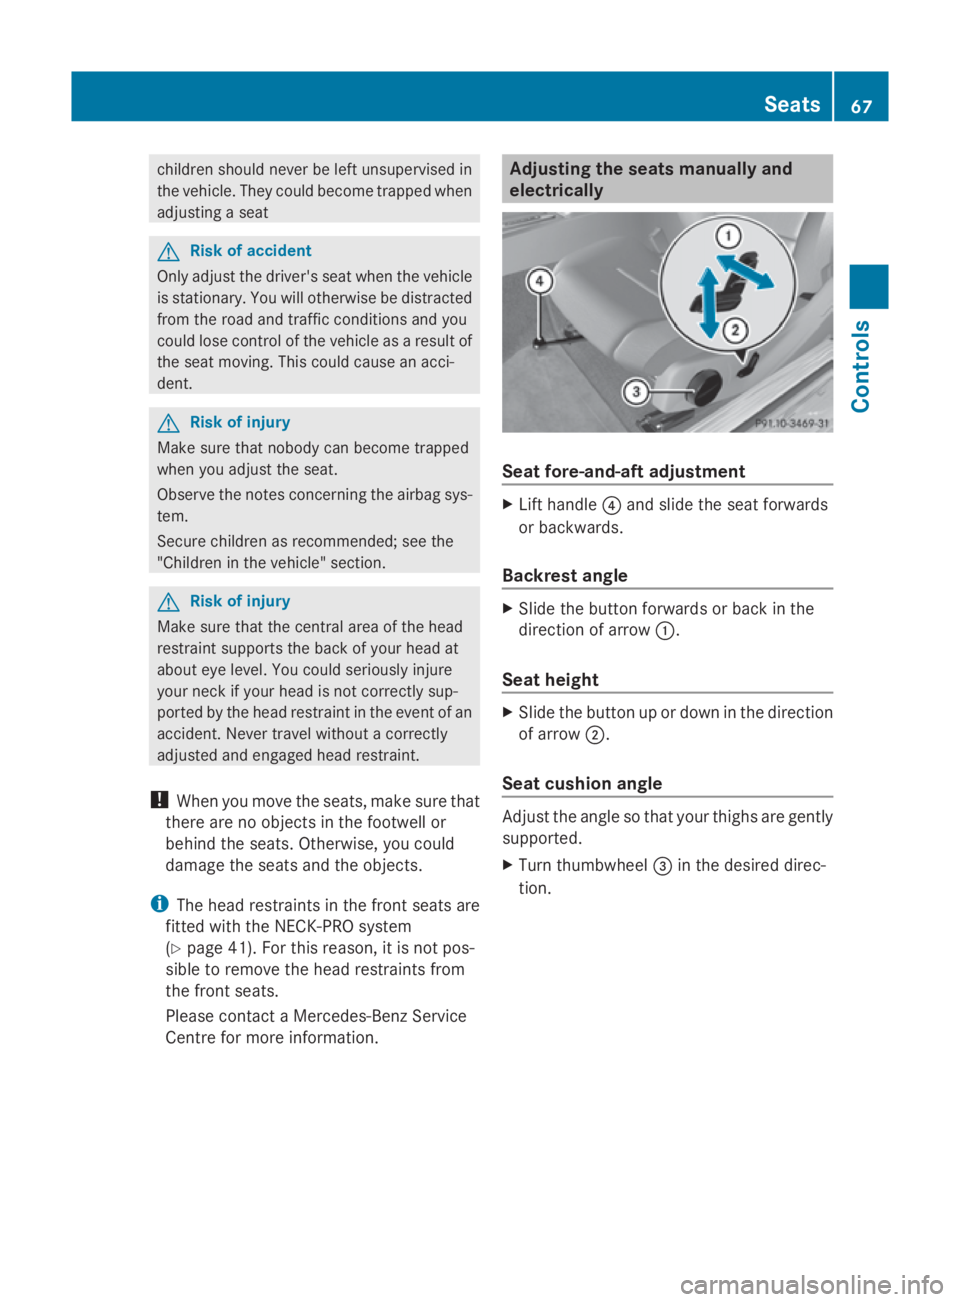
Centre for more information. Adjusting the seats manually and
electrically
Seat fore-and-aft adjustment
X
Lift handle 0088and slide the sea tforwards
or backwards.
Backrest angle X
Slide the button forward sorbackint he
direction of arrow 0046.
Seat height X
Slide the button up or dow ninthe direction
of arrow 0047.
Seat cushio nangle Adjus
tthe angl esothat your thighs are gently
supported.
X Turn thumbwheel 008Ain the desire ddirec-
tion. Seats
67Controls
207_AKB;2;3,en-GB
mkalafa ,V ersion: 2.11.8.1
2009-07-23T10:23:49+02:00
-Seite 67 Z
Page 71 of 313
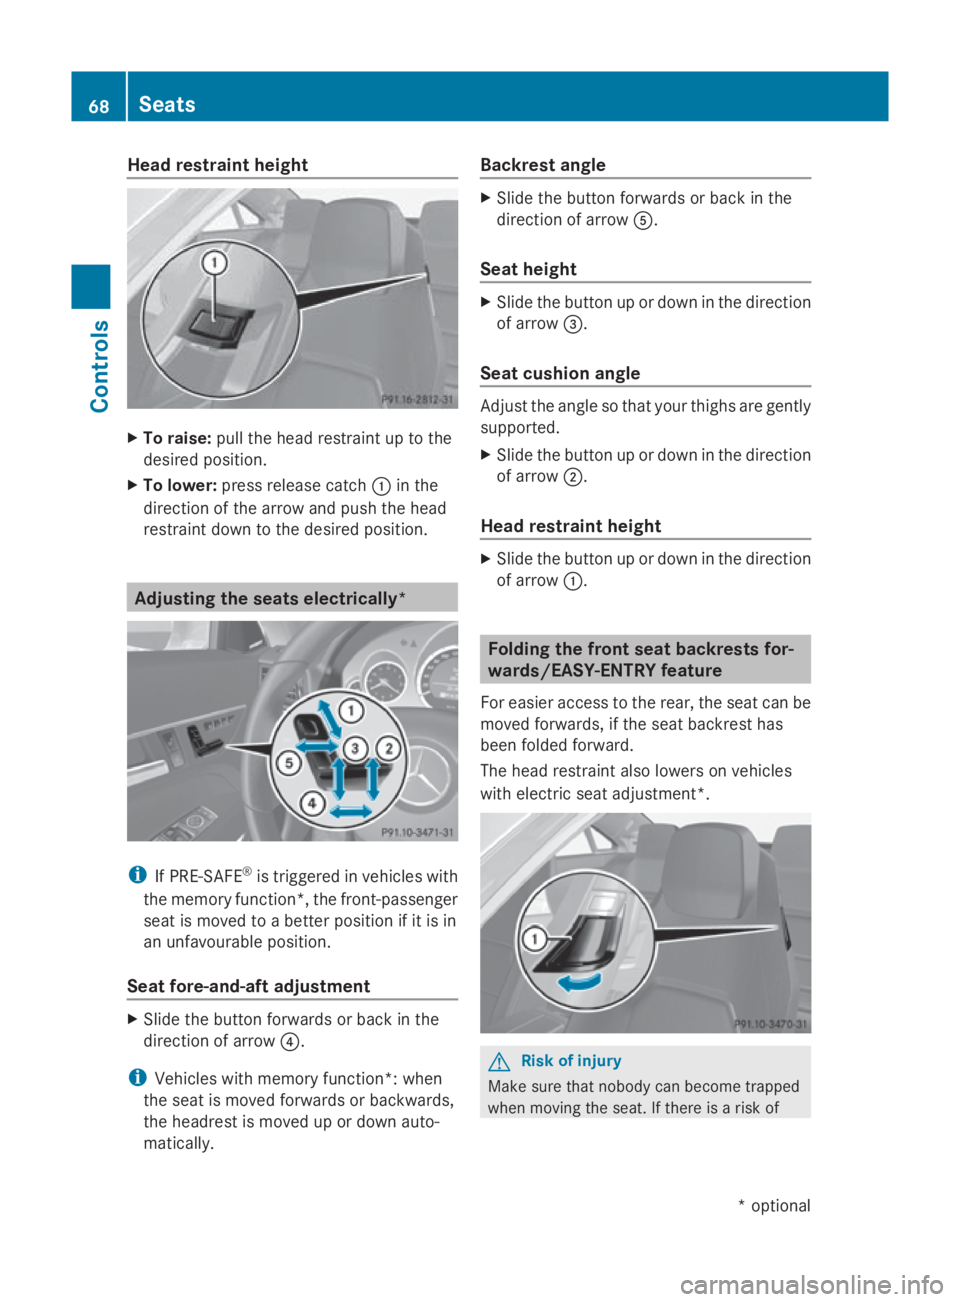
Head restraint height
X
To raise: pullthe headr estraint up to the
desired position.
X To lower: press release catch 0046in the
direction of the arrow and pusht he head
restraint downtot he desired position.Adjusting the seats electrically*
i
If PRE-SAFE ®
is triggere dinvehicles with
the memory function*, the front-passenger
seatism oved toabetter position if it is in
an unfavourable position.
Seat fore-and-aft adjustment X
Slid ethe button forwards or back in the
direction of arrow 0088.
i Vehicles with memory function*: when
the seatism oved forwards or backwards,
the headrest is moved up or downa uto-
matically. Backrest angle X
Slid ethe button forwards or back in the
direction of arrow 0086.
Seat height X
Slid ethe button up or downint he direction
of arrow 008A.
Seat cushion angle Adjust the angle so that yourt
highs are gently
supported.
X Slid ethe button up or downint he direction
of arrow 0047.
Head restraint height X
Slid ethe button up or downint he direction
of arrow 0046. Folding the front seat backrests for-
wards/EASY-ENTRY feature
For easier access to the rear, the seatc an be
moved forwards, if the seatb ackrest has
been folde dforward.
The headr estraint alsol owers on vehicles
with electric seata djustment*. G
Risk of injury
Make sure that nobody can become trapped
when moving the seat. If there is arisk of 68
SeatsControls
*o
ptional
207_AKB; 2; 3, en-GB
mkalafa,
Version: 2.11.8.1 2009-07-23T10:23:49+02:00-Seite 68
Page 72 of 313
someone becoming trapped, press the seat
adjustment switch on the door.
Folding the backrest forwards X
Vehicles without the memory func-
tion*: if necessary, release the head
restraint and push it down.
X Pull seat release handle 0046forwards and
fold the backrest forwards, until the seat
backrest engages.
X Push the seat as far forwards as it will go.
X Vehicles with the memory function*:
pull seat release handle 0046forwards and
fold the backrest forwards as far as it will
go.
The seat moves automaticallytot he fore-
most position.
Folding back the backrest X
Vehicles without the memory func-
tion*: push the seat backrest back hori-
zontally until the seat reaches the position
that was previouslys et.
X Swing back the seat backrest evenly below
release handle 0046until it engages, doing so
in as mooth manner.
X If the head restraint has been moved, check
the position of the head restraint and set it
to the correct position after the seat back-
rest has been folded back.
X Vehicles with the memory function*:
swing back the seat backrest.
The seat moves automaticallytot he stored
position. G
Risk of injury
Make sure that the backrest engages fully.If
the seat backrest is not engaged, the mes-
sage Front right seat backrest not
locked orFront left seat backrest
not locked appears in the multi-function dis-
play.S top the vehicle as soon as road and
traffic conditions permit and remove any
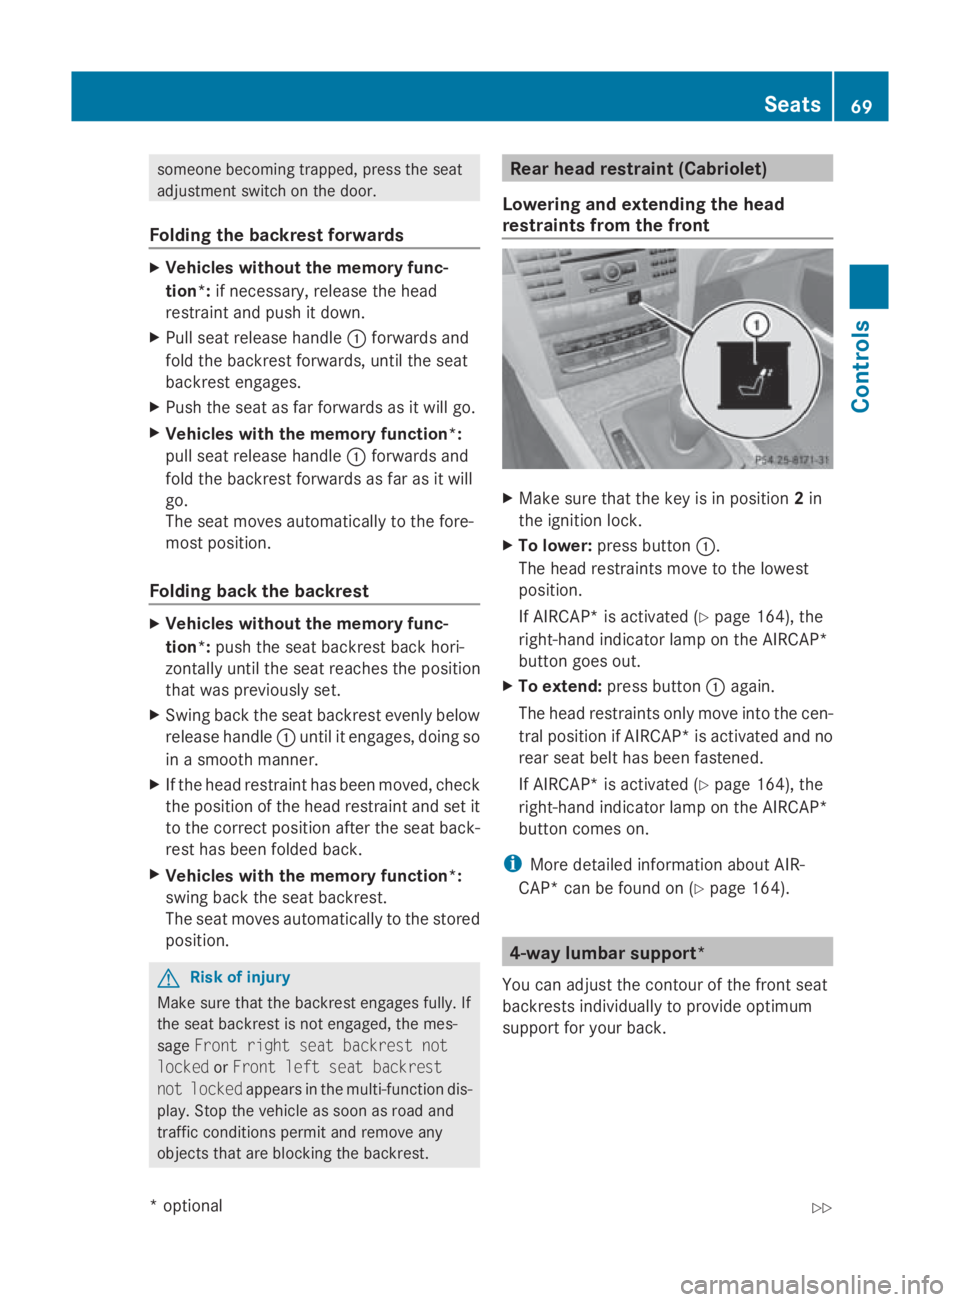
objects that are blocking the backrest. Rear head restraint (Cabriolet)
Lowering and extending the head
restraints from the front X
Make sure that the key is in position 2in
the ignition lock.
X To lower: press button 0046.
The head restraints move to the lowest
position.
If AIRCAP* is activated (Y page 164), the
right-hand indicator lamp on the AIRCAP*
button goes out.
X To extend: press button 0046again.
The head restraints only move into the cen-
tral position if AIRCAP* is activated and no
rear seat belt has been fastened.
If AIRCAP* is activated (Y page 164), the
right-hand indicator lamp on the AIRCAP*
button comes on.
i More detailed information aboutA IR-
CAP* can be found on (Y page 164). 4-way lumbar support*
You can adjust the contour of the front seat
backrests individually to provide optimum
support for your back. Seats
69Controls
*optional
207_AKB;2;3,e
n-GB
mkalafa, Version: 2.11.8.1 2009-07-23T10:23:49+02:00-Seite 69 Z
Page 79 of 313
X
Make sure that the vehicle is stationary and
that the key is in position 2in the ignition
lock.
X Press button 0047for the exterior mirror on
the front-passenger side.
X Engage reverse gear.
The exterior mirror on the front-passenger
side moves to the preset parking position.
X Use adjustment button 008Ato adjust the
exterior mirror to aposition which allows
you to see the rear wheel and the kerb.
The parking position is stored.
i If you shift the automatic transmission
into another gear, the exterior mirror on the
front-passenger side returns to the driving
position.
i You can also store the parking position
using the memory button M0088:
X With the key in position 2in the igni-
tion lock and with the exterior mirror
on the front-passenger side activated,
use adjustment button 008Ato set the
exterior mirror such that the rear
wheel and kerb are visible.
X Press memory button M0088 and one of
the arrows on adjustment button 008A
within three seconds.
The parking position is stored if the
exterior mirror does not move.
If the mirror moves out of position, repeat
the steps.
Calling up the parking position X
When the key is in position 2in the ignition
lock and the exterior mirror on the front-
passenger side is activated, engage
reverse gear.
The exterior mirror on the front-passenger
side moves to the stored parking position.
The exterior mirror on the front-passenger
side moves back to its original position: R
as soon as you exceed aspeed of
10 km/h
R about ten seconds after you have disen-
gaged reverse gear
R if you press button 0046for the exterior mir-
ror on the driver's side Seat belts
Wearing seat belts
Seat belts are the most effective means of
restraining the movement of vehicle occu-
pants in the event of an accident. This
reduces the risk of vehicle occupants coming
into contact with the vehicle interior. G
Risk of injury
As eat belt which is not worn correctly, or
which has not been engaged in the seat belt
buckle correctly, cannot perform its intended
protective function. Under certain circum-
stances, this could result in severe or even
fatal injuries.
Make sure that all occupants –inparticular,
pregnant women –wear their seat belt cor-
rectly at all times.
R The seat belt must fit snugly on your body
and must not be twisted. Therefore, you
should avoid wearing bulky clothing (e.g. a
winter coat). The shoulder belt section
must be routed across the centre of your
shoulder –onnoaccount across your neck
or under your arm –and pulled tight against
your upper body. The lap belt must always
pass across your lap as low down as possi-
ble, i.e. over your hip joints–n ot across
your abdomen. If necessary, push down the
belt strap slightly and then retighten it in
the roll-up direction.
R Do not route the belt strap across sharp
edges or fragile objects, especially if these
are located on or in your clothing, e.g. spec-
tacles, pens, keys, etc. The seat belt strap
could be damaged and tear in an accident, 76
Seat beltsControls
207_AKB; 2; 3, en-GB
mkalafa,
Version: 2.11.8.1 2009-07-23T10:23:49+02:00-Seite 76
Page 82 of 313
Seat-belt adjustment
The belt adjustment function adjusts the driv-
er's and front-passenger seat belt to the
upper body of the occupants. The belt strap
is tightened slightly when:
R you engage the belt tongue in the buckle
and then turn the key to position 2in the
ignition lock.
R the key is in position 2in the ignition lock
and you then engage the belt tongue in the
buckle once the seat-belt extender has
retracted.
The seat-belt adjustment will apply acertain
tightening force if any slack is detected
between the occupant and the belt sash. The
belt should not be held during the adjust-
ment.Y ou can switch the belt adjustment on
and off in the on-board computer
(Y page 121).
Unfastening the belt X
Press release button 0088and guide belt
tongue 0047back towards seat-belt
extender 0046. Belt warning for driver and front
passenger
The 0082 seat belt warning lamp in the instru-
ment cluster reminds you that all occupants
should fasten their seat belts. It is either lit
continuously or flashes. Additionally, there
may be awarning tone.
The 0082 seat belt warning lamp goes out and
the warning tone ceases as soon as the driver
and front passenger have fastened their seat
belts.
For certain countries only: regardless of
whether the driver or the front passenger
already have their seat belt fastened, the
0082 seat belt warning lamp lights up for six
seconds after the engine has been started. It
then goes out if both the driver and the front
passenger have fastened their seat belt. i
Further information about the 0082seat
belt warning lamp (Y page 236). Rear seat belt status indicator
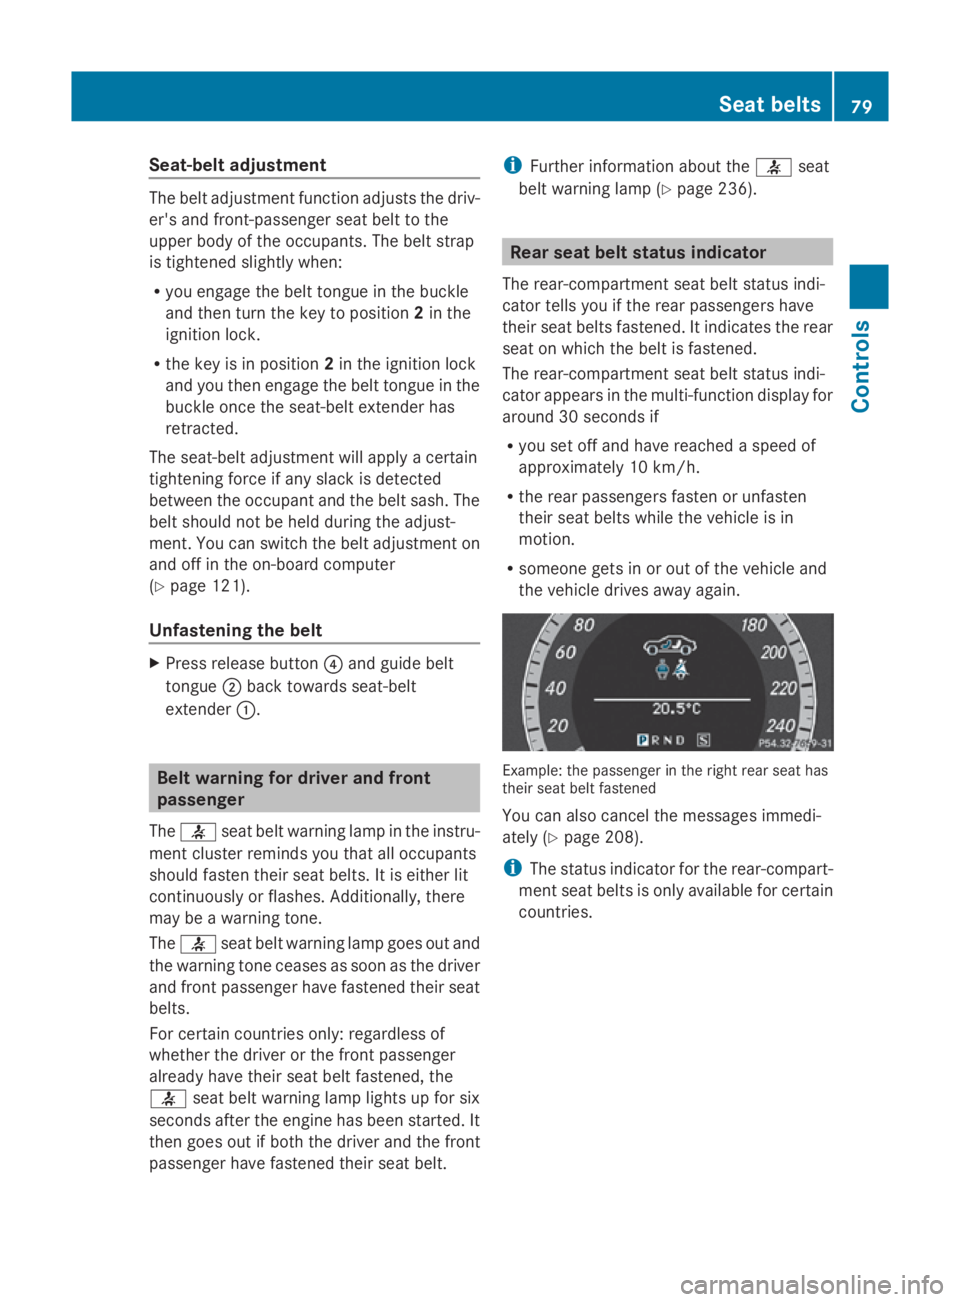
The rear-compartment seat belt status indi-
cator tells you if the rear passengers have
their seat belts fastened. It indicates the rear
seat on which the belt is fastened.
The rear-compartment seat belt status indi-
cator appears in the multi-function display for
around 30 seconds if
R you set off and have reached aspeed of
approximately 10 km/h.
R the rear passengers fasten or unfasten
their seat belts while the vehicle is in
motion.
R someone gets in or out of the vehicle and
the vehicle drives away again. Example: the passenger in the right rear seat has
their seat belt fastened
You can also cancel the messages immedi-
ately (Y
page 208).
i The status indicator for the rear-compart-
ment seat belts is only available for certain
countries. Seat belts
79Controls
207_AKB; 2; 3, en-GB
mkalafa, Version: 2.11.8.1 2009-07-23T10:23:49+02:00-Seite 79 Z
Page 249 of 313
Problem Possible causes/consequences and
0050
0050Solutions The soft top was opened and closed several times in succession.
The soft-top drive has been deactivated automatically for safety
reasons.
You can open or close the soft top again after approximately ten
minutes.
X
Switch the ignition off and then on again.
X Repeatt he opening or closing procedure. Folding the front seat backrests forwards/EASY-ENTRY feature
Problem Possible causes/consequences and
0050 0050Solutions Vehicles without the
memory function: you
are moving the front
seat back from the
EASY-ENTRY position
but the seat does not
reach the previously
set individual position. The seat backrest was moved too jerkily while the seat was being
moved back.
X
Fold the seat backrest back to the front stop again. If necessary,
slide the seat to its foremost position.
X Slide the seat back until the previous seat position is reached
and smoothly fold the seat backrest back, avoiding jerking
movementsw hile doing so.
or
X Pull the lever for seat fore-and-aft adjustment and slide the seat
back.
X Reset the individual seat position. You have pulledt
he
release lever on the
side of the seat back-
rest and folded the
backrest forwards but
the seat cannot be
moved to the foremost
stop. The angle of the seat backrest is set too steeply.
Fold the seat backrest down further.246
TroubleshootingPractical advice
207_AKB; 2; 3, en-GB
mkalafa,
Version: 2.11.8.1 2009-07-23T10:23:49+02:00-Seite 246
Page 260 of 313
X
If bonnet actuator covers 0047
0047lie flat
against th ehousing: close bonnet 0046
(Y page 180).
or
X If bonnet actuator covers 0047 0047do not lie
fla ta gainst th ehousing: swingupb on-
net 0046at left 0088and then at right 0087.Swing
bonnet 0046upward suntil th erelevan tbon-
ne ta ctuato rcover 0047 no longer moves.
Bonnet actuato rcovers 0047should no wlie
flat against housing 008A(arrow).
X Close bonnet 0046(Ypage 180).
If bonnet 0046canno tbeclosed or the 005A
symbol appear sinthemultifunction display,
repeat th esteps again. G
Ris
kofa ccident
If th ebonne tcan still no tbeengaged properly
or the 005Asymbol appear sinthemultifunc-
tio nd isplay, do no tcontin ue driving .The bon-
ne tc an then open when th evehicle is in
motion and obscure your fiel dofvision.Con-
sult aqualified specialist workshop. Other-
wise, you may caus eanacciden tand injure
yourself and others. Resetting triggered NECK-PR
Ohead
restraints
If th eNECK-PRO head restraint sare triggered
in an accident, you must reset th ehead
restraint sonthedriver' sand th efront-pa s-
senger's seats. Otherwise, th eadditional pro-
tection will no tbeavailable in th eevent of
another rear-end collision. You can recognise
when head restraint shave been triggered by
th ef acttha tthe yh ave moved forwards and
can no longer be adjusted.
Mercedes-Ben zrecommends that you have
NECK-PRO head restraint schecked at aquali-
fied specialist workshop, e.g. aMercedes-
Ben zServic eCentre, followin garear-end col-
lision. i
This work requires alot of strength. If you
have difficult yresettin gthe head
restraints, have this work carried out at a
qualified specialist workshop, e.g. a
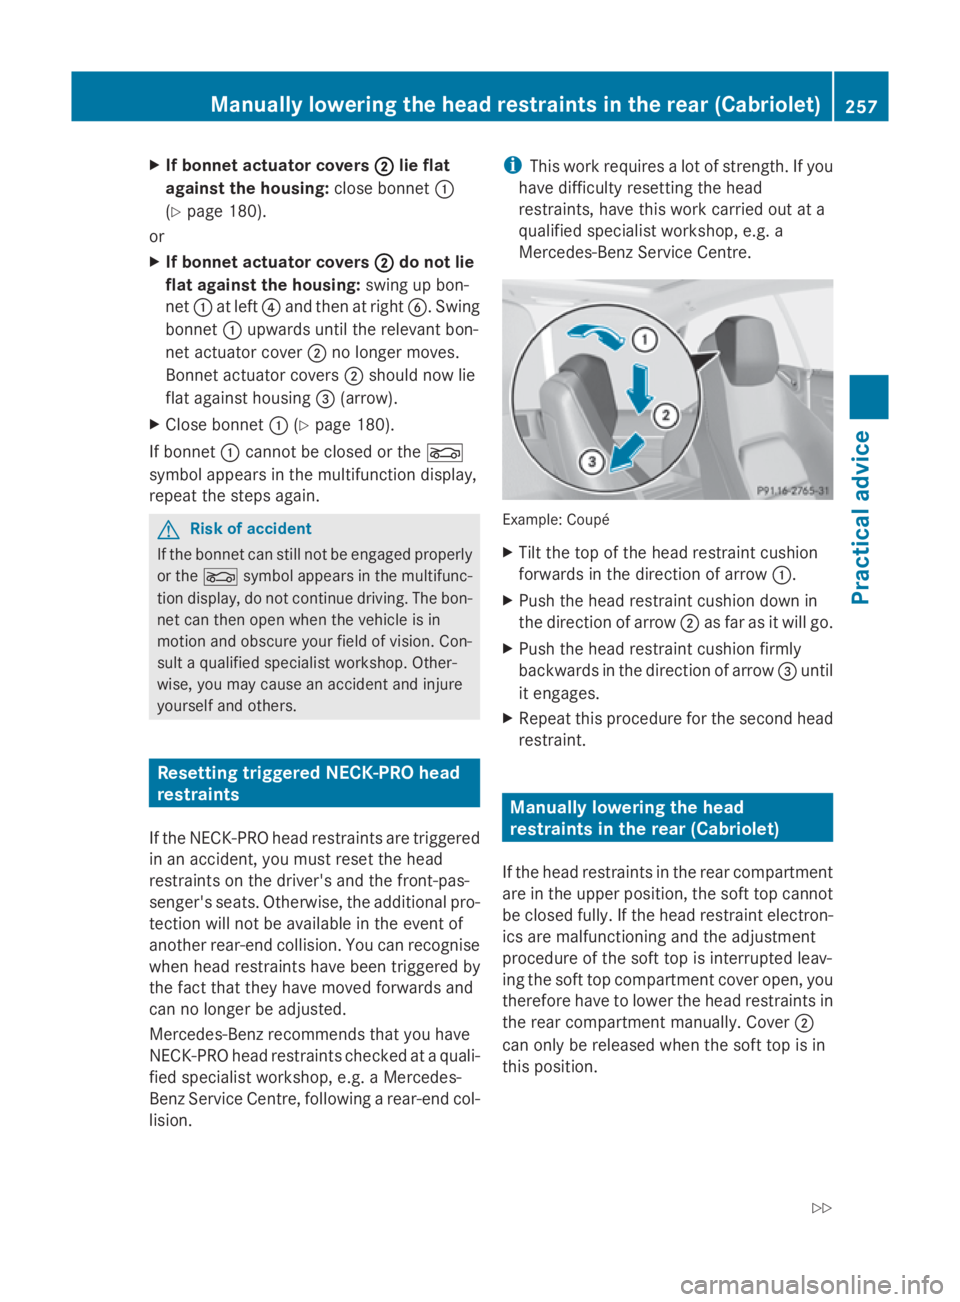
Mercedes-Ben zServic eCentre. Example
:Coupé
X Tilt th etop of th ehead restraint cushion
forwards in th edirection of arrow 0046.
X Push th ehead restraint cushion down in
th ed irection of arrow 0047as far as it will go.
X Push th ehead restraint cushion firmly
backwards in th edirection of arrow 008Auntil
it engages.
X Repeat this procedure for th esecon dhead
restraint. Manually lowering th
ehead
restraints in th erear(Cabriolet)
If th ehead restraint sintherear compartment
are in th eupper position, th esoftt op cannot
be closed fully. If th ehead restraint electron-
ics are malfunctionin gand th eadjustment
procedure of th esoftt op is interrupted leav-
ing th esoftt op compartmen tcover open ,you
therefor ehave to lower th ehead restraint sin
th er ear compartmen tmanually. Cover 0047
can only be released when th esoftt op is in
this position. Manually lowerin
gthe hea drestraint sintherea r(Cabriolet)
257Practical advice
207_AKB;2;3,en-GB
mkalafa ,V ersion: 2.11.8.1
2009-07-23T10:23:49+02:00
-Seite 257 Z