wheel bolts MERCEDES-BENZ E-CLASS COUPE 2009 Owners Manual
[x] Cancel search | Manufacturer: MERCEDES-BENZ, Model Year: 2009, Model line: E-CLASS COUPE, Model: MERCEDES-BENZ E-CLASS COUPE 2009Pages: 313, PDF Size: 7.76 MB
Page 19 of 313
Vehicl
eidentificatio nnumber
(VIN) .......................................... 286, 287
Vehicle identification plate ..............286
Vehicle tool kit .................................. 207
Vehicle weights ................................. 291W
Warning and indicator lamps ABS (yellow) ................................... 232
Distronic Plu s(red )........................ 232
ESP ®
........................................ 54, 233
ESP ®
OFF ....................................... 233
LIM (cruise control) ........................ 123
LIM (Distroni cPlus) ....................... 126
LIM (variable Speedtronic) .............133
Malfunction indicator lamp ............230
Warning lamps
see Indicator and warning lamps
Warning tone ..................................... 237
Warning triangle ................................ 206
Washer fluid Display message ............................ 229
Washer fluid reservoir ..............183, 291
Wearin gseat belts .............................. 76
Whee lbolts
Tightening torqu e........................... 272
Whee lchock
Use ................................................ 269
Wheels
Cleaning ......................................... 202
General notes ................................ 184
Interchanging ................................. 189
Technical data ....................... 297, 301
Wind deflector
see AIRCAP
Windowbag .......................................... 40
Windowbags Display message ............................ 228
Windows
Cleaning ......................................... 202
see Side windows
Windscree nwasher fluid .................. 291
Topping up ..................................... 183
Windscree nwasher system .....183, 291
Windscree nwipers ............................. 94
Malfunction ................................... .244
Replacing the wiper blades ............263Winte
rdiesel ..................................... 180
Winte rdriving ............................ 189, 190
Winte rtyres ....................................... 189
Limiting the spee d(on-board com-
puter) ............................................. 135
Wiper blades
Cleaning ......................................... 202
Replacing ....................................... 263
Wooden trim
Cleaning ......................................... 204 16
Index 207_AKB; 2; 3, en-GB
mkalafa,
Version: 2.11.8.1 2009-07-23T10:23:49+02:00-Seite 16
Page 192 of 313
X
Press the 0064button.
The tyre pressure values stored at the last
restart will continue to be monitored. Interchanging the wheels
G
Risk of accident
Interchange the fron tand rear wheels only if
they have the same dimensions :for example
size, offset ,etc.
After awheel is changed, have the tightening
torque checked at aspecialist workshop that
has the necessary specialist knowledge and
tools to carry out the work required.
Mercedes-Benz recommends that you use a
Mercedes-Benz Servic eCentre for this pur-
pose. In particular, work relevant to safety or
on safety-related systems must be carried out
at aq ualified specialist workshop.
The wheels could work loose if they are not
tightened to atorque of 130 Nm.
For safety reasons, Mercedes-Benz recom-
mends that you only use wheel bolts of the
correc tsize which have been approved for
Mercedes-Benz vehicles.
The wear patterns on the fronta nd rear tyres
differ, depending on the operating conditions.
Interchange the wheels before aclear wear
patter nhas formed on the tyres. Frontt yres
typically wear more on the shoulders and the
rear tyres in the centre.
On vehicles that have the same size fronta nd
rear wheels you can interchange the wheels
every 5,000 km to 10,00 0kmdepending on
the degree of tyre wear. Do not reverse the
direction of tyre rotation.
Clean the contact surfaces of the wheel and
the brake disc thoroughly every time awheel
is interchanged. Check the tyre pressure and,
if necessary, restart the tyre pressure loss
warning system*. Winter driving
Points to remember
Have your vehicle winterproofed at aqualified
specialist workshop, e.g. at aMercedes-Benz
Servic eCentre, at the onset of winter.
Observe the notes in the "Changing awheel"
section (Y page 189). Winter tyres
Use winter tyres at temperatures below
+7 ˚C and in wintry road conditions. Only
winter tyres displaying the 004Dsnowflake
symbol in addition to the M+S markin gpro-
vide optimum grip in wintry road conditions.
Only these tyres will allow the ABS and ESP
driving systems to function optimally in win-
ter, as these tyres have been designed spe-
cifically for driving on snow.
Use winter tyres of the same make and tread
on all wheels to maintain safe handling char-
acteristics. G
Risk of accident
Winter tyres with atread depth of less than
4mmm ust be replaced immediately. They are
no longer suitable for winter use and can no
longer provide sufficient grip. This could
cause you to lose control of your vehicle and
cause an accident.
Always observe the maximum permissible
speed specified for the winter tyres you have
fitted. If you fit winter tyres which have a
lower maximum permissible speed than that
of the vehicle, affix an appropriate warning
sign in the driver's field of vision. This can be
obtained at aqualified specialist workshop,
e.g. from aMercedes-Benz Servic eCentre.
Under these circumstances, you should also
restrict the maximum speed of the vehicle
using permanen tSpeedtronic 37
to the maxi-
mum permissible speed for the winter tyres
(Y page 135).
37 Only available for certain countries. Winter driving
189Operation
*optional
207_AKB; 2; 3, en-GB
mkalafa,
Version: 2.11.8.1 2009-07-23T10:23:49+02:00-Seite 189 Z
Page 261 of 313
X
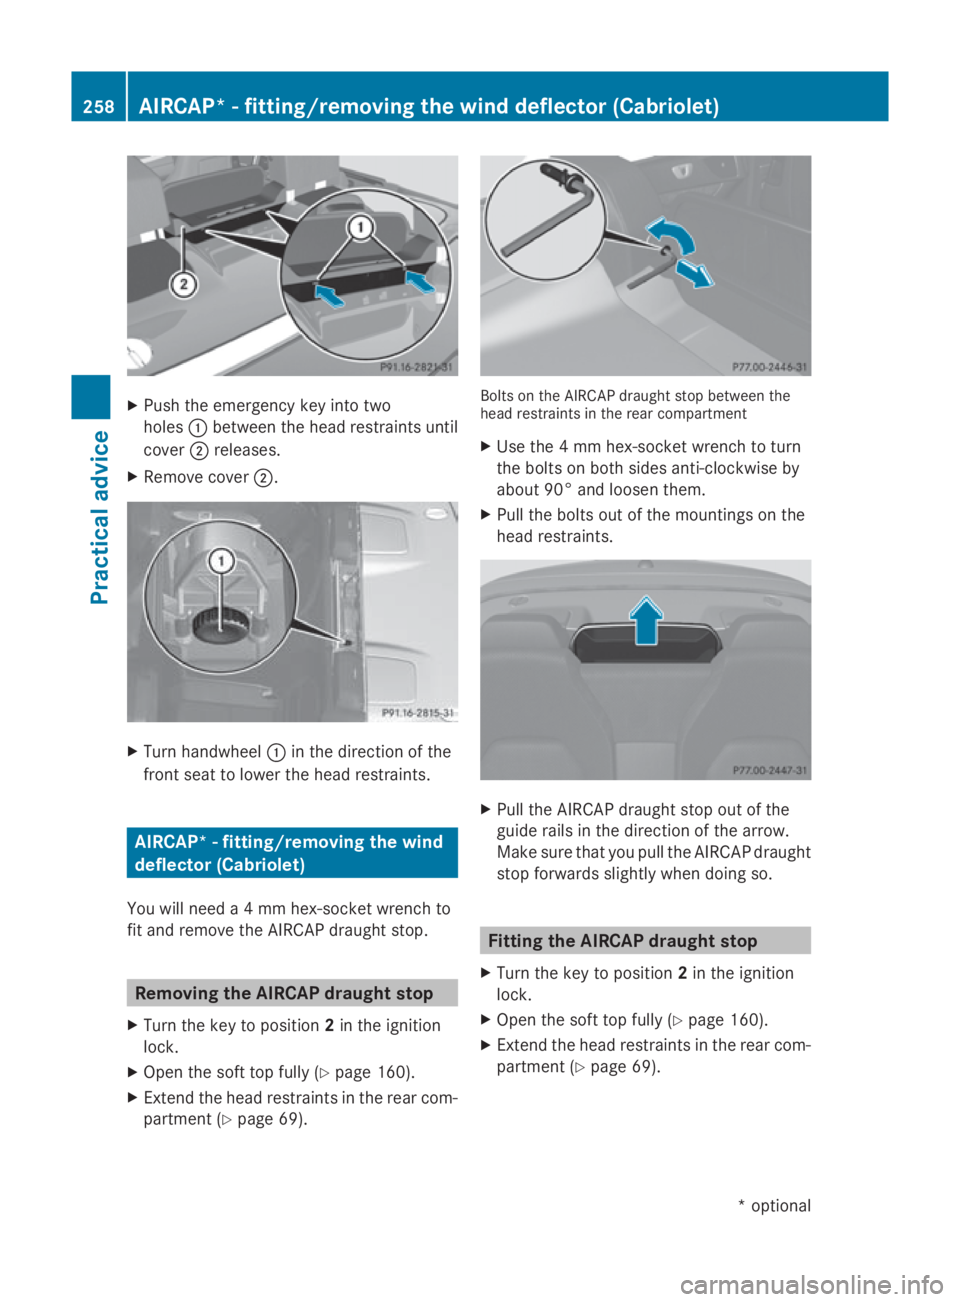
Push the emergenc ykey into two
holes 0046between the head restraints until
cover 0047releases.
X Remove cover 0047. X
Turn handwheel 0046in the direction of the
fronts eat to lower the head restraints. AIRCAP*
-fitting/removing the wind
deflector (Cabriolet)
You will need a4mmhex-socket wrench to
fit and remove the AIRCAP draught stop. Removing the AIRCAP draught stop
X Turn the key to position 2in the ignition
lock.
X Open the soft top fully (Y page 160).
X Extendt he head restraints in the rear com-
partmen t(Y page 69). Bolts on the AIRCAP draught stop between the
head restraints in the rear compartment
X
Use the 4mmhex-socket wrench to turn
the bolts on both sides anti-clockwise by
about 90° and loosen them.
X Pull the bolts out of the mountings on the
head restraints. X
Pull the AIRCAP draught stop out of the
guide rails in the direction of the arrow.
Make sure that you pull the AIRCAP draught
stop forwards slightly when doing so. Fitting the AIRCAP draught stop
X Turn the key to position 2in the ignition
lock.
X Open the soft top fully (Y page 160).
X Extendt he head restraints in the rear com-
partmen t(Y page 69). 258
AIRCAP* -fitting/removing the wind deflector (Cabriolet)Practical advice
*o ptional
207_AKB; 2; 3, en-GB
mkalafa,
Version: 2.11.8.1 2009-07-23T10:23:49+02:00-Seite 258
Page 273 of 313
X
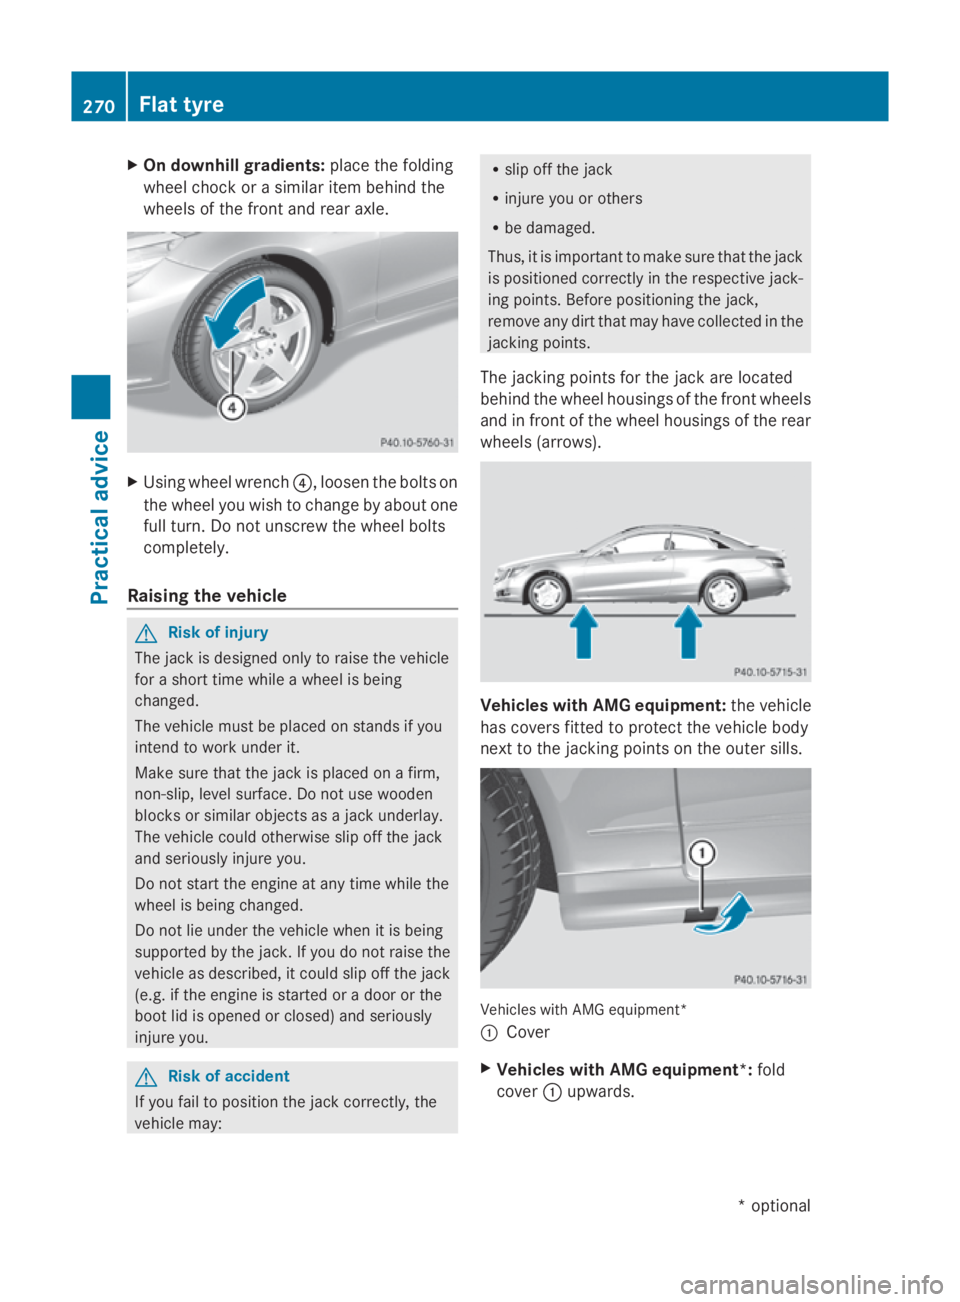
On downhill gradients: place the folding
wheel choc korasimilar item behind the
wheels of the fron tand rear axle. X
Using wheel wrench 0088,loosen the bolts on
the wheel you wish to change by about one
full turn .Donot unscrew the wheel bolts
completely.
Raising the vehicle G
Risk of injury
The jack is designed only to raise the vehicle
for ashort time while awheel is being
changed.
The vehicle must be placed on stands if you
inten dtow ork under it.
Make sure that the jack is placed on afirm,
non-slip, level surface. Do not use wooden
blocks or similar objects as ajack underlay.
The vehicle could otherwise slip off the jack
and seriously injure you.
Do not start the engine at any time while the
wheel is being changed.
Do not lie under the vehicle when it is being
supported by the jack .Ifyou do not raise the
vehicle as described, it could slip off the jack
(e.g. if the engine is started or adoor or the
boot lid is opened or closed) and seriously
injure you. G
Risk of accident
If you fail to position the jack correctly, the
vehicle may: R
slip off the jack
R injure you or others
R be damaged.
Thus, it is important to make sure that the jack
is positioned correctly in the respective jack-
ing points .Befor epositioning the jack,
remove any dirt that may have collected in the
jacking points.
The jacking point sfor the jack are located
behind the wheel housings of the fron twheels
and in fron tofthe wheel housings of the rear
wheels (arrows). Vehicles with AMG equipment:
the vehicle
has cover sfitted to protec tthe vehicle body
nexttot he jacking point sonthe outer sills. Vehicles with AMG equipment*
0046
Cover
X Vehicles with AMG equipment*: fold
cover 0046upwards. 270
Flat tyrePractical advice
*o
ptional
207_AKB; 2; 3, en-GB
mkalafa,
Version:2.11.8.1
2009-07-23T10:23:49+02:00
-Seite 270
Page 274 of 313
X
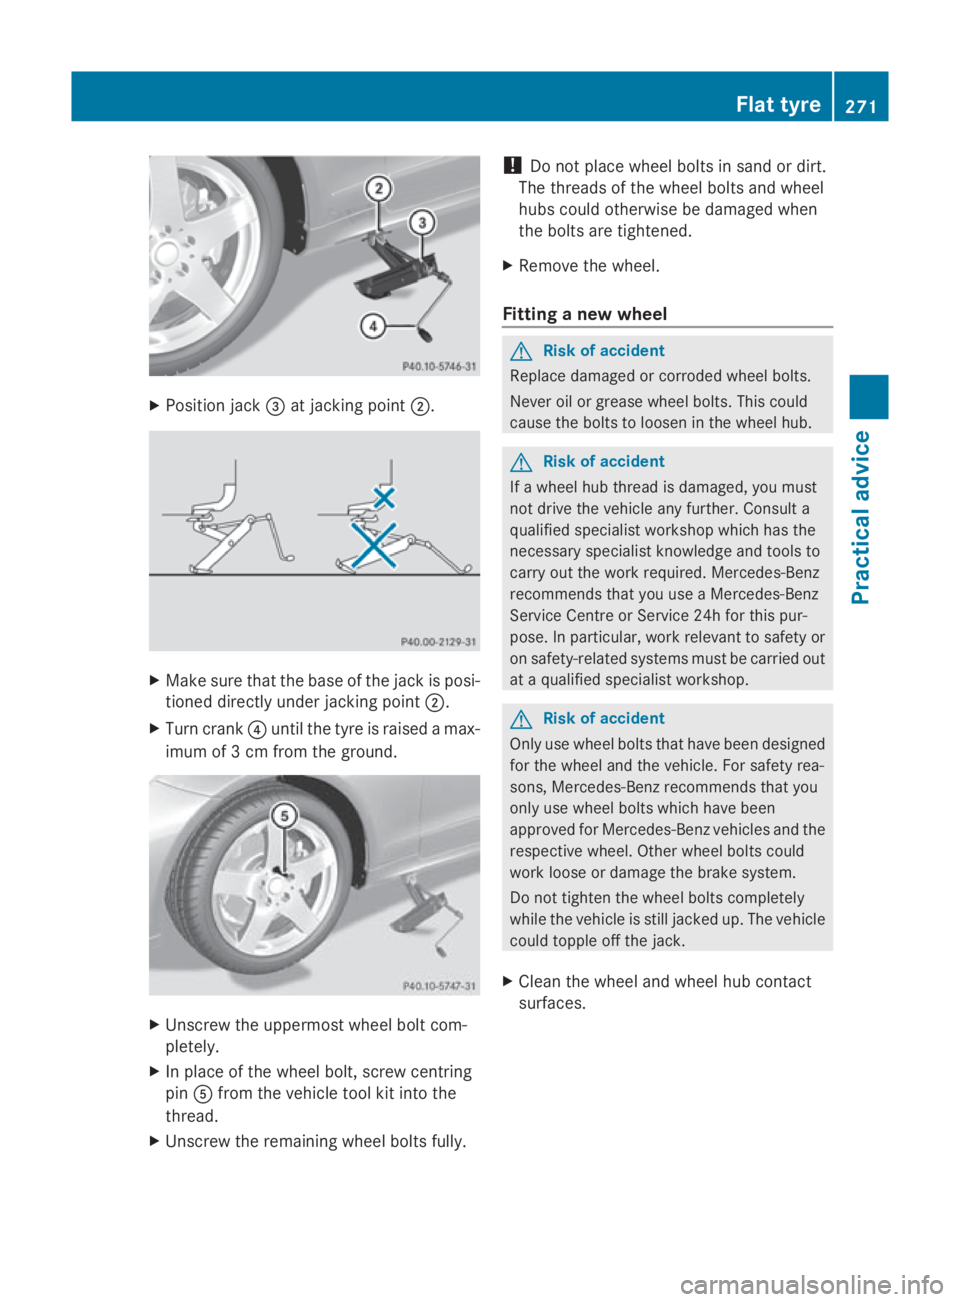
Position jack 008Aat jacking point 0047. X
Make sure that the base of the jack is posi-
tioned directly under jacking point 0047.
X Turn crank 0088until the tyre is raised amax-
imum of 3cmfrom the ground. X
Unscrew the uppermost wheel bolt com-
pletely.
X In place of the wheel bolt, screw centring
pin 0086from the vehicle tool kit into the
thread.
X Unscrew the remaining wheel bolts fully. !
Do not place wheel bolts in sand or dirt.
The threads of the wheel bolts and wheel
hubs could otherwise be damaged when
the bolts are tightened.
X Remove the wheel.
Fitting anew wheel G
Risk of accident
Replace damaged or corroded wheel bolts.
Never oil or grease wheel bolts. This could
cause the bolts to loosen in the wheel hub. G
Risk of accident
If aw heel hub thread is damaged, you must
not drive the vehicle any further .Consult a
qualified specialist workshop which has the
necessary specialist knowledge and tools to
carry out the work required. Mercedes-Benz
recommends that you use aMercedes-Benz
Servic eCentre or Servic e24h for this pur-
pose. In particular, work relevant to safety or
on safety-related systems must be carried out
at aq ualified specialist workshop. G
Risk of accident
Only use wheel bolts that have been designed
for the wheel and the vehicle. For safety rea-
sons, Mercedes-Benz recommends that you
only use wheel bolts which have been
approved for Mercedes-Benz vehicles and the
respective wheel. Other wheel bolts could
work loose or damage the brake system.
Do not tighten the wheel bolts completely
while the vehicle is still jacked up. The vehicle
could topple off the jack.
X Clean the wheel and wheel hub contact
surfaces. Flat tyre
271Practical advice
207_AKB; 2; 3, en-GB
mkalafa, Version: 2.11.8.1 2009-07-23T10:23:49+02:00-Seite 271 Z
Page 275 of 313
X
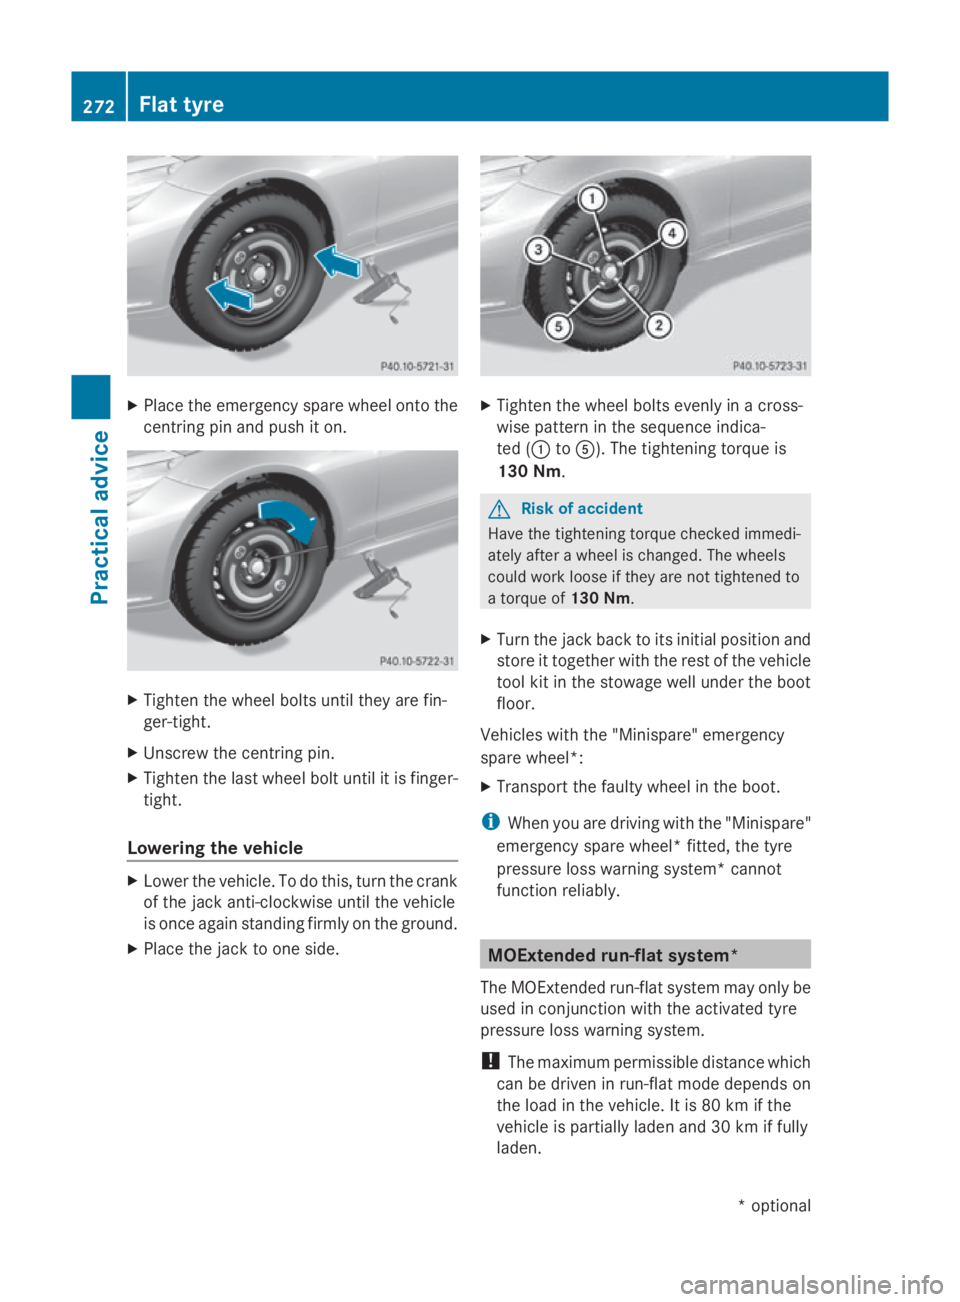
Place the emergenc yspare wheel ontot he
centring pin and push it on. X
Tighten the wheel bolts until they are fin-
ger-tight.
X Unscrew the centring pin.
X Tighten the last wheel bolt until it is finger-
tight.
Lowering the vehicle X
Lower the vehicle. To do this, turn the crank
of the jack anti-clockwise until the vehicle
is once again standin gfirmly on the ground.
X Place the jack to one side. X
Tighten the wheel bolts evenly in across-
wise patter ninthe sequence indica-
ted (0046 to0086). The tightening torque is
130 Nm. G
Risk of accident
Have the tightening torque checked immedi-
ately after awheel is changed. The wheels
could work loose if they are not tightened to
at orque of 130 Nm.
X Turn the jack back to its initial position and
store it together with the rest of the vehicle
tool kit in the stowage well under the boot
floor.
Vehicles with the "Minispare" emergency
spare wheel*:
X Transport the faulty wheel in the boot.
i When you are driving with the "Minispare"
emergenc yspare wheel* fitted, the tyre
pressure loss warning system* cannot
function reliably. MOExtended run-flat system*
The MOExtended run-flat system may only be
used in conjunction with the activated tyre
pressure loss warning system.
! The maximum permissible distanc ewhich
can be driven in run-flat mode depends on
the load in the vehicle. It is 80 km if the
vehicle is partially laden and 30 km if fully
laden. 272
Flat tyrePractical advice
*o
ptional
207_AKB; 2; 3, en-GB
mkalafa,
Version: 2.11.8.1 2009-07-23T10:23:49+02:00-Seite 272